
In the first two articles of this series on Convolutional Neural Networks [CNNs] and “Deep Dream” pictures
Deep Dreams of a CNN trained on MNIST data – II – some code for pattern carving
Deep Dreams of a CNN trained on MNIST data – I – a first approach based on one selected map of a convolutional layer
I introduced the concept of CNN-based “pattern carving” and a related algorithm; it consists of a small number of iterations over of a sequence of image manipulation steps (downscaling to a resolution the CNN can handle, detection and amplification of a map triggering pattern by a CNN, upscaling to the original size and normalization). The included pattern detection and amplification algorithm is nothing else than the OIP-algorithm, which I discussed in another article series on CNNs in this blog. The OIP-algorithm is able to create a pattern, which triggers a chosen CNN map optimally, out of a chaotic fluctuation background. The difference is that we apply such an OIP-algorithms now to a structured input image – the basis for a “dream”. The “carving algorithm” is just a simplifying variation of more advanced Deep Dream algorithms; it can be combined with simple CNNs trained on gray and low-resolution images.
In the last article I provided some code which creates dream like pictures with the help of carving by a CNN trained on MNIST data. Nice, but … In the original theory of “Deep Dreaming” people from Google and others applied their algorithms to a cascade of so called “octaves“: Octaves represent the structures within an image at different levels of resolution. Unfortunately, at first sight, such an approach seems to be beyond the capabilities of our MNIST CNN, because the latter works on a fixed and very coarse resolution scale of 28×28 pixels, only.
As we cannot work on different scales of resolution directly: Can we handle pattern detection and amplification on different length scales in a different way? Can we somehow extend the carving process to smaller length scales and a possible detection of smaller map-triggering patterns within the input image?
The answer in short is: Yes, we can.
We “just” have to replace working with “octaves” by looking at sub-segments of the images – and apply our “carving” algorithm with up and down-scaling to these sub-segments as well as to the full image during an iteration process. We shall test the effects of such an approach in this article for a single selected sub-area of the input image, before we apply it more thoroughly to different input images in further articles.
A first step towards Deep Dreams “dreaming” detail structures of a chosen image …
We again use the image of a bunch of roses, which we worked with in the last articles, as a starting point for the creation of a Deep Dream picture. The easiest way to define sub-areas of our (quadratic) input image is to divide it into 4 (quadratic) adjacent sub-segments or sub-images, each with half of the side length of the original image. We thus get two rows, each with two neighboring sub-areas of the size 280×280 px. Then we could apply the carving algorithm to one selected or to all of the sub-segments. But how do we combine such an approach with an overall treatment of the full image? The answer is that we have to work in parallel on both length-scales involved. We can do this within each cycle of down- and up-scaling according to the following scheme:
- Step 1: Pick the input image IMG at the full working size (here 560 x 560 px) – and reshape it into a tensor suitable for
Tensorflow 2 [TF2] functions. - Step 2: Down- and upscale the input image “IMG” (560×560 => 28×28 => 560×560) – with information loss
- Step 3: Calculate the difference between the re-up-scaled image to the original image as a tensor for later detail corrections.
- Step 4: Subdivide IMG into 4 quadrants (each with a size of of 280×280 px). Save the quadrants as sub-images S_IMG_1, …. S_IMG_4 – and create respective tensors.
- Step 5: For all sub-images: Down- and up-scale the sub-images S_IMG_m (280×280 => 28×28 => 280×280) – with information loss.
- Step 6: For all sub-images: Determine the differences between the re-upscaled sub-images and the original sub-images as tensors for later detail corrections.
- Step 7: Loop A [around 4 to 6 iterations]
- Step LA-1: Pick the down-scaled image IMG_d (of size 28×28 px) as the present input image for the CNN and the OIP-analysis
- Step LA-2: Apply the OIP-algorithm for N epochs (20 < N < 40) to the downscaled image IMG_d (28x28)
- Step LA-3: Upscale the resulting changed version of image IMG_d to the original IMG- size by bicubic interpolation => IMG_u
- Step LA-4: Add the (constant) correction tensor for details to IMG_u.
- (Step LA-5: Loop B over Sub-Images)
- Step LB-1: Cut out the area corresponding to sub-image S_IMG_m from the changed full image IMG_u. Use it as Sub_IMG_m during the following steps.
- Step LB-2: Downscale the present sub-image Sub_IMG_m to the size suitable for the CNN (here: 28×28) by bicubic interpolation => Sub_IMG_M_d.
- Step LB-3: Apply the OIP-algorithm for N epochs (20 < N < 40) to the downscaled sub-image (28x28) Sub_IMG_m_d
- Step LB-4: Upscale the changed Sub_IMG_m_d to the original size of Sub_Img_m by bicubic interpolation => Sub_IMG_m_u
- Step LB-5: Add the (constant) correction tensor to the tensor for the upscaled sub-image Sub_IMG_m_u
- Step LB-6: Replace the sub-image region of the upscaled full image IMG_u with the (corrected) sub-image Sub_IMG_m_u
- Step LB-7: Downscale the new full image IMG_u again (to 28×28 => IMG_d) and use the resulting IMG_d for the next iteration of Loop A
The Loop B has been placed in brackets because we are going to apply the suggested technique only to a single one of the 4 sub-image quadrants in this article.
Code fragments for the sub-image preparation
The following code for a Jupyter cell prepares the quadrants of the original image IMG – here of a bunch of roses. The code is straight forward and easy to understand.
# ****************************
# Work with sub-Images
# ************************

%matplotlib inline

import PIL
from PIL import Image, ImageOps

fig_size = plt.rcParams["figure.figsize"]
fig_size[0] = 16
fig_size[1] = 20
fig_3 = plt.figure(
3)
ax3_1_1 = fig_3.add_subplot(541)
ax3_1_2 = fig_3.add_subplot(542)
ax3_1_3 = fig_3.add_subplot(543)
ax3_1_4 = fig_3.add_subplot(544)
ax3_2_1 = fig_3.add_subplot(545)
ax3_2_2 = fig_3.add_subplot(546)
ax3_2_3 = fig_3.add_subplot(547)
ax3_2_4 = fig_3.add_subplot(548)
ax3_3_1 = fig_3.add_subplot(5,4,9)
ax3_3_2 = fig_3.add_subplot(5,4,10)
ax3_3_3 = fig_3.add_subplot(5,4,11)
ax3_3_4 = fig_3.add_subplot(5,4,12)
ax3_4_1 = fig_3.add_subplot(5,4,13)
ax3_4_2 = fig_3.add_subplot(5,4,14)
ax3_4_3 = fig_3.add_subplot(5,4,15)
ax3_4_4 = fig_3.add_subplot(5,4,16)
ax3_5_1 = fig_3.add_subplot(5,4,17)
ax3_5_2 = fig_3.add_subplot(5,4,18)
ax3_5_3 = fig_3.add_subplot(5,4,19)
ax3_5_4 = fig_3.add_subplot(5,4,20)

# size to work with
# ******************
img_wk_size = 560

# bring the orig img down to (560, 560)
# ***************************************
imgvc = Image.open("rosen_orig_farbe.jpg")
imgvc_wk_size = imgvc.resize((img_wk_size,img_wk_size), resample=PIL.Image.BICUBIC)
# Change to np arrays
ay_picc = np.array(imgvc_wk_size)
print("ay_picc.shape = ", ay_picc.shape)
print("r = ", ay_picc[0,0,0],    " g = ", ay_picc[0,0,1],    " b = " , ay_picc[0,0,2] )
print("r = ", ay_picc[200,0,0],  " g = ", ay_picc[200,0,1],  " b = " , ay_picc[200,0,2] )

# Turn color to gray
#Red * 0.3 + Green * 0.59 + Blue * 0.11
#Red * 0.2126 + Green * 0.7152 + Blue * 0.0722
#Red * 0.299 + Green * 0.587 + Blue * 0.114

ay_picc_g = ( 0.299  * ay_picc[:,:,0] + 0.587  * ay_picc[:,:,1] + 0.114  * ay_picc[:,:,2] )
ay_picc_g = ay_picc_g.astype('float32')
t_picc_g  = ay_picc_g.reshape((1, img_wk_size, img_wk_size, 1))
t_picc_g  = tf.image.per_image_standardization(t_picc_g)

# downsize to (28,28)
t_picc_g_28 = tf.image.resize(t_picc_g, [28,28], method="bicubic", antialias=True)
t_picc_g_28 = tf.image.per_image_standardization(t_picc_g_28)

# get the correction for the full image
t_picc_g_wk_size = tf.image.resize(t_picc_g_28, [img_wk_size,img_wk_size], method="bicubic", antialias=True)
t_picc_g_wk_size = tf.image.per_image_standardization(t_picc_g_wk_size)

t_picc_g_wk_size_corr = t_picc_g - t_picc_g_wk_size
t_picc_g_wk_size_re   = t_picc_g_wk_size + t_picc_g_wk_size_corr


# Display wk_size orig images
ax3_1_1.imshow(imgvc_wk_size)
ax3_1_2.imshow(t_picc_g[0,:,:,0], cmap=plt.cm.gray)
ax3_1_3.imshow(t_picc_g_28[0,:,:,0], cmap=plt.cm.gray)
ax3_1_4.imshow(t_picc_g_wk_size_re[0,:,:,0], cmap=plt.cm.gray)


# Split in 4 sub-images
# ***********************

half_wk_size  = int(img_wk_size / 2)

t_picc_g_1  = t_picc_g[:, 0:half_wk_size, 0:half_wk_size, :]
t_picc_g_2  = t_picc_g[:, 0:half_wk_size, half_wk_size:img_wk_size, :]
t_picc_g_3  = t_picc_g[:, half_wk_size:img_wk_size, 0:half_wk_size, :]
t_picc_g_4  = t_picc_g[:, half_wk_size:img_wk_size, half_wk_size:img_wk_size, :]

# Display wk_size orig images
ax3_2_1.imshow(t_picc_g_1[0,:,:,0], cmap=plt.cm.gray)
ax3_2_2.imshow(t_picc_g_2[0,:,:,0], cmap=plt.cm.gray)
ax3_2_3.imshow(t_picc_g_3[0,:,:,0], cmap=plt.cm.gray)
ax3_2_4.imshow(t_picc_g_4[0,:,:,0], cmap=plt.cm.gray)


# Downscale sub-images
t_picc_g_1_28 = tf.image.resize(t_picc_g_1, [28,28], method="bicubic", antialias=True)
t_picc_g_2_28 = tf.image.resize(t_picc_g_2, [28,28], method="bicubic", antialias=True)
t_picc_g_3_28 = tf.image.resize(t_picc_g_3, [28,28], method="bicubic", antialias=True)
t_picc_g_4_28 = tf.image.resize(t_picc_g_4, [28,28], method="bicubic", antialias=True)


# Display downscales sub-images
ax3_3_1.imshow(t_picc_g_1_28[0,:,:,0], cmap=plt.cm.gray)
ax3_3_2.imshow(t_picc_g_2_28[0,:,:,0], cmap=plt.cm.gray)
ax3_3_3.imshow(t_picc_g_3_28[0,:,:,0], cmap=plt.cm.gray)
ax3_3_4.imshow(t_picc_g_4_28[0,:,:,0], cmap=plt.cm.gray)


# get correction values for upsizing
t_picc_g_1_wk_half = tf.image.resize(t_picc_g_1_28, [half_wk_size,
half_wk_size], method="bicubic", antialias=True)
t_picc_g_1_wk_half = tf.image.per_image_standardization(t_picc_g_1_wk_half)
t_picc_g_2_wk_half = tf.image.resize(t_picc_g_2_28, [half_wk_size,half_wk_size], method="bicubic", antialias=True)
t_picc_g_2_wk_half = tf.image.per_image_standardization(t_picc_g_2_wk_half)
t_picc_g_3_wk_half = tf.image.resize(t_picc_g_3_28, [half_wk_size,half_wk_size], method="bicubic", antialias=True)
t_picc_g_3_wk_half = tf.image.per_image_standardization(t_picc_g_3_wk_half)
t_picc_g_4_wk_half = tf.image.resize(t_picc_g_4_28, [half_wk_size,half_wk_size], method="bicubic", antialias=True)
t_picc_g_4_wk_half = tf.image.per_image_standardization(t_picc_g_4_wk_half)


t_picc_g_1_corr =  t_picc_g_1 - t_picc_g_1_wk_half
t_picc_g_2_corr =  t_picc_g_2 - t_picc_g_2_wk_half
t_picc_g_3_corr =  t_picc_g_3 - t_picc_g_3_wk_half
t_picc_g_4_corr =  t_picc_g_4 - t_picc_g_4_wk_half

t_picc_g_1_re   = t_picc_g_1_wk_half + t_picc_g_1_corr
t_picc_g_2_re   = t_picc_g_2_wk_half + t_picc_g_2_corr
t_picc_g_3_re   = t_picc_g_3_wk_half + t_picc_g_3_corr
t_picc_g_4_re   = t_picc_g_4_wk_half + t_picc_g_4_corr

print(t_picc_g_1_re.shape)

# Display downscales sub-images
ax3_4_1.imshow(t_picc_g_1_re[0,:,:,0], cmap=plt.cm.gray)
ax3_4_2.imshow(t_picc_g_2_re[0,:,:,0], cmap=plt.cm.gray)
ax3_4_3.imshow(t_picc_g_3_re[0,:,:,0], cmap=plt.cm.gray)
ax3_4_4.imshow(t_picc_g_4_re[0,:,:,0], cmap=plt.cm.gray)

ay_img_comp = np.zeros((img_wk_size,img_wk_size))
ay_t_comp   = ay_img_comp.reshape((1,img_wk_size, img_wk_size,1))
t_pic_comp  = ay_t_comp
t_pic_comp[0, 0:half_wk_size, 0:half_wk_size, 0]                       = t_picc_g_1_re[0, :, :, 0]
t_pic_comp[0, 0:half_wk_size, half_wk_size:img_wk_size, 0]             = t_picc_g_2_re[0, :, :, 0]
t_pic_comp[0, half_wk_size:img_wk_size, 0:half_wk_size, 0]             = t_picc_g_3_re[0, :, :, 0]
t_pic_comp[0, half_wk_size:img_wk_size, half_wk_size:img_wk_size, 0]   = t_picc_g_4_re[0, :, :, 0]

ax3_5_1.imshow(t_picc_g[0,:,:,0], cmap=plt.cm.gray)
ax3_5_2.imshow(t_pic_comp[0,:,:,0], cmap=plt.cm.gray)
Note the computation of the correction tensors; we prove their effectiveness below by displaying respective results for the full image, cut out and re-upscaled, corrected quadrants and replaced areas of the original image.
The results in the prepared image frames look like:
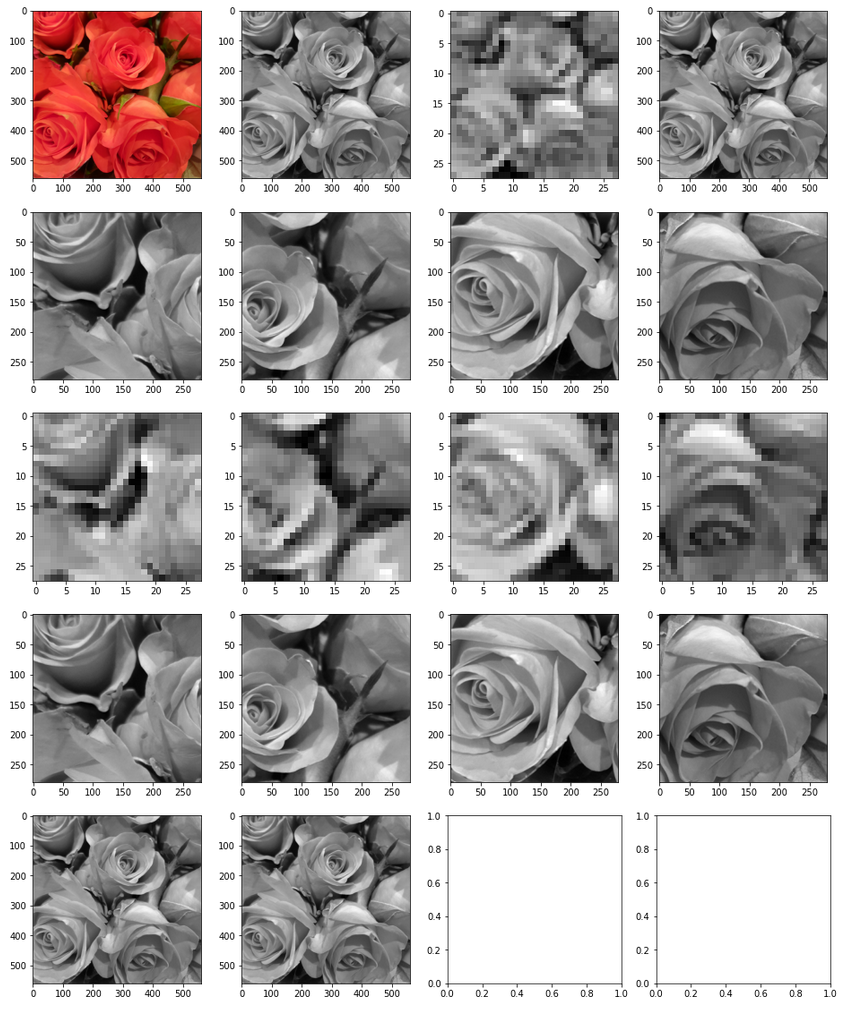
Good!
Some code for the carving algorithm – applied to the full image AND a single selected sub-image
Now, for a first test, we concentrate on the sub-image in the lower-right corner – and apply the above algorithm. A corresponding Jupyter cell code is given below:
# *************************************************************************
# OIP analysis on sub-image tiles (to be used after the previous cell)
# **************************************************************************
# Note: To be applied after previous cell !!!
# ******

#interactive plotting - will be used in a future version when we deal with "octaves"
#%matplotlib notebook
#plt.ion()

%matplotlib inline

# preparation of figure frames
# ~~~~~~~~~~~~~~~~~~~~~~~~~~~~~
fig_size = plt.rcParams["figure.figsize"]
fig_size[0] = 12
fig_size[1] = 12
fig_4 = plt.figure(4)
ax4_1_1 = fig_4.add_subplot(441)
ax4_1_2 = fig_4.add_subplot(442)
ax4_1_3 = fig_4.add_subplot(443)
ax4_1_4 = fig_4.add_subplot(444)

ax4_2_1 = fig_4.add_subplot(445)
ax4_2_2 = fig_4.add_subplot(446)
ax4_2_3 = fig_4.add_subplot(447)
ax4_2_
4 = fig_4.add_subplot(448)

ax4_3_1 = fig_4.add_subplot(4,4,9)
ax4_3_2 = fig_4.add_subplot(4,4,10)
ax4_3_3 = fig_4.add_subplot(4,4,11)
ax4_3_4 = fig_4.add_subplot(4,4,12)

ax4_4_1 = fig_4.add_subplot(4,4,13)
ax4_4_2 = fig_4.add_subplot(4,4,14)
ax4_4_3 = fig_4.add_subplot(4,4,15)
ax4_4_4 = fig_4.add_subplot(4,4,16)

fig_size = plt.rcParams["figure.figsize"]
fig_size[0] = 12
fig_size[1] = 6
fig_5 = plt.figure(5)
axa5_1 = fig_5.add_subplot(241)
axa5_2 = fig_5.add_subplot(242)
axa5_3 = fig_5.add_subplot(243)
axa5_4 = fig_5.add_subplot(244)
axa5_5 = fig_5.add_subplot(245)
axa5_6 = fig_5.add_subplot(246)
axa5_7 = fig_5.add_subplot(247)
axa5_8 = fig_5.add_subplot(248)
li_axa5 = [axa5_1, axa5_2, axa5_3, axa5_4, axa5_5, axa5_6, axa5_7, axa5_8]

# Some general OIP run parameters
# ~~~~~~~~~~~~~~~~~~~~~~~~~~~~~~~~~
n_epochs  = 30          # should be divisible by 5
n_steps   = 6           # number of intermediate reports
epsilon   = 0.01        # step size for gradient correction
conv_criterion = 2.e-4  # criterion for a potential stop of optimization

# image width parameters
# ~~~~~~~~~~~~~~~~~~~~~
img_wk_size   = 560    # must be identical to the last cell
half_wk_size  = int(img_wk_size / 2)

# min / max values of the input image
#~~~~~~~~~~~~~~~~~~~~~~~~~~~~~~~~~~~~
# Note : to be used for contrast enhancement
min1 = tf.reduce_min(t_picc_g)
max1 = tf.reduce_max(t_picc_g)
# parameters to deal with the spectral distribution of gray values
spect_dist = min(abs(min1), abs(max1))
spect_fact   = 0.85
height_fact  = 1.1

# Set the gray downscaled input image as a startng point for the iteration loop
# ~~~~~~~~~~~~~----------~~~~--------------~~~~~~~~~~~~~~~~~~~~~~~~~~~~~~~~~~~~~~~~
MyOIP._initial_inp_img_data = t_picc_g_28

# ************
# Main Loop
# ***********

num_main_iterate = 4
# map_index_main = -1       # take a cost function for a full layer
map_index_main = 56         # map-index to be used for the OIP analysis of the full image
map_index_sub  = 56         # map-index to be used for the OIP analysis of the sub-images


for j in range(num_main_iterate):

    # ******************************************************
    # deal with the full (downscaled) input image
    # ******************************************************

    # Apply OIP-algorithm to the whole downscaled image
    # ~~~~~~~~~~~~~~~~~~~-----------~~~~~~~~~~~~~~~~~~~~~~~
    map_index_main_oip = map_index_main   # map-index we are interested in

    # Perform the OIP analysis
    MyOIP._derive_OIP(map_index = map_index_oip,
                      n_epochs = n_epochs, n_steps = n_steps,
                      epsilon = epsilon , conv_criterion = conv_criterion,
                      b_stop_with_convergence=False,
                      b_print=False,
                      li_axa = li_axa5,
                      ax1_1 = ax4_1_1, ax1_2 = ax4_1_2)

    # display the modified downscaled image  (without and with contrast)
    # ~~~~~~~~~~~~~~~~~~~~~~~~~~~~~~~~~~~~~~
    t_oip_g_28  = MyOIP._inp_img_data
    ay_oip_g_28 = t_oip_g_28[0,:,:,0].numpy()
    ay_oip_g_28_cont = MyOIP._transform_tensor_to_img(T_img=t_oip_g_28[0,:,:,0], centre_move=0.33, fact=1.0)
    ax4_1_3.imshow(ay_oip_g_28_cont, cmap=plt.cm.gray)
    ax4_1_4.imshow(t_picc_g_28[0, :, :, 0], cmap=plt.cm.gray)

    # rescale to 560 and re-add details via the correction tensor
    # ~~~~~~~~~~~~~~~~~~~~~~~~~~~~~~~~~~~~~~~~~~~~~~~~~~~~~~~~~~~~~
    t_oip_g_wk_size        = tf.image.resize(t_oip_g_28, [img_wk_size,img_wk_size],
                                             method="bicubic", antialias=True)
    t_oip_g_wk_size_re     = t_oip_g_wk_size + t_picc_g_wk_size_corr

    # standardize to get an intermediate image
    # ~~~~~~~~~~~~~~~~~~~~~~~~~~~~~~~~~~~~~~~~~~~~
n    # t_oip_g_loop           = t_oip_g_wk_size_re.numpy()
    # t_oip_g_wk_size_re_std = tf.image.per_image_standardization(t_oip_g_wk_size_re)
    t_oip_g_wk_size_re_std = tf.image.per_image_standardization(t_oip_g_wk_size_re)
    t_oip_g_loop           = t_oip_g_wk_size_re_std.numpy()

    # contrast required as the reduction of irrelvant pixels has smoothed out the gray scale beneath
    # ~~~~~~~~~~~~~~~~~
    # the added details at pattern areas = high level of whitened socket + relative small detail variation
    t_oip_g_wk_size_re_std_plt = tf.clip_by_value(height_fact*t_oip_g_wk_size_re_std, -spect_dist*spect_fact, spect_dist*spect_fact)
    ax4_2_1.imshow(t_oip_g_wk_size[0,:,:,0], cmap=plt.cm.gray)
    ax4_2_2.imshow(t_oip_g_wk_size_re_std[0,:,:,0], cmap=plt.cm.gray)
    ax4_2_3.imshow(t_oip_g_wk_size_re_std_plt[0,:,:,0], cmap=plt.cm.gray)
    ax4_2_4.imshow(t_picc_g[0,:,:,0], cmap=plt.cm.gray)


    # *************************************************************
    # deal with a chosen sub-image - in this version: "t_oip_4_g"
    # **************************************************************

    # Cut out and downscale a sub-image region
    # ~~~~~~~~~~~~~~~~~~~~~~~~~~~~~~~~~~~~~~~~~
    t_oip_4_g     = t_oip_g_loop[:, half_wk_size:img_wk_size, half_wk_size:img_wk_size, :]
    t_oip_4_g_28  = tf.image.resize(t_oip_4_g, [28,28], method="bicubic", antialias=True)

    # use the downscaled sub-image as an input image to the OIP-algorithm
    # ~~~~~~~~~~~~~~~~~~~~~~~~~~~~~~~~~~~~~~~~~~~~~~~~~~~~~~~~~~~~~~~~~~~~
    MyOIP._initial_inp_img_data = t_oip_4_g_28


    # Perform the OIP analysis on the sub-image
    # ~~~~~~~~~~~~~~~~~~~~~~~~~~~~~~~~~~~~~~~~~~~
    map_index_sub_oip  = map_index_sub   # we may vary this in later versions

    MyOIP._derive_OIP(map_index = map_index_sub_oip,
                      n_epochs = n_epochs, n_steps = n_steps,
                      epsilon = epsilon , conv_criterion = conv_criterion,
                      b_stop_with_convergence=False,
                      b_print=False,
                      li_axa = li_axa5,
                      ax1_1 = ax4_3_1, ax1_2 = ax4_3_2)


    # display the modified sub-image without and with contrast
    # ~~~~~~~~~~~~~~~~~~~~~~~~~~~~~~~~~~~~~~~~~~~~~~~~~~~~~~~~~
    t_oip_4_g_28  = MyOIP._inp_img_data
    ay_oip_4_g_28 = t_oip_4_g_28[0,:,:,0].numpy()
    ay_oip_4_g_28_cont = MyOIP._transform_tensor_to_img(T_img=t_oip_4_g_28[0,:,:,0], centre_move=0.33, fact=1.0)
    ax4_3_3.imshow(ay_oip_4_g_28_cont, cmap=plt.cm.gray)
    ax4_3_4.imshow(t_oip_4_g[0, :, :, 0], cmap=plt.cm.gray)

    # upscaling of the present sub-image
    # ~~~~~~~~~~~~~~~~~~~~~~~~~~~~~~~~~~~
    t_pic_4_g_wk_half = tf.image.resize(t_oip_4_g_28, [half_wk_size,half_wk_size], method="bicubic", antialias=True)

    # add the detail correction to the manipulated upscaled sub-image
    # ~~~~~~~~~~~~~~~~~~~~~~~~~~~~~~~~~~~~~~~~~~~~~~~~~~~~~~~~~~~~~~~~
    t_pic_4_g_wk_half = t_pic_4_g_wk_half + t_picc_g_4_corr
    #t_pic_4_g_wk_half = tf.image.per_image_standardization(t_pic_4_g_wk_half)
    ax4_4_1.imshow(t_pic_4_g_wk_half[0, :, :, 0], cmap=plt.cm.gray)
    ax4_4_2.imshow(t_oip_4_g[0, :, :, 0], cmap=plt.cm.gray)

    # Overwrite the related region in the full image with the new sub-image
    # ~~~~~~~~~~~~~~~~~~~~~~~~~~~~~~~~~~~~~~~~~~~~~~~~~~~~~~~~~~~~~~~~~~~~~
    t_oip_g_loop[0, half_wk_size:img_wk_size, half_wk_size:img_wk_size, 0]  = t_pic_4_g_wk_half[0, :, :, 0]
    t_oip_g_loop_std = tf.image.per_image_standardization(t_oip_g_loop)

    #ax4_4_3.imshow(t_oip_g_loop[0, :, :, 0], cmap=plt.cm.gray)
    ax4_4_3.imshow(t_oip_g_loop_std[0, :, :, 0], cmap=plt.cm.gray)
    ay_oip_g_loop_std_plt = tf.clip_by_value(height_fact*t_oip_g_loop_std, -spect_dist*spect_fact, spect_dist*spect_fact)
    ax4_4_4.
imshow(ay_oip_g_loop_std_plt[0, :, :, 0], cmap=plt.cm.gray)

    # Downscale the resulting new full image and feed it into into the next iteration of the main loop
    # ~~~~~~~~~~~~~~~~~~~~~~~~~~~~~~~~~~~~~~~~~~~~~~~~~~~~~~~~~~~~~~~~~~~~~~~~~~~~~~~~~~~~~~~~~~~~~~~~~
    MyOIP._initial_inp_img_data = tf.image.resize(t_oip_g_loop_std, [28,28], method="bicubic", antialias=True)
The result of these operations after 4 iterations is displayed in the following image:
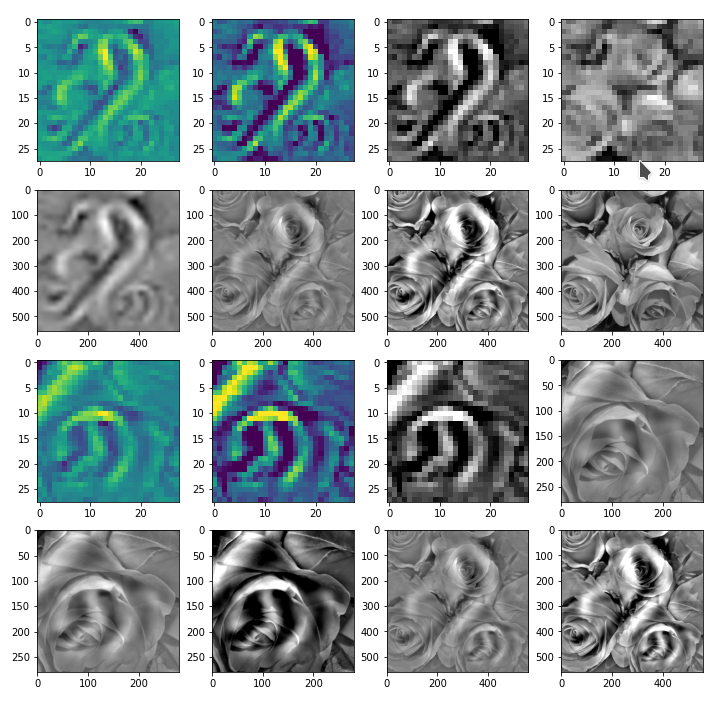
We recognize again the worm-like shape resulting for map 56, which we have seen in the last article, already. (By the way: Our CNN’s map 56 originally is strongly triggered for the shapes of handwritten 9-digits and plays a significant role in classifying respective images correctly). But there is a new feature which appeared in the lower right part of the image – a kind of wheel or two closely neighbored 9-like shapes.
The following code compares the final result with the original image:
fig_size = plt.rcParams["figure.figsize"]
fig_size[0] = 12
fig_size[1] = 12
fig_7X = plt.figure(7)
ax1_7X_1 = fig_7X.add_subplot(221)
ax1_7X_2 = fig_7X.add_subplot(222)
ax1_7X_3 = fig_7X.add_subplot(223)
ax1_7X_4 = fig_7X.add_subplot(224)

ay_pic_full_cont = MyOIP._transform_tensor_to_img(T_img=t_oip_g_loop_std[0, :, :, 0], centre_move=0.46, fact=0.8)

ax1_7X_1.imshow(imgvc_wk_size)
ax1_7X_2.imshow(t_picc_g[0,:,:,0], cmap=plt.cm.gray)
ax1_7X_3.imshow(ay_oip_g_loop_std_plt[0, :, :, 0], cmap=plt.cm.gray)
ax1_7X_4.imshow(ay_pic_full_cont, cmap=plt.cm.gray)
Giving:
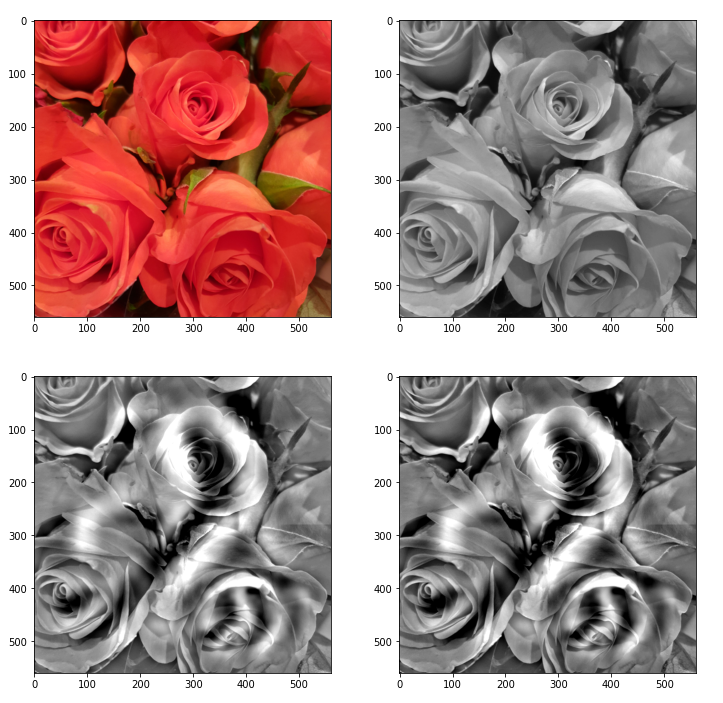
Those who do not like the relative strong contrast may do their own experiments with other parameters for contrast enhancement.
You see: Simplifying prejudices about the world, which get or got manifested in inflexible neural networks (or brains ?), may lead to strange, if not bad dreams. May also some politicians learn from this … hmmm, just joking, as this requires both an openness and capacity for learning … can’t await Jan, 21st …
Conclusion
Our “carving algorithm”, which corresponds to an amplification of traces of map-related patterns that a CNN detects in an input image, can also be used for sub-image-areas and their pixel information. We can therefore use even very limited CNNs trained on low resolution MNIST images to create a “Deep MNIST Dream” out of a chosen arbitrary input image. At least in principle.
Addendum 06.01.2021: There is, however, a pitfall – our CNN (for MNIST or other image samples) may have been trained and work on standardized image/pixel data, only. But even if the overall input image may have been standardized before operating on it in the sense of the algorithm discussed in this article, we should take into account that a sub-image area may contain pixel data which are far from a standardized distribution. So, our corrections for details may require more than just the calculation of a difference term. We may have to reverse intermediate standardization steps, too. We shall take care of this in forthcoming code changes.
In the next article we are going to extend our algorithm to multiple cascaded sub-areas of our image – and we vary the maps used for different sub-areas at the same time.