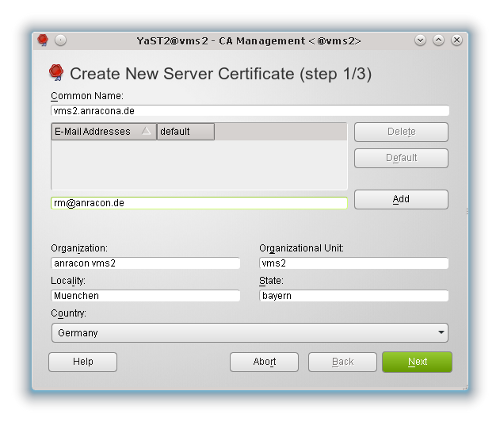
In den letzten zwei Beiträgen zur LDAP-Installation unter Opensuse 12.1 hatte ich auf einem Testsystem “vms2.anracona.de” einen LDAP-Server installiert und diesen TLS-fähig gemacht.
Ferner hatte ich auf diesem Server die YaST2-Clients zur Anwenderverwaltung eingerichtet. In diesem Zusammenhang hatten wir neben der Konfigurationsdatei
“/etc/openldap/ldap.conf”
auch die wichtige Konfigurationsdatei
“/etc/ldap.conf”
für PAM und NSS betrachtet. Allerdings haben wir die User- und Gruppenverwaltung bislang nur lokal auf dem LDAP-Server selbst durchgeführt und getestet. Server- und Client-System waren also identisch.
Letztlich wollen wir aberr erreichen, dass mit Hilfe des zentralen LDAP-Systems eine Authentifizierung von Usern, die sich an einem beliebigen Host im Netzwerk einloggen, gewährleistet wird. Ferner soll über das LDAP-Verzeichnis neben der Authentifizierung auch eine userspezifische Autorisierung des Zugangs zu ganz bestimmten Hosts verwaltet und bei jedem Login-Vorgang vorgenommen werden. Es ist klar, dass hierzu während eines Login-Vorgangs auf einem Host eine Kommunikation zwiuschen dem Host und dem zentralen LDAP-System ablaufen muss. Da hierbei sicherheitsrelevante Information ausgetauscht wird, muss die Kommunikationsverbindung durch Verschlüsselung (TLS/SSL) abgesichert werden.
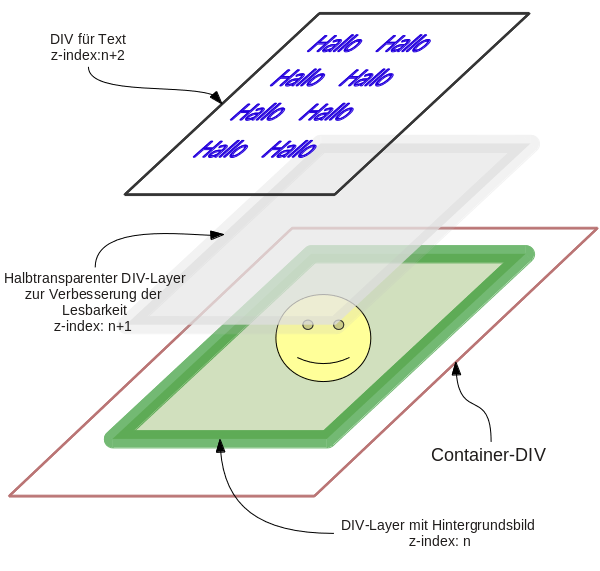
In diesem Beitrag erinnern wir deshalb an die Skizze am Anfang des LDAP II-Artikels. Unser nächstes Ziel ist es, einen Zugriff auf den LDAP-Server von einem echten Opensuse 12.1-Client-System aus zu realisieren. Dieser Client sei im lokalen Testnetz unter der Adresse “vms1.anracona.de” erreichbar.
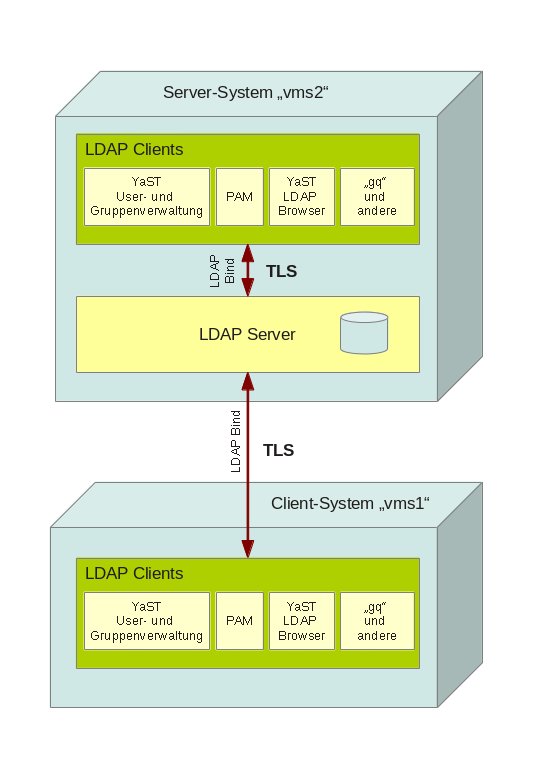
Wir wollen auf dem System “vms1” natürlich auch wieder die YaST2-Tools zur Anlage von User- und Gruppenaccounts benutzen. Diese Accounts sollen aber nicht lokal, sondern auf dem LDAP-Server hinterlegt werden. Wir benötigen also einen TLS-geschützten Zugriff von LDAP-Clients des Systems “vms1” auf den LDAP-Server “vms2”.
Die im letzten Beitrag bereits durchgeführte Einrichtung der YaST2-LDAP-Client-Module sowie der YaST2-User- und Gruppen-Verwaltung auf dem Server sah sehr generisch aus. Wir vermuten daher zu Recht:
Auf dem System “vms1” können wir im Prinzip ähnlichen Schritten zur Einrichtung der YaST2-LDAP-Module folgen wie bei der Einrichtung des YaST2-LDAP-Clients und der YaST2-Benutzerverwaltung auf dem LDAP-Server selbst.
Damit wir dabei aber auch etwas Neues kennenlernen, werden wir uns in diesem Beitrag zusätzlich folgende Punkte genauer ansehen:
- Templateartige und opensuse-spezifische Vorgaben für die Anlage von Usern- und Gruppen. Zentrale Hinterlegung der Vorgaben auf dem LDAP-Server und Ort der entsprechenden Einträge im LDAP-Verzeichnisbaum. Änderung der Vorgaben per YaST2.
- LDAP-Einträge in den Konfigurationsdateien für PAM und NSS
Ein später nachfolgender Beitrag “LDAP IV” widmet sich dagegen einer zentralen Passwort-Politik, die wir auf dem LDAP-Server einrichten sowie Fragen der Absicherung des Servers gegenüber Logins von beliebigen Usern, die im LDAP-System hinterlegt wurden.
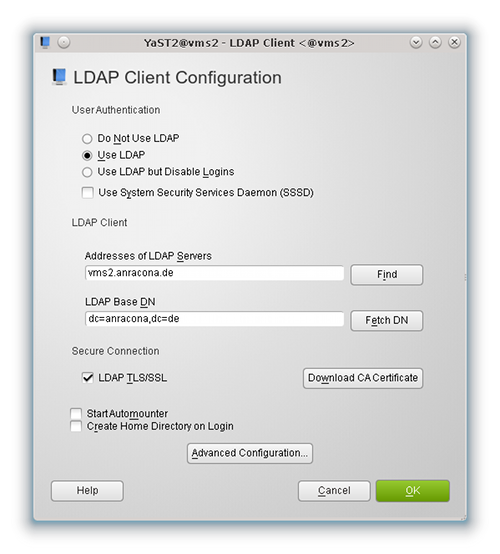
Konfiguration des YaST-LDAP-Clients auf dem externen System “vms1”
Schritt 1: Beschaffung des CA-Zertifikats
Wir gehen hier unter YaST2 völlig analog zu den Schritten vor, die ich im Beitrag LDAP I unter dem Schritt 4 und im Beitrag LDAP II unter dem dortigen Schritt 3 beschrieben habe. Im Unterschied zur Ersteinrichtung der LDAP-Clients auf dem Server (s. LDAP I) berücksichtigen wir hier aber von vornherein die Nutzung von TLS.
Die auszufüllenden
Masken geben wir hier nicht erneut vollständig wieder. Wir betrachten nur die wichtigsten:
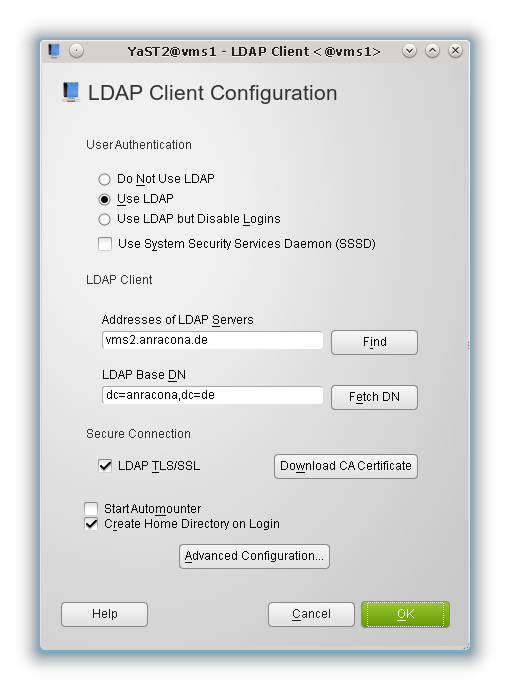
Unser Server ist in unserem Beispiel natürlich nach wie vor das System “vms2.anracona.de” (und nicht “vms1” !). Auch die “LDAP Base DN” ist natürlich identisch zu der, die wir bei der Client-Einrichtung auf dem Server eingetragen hatten.
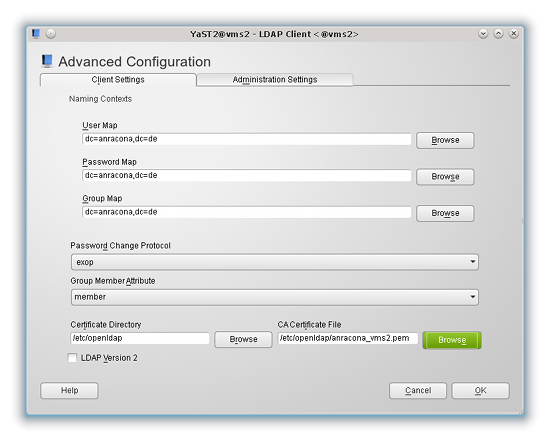
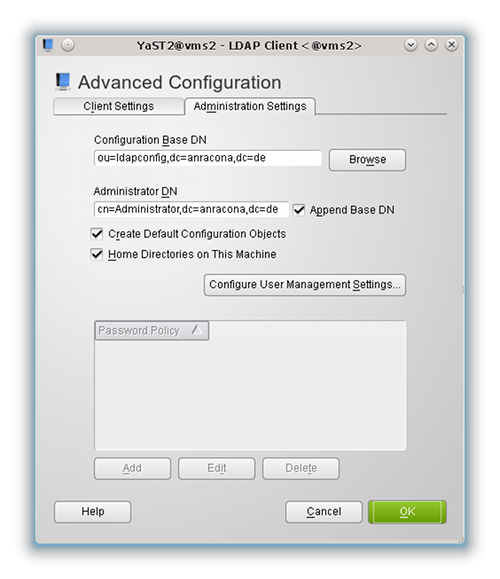
Eine wichtige Ausnahme zum bisherigen Vorgehen gibt es allerdings auf der Maske
“Advanced Configuration >> Reiter Administration Settings”
des LDAP-Clients:
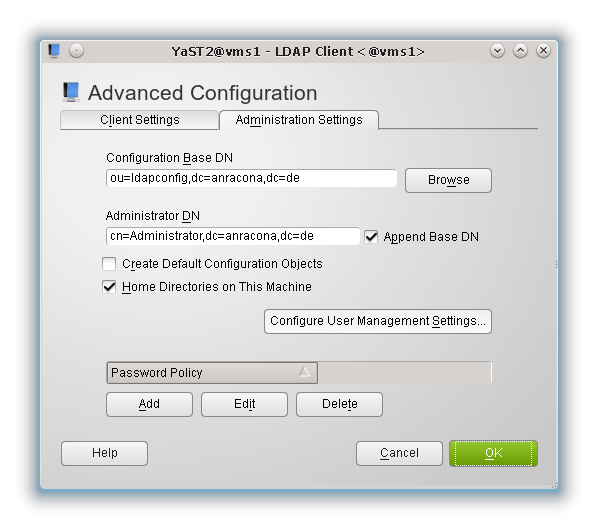
Wichtiger Hinweis 1:
Der Haken bei “Home Directories on This Machine” ist unbedingt erforderlich. Wir wollen ja, dass die Home-Verzeichnisse definitiv auf dem System “vms1” angelegt werden – und nicht sonst wo (etwa auf dem LDAP-Server “vms2”) oder evtl. gar nicht.
Wichtiger Hinweis 2:
Wir setzen keinen Haken beim Punkt “Create Default Configuration Objects” ! Dadurch würden wir auf dem Server “vms2” bereits durchgeführte Konfigurationen zur Anlage von User- und Gruppen Accounts ggf. überschreiben. Was das bedeutet, werden ich weiter unten (s. Schritt 1.4) beschreiben.
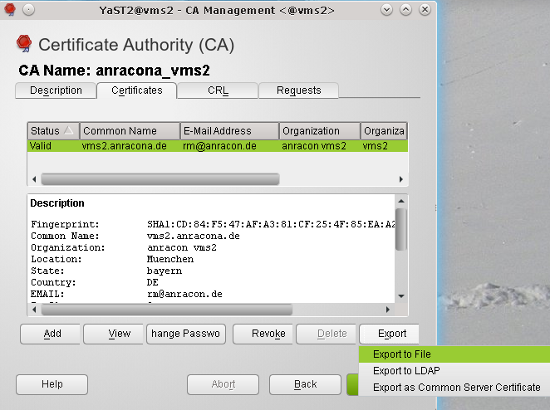
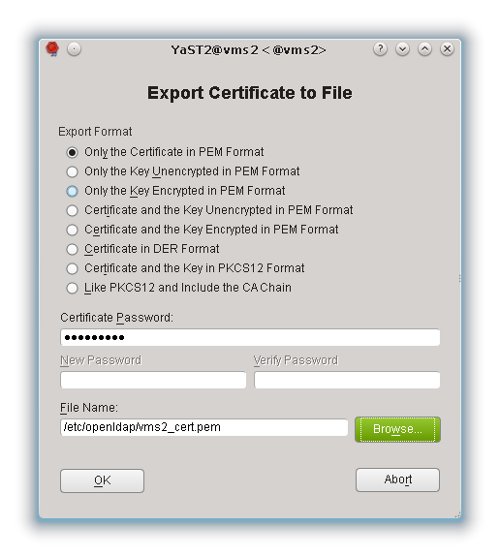
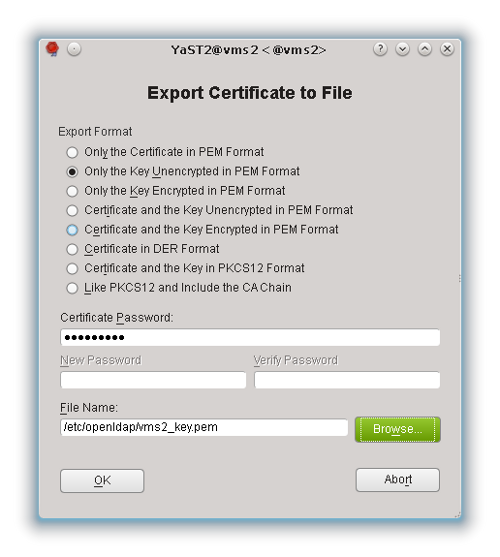
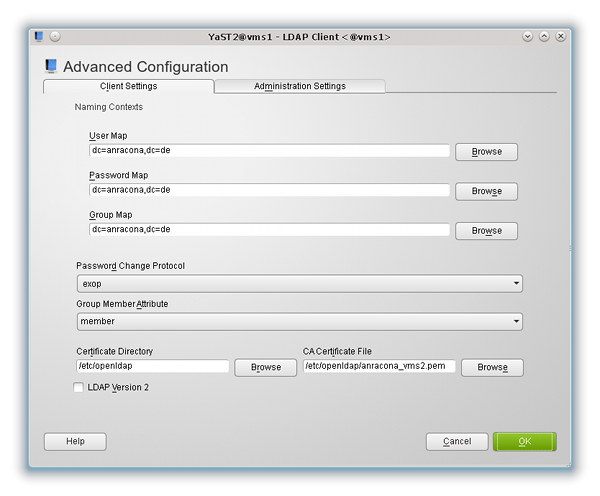
Erwartungsgemäß benötigen wir für den Aufbau von TLS-Verbindungen der YaST2-LDAP-Clients und der PAM/NSS-Komponenten vom System “vms1” zum Server “vms2” auch Kopien von Zertifikaten. Der Ablageort dieser Zertifikate muss natürlich auch auf dem System “vms1” in die Konfigurationsmasken eingetragen werden. Wir nehmen der Einfachheit halber auch hier das lokale Verzeichnis “/etc/openldap” (auf “vms1”):
Welche Art von Zertifikatsdateien benötigen wir? Brauchen wir überhaupt mehrere?
Ohne großes Nachdenken tippen wir mal darauf, dass uns der LDAP-Server im Rahmen des TLS- Verschlüsselungsdialogs sein eigenes Server-Zertifikat übermitteln wird, damit wir auf “vms1” seine Authentizität überprüfen können. In unserem Beispiel liegt das Server-Zertifikat auf dem Server “vms2” – und dort in der Datei “/etc/openldap/vms2_cert.pem”. Dieses Zertifikat wird auf dem Client-System nicht benötigt.
Für die Überprüfungsprozesse, die LDAP-Client-Module auf “vms1” bzgl. des Server-Zertifikats von “vms2” durchführen, müssen wir jedoch angeben, welchen CA-Authorities (bis hin zu Root-CA) das System “vms1” dabei vertrauen soll.
Hinweis:
Dies ist in unserem Testbeispiel umso wichtiger, als es sich bei “vms2_cert.pem” im Kern ja um ein “self-signed” Zertifikat für den LDAP-Server handelt. Denn es wurde ja gerade von einer Root-CA ausgestellt, die auf dem LDAP-Server “vms2” beheimatet ist.
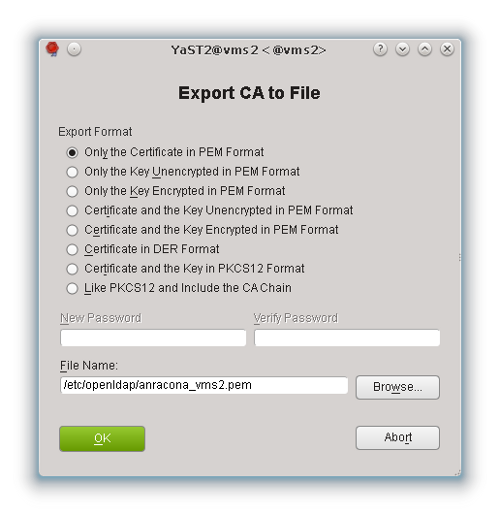
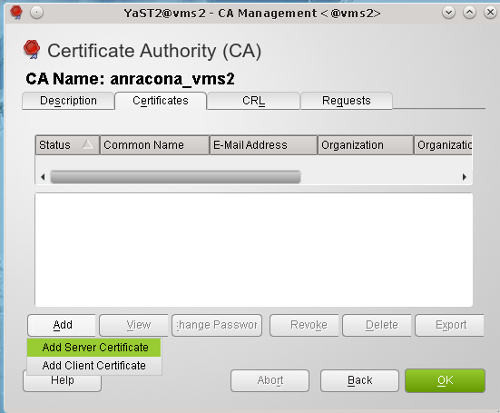
Dieser Root-CA muss unser Client-System im Testnetz also explizit vertrauen. Wodurch identifizieren wir auf dem Client aber die CA? Natürlich durch ihr eigenes Zertifikat! Wir benötigen also das Zertifikat “anracona_vms2.pem” unserer Root-CA. Genauer müsste man eigentlich sagen: Die Zertifikate der für das Serverzertifikat “vms2_cert.pem” des LDAP-Server ausschlaggebenden CA-Authorities. Wären in einem realistischeren Beispiel mehrere hierarchische CAs involviert gewesen, so würden wir alle Zertifikate der CA-Kette benötigen!
In unserem einfachen Fall müssen wir also die Datei “/etc/openldap/anracona_vms2.pem” vom Server auf unser Clientsystem kopieren. Wir können dies z.B. mit “scp” erledigen, wenn wir openssh auf beiden Systemen installiert haben.
Auf dem Server “vms2”:
vms2:~ # scp /etc/openldap/anracona_vms2.pem root@vms1.anracona.de:/etc/openldap/
Im realen Leben würden wir das Zertifikat der Root-CA
dagegen für unseren Client von einem LDAP-Server herunterladen. Danach versehen wir die Zertifikatsdatei auf dem Clientsystem “vms1” mit passenden Zugriffsrechten:
vms1:~ #: chown ldap.ldap /etc/openldap/anracona_vms2.pem
vms1:~ #: chmod 644 /etc/openldap/anracona_vms2.pem
Schritt 2: Die Datei “/etc/openldap/ldap.conf”
Wir erinnern uns, dass die Einstellungen, die YaST2 bei der Einrichtung der LDAP-Client-Fähigkeit vornimmt, sich an mehreren Stellen auf die Konfiguration des Opensuse-Systems auswirken (u.a. in den Dateien “/etc/openldap/ldap.conf” und “/etc/ldap.conf”).
Zunächst sehen wir uns mal die benötigten Einträge in der Datei “/etc/openldap/ldap.conf” des Clients “vms1” an.
Diese Datei steuert systemweit Standard-LDAP-Zugriffsverfahren (vergl. mit dem Beitrag LDAP II). Hier Auszüge aus dem Datei-Inhalt für das System “vms1”:
/etc/openldap/ldap.conf
base dc=anracona,dc=de
uri ldap://vms2.anracona.de
ldap_version 3
ssl start_tls
TLS_CACERTDIR /etc/openldap
TLS_CACERT /etc/openldap/anracona_vms2.pem
TLS_REQCERT allow
Über den Parameter “uri” wird die Adresse des LDAP-Servers angegeben. Einen speziellen Port geben wir dabei nicht an. Stattdessen sorgt die Zeile
ssl start_tls”
dafür, dass eine TLS-geschützte Verbindung über den Standard-LDAP-Port 389 initialisiert wird. Bzgl. der übrigen Parameter werfen wir zur Vervollständigung unseres Wissens auch mal einen Blick in die man-Seiten. Es folgen Ausschnitte:
URI <ldap[si]://[name[:port]] …>
Specifies the URI(s) of an LDAP server(s) to which the LDAP library should connect. The URI scheme may be any of ldap, ldaps or ldapi, which refer to LDAP over
TCP, LDAP over SSL (TLS) and LDAP over IPC (UNIX domain sockets), respectively.
Each server’s name can be specified as a domain-style name or an IP address lit-
eral. Optionally, the server’s name can followed by a ‘:’ and the port number the
LDAP server is listening on. If no port number is provided, the default port for
the scheme is used (389 for ldap://, 636 for ldaps://).
TLS_CACERT <filename>
Specifies the file that contains certificates for all of the Certificate
Authorities the client will recognize.
TLS_CACERTDIR <path>
Specifies the path of a directory that contains Certificate Authority certificates in separate individual files. The TLS_CACERT is always used
before TLS_CACERTDIR. This parameter is ignored with GnuTLS.
TLS_REQCERT <level>
Specifies what checks to perform on server certificates in a TLS session, if any. The can be specified as one of the following keywords:
never The client will not request or check any server certificate.
allow The server certificate is requested. If no certificate is provided,
the session proceeds normally. If a bad certificate is provided, it
will be ignored and the session
proceeds normally.
try The server certificate is requested. If no certificate is provided,
the session proceeds normally. If a bad certificate is provided, the
session is immediately terminated.
demand | hard
These keywords are equivalent. The server certificate is requested.
If no certificate is provided, or a bad certificate is provided, the
session is immediately terminated. This is the default setting.
Aha, an den Werten für den Parameter “TLS_REQCERT” erkennen wir, dass es durchaus unterschiedliche “Level” für den Umgang mit dem Zertifikat des Servers gibt. Wir können in unser Testkonfiguration nun durchaus mal die Einstellung “demand” ausprobieren und sehen, ob auf dem Client “vms1” das Absetzen eines Kommandos der Art:
vms1:~ # ldapsearch -b dc=anracona,dc=de uid=* -x -D “cn=Administrator,dc=anracona,dc=de” -W -xLLL -ZZ
funktioniert. Bzgl. der Parameter siehe die man-Seiten zu “ldapsearch”. (Zitat: “-Z[Z] Issue StartTLS (Transport Layer Security) extended operation. If you use -ZZ, the command will require the operation to be successful.” / Zum Beobachten des Zertifikatsaustausches kann man die Option -d2 anschließen.)
Die Durchführung des “ldapsearch-Kommandos” sollte in unserer Testkonfiguration anstandslos Ergebnisse für die bereits eingetragenen User liefern. Damit haben wir auch gleich unseren ersten Test für die Client-Anbindung hinter uns gebracht. Normale LDAP-Operationen funktionieren zwischen unseren Opensuse-Systemen bereits.
Schritt 3: Die Datei “/etc/ldap.conf”
Wir erinnern uns daran (siehe Beitrag “LDAP II), dass diese Datei unter Opensuse 12 für die Anbindung von PAM und NSS an LDAP zu steuern. Wir sehen uns nur die Parameter an, die von Standardeinstellungen abweichen. Weitere Informationen zu den einzelnen Parametern liefern die man-Seiten zu “/etc/ldap.conf”.
/etc/ldap.conf
# The distinguished name of the search base.
base dc=anracona,dc=de
# Reconnect policy:
# soft: return immediately on server failure
bind_policy soft
# Search the root DSE for the password policy (works
# with Netscape Directory Server). Make use of
# Password Policy LDAP Control (as in OpenLDAP)
pam_lookup_policy yes
# Use the OpenLDAP password change
# extended operation to update the password.
pam_password exop
# returns NOTFOUND if nss_ldap’s initgroups() is called
# for users specified in nss_initgroups_ignoreusers
# (comma separated)
nss_initgroups_ignoreusers root,ldap
# Enable support for RFC2307bis (distinguished names in group
# members)
nss_schema rfc2307bis
# configure –enable-nds is no longer supported.
# NDS mappings
nss_map_attribute uniqueMember member
# OpenLDAP SSL mechanism
# start_tls mechanism uses the normal LDAP port, LDAPS typically 636
ssl start_tls
uri ldap://vms2.anracona.de
ldap_version 3
pam_filter objectClass=posixAccount
# OpenLDAP SSL options
# Require and verify server certificate (yes/no)
# Default is to use libldap’s default behavior, which can be configured in
# /etc/openldap/ldap.conf using the TLS_REQCERT setting. The default for
# OpenLDAP 2.0 and earlier is “no”, for 2.1 and later is “yes”.
#tls_checkpeer yes
# CA
certificates for server certificate verification
# At least one of these are required if tls_checkpeer is “yes”
tls_cacertdir /etc/openldap
tls_cacertfile /etc/openldap/anracona_vms2.pem
Einige Einträge sind offenkundig ganz ähnlich zu den Einträgen in der “/etc/openldap/ldap.conf”. Einige sind jedoch auch spezifisch:
Die Einstellung “soft” des Parameters “bind_policy” bedeutet nach den man-Seiten und der Quelle “http://linux.die.net/man/5/nss_ldap“, dass kein Reconnect (mit erheblicher Zeitverzögerung) versucht wird, wenn ein (initialer) Connect-Versuch gemäß der NSS-Anweisungen fehlschlägt.
bind_policy <hard_open|hard_init|soft>
Specifies the policy to use for reconnecting to an unavailable LDAP server. The default is hard_open, which reconnects if opening the connection to the directory server failed. By contrast, hard_init reconnects if initializing the connection failed. Initializing may not actually contact the directory server, and it is possible that a malformed configuration file will trigger reconnection. If soft is specified, then nss_ldap will return immediately on server failure. All "hard" reconnect policies block with exponential backoff before retrying.
“Hard”-Einstellungen für diesen Parameter können also problematisch werden; siehe auch :
http://www.held.org.il/blog/2008/09/ldap-default-bindhard-policy-is-problematic/
http://unix.derkeiler.com/Mailing-Lists/FreeBSD/questions/2008-02/msg01126.html
https://bugzilla.redhat.com/show_bug.cgi?id=502072
Ganz unten sehen wir wieder die Einstellungen für die Zertifikate, denen zu vertrauen ist. Bzgl. des “tls_cacertdir”-Wertes siehe die entsprechenden Ausführungen im früheren Beitrag LDAP II.
Die Bedeutung des Parameters “tls_checkpeer” ergibt sich aus der in der Datei unmittelbar darüber stehenden Erläuterung. Wir können das Kommentarzeichen vor diesem Parameter in unserer Testumgebung auch mal versuchsweise entfernen und den Wert auf “yes” setzen. Das sollte zu keinen Problemen führen.
Interessanter sind die Parameter “pam_password” und “pam_lookup_policy”.
Unter der Web-Adresse http://karmak.org/archive/2003/02/ldap/ldap-linux.htm
lesen wir:
“The directive “pam_password exop” tells pam-ldap to change passwords in a way that allows OpenLDAP to apply the hashing algorithm specified in /etc/ldap/slapd.conf, instead of attempting to hash locally and write the result directly into the database.”
Tja, nun hatten wir ja schon früher gesehen, dass es die “slapd.conf”-Konfigurationsdatei unter Opensuse gar nicht mehr gibt!
Jetzt könnte man unbedarft versuchen, auf dem Opensuse LDAP-Server in dessen modularen Konfigurationsdateien einen Eintrag für ein Standard-Hash-Verfahren des LDAP-Servers zu finden. Also einen Eintrag der Art “password-hash {SHA},{SSHA}”, wie es ihn früher in der guten alten “slapd.conf” gab.
Eine Suche der Art
vms2:/etc # grep -d recurse hash /etc/openldap/
liefert aber nur Kommentarzeilen aus diversen Schema-Dateien. Deshalb stellen sich jetzt folgende Fragen:
- Woher wissen die Yast2-Userverwaltung auf “vms1” und der LDAP-Server eigentlich, welches Passwort-Verschlüsselungsverfahren bei der Anlage der Userdaten auf einem LDAP-Server angewendet werden soll?
- Woher kennt die YaST-Userverwaltung für LDAP auf “vms1” eigentlich die nächste lfd. UID-Nummer, die bei der Anlage eines neuen Users verwendet werden soll, wenn die Nummern der bisher angelegten User doch auf dem LDAP-Server liegen?
- Woher erfährt das YaST2-Modul zur Anlage von Usern eigentlich das Skeleton-Verzeichnis oder andere Standarddaten, die bei der Neuanlage eines Users berücksichtigt werden sollen?
- Wie zentralisiert man eigentlich die Standarddaten für die Anlage von Useracounts über mehrere Systeme hinweg?
- Wo wurde eigentlich festgelegt, dass User-Daten auf unserem Testsystem im LDAP-Baum unter “ou=people,dc=anracona,dc=de” angelegt werden sollen ?
Vielleicht ist man nun durch diese Fragen verunsichert worden und bezweifelt, dass die YaST2-Benutzerverwaltung auf dem System “vms1” überhaupt funktioniert. Höchste Zeit also für die testweise Anlage einiger Testuser auf dem System “vms1”.
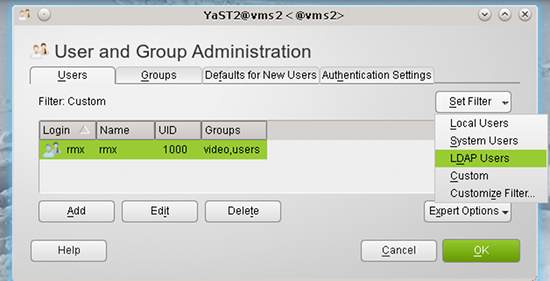
Die Möglichkeit zur YaST2-gestützten Useranlage unter Hinzuziehung des LDAP-Servers erhalten wir, wie in den früheren Beiträgen beschrieben, auch auf dem System “vms1” über folgende Maske der YaST2-Benutzerverwaltung und die Wahl des Filters “LDAP-Users”:
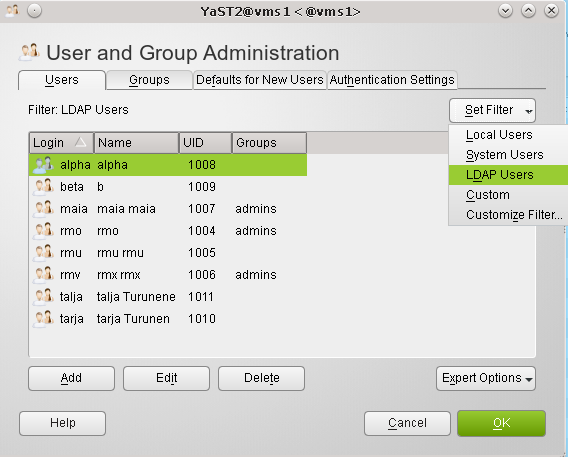
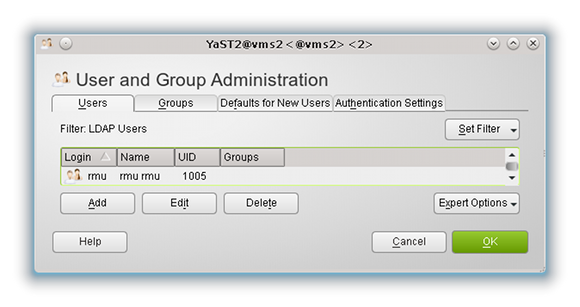
Dort drücken wir auf den Button “Add” und nehmen in den nachfolgenden Masken die erforderlichen Einträge vor. Auf der Maske “Details” erkennen wir dabei übrigens, dass auf wundersame Weise automatisch die nächste freie Nummer für den Testuser gewählt wird.
Ohne hier alle Schritte vorzuführen, endet unser Test der Useranlage mit YaST2 auch auf “vms1” erfolgreich:
- die Kommunikation unserer YaST2-Benutzerverwaltung auf “vms1” mit dem LDAP-Server “vms2” funktioniert,
- unter dem Zweig “ou=people,dc=anracona,dc=de” werden im LDAP-Verzeichnis auf “vms2” die erforderlichen User-Einträge angelegt,
- auf “vms1” (und nicht etwa auf vms2) werden die Home-Verzeichnisse für die neuen User korrekt angelegt und
- jeder neu mit YaST2 von “vms1” aus angelegte User kann sich auf “vms1” auch einloggen.
Der Leser möge speziell den letzten Punkt – nämlich den erfolgreichen Login auf dem Host “vms1” an dieser Stelle selbst ausprobieren. In den Beiträgen “LDAP IV” und “LDAP V” werden wir solche Login-Vorgänge explizit und ausführlich an mehreren Userbeispielen betrachten. Wir zeigen dies hier für einen Test-User “tarja”:
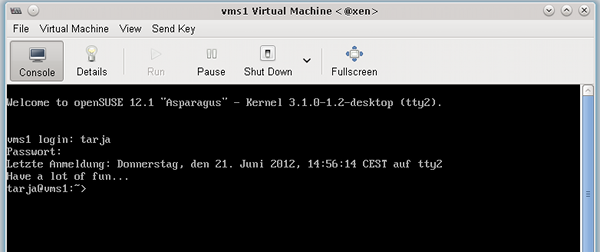
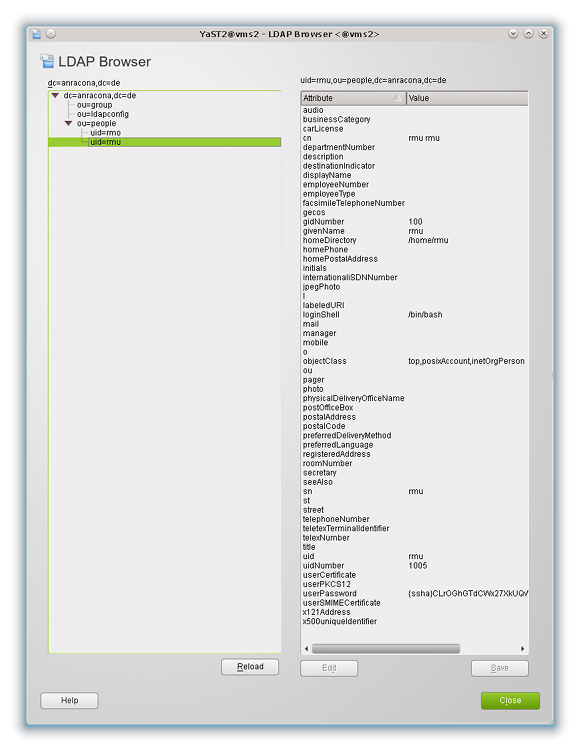
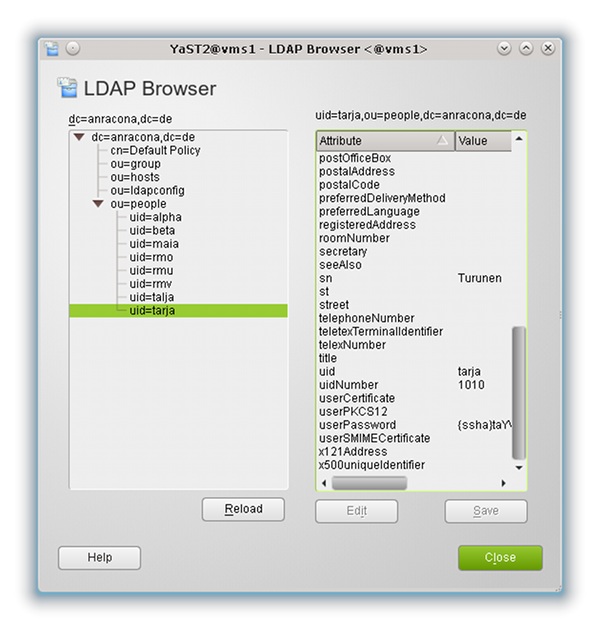
Offenbar haben wir “vms1” richtig konfiguriert. Ein Blick mit dem LDAP-Browser auf “vms2” zeigt denn auch die angelegten Testuser an:
Als nächstes sehen wir uns ein Detail der User-Einträge, die YaST2 für uns auf dem LDAP-Server vornimmt, genauer an.
Studiert man nun die User-Einträge unter dem Ast “ou=people,dc=anracond,dc=de” des LDAP-Verzeichnisses genauer, so findet man bzgl. der Passwortverschlüsselung Feldeinträge der Form:
userPassword {ssha}dMU9M69W………
Es wurde also SSHA als Hash-Verfahren für die Passwortverschlüsselung herangezogen. Gehen wir dagegen auf die Passworteinstellungen der YaST2-Userverwaltung (Expert-Options >> Password Encryption) auf dem System “vms1”, so finden wir dort überraschenderweise jedoch Folgendes:
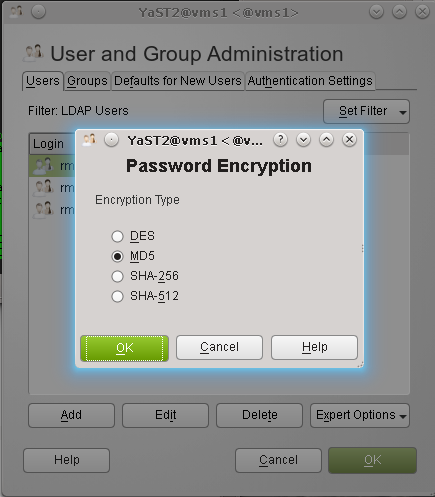
Opensuses’s YaST ist nach einer Standardinstallation eigentlich auf MD5 als Hashverfahren eingestellt! Unser Fragenkatalog von oben erweitert sich also um die Frage:
- Woher also kommt also die SSHA-Einstellung für das LDAP-System?
Auf diese Frage gibt es eine Antwort, die allein aber nicht hinreichend ist:
Die erste Antwort ist, dass der LDAP-Server eine Standardeinstellung zieht, wenn die Option “exop” gesetzt ist. Wir zitieren nach
http://www.zytrax.com/books/ldap/ch6/#passwordhash:
olcPasswordHash (password-hash)
Allows definition of one or more hash methods used when storing a new password in userPassword with an Extended Modify Password Operation (RFC 3602). Format:
# OLC (cn=config) form
olcPasswordHash: {hash}[,{hash} [, …]]
# slapd.conf form
password-hash {hash}[,{hash} [, …]]
The value of hash must be one of the supported methods {SSHA}, {SHA}, {SMD5}, {MD5}, {CRYPT}, or {CLEARTEXT}. The default value is {SSHA}. … When used with OLC (cn=config) this attribute appears in/is added to the olcDatabase={-1}frontend,cn=config entry not the global (cn=config) entry.
SSHA ist also der Standard, der gezogen wird, wenn in der Datei “/etc/ldap.conf” der Parameter “pam_password exop” gesetzt ist, und in die Datei “olcDatabase={-1}frontend.ldif” kein Eintrag der Form “olcPasswordHash: {hash}” eingefügt wurde. Wie es bei uns der Fall ist.
Dennoch könnte es ja so sein, dass die Module, die YaST2 einsetzt, um User anzulegen, explizit andere Einstellungen für die Verschlüsselung der Passwörter verwenden – wie eben MD5. Die Schemata, deren Felddefinitionen einen User-Datensatz festlegen, lassen eine individuelle Festlegung des Verschlüsselungsverfahrens für das Feld “userPasswort” ja durchaus zu.
Wo befinden sich also die Vorgaben für die YaST2-Module zur Useranlage? Um diese Frage und auch die anderen offen gebliebenen Fragen zu beantworten, müssen wir nun auf einen Punkt aus dem Beitrag “LDAP I” zurückkommen, der SuSE-spezifisch ist und auf den wir bislang nicht eingegangen sind.
Schritt 4: Opensuse-spezifische Konfigurationsvorgaben und Templates für die Anlage von Usern und Gruppen
Im Beitrag “LDAP I” hatten wir in folgender Maske zur Einrichtung der YaST2-LDAP-Clients auf “vms2”
die Option “Create Default Configuration Objects” gesetzt.
Lässt man dies bei der Einrichtung eines anderen LDAP-Servers testweise weg und legt später User an, so wird man u.a. feststellen, dass die User Accounts dann keineswegs unter dem LDAP-Verzeichniszweig
“ou=people,dc=anracona,dc=de”
angelegt werden. Diesen Zweig gibt es dann nicht einmal ! Im LDAP-Baum würde die Anlage von Informationen zu User Accounts in einer solchen Situation vielmehr direkt unter der Base-DN erfolgen, was aus einer Reihe von Gründen natürlich nicht erstrebenswert wäre.
Die Option “Create Default Configuration Objects” bei der Konfiguration des LDAP-Clients scheint also dazu zu führen, dass YaST2 während der Einrichtung des LDAP-Clients auf dem LDAP-Server (!) einige Standardeinstellungen vornimmt und dabei auch bestimmte Äste des LDAP-Baums einrichtet.
Ein Blick mit dem YaST2-LDAP-Browser offenbart denn auch, was so alles während unserer LDAP-Einrichtung angelegt wurde:
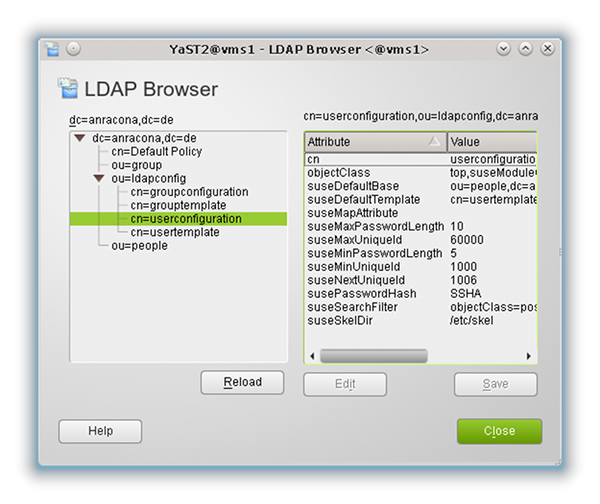
Zunächst stellen wir fest, dass es drei interessante “ou-Zweige” gibt:
- ou=people
- ou=ldapconfig
- ou=group
(Der darüber liegende Eintrag “cn=Default Policy” ist übrigens kein Standardeintrag. Wie dieser Eintrag auf meinem Testsystem “vms2” entstanden ist, bespreche ich im Beitrag “LDAP IV”.)
Unter dem Zweig “ou=people” hinterlegt die YaST-Userverwaltung offenbar die Informationen zu User Accounts, unter “ou=group” die Informationen zu Group Accounts. Für die User hatten wird dies im Beitrag “LDAP II” bereits explizit gesehen. Dass das auch für Gruppen gilt, kann jeder selbst durch Anlegen entsprechender Test-Accounts für Gruppen verifizieren.
Von größerem Interesse ist aber der Bereich “ou=ldapconfig”. Dort wurden von YaST2 bei unserer initialen Konfiguration des “LDAP-Clients” auf dem System “vms2” (s. LDAP I) offenbar schablonen- und templateartige Informationen als Vorgaben für die Anlage von User- und Group-Accounts angelegt. Ein Blick auf die Felder der “cn”-Einträge
- cn=groupconfiguration
- cn=grouptemplate
- cn=userconfiguration
- cn=usertemplate
ist wirklich ganz instruktiv. Man erkennt sofort, dass die Inhalte tatsächlich in etwa den Informationen entsprechen, die man bei einer manuellen Verwendung von “useradd” bzw. “usermodify” auf Standardsystemen auch anlegen bzw. modifizieren würde.
U.a. finden wir in den genannten LDAP-Einträgen auch die vorhin gesuchte Vorgabe zur Verwendung von SSHA als Hash-Verfahren für die User-Passwörter sowie eine Vorgabe für das Skeleton-Verzeichnis. Beide Informationen werden von YaST2 verwendet, wenn ein neuer User-Account angelegt wird.
Wichtiger Hinweis:
An dieser Stelle sollte durch Vergleich zur weiter oben gemachten Anmerkung für den Hash-Standard des Servers klar sein, dass man zwischen den Einstellungen in Opensuse’s “userconfiguration”-Eintrag und dem Serverstandard, der in den Server-Konfigurationsdateien eingestellt wird, für Konsistenz sorgen muss, wenn man nicht ein kunterbuntes Durcheinander an Passwort-Hashes riskieren will. Denn löst man sich irgendwann von YaST2 und nutzt andere Tools oder direkt LDIF-Dateien für die User-Anlage, so ist je nach verwendeten Einstellungen für Uneinheitlichkeit viel Platz. Aber das nur nebenbei.
Offenbar werden bei der Anlage neuer Accounts auf dem LDAP-System auch Informationen zur nächsten freien UID-Nr und GID-Nr. in entsprechenden Feldern der Zweige “userconfiguration” und “groupconfiguration” überschrieben (suseNextUniqueID). Darauf greifen die YaST-Module bei der Anlage des nächsten Users zurück.
Die Struktur der Einträge entspricht übrigens einem spezifischen LDAP-Schema, das bei der Einrichtung des LDAP-Servers von YaST2 mit angelegt wurde, nämlich dem “yast”-Schema.
Dies bestätigen ein Blick in das Konfigurationsverzeichnis “/etc/openldap/slapd.d/ ”

sowie zusätzliche Blicke in die Dateien
- /etc/openldap/slapd.d/cn=config/cn=schema/cn={4}yast.ldif” und
- /etc/openldap/schema/yast.schema
Was sagt uns das alles?
- Opensuses’ YaST erstellt schablonenartige Vorgaben zur Erstellung von User- und Group-Accounts. Während der Einrichtung der YaST2-LDAP-Clients für die User-Verwaltung werden diese Vorgaben im LDAP-System selbst unter dem Zweig “ou=ldapconfig” unterhalb der Base-DN hinterlegt! Dies ist der Sinn der oben erwähnten Option “Create Default Configuration Objects
“.
- Die YaST2-Client-Anwendungen zur Userverwaltung holen sich diese Daten im Vorfeld einer Account-Einrichtung oder -Änderung also vom LDAP-Server selbst ab. (Faktisch geschieht dies bei der Setzung des Filters für das Account-Backend auf “LDAP User” oder “LDAP Group” (Button “Set Filter” in den Masken zur User- und Gruppenverwaltung).
Die Antworten auf die oben gestellten Fragen liegen also in den Tiefen von YaST2 und den dort in ycp-Scripts verankerten Ideen von Opensuse zur Account-Verwaltung und einem spezifischen “yast”-LDAP-Schema.
YaST’s ycp-Scripts fragen im Zuge der User- und Gruppen-Verwaltung im LDAP-System dort hinterlegte Instruktionen zur User- und Gruppen-Anlage ab. Bei der Konfiguration des YaST2-LDAP-Clients hingegen werden durch ycp-Scripts auf dem LDAP-Server bestimmte Verzeichnis-Zweige angelegt und Einträge mit Vorgaben zur User- und Gruppen-Anlage hinterlegt.
Tatsächlich findet man nach ein wenig Recherche in der Datei “/usr/share/YaST2/modules/Ldap.ycp” auch die Codezeilen für diejenigen Informationen, die bei der initialen Anlage der Vorgaben zu User- und Gruppenaccounts unter “ou=ldapconfig” von den YaST2-Konfigurationsskripts herangezogen werden:
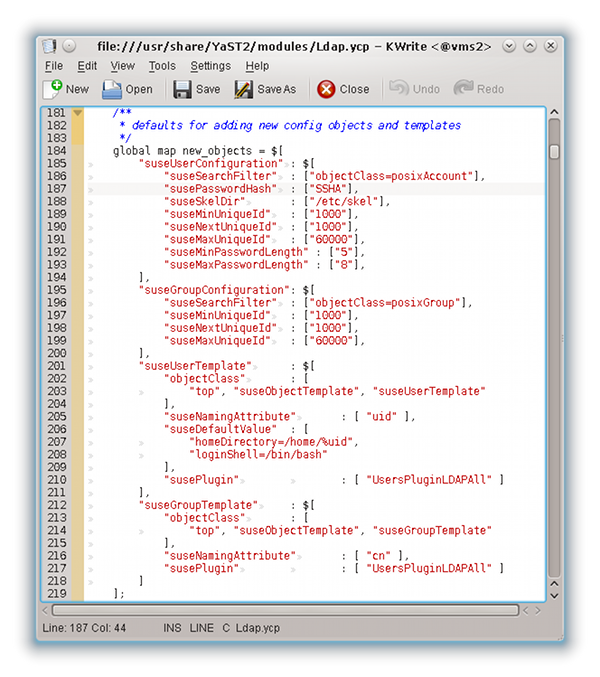
Nun fragt man sich als nächstes, ob und wo man diese Standardeinstellungen für die account-bezogenen Configuration- und Template-Vorgaben ändern kann.
Auch dies geschieht natürlich über YaST2 und zwar im YaST2-Modul “LDAP-Client”.
Auf der Einstiegsmaske “LDAP Client Configuration” nutzt man den Button “Advanced Configuration”, geht auf der nächsten Maske in den Reiter “Administration Settings” und klickt dort auf den Button “Configure User Management Settings”. Auf der nachfolgenden Maske hat man alle Möglichkeiten zum Überschreiben der Werte für die User- und auch der Gruppenkonfiguration sowie der zugehörigen “Templates” :
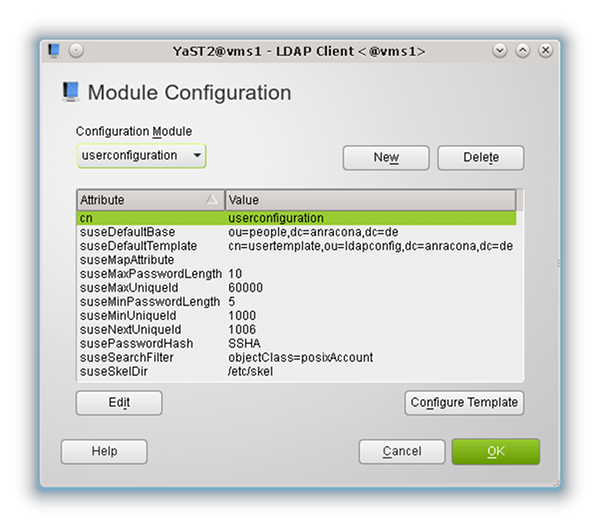
Diese Änderungen kann per YaST2 man von jedem System aus vornehmen, das den LDAP-Server als Backend für die User- und Gruppenverwaltung verwendet.
Inzwischen wird wohl auch ein wenig klar, wie man mittels YaST2 und LDAP eine (in diesem Stadium einfache!) systemübergreifende User- und Gruppenverwaltung hinbekommt, die zumindest elementaren Bedürfnissen ganz gut gerecht wird.
Grundsätzlich finde ich das Opensuse-Vorgehen zur User- und Gruppenverwaltung mit YaST2 und LDAP ja für eine Basisausstattung und einfache Situationen hinreichend und clever. Aber zwei Dinge stören mich doch ganz erheblich:
- Weder aus den YaST-Masken selbst noch aus den zugehörigen Hilfeseiten ist ersichtlich, was die “Default Configuration Objects” sind und wo sie hinterlegt werden. Die Bezeichnung “LDAP Client” verführt geradezu zu der Annahme, dass auch hierbei nur Einstellungen auf dem Client vorgenommen werden – was aber offenkundig falsch ist.
- Wenn man den LDAP-Server als Backend für die User- und Gruppenverwaltung von mehreren Systemen aus verwendet, so kann man mit dem YaST”-LDAP-Client-Modul von jedem System aus die Vorgaben unter “ou=ldapconfig” auf dem zentralen Server überschreiben.
Blöderweise gilt dies auch während der initialen Konfiguration des YaST2 LDAP-Client Moduls auf einem jeden neuen System, das an den LDAP-Server angebunden werden soll. Setzt man hier versehentlich den Haken bei der Option “Create Default Configuration Objects”, so werden die bisherigen, auf dem LDAP-Server gepflegten User- und Gruppen-Konfigurationsoptionen erneut durch die Default-Einstellungen überschrieben.
Daher ist mein obiger Hinweis, diesen Haken bei der Einrichtung von “vms1” nicht zu setzen, wichtiger als man zunächst vielleicht meinen
möchte!
NSS und PAM auf dem System “vms1” und ihr Zusammenspiel mit LDAP
Weiter oben hatten wir den erfolgreichen Login eines Testusers auf “vms1” als Beleg für die richtige Konfiguration des Zusammenspiels unseres Hosts “vms1” mit dem LDAP-Server “vms2” angesehen. Für Details des Login-Vorgangs hatten wir uns dabei aber noch nicht interessiert. Unser Fokus lag auf den Konfigurationseinstellungen.
Bereits aus dem beitrag “LDAP II” wissen wir aber, dass Login-Vorgänge und zugehörige Authentifizierungsvorgänge auf aktuellen Linux-Systemen vom PAM-Mechanismus überwacht und gesteuert werden. Es ist daher an der Zeit, sich das Zusammenspiel von PAM mit LDAP auf unserem Host “vms1” etwas genauer anzusehen. In diesem Beitrag sehen wir uns einige Konfigurationsdateien an. Vertieft wird das Verständnis der Interaktion zwischen PAM auf einem Host “vms1” mit einem zentralen LDAP-Server aber vor allem im folgenden Beitrag LDAP IV.
NSS-Konfigurationsdatei für LDAP
Bereits im Beitrag LDAP II hatten wir festgestellt, dass das YaST2-Module “LDAP Client” offenbar auch Einstellungen für PAM und NSS vornimmt. Bislang hatten wir nur die Datei “/etc/ldap.conf” betrachtet. Es ist aber auch ganz lehrreich, mal einen Blick in ein paar andere NSS- und PAM-spezifische Dateien auf dem System “vms1” zu werfen.
Sehen wir als erstes in die Datei “/etc/nsswitch.conf”:
/etc/nsswitch.conf
passwd: compat
group: files ldap
hosts: files mdns4_minimal [NOTFOUND=return] dns
networks: files dns
services: files ldap
protocols: files
rpc: files
ethers: files
netmasks: files
netgroup: files ldap
publickey: files
bootparams: files
automount: files nis
aliases: files ldap
passwd_compat: ldap
Grundlegende Informationen zum Aufbau dieser Konfigurationsdatei zum NSS-Service findet man unter:
http://cims.nyu.edu/cgi-systems/man.cgi?section=4&topic=nsswitch.conf
http://serverfault.com/questions/289933/pam-nsswitch-and-ldap-configuration
http://cims.nyu.edu/cgi-systems/man.cgi?section=4&topic=passwd
Wir stellen fest, dass Opensuse bereits (vorsorglich?) für einige der eingetragenen Punkte “ldap” vorgemerkt hat, obwohl z.T. noch gar keine entsprechenden Informationen im LDAP-Baum vorhanden sind. Dadurch lassen wir uns nicht beunruhigen. Wir kümmern uns zunächst um die Einträge
- passwd: compat
- group: files ldap
- passwd_compat: ldap
Hierzu ist zu sagen, dass Opensuse – vermutlich aus Rücksichtnahme auf Installationen mit vorhandenem NIS eine ältere Variante des Zugriffs auf “ldap” hinsichtlich der Passwörter über den Parameter “passwd: compat” und ein anschließendes “passwd_compat: ldap” vornimmt.
Der NSS-Service erwartet dann in der Datei “/etc/passwd” eine Zeile der Form
+::::::
und in “/etc/shadow” eine Zeile
+
vorzufinden, was tatsächlich auch der Fall ist.
Die Platzhalter stehen für Einträge aus NIS und eben auch LDAP-Quellen.
Zur Prüfung, dass die Abfrage-Kette
- Durchsuche die Datei “/etc/passwd/” und
- gehe dann zusätzlich auf LDAP
funktioniert, bietet sich auf “vms1” das Absetzen des Befehls “getent passwd” an. Man bekommt dann alle passwd-Einträge, aber auch alle Einträge auf dem LDAP-Server aufgelistet:
vms1:~ # getent passwd
at:x:25:25:Batch jobs daemon:/var/spool/atjobs:/bin/bash
…
…
…
rmx:x:1000:100:rmx:/home/rmx:/bin/bash
rmo:*:1004:100:rmo:/home/rmo:/bin/bash
rmu:*:1005:100:rmu rmu:/home/rmu:/bin/bash
rmv:*:1006:100:rmx rmx:/home/rmv:/bin/bash
vms1:~ #
Der einzige auf dem Test-System regulär eingetragene User ist rmx, die anderen User-Einträge kommen vom LDAP-Server “vms2”.
Alternativ hätte es natürlich auch die etwas modernere Variante gegeben, in der Datei “nsswitch.conf” den LDAP-Zugriff für “passwd” zu gestalten, nämlich:
passwd: files ldap
Das funktioniert auf einem System ohne NIS genauso, nur sollte man dann auch die Platzhalterzeilen “+::::::” bzw. “+” in “/etc/passwd” bzw. “/etc/shadow” eliminieren. Das mag jeder mal selbst ausprobieren.
Interessant ist, dass Opensuse im Gegensatz zu früheren Veröffentlichungen
http://www.pks.mpg.de/~mueller/docs/suse10.0/suselinux-manual_de/manual/sec.ldap.yast.client.html
oder
http://www.linuxtopia.org/online_books/suse_linux_guides/SLES10/suse_enterprise_linux_server_installation_admin/sec_ldap_yast_client.html)
für die Gruppen einen analoge “compat”-Politik nicht mehr verfolgt. Hier wird das modernere Verfahren eingesetzt.
In professionellen Umgebungen mit vielen hundert Usern würde es laufend entsprechend viele Netzwerkzugriffe auf den LDAP-Server geben. Um das zu vermeiden, sollte man auf den Systemen den Daemon für den sog. “Name Service Cache”-Service – kurz “NSCD” – starten. Unter Opensuse ist das vorkonfiguriert. Die zugehörige Konfigurationsdatei findet man auf “vms1” unter “/etc/nscd.conf”. Ob der Dienst läuft, kann man mit “rcnscd status” prüfen.
PAM-Konfigurationsdateien für LDAP auf “vms1”
Wir setzen nachfolgend ein Grundverständnis von PAM voraus. Eine erste Übersicht gibt
http://www.comptechdoc.org/os/linux/howlinuxworks/linux_hlpam.html
Einen instruktiven Foliensatz findet man unter
http://www.linuxcampus.net/component/remository/func-startdown/56/?Itemid=186
Für PAM allgemein und für die PAM-Konfiguration zu SSHD findet man erste Übersichtsinformationen unter
http://www.mpipks-dresden.mpg.de/~mueller/docs/suse10.0/suselinux-manual_de/manual/cha.pam.html
Details zu einigen PAM-Modulen entnimmt man dem “Linux-PAM System Administrators’ Guide”
http://webapp5.rrz.uni-hamburg.de/SuSe-Dokumentation/packages/pam/pdf/Linux-PAM_SAG.pdf
Die wichtigsten PAM-Konfigurationsdateien für sicherheitsrelevante Services findet man im Verzeichnis “/etc/pam.d”. Welche dieser Konfigurationsdateien enthalten Einträge bzgl. LDAP?
Unter Opensuse werden einige zentrale Dateien in die Konfigurationsdateien der einzelnen sicherheitsrelevanter Services inkludiert. Diese zentralen Dateien (meist als Link auf eine weitere Datei ausgelegt) sind die folgenden:
- /etc/pam.d/common-auth
- /etc/pam.d/common-account
- /etc/pam.d/common-password
- /etc/pam.d/common-session
Uns verwundert es daher nicht, dass LDAP-Module genau in diesen Dateien aufgerufen werden:
vms1:~ # grep -d recurse ldap /etc/pam.d/
/etc/pam.d/common-auth:auth required pam_ldap.so use_first_pass
/etc/pam.d/common-auth-pc:auth required pam_ldap.so use_first_pass
/etc/pam.d/common-account-pc:account required pam_ldap.so use_first_pass
/etc/pam.d/common-password-pc:password required pam_ldap.so try_first_pass use_authtok
/etc/pam.d/common-password:password required pam_ldap.so try_first_pass use_authtok
/etc/pam.d/common-session-pc:session optional pam_ldap.so
/etc/pam.d/common-session:session optional pam_ldap.so
/etc/pam.d/common-account:account required pam_ldap.so use_first_pass
vms1:~ #
Hier wird also an verschiedenen Stellen auf die Shared Object Library “pam_ldap.so” zurückgegriffen, die offenbar die erforderlichen Abfragen und die Kommunikation mit dem LDAP-System (auf Basis der “/etc/ldap.conf”-Regeln) für PAM erledigt. Wir halten fest:
Das PAM-Modul “pam_ldap.so” ist entscheidend für die zentrale LDAP-basierte Authentifizierung und Autorisierung eines Users, der sich auf einem Host (hier “vms1”) unseres Netzwerks einloggen will und der über das LDAP-Verzeichnis verwaltet wird.
Ich komme darauf gleich noch einmal detaillierter zurück. Es ist jedenfalls kaum überraschend, dass die oben genannten PAM-Dateien des Opensuse-Systems unter “/etc/pam.d/” u.a. in den PAM-Konfigurationsdateien für die Kontrolle des gewöhnlichen Login-Mechanismus (/etc/pam.d/login) oder einer SSH-verbindung (/etc/pam.d/sshd) benutzt werden.
Wir betrachten auf unserem Clientsystem als Beispiel mal die Datei “/etc/pam.d/login”:
/etc/pam.d/login
#%PAM-1.0
auth requisite pam_nologin.so
auth [user_unknown=ignore success=ok ignore=ignore auth_err=die default=bad] pam_securetty.so
auth include common-auth
account include common-account
password include common-password
session required pam_loginuid.so
session include common-session
session optional pam_lastlog.so nowtmp showfailed
session optional pam_mail.so standard
session optional pam_ck_connector.so
Opensuse wartet hier nicht mit besonderen Überraschungen auf. Eine kurze, prägnante Erklärung zum Aufbau einer PAM-Konfigurationsdatei für den Login-Mechanismus bietet etwa
http://www.selflinux.de/selflinux/html/grundlagen_sicherheit05.html
Man erkennt in unser Datei sofort Elemente der im gerade genannten Link beschriebenen Struktur wieder:
Zuerst wird überprüft, ob die Datei “/etc/nologin” existiert und nur root Zugang zum System haben darf. Danach wird der Root-Zugang über sichere TTYs geregelt. Anschließend wird die Authentizität des Users anhand seiner Credentials überprüft – dies geschieht durch die Elemente der Datei “common-auth”. Diese steuert die Abfolge möglicher Authentifizierungsvorgänge:
/etc/pam.d/common-auth
auth required pam_env.so
auth optional pam_gnome_keyring.so
auth sufficient pam_unix2.so
auth required pam_ldap.so use_first_pass
Man erkennt hier, dass eine Anfrage an des LDAP-System gestartet wird, falls eine lokale Prüfung durch das “pam_unix2”-Modul nicht erfolgreich ist (Check Anmeldename und Passwort gegen “/etc/passwd” und “/etc/shadow”). Durch “use_first_pass” ist dafür gesorgt, dass das bereits eingegebene Password an das LDAP-Modul weitergereicht und nicht neu beim User abgefragt wird.
Was genau macht nun eigentlich das zentrale Modul “pam_ldap.so” für uns bei seiner Interaktion mit dem LDAP-Server ?
Wir zitieren hierzu aus der Quelle http://linux.die.net/man/5/pam_ldap, die das sehr prägnant beschreibt:
When authenticating or authorizing a user, pam_ldap first maps the user's login name to a distinguished name by searching the directory server. This must be possible using the local system's identity, specified in pam_ldap.conf. (Note that presently only simple authentication is supported for authenticating in this initial step.)
To authenticate a user, pam_ldap attempts to bind to the directory server using the distinguished name of the user (retrieved previously). Both simple and SASL authentication mechanisms are supported; in the former case, one should take care to use transport security to prevent the user's password being transmitted in the clear.
Hier lohnt es sich, ein wenig tiefer über den zweiten Satz (“This must be possible …”) nachzudenken. Ich überlasse es dem Leser herauszufinden,
- warum das Durchsuchen des LDAP-Baumes erlaubt ist
- und unter welcher Identität sich PAM initial für den ersten Schritt am LDAP-Server anmeldet
Der erste Punkt hat damit zu tun, welche Zugriffsrechte bzgl. der Zweige des LDAP-Baums gesetzt wurden. Bislang haben wir uns darum nicht explizit gekümmert. YaST2 hat uns während der früheren Schritte entsprechende Festlegungen abgenommen. Leser, die hier mehr wissen wollen, sollten sich nun z.B. unter folgenden Adressen zur Vergabe von Zugriffsrechten auf einem LDAP-Server kundig machn:
http://www.openldap.org/doc/admin24/access-control.html
http://www.mpipks-dresden.mpg.de/~mueller/docs/suse10.3/opensuse-manual_de/manual/sec.ldap.slapd.html
www.linux-info-tag.de/62/image/LDAP.pdf
Danach lohnt sich ein Blick in die Server-Konfigurationsdatei
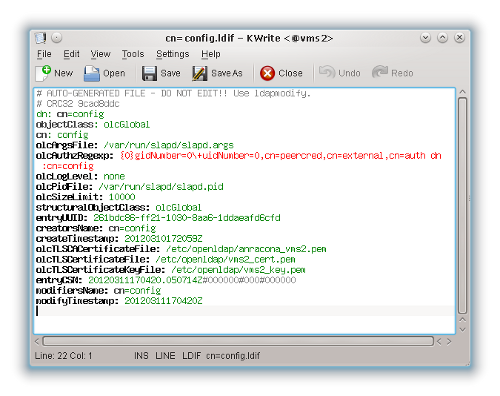
/etc/openldap/slapd.d/cn=config/olcDatabase={-1}frontend.ldif
Dort findet man die Rechte, die von YaST2 bei der Serverkonfiguration und bei der Einrichtung der Userverwaltung gesetzt wurden.
Bzgl. des zweiten Punktes ist erstens ein Blick auf einige bisher von uns nicht beachtete
Einträge der PAM-relevanten Datei “/etc/ldap.conf” interessant. Wir zitieren wieder nach http://linux.die.net/man/5/pam_ldap:
binddn
Specifies the distinguished name with which to bind to the directory server(s). This option is optional; the default is to bind anonymously.
bindpw
Specifies the cleartext credentials with which to bind. This option is only applicable when used with binddn above. The default is no credential (anonymous bind). When binding to the directory using SASL or other authentication mechanisms apart from simple binds, this option is not used.
rootbinddn
This option has the same syntax and effect as the binddn option above, except it applies when the effective user ID is zero. If not specified, then the identity specified in binddn is used instead. Because the configuration file may be readable by many users, the root bind DN credentials are stored in the pam_ldap.secret file instead. This file is usually in the same directory as the configuration file.
Nun kann man sich mal genauer ansehen, was YaST2 hier z.B. auf dem Host “vms1” für Eintragungen vorgenommen hat.
Die Aussagen zum zweiten Schritt dessen, was “pam_ldap.so” macht, sind jedenfalls klar. Die Authentifizierung erfolgt über einen erfolgreich durchgeführten Bind. Bzgl. des Hinweises zur Verbindungsabsicherung haben wir durch unsere TLS-Konfiguration bereits hinreichende Vorkehrungen getroffen.
Nachdem wir das Prinzip einer User-Authentifizierung duch und am LDAP-Server nun verstanden haben, wenden wir uns wieder dem Ablauf der PAM-Kontrolle eines Login-Vorgangs zu:
Im nächsten Schritt werden gemäß der Datei “/etc/pam.d/login” Zugangsberechtigungen untersucht, die mit dem Account zusammenhängen – u.a., ob keine Zeitbeschränkungen des Accounts verletzt sind. Die Schlüsselfrage ist: “Gibt es diesen Benutzer im System und darf er sich anmelden?” Ein Blick in “common-account” zeigt auch hier die Abfrage des LDAP-Systems an:
/etc/pam.d/common-account
account requisite pam_unix2.so
account sufficient pam_localuser.so
account required pam_ldap.so use_first_pass
Damit die erste Bedingung erfüllt wird, müssen die weiter oben erläuterten Verweis-Einträge im NIS-Format in den Dateien “/etc/passwd” und “/etc/shadow” vorhanden sein !
LDAP ist im Zusammenhang mit der Account-Prüfung auch aus folgendem Grund interessant:
The pam_ldap module provides the ability to specify a list of hosts a user is allowed to log into, in the "host" attribute in LDAP. The host attribute can be specified multiple times for each user. If any of the entries match the hostname (of the machine logging in to), login is succesful. Otherwise, login is denied.

This feature is enabled by specifying pam_check_host_attr yes in /etc/pam_ldap.conf. When it is enabled, the account facility of pam_ldap will perform the checks and return an error when no proper host attribute is present.
Zitiert nach: https://wiki.debian.org/LDAP/PAM
Das “pam_ldap.so”-Modul kann also untersuchen, ob im LDAP-System eingetragene User bestimmten Hosts zugeordnet sind. Hierdurch kann der Zugriff auf bestimmte Hosts verhindert werden. Mit diesem sicherheitsrelevanten Thema werden wir uns im Beitrag “LDAP – V” genauer befassen.
Im Anschluss an PAM’s account- und Berechtigungs-Prüfungen kommen Bedingungen an Passwörter zu tragen, die dann von Bedeutung sind, wenn ein User im Login-Vorgang zur Änderung des Passworts gezwungen ist. Das genaue Studium und die Analyse der Bedingungen in “common-password” überlassen wir dem interessierten Leser.
/etc/pam.d/common-acount
password requisite pam_cracklib.so minlen=8
password optional pam_gnome_keyring.so use_authtok
password sufficient pam_unix2.so use_authtok nullok
password required pam_ldap.so try_first_pass use_authtok
Die “Session”-Bedingungen sorgen für eine ordnungsgemäße Sitzungsabwicklung. Hier ein Auszug
session optional pam_mkhomedir.so
session required pam_limits.so
session required pam_unix2.so
session optional pam_ldap.so
session optional pam_umask.so
session optional pam_systemd.so
Wir erkennen an den Namen der Module bereits Aufgaben der involvierten Module:
- Falls erforderlich kümmert sich zunächst “pam_mkhomedir.so” beim Login eines neuen Users um die Erzeugung eines Home-Dirs (oder aber um die Umlenkung auf ein Ersatz-Verzeichnis).
- Pam_unix2 protokolliert in den Logfiles nicht nur den Beginn einer Sitzung, sondern auch deren Ende.
- Das Modul “limits.so” begrenzt Systemressourcen-Anforderungen, u.a. Hauptspeicherbedarf, CPU-Zeit, Prozesse und Dateien für einzelne Benutzer bzw. Benutzergruppen.
- Danach werden LDAP-Einträge für Session-Bedingungen abgefragt. Diese Abfrage ist im Gegensatz zu anderen PAM-Bedingungen jedoch optional – das Ergebnis verhindert den Erfolg eines Einloggens in keinem Fall.
- Es folgen die Prüfung von umask-Regeln und unter Opensuse neuerdings auch von systemd-Regeln.
Hinweis: User- oder gruppen-spezifische Limit-Einstellungen können in der Konfigurationsdatei “/etc/security/limits.conf” vorgenommen werden. Systemweite Limit-Konfigurationen erfolgen unter Opensuse unter “/etc/sysconfig/ulimit” (s. auch: https://build.opensuse.org/package/show?package=ulimit&project=openSUSE%3A12.1).
Ich denke, der Leser hat nun ein gewisses Gefühl dafür bekommen, dass und in welcher Form PAM und LDAP ineinander greifen. Bei Opensuse ist das Ganze (vernünftigerweise?) so organisiert, dass bestimmte erfolgreiche lokale Authentifizierungsprüfungen in der Regel hinreichend sind. Erst im negativen Fall wird auf die LDAP-Einträge zur Auth- und Account-Prüfung ausgewichen. Entsprechend Anfragen müssen dann aber auch zu einem positiven Ergebnis führen. Bzgl. der Login-Session-Handhabung sind LDAP-Einträge nur optional.
Zu beachten ist, dass es in der PAM-Konfiguration, die die YaST2-Module standardmäßig vornehmen, keine einzige “sufficient”-Bedingung im Zshg. mit LDAP-Anfragen gibt.
Nun kann man ja versucht sein, den Ergebnissen von LDAP-Abfragen ein höheres Gewicht zu geben als lokalen Bedingungen. Dies führt typischerweise zu Experimenten, bei denen man die Reihenfolge der PAM-Bedingungen für LDAP-Abfragen und lokale Abfragen umstellt.
Warnung:
Hierbei muss man wirklich genau wissen, was man tut. Im besonderen sind dann auch Kriterien wie “use_first_pass” und “use_authtok” nicht mehr unbedingt in der Zeile zum LDAP-Modul sondern bei den nachfolgenden PAM-Bedingungen
anzugeben. Generell gilt, dass ein unvorsichtiges Vorgehen bei der PAM-Konfiguration zu erheblichen Schwierigkeiten bzgl. des Systemzugangs führen kann. Also seid bitte vorsichtig und experimentiert bzgl. PAM nicht an Produktivsystemen herum!
Ich persönlich finde übrigens an der Politik von Opensuse, lokalen Kriterien den Vorrang zu geben, nicht viel auszusetzen.
Wer LDAP-Abfragen dennoch den Vorrang geben will, sollte sich unbedingt die von PADL vorgeschlagenen Standard-Konfigurationen für PAM ansehen
http://oss.sgi.com/LDP/HOWTO/LDAP-Implementation-HOWTO/pamnss.html ,
gründlich analysieren und sich fragen, ob und wie das zum eigenen System passt.
Weniger gefährlich sind entsprechende Tests für die Einstellungen zu SSH in der Datei “/etc/pam.d/sshd”. Siehe hierzu:
(http://quark.humbug.org.au/publications/ldap/system_auth/sage-au/system_auth.html
oder
http://www.linuxlaboratory.org/articles/linux-ldap-client/
Wir haben uns durch die obigen Betrachtungen folgendes Verständnis der User-Authentifzierung während eines Login-Vorgangs auf einem Linux-Host erarbeitet, der mit einem LDAP-Srrver zusammenarbeitet:
- Auf dem Host überwacht PAM auf Basis der vorgegebenen PAM-Konfiguration User-Login-Vorgänge und autorisiert diese gemäß lokaler Authentifizierungskriterien oder aber über LDAP-Einträge.
- Zur Abfrage des LDAP-Servers setzt PAM u.a. das Modul “pam_ldap.so” ein.
- Auf dem LDAP-Server wird bei entsprechenden Anfragen ein Bind-Versuch mit den User-Credentials (UID, Password) vorgenommen.
- Der Erfolg des LDAP-Binds entscheidet über den Erfolg des Logins auf dem anfragenden Host (soweit nicht noch weitere Kriterien abgefragt werden).
Der letzte Satz ist wiederum einer weitergehenden Überlegung wert: Ohne den Zusatz in Klammern würde er nämlich im Kern nichts anderes bedeuten, als dass die Authentifizierung durch einen LDAP-Bind der Autorisierung eines Zugangs zu jedem Host im Netzwerk gleichkäme, wenn dieser Host für eine PAM-basierte LDAP-Authentifizierung konfiguriert wäre.
Zusammenfassung und offene Punkte
Wir haben in diesem Beitrag gesehen, wie wir ein anderes System (hier einen Host “vms1”) an den zentralen LDAP-Server eines Netzwerkes anbinden können. Wir haben die Verbindung ferner mit TLS abgesichert. Ferner haben wir uns damit befasst, in welcher Form Opensuse auf dem LDAP-Server templateartige Vorgaben zur Anlage von Usern und Gruppen hinterlegt und wie man diese Vorgaben verändert.
Ergänzend haben wir uns über die entsprechenden Konfigurationsdateien auf dem Testsystem ein paar Hinweise dazu geholt, wie das Zusammenwirken von NSS, PAM mit LDAP durch die von YaST2 automatisch vorgenommenen Einstellungen konfiguriert wird. Der Zugriff auf relevanten Konfigurationsdateien ermöglicht uns künftig eine direkte Einstellung von wichtigen Parametern – auch ohne YaST2.
Im Ergebnis können wir nun mehrere Clientsysteme mit dem LDAP-Server TLS-gesichert verbinden und von jedem Client aus (per YaST2) neue User für die Benutzung des jeweiligen Clients anlegen. Ein User, der sich danach auf einem System des Netzwerks einloggen will, kann über das zentrale LDAP-System und PAM-gesteuerte Bind-Versuche zum LDAP-Verzeichnis authentifiziert werden. Die entsprechende Kommunikation läuft ebenfalls TLS-gesichert ab. Damit haben wir einen wichtigen Schritt in Richtung auf eine zentrale Authentifizierungs-Infrastruktur in einem Opensuse-Netzwerk hinter uns gebracht.
Leider haben wir dabei aber immer noch nicht alle Grundlagen für eine wirklich tragfähige zentrale, LDAP-basierte Authentifizierungs- und Autorisierungs-Struktur für ein Netzwerk geschaffen. Folgende sicherheitskritische Fragen sind bislang nämlich offen geblieben und sollten von einem verantwortungsbewußten Admin untersucht werden:
- Wie kann ich unter Opensuse auf dem LDAP-Server eine zentrale Passwort-Politik hinterlegen, die für alle LDAP-User gleichermaßen gelten soll?
- Können sich eigentlich User, die man von bestimmten Clientsystemen aus auf dem LDAP-Server (hier “vms2”) angelegt hat, auch auf dem Server “vms2” selbst einloggen? Oder auf anderen Host-Systemen, die an den LDAP-Server angebunden sind? Per grafischer Oberfläche oder am Login-Prompt oder per ssh ? Ist ein Login möglich, selbst wenn auf dem System kein Home-Verzeichnis angelegt wurde?
- Wie schütze ich ggf. den LDAP-Server oder auch andere Host-Systeme gegen den Zugriff von x-beliebigen Usern, die wir im LDAP-Verzeichnis per YaST2 von irgendeinem bestimmten Client-System aus angelegt haben ? Wie begrenze ich den Zugriff eines im LDAP erfassten Users oder einer Gruppe auf bestimmte Hosts? Wie realisiere ich mit LDAP eine user- und host-spezifische Zugangs-Autorisierung?
Auf diese Fragen bieten die nächsten beiden Beiträge LDAP IV und LDAP V aus der LDAP-Reihe dieses Blogs eine Antwort. Und dabei werden wir auch die Grenzen der Bordmittel von YaST2 zur Konfiguration des LDAP-Servers und zur Verwaltung der User und Hosts erkennen.