After my retirement I was overwhelmed by a lot of typical German bureaucracy. But last weekend I used some time to start the long overdue upgrade of my old laptop from Opensuse Leap 15.3 to Leap 15.4. (The support for Leap 15.3 ended the at the end of 2022.)
I am always a bit afraid of upgrading my old laptop. It has a somewhat complicated configuration:
Its LVM volumes are fully encrypted with LUKS 2. It is an Optimus-System – and in the past it was not always easy to switch from the integrated Intel graphics card to the dedicated Nvidia card. Instead of Bumblebee I have used Opensuse’s Prime-Select with Leap 15.3. I use KDE as my graphical desktop environment. On Leap 15.3 I did not yet apply Wayland – but I intend to switch to Wayland with Leap 15.4. For some of my activities I also use Blender with full OpenGL support in form of a Flatpack installation. Furthermore, the laptop is used for both Machine learning, i.e. Python development, as well Web-development based on LAMP. So, it hosts a variety of services you normally find on servers. In addition we have KVM and VMware WS Pro installations. So, there are a lot of things which can go wrong. The Nvidia card is also an old one – a GT 645M which cannot be run with the latest generation of Nvidia drivers.
The good message is: The upgrade from leap 15.3 to 15.4 went very smoothly. At least regarding the things I was interested in. Below I describe the steps I have taken to upgrade. With some modifications you should be able to adapt it to your situation.
Backup of the encrypted LVM volume mounted on “/”
On my desktop PCs with Opensuse-installations, which I use for daily work, I follow a two-fold “backup”-policy ahead of upgrades: I copy my root-volume/partition to another LVM-volume or partition, and make it bootable in parallel to the existing installation. Reason: I want to be able to quickly switch to my present installation in case of trouble. As I have all of my personal and project data on separate LVM volumes with dedicated backups, the root-volume is the only one which I really must take care of. Therefore, I also copy it to a backup file on an external disk. For all data volumes I have a separate backup routine.
On my laptop I am a bit more relaxed: I just copy the volume mounted on “/” to an external disk. I have no second bootable installation on some other encrypted volume on the laptop. This means that I must boot a Live system or a Rescue system to make a backup of the unmounted “/”-volume.
For my purposes the Leap 15.3 “Rescue System”, which you can find on an DVD-ISO-image for the installation of Leap 15.3, was sufficient. You get the ISO image for such a DVD from opensuse.org and can burn it onto a DVD. The steps afterward were as follows:
- Boot your Leap 15.3 system. Check, on which partition or LVM volume your (encrypted) root-filesystem resides. Use e.g. YaST’s partitioner or gparted for this purpose. Shut down.
- Insert the DVD, select a boot menu, select the DVD, start from it, select “More …” in the GRUB-like menu, then select the DVD with the “Rescue System” and boot it.
- Login as root (no password required). Check that a tmpfs is mounted on / – and not some real partition.
Note: The root-filesystem of our Leap-installation is NOT mounted on “/” of the rescue system. When I speak of the “root-filesystem” below I always refer to the filesystem containing the operative system of our current Leap 15.3 installation and not the root-fs of the rescue system. - Check with command blkid what the device names of all accessible partitions and LVM volumes are. You should see encrypted and other volumes/partitions of your laptop disks/SSDs there.
- Plugin an external backup USB-disk. blkid should now also show the partitions on this disk, too.
- Mount the target filesystem of the external disk, where you want to place your backup, onto “/mnt” in your booted rescue system. Check the available space. In my case (with sdc being the external disk) :
tty1:rescue:~ # mount /dev/sdc2 /mnt
tty1:rescue:~ # df -h
..
/dev/sdc2     825G   78G   706G     10%   /mnt
...
- Locate your Leap 15.3 root-filesystem. In my case the root-filesystem of the laptop is an LUKS2-encrypted LVM available as “/dev/mapper/vgb-lvb2”. Note: You must know in advance, i.e. from your Leap 15.3 setup, where your root-filesystem resides.
- We now use the command “dd” to copy the root-filesystem onto a restorable image file. In my case:
dd status=progress if=/dev/mapper/vgb-lvb2 of=/mnt/root_lap.img
After the backup of the (encrypted) root-fs of our Leap 15.3 installation we shut down the rescue system, remove the DVD and boot Leap 15.3 again.
Check your RPM repositories – refresh and update
On the rebooted Leap 15.3 we check what we have of active repositories. In my case these were quite many:
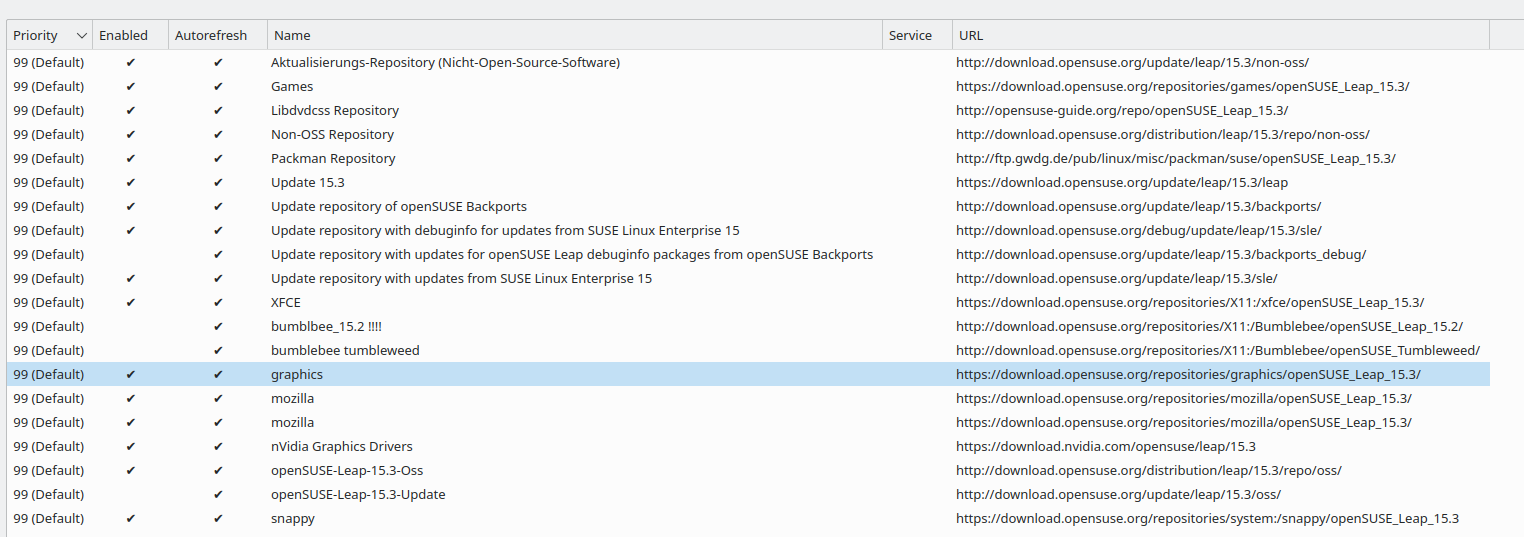
(Ignore the double “mozilla” entry.)
Recommendation: You should make a similar screenshot and save it somewhere outside your laptop to later be able to restore all of the different repositories for Leap 15.4.
However, the most important repositories required to perform the upgrade are three update repositories:
- One with renewed RPMs for the OSS,
- one for Backports (backportet RPMs, e.g. security RPMS backportet from newer kernel or glibc related versions than the presently available versions on Opensuse Leap/SLES)
- and one for renewed RPMs for the SLES version corresponding to the current Leap.
Update-repositories contain the latest RPMs of an Opensuse distribution. In our upgrade process we still deal with relevant update repositories for Leap 15.3. But we are soon going to exchange them with their Leap 15.4 counterparts.
Look out for the URLs of the current update repositories :
 * https://download.opensuse.org/update/leap/15.3/oss/
 * https://download.opensuse.org/<br>update/leap/15.3/backports/
 * https://download.opensuse.org/<br>update/leap/15.3/sle/ repo-sle-update
Leap 15.3 and 15.4 RPMs are binary compatible to those for the related SLES versions. In my case I had switched most of my Leap 15.3 RPMs to those of the update repo of SLES already a long time ago. If you have not done this yet you should do so now with the help of YaST.
I also directly deleted the repository for games as I regard it unimportant during an Upgrade.
Now, we refresh the lists of available RPMs and update to the latest versions. You can use the graphical YaST2 for this purpose or the command line:
mytuxlap:~ # zypper refresh
Then we perform an update of our Leap 15.3 RPMs to the latest available versions:
mytuxlap:~ # zypper update
In my case some of my Leap 15.3 repositories (for games, graphics, xfce and for snappy) were no longer available and could not be refreshed. I just had waited too long with my upgrade. But this resulted in no major problems during the upgrade.
After the update reboot and verify that your Leap 15.3 system still works.
Change repository URLs to contain the ${releasever} instead of an explicit version number
We change the URLs of our repositories now to contain ${releasever} instead of an explicit “15.3” in the URLs. It is easy to do this on the command line:
mytuxlap:~ # sed -i 's/15.3/${releasever}/g' /etc/zypp/repos.d/*.repo
mytuxlap:~ # sed -i 's/$releasever/${releasever}/g' /etc/zypp/repos.d/*.repo
The second command is just for being on the save side of the shell interpreter. I had previously already changed some of the repo URLs to include $releasever, but I want everything to consistently use ${releasever}.
Refresh for Leap 15.4 repository content – and eliminate some repositories
Next we start switching to the repositories for Leap 15.4. The first step is a refresh on the command line, but now for the Leap 15.4 repos. We can do this with the help of the variable ${releasever} in the following form:
mytuxlap:~ # zypper --releasever=15.4 refresh
Note that this does not yet change our repositories themselves, yet, but just the local content information. It gets replaced by lists about the contents of the Leap 15.4 repositories.
In my case this refresh process lead to errors. The reason was that some of the repositories which I used on Leap 15.3 had got a different path structure of the respective web resource below “download.opensuse.org/” for Leap 15.4. You have to ask the Opensuse people why they changed this.
mytuxlap:~ # zypper --releasever=15.4 refresh
Warning: Enforced setting: $releasever=15.4
Retrieving repository 'nVidia Graphics Drivers' metadata ...........................................[done]
Building repository 'nVidia Graphics Drivers' cache ................................................[done]
Retrieving repository 'Packman Repository' metadata ................................................[done]
Building repository 'Packman Repository' cache .....................................................[done]
Retrieving repository 'Update 15.4' metadata .......................................................[done]
Building repository 'Update 15.4' cache..... .......................................................[done]
Retrieving repository 'graphics' metadata .........................................................[error]
Repository 'graphics' is invalid.
[openSUSE_Leap_${releasever}_1|https://download.opensuse.org/repositories/graphics/openSUSE_Leap_15.4/] Valid metadata not found at specified URL
History:
 - [openSUSE_Leap_${releasever}_1|https://download.opensuse.org/repositories/graphics/openSUSE_Leap_15.4/] Repository type can't be determined.

Please check if the URIs defined for this repository are pointing to a valid repository.
Skipping repository 'graphics' because of the above error.
Retrieving repository 'mozilla' metadata ...........................................................[done]
Building repository 'mozilla' cache ................................................................[done]
Retrieving repository 'XFCE' metadata .............................................................[error]
Repository 'XFCE' is invalid.
[openSUSE_Leap_${releasever}_3|https://download.opensuse.org/repositories/X11:/xfce/openSUSE_Leap_15.4/] Valid metadata not found at specified URL
History:
 - [openSUSE_Leap_${releasever}_3|https://download.opensuse.org/repositories/X11:/xfce/openSUSE_Leap_15.4/] Repository type can't be determined.

Please check if the URIs defined for this repository are pointing to a valid repository.
Skipping repository 'XFCE' because of the above error.
Retrieving repository 'Libdvdcss Repository' metadata ..............................................[done]
Building repository 'Libdvdcss Repository' cache ...................................................[done]
Retrieving repository 'Update repository of openSUSE Backports' metadata ...........................[done]
Building repository 'Update repository of openSUSE Backports' cache ................................[done]
Retrieving repository 'Non-OSS Repository' metadata ................................................[done]
Building repository 'Non-OSS Repository' cache .....................................................[done]
Retrieving repository 'openSUSE-Leap-15.4-Oss' metadata ............................................[done]
Building repository 'openSUSE-Leap-15.4-Oss' cache .................................................[done]
Retrieving repository 'Update repository with updates from SUSE Linux Enterprise 15' metadata ......[done]
Building repository 'Update repository with updates from SUSE Linux Enterprise 15' cache ...........[done]
Retrieving repository 'Aktualisierungs-Repository (Nicht-Open-Source-Software)' metadata ...........[done]
Building repository 'Aktualisierungs-Repository (Nicht-Open-Source-Software)' cache ................[done]
Retrieving repository 'snappy' metadata ............................................................[done]
Building repository 'snappy' cache .................................................................[done]
Some of the repositories have not been refreshed because of an error.
Then I changed again to the repository administration of YaST and simply deleted the problematic repos. We will care for their new URL later.
Note: The fact that we may have RPMs from missing repos during the upgrade is later on compensated by allowing for a “vendor change” – which means a repository change. See below.
After having eliminated problematic repos we get a successful refresh for the contents of remaining 15.4 repositories on the command line:
mytuxlap:~ # zypper --releasever=15.4 refresh
Warning: Enforced setting: $releasever=15.4
Repository 'nVidia Graphics Drivers' is up to date.
Repository 'Packman Repository' is up to date.
Repository 'mozilla' is up to date.
Repository 'Libdvdcss Repository' is up to date.
Repository 'Update repository of openSUSE Backports' is up to date.
Repository 'Non-OSS Repository' is up to date.
Repository 'openSUSE-Leap-15.4-Oss' is up to date.
Repository 'Update repository with updates from SUSE Linux Enterprise 15' is up to date.
Repository 'Aktualisierungs-Repository (Nicht-Open-Source-Software)' is up to date.
Repository 'snappy' is up to date.
All repositories have been refreshed.
Download of the RPMs without applying them, yet
The next step is to download the RPMs from the Leap 15.4 repos and save them in a cache for the later upgrade process. On a TTY or a root terminal window
mytuxlap:~ # zypper --releasever=15.4 dup --download-only --allow-vendor-change
The option “–download-only” avoids the installation of the new 15.4 RPMs. Also note the option “–allow-vendor-change”: If a RPM cannot be replaced a substitute from other major repositories will be used – if one is found.
Agree to the RPM setup displayed and the license conditions. Some 5 to 10 minutes later, after having downloaded everything, we must deactivate the graphical desktop.
Perform the Upgrade on an ASCII terminal (TTY)
On a system with both an integrated Intel card and a dedicated Nvidia card you may first want to decide which card driver you want to be loaded during the upgrade. You may use the Prime-Select Applet of Opensuse to switch to Intel on your desktop. Then logout and login again and check whether the Nvidia driver is no longer active.
Personally, I just kept the Nvidia card and the respective driver running. The resulting small problems were easy to overcome; see below.
mytuxlap:~ # lsmod | grep nvidia
nvidia_drm             69632  5
nvidia_modeset       1204224  6 nvidia_drm
nvidia              35512320  281 nvidia_modeset
drm_kms_helper        303104  2 nvidia_drm,i915
drm                   634880  10 drm_kms_helper,nvidia,nvidia_drm,i915,ttm
mytuxlap:~ #
Important: Logout now of the graphical desktop to perform the Upgrade.
Move to an ASCII terminal (e.g. via Ctrl-Alt F1). There login as root. Type in “init 3” to stop your running X- or Wayland server. And then start the real upgrade and the respective rpm installation via “zypper –no-refresh –releasever=15.4 dup –allow-vendor-change” :
mytuxlap:~ # init 3
mytuxlap:~ # zypper --no-refresh --releasever=15.4 dup --allow-vendor-change
You must again confirm the RPM configuration and the license conditions. Depending on your previous configuration several thousands of packages will then be installed the next 10 minutes or so from the preloaded and cached RPMs.
After all required RPMs have been installed just reboot by typing “init 6” on the command line.
My Leap 15.4 situation after reboot
In may case the systems behavior after reboot was a bit strange.
The good news is:
I experienced no problems with LUKS 2, grub2, initramfs and the second phase of the startup during which all of my other LUKS2-encrypted LVM volumes were decrypted, checked and mounted.
Off topic: Leap uses initramfs, but stores it at /boot/initrd.
The whole startup process worked like before: I get asked for the LUKS2 decryption key directly after starting the boot process, then the graphical grub2 menu comes up and I can start the primary phase of the boot process based on initramfs. In my installation, due to security precautions, I was asked to provide the decryption key once again before the second boot phase on the real root-filesystem started. (Off topic: There are configuration tricks to circumvent the 2nd request for the LuKS2 key, but my personal opinion is that the asking a second time enhances security a bit. I cannot go into the related details of a LUKS 2 configuration here.)
The bad news is:
The behavior of the Optimus environment was not consistent. Although the Nvidia RPMs had been shifted to those from the Nvidia community repository for Leap 15.4 after the reboot the Intel i915 was loaded – and I did not manage to activate the Nvidia driver. Also bbswitch interfered with my trials and shut down the Nvidia card:
The warm reboot directly after the upgrade seemed to work without major error messages (with the exception of an expected VMware related error; see below). The startup process eventually led to graphical login screen of sddm.
After login the applet for Prime-Select told me that Nvidia was active.
However, after shutting the laptop down completely and starting it via a cold boot I saw that the laptop’s LED signalling the activation of Nvidia was off (more precise showing a blue instead a red color). The Intel driver i915 was loaded with the start of the sddm login screen. Afterward the X11-KDE/Plasma combination actually worked perfectly with it. As did the combination Wayland and KDE Plasma; see below.
But at least for work with Blender I do need an active Nvidia card on the desktop. So, how to get it running?
Optimus – and a small problem with the Nvidia card
When I turned to a TTY and issued “init 3” I, actually, could activate the NVidia card via
mytuxlap:~ # tee /proc/acpi/bbswitch <<< ON
And I also could load the Nvidia driver by
mytuxlap:~ # modprobe nvidia
In addition
mytuxlap:~ # prime-select nvidia
seemed to be accepted by the system.
However, when I afterward wanted to start the graphical desktop again via “init 5” I experienced that the Nvidia card was directly deactivated and that the Nvidia driver, therefore, could not work or be reloaded.
What a stupid situation! Obviously, the configuration of bbswitch had not been aligned correctly with prime-select and Nvidia during Upgrade.
Solution
In the end the solution was simple: I turned to a TTY, issued “init 3”, activated the Nvidia card, loaded the present driver and used the ASCII version of YaST (not graphical yast2) to reinstall (= update unconditionally) the Nvidia drivers from the Nvidia repository
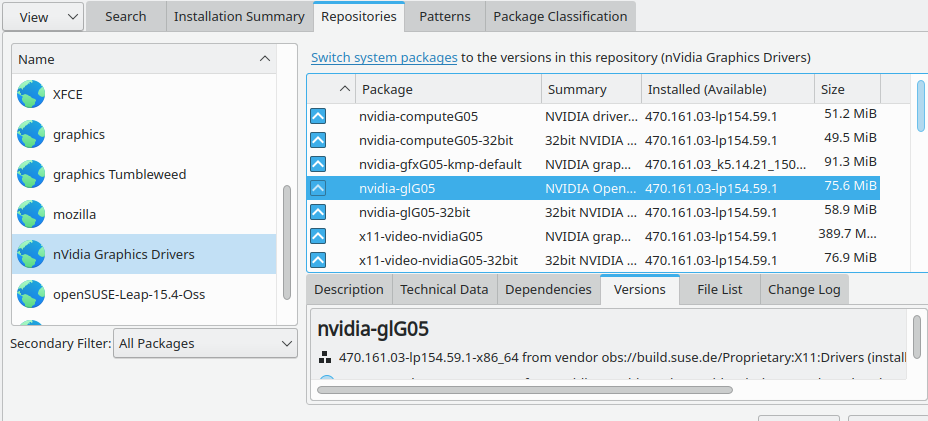
I had to pick the G05-drivers as my graphics card is rather old. Note that the driver version 470 is also relatively old and has been reported to have some problems with the display manager Wayland.
After reboot everything then already worked as expected:
The Nvidia card was activated from the start and used for the graphical desktop afterwards. And I could use the Prime-Select Applet to switch to the Intel Driver with a subsequent logout from the KDE desktop and then a re-login. With Intel the Nvidia card got deactivated – which is very reasonable as it reduces the power consumption and heat generation of the laptop.
You may also check if things are already OK after a re-installation of the Nvidia drivers. The probably important thing is that during the reinstallation mkinitrd is started in the background and dracut is forced to re-configure the initramfs – this time with a loaded Nvidia driver.
If things still do not work in your case: Check that you have blacklisted the Nouveau driver in file “/etc/modprobe.d/50-blacklist.conf” and/or “/etc/modprobe.d/nvidia-default.conf” with entries
blacklist nouveau
options nouveau modeset=0
Then stop the graphical target again: Go to a terminal (Ctrl-Alt-F1), use “init 3” and try
mytuxlap:~ # init 3
mytuxlap:~ # tee /proc/acpi/bbswitch <<< ON
mytuxlap:~ # modprobe nvidia
This should work. Then
mytuxlap:~ # mkinitrd
Then reboot. On the graphical desktop (probably still using the Intel driver) open a root terminal window. Try
mytuxlap:~ # prime-select nvidia
Log out from the graphical desktop, watch the laptop LED indicating the activation of the Nvidia card (should now show that Nvidia is on), log in and check that the Nvidia driver was loaded:
mytuxlap:~ # lsmod | grep video
This should give you something like:
mytuxlap:~ # lsmod | grep nvidia
nvidia_drm             69632  7
nvidia_modeset       1204224  16 nvidia_drm
nvidia_uvm           1138688  0
nvidia              35512320  980 nvidia_uvm,nvidia_modeset
drm_kms_helper        303104  2 nvidia_drm,i915
drm                   634880  12 drm_kms_helper,nvidia,nvidia_drm,i915,ttm
Then test the reversion to the Intel driver via Opensuse’s prime-select applet. Should work now.
No cube animation for switching virtual desktops on KDE any more!
I had a brief look at other things on my new Leap 15.4 installation. Regarding KDE on Xorg the only thing I could complain about on Leap 15.4 was that the rotating cube animation for switching between virtual desktops was gone. This is due to decisions of the KDE people. So, Opensuse is NOT to blame for it. Personally, I think the loss of the animation is a pity, but it does not hinder any productivity, either. So, no big thing …
Wayland with KDE 5.24
A switch off the display server from Xorg to Wayland is a major step. I had been reluctant to use Wayland with Leap 15.2 and 15.3. Kernel, KDE and the Nvidia driver – all of their components must support Wayland. Unfortunately, Nvidia has for years been a major hinder in the support process – in contrast to Intel or AMD. So, I was a bit skeptical with Wayland, KDE/Plasma and Nvidia’s 470-driver on my old graphics card.
Positive results: KDE 5 started well. The startup of the desktop took longer time than with Xorg but completed successfully. Afterwards: No flickering of KDE, no problems with switching between virtual desktops or 3D desktop animations. Glxspheres worked. No problems with new windows of browsers like Firefox or Chromium – as were previously reported by others.
Best of all: My flatpack installation of Blender 3.3 did work very well.
Negative results: Nvidia-settings 470 did not work. Also, 3D-animation effects like wobbly windows appeared to have a slightly better performance on Xorg. After a session break (and the display of a protection screen with the option to relogin) a return to the KDE session lead to a strong white-flickering of the background. But this could be stopped by a mouse-click on the flickering background.
All in all: Even on my relatively old laptop I can productively use Wayland with Opensuse Leap 15.4 and KDE/Plasma 5.24 and Nvidia driver 470.
Leap 15.4 repositories with different locations than for 15.3
In general we can find available repositories at “https://download.opensuse.org”. The graphics repository has found a new location at
https://download.opensuse.org/repositories/graphics/15.4/,
the XFCE at
https://download.opensuse.org/repositories/X11:/xfce/15.4/.
Use Yast to add these repositories back to your list of active Leap 15.4 repos.
Still no actual Blender version on Leap 15.4
Note: Blender in a version above 2.82 is still not available for Leap 15.4. Which is a major shame. The glibc version is just too old for Blender 3.x. The only way out of this dilemma is a Flatpack or Snap based installation of Blender 3.4.
Such installations work, however, very well on Leap 15.4 – both with Xorg and Wayland.
Multimedia: Change system packages to RPMs of the packman repository
A broad range of multimedia tools and codecs require the packman repositories. What I typically do is to add a mirror with the packman repository, e.g.
https://ftp.gwdg.de/pub/linux/misc/packman/suse/openSUSE_Leap_${releasever}/
to the list of repositories, use YaST2 for the display of the contents of this repository and then click on the link “Switch system packages to the versions in this repository (Packman repository)”.
I tested some typical multimedia applications I use: Pulseaudio, PA equalizer, Clementine, VLC and TV channels on browsers. No problems.
What about Python?
My last development work on a desktop machine was done with Python 3.9, Jupyter notebooks and Eclipse. Leap 15.4 offers Python 3.6 as the standard. However, you can in parallel install either Python 3.9 OR Python 3.10. the OR is unfortunately exclusive. (The current Python version is 3.11).
I think I can live for some time with Python 3.10. So, I tested an installation of a virtual Python environment on Leap 15.4. The key to do so is to move to a directory where you want to implement your virtual environment – and install the relevant interpreter plus related basic directories. The following commands show an example:
myself@mytuxlap:~> mkdir /projekte/GIT/ml_5
myself@mytuxlap:~> cd /projekte/GIT/
myself@mytuxlap:/projekte/GIT> virtualenv -p /usr/bin/python3.10 ml_5
myself@mytuxlap:/projekte/GIT> cd ml_5
myself@mytuxlap:/projekte/GIT/ml_5> source bin/activate
(ml_5) myself@mytuxlap:/projekte/GIT/ml_5> pip install --upgrade pip
Collecting pip
  Using cached pip-23.0.1-py3-none-any.whl (2.1 MB)
Installing collected packages: pip
  Attempting uninstall: pip
    Found existing installation: pip 20.2
    Uninstalling pip-20.2:
      Successfully uninstalled pip-20.2
Successfully installed pip-23.0.1
(ml_5)  myself@mytuxlap:/projekte/GIT/ml_5> pip install jupyter
Collecting jupyter
  Using cached jupyter-1.0.0-py2.py3-none-any.whl (2.7 kB)
...
...
(ml_5) myself@mytuxlap:/projekte/GIT/ml_5> jupyter-notebook
...
This all works – but there are some (expected) errors regarding the jupyter_nbextensions_configurator. This is all well known – and also what has to be done to configure the jupyter_nbextensions correctly. This is no matter of leap 15.4.
Anyway, a Jupyter notebook will start in your default browser and you can start working with Python 3.10. I systematically added the needed libs and modules afterward with the help of pip. So, no majro problem with Python 3.10 on Leap 15.4!
What about PHP?
Well, Leap 15.4 offers an installation of either PHP7 or PHP8.0. I picked PHP8. But how does PHP 8 work together with a standard Apache2 installation on Leap 15.4?
Answer: It depends!
From the Apache point of view we would like to distribute the web server’s load on multiple Apache processes with a minimum consumption of RAM. Therefore, we would like to run Apache with an event based MPM module or just with the standard MPM-module. The problem is that this does not work with PHP. This problem already existed for lower PHP-versions than PHP 8.
You run into an error message like:
Apache is running a threaded MPM, but your PHP Module is not compiled to be threadsafe. You need to recompile PHP.
There are two solutions to this problem:
- Switch to a prefork configuration of Apache 2.4 – and ignore the resulting RAM consumption
- Use FastCGI and php8-fpm.
You also have to decide which method you want to use for changing the Apache2 configuration on Leap 15.4. You can remove RPMs or use a2enmod, a2dismod and maybe a2config, respectively. Relevant commands in our case would be “a2dismod mpm_worker”, a2dismod mpm_event” and a2enmod mpm_prefork”.
The easiest way, however, is to remove the RPMs “apache2-event” and/or “apache2-worker”, depending on what kind of configuration you have installed. I have no time to discuss the specific differences of these types of Multi-process setups of Apache2 here. To be able to activate prefork the RPM apache2-prefork must be installed. A reasonable RPM selection for a prefork variant would then look like this:
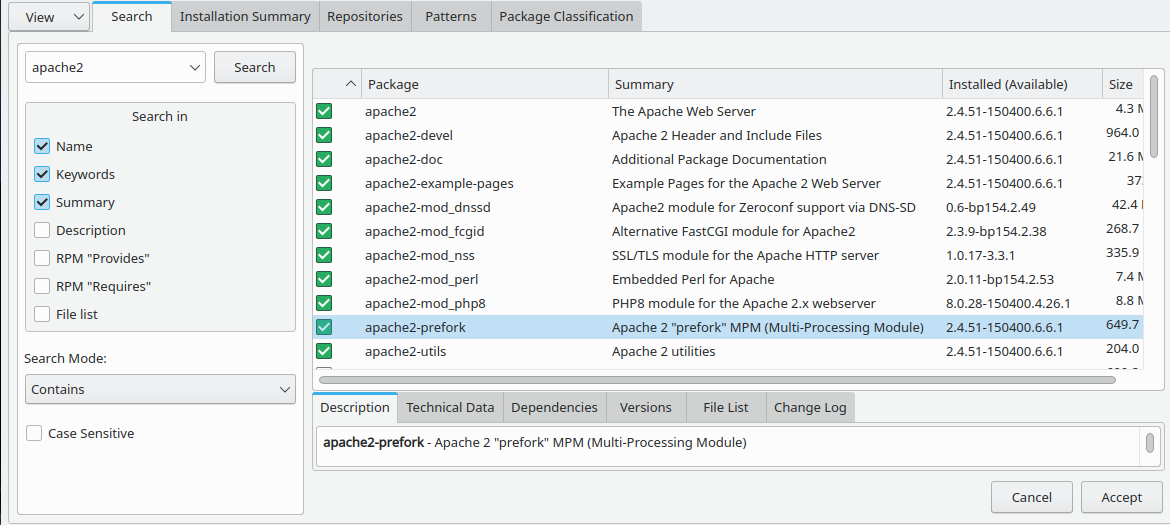
With this RPM selection you can just start Apache2 with the following modules successively:
mytuxlap:~ # rcapache2 restart
mytuxlap:~ # a2enmod rewrite
mytuxlap:~ # a2enmod -l
actions alias auth_basic authn_core authn_file authz_host authz_groupfile authz_core authz_user autoindex cgi dir env expires include log_config mime negotiation setenvif ssl socache_shmcb userdir reqtimeout php8 version mpm_prefork rewrite
mytuxlap:~ #
I.e.: For the simple prefork solution we can either try to disable the modules mpm_worker and/or mpm_event and activate “mpm_prefork” OR remove/install related RPMs.
But there is also another way to get PHP8 running – which is based on a FastCGI configuration of Apache2 together with the installation of a service for php8, namely php8-fpm. Personally, I have not yet tried a fast-cgi / php8-fpm combination on Leap 15.4. But I intend to describe the setup soon in this blog. In the meantime, please, check the information at the following links. It is given for other operative systems, but an adaption is straightforward.
Note: php-fpm is a service which must be started on your system via systemd’s command “systemctl”.
Digital ocean on PHP-fpm and Apache2 for Ubuntu 18
Digital Ocean on PHP and BSD
Digital ocean on PHP-fpm and Apache2 for Ubuntu 20
VMware and KVM
KVM works on leap 15.4 wwithout problems. I could directly start an existing qemu-virtualized Debian installation.
VMware WS also works on Leap 15.4. But you must have a version > WS 16.2.3 available. I updated to WS 16.2.5 by installing the bundle “VMware-Workstation-Full-16.2.5-20904516.x86_64.bundle”. Afterward I could start both VMware-virtualized Windows 10 and Win 7 installations on a Leap 15.4 KDE desktop without any problems.
Conclusion
The Upgrade from Opensuse Leap 15.3 to Leap 15.4 (with a KDE desktop) works without major problems even on older laptops with old Nvidia mobile graphics cards. Its a bit irritating that some Leap repositories got a new location with Leap 15.4 – but this can be fixed after the Upgrade.
A big positive surprise was that KDE 5.24 worked with Wayland even on my old Nvidia GT 645M card. A current Blender version MUST, unfortunately, be installed via Flatpack. Python 3.10 and PHP 8.0 are supported. KVM and VMware WS 16.2.5 pose no problems on Leap 15.4.
Happy working with Leap 15.4!
Links
Wayland vs. Xorg
https://linuxiac.com/ xorg-x11-wayland-linux-display-servers-and-protocols-explained/
Apache2 and PHP8
https://bbs.archlinux.org/ viewtopic.php?id=178124
Ceterum censeo: The worst fascist, war criminal and killer living today is the Putler. He must be isolated at all levels, be denazified and sooner than later be imprisoned. A president who orders the systematic destruction of civilian infrastructure must be fought and defeated because he is a permanent danger to basic principles of humanity. He must be brought to justice in front of an international court. Long live a free and democratic Ukraine!