
Das Thema “Container” ist wegen der guten Ressourcenauslastung auch für KMUs von Interesse. Will man sich dem Thema “Container” unter Linux annähern, ohne sich gleich mit Docker zu befassen, kann man alternativ zu LXC greifen. Dafür sprechen sogar ein paar gute Gründe:
- LXC ist erprobt; viele Distributionen bringen LXC mit.
- Ubuntu setzt mit der LXD-Umgebung explizit auf dieses Container-Format.
- LXC (und LXD) setzen mehr auf Container für vollständige Betriebssysteme, Docker dagegen auf modulare Container für Einzelapplikationen. Wären da nicht diverse Sicherheitsthemen, so könnten performante, ressourcenschonende LXC-Container virtuelle (Linux-) Maschinen unter KVM ersetzen. Die potentielle Packungsdichte von LXC-Containern auf einem Host ist deutlich höher als die von KVM/qemu-VMs.
- LXC erlaubt einen unpriviligierten Container-Betrieb – der Gewinn an Sicherheit erfordert allerdings Mühe im Container-Setup. Aber immerhin …
- Auch in kleinen Umgebungen will man Container neben virtuellen KVM-Maschinen gerne grafisch verwalten und überwachen. Als handliche und vor allem erschwingliche Werkzeuge bleiben da eigentlich nur “virtlib/virt-manager” (rudimentäre Minimalausstattung) und “Proxmox” für den professionellen Einsatz übrig. Beide Tools unterstützen LXC-Container und erlauben zudem das Anlegen mehr oder weniger komplexer Storage-Konfigurationen.
- Läuft der gewünschte Container erst mal, darf man sich über eine sehr gute Performance freuen (zumindest im kleinskaligen Betriebsumfeld).
Am letzten Wochenende wollte ich einen LXC-Container unter Opensuse Leap einfach mal ein wenig austesten. Für das Erstellen wollte ich das Gespann “libvirt/virt-manager” heranziehen. Die Anlage eines sog. “Betriebssystem-Containers” erwies sich damit unter Leap 42.2 aber als kleineres Abenteuer – selbst bei einer rein lokalen Storage-Konfiguration. Dieser und der nachfolgende Artikel sollen Einsteigern helfen, die ersten Hürden zu überwinden.
Begrifflichkeiten und eine Warnung
Ich gehe nachfolgend aus Platzgründen nicht weiter auf die grundlegenden Unterschiede zwischen Containern und voll- oder paravirtualisierten “Virtuellen Maschinen” [VMs] ein. Wer sich Container-Technologie im Schnelldurchgang reinziehen will, sei auf den Foliensatz https://de.slideshare.net/jpetazzo/anatomy-of-a-container-namespaces-cgroups-some-filesystem-magic-linuxcon verwiesen.
Für den vorliegenden Blog-Beitrag ist die Vorstellung hilfreich, ein Container sei so etwas wie eine aufgeblasene chroot-Umgebung, die Prozesse in einer vom restlichen Betriebssystem “isolierten” Umgebung bündelt.
Auch die Suse-Dokumentationen zur Anlage von Containern
https://www.suse.com/documentation/sles-12/singlehtml/book_virt/book_virt.html#sec.lxc.setup.container.app
https://doc.opensuse.org/documentation/leap/virtualization/book.virt_color_en.pdf
merken an:
Conceptually, containers can be seen as an improved chroot technique. The difference is that a chroot environment separates only the file system, whereas containers go further and provide resource management and control via cgroups.”
Die vom Container-Nutzer ausgelösten Prozesse laufen direkt unter dem Kernel des Hosts – und nicht wie in einer VM unter einem eigenem Kernel für die emulierte HW). Für die Container-
Isolation sorgen unter Linux cgroups und vor allem strong>namespaces (seit Kernelversion 3.8):
- “cgroups” bündeln Prozesse in Bezug auf die limitierte Nutzung von System-Ressourcen auf dem Host.
- “namespaces” sorgen hingegen dafür, dass Prozesse und ihre Kinder eine separate Sicht und einen abgegrenzten Zugriff auf ihre jeweilige Betriebssystem-Umgebung erhalten.
Vor allem “namespaces” sorgen also für eine (hoffentlich !) hinreichende Isolation der Container gegeneinander und gegenüber dem Host. Aber: Container lassen sich ohne zusätzliche Hilfsmittel bei weitem nicht so gut vom Host isolieren wie etwa virtuelle Maschinen unter KVM/qemu; resultierende Sicherheitsthemen werde ich in kommenden Blog-Beiträgen immer mal wieder aufgreifen. Ich zitiere einen der LXC-Vorkämpfer aus einem frühen Artikel (https://www.berrange.com/posts/2011/09/27/getting-started-with-lxc-using-libvirt/):
“Repeat after me “LXC is not yet secure. If I want real security I will use KVM”.
Das gilt mit Einschränkungen wohl auch heute noch; wer den professionellen Einsatz von LXC-Containern erwägt, muss sich mit SE-Linux- oder Apparmor-Profilen sowie ggf. Kernel-Capabilities auseinandersetzen. Ferner empfehle ich, einen Einsatz von LXC-Containern unter KVM-VMs in Betracht zu ziehen, wobei letztere dafür mit virtio-Treibern beschleunigt werden müssen.
Unterschiede zwischen nativen lxc-Tools und libvirt-lxc
Will man mit virt-manager und LXC-Containern arbeiten, begibt man sich auf ein nicht unumstrittenes Gleis. Es gibt nämlich zwei nicht kompatible Toolsets zum Aufsetzen und Verwalten von LXC-Containern: lxc und libvirt-xlc. “lxc” ist das native Toolset und besteht aus einer Reihe sehr flexibel einsetzbaren CLI-Kommandos. “lxc” liegt in den Version 1.1 bzw. 2.0 unter vielen aktuellen Linux-Distributionen vor (Leap 42.2 =>LXC V1.1, Debian Stretch => LXC V2.0). Container werden unter “lxc” über (vorgefertigte) “Configuration Files” definiert.
Libvirt greift dagegen auf XML-Files zur Definition von Containern zurück – also genau wie bei KVM/qemu-VMs. Libvirt nutzt für das LXC-Setup ferner direkte Schnittstellen zum Kernel und rankt darum eigene, unabhängige Tools, die mit den nativen LXC-Tools wenig gemein haben. Man kann native lxc-Kommandos meines Wissens deshalb auch nicht zur Verwaltung der Container verwenden, die mit libvirt-lxc erzeugt wurden. Dafür kann man nach der Einrichtung von libvirt-LXC-Containern aber auf das grafische “virt-manager”-Interface zum Starten, Stoppen und Manipulieren dieser Container zurückgreifen. Auf der Kommandozeile kann alternativ das “virsh”-Kommando mit lxc-bezogenen Optionen eingesetzt werden.
Beide Toolsets nehmen es einem ab, sich um die Konfiguration von cgroups (Ressourcenmanagement) und namespaces (Abschottung) im Detail und händisch kümmern zu müssen. Sie tun dies aber auf unterschiedliche Weise – und stellen zugehörige Informationen keineswegs in kompatibler Weise bereit. In diesem Artikel nutze ich die “libvirt-lxc”-Tools. Nicht zuletzt, weil ich selbst von KVM her komme. Aber – ich sage es vorweg:
Die libvirt-lxc-Tools lassen sich aus meiner Sicht nicht wirklich bruchfrei nutzen.
Der eine oder andere Nutzer wird daher mit wachsender Erfahrung zu den nativen Tools wechseln. Im Internet sind zudem sehr viel mehr Informationen zur Verwaltung von LXC-Containern mit den nativen Tools verfügbar als für die “libvirt-lxc”-Tools. Interessant ist ein LXC-Container-Setup mit libvirt/virt-manager aber allemal.
Ziel: LXC-Betriebssystem-Container
Unter “virt-manager” werden 2 LXC-Container-Typen unterschieden:
- LXC Distribution
Container für eine Umgebung mit einer Root-Filesystem-Struktur für eine Distribution. Solche Container eigenen sich m.E. als Ersatz für KVM/qemu-VMs. - LXC Application Container für einzelne Anwendungen. Ein solcher Container bietet nur eine temporäre, isolierte Umgebung für einzelnen Anwendungen – und wird mit dem Schließen der Anwendung auch beendet. Solche Container sind eher mit Docker-Containern vergleichbar.
App-Containern fehlen bei ohne eigene Zusatzmaßnahmen wesentliche Elemente eines für die jeweilige Applikation funktionierenden Filesystems. Das ist ohne vorgefertigte Schablonen Bastelarbeit. Man muss sich je nach Applikation u.a. um Anteile von /etc, /sys, /proc/, /dev, /dev/shm und relevante Bibliotheks-Bereiche wie des Filesystems kümmern. Siehe die Links unten.
Das verführt dazu, am Anfang seiner Lernkurve einen “Betriebssystem-Container” zu erstellen. Für das Filesystem kann man dann nämlich eine Basisimplementation der jeweiligen Distribution heranziehen. Für Debian ist hier “debootstrap” zu nennen.
Bzgl. der praktischen Anlage notwendiger Verzeichnisinhalte erleichtern einem unter dem RPM-basierten Opensuse hingegen sog. Paket-Patterns das Leben. Für ein minimalistisch aufgesetztes Filesystem-Setup greift man hier auf das sog. “base”-Pattern zurück.
Opensuses Script für den Root-Filesystem-Unterbau
Bzgl. der Installation des “base”-Patterns für Container hat die OpenSuSE-Mannschaft es sich in letzter Zeit allerdings etwas zu einfach gemacht: Die aktuelle Doku verweist nämlich auf ein Skript “/usr/bin/virt-create-rootfs”.
Diese Script läuft ohne Zusatzwissen und ohne Modifikationen unter Leap 42.2/42.3 aber ins Leere. In Blick in in den Code zeigt: Standardmäßig wird nur Opensuse 13.1 unterstützt; die zugehörigen Repositories, die bemüht werden, sind aber längst obsolet. Ich zeige nachfolgend relevante Ausschnitte aus dem Script:
#!/bin/sh
set -e
....
....
function print_help
{
cat << EOF
virt-create-rootfs --root /path/to/rootfs [ARGS]

Create a new root file system to use for distribution containers.

ARGUMENTS

    -h, --help          print this help and exit
    -r, --root          path where to create the root FS
    -d, --distro        distribution to install
    -a, --arch          target architecture
    -u, --url           URL of the registration server
    -c, --regcode       registration code for the product
    -p, --root-pass     the root password to set in the root FS
    --dry-run           don't actually run it
EOF
}

ARCH=$(uname -i)
ROOT=
DISTRO=
URL=
REG_CODE=
ROOT_PASS=
DRY_RUN=
.....
.....
function call_zypper
{
    $RUN zypper --root "$ROOT" $*
}

function install_sle
{
    PRODUCT="$1"
    VERSION="$2"

    case "$VERSION" in
        12.0)
            # Transform into zypper internal version scheme
            VERSION="12"
            ;;
        *)
            fail "Unhandled SLE version: $VERSION"
            ;;
    esac
....
....

}

case "$DISTRO" in
    SLED-*)
        install_sle "SLED" "${DISTRO:5}"
        ;;
    SLED-* | SLES-*)
        install_sle "SLES" "${DISTRO:5}"
        ;;

    openSUSE-*)
        VERSION=${DISTRO:9}
        case "$VERSION" in
            13.1)
                REPO="http://download.opensuse.org/distribution/13.1/repo/oss/"
                UPDATE_REPO="http://download.opensuse.org/update/13.1/"
                ;;
            *)
                fail "Unhandled openSUSE version: $VERSION"
                ;;
        esac
        call_zypper ar "$REPO" "openSUSE"
        call_zypper ar "$UPDATE_REPO" "openSUSE udpate"
        call_
zypper in --no-recommends -t pattern base
        ;;
esac

if test "$DRY_RUN" != "yes"; then
    echo "pts/0" >> "$ROOT/etc/securetty"
    chroot "$ROOT" /usr/bin/passwd
fi
Man muss das betreffende Skript also anpassen oder die notwendigen Schritte manuell durchführen.
Modifikation des Scripts
Lässt man mal den Zugriff auf SLES oder SLED-Repositories außer Acht, so leistet das Script im Grunde nur Folgendes:
- Ein Verzeichnis des Hosts als künftiges root-Verzeichnis des Containers aus einem Übergabeparameter auslesen.
- Das grundlegende “oss”-Repository sowie das zugeh. Update-Repository für eine Distribution festlegen.
- “zypper” in der Form “zypper –root PATH_TO_CONTAINER_ROOT in –no-recommends -t pattern” aufrufen.
- Das root-Password für den chroot-Bereich ändern.
Entscheidend ist im Script-Ablauf die “–root” Option von zypper; die sorgt dafür, dass die Verzeichnisse/Files unterhalb des definierten chroot-Verzeichnisses (PATH_TO_CONTAINER_ROOT) gemäß des definierten Paket-Patterns gefüllt werden. Wir ergänzen das Script deshalb versuchsweise in der Abfrage für die Distribution und ändern die Statements in den Zeilen 205 – 207 ab:
....
.....
case "$DISTRO" in
    SLED-*)
        install_sle "SLED" "${DISTRO:5}"
        ;;
    SLED-* | SLES-*)
        install_sle "SLES" "${DISTRO:5}"
        ;;

    openSUSE-*)
        VERSION=${DISTRO:9}
        case "$VERSION" in
            13.1)
                REPO="http://download.opensuse.org/distribution/13.1/repo/oss/"
                UPDATE_REPO="http://download.opensuse.org/update/13.1/"
                ;;
            42.2)
                REPO="http://download.opensuse.org/distribution/leap/42.2/repo/oss/"
                UPDATE_REPO="http://download.opensuse.org/update/leap/42.2/"
                ;;
            *)
                fail "Unhandled openSUSE version: $VERSION"
                ;;
        esac
        echo "HERE0"
        call_zypper ar "$REPO" "openSUSE"
        echo "HERE1"
        call_zypper ar "$UPDATE_REPO" "openSUSE-udpate"
        echo "HERE2"
        call_zypper in --no-recommends -t pattern enhanced_base
        call_zypper in --no-recommends -t pattern  file_server
        #call_zypper in --no-recommends -t pattern base
        #call_zypper in --no-recommends -t pattern "patterns-openSUSE-enhanced_base"
        ;;
esac
Um wenigstens ein paar “Convenience”-Pakte zusätzlich zu erhalten, habe ich das “enhanced_base”-Pattern gewählt.
Anlegen des Filesystems
Für meinen Test nutze ich ein LVM-Volume auf einem SSD-Array; das Volume wird dabei auf das Verzeichnis “/kvm/” gemountet. Das Filesystem meines Containers soll unter “/kvm/lxc2/ zu liegen kommen. Also Verzeichnis angelegt und dann unser umgeschriebenes Script starten:
mytux:~ # virt-create-rootfs -r /kvm/lxc2/ -d openSUSE-42.2
Adding repository 'Leap-42.2-Oss' .......................................................[done]
Repository 'Leap-42.2-Oss' successfully added

URI         : http://download.opensuse.org/distribution/leap/42.2/repo/oss/
Enabled     : Yes
GPG Check   : Yes
Autorefresh : No
Priority    : 99 (default priority)

Repository priorities are without effect. All enabled repositories share the same priority.
r
Adding repository 'Leap-42.2-Update' ....................................................[done]
Repository 'Leap-42.2-Update' successfully added

URI         : http://download.opensuse.org/update/leap/42.2/oss/
Enabled     : Yes
GPG Check   : Yes
Autorefresh : No
Priority    : 99 (default priority)

Repository priorities are without effect. All enabled repositories share the same priority.

New repository or package signing key received:

  Repository:       Leap-42.2-Oss
  Key Name:         openSUSE Project Signing Key <opensuse@opensuse.org>
  Key Fingerprint:  22C07BA5 34178CD0 2EFE22AA B88B2FD4 3DBDC284
  Key Created:      Mon May  5 10:37:40 2014
  Key Expires:      Thu May  2 10:37:40 2024
  Rpm Name:         gpg-pubkey-3dbdc284-53674dd4


Do you want to reject the key, trust temporarily, or trust always? [r/t/a/? shows all options] (r): a
Building repository 'Leap-42.2-Oss' cache ...............................................[done]
Building repository 'Leap-42.2-Update' cache ............................................[done]
Loading repository data...
Reading installed packages...
Resolving package dependencies...

The following 163 NEW packages are going to be installed:
  aaa_base bash binutils coreutils cpio cracklib cracklib-dict-full dbus-1 dbus-1-x11
  device-mapper diffutils dirmngr dracut elfutils expat file file-magic filesystem fillup
  findutils fipscheck gawk gio-branding-openSUSE glib2-tools glibc gpg2 grep gzip hardlink
  hwinfo info insserv-compat kbd kbd-legacy klogd kmod kmod-compat krb5 libX11-6 libX11-data
  libXau6 libacl1 libadns1 libaio1 libapparmor1 libasm1 libassuan0 libattr1 libaudit1 libblkid1
  libbz2-1 libcap-ng0 libcap2 libcom_err2 libcrack2 libcryptsetup4 libcurl4 libdbus-1-3 libdw1
  libedit0 libelf0 libelf1 libexpat1 libfdisk1 libffi4 libfipscheck1 libgcc_s1 libgcrypt20
  libgio-2_0-0 libglib-2_0-0 libgmodule-2_0-0 libgmp10 libgobject-2_0-0 libgpg-error0 libidn11
  libkeyutils1 libkmod2 libksba8 libldap-2_4-2 liblua5_1 liblzma5 libmagic1 libmount1
  libmozjs-17_0 libncurses5 libncurses6 libnl-config libnl3-200 libopenssl1_0_0 libpcre1
  libpolkit0 libpopt0 libprocps3 libpth20 libqrencode3 libreadline6 libsasl2-3 libseccomp2
  libselinux1 libsemanage1 libsepol1 libsmartcols1 libssh2-1 libstdc++6 libsystemd0
  libtirpc-netconfig libtirpc3 libudev1 libusb-0_1-4 libusb-1_0-0 libustr-1_0-1 libutempter0
  libuuid1 libverto1 libwicked-0-6 libwrap0 libx86emu1 libxcb1 libxml2-2 libz1 libzio1
  mozilla-nspr ncurses-utils netcfg openSUSE-build-key openSUSE-release openSUSE-release-ftp
  openssh openssl pam pam-config patterns-openSUSE-base patterns-openSUSE-enhanced_base
  perl-base permissions pigz pinentry pkg-config polkit polkit-default-privs procps rpcbind rpm
  sed shadow shared-mime-info suse-module-tools sysconfig sysconfig-netconfig systemd
  systemd-presets-branding-openSUSE systemd-sysvinit sysvinit-tools terminfo-base time udev
  update-alternatives util-linux util-linux-systemd which wicked wicked-service xz

The following 2 NEW patterns are going to be installed:
  base enhanced_base

The following NEW product is going to be installed:
  openSUSE

163 new packages to install.
Overall download size: 48.1 MiB. Already cached: 0 B. After the operation, additional 178.0 MiB
will be used.
Continue? [y/n/...? shows all options] (y): y
....
....
New password:
Retype new password:
passwd: password updated successfully
Die Installation nimmt kaum Zeit in Anspruch. Danach liegt ein ziemlich umfassendes chroot-Filesystem vor, für das wir auch ein root-
Passwort definiert haben:
mytux:~ # la /kvm/lxc2
total 84
drwxr-xr-x 21 root root 4096 Sep 25 18:27 .
drwxr-xr-x  6 root root 4096 Sep 25 18:17 ..
drwxr-xr-x  2 root root 4096 Sep 25 18:28 bin
drwxr-xr-x  2 root root 4096 Oct  7  2016 boot
drwxr-xr-x  2 root root 4096 Sep 25 18:28 dev
drwxr-xr-x 56 root root 4096 Sep 25 18:29 etc
drwxr-xr-x  2 root root 4096 Oct  7  2016 home
drwxr-xr-x  8 root root 4096 Sep 25 18:28 lib
drwxr-xr-x  5 root root 4096 Sep 25 18:28 lib64
drwxr-xr-x  2 root root 4096 Oct  7  2016 mnt
drwxr-xr-x  2 root root 4096 Oct  7  2016 opt
dr-xr-xr-x  2 root root 4096 Oct  7  2016 proc
drwx------  4 root root 4096 Sep 25 18:28 root
drwxr-xr-x  7 root root 4096 Sep 25 18:28 run
drwxr-xr-x  2 root root 4096 Sep 25 18:28 sbin
drwxr-xr-x  2 root root 4096 Oct  7  2016 selinux
drwxr-xr-x  4 root root 4096 Sep 25 18:27 srv
dr-xr-xr-x  2 root root 4096 Oct  7  2016 sys
drwxrwxrwt  7 root root 4096 Sep 25 18:28 tmp
drwxr-xr-x 13 root root 4096 Sep 25 18:27 usr
drwxr-xr-x 12 root root 4096 Sep 25 18:27 var
mytux:~ #
Definition des LXC-Containers mit virt-manager
Wir starten nun virt-manager. Zunächst muss mal LXC auf unserem Host laufen – und wir brauchen eine Verbindung zum lokalen Socket. Dazu bemüht man den Menüpunkt “File >> Add Connection”:

Wir drücken dann auf den Button “Connect”. Nun legen wir unseren Container an über “File >> New Virtual Machine”.
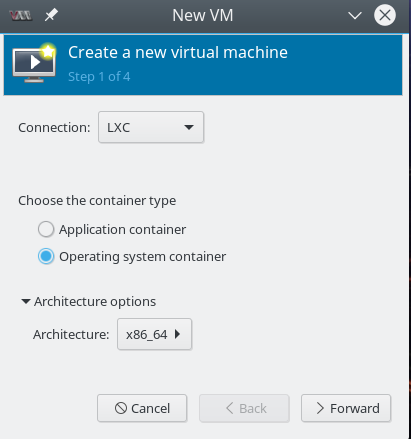
Der Button “Forward” führt zu einem Dialog-Window, in dem wir direkt unser Verzeichnis für das Root-FS eintippen (wir befassen uns nicht mit Storage-Verwaltung).
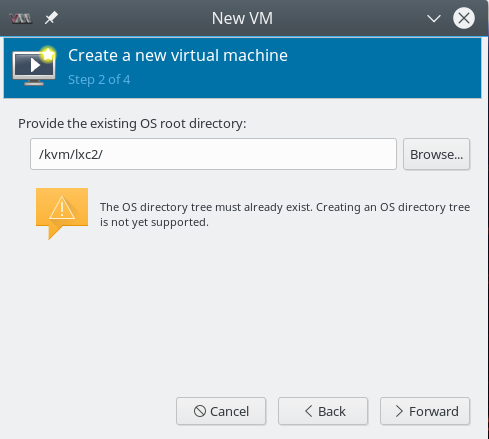
Wieder “Forward” klicken; wir werden nun aufgefordert, RAM-Größe und die Anzahl der zu verwendenden CPUs festzulegen:
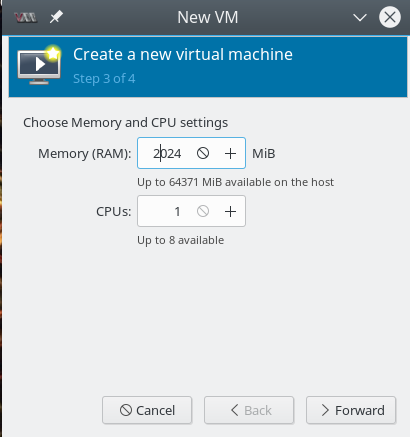
Schließlich geben wir dem Container noch einen Namen:

Die Netzwerk-Konfiguration unterlassen wir im Moment. Der Grund hierfür ist, dass wir ohne Installation weiterer Pakete im Container mit einer Netzwerkverbindung eh’ nicht viel anfangen können. Ich komme darauf aber im nächsten Blog-Beitrag zurück. Wir starten die Container-Installation – und uns wird fast umgehend eine Shell angeboten :
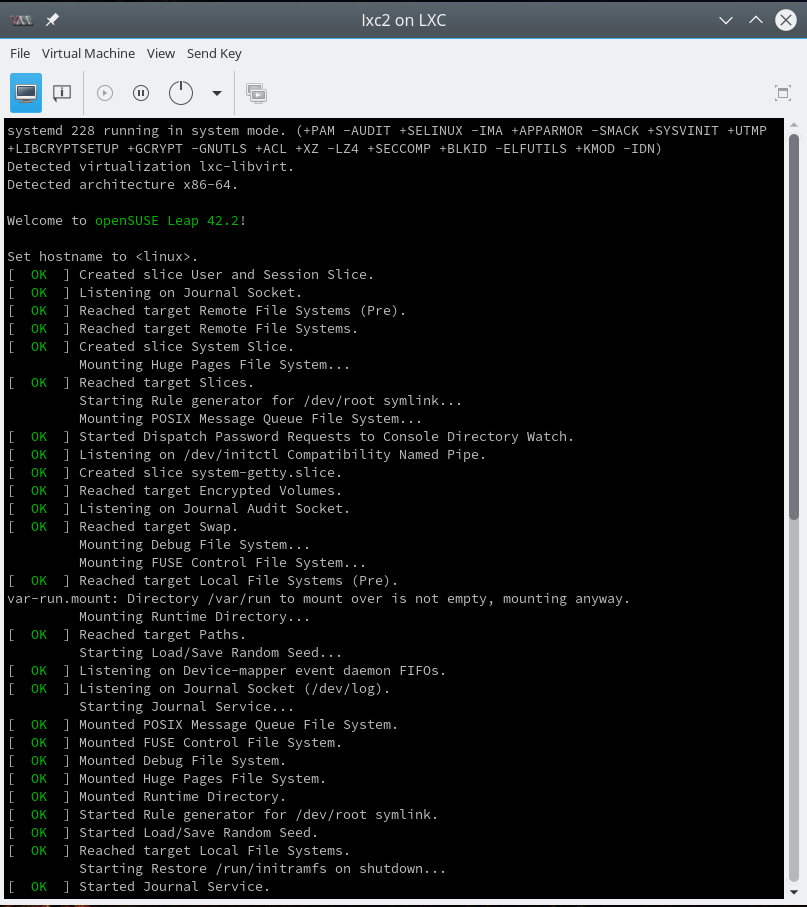
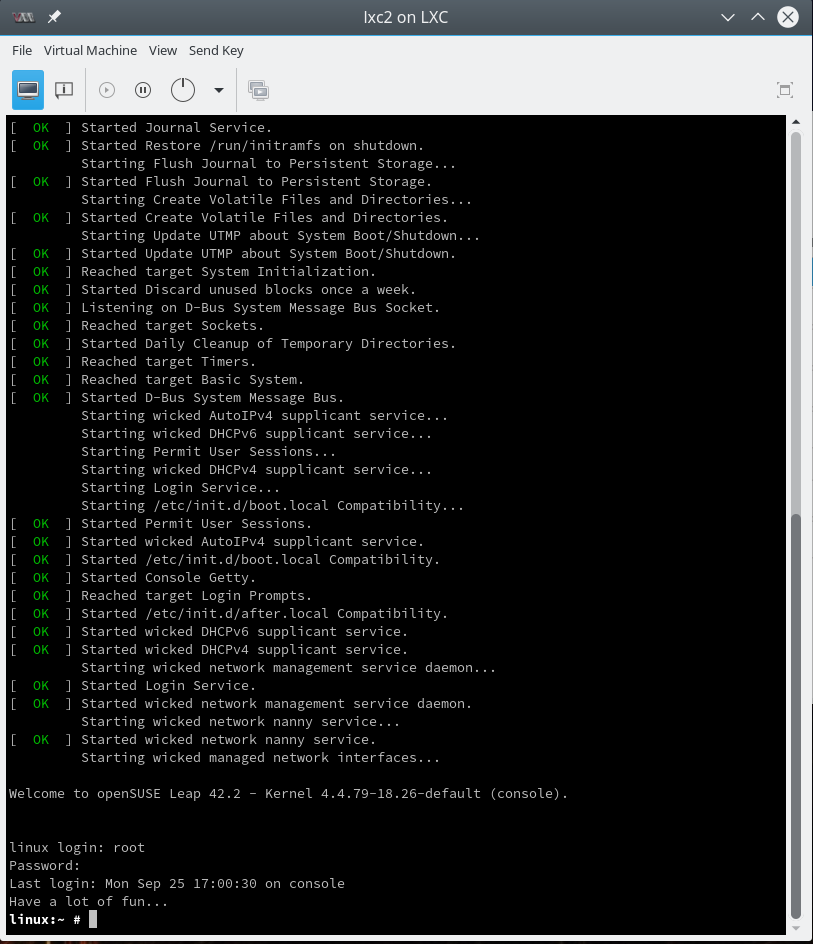
Zum Einloggen geben wir das für den chroot-Bereich definierte Passwort ein. So weit, so gut. Ein wenig Herumspielen zeigt sehr schnell: Die Installation ist wirklich recht minimal.
Ausblick
Im nächsten Blog-Beitrag
LXC-Betriebssystem-Container mittels virt-manager unter Opensuse Leap 42.2 – II
ergänze ich zunächst einige nützliche Pakete aus den Opensuse-Repositories. Dann zeige ich, wie man zu einer funktionierenden Netzwerk-Karte in Form eines veth-Devices kommt.
Links
Unterschiede LXC, LXD, Docker
https://unix.stackexchange.com/questions/254956/what-is-the-difference-between-docker-lxd-and-lxc
https://bobcares.com/blog/lxc-vs-docker/
http://www.zdnet.com/article/ubuntu-lxd-not-a-docker-replacement-a-docker-enhancement/