KVM/Qemu VMs with a multi-screen Spice console – IV – remote access via SSH, remote-viewer and a Unix socket

I continue with my series on methods to access the graphical Spice console of virtual machines [VM] based on the KVM/Qemu-hypervisor combination on a Linux host.

KVM/Qemu VMs with a multi-screen Spice console – III – local access with remote-viewer via a Unix socket
KVM/Qemu VMs with a multi-screen Spice console – II – local access with remote-viewer via a network port
KVM/Qemu VMs with a multi-screen Spice console – I – Overview over local and remote access methods

In the last article we saw that “remote-viewer” can be used locally on the KVM-host to directly access the Qemu-emulator of a specific VM via a Unix socket instead of a network port. Its a simple and fairly effective method – though not well documented. We confined the right to access the socket for a VM to a specific group of users.

Actually, the socket based access method also provides the basis for a simple remote scenario in an Intranet – namely via ssh -X. This is the topic of this article.

Such a method requires relatively high data transfer rates across the network – but in a switched Gigabit LAN the rates are within reasonable limits …. And despite a lack of OpenGL HW acceleration Spice reacts very responsively to mouse operations and window movements. In the course of our experiments I will also introduce another virtual “video” device model which can be used together with our VM – namely a “virtio” device with multiple heads. As the QXL device it corresponds to a kind of virtual graphics card.

I assume that the reader is familiar with SSH and the setup of the SSH-service on a Linux system. Some knowledge about Pulseaudio is helpful, too.

Why do we care about remote Spice scenarios in an Intranet?

Why do I discuss remote scenarios for a “one seat” console of a VM in an Intranet at all? One answer is:

Any free-lance consultant or developer must think about a systematic way of how to organize data and work for customers in accordance with security requirements like the EU-GDP or the German DSGVO. Personally, I strongly recommend to confine the work and all data exchange processes for a selected customer to a specific VM on a well managed Linux server host. You then can encrypt the virtual disks and isolate the VM(s) pretty well by configuring both firewalls in the virtual network, on each VM as well as on the KVM-host and on routers in your LAN. Backup, recovery and machine extensions are easy to manage, too.
But you may need to access a VM’s desktop graphically from a client system (PC, laptop). This is were Spice comes into the game – at least in a Linux environment. Being able to work with a full fledged graphical desktop of a VM from different clients and locations in your LAN might be a basic requirement for preparing presentations, documents and maybe some development work in parallel on the VM.

I myself, for instance, often access the full desktop of server-based VMs from my Linux workstation or from a Linux laptop. Via SSH and the Spice console. We shall see below that the network data transfer rates for applications as Libreoffice Draw via SSH to the KVM host and using the Spice console can become smaller than in a situation where we open Libreoffice remotely by a direct “ssh -X” call to the VM itself. And the situation is even better in other scenarios we shall study in forthcoming articles.

In general it will be interesting to watch the objective data transfer rates plus the felt
responsiveness of Spice clients in remote scenarios throughout all our coming experiments.

Encryption requirements – the advantages of SSH

Even in the LAN/Intranet of a free-lancer or in a home-office with multiple users encryption for remote interactions with VMs may be required. We have two main options to achieve this for remote-viewer:

  • We use SSH on the remote system, connect to the KVM-host and start remote-viewer there.
  • We start remote-viewer on the remote system and encrypt the connection to the VM on the KVM host with TLS.

Both methods have their advantages and disadvantages. In the end usability on the remote system is an important criterion. A TLS setup will be discussed in a forthcoming post. Note that we also can use remote-viewers’ sister application “virt-viewer” in a SSH-based scenario – but this is a different story, too.

It is clear that using “ssh -X” is a simple approach which just uses the X11-protocol capabilities to realize a remote scenario. But it has some major advantages over other scenarios:

  • We get encryption almost for free. Most SSH implementations on Linux systems work out of the box.
  • We can enforce the use of secure Opensource encryption algorithms – both for the asymmetric KEX and authentication mechanisms and for the symmetric encryption parts of the data exchange. (See https://stribika.github.io/2015/01/04/secure-secure-shell.html)
  • We get user authentication based on a public key algorithm almost for free.
  • We can use a “ssh-agent” on the remote client to control the different authentication keys for different users allowed to access different VMs.
  • It is sufficient to open a SSH-port on the server. We do not need to open extra network ports for the Spice protocol.
  • We can get encrypted audio data transfer with some simple tricks in combination with Pulseaudio.

Therefore, it is really worthwhile to test a combination of “ssh -X” with starting remote-viewer on the KVM host. I shall, however, not discuss basics of SSH server and client configurations in this article. The preferred or enforced use of certain encryption algorithms for specific SSH connections is something a Linux user should be or become familiar with.

Regarding authentication I assume a standard configuration where private and public authentication keys are organized in the folders “~./ssh/” both for the involved user on the remote client system and the invoked user on the KVM/Qemu server host, respectively.
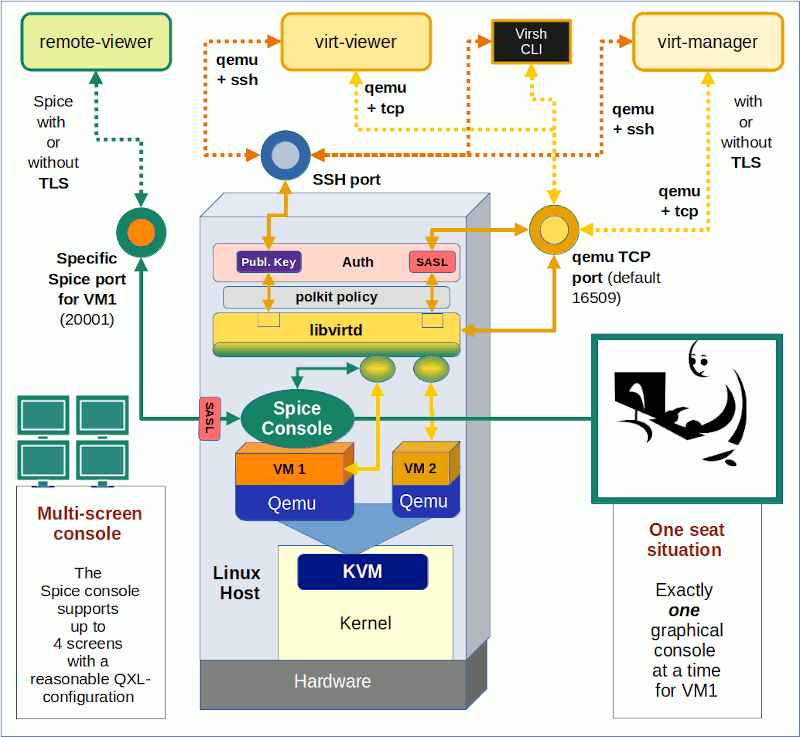
Schematic drawing

I have not yet depicted the SSH scenario with remote-viewer in any of my schematic drawings so far. The combination of remote-viewer with SSH is a variant of a local scenario as we open the “remote-viewer”-application on the KVM host [MySRV] and just transfer its graphical output via SSH to the X-Server of a remote Linux workstation [MyWS].

We do not care about the transfer of audio data during our first steps. We shall cover this problem in some minutes.

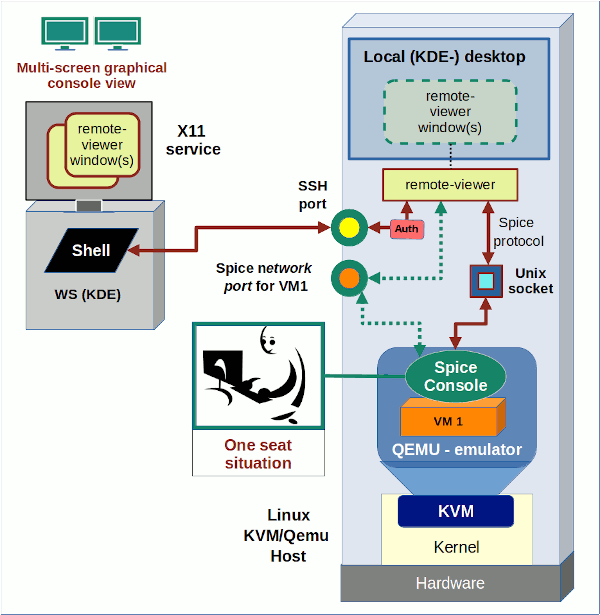
On the left side we see a Linux workstation from which a user logs into our KVM host as user “uvmb”. I assume that user “uvmb” has become a member of the special group “spicex” on the KVM host which we gave read/write access to the Spice UNIX socket created by Qemu (see my last post). On the right side we have our a KVM/Qemu server host. The user starts the remote-viewer application there (i.e. on the KVM
host), but gets its graphical output on his desktop on the remote workstation. On the KVM/Qemu host we, of course, use the fastest method for the remote-viewer application to exchange data with the Qemu-emulator process – namely via a Unix socket. See the definitions for the VM’s XML file (for libvirt applications) discussed in the last post:

    
    <graphics type='spice' autoport='no' keymap='de' defaultMode='insecure'>
      <listen type='socket' socket='/var/spicex/spice.socket'/>
      <image compression='off'/>
      <gl enable='no'/>
    </graphics>

This scenario may appear a bit strange for those among my readers who know that remote-viewer is a network client application: Remote-viewer is normally used on a remote client systems to connect to the Qemu process for a VM on a server host via TCP over a LAN. In our present scenario, however, we start remote-viewer on the server host itself and achieve network capabilities only by making use of SSH. But such a scenario sets comparison standards regarding data transfer rates. Any real client/server solution should provide advantages over such a simple approach. We come back to such comparisons in the forthcoming articles of this series.

An interesting question, for example, is whether the whole data exchange will resemble more a transfer of image data in the case of a full desktop presentation by remote-viewer or a transfer of X commands for constructing individual desktop contents. We should not forget that Spice and remote-viewer have their own handling of graphical data and a special client-server model for it.

A first disadvantage of our simple SSH-based scenario could result from the following fact:

Spice does not accept an activation for the compression of image data for a local socket-based configuration. As we start remote-viewer in our scenario on the KVM host we, therefore, cannot use the image-compression option for the Spice configuration. If a reduction of data transfer rates is required due to a limited LAN bandwidth our only chance is to use data compression for SSH. SSH uses gzip; due to extra CPU activities on both sides using compression may reduce the performance of application which exchange many data between the SSH client and server during user interactions.

In my test setup the KVM-host is controlled by an Opensuse Leap 15.2 OS, whereas the remote client system – a laptop (MyLAP) – runs Opensuse Leap 15.1. (Yes, I should have upgraded it already …).

Requirements for a reasonable performance of remote scenarios with SSH, remote-viewer and Spice

“ssh -X” is not the most efficient way of transferring graphical data. The performance experience depends a bit on the symmetric encryption algorithm and very much on the bandwidth of your network. To make a long story short:

For the QXL device temporary peaks of the data transfer rate can reach 60 MiB/s to 90 MiB/s for some window operations on a Spice console. Such rates may e.g. occur appear when you move complex and large windows quickly around with the mouse on the displayed VM’s desktop – with transparency effects of a XRender compositor being active. With the “virtio” graphics device we reach a rate of around and below 40 MBit/s.

Such rates may seem quite high – and they indeed are. But a quick test shows that you reach 25 – 45 MiB/sec already when quickly moving around a complex transparent pattern within a “Libreoffice Draw” sketch remotely over a network connection with SSH. The presentation of transparent windows within a KDE desktop with compositor dependent effects is far more complex. So Gigabit NICs are required.

If your network becomes a limiting factor you can use the “-C”-option of SSH to enable data compression. This may give you a factor between 8 and 10 for the reduction of transfer data rates. In a test
case with remote-viewer I could reduce the data transfer rate below 8 MiB/s from something of 80 MiB/s without compression. This is an impressive reduction of data.

But there is a caveat of compression, too. The compression has to happen very (!) quickly for fast user interactions with the displayed VM-desktop in the Spice windows. So, you may get a delayed response now for some fast actions on the displayed desktop due to the compression overhead. Now you need pretty fast CPU cores on the KVM/Qemu host and the remote client system! Depending on your system and your LAN I would experiment a bit with and without compression.

A first test

I use a laptop with the hostname “MyLAP” with an Opensuse Leap 15.1 installation for a quick test. The VM (with a KALI 2020.4 OS) is located on a server host “MySRV” with Opensuse Leap 15.2 (see the last articles of this series for its configuration).

On the laptop I start a KDE session as user “myself”. We have a SSH authentication key pair prepared. Our (private) key resides in “~/.ssh/id_rsa_vm”. We have exported the public key to the KVM host into the “~/.ssh/”-directory of the user “uvmb” there (probably “/home/uvmb/.ssh/”). User “uvmb” is a member of the group who got “rw”-access by ACL rules on the KVM-server to the specific UNIX socket used by our test VM “debianx” (see the previous articles).

On the KVM host a privileged user “uvma” has already started the VM “debianx” (with a local socket configuration) for us. Just to be on the safe side we open a desktop session for user “uvmb” on the KVM/Qemu” server and test remote-viewer there:

All Ok here.

Now, we move to the laptop. There we open a KDE session, too, as user “myself”. In a terminal we start the ssh-session:

myself@mylap:~/.ssh> ssh -X -i ~/.ssh/id_rsa_x uvmb@mysrv
Enter passphrase for key '/home/myself/.ssh/id_rsa_x': 
Last login: Thu Mar 25 09:54:53 2021 from 192.168.2.22
Have a lot of fun...
uvmb@mysrv:~> 
uvmb@mysrv:~> remote-viewer spice+unix:///var/spicex/spice.socket &
[1] 5041
uvmb@mysrv:~> 
(remote-viewer:5041): GStreamer-WARNING **: 12:37:49.271: External plugin loader failed. This most likely means that the plugin loader helper binary was not found or could not be run. You might need to set the GST_PLUGIN_SCANNER environment variable if your setup is unusual. This should normally not be required though.

(remote-viewer:5041): GSpice-WARNING **: 12:37:49.409: Warning no automount-inhibiting implementation available

We ignore the warnings – and get our two Spice windows (on the KDE desktop of the laptop).

So far so good.

Let us move a complexly structured window (Firefox or the KDE settings window with a significant size (800×800)) around on the VM’s desktop in the Spice window of the laptop, with the help of fast mouse movements. Whilst we do this we measure the data transfer rates over the relevant NIC on the KVM server:

If you enlarge the picture you see peak rates of 85 MiB/s for data sent to the SSH-client.
In my network this has, fortunately, no major effect on the interaction between laptop and the VM – no major delay or lagging behind. And due to a fast switch my wife can nevertheless stream videos over a gateway system from the Internet. 🙂

How can we explain such transfer rates? Well, the window within the Spice screen I moved around had a size of around 800×800 px. Assume a 32 Bit color depth and a refresh rate of the pixel information on the virtual screen of around 30 times a second. You can do the calculation by yourself. The data fit well to the observations. Thus, we probably transfer changed image data of the window area on the VM’s desktop.

Reducing data transfer rates by SSH integrated (gzip) compression

We end the Spice session now on the laptop (by closing the Spice windows) and log out of the SSH session. Then we restart a new SSH-session with

<pre>myself@mylap:~/.ssh> ssh -XC -i ~/.ssh/id_rsa_x uvmb@mysrv
Enter passphrase for key '/home/myself/.ssh/id_rsa_x': 
Last login: Thu Mar 25 09:54:53 2021 from 192.168.2.22
Have a lot of fun...
uvmb@mysrv:~> 
uvmb@mysrv:~> remote-viewer spice+unix:///var/spicex/spice.socket &
[1] 5041
uvmb@mysrv:~> 

Note the “C“-option for the ssh-command!
Now the measured transfer rates on the KVM-server are less than 9 MiB/s.

However, I notice some lagging of the moved windows reaction to quick mouse cursor changes on the remote client. Not, that it affects normal working – but palpable. I cross checked by working with complex figures within Libreoffice Draw – absolutely no problems with the performance there. So, the reduced responsiveness is mainly due to operations which trigger the VM’s window manager and the re-drawing of the windows as well as the desktop within the Spice induced X-window on the client-system. In our case fast mouse movements to change the position of some application windows on the displayed VM desktop quickly and erratically ….

I see the lagging also with the Gnome desktop of the Kali guest – especially, when moving transparent terminal windows. In my opinion the lagging is even more pronounced. So, KDE 5 is not so bad after all 🙂 . And then its time for optimizing via desktop settings. Remember that you can switch off a compositor totally for the KDE desktop.

I also found that the decline of responsiveness with SSH data compression also depended somewhat on the number of opened Spice “displays” or “screens” and their sizes. Responsiveness is better with just one Spice window open on the remote system. In our SSH-based scenario responsiveness depends

  • on the number of virtual Spice displays,
  • on the size of the moved window,
  • on the complexity and to a minor degree also on transparency effects.

I could also see these dependencies for a “ssh -XC” when I exchanged the QXL device with a so called “virtio”-video-device.

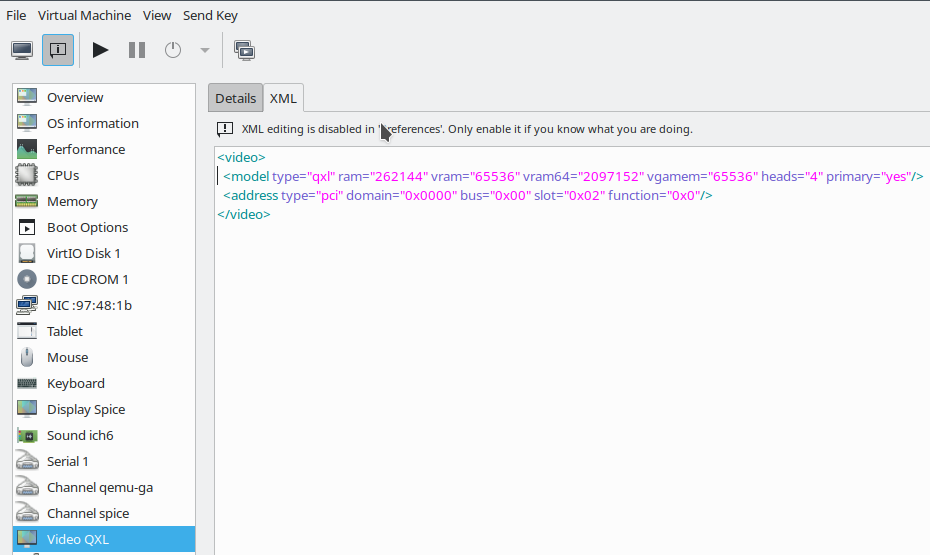
Using a “virtio” video device

So far we have worked with the QXL device for a virtual graphics card device in the VM’s configuration. Let us try an alternative – namely a so called “virtio”-video-device. “virtio”-devices for virtual NICs and virtual storage devices enhance performance due to special interaction concepts with the real hardware; see the links at the bottom of this post for more information on the ideas behind virtio-drivers. Can we get a performance improvement in our scenario by a “virtio” device for the virtual graphics card?

Our configuration for the VM then, for example, looks like

   <graphics 
type='spice' keymap='de' defaultMode='insecure'>
      <listen type='socket' socket='/var/spicex/spice.socket'/>
      <image compression='off'/>
      <gl enable='no'/>
    </graphics>
    ...
    ...
    <video>
      <model type='virtio' heads='2' primary='yes'>
        <acceleration accel3d='yes'/>
      </model>
      <address type='pci' domain='0x0000' bus='0x00' slot='0x02' function='0x0'/>
    </video>
    ...

You see that we can set multiple heads for a virtio video device, too. A big advantage is that we do not need any special memory settings as for the QXL device.

When you try this setting, you will found out that it works quite well, too. And there is a remarkable difference regarding data transfer rates:

The maximum rates for the same kind of window movements are now well below 48 MiB/s. For the same kind of fast movements of complex windows across the desktop surface in the Spice window.

Now, if you in addition use SSH compression (ssh -XC) you get the rates down to 8.2 MiB/sbut with only a slightly better responsiveness of windows to the mouse movement on the remote Spice window than for a QXL setup.

In my opinion a virtio-display device is something worth to experiment with (even without 3D acceleration).

Libreoffice Draw as a real world test case

Let us briefly compare data rates for something more realistic in daily work.

In the tests described below I firstly open Libreoffice [LO] Draw by a direct “ssh -X” call to the VM itself. Then I open LO Draw within the remotely displayed desktop of the VM based on a “SSH -X” connection to the KVM server. This means a major difference regarding the SSH connection and the data transfer requests!

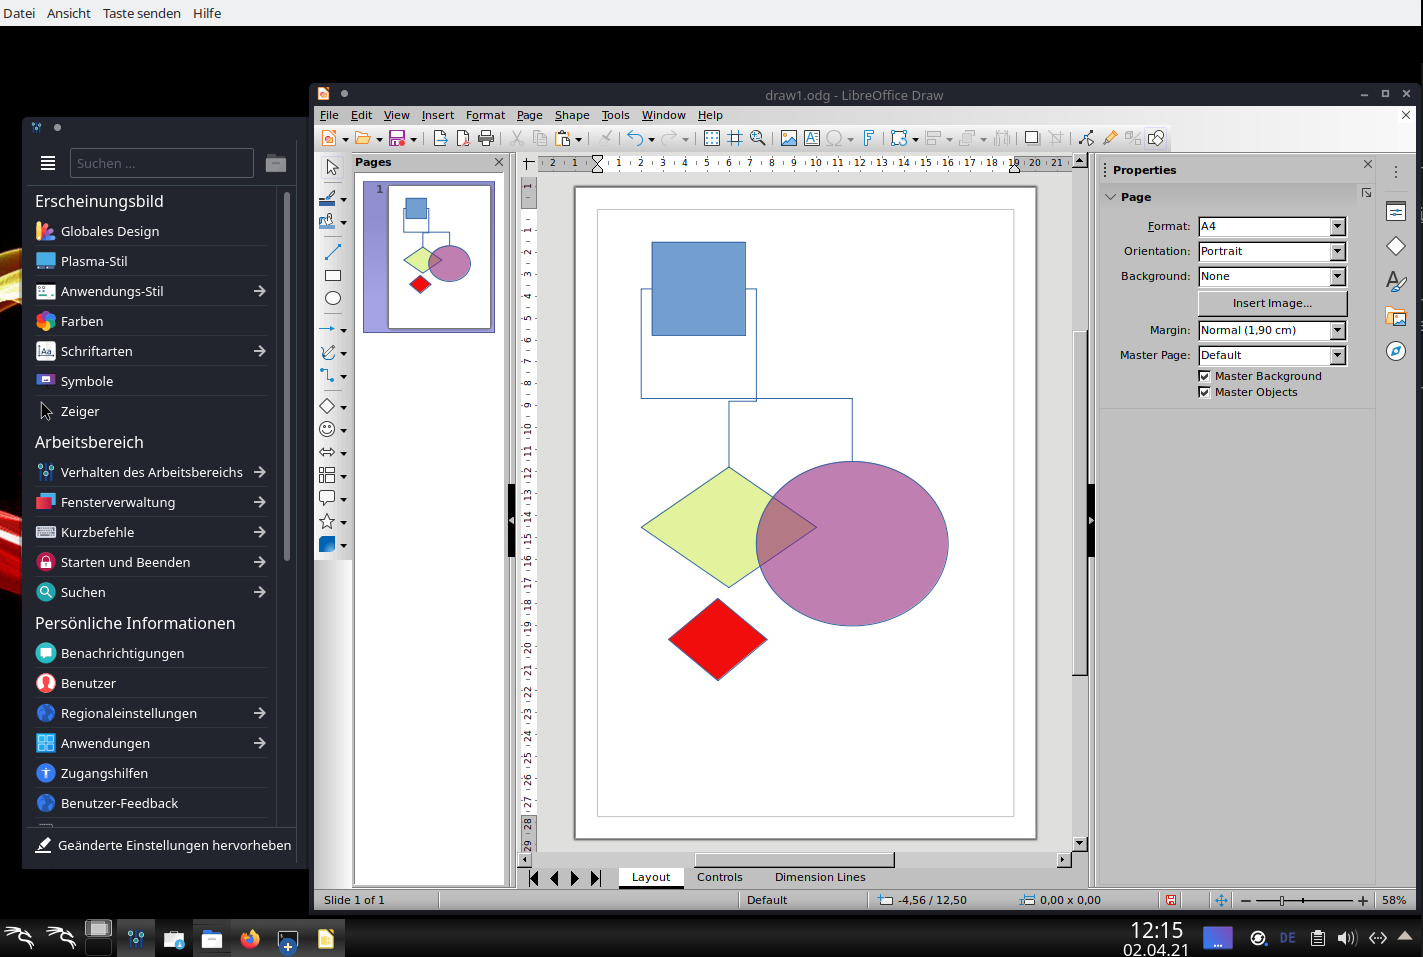
Within LO Draw I use a sketch like the following

and, later on, move the green or violet figures very fast around in the LO frame with the mouse. Transparency included.

So, for a first test, let us open the VM’s LO Draw on my laptop MyLAP via a direct “ssh -X” command (without data compression!) directed to the VM:

<pre>myself@mylap:~/.ssh> ssh -X -i ~/.ssh/id_rsa_x myself@debianx
Enter passphrase for key '/home/myself/.ssh/id_rsa_x': 
Linux debianx 5.10.0-kali3-amd64 ......
......
Last login: Fri Mar 26 17:38:16 2021 from 192.168.2.22
...
myself@debianx:~> 
myself@debianx:~$ libreoffice --draw 

Note that “debianx” is now used as a host name! (The host name was chosen to be the same as the name of the VM in virt-manager; but the meaning in a network context, where “debianx” must be resolved to an IP, is now different. Note that the VM communicates to the outside world via a virtual network of the KVM host and routes defined on the VM and the KVM host directing data from the VM in the end over some NIC of the KVM host).

When moving the drawing’s figures around I measure data transfer rates on the relevant Ethernet device of the KVM-server:

Taking sent and received data together we have total rates around 25 MiB/s.

Now, in a second test, let us do something very different: We open Libreoffice Draw on the VM’s KDE desktop displayed in a Spice window, which in turn got transferred via SSH to the X11-service on my laptop:

And, again, we move the figures around very fast. The measured rates then are significantly smaller – below 4.4 MiB/s.

This proves the following statement which in turn justifies the whole Spice approach:

It may be more efficient to work remotely with a VM application on the VM’s desktop via Spice and a “SSH -X” connection to the KVM-server than requesting the graphical output of the VM’s application directly via “SSH -X” from the VM itself!

And what about sound?

We now turn to a topic which also deserves more documentation – namely the handling of sound with a remote solution like ours. We need Pulseaudio for a transfer of sound data from a VM (on the KVM/Qemu server) to the remote client system. Well, the very same Pulseaudio [PA] which often enough has ruined some of my nerves as a Linux user in the past 12 years or so. In combination with remote-viewer we simply cannot avoid it.

To be able to understand its configuration in a network with Opensuse Leap systems we must deal with the server properties of PA. See e.g. the following links for some explanation:
Free desktop Org documentation on Pulseaudio in a network
Archlinux documentation on PulseAudio

A Pulseaudio installation can work as a daemon-based service for other client-applications than the ones started locally during the desktop session of a user. Such clients can be applications started on other computers. PA’s client/server structure has network capabilities! To use PA in a network context some requirements must be fulfilled:

  • The module “module-native-protocol-tcp ” must be loaded. On a standard Opensuse Leap system this is the case; see the settings in the files “/etc/pulse/default.pa” and for a specific user in “~/.config/pulse/default.pa“.
  • For a direct connection between two PCs, as we need it for our present purpose, we can use a special TCP-port. The standard port is “4713“. For some first tests we will open this port for a directed transfer from the server to the client on local firewalls of the systems as well as on firewalls in between. But later we will rather integrate the port handling into our SSH tunnel.
  • The PA service must be told to accept remote connections over TCP. We can use the “paprefs” application for it.
  • We may require some form of authentication to grant access. We move this point to SSH by opening a remote tunnel – so we can forget about this point.

To get some information about
what is playing where during the next steps it is useful to have the applications “pavucontrol” (pulseaudio volume control) and “paman” (pulseaudio manager) running. You find the relevant packets in the standard Update Repository of your Leap distribution. The packet “qemu-audio-pa” should be installed, too, if it is not yet present on your system.

Where is sound of the VM played if we do nothing?

The funny thing about sound in our remote scenario with SSH and a Unix socket on the KVM host is the following:

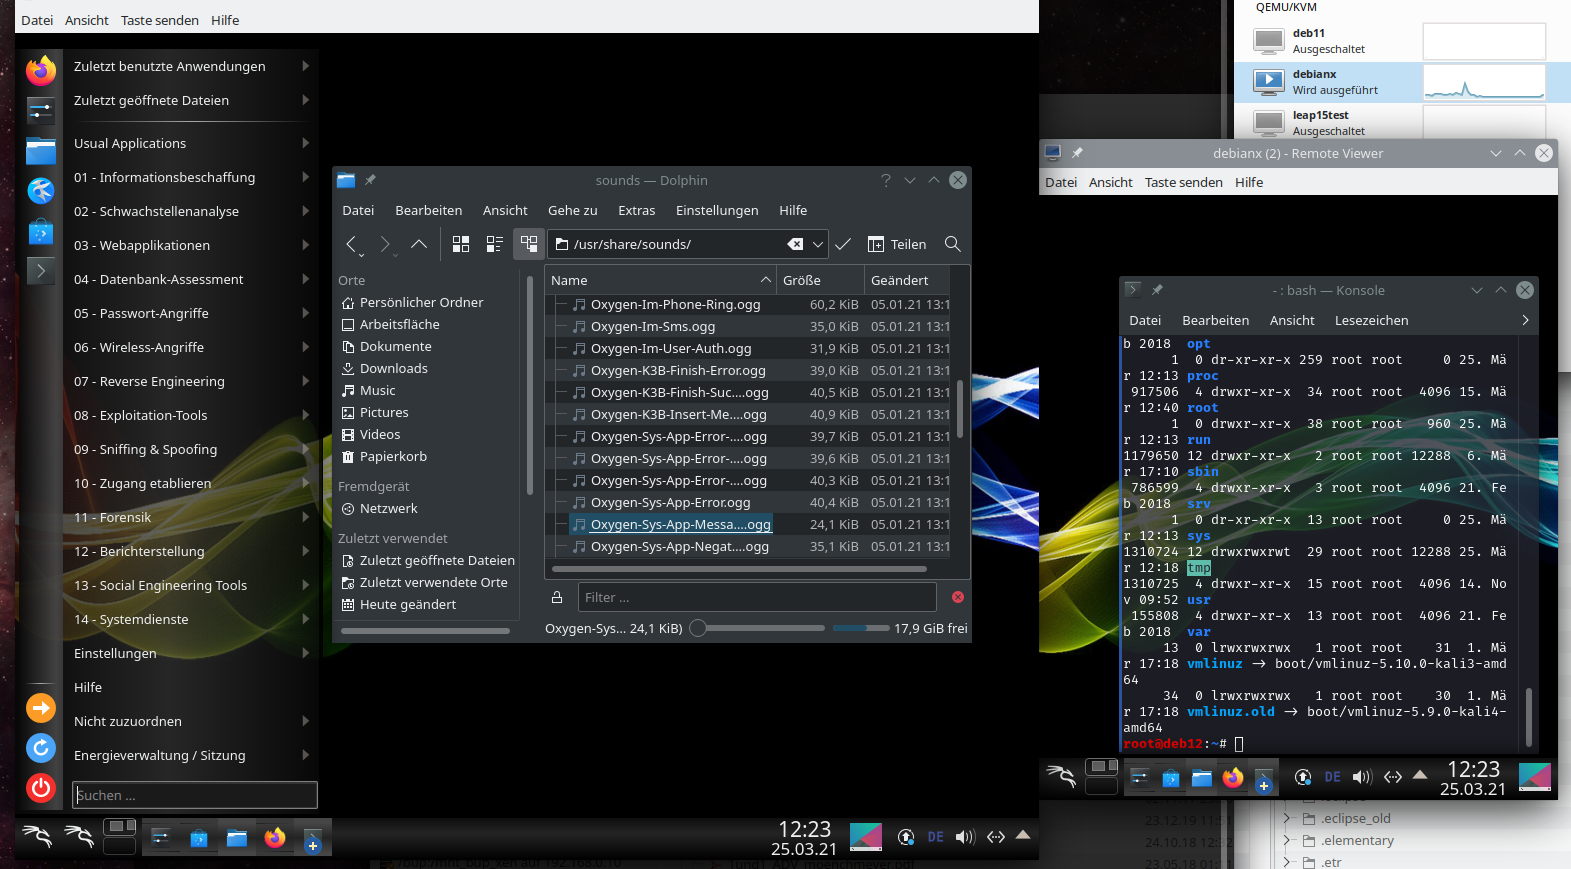
When we start remote-viewer on the KVM-server in our scenario without any special measures for audio, we will see the graphical output on the remote client, but hear the sound on the speaker system of the server (if it has any). Well, in my test scenario the “server” has such an equipment.

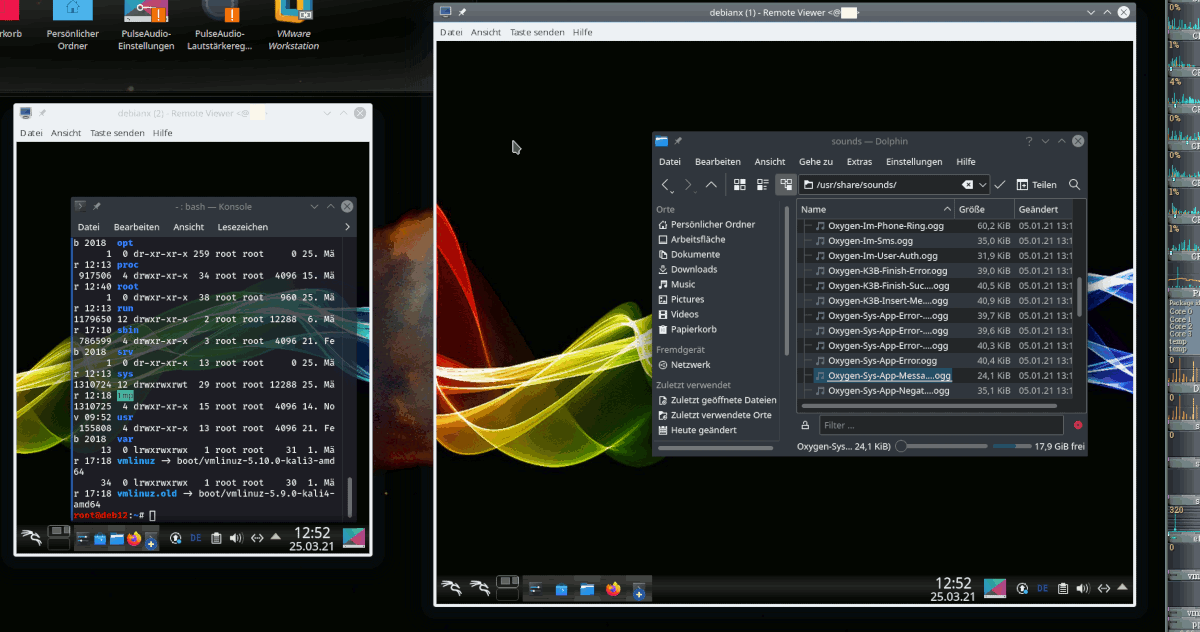
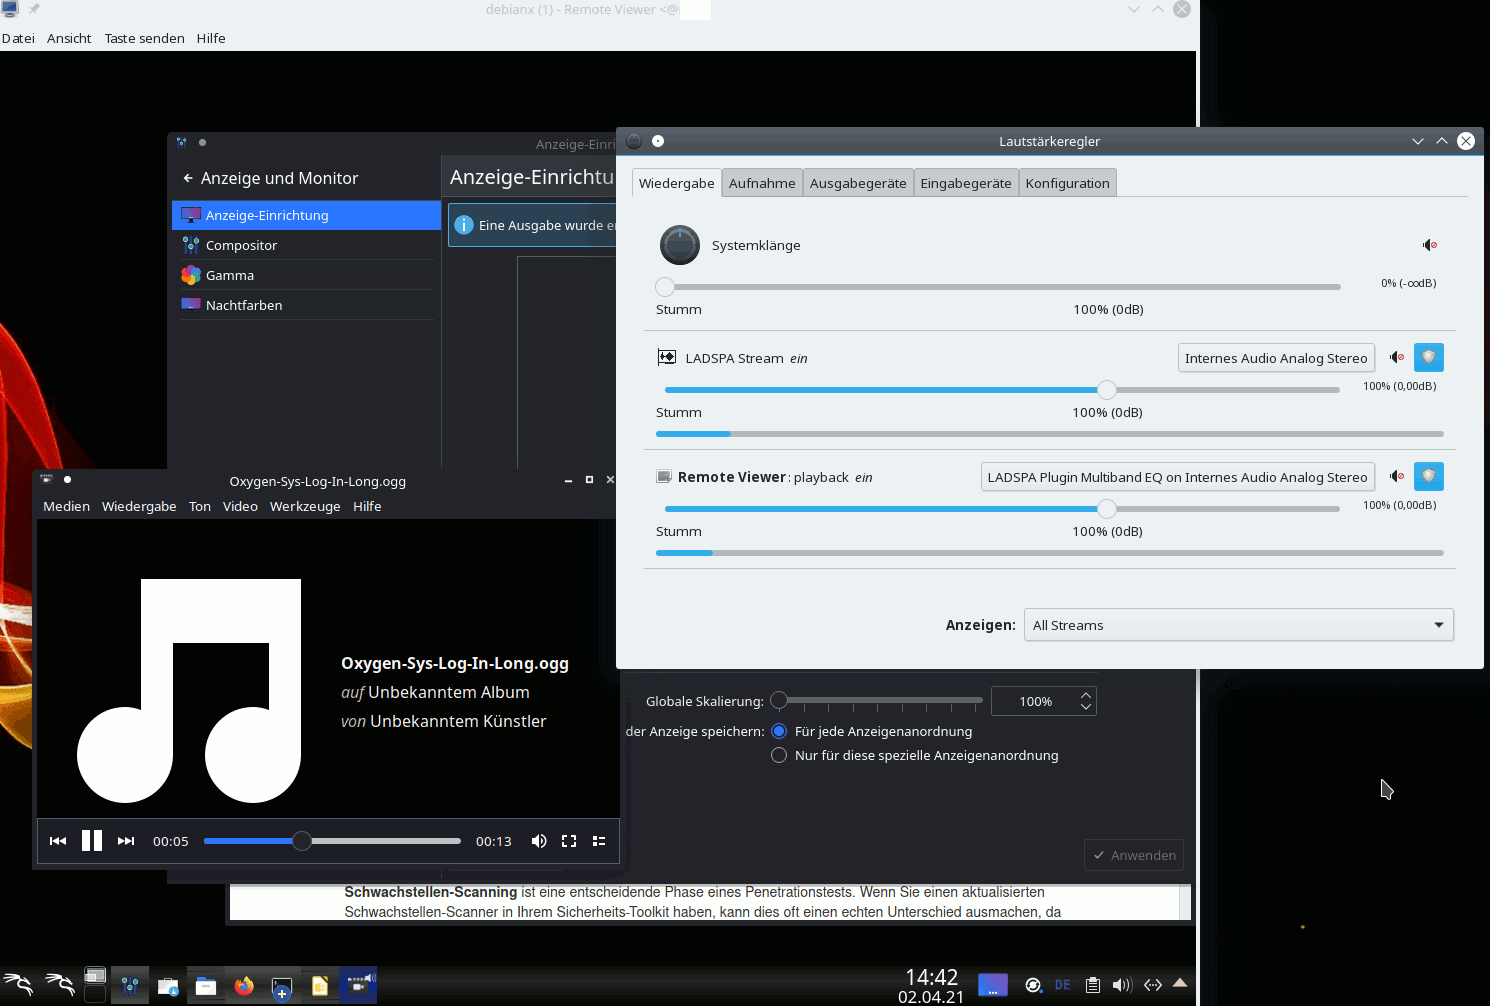
well, let us start some sounds via the Spice windows on the client “MyLAP”. In the above images you saw that I had opened a directory with KDE sound files. Whilst we play them (e.g. with the parole player) we can at the same time have a look at the pavucontrol window on the KDE desktop of user “uvmb” on the server “MySRV”:

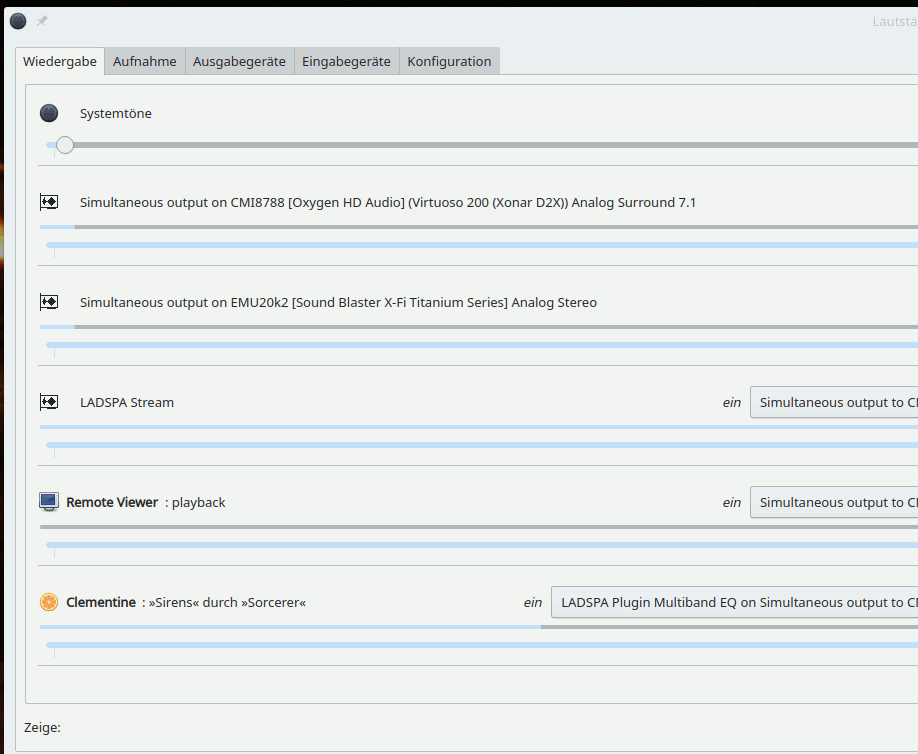
If you enlarge the image you see a PA-client there with the name “Remote Viewer”. This is not too astonishing as we had started remote-viewer on the KVM server and not on the remote laptop. And as a default remote-viewer interacts with the active PA on the system where remote-viewer itself is running:

Well this might be okay if the client and the server are in the same room. But if you had moved with your laptop into another room you, of course, would like to hear the sound on your laptop’s speakers. To achieve this we have to redirect the audio data stream of an application of the VM to a remote PA service.

How do we transfer sound from a SSH-server to the PA-system on the client during a SSH session?

I assume now that port 4713 is open on all firewalls. Still we have to prepare the PA-service on the remote client system – here on our laptop “MyLAP”.
For this purpose we open “paprefs” on MyLAP (NOT in the VM displayed in the Spice windows there, but in a standard terminal window of MyLAP’s desktop):

myself@mylap:~> paprefs

we turn to the tab “network server” and activate the following options:

Your laptop (the SSH- and Spice-client) is then able to work as a sound-server within the LAN.

Do not worry too much about the deactivated authentication. You can control in your firewall settings which system gets access – and later on we shall close port 4713 completely again for remote access by restrictive firewall rules. (If you really need authentication you must copy the cookie under “~/.config/pulse/cookie” from your laptop onto the server and uvmb’s folder structure.)

But now: How, do we tell an application started on the KVM-server to direct its audio output to the PA server on the laptop? Well, this is controlled by an environment variable “PULSE_SERVER”; see the documentation mentioned above about this.

You
can easily test this by opening a “ssh -X” connection from your remote system to an SSH server and redirect the audio output of an application like smplayer to the PA on your remote system. In my case:

<pre>myself@mylap:~/.ssh> ssh -X -i ~/.ssh/id_rsa_x uvmb@mysrv
Enter passphrase for key '/home/myself/.ssh/id_rsa_x': 
Last login: Thu Mar 25 09:54:53 2021 from 192.168.2.22
Have a lot of fun...
uvmb@mysrv:~> 
uvmb@mysrv:~> env PULSE_SERVER=192.168.2.22 smplayer & 
[1] 5041
uvmb@mysrv:~> 

Any sound played with smplayer is now handled by the PA on the laptop. See the screenshot from the laptop:

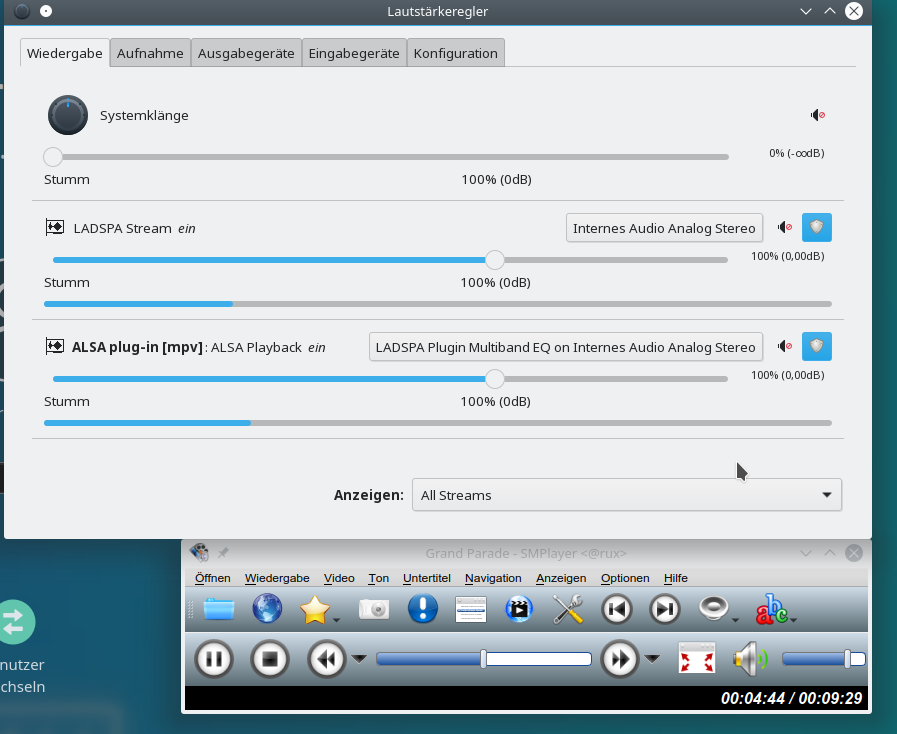
Now, we can of course do the same with our remote-viewer:

<pre>myself@mylap:~/.ssh> ssh -X -i ~/.ssh/id_rsa_x uvmb@mysrv
Enter passphrase for key '/home/myself/.ssh/id_rsa_x': 
Last login: Thu Mar 25 09:54:53 2021 from 192.168.2.22
Have a lot of fun...
uvmb@mysrv:~> 
uvmb@mysrv:~> env PULSE_SERVER=192.168.2.22 remote-viewer spice+unix:///var/spicex/spice.socket &
[1] 5041
uvmb@mysrv:~> 

You should hear any sound played with an audio application within the VM on the remote system (in my case on the laptop MyLAP):

Isn’t it fun?

Remote SSH tunnel and port forwarding for the transfer of audio data

Ok, we have a sound transfer – but not encrypted. This can – dependent on your audio applications – be a security hole. In addition we lack control over the users who may access our PA-server on the remote system. To cover both problems we are going now to make use of the full power of SSH. We open a reverse SSH tunnel with port forwarding from some arbitrarily chosen port on the KVM/Qemu server to port 4713 on the laptop:

<pre>myself@mylap:~/.ssh> ssh -X -R 44713:localhost:4713 -i ~/.ssh/id_rsa_x uvmb@mysrv
Enter passphrase for key '/home/myself/.ssh/id_rsa_x': 
Last login: .... from 192.168.2.22
Have a lot of fun...
uvmb@mysrv:~> 
uvmb@mysrv:~> env PULSE_SERVER=tcp:localhost:44713 remote-viewer spice+unix:///var/spicex/spice.socket &
[1] 5041
uvmb@mysrv:~> 

You see the difference? We direct the audio output of remote-viewer on the KVM-host to port 44713 – and SSH does the rest for us via port-forwarding (plus encryption). (Control question: Which system does “localhost” in the SSH statement refer to? The laptop or the KVM/Qemu server?)

The result of this sound redirection looks, of course, the same on pavucontrol on our remote client system as before.

We now can close the port 4713 by some suitable firewall rule on our client system for any external access. Due to SSH port forwarding we only access the port locally there. You can even pin it on the “lo”-device with the SSH command. Read about it on the Internet.

The additional overhead of the audio data transfer is minimal in comparison to the video data transfer triggered by window manager operations:

We speak about some 600 KiB/s for some stereo sound.

To make things complete –
here are the data transfer rates for high resolution Live TV video streaming from the VM on the KVM-server over “SSH -X” to the remote client (without data compression):

You see: Its Easter time! Old Hollywood movies are running on German TV …

Conclusion

The method to access the Spice console of a VM with remote-viewer and via a Unix socket locally on the KVM host enabled a first secure remote scenario by simply redirecting the graphical data stream from the KVM-server to a remote X-window service with “SSH -X”.
The combination with a virtio-video device proved to deliver a relatively small peak data transfer rate around 45 MiB/s for complex window operations requiring a fast redraw of major parts of the desktop in the remote Spice windows. Without SSH data compression we got a very good responsiveness of complex windows to fast movements induced by the mouse cursor on the remotely displayed desktop of the VM. We saw that we could reduce the resulting data transfer rates below 9 MiB/s by using SSH data compression. However, this had some negative impact on the felt responsiveness of operations triggering the window manager of the VM’s graphical desktop.
However, working with graphical applications like Libreoffice Draw on the remotely displayed desktop of the VM via Spice and SSH required substantially smaller transfer rates than in a scenario where we requested a display of the application by a direct “ssh-X” connection to the VM itself.
I have shown in addition that we can easily transfer the sound created by audio applications within the VM via a remote SSH tunnel and port forwarding to the Pulseaudio server on the remote client system.

In the next article of this series we are preparing a TLS based remote solution for accessing the Spice console of a VM.

Links

SSH with compression
https://www.xmodulo.com/how-to-speed-up-x11-forwarding-in-ssh.html?format=pdf

SSH with Pulseaudio
https://askubuntu.com/questions/371687/how-to-carry-audio-over-ssh

KVM/Qemu VMs with a multi-screen Spice console – I – Overview over local and remote access methods

KVM/Qemu based virtual machines [VMs] are a nice and comfortable part of my life with Linux. I use them both as dedicated entities for various services on a server host and as experimental test or work environments on my Linux workstation. Whereas the access to server VMs was dominated by SSH connections and CLI interaction so far, working with VMs on my PC was and is is characterized by graphical user-interfaces.

In the latter case we speak of desktop-virtualization: Connections to the virtual guests are set up locally via sockets (or via a network port over device “lo”) on the very same PC or workstation which also serves as KVM host. Supported by a client/server model for graphics, KVM/Qemu provides multiple capable methods for the local display of the graphical output of a VM. And by graphical output I mean a desktop environment as KDE, XFCE or Gnome.

For KVM/Qemu the combination of the so called

  • Spice display” and the Spice protocol
  • with drivers for potent virtual video devices (as QXL or Virtio)

offers a very convenient solution for the presentation of a VM’s graphical desktop with high performance – which, in my experience, is considerably faster than most VNC variants.

In addition:
With the help of certain Spice clients one can access a local VM via a desktop display which extents over up to four “screens“. All of these “screens” are displayed within scalable windows of your preferred basic desktop environment on your Linux machine – e.g. KDE, LXDE. This means that you can graphically work with a full fletched KDE desktop of the VM displayed in multiple windows within a KDE or Gnome environment on your local KVM/Qemu host (e.g your Linux workstation).

Can we get this comfort also with remote connections over a LAN? With encryption tunnels? The answer is yes – and related Qemu and Libvirt configurations are the main topics of this article series.

Why do I write about these subjects, at all? Recently, I needed to work with a KVM/Qemu guest remotely on an Opensuse Leap 15.2 server. I wanted to use a SSH tunneled connection with password authentication for a special graphical Spice client, namely “virt-viewer“. Being a bit naive, I ran into some major trouble. This in turn forced me to look closer at different possibilities for remote connections to KVM/Qemu based VM. Unfortunately, I found Opensuse’s documentation on Spice sparse – to say the best. But Spice gets especially interesting and somewhat complex with remote access methods, encryption and authorization.

In this article series I discuss some of the multiple configuration options I have experimented with. I restrict myself to Spice based solutions with the clients “virt-viewer“, “remote-viewer” and also “virt-manager“. In combination with SSH, TLS. I hope my experiences help other Opensuse Leap users to set up convenient remote solutions.

After giving some documentation links, I start with an overview over some selected remote access scenarios which are available. They are the most important ones and are all based on network ports. But, in the coming posts I will cover local access scenarios based on Unix sockets, too. And their combination with SSH.

Limitations

Unfortunately, I have to reduce expectations of readers who are out for “multi-user remote desktop solutions”. This is not what the present Spice solutions with the named clients will offer you. See below.

A topic which I will not address in the forthcoming articles is the setup of a local VM with OpenGL acceleration on the graphics device of the KVM host. With Nvidia cards and drivers this is
unfortunately a mess – and it is Nvidia’s fault, in my opinion. Very similar, by the way, to Nvidia’s EGL-based solution attempt for Wayland. All of this because of their own OpenGL handling and their declined support for GBM. So, let us not go there to avoid frustration …

Basic preparations of a KVM/Qemu VM: Documentation and guides?

I assume that you are already familiar with the basic set up and configuration of a KVM/Qemu based virtual machine – e.g. with virsh or virt-manager. If not, you will find valuable hints for Opensuse Leap systems in SuSE’s “Virtualization Guide

However, as said above, Opensuse’s documentation on virtualization does not give you much information about Spice. We only get a glimpse of it at the sections on “virsh” and “Qemu“. The information is rather spurious there; one doesn’t get a broader context. You may get a better understanding by reading introductory pages on the site “https://www.spice-space.org/“, especially the user manual
https://www.spice-space.org/spice-user-manual.html.
Regarding special configuration settings of a VM, see https://libvirt.org/formatdomain.html.

Spice with multiple screens requires a non default configuration of the VM’s QXL device

For a basic Spice setup there is not too much to do; “just” choose Spice for the display-settings of your VM and configure the VM’s QXL graphics device. Such a device corresponds to something like a virtual graphics card. Well, it sounds easy, but when I tried it myself, I had to experiment. To help others a bit: I have already discussed in depth how we can configure a KVM/Qemu guest and its QXL device such that it supports multiple scalable high-resolution screens for Spice clients. See the following articles:

KVM/qemu mit QXL – hohe Auflösungen und virtuelle Monitore im Gastsystem definieren und nutzen – I
KVM/qemu mit QXL – hohe Auflösungen und virtuelle Monitore im Gastsystem definieren und nutzen – II
KVM/qemu mit QXL – hohe Auflösungen und virtuelle Monitore im Gastsystem definieren und nutzen – III
KVM/qemu mit QXL – hohe Auflösungen und virtuelle Monitore im Gastsystem definieren und nutzen – IV

These posts were written in German; but with a little bit of goodwill one can understand the configuration settings and related commands.

An alternative today is to use a “virtio” video device in the VM’s configuration. I shall come back to this point in a later article.

What I did not cover in my previous posts on Spice was the broader spectrum of access options to a KVM/Qemu-based VM with libvirt/Space clients – both regarding local and remote connections. I only discussed how to use the “remote-viewer” client locally – despite the fact that its name already indicates something else. What I also disregarded in my articles in 2017 is the fact that
there are various (remote) access methods – direct ones and some through a libvirt-layer on the KVM-host. As always with Linux there are multiple ways to achieve your objectives :-).

However, when we use Spice instead of VNC we speak about a “one person” or a “one seat” solution.

Spice and libvirt => multiple methods to access exactly one graphical console of a KVM/Qemu based VM

What you should be aware of when you think of using Spice for a graphical access to a KVM/Qemu VM is the following:

1. The Spice protocol and the Spice display for KVM/QEMU based VMs do NOT provide a multi-user service for graphical remote terminals or remote desktop displays – at least not in their default configuration.

According to what I have read, anything in this direction still seems to be experimental. Instead:

2. We access a data stream describing the graphical contents of one or multiple screens of a console which is virtually “attached” to the VM.

Let us call this device a multi-screen Spice console of the VM.

The Spice console solution is fully integrated into the QEMU-emulator. The console screen data and related sound can, however, also be displayed and played on a remote Linux system. And here we face a point which makes the user’s life both convenient and complex at the same time :

3. The Spice console of a VM can be accessed by various protocols or protocol combinations. The Spice console is fully integrated with Qemu and directly accessible there via a (network) socket, but it is in addition accessible via libvirt components. This leads to a variety of connectivity options.

These aspects can be underestimated: Remote access for multiple screen requires sufficient band-width of the network. The second point excludes the application of Spice for multi-user scenarios. The third point opens up a range of local and remote access possibilities – some are more complicated to configure, some are more secure than others. Some options are deactivated in a default libvirt installation (not only on Opensuse Leap systems).

The most important connection options for standard libvirt/spice clients are summarized in the following schematic drawing.

The Spice console of a KVM/Qemu VM

The graphics shows a Linux KVM host at its center. KVM supports the VM emulator QEMU in the Linux kernel – thus making QEMU fast. Two virtual machines VM1 and VM2 are shown. VM1’s configuration includes a Spice (console) display – e.g. set up according to the following excerpt of a configuration example for a VM (done with virt-manager):

Note that the configuration item is called “display” in virt-manager (and “graphics” in the XML-configuration of a VM). I think that in the case of Spice “Console” would have been a better name. I should also warn you that the displayed configuration may lead to security risks – if not accompanied by protective measures.

Note also that “virt-manager” does not allow for a detailed QXL-configuration required for multiple screens on the displayed dialog. But you can edit the XML-files of the VM for this purpose via the second tab (or an editor;
you find the XML-files for VMs in the directory “/etc/libvirt/qemu” on Opensuse Leap systems):

The QXL configuration displayed here is an example – you may choose other parameters. (Or test out a “virtio” device; see a later article).

“One seat” console
In the lower right part of the first sketch above I have tried to express that a graphical Spice console corresponds to a “one console with one seat” situation. The console is only available for exactly one (authorized) user at a time. Note:

Any user having sufficient access rights may any time claim the console and throw you off the seat in front of the graphical console screen, if you do not secure the access to the console by a password (or other measures)!

We did not do this in the configuration example above; see the empty field for the password. I quote from the documentation:

“Spice does not support multiple connections to the same QEMU instance by default. So anybody who will connect to the same host and port can simply take over your session. You can solve this problem by using ticketing.” (see: https://www.spice-space.org/spice-user-manual.html)

“Ticketing” means setting a password to access the VMs console screen; but still anyone knowing the password could claim the console – a password is no real solution for a multi-user situation. To say it clearly:

If your objective is to establish something like a multi-user graphical access to a KVM/QEMU-based virtual machine with a full desktop display for each user (i.e. a “remote desktop solution”), then think about something like a headless graphical server configuration of the KVM guest. On a Linux VM, you can achieve this by either implementing a X2GO server, a commercial NoMachine server, a VNC server-variant or even XRDP. Some of these solutions can easily be combined with SSH.
And do not forget: In a LAN with sufficient bandwidth “ssh -X” may already serve most practical purposes.

But in many cases a local or remote “one seat situation” with a full graphical desktop may be sufficient. Now, let us look at the other parts of the drawing.

Different access options to the Spice console of a KVM/Qemu-based VM

There is a multitude of options to connect to the Spice console (https://www.spice-space.org/spice-for-newbies.html). We shall describe them briefly in this first article. In forthcoming articles we shall have a closer look at each of them.

Option 1: Simple connection with “remote-viewer” via a Spice (network) port

The Qemu-emulator is able to handle requests over the Spice protocol on its own, i.e. without the invocation of special libvirt-support. The Spice solution offers connections to the console either on the basis of a pure Unix socket (local solution) or a network port (remote solution).

A network oriented solution, which can be realized with the Spice client “remote-viewer” is depicted on the left side of our central sketch:

You access the Spice console of a specific VM directly via a specific network port. Spice ports have to be configured independently for each of the VMs. I.e., if you have 2 VMs whose Spice consoles you want to access independently then you need to define two different ports for the Spice consoles. Actually, you won’t be able to start a VM which has the same port associated with its Spice console as another already running VM.

nProperties of a remote-viewer connection over a network port:

  • Default port? The standard Spice port is 5900 (which is also the port used by VNC). In the example displayed above I instead used port 20001. (Do not forget to open your firewalls for your chosen ports!)
  • Security by encryption? The connection to the port is not secured by any encryption. However, it is possible to define an additional specific TLS-secured port. We shall cover spice + TLS protocol combinations in another article.
  • User authentication on the KVM server host? Can optionally be achieved via SASL.
  • Preferred Spice client? The Spice client which uses the Spice protocol directly and without libvirt is “remote-viewer“.
  • Works locally and/or remotely? Both.

Some additional hints:

In some old articles or posts on the Internet you may find descriptions of “virt-viewer” together with URIs like “spice://host:5900”. This does not work any more – at least on my systems.

By setting proper attributes to the VM, we can in addition enforce that it only accepts secured connections. For those who are eager to experiment already: Where do we learn something about such machine specific settings in XML-format? The answer is:
https://libvirt.org/formatdomain.html

Option 2: Connection with “virt-viewer” or “virt-manager” via libvirtd and a defined TCP port

Besides “remote-viewer” there is another Spice client called “virt-viewer“. This client is of special use when you work on a KVM host with multiple VMs. What some admins do not know is that it can be used via a simple socket with a specific TCP-port. You do not need SSH or TLS, if you can disregard security. This corresponds pretty much to what we got with remote-viewer and a Spice port. The difference is that we access the socket via the mediation of libvirtd components:

virt-viewer requires URIs which specify the target hypervisor for the libvirtd daemon – in our case “qemu”. Such URIs differ from URIs used for remote-viewer as they always contain a two fold protocol definition.

We shall apply such URIs in a later article. In addition this access method requires a special (non-default) configuration of the libvirt-daemon. Among other things, you, of course, have to define the port. The ability to listen to an insecure TCP port is normally deactivated in the libvirtd configuration; we have to activate it manually. This is something we shall have a closer look at.

Unencrypted access to the Spice console via a special libvirtd port may be a useful solution for KVM guests sitting in a secured physical LAN-segment or behind a virtual bridge/firewall in a virtualized LAN-segment of the KVM host.

Properties of a virt-viewer connection via a TCP port

  • Default port? 16509.
  • Security by encryption? The connection to the port is not secured by any encryption. However, we have other options for virt-viewer to connect to the VM via SSH or TLS secured connections. See below.
  • Preferred Spice client?: virt-viewer (You cannot provide a valid URI to remote-viewer this way). However, this connection option also works with “virt-manager” (and its included graphical access to the Spice console).
  • User authentication? Can be achieved via SASL.
  • Works
    locally and/or remotely?
    Both.

on the KVM host.
Note that the access to libvirtd must be allowed for the user invoking the connection! This can be configured on Opensuse Leap systems by some policy and/or libvirtd settings.

Option 3: Connection with “virt-viewer” or “virt-manager” via SSH and libvirtd

A very convenient method to get a secure connection with Linux is to use SSH encryption. Therefore, we are not astonished to find that “virt-viewer” can be combined with SSH. This connection method also requires a special URI-format. And again: access to libvirtd must be allowed for the user using this type of connection.

Properties of a virt-viewer connection via a SHH port:

  • Default port? 22 or otherwise the defined SSH-port on your system.
  • Security by encryption? SSH.
  • Preferred Spice client?: virt-viewer (You cannot provide a valid URI to remote-viewer this way). However, this connection option also works with “virt-manager” (and its included graphical access to the Spice console).
  • User authentication? Via SSH (preferably public-key authentication)
  • Works locally and/or remotely? Both.

Both options 2 and 3 work with virt-manager, too. However, virt-manager does not provide you with a multi-screen access to the Spice console.

Note that a combination of SSH and remote-viewer is also possible; but then you would open a “SSH -X” connection first and run remote-viewer on the KVM/Qemu host and not on the network client system. I will present such a solution in a later article, too.

Conclusion

The Spice console of KVM/Qemu offers access to a graphical desktop of a virtual machine guest. Spice clients as “remote-viewer”, “virt-viewer” and “virt-manager” can be used locally and remotely. The first two clients offer multiple screens – but all clients provide a one seat solution, only. This may, however, be sufficient for many use cases. There is a variety of local and remote access methods. Connections can be secured by TLS or SSH encryption.

In the next article

KVM/Qemu VMs with a multi-screen Spice console – II – local access with remote-viewer via a network port

I shall have a closer look at a local connection from the “remote-viewer” client to the Spice console of a VM.

Links

Spice console and Spice protocol
https://linuxhint.com/ configure_ spice_server_ debian_10/
https://www.spice-space.org/ spice-user-manual.html
https://www.spice-space.org/ spice-for-newbies.html

Activate spice
https://www.linux-kvm.org/page/SPICE
https://linux-blog.anracom.com/2017/08/15/kvmqemu-mit-qxl-hohe-aufloesungen-und-virtuelle-monitore-im-gastsystem-definieren-und-nutzen-iv/
https://octetz.com/docs/2020/2020-05-06-linux-hypervisor-setup/

Nvidia 🙁
https://www.phoronix.com/scan.php?page=news_item&px=XDC2016-Device-Memory-API

Further
articles in this series

KVM/Qemu VMs with a multi-screen Spice console – VIII – VM and user specific restrictions for remote-viewer connections – iptables and sudo
KVM/Qemu VMs with a multi-screen Spice console – VII – remote-viewer, qemu and SASL authentication
KVM/Qemu VMs with a multi-screen Spice console – VI – remote access with remote-viewer and TLS encryption
KVM/Qemu VMs with a multi-screen Spice console – V – remote access via remote-viewer, a network port and a SSH-tunnel
KVM/Qemu VMs with a multi-screen Spice console – IV – remote access via SSH, remote-viewer and a Unix socket
KVM/Qemu VMs with a multi-screen Spice console – III – local access with remote-viewer via a Unix socket
KVM/Qemu VMs with a multi-screen Spice console – II – local access with remote-viewer via a network port

Eclipse, Git, SSH2, Einträge in der ~/.ssh/config, Bug bei Ciphers mit Domain-Angabe

Wenn man mit Eclipse (Oxygen2, Neon3) Git-Repositories auf Remote-Servern versorgen will, macht man das natürlich über SSH. Ich hatte in einem früheren Blogbeitrag schon mal auf einen Artikel

https://stribika.github.io/2015/01/04/secure-secure-shell.html

hingewiesen, in dem verschiedene Härtungsmaßnahmen aufgezeigt werden. Natürlich verwendet man dabei auch eine Public Key Authentication, wobei der öffentliche RSA-Schlüssel in hinreichender Länge (> 2048 Bit) auf dem Server implementiert wird. Er ist dort wie üblich beim entsprechenden externen User in die Datei “~/.ssh/authorized_keys” einzukopieren.

Unter Eclipse ist dann in jedem Fall noch Folgendes erforderlich: Unter dem Menüpunkt

Window >> Preferences >> General >> Network Connections >> SSH2

trägt man im Fensterchen zum “General”-Tab das Verzeichnis ein, in dem man seine privaten Keys aufbewahrt – und listet zudem die von Eclipse zu verwendenden Keys für die verschiedenen Git- bzw. SSH-Server auf. Das sieht dann etwa so aus:

Ohne diese Einträge funktioniert eine key-basierte SSH-Authentifizierung unter Eclipse nicht. Das gilt nicht nur für Git sondern auch für andere Arten von SSH-Verbindungen etwa unter den “Remote Systems”-Modulen, für SFTP- und für SSH-Shell-Zugriffe. Die korrespondierende Git-Push-Konfiguration für SSH kann dann etwa wie folgt aussehen:

“55511” sei dabei der gewählte SSH-Port, unter dem der Server erreichbar sein soll. Der Leser muss an dieser Stelle natürlich die für ihn geletenden Einträge vorzunehmen.

Auf einem typischen OpenSSH-Server unter Linux lassen sich die Vorgaben des oben genannten Artikels zu Einträgen in der SSH-Konfigurationsdatei “/etc/ssh/sshd_config” problemlos umsetzen. Etwas anders sieht es aber auf dem OpenSSH-Client-System aus. Dort würde man gerne zumindest folgende empfohlenen Härtungseinträge in der Datei “~/.ssh/config” unterbringen:

Korrekte Einträge in der OpenSSH “~/.ssh/config”-Datei, die aber unter Eclipse nicht funktionieren:

  
Host myserv.myhosteddomain.net
KexAlgorithms curve25519-sha256@libssh.org,diffie-hellman-group-exchange-sha256
Ciphers chacha20-poly1305@openssh.com,aes256-gcm@openssh.com,aes256-ctr,aes256-cbc

Nutzt man die Zeile für “Ciphers” in der angegebenen Form, so funktioniert dies zwar für eine native SSH-Verbindung von der Kommandozeile eines Terminalfensters aus; Eclipse reagiert jedoch traurigerweise mit einer Exception “….. java.lang.NullPointerException“.

Ursache dafür ist eine falsche Behandlung von Domain-Angaben in den Cipher-Verfahren durch die zuständigen Eclipse-Module. Interessanterweise funktionieren aber die Domain-Angaben hinter den KEX-Verfahren!

Folgende Variante funktioniert mit den SSH-Modulen von Eclipse:

Funktionierende SSH-config-Datei für Eclipse:

  
Host myserv.myhosteddomain.net
KexAlgorithms curve25519-sha256@libssh.org,diffie-hellman-group-exchange-sha256
# The following does not 
work in Eclipse 
# Ciphers chacha20-poly1305@openssh.com,aes256-gcm@openssh.com,aes128-gcm@openssh.com,aes256-ctr,aes192-ctr,aes128-ctr,aes192-cbc
# This works, however: 
Ciphers aes256-cbc,aes256-ctr 

Es ist irgendwie traurig, dass Eclipse sich in puncto SSH und Cipher-Angaben fehlerhaft verhält; denn man steht nun vor einer (geringfügigen) Einschränkung der Sicherheit. 256Bit basierte AES-Verfahren sollten im Moment allerdings noch ausreichen.

Ich hoffe, das hilft dem einen oder anderen, der auf die oben genannte Exception stößt. Zu hoffen bleibt auch, dass die Eclipse-Entwickler solche Bugs baldmöglichst beseitigen.

firejail firecfg – Problem mit dem KDE-Login unter Opensuse Leap 42.3 – .ssh-Dateien und ssh-agent als Ursache

Experimentiert man unbedarft mir neuen Dingen, muss man sich nicht wundern, wenn man sich Probleme schafft. Jetzt passierte mir das mit firejail.

Ich muss manchmal Skype benutzen. Zu meinem großen Ärger, da jede Art von Closed Source UDP-Streaming Applikation ein prinzipielles Sicherheitsrisiko darstellt. In einen UDP-Datenstrom können immer Pakete integriert werden, die ganz anderen Zwecken dienen als der Übertragung der eigentlichen Audio- und Videodaten. Und wenn man dann den Code nicht kennt … Neben dem Aufsetzen eines speziell konfigurierten Containers ist die Nutzung von Firejail eine Gegenmaßnahme, solchen Applikationen das Vordringen ins System zu erschweren.

Opensuse 42.3 bietet im Repository “Virtualization
ein RPM-Paket firejail 0.9.5 zum Download an. Das habe ich installiert. nach der Installation war zunächst auch ein kein Problem feststellbar.

Aber dann habe ich ein wenig in der Dokumentation gestöbert. Auf der Seite https://firejail.wordpress.com/documentation-2/ findet man dann unter dem Titel “I’ve just installed Firejail, now what?!” Hinweise zu bestimmten Kommandos, um “pulseaudio” [PA] zu korrigieren (wundert mich nicht) und auch das Kommando “firecfg” auszuführen:

$ firecfg –fix-sound
$ sudo firecfg

Beides hat u.U. aber unangenehme Nebenwirkungen:

1) Pulseaudio zunächst nicht mehr deaktivierbar
Das erste Kommando korrigiert “pulseaudio”-Konfigurationsdateien zwar; es sorgt aber auch dafür, dass man unter Opensuse PA nicht mehr einfach über YaST und die dortige Audio-Konfiguraiton abschalten kann. Bekanntermaßen verwende ich PA nur, wenn nicht umgehbar. So erzwangen etwa frühere Skype Versionen für Linux ( u.a. die Version 4.3) die Nutzung von PA. Das ist beim aktuellen “skypeforlinux” (Beta) nicht der Fall; das kooperiert auch direkt mit Alsa.

Das ist auf meinem Laptop auch gut so, denn PA erzeugt dort ein dauerhaftes unangenehmes Hintergrundsgeräusch (niederfrequenter Pfeifton; keine Rückkopplung) auf meinem eingebauten Mikrophon (unabhängig von Skype). Das ließ sich auch durch Ändern der Empfindlichkeit und der Regelung von Verstärkungsfaktoren unter dem PA-eigenen “pavucontrol” nie beseitigen. Ein solches Geräusch tritt bei mir im reinen Alsa-Betrieb dagegen nicht auf.

Beseitigt habe ich die Aktivierung von PA dann durch Umbenennen/Verschieben der Datei “~/.pulseaudio” und anschließende erneute Deaktivierung von PA über YaST.

2) Kein KDE-Login und kein X11-Start mehr für bestimmte Accounts möglich
Schlimmer ist dagegen eine Auswirkung des zweiten Kommandos: Es erzeugt eine Liste von Links unter dem Verzeichnis von “/usr/local/bin“, die alle auf firejail verweisen. Normalerweise führt das dazu, dass viele Programme/Anwendungen über firejail gestartet und geschützt werden. Leider ist die Liste der Profile für Anwendungen aber keineswegs vollständig. Wird für eine Anwendung nichts gefunden, dann kommt wohl ein “default.profile” zum Einsatz. Letzteres verhindert aber den Zugriff u.a. auf ~/.ssh und ~/.gnupg-Verzeichnisse und dortige Dateien. Das wird aber unter Umständen unter Opensuse zu einem Megaproblem beim Start von KDE aus SDDM oder KDM heraus:

Ich konnte mich unter bestimmten Accounts nach dem Absetzen von firecfg nicht mehr von KDM oder SDDM aus in KDE (Plasma 5) einloggen. X11 wurde nicht gestartet; man landet nach ca. 1 Sekunde wieder auf dem KDM oder SDDM-Login-Schirm.

Die Fehlermeldungen hierzu waren unzureichend. Nach mühsamen Experimenten mit Konfigurationsdateien stieß ich schließlich darauf, dass allein die Existenz eines “~/.ssh“-Verzeichnisses zu Fehlern beim KDE-Start
führte. Entfernte ich das Verzeichnis komplett, ließen sich KDE und X11 wieder regulär starten.

Wer oder was will im Start “~/.ssh” auslesen? Mir fiel dazu zunächst nichts ein. Dann stieß ich auf ssh-agent. Und tatsächlich ergab sich unter Opensuse Leap 42.3 folgendes Bild:

mytux:~ # ps aux | grep ssh
root      1574  0.0  0.0  53492  5816 ?        Ss   13:30   0:00 /usr/sbin/
sshd -D
myself       4065  0.0  0.0  20136  1868 ?        S    13:30   0:00 /usr/bin/dbus-launch --sh-syntax --exit-with-session /usr/bin/ssh-agent /usr/bin/gpg-agent --sh --daemon --keep-display --write-env-file /home/myself/.gnupg/
agent.info-mytux.mydomain.de:0 /etc/X11/xinit/xinitrc
myself       4067  0.0  0.0  13312   332 ?        Ss   13:30   0:00 /usr/bin/ssh-agent /usr/bin/gpg-agent --sh --daemon --keep-display --write-env-file /home/myself/.gnupg/agent.info-mytux.mydomain.de:0 /etc/X11/xinit/xinitrc

Offenbar klappt diese Art des X-Starts nicht mit dem komplett gefüllten “/usr/local/bin” (genauer mit den dortigen Links). Ich sehe die Ursache – wie gesagt – im “default.profile”.

Die Link-Orgie unter “/usr/local/bin” beseitigt man übrigens mit

firecfg –clean

Danach klappt der Login in das X11/KDE-Gespann alles wieder. Meine Strategie ist im Moment, die Profile für verschiedene Anwendungen zu checken und “/usr/local/bin” langsam und systematisch mit Links zu füllen, die nur bestimmte Anwendungen betreffen.

Bei manchen alten Accounts habe ich zudem festgestellt, dass die Anlage der Links unter /usr/local/bin” auch dazu führt, dass jeglicher Netzwerkzugriff unterbunden ist. Hier bin ich noch an der Ursachenforschung.

Merke: Nicht gleich alles machen, was Manuals vorschlagen, wenn man von einer neuen Anwendung noch zu wenig versteht.

Veracrypt, SSHFS und kryptierte Datenhaltung auf gehosteten Servern – I

Ich kenne einige Kleinstunternehmen und Freiberufler, die Kunden- oder gar Patientendaten bei einem Provider lagern wollen. Zu Backup-Zwecken oder gar für einen Remote-Zugriff. Für mich stellt sich da die Frage:

Wie weit kann und darf man seinem Provider für gehostete Server oder Cloud-Dienste eigentlich trauen?

Administratoren haben bei Internet-Providern ja nicht nur theoretisch, sondern je nach Berechtigungsstufe faktischen, d.h. administrativ-digitalen oder womöglich gar physikalischen Zugriff auf die gehosteten Systeme und angebundene Datenhaltungssysteme. Der potentielle Zugriff ist in vielen Hosting-Szenarien (Container-Technologie etc.) inhärent gegeben und für den ordnungsgemäßen Betrieb z.T. sogar notwendig; unabhängig davon, ob sich Administratoren für die gelagerten Inhalte interessieren oder nicht. Einen potentiellen Zugriff von IT-Verantwortlichen auf die Inhalte von Daten oder Datenströme auf gehosteten Systemen verhindert auch eine ISO 27001-Zertifizierung des Providers (z.B. von Strato) nicht zwingend. Gesetzliche Datenschutz- und Geheimhaltungsvorgaben – insbesondere für Patientendaten – sind in simplen Hosting-Szenarien deshalb nur schwer einzuhalten. Hinzu kommt das Risiko potentieller Schwachstellen in der Technik zur Isolation gehosteter Dienste oder virtualisierter Server gegeneinander – insbesondere bei Einsatz von Container-Technologien.

Für Daten, die im eigenen oder – oft noch wichtiger – im Kundeninteresse zwingend geheimzuhalten sind, ist daher folgende Regel angebracht: “Im Internet und in der “Cloud” gibt es keine Freunde”.

Sichere Ablage von privaten Dateien oder Kunden-Daten auf gehosteten Systemen?

Was also tun, wenn man oft unterwegs ist und eine Art sicheren, privaten Cloud-Dienst benötigt, der es einem bei Bedarf erlaubt, z.B. vom Notebook aus zumindest auf einzelne, wichtige Dateien zuzugreifen? Die aber niemand anderes einsehen soll?

Aufwand und Kosten für Betrieb und Absicherung eines eigenen, im Internet exponierten Servers sind für kleine Firmen und Freiberufler durchaus ein Thema … Dann will man einerseits gerne auf Hosting-Angebote zurückgreifen, andererseits aber auch seine Geheimhaltungspflichten nicht verletzen … Und was tun, wenn der gewünschte Datenzugriff gar für mehrere Personen (in begrenzter Anzahl) ermöglicht werden soll?

Oftmals reichen in einem Szenario mit Remote-Zugang rein lesende Zugriffe auf die zentral gelagerten Daten aus. Zu ändernde Inhalte synchronisiert man ggf. rollierend in einem speziellen organisatorischen Prozess über einen definierten administrativen User.

Ein anderes, einfacheres Szenario ist die sichere Lagerung von verschlüsselten Daten als Backup bei einem Cloud-Dienst. Da will ein beauftragter Admin bei Gelegenheit ggf. nur einige Files oder Verzeichnisse austauschen oder zum aktuellen Bestand hinzufügen – und nicht alle zu sichernden Daten komplett neu hinterlegen. Umgekehrt will er bei Bedarf nur bestimmte Versionen von einigen Dateien aus dem verschlüsselten Archiv zurückholen. Andere Benutzer haben zum Backup jedoch keinen Zugang.

Unter diesen Voraussetzungen beginnt man sich als Linux-Anwender dafür zu interessieren, ob und wie man verschlüsselte Container-Files auf einem Server nutzen und bei Bedarf auf einem Client sicher über das Internet öffnen oder mounten kann. Geht so was? Wenn ja, ist das auch hinreichend schnell?

Ich bespreche nachfolgend einen Ansatz, der auf einem gehosteten Linux-Server, Linux-Endgeräten und Veracrypt aufbaut. Ich gehe davon aus, dass die geheimzuhaltenden Daten auf dem gehosteten Server in einem Veracrypt-“Container” lagern. Ich setze den Umgang mit und Wissen über Veracrypt [VC] voraus. Unter https://www.veracrypt.fr/ en/ Documentation.html findet man u.a ein Tutorial.
Das grafische VC-Interface macht das Erstellen und Mounten von Container-Dateien zu einer relativ einfachen Übung.

Das jeweilige (mobile) Endgerät, das auf den gehosteten Server zugreifen soll, bezeichne ich nachfolgend schlicht als “Client”. Es geht in diesem Artikel primär um die sichere Lagerung der Daten auf dem Server; dennoch halte ich ein einem zweiten ergänzenden Artikel auch ein paar grundsätzliche Anmerkungen zur Sicherheit der Daten auf den Clients für angebracht.

Einschränkung:
Ich behaupte und impliziere mit diesem Artikel keineswegs, dass die Nutzung von verschlüsselten Containern eine Maßnahme ist, die für sich schon Datenschutzvorschriften und Gesetzen, die die Geheimhaltung von Daten regeln, genügen würde. Das nachfolgende Diskutierte kann höchstens ein mögliches Element in einer ganzen Kette von Sicherheitsmaßnahmen sein. Genaueres muss man in jedem Fall mit seinem Datenschutzbeauftragten und auch Anwälten klären.

Verschlüsselung

Die dauerhafte Lagerung der Daten soll bei einem Provider oder Cloud-Dienst erfolgen. Aus der Einschränkung, dass Fremde und das Personal beim Provider die Daten in keinem Fall einsehen dürfen, ergibt sich:

Die geheimzuhaltenden Daten dürfen nur auf dem eigenen Endgerät bzw. den Endgeräten der eigenen Mitarbeiter in eine unverschlüsselte Form gebracht werden – und auch dort nur temporär.

Wesentlich ist einerseits also eine (hochwertige) Verschlüsselung auf allen relevanten Ebenen des Zugriffs und der Lagerung. Anderseits sind Vorkehrungen zu treffen, dass eine Entschlüsselung nur auf bestimmten Geräten abseits des Servers stattfindet:

  1. Anforderung 1: Ausschließlich verschlüsselte Ablage der Daten auf dem gehosteten Linux-Server. Das bedeutet aber auch: Auf dem Server dürfen keine unverschlüsselten Daten/Dateien/Dateifragmente im Speicher oder gar den Datenhaltungssystemen auftreten und verbleiben.
  2. Anforderung 2: Verschlüsselung des Transportwegs zum und vom Server.
  3. Anforderung 3: Entschlüsselung der Daten nur auf dem Client.
  4. Anforderung 4: Verschlüsselung bearbeiteter Dateien auf dem Client vor dem Rücktransfer zum Server.

Ein paar ergänzende Hinweise sind aus meiner Sicht angebracht:

Hinweis 1:

Da ein Betriebssystem, Linux-Desktop-Systeme und nicht zuletzt Anwendungen Daten in allen möglichen Verzeichnissen puffern und/oder im Hinhtergrund Sicherungskopien erstellen, bedeuten die Anforderungen 1 und 3, dass wir das Container-File nie (!) auf dem Server mounten und dort auch nie auf dessen Inhalte zugreifen dürfen. Würde man das tun, stünden die geheimzuhaltenden Daten dort ja irgendwo unkontrolliert im Klartext bereit. Besonders kritisch sind in diesem Zusammenhang übrigens SSDs mit Wear Leveling zu sehen (s. den kommenden 2-ten Artikel dieser Miniserie). Heute sind solche SSDs aber fast immer Teil von Hosting-Angeboten. Also:

Ein Szenario, bei dem Anwender über das Internet auf einen auf dem Server gemounteten und entschlüsselten VC-Container zugreifen, der für externe Nutzung (z.B. über NFS) freigegeben wurde, verbietet sich in unserem Szenario von vornherein.

Das ist eine ziemlich massive Einschränkung! Klassische VPN-Ansätze sind somit ohne weitere Maßnahmen unzureichend. Und auch der “Multiuser”-Zugriff auf per NFS bereitgestellte Containerinhalte fällt flach. Um erst gar nicht in Versuchung zu kommen, installiert man das Tool Veracrypt auf dem Server am besten überhaupt nicht. (Es wird dort auch nicht benötigt.)

Hinweis 2:

Die meisten Hosting-/Cloud-Angebote bzgl. Speicherplatz – u.a. auch Stratos HiDrive – verschlüsseln zwar den Transportweg, erfüllen aber nicht die Bedingung einer verschlüsselten Lagerung der Dateien im technisch meist unspezifizierten “Cloud”-Speicher. Tatsächlich empfiehlt z.B. Strato für die sichere Lagerung von Daten eine “Synchronisation” – genauer ein Up- und Downloaden – von verschlüsselten Containerdateien.

Obwohl nicht primäres Thema dieses Artikels wollen wir bereits erste Bedingungen bzgl. der Sicherheit der Daten auf dem Client formulieren. Schließlich will man Dateien, die man aus dem Server-Archiv kopiert hat, ja auch auf seinem eigenen Endgerät vor der Einsichtname durch Fremde schützen – z.B. für den Fall eines Verlusts des Laptops/Notebooks. Eine vollständige Sicherheitskette muss deshalb u.a. auch folgenden Anforderungen gerecht werden:

  • Anforderung C1: Haltung/Lagerung von Dateien, die aus dem zentralen VC-Container auf den Client (Notebook/Laptop) kopiert wurden, nur in verschlüsselter Form.
  • Anforderung C2: Vermeidung der Ablage von Dateien/Dateifragmenten, die durch das Öffnen von Dateien aus dem Container auf dem Client in unverschlüsselter Form entstehen und ggf. an verschiedenen Stellen des Verzeichnisbaums gespeichert werden.

Hinweis 3:
Vielen Anwendern ist nicht klar, dass die eigentliche Herausforderung bzgl. einer durchgehenden Datensicherheit in der Anforderung C2 besteht. Siehe hierzu die Anmerkungen und Hinweise im zweiten Artikel dieser Serie.

Einsatz von verschlüsselten Veracrypt-Containern

Würde man nur lokal arbeiten, könnte man zur Erfüllung der Anforderungen 1 und 3 auf Tools zur Erstellung verschlüsselter Container-Dateien zurückgreifen, die dann (als Loop-Device) im Dateisystem des Clients unter gleichzeitiger Dekryptierung gemounted werden. Entsprechende Anwendungen erledigen die Ver- und Entschlüsselung quasi “en passant”.

In Frage kommen hierfür unter Linux etwa LUKS, aber eben auch Veracrypt. Letzteres betrachten viele als verbesserten Nachfolger von Truecrypt.

Der Hauptentwickler von Veracrypt ist übrigens Franzose. Vive la France! Die Entwickler haben VC mit Hilfe von Sponsoren im Jahr 2016 einem Sicherheitsaudit unterziehen lassen. Das weckt Vertrauen. [Der Vollständigkeit halber sei darauf hingewiesen, dass meines Wissens aber noch nicht alle Mängel aus dem Sicherheitsaudit von 2016 behoben sind – sehr wohl aber die wichtigsten (s. die entsprechenden Links am Ende des Artikels)]. Für uns relevant ist hier aber folgende Aussage der Entwickler:

Note that VeraCrypt never saves any decrypted data to a disk – it only stores them temporarily in RAM (memory). Even when the volume is mounted, data stored in the volume is still encrypted.

Zitiert nach “https://www.veracrypt.fr/ en/ Beginner%27s%20 Tutorial.html“. (Hervorhebung von mir.)

So wie das geschrieben ist, sollte das also auch gelten, wenn das Verzeichnis, auf dem die Veracrypt-Container-Datei liegt, mit einem geeignetem Tool auf einem Remote-System gemounted wird. Der Container auf dem Server enthält und erhält auch dann nur kryptierte Daten.

1-User-Szenario mit Veracrypt

Wir betrachten zunächst ein 1-User-Szenario. Der User habe auf dem Server den Usernamensmy” und auf dem Client “myself“.

Ich gehe davon aus, dass der Anwender mit Hilfe von Veracrypt bereits ein verschlüsseltes Container-File angelegt und dieses über SFTP oder SCP auf dem gehosteten Server hinterlegt hat. (Der Anwender hat es dort aber wegen der oben angeführten Gründe nie geöffnet!)

Das
Container-File selbst sei auf dem Server als Datei “/mydirs/conts/vc_cont_srv” gespeichert, also im Verzeichnis “/mydirs/conts”.

Weiter gehe ich davon aus, dass der Anwender auch lokal (auf dem Client) einen verschlüsselten Veracrypt-Container angelegt hat, um dort Dateien (evtl. Datei-Kopien vom Server-Container) verschlüsselt abzulegen. Der lokale Veracrypt-Container sei in Form der Datei “/home/myself/mycont/vc_cont_cli” gespeichert.

Auf dem Client seien mehrere Mount-Punkte für Remote-Verzeichnisse und VC-Container vorgesehen.

Mount-Punkte auf dem Client:

  • “/home/myself/mnt_remote” für das Mounten eines beliebigen Remote-Verzeichnisses (hier etwa von “conts”).
  • “/home/myself/mnt_vc_srv” für das Mounten des Veracrypt-Containers vom Server (“vc_cont_srv”).
  • “/home/myself/mnt_vc_cli” für das Mounten des lokalen Veracrypt-Containers (“vc_cont_cli”).

Zielsetzung: Zweistufiges Mounten statt Hin- und Herschieben kompletter Containerfiles

Wir möchten in unserem Szenario nicht größere Containerfiles vom Server zum Client kopieren, dort lokal mounten, damit arbeiten und danach wieder das geänderte Veracrypt-Containerfile vollständig auf den Server zurückschieben. Das ist unbequem und kostet bei großen Containern in Abhängigkeit von der Bandbreite der Internet-Anbindung des Clients natürlich Zeit – besonders beim Upload.

Unser Lösungsansatz besteht vielmehr darin, das Verzeichnis des Servers, das den VC-Container enthält, remote auf dem Client zu mounten. Anschließend hängen wir das Containerfile mit Hilfe von Veracrypt in den lokalen Verzeichnisbaum des Clients ein. In der obigen Skizze sind beide sukzessiven Schritte des Mountens angedeutet.

Die Dekryptierung und bei Änderungen auch die Kryptierung von Container-Inhalten (neue oder geänderte Files/Verzeichnisse) würde im Zuge eines solchen Verfahrens allein im RAM des Clients vor sich gehen.

Nun ist Mounten ein Prozess, bei dem nicht das gesamte Filesystem durchforstet werden muss, und der deshalb schnell ist. Unsere Hoffnung ist also, dass dies auch für das Mounten des VC-Containers aus einem remote gemounteten Verzeichnis gilt. Falls das so funktionieren würde, läge der wünschenswerte Unterschied gegenüber einem Hin- und Her-Kopieren des gesamten Container-Files vor allem darin, dass bei Zugriffen auf Container-Inhalte nur diejenigen (verschlüsselten) Datenbereiche über Inodes addressiert und transferiert würden, die am Client tatsächlich benötigt werden.

Zunächst (beim Mounten) vor allem Veracrypt-Header und Verzeichnisstrukturinformationen. Blöcke, die zu einzelnen Dateien gehören, welche anschließend dem Client mit lokalen Instrumenten wie Editoren geöffnet werden, müssten allerdings vollständig übertragen werden (soweit es sich nicht um streambare Dateien handelt) – aber eben nur die Blöcke der zu bearbeitenden Dateien. Und nicht der komplette Container. Ein vollständiger Datei-Transfer ist ggf. auch für Schritte zum (Zwischen-) Speichern geänderter Dateien zu erwarten (s.u.). Deshalb arbeiten wir auf dem Client evtl. effizienter mit Kopien (s.u.), die wir nach Abschluss der Arbeiten wieder in den gemounteten Container laden.

Einsatz von SSH für die Verschlüsselung des Transportweges

Um der Anforderung 2 nachzukommen, können wir unter Linux z.B. auf SSH (genauer: OpenSSH mit Key-Authentication) setzen. Ansonsten müssten wir uns mit einer aufwändigen Kerberos- und NFS4- Konfiguration herumschlagen,
um eine hinreichende Verschlüsselung zu erreichen. SSH bringt zugegebenermaßen Latenzprobleme mit sich – aber bei aDSL/vDSL-Verbindungen mit begrenzten Upload-Geschwindigkeiten ist das vermutlich nicht mal das primäre Problem, über das es sich nachzudenken lohnt.

Wie man SSH für eine schlüsselbasierte Authentifizierung konfiguriert, habe ich in diesem Blog schon mehrfach an anderer Stelle besprochen. Ich gehe daher davon aus, dass für den SSH-Zugang zum gehosteten Server auf dem Client ein (passwortgeschütztes) Keyfile etwa unter “~/.ssh/KEYFILE” bereitsteht.

Zu weiteren Maßnahmen für eine Absicherung der SSH-Verbindung gegenüber Angriffen siehe etwa https://stribika.github.io/ 2015/01/04/ secure-secure-shell.html. In Sinne des genannten Artikels hat man sich natürlich um aktuelle OpenSSH-Versionen zu kümmern. Vor allem aber sollte man die einzusetzenden asymmetrischen SSH-KEX-Algorithmen, symm. Verschlüsselungs- und Hash-Algorithmen auf noch als sicher geltende Verfahren einschränken!

Einsatz von SSHFS

SSH erlaubt zunächst nur eine verschlüsselte Verbindung. Wir wollen in unserem Szenario ja aber das Verzeichnis “conts” vom Server mounten. Dafür haben wir mehrere Möglichkeiten, u.a.

  • CIFS über einen SSH-Tunnel,
  • NFS3/4 über einen SSH-Tunnel.
  • NFS4 mit Kerberos
  • SSHFS.

Vermutlich ist NFS4 die performanteste und skalierbarste unter den genannten Alternativen. NFS4 erfordert jedoch Einiges an grundsätzlicher Konfigurationsarbeit – im Besonderen bzgl. der Benutzerberechtigungen. Hinzu kommt die Einrichtung der SSH-Tunnel. Will man SSH-bedingte Latenzprobleme vermeiden, führt kein Weg an NFS4 und Kerberos vorbei. Damit sind manche User evtl. überfordert.

Ich greife in diesem Artikel daher mal zu SSHFS; das kombiniert mir den Einsatz von FUSE bei gleichzeitiger Verschlüsselung der Verbindung: FUSE erlaubt es, Filesysteme auf einfache Weise im Userspace zu mounten. SSHFS erlaubt das Mounten von Remote-Verzeichnissen über FUSE und unter SSH. Dabei werden u.a. Fähigkeiten von SFTP genutzt. Letzteres ist bei OpenSSH dabei. Voraussetzung der Nutzung ist die Installation der Distributionspakete zu FUSE und SSHFS. Auf dem Server muss OpenSSH natürlich hinreichend eingerichtet sein. Der zugehörige Port muss in der Firewall geöffnet sein. Zugangsberechtigungen sollten auf User-, Gruppen-Ebene und Host-Ebene geregelt sein.

Es ist – wie bei SFTP auch – möglich, bestimmte SSHFS-Benutzer auf das Mounten definierter Verzeichnisse unterhalb eines CHROOT-Verzeichnis einzuschränken. Dafür nimmt man als Admin normale SFTP-Einstellungen für User- und Gruppen-Zugriffe auf ein definiertes CHROOT-Directory vor. Siehe hierzu etwa
https://wiki.archlinux.org/ index.php/SSHFS
https://wiki.archlinux.org/ index.php/ SCP_and_SFTP
SFTP mit Key-Authentication auf (gehosteten) Linux-Servern für Web-Entwickler mit unterschiedlichen Privilegien – II

Performance von SSHFS?

Man sollte sich bei Gelegenheit mit den Parametern von SSHFS zum Caching, zur Komprimierung etc. befassen. Das Schöne ist, dass man bei etwas Optimierung in einigen Anwendungsfällen sehr wohl an die Performance von NFS herankommt – mit Ausnahme von Random Read-Operationen (max. 60% der NFS-Performance ohne SSH-Tunnel). Siehe für Benchmark-Daten und Optimierungshinweise:

http://www.admin-magazine.com/ HPC/ Articles/ Sharing-Data-with-SSHFS
https://www.smork.info/ blog/ 2013/04/24/ entry130424-163842.html
http://www.linux-magazine.com/ Issues/ 2014/165/ SSHFS-MUX
http://homepages.warwick.ac.uk/ staff/ E.J.Brambley/ sshspeedtest.php
Kritik: http://julio.meroh.net/ 2016/02/ sshfs-performance-analysis-for-builds.html

Tip: Bei langsamen Leitungen sollte man unbedingt auch Performance-Vergleiche für Zugriffe mit oder ohne Kompression anstellen.

Mounten des Server-Verzeichnisses mit SSHFS

Ich gehe mal davon aus, dass auf dem Client (Laptop/Notebook/PC) zu einem bestimmten Zeitpunkt nur ein User – hier “myself” – arbeitet. Wie mounted der nun konkret ein Verzeichnis vom Server unter Beachtung des Key-Files mit SSHFS?

Der Server habe beispielsweise die Adresse “h1234567.stratoserver.net”. Der SSH-Zugang sei dort in der Firewall z.B. unter dem Port 57888 geöffnet. Der notwendige Befehl zum Mounten des oben angegebenen Remote-Verzeichnis wäre dann:

myself@mytux:~> sshfs -p 57888 -o "IdentityFile=/home/myself/.ssh/KEYFILE"  smy@h1234567.stratoserver.net:/mydirs/conts/ ~/my_mnt -o idmap=user -o uid=$(id -u) -o gid=$(id -g) 
Enter passphrase for key '/home/myself/.ssh/KEYFILE':

 
Durch die Optionen “-o uid=$(id -u) -o gid=$(id -g)” wird eine Abbildung der UID und GID des lokalen Users “myself” auf den Remote-User “smy” und dessen Rechte geleistet! Das ist eine sicherheitsrelevanter Punkt, den man bei Konfigurationen für mehrere User im Auge haben muss.

Hinweis: Man kann die Optionen übrigens auch nur nach einem “-o”, dann aber kommasepariert angeben.

Man wird zur Eingabe des Passworts aufgefordert. Danach steht einem der Inhalt des gemounteten Verzeichnisses bereits zur Verfügung:

myself@mytux:~> la my_mnt
insgesamt 573448
drwx------  1 myself users      4096 19. Aug 14:58 .
drwxr-xr-x 83 myself users      4096 20. Aug 15:38 ..
-rw-------  1 myself users 524288000 19. Aug 15:29 vc_cont_srv
myself@mytux:~> 

Mounten des Veracrypt-Containers auf dem Client – Fehlermeldung ???

Funktioniert nun bereits der zweite Schritt, nämlich ein lokales Mounten des Containers “vc_cont_srv”, der uns auf dem Client ja nun unter “/home/myself/my_mnt/vc_cont_srv” zur Verfügung steht? Leider Nein!

Versucht man wie gewohnt, den Container mit Veracrypt auf das Zielverzeichnis “/home/myself/mnt_vc_srv” zu mounten, so erhält man eine Fehlermeldung der Art:

Keine Berechtigung:
/home/myself/my_mnt/vc_cont_srv

VeraCrypt::File::Open:232 

Was ist die Ursache und wie kann man damit umgehen?

Rechteproblem beim lokalen Mounten eines Veracrypt-Containers aus einem SSHFS/Fuse-Verzeichnis heraus

Die Fehlermeldung deutet an, dass bereits der Zugriff auf das Containerfile selbst nicht klappt! Man könnte dabei auf ein Problem mit SSHFS-Rechten tippen; ggf. mit der UID und GID-Abbildung. Führt man aber einen Zugriff auf andere Dateien mit gleicher User-Berechtigung durch, so geht das einwandfrei! Also muss das Rechteproblem am Zusammenspiel von Veracrypt mit FUSE liegen. Ein wenig Recherche im Internet zeigt, dass Veracrypt den Mount-Prozess mit “root”-Rechten abwickelt. Nächste Frage: Darf “root” denn nicht auf die Inhalte des gemounteten FUSE-Filesystems zugreifen? Ein Versuch zeigt tatsächlich:

mytux:~ # cd /home/myself/my_mnt
-bash: cd: /home/myself/my_mnt: Permission denied
mytux:~ # cd /home/myself/
mytux:/
home/myself # 

Es handelt sich hier um eine (sehr sinnvolle) Sicherheitssperre unter FUSE! Die ist vor allem auf Multiuser-Systemen wichtig! Interessanterweise kommen dabei andere und mehr Gründe als nur die Sorge um reine Zugangsberechtigungen ins Spiel. Siehe hierzu: https://www.kernel.org/ doc/ Documentation/ filesystems/ fuse.txt

Kann man diese Sperre für unsere Situation umgehen? Antwort: Ja, wenn das von “root” auf dem Client erlaubt wird oder wurde! Es geht dabei um eine grundlegende FUSE-Sicherheits-Einstellung, die man in der dortigen Datei “/etc/fuse.conf” vornehmen muss. Siehe hierzu:
http://man7.org/linux/man-pages/man8/mount.fuse.8.html
https://wiki.ubuntuusers.de/ FUSE/

Auf einem Client-System unter Debian sieht diese Datei etwa wie folgt aus:

root@deb:~# cat /etc/fuse.conf 
# /etc/fuse.conf - Configuration file for Filesystem in Userspace (FUSE)

# Set the maximum number of FUSE mounts allowed to non-root users.
# The default is 1000.
#mount_max = 1000

# Allow non-root users to specify the allow_other or allow_root mount options.
#user_allow_other
root@deb:~# 

In unserem Fall, in dem der User “myself” allein dem Laptop nutzt, finde ich es akzeptabel, die Option

user_allow_other

zu setzen – also das Kommentarzeichen “#” zu entfernen.

Hinweis:
In einigen Linux-Distributionen (Opensuse Leap, Ubuntu) ist die Konfigurationsdatei “/etc/fuse.conf” aber nicht mal vorhanden. Macht nichts: Man kann sie einfach anlegen; sie wird dann ausgelesen.

Unser User “myself” hat nach dieser grundlegenden Systemänderung dann zwei Optionen, zwischen denen er unter SSHFS wählen kann: “allow_root” und “allow_other”. Für unsere Zwecke genügt “allow_root”. Wir müssen unseren SSHFS-Befehl noch wie folgt anpassen:

myself@mytux:~> sshfs -p 57888 -o "IdentityFile=/home/myself/.ssh/KEYFILE"  smy@h1234567.stratoserver.net:/private-backup/private-backups/conts/ ~/my_mnt -o idmap=user -o uid=$(id -u) -o gid=$(id -g) -o allow_root   
Enter passphrase for key '/home/myself/.ssh/KEYFILE':

 
Die erforderlichen Kommandos wird man als Admin des Clients natürlich in adäquater Weise in Scripts einbauen, die man dem User bereitstellt.

Jedenfalls klappt es danach auch mit Veracrypt: Der User “myself” kann das File endlich in seinen Verzeichnisbaum einhängen. Hat man im Veracrypt-Dialog den Slot 4 gewählt und den vorgesehenen Mount-Point “/home/myself/mnt_vc_srv” explizit unter “Options” eingetragen, so sieht das Ergebnis wie folgt aus:

myself@mytux:~> mount
smy@h1234567.stratoserver.net:/mydirs/conts/ on /home/myself/my_mnt type fuse.sshfs (rw,nosuid,nodev,relatime,user_id=1029,group_id=100,allow_other)
veracrypt on /tmp/.veracrypt_aux_mnt1 type fuse.veracrypt (rw,nosuid,nodev,relatime,user_id=0,group_id=0,allow_other)
/dev/mapper/veracrypt4 on /home/myself/mnt_vc_srv type ext4 (rw,relatime,data=ordered)

 
In meinem Testfall kontrolliere ich noch, ob der Inhalt des Containers auch angezeigt wird:

myself@mytux:~> la ~/mnt_vc_srv
insgesamt 76127
drwxr-xr-x  3 myself  users     1024 19. Aug 16:14 .
drwxr-xr-x 83 myself  users     4096 20. Aug 15:50 ..
-rwxrwxrwx  1 myself  users 19580917 18. Nov 2011  ajax.pdf
-rw-r--r--  1 root root   3544281  6. Jan 2017  blktrace_sdb6_kernel44.zip
drwx------  2 root 
root     12288 19. Aug 15:29 lost+found
-rw-r--r--  1 myself  users 31498557  4. Jan 2017  Reiher-848x480-13064.mp4
-rw-r--r--  1 myself  users  1159382  4. Jan 2017  Reiher-848x480-600kb.mp4
-rw-r--r--  1 root root   9963112  6. Jan 2017  sdb6.blktrace.0
-rw-r--r--  1 root root   5791834  6. Jan 2017  sdb6.blktrace.1
-rw-r--r--  1 root root   3864342  6. Jan 2017  sdb6.blktrace.2
-rw-------  1 root root   2529586  6. Jan 2017  sdb6.blktrace.3
myself@mytux:~> 

 
Das sind offenbar keine besonders gheimnisvollen Daten. Ist ja nur ein Test. Man sieht, dass auch der User “root” hier mal was abgelegt hat. Obwohl ich (“myself”) gemountet habe, werden die Zugriffsrechte aber natürlich nicht umgangen:

myself@mytux:~> cat mnt_vc_srv/sdb6.blktrace.3
cat: mnt_vc_srv/sdb6.blktrace.3: Keine Berechtigung
myself@mytux:~> 

Man kann nun auf dem Verzeichnis unter “/home/myself/mnt_vc_srv” nach Bedarf arbeiten. Z.B. Libreoffice-Dateien anlegen und bearbeiten.

Wie lange dauert das Mount des VC-Containers?

Das Mounten des Verzeichnisses “conts” mit SSHFS geht sehr schnell von statten. Das anschließende Mounten
eines 1GB großen Containers, der mit 500 MByte an Dateien in einem recht verzweigten Baum gefüllt war, dauerte bei Tests mit einer aDSL-Verbindung [16MBit/s] nur zwischen ca. 4 und 5 Sekunden.

Das ist akzeptabel. Es ist offensichtlich, dass hierfür (wie erwartet) nicht das gesamte Container-File transportiert wird. VC genügt offenbar der Zugriff auf Header Informationen aus dem File und den Filesysteminformationen für das Loop-Device.

Arbeiten mit größeren Files – z.B. unter LibreOffice Writer

Ich habe testweise mal ein 2,4 MByte großes odt-File unter LO-Writer editiert und zwischendrin immer wieder abgespeichert. Da sieht es dann so aus, dass das gesamte File zur Ablage über das Netz transferiert wird. Reguläres Speichern im Hintergrund gibt es unter LO ja leider nach wie vor nicht …

Das ist bei einer langsamen Verbindung natürlich nicht prickelnd – LO Writer ist während des Speicherns bei einer ADSL-Uploadgeschwindigkeit von 2.4MBit zw. ca. 7 – 8 Sek. nicht benutzbar.

Das Speichern von Wiederherstellungsinformation passiert dagegen ja lokal am Client und geht schnell. Aber reguläres Speichern eben nicht. Dafür benötigt man eine hinreichend schnelle Verbindung.

Alternativ arbeitet man jedoch am besten mit einer lokalen Kopie der Datei und lädt die dann “hoch”, indem man sie in das gemountete Verzeichnis unter dem Vercrypt-Mountpunkt /home/myself/mnt_vc_srv” des Servercontainers kopiert. Immerhin muss man so nur einzelne Dateien kopieren und nicht den ganzen Container!

Unmount?

Hat man seine Arbeiten beendet, so muss man zwei Unmounts in folgender Reihenfolge vornehmen:

  1. Unmounten des Veracrypt-Containers vom Verzeichnis “/home/myself/mnt_vc_srv”. Dies macht man am besten über das VC-Interface.
  2. Unmounten des SSHFS Remote-Verzeichnisses vom Verzeichnis “/home/myself/my_mnt”

Für Letzteres ist der Befehl “fusermount -u” heranzuziehen:

myself@mytux:~> fusermount -u my_mnt

Weiter oben hatte ich ja auf Parameter von SSHFS für eine Optimierung (Cahcing etc.) hingewiesen. Das Caching sorgt bei viel RAM auf dem Client in vielen Situationen übrigens für einen falschen Eindruck beim Dateitransfer. Kopiert man etwa mittels eines Dateimanagers wie Dolphin größere Dateien in Richtung Server, so signalisieren Dolphin bzw. KDE einem ein sehr schnelles Ende des Transfers; das findet aber nur im lokalen Puffer statt. Der echte Transfer über Netz hat dann bei langsamen Upload-Verbindungen gerade erst begonnen.

Man sollte bei größeren Dateitransfers also den
ausgehenden Netzverkehr im Auge haben, bevor man mit dem Unmounten beginnt. Oftmals ist noch nicht alles zum Server transferiert worden, was da hin muss.

Verbindungsabbruch und Folgen

Was ich im Vorfeld dieses Artikels nicht getestet habe, sind Folgen einer Verbindungsunterbrechung. Dennoch kann man dazu was sagen. Ein Verbindungsabbruch hat potentiell Konsequenzen für die Konsistenz des Container-Files, aber auch des umgebenden Filesystems auf dem Server. Probleme mit letzterem sind mit Hilfe von “fsck” auf dem Server relativ einfach zu beheben. Zumindest, wenn man das Verzeichnis auf dem Server mit einem eigenen Filesystem unterlegt hatte – wozu ich ausdrücklich rate, falls dies denn im Rahmen des Hosting-Paketes möglich ist!

Schwieriger sieht es mit der internen Konsistenz des Container-Files selbst aus. Hier muss man auf dem Client (!) eine Dekryptierung ohne Mounten vornehmen. Danach kann man dann fsck auf das dekryptierte Filesystem anwenden. Informationen, wie man das mit Truecrypt zu machen hatte, findet man hier. Angeblich gelten die Anweisungen auch für Veracrypt in analoger Weise.

http://john.wesorick.com/2012/03/running-fsck-on-truecrypt-volume.html
Siehe auch:
https://serverfault.com/ questions/ 83601/ how-to-fsck-ext3-a-truecrypt-volume
http://sebsauvage.net/ links/ ?GsfKdw

Das dauert je nach Größe des Container-Files natürlich unangenehm lange, da dabei über Netz gearbeitet werden muss. Regelmäßige Backups des Vercrypt-Containers sind in unserem Szenario nicht nur aus diesem Grunde Pflicht. Darauf weise ich ausdrücklich hin.

Größeren Schäden vorbeugen kann man auch durch reine Read-Only-Mounts. Und falls Schreiben/Änderungen an Container-Inhalten absolut erforderlich sind: Arbeiten auf Datei- oder Verzeichnis-Kopien und nur kurzzeitiges RW-Mounten zum Upload der geänderten Datei.

Gleichzeitiger Zugriff mehrer Personen? Einsatz für Firmen?

Wie sieht es nun mit Szenarien aus, bei denen mehrere User zugreifen müssen? Hierzu sind mehrere Punkte anzuführen:

Skalierung: Ich habe das nicht getestet – aber vermutlich gilt: SSHFS skaliert nicht so gut wie NFS. Ab einer durch Tests zu bestimmenden Useranzahl lohnt sich vermutlich der Umstieg auf NFS.

Read Only: Auch unter NFS können nicht mehrere User unabhängig voneinander einen VC-Container bei sich lokal zum Lesen und Schreiben auf dem jeweiligen Client mounten. Das führt unweigerlich in die Katastrophe! Die Konsistenz des VC-Containers kann am Server unter diesen Bedingungen nicht aufrechterhalten werden!

Die Vercrypt-Entwickler haben zu diesem Thema eine entsprechende Empfehlung abgegeben, die schon für Truecrypt-Container galt:

  • Für schreibende Zugriffe durch mehrere Personene muss der Container bereits am Server gemounted und dann einem Sharing-Verfahren (z.B. über NFS oder SSHFS) unterworfen werden.
  • Ansonsten darf der Container nur dann auf mehreren Endgeräten gleichzeitig gemounted werden, wenn dies ausschließlich lesend erfolgt. Dies bedeutet im Klartext, dass bereits das umgebende Verzeichnis (hier: ) nur ReadOnly gemounted wird.

Siehe: https://www.veracrypt.fr/ en/ Sharing%20over%20Network.html

Die erste Variante fällt für unseren gehosteten Server – wie oben begründet – flach. Das bedeutet:

Multiuser-Szenarien auf gehosteten Servern sind nur im rein lesenden Modus möglich, nicht aber für Schreibzugriffe.

r

Würde man den Container andererseits indirekt über einen eigenen Server in der Firma mounten und dort freigeben, stellt sich die Frage, warum man nicht gleich über diesen Server arbeitet.

Ausweg bzgl. notwendiger Änderungen:
Leider nur in Kombination mit organisatorischen Maßnahmen. So könnten Mitarbeiter inhaltliche Änderungen lokal vornehmen und in GIT-/SVN-Repositories einchecken, die spätestens beim nächsten Aufenthalt in der Firma abgeglichen werden. Das Ergebnis des Abgleichs wird dann wieder für alle sichtbar in eine Containerdatei ausgespielt, die auf den Clients der mobilen Mitarbeiter nur lesend gemounted werden darf und kann.

Ich finde, das ist für viele Anwendungsfälle keine massive Einschränkung.

Ein Mehrbenutzerszenario, bei dem User auf dem Server grundsätzlich nicht nur lesende Operationen durchführen dürfen, ist von Haus mit sekundären Sicherheits-Problemen verbunden. Man muss etwa verhindern, dass die User geheimzuhaltende Daten eigenhändig und abseits des Containers auf den Server transferieren können. Alles andere als einfach …

Hochsicherheit am Server?

Man kann für manche Dateien, deren Inhalte (z.B. Passwörter) besondere Sicherheitsvorkehrungen erfordern, das Spielchen noch etwas weiter treiben:

Man erlaubt nur RO-Zugriffe – und hinterlegt diese Dateien innerhalb des VC-Containers nochmals verschlüsselt. Am besten mit GnuPGP – das gilt noch als sicheres Verfahren. Das PGP-File oder den PGP-Container kopiert und entschlüsselt man dann mit Tools wie Kleopatra oder KGpg auf dem Client.

Ein Angreifer, der es irgendwie schafft, den VC-Container oder den Datenverkehr vom/zum Client zu knacken, sieht sich dann immer noch mit dem PGP-File/Container konfrontiert. Wohlgemerkt: Das erhöht zwar die Sicherheit auf dem gehosteten Server. Aber es verschiebt die Sicherheitsthematik ganz genau wie die VC-Entschlüsselung auf den Client.

Weitere Schwachstellen?

Sind wir nun nach menschlichem Ermessen sicher? Nun ja, jedes System kann gehackt werden. Und sicher hat auch ein böswilliger Admin beim Provider die Möglichkeit dazu. Eine manupulierte Implementierung von SSH wäre in unserem Szenario z.B. ein Ansatzpunkt für einen Angriff. Ein Minimum an weiteren Vorsichtsmaßnahmen muss daher sein, dass wir Systempakete selbst installieren (soweit möglich) – und deren Integrität mit IDS-Tools überwachen. Für einzelne Komponenten wie SSH ggf. mit Tripwire.

Man kann die Integritätsbetrachtung aber natürlich beliebig ausdehnen – bis hin zum Host-Kernel, auf den man oft keinen Einfluss hat. Das führt zur Frage des Einsatzes von Root-Servern, die man absichern muss. Die Frage ist dann: Wann hat man gesetzlichen Vorgaben auf dem Stand der Technik Genüge getan?
Wir nähern uns erneut Domäne von Vorgaben durch Datenschutzbeauftragte und Anwälten. Und das sprengt diesen Artikel. Aber es macht erneut klar: Echte Sicherheit endet nicht bei der verschlüsselten Ablage von Daten.

Ausblick

Wir haben gesehen, dass es bei einer bzw. wenigen Personen durchaus möglich ist, Veracrypt-Container auf einem Server zu nutzen, ohne jemals eine Entschlüsselung auf dem Server selbst vornehmen zu müssen. Eine einfache Möglichkeit des Zugriffs ergibt sich dabei über SSHFS und eine anschließendes Mounten des VC-Containers auf dem Client.

Szenarien für Lese- und Schreibzugriffe mehrerer Anwender sind ohne Gefährdung der Sicherheit nicht möglich. Hier ist auf ReadOnly-Szenarien und organisatorische Maßnahmen auszuweichen.

Für Einzelanwender geht dagegen sogar Lesen und Schreiben. U.a. LibreOffice erfordert aber hohe Upload-Raten der Verbindung, da das Zwischenspeichern zum Transfer der gesamten geöffneten Datei führt.
Alternativ arbeitet man mit lokalen Kopien am Client. Ein Hin- und Her-Kopieren des gesamten Containers erscheint jedoch überflüssig. Bitte
korrigiert mich, wenn ich etwas übersehen haben sollte.

Im nächsten und letzten Artikel dieser Serie

Veracrypt, SSHFS und sichere Datenhaltung auf gehosteten Servern – II – die Client-Seite …

stelle ich einige Hinweise zur Sicherheit der Daten auf unserem Client zusammen. Denn es gilt: Wir handhaben dort entschlüsselte Daten und haben damit die Sicherheitsthematik auf das Endgerät des Benutzers verschoben.

Links

Veracrypt
https://en.wikipedia.org/ wiki/ VeraCrypt
http://www.deutschlandfunk.de/ verschluesselungssoftware-veracrypt-unabhaengige.684.de.html?dram:article_id=369309
https://www.computerbase.de/ 2016-10/ truecrypt-alternative-veracrypt-audit/
http://www.linux-magazine.com/ Online/ Features/ VeraCrypt

Audit Report zu Veracrypt
https://ostif.org/ wp-content/ uploads/ 2016/10/ VeraCrypt-Audit-Final-for-Public-Release.pdf
https://www.golem.de/ news/ truecrypt-nachfolger-veracrypt-audit-findet-schwerwiegende-sicherheitsluecken-1610-123893.html

LUKS
https://wiki.ubuntuusers.de/ LUKS/ Containerdatei/

SSH mit Key Files
https://www.digitalocean.com/ community/ tutorials/ how-to-configure-ssh-key-based-authentication-on-a-linux-server
https://stribika.github.io/ 2015/01/04/ secure-secure-shell.html
https://wiki.mozilla.org/ Security/ Guidelines/ OpenSSH

FUSE
https://de.wikipedia.org/ wiki/ Filesystem_in_Userspace

SSHFS
https://wiki.archlinux.de/ title/ Sshfs
https://wiki.archlinux.org/ index.php/ SSHFS
https://www.heise.de/ ct/ artikel/ Toolbox-Dateizugriffe-mit-sshfs-1646679.html
https://www.linode.com/ docs/ networking/ ssh/ using-sshfs-on-linux

SSHFS mit Identityfile
https://unix.stackexchange.com/ questions/ 61567/ sshfs-specify-key
https://stackoverflow.com/ questions/ 22393502/ how-do-i-specify-the-key-file-for-sshfs

Cloud-Definition
https://www.cloud.fraunhofer.de/ de/ faq/ publicprivatehybrid.html

Strato HiDrive
http://cloudlist.de/ dienst/ strato-hidrive-test/
https://strato.de/ blog/ 3-truecrypt-alternativen-fuer-
hidrive/