Opensuse Leap 15.4 on a PC – I – Upgrade from Leap 15.3 – repositories, Nvidia, Vmware WS, KVM, Plasma widget deficits

Today I upgraded a desktop PC with an Nvidia graphics card from Opensuse Leap 15.3 to Leap 15.4. I really must say: This was one of the smoothest upgrades I have ever experienced with Opensuse. However, there were again a few standard problems which had to be solved.

In this first post I summarize the upgrade steps and check the basic functionality of KDE/Plasma, VMware Workstation and KVM. I will also comment on some deficits of Plasma widgets for system monitoring.

In a second posts I summarize a brief test of Xwayland. A third post will discuss how to define a screen order for situations where multiple screens are attached to your PC. A brief fourth post will discuss PHP8 and Apache2 settings. We will also check that Eclipse works for PHP and Python/PyDeV. I will also verify the functionality of Python3 (3.9/3.10), Tensorflow2 and Jupyter after the upgrade. A last post provides solutions for multi-soundcard setups with Pulseaudio and pavucontrol.

PC components – and major SW

My PC has two major raid-systems – one with multiple SSDs (at an Intel controller, set up and controlled with the help of Linux mdraid) and one with HDs (3ware controller). The raid systems host LVM volumes and ordinary partitions. The graphics card is a relatively old Nvidia card. Two sound cards (X-Fi, Xonar D2X) are used in parallel. My standard desktop is KDE/Plasma scaled over 3 screens. For virtualization of Windows 10 VMware WS 16 is used. Virtualized Linux systems, however, run on KVM/qemu with virtual spice screens. PHP development is done with the help of Eclipse and a local Apache server. Machine Learning development is done with Python3 (3.9), PyDEV (Eclipse), Tensorflow2/Keras, Juypter.

Upgrade procedure

Regarding the basic upgrade procedure you can adapt steps which I have extensively described for a laptop here. You can just ignore any steps regarding an Optimus based combination of graphics cards.

List of steps

  • Step 1:Make backups! Especially of the LVM volumes or partitions which host your root filesystem and your /home-directory.
  • Step 2: Check your repositories! Save a list of your active ones and their URLs. Reason: Some repository paths below “download.opensuse.org” have changed and you need to include these repos again into zypper. Below I give some information on repositories which directly can be upgraded with the help of ${releasever}.
  • Step 3: Update your current RPMs.
  • Step 4: In a terminal window:
    mytux:~ # zypper refresh
    mytux:~ # zypper update

    Then restart your system and verify that it is working.

  • Step 5: In a terminal window change repo URLs to include ${releasever}
    mytux:~ # sed -i 's/15.3/${releasever}/g' /etc/zypp/repos.d/*.repo
    mytux:~ # sed -i 's/$releasever/${releasever}/g' /etc/zypp/repos.d/*.repo
    
  • Step 6: In a terminal window test a refesh for the Leap 15.4 repos:
    mytux:~ # zypper --releasever=15.4 refresh
    

    If there are problems analyze the reason and eliminate those repositories whose URL have changed. Re-check the success of the refresh.

  • Step 7: In a terminal window download the new RPMs
    mytux:~ #  zypper --releasever=15.4 dup --download-only --allow-vendor-change
    
  • Step 8: Close the graphical desktop and switch to a TTY (Ctrl-Alt-F1). Stop the display server and then upgrade
    mytux:~ # init 3 
    mytux:~ # zypper --no-refresh --releasever=15.4 dup --allow-vendor-change
    
  • Step 9: Pray and reboot to your upgraded Opensuse Leap 15.4

With selected repositories discussed below all these steps could be performed without major problems.

My good news are: There were no problems regarding drivers for the Nvidia card (see below), the raid controllers and my multiple Raid 5 and Raid 10 setups with LVM groups and LVM volumes. No problem was seen regarding Grub2 and systemd.

Which repositories can be directly upgraded via ${releasever}?

Central repositories for the upgrade are

https://download.opensuse.org/update/leap/15.4/oss/
http://download.opensuse.org/update/leap/15.4/backports/
http://download.opensuse.org/update/leap/15.4/sle/

Their 15.3 precedessors must be active. You need to refresh them and replace the “15.3” in their addresses by “${releasever}”. See my post named above for the required steps. Aside of the central repositories I kept some others active during the upgrade process (with ${releasever}). Worth to name:

https://download.opensuse.org/repositories/LibreOffice:/7.5/openSUSE_Leap_15.4/
https://download.nvidia.com/opensuse/leap/15.4
https://developer.download.nvidia.com/compute/cuda/repos/opensuse15/x86_64
https://ftp.fau.de/packman/suse/openSUSE_Leap_15.4/
https://download.opensuse.org/repositories/mozilla/openSUSE_Leap_15.4/
https://download.opensuse.org/repositories/devel:/languages:/php/openSUSE_Leap_15.4/

These repositories cause no problems as their URLs for 15.3 and 15.4 only show a difference regarding their release version but not their position in the URL-tree below “download.opensuse.org”. However, some other repositories, like those for X2GO, graphics, network, security have changed their position in the URL-resource-tree and must be reconfigured after the upgrade – e.g with the help of YaST or zypper.

Nvidia driver and the new kernel

On Leap 15.3 I had used the latest Nvidia driver from the usual Nvidia community repository

download.nvidia.com/opensuse/leap/${releasever}

The active RPM was replaced by the one from the Leap 15.4 repo during upgrade resulting in the RPM “nvidia-compute-G06”, version 525.89.02-lp154.5.1. Both the transition to the respective Nvidia kernel module for the new kernel 5.14.21 and the module’s inclusion in the system’s startup procedures by dracut went without any faults.

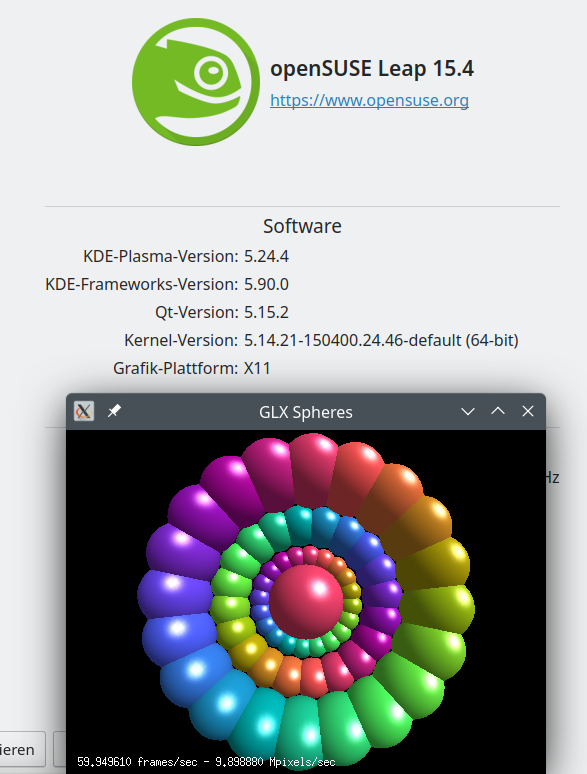
The upgraded system directly started into a SDDM login screen. There as a mess regarding my screen order (see a forthcoming post), but this did not hinder a proper login. Afterward KDE/Plasma (in combination with Xorg) started on the three screens attached to my PC. Though I feel that the startup of KDE/Plasma for Xorg takes a more time than on Leap 15.3. But I could see no major problems. GLX applications were running as expected.

VMware Workstation WS 16.2.5 works!

As I already saw with a Leap 15.4 installation on a laptop: VMware WS 16.2.5 works with Leap 15.4 and Kernel 5.14.21. Actually, already version WS 16.2.3 is compatible.

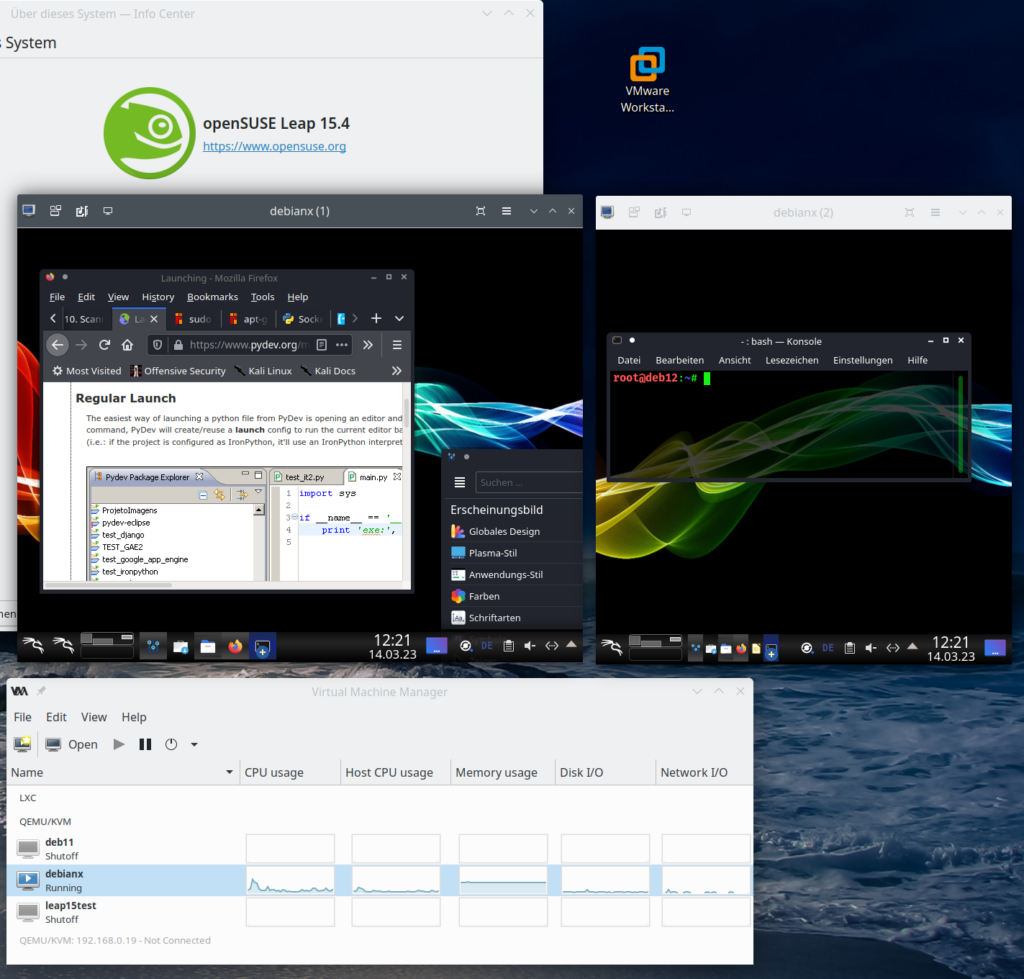
KVM/Qemu works with installed virtual systems!

The transition of KV, qemu und libvitrtd went smoothly. virt-manager works and starts installed virtual systems as expected:

KDE – plasma-systemmonitor and respective widgets do not show information on Nvidia graphics card and not all information on network cards

At least on my system with KDE Plasma 5.24.4 (KDE Framework 5.90) I saw major deficits regarding apps and widgets which should monitor the status of system resources:

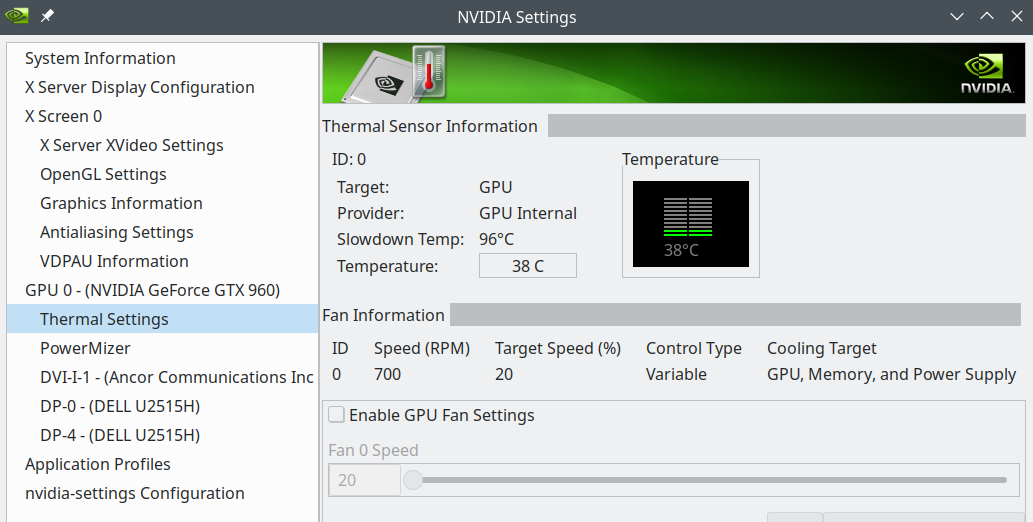
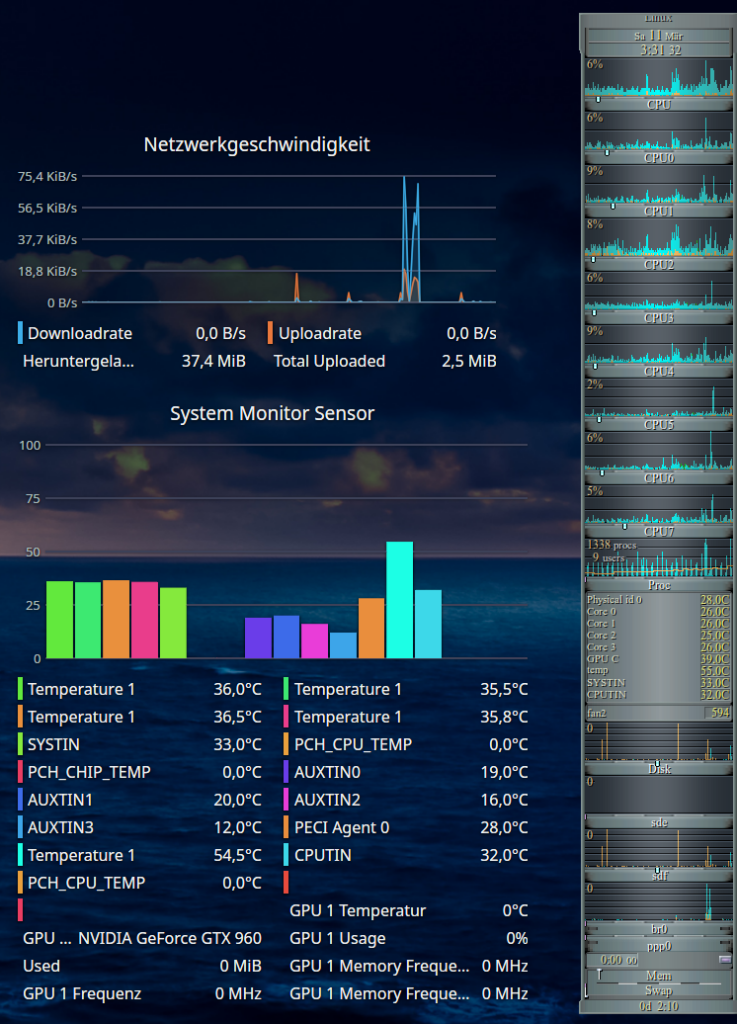
  • Problem 1 – no information about the status of the Nvidia GPU: Neither the application “systemmonitor” nor related widgets can deliver information about the status of the NVidia card (temperature, VRAM usage, fan) – with the (useless) exception of the type of the card. See th eimage in the next section. (Note that lm_sensors do not help in this case as the HW sensors did not detect the Nvidia card either.)
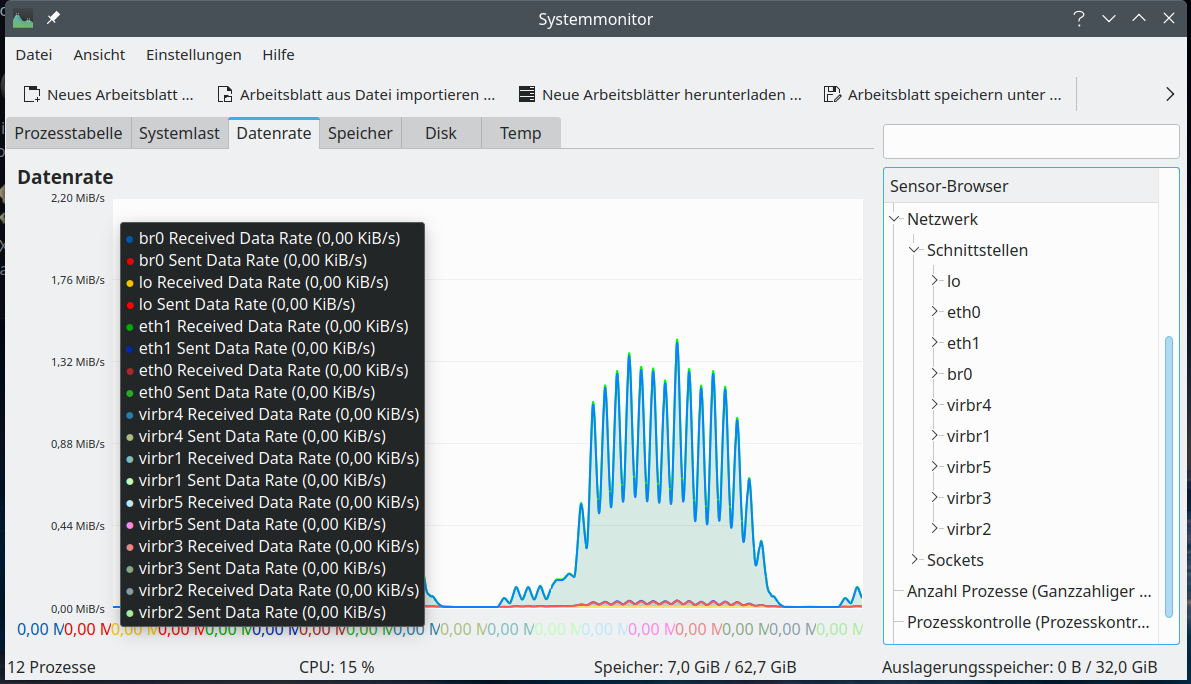
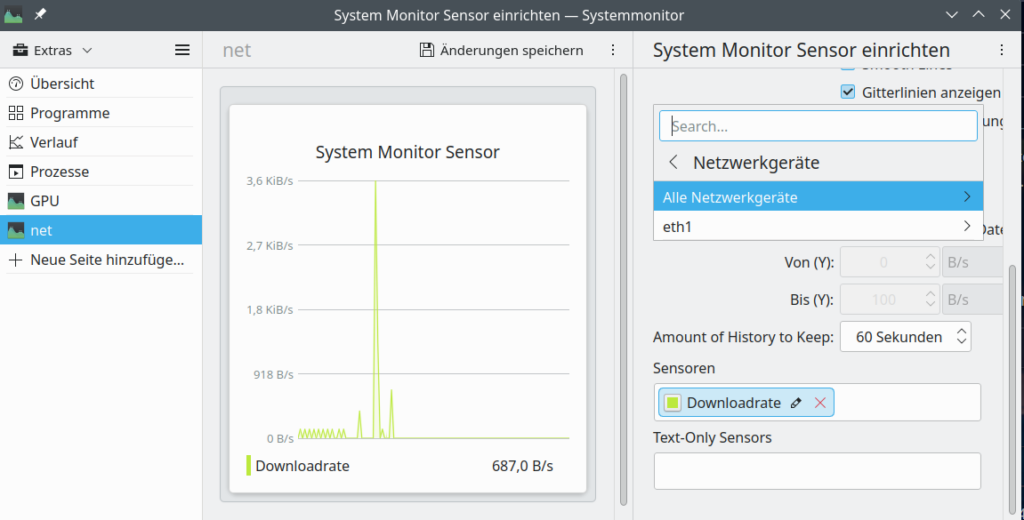
  • Problem 2 – no information about virtual network devices: In addition the KDE/Plasma widgets were not able to display all data for network interfaces correctly. E.g. interfaces like lo, bridges and other virtual devices were not even listed. And thus on a more complex configuration with virtualization you will not see your IP addresses with the Plasma-tools.

Regarding the second point: The image below shows that the dialog to set up network monitoring only offers to select an active physical device, in my case eth1. But no virtual devices which are available, too.

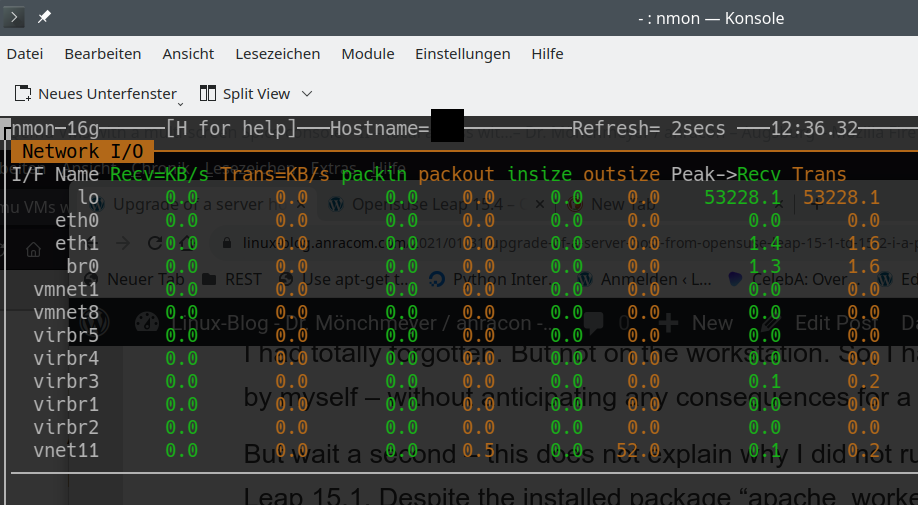
And here the devices nmon lists up:

These are clearly Plasma problems as other basic Linux and desktop applications perform much better for the named resources. Someone who works with Machine Learning and with virtualized Linux installations needs to watch the GPU (fans and temperature) and traffic across network devices – virtualized or real. This does not seem to be something we can get from fancy KDE/Plasma widgets today. So, we have to look out for alternatives.

Alternatives to watch the temperature of Nvidia GPUs

One prominent example which covers more than the present KDE widgets for system monitoring is the good old “gkrellm“. I love it, really! Compact, with a lot of already integrated default “sensors” and compatible to lm_sensors! And it delivers me the GPU temperature.

Another desktop tool with a somewhat old fashioned presentation of graphics is psensor. You can get a binary for Leap 15.4 from the “home”-repository of plasmaaregataos.

https://download.opensuse.org/repositories/home:/plasmaregataos/15.4/

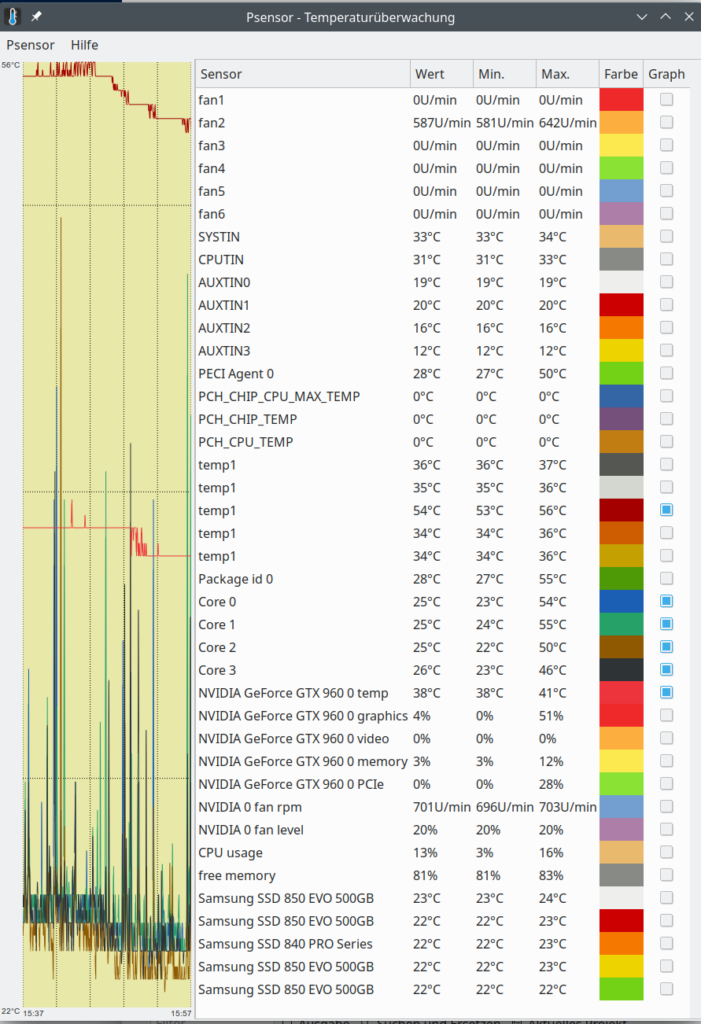
Interesting, how much this tool finds out about the Nvidia card (where Plasma tools fail totally).

And then we have, of course, Nvidia’s own tools: nvidia-settings (graphical) and nvidia-smi (ASCII):

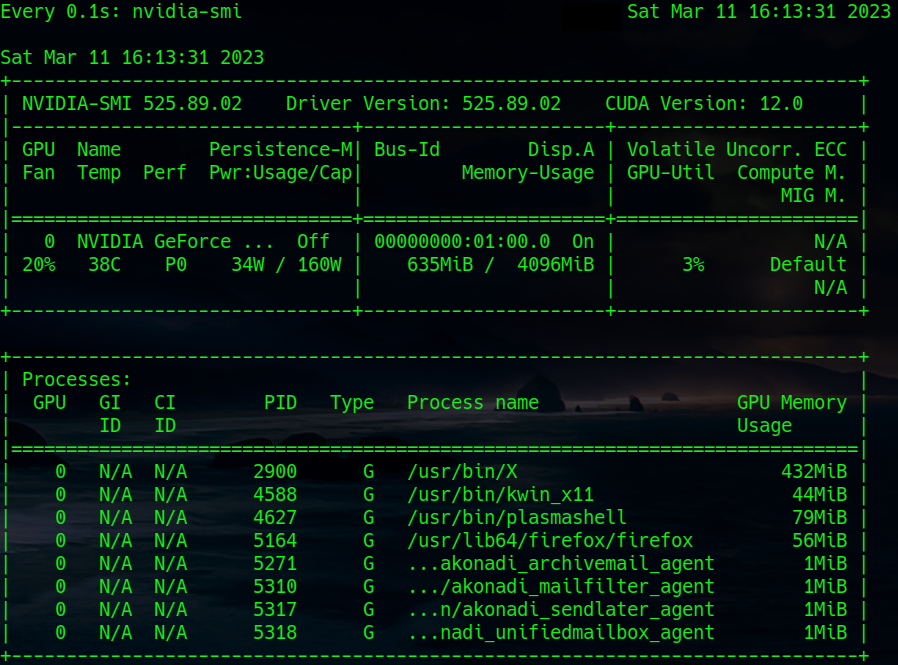
Note that the command to periodically update the nvidia-smi information is:

watch -n0.1 nvidia-smi

Alternatives to watch the data traffic across all network devices – real and virtual

Once again I have to name gkrellm. It provides a lot of information on real and virtual network interface.

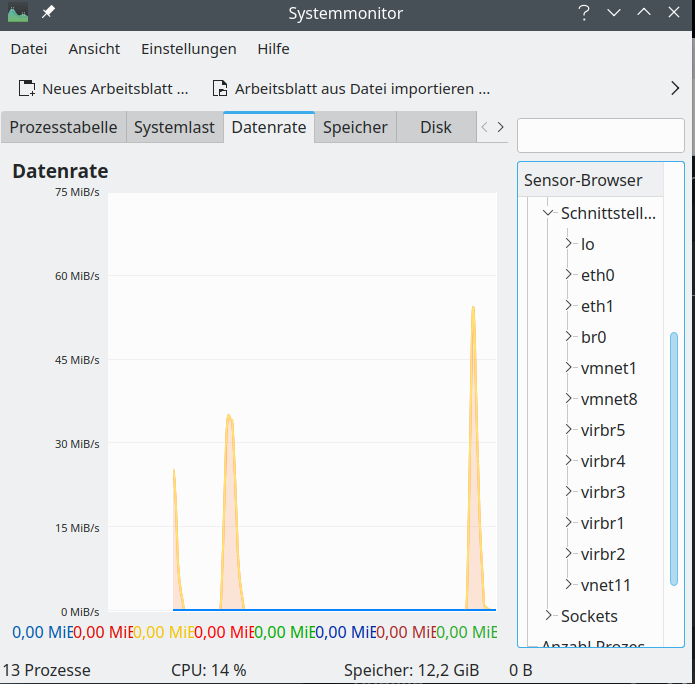
Regarding a graphical information on virtual network interfaces we can also use a relatively old KDE tool, namely ksysguard. Besides real network interfaces it detects bridges and KVM or Vmware based virtual devices and tracks their load.

Hint for those who worry about the discrepancy with the screenshot for nmon above: Some devices which nmon showed were not available at the time of the screenshot of ksysguard as certain KVM virtual machines and networks were not yet started. Later ksysguard detects other devices, too:

Based on ncurses you can also use the network part of “nmon” to get information on transfer rates across all defined network interfaces. If you need to go more into details a very good ASCII tool is “iptraf-ng“. “iftop” is also cool, but to watch multiple interfaces in parallel you have to use the command “iftop -i” on multiple terminal windows.

So, dear Plasma developers: When can we expect a fancy Plasma applications or widgets which reproduce and combine the “sensoric” abilities of gkrellm, psensor, ksysguard and iptraf-ng?

Conclusion

The upgrade from Leap 15.3 to Leap 15.4 posed no major problems on my PC. A relatively old VMware WS 16.2.x still worked and there were no problems regarding KVM/qemu. The new Nvidia driver could be compiled without any problems for the new kernel during upgrade and was directly integrated into the system by dracut. The new KDE/Plasma version started without problems on Xorg. Deficits of Plasma widgets for monitoring system devices were obvious; but this is not something we can blame Opensuse for.

In the next post of this series

Opensuse Leap 15.4 on a PC – II – Plasma, Gnome, flatpak, Libreoffice and others on (X)Wayland?

I will have a look at KDE/Plasma started on Xwayland.

Happy working with Opensuse Leap 15.4 and stay tuned …


Flatpak and Blender after system updates – update the flatpak Nvidia packet to match your drivers

Some days ago I wanted to perform some Blender experiments on my laptop. Before I had upgraded most of the installed Leap 15.3 packages installed. Afterwards I thought this was a good opportunity to bring my flatpak based installation of Blender up to date, too.

A flatpak installation of Blender had been necessary since I had changed the laptop’s OS to Opensuse Leap 15.3. Reason: Opensuse did and does not offer any current version of Blender in its official repositories for Leap 15.3 (which in itself is a shame). (I have not yet checked whether the situation has changed with Leap 15.4.)

Blender’s present version available for flatpak is 3.3.1. I had Blender version 3.1 installed. So, I upgraded to version 3.3.1. However, this upgrade step for Blender alone did not work. (In contrast to a snap upgrade).

The problem

The sequence of commands I used to perform the update was:

flatpak remote-add --if-not-exists flathub https://flathub.org/repo/flathub.flatpakrepo
flatpak update org.blender.Blender  
flatpak list

The second command brought Blender V3.3.1 to my disk. However, when I tried to start my new Blender with

flatpak run org.blender.Blender &

the system complained about a not working GLX and GL installation.

But, actually my KDE desktop was running on the laptop’s Nvidia card. The laptop has an Optimus configuration. I use Opensuse Prime to switch between the Intel i915 driver for the graphics card integrated in the processor and the Nvidia driver for the dedicated graphics card. And Nvidia was running definitively.

The cause of the failure and its solution

Flatpak requires the right interface for the Nvidia card AND the presently active GLX-environment to start OpenGL applications.

A “flatpak list” showed me that I had an “app” “nvidia-470-141-01” running.

Name                    Application ID                                   Version    Branch   Installation
Blender                 org.blender.Blender                              3.3.1      stable   system
Codecs                  org.blender.Blender.Codecs                                  stable   system
Freedesktop Platform    org.freedesktop.Platform                         21.08.16   21.08    system
Mesa                    org.freedesktop.Platform.GL.default              21.3.9     21.08    system
nvidia-470-141-01       org.freedesktop.Platform.GL.nvidia-470-141-01               1.4      system
Intel                   org.freedesktop.Platform.VAAPI.Intel                        21.08    system
ffmpeg-full             org.freedesktop.Platform.ffmpeg-full                        21.08    system
openh264                org.freedesktop.Platform.openh264                2.1.0      2.0      system

A quick view to the nvidia-settings and YaST showed me, however, that the drivers and other components installed on Leap 15.3 were of version “nvidia-470-141-03”.

Then I tried

mytux:~ # flatpak install flathub org.freedesktop.Platform.GL.nvidia-470-141
Looking for matches…
Similar refs found for ‘org.freedesktop.Platform.GL.nvidia-470-141’ in remote ‘flathub’ (system):

   1) runtime/org.freedesktop.Platform.GL.nvidia-470-94/x86_64/1.4
   2) runtime/org.freedesktop.Platform.GL.nvidia-470-141-03/x86_64/1.4
   3) runtime/org.freedesktop.Platform.GL.nvidia-470-141-10/x86_64/1.4
   4) runtime/org.freedesktop.Platform.GL.nvidia-470-74/x86_64/1.4
   5) runtime/org.freedesktop.Platform.GL.nvidia-430-14/x86_64/1.4
   6) runtime/org.freedesktop.Platform.GL.nvidia-390-141/x86_64/1.4

Which do you want to use (0 to abort)? [0-6]: 2

This command offered me a list to select the required subversion from. In my case option 2 was the appropriate one.

And indeed after the installation I could start my new Blender version again.

By the way: Flatpak allows for multiple versions to be installed at the same time. Like:

Name                 Application ID                                Version  Branch Installation
Blender              org.blender.Blender                           3.3.1    stable system
Codecs               org.blender.Blender.Codecs                             stable system
Freedesktop Platform org.freedesktop.Platform                      21.08.16 21.08  system
Mesa                 org.freedesktop.Platform.GL.default           21.3.9   21.08  system
nvidia-470-141-03    org.freedesktop.Platform.GL.nvidia-470-141-03          1.4    system
nvidia-470-141-10    org.freedesktop.Platform.GL.nvidia-470-141-10          1.4    system
Intel                org.freedesktop.Platform.VAAPI.Intel                   21.08  system
ffmpeg-full          org.freedesktop.Platform.ffmpeg-full                   21.08  system
openh264             org.freedesktop.Platform.openh264             2.1.0    2.0    system

Conclusion

Your flatpak installation must provide a version of the ‘org.freedesktop.Platform.GL.nvidia-xxx-nnn-mm’ packet which matches the present Nvidia driver installation on your Linux operative system.
Do not forget to upgrade flatpak packets for NVidia after having upgraded Nvidia drivers on your Linux OS!

Links

https://github.com/flathub/ org.blender.Blender/ issues/97
Replacing unstable Blender 2.82 on Leap 15.3 with flatpak or snap based Blender 3.1

Opensuse Leap, dolphin and abysmal slow data transfer between two external USB 3 disks

Today I had to copy a set of multiple directories, each with around 600 sub-directories and a total of 420,000 singular files, between two external USB-3 hard disks. Both the USB controllers of the mainboard and the controllers of the external disks were USB-3 capable. My PC has 64 GB RAM. Which in this case was of no help. I got the problem on an Opensuse Leap 15.3-system, but you may find it on other Linux-OS, too.

The problem

First I started to copy with the help of KDE’s Dolphin. The transfer rates were really bad – something about 5 MB/s. Would have had to wait for hours.

Then I tried with just a standard cp-command. The rates rose to something like 20 MB/s to 25 MB/s. But this was not a reasonable transfer rate either.

A workaround

A search on the Internet then gave me the following two commands

mytux:~ # echo $((48*1024*1024)) > /proc/sys/vm/dirty_bytes
mytux:~ # echo $((16*1024*1024)) > /proc/sys/vm/dirty_background_bytes

Note that setting values on these system parameters automatically sets the standard values of

mytux:~ # cat /proc/sys/vm/dirty_ratio
20
mytux:~ # cat /proc/sys/vm/dirty_background_ratio
10 

to zero! And vice versa. You either have to use dirty_bytes and dirty_background_bytes OR the related ratio-parameters!

The effect of the above settings was remarkable: The total transfer rate (i.e. reading from one disk and writing to another; both on the same controller) rose to 130 MB/s. Still far away from theoretical rates. But something I could live with.
It would be worth to experiment more with the size of the parameters, but I was satisfied regarding my specific problem.

Conclusion

An efficient data transfer on Linux systems between two external USB-3 disks may require system parameter settings by the user.
I admit: The whole thing left me baffled. For discussions and hints please refer to the Internet. It seems that the whole performance reduction is worst for users who have a lot of RAM. And the problem exists since 2014. Unbelievable!

Links

https://gist.github.com/ 2E0PGS/ f63544f8abe69acc5caaa54f56efe52f
https://www.suse.com/ support/kb/doc/? id=000017857
https://archived.forum.manjaro.org/ t/decrease-dirty-bytes-for-more-reliable-usb-transfer/62513
https://unix.stackexchange.com/ questions/ 567698/slow-transfer-write-speed-to-usb-3-flash-what-are-all-possible-solutions
https://unix.stackexchange.com/ questions/ 23003/ slow-performance-when-copying-files-to-and-from-usb-devices
https://lonesysadmin.net/ 2013/12/22/ better-linux-disk-caching-performance-vm-dirty_ratio/
https://forum.manjaro.org/t/the-pernicious-usb-stick-stall-problem/52297
https://stackoverflow.com/ questions/ 6834929/linux-virtual-memory-parameters


Switching between Intel and Nvidia graphics cards on an Optimus laptop with Leap 15.3

At my present location an old laptop with an Optimus system still provides me with good services. Recently, I installed Opensuse Leap 15.3 on it. Since then I have tried almost all I can think of to get Bumblebee running smoothly on it. In the end I gave up – sometimes “primusrun” worked, sometimes not – especially with more complex applications like Blender. And even if “primusrun” worked – “optirun” most often did not.

So, I had a look at “prime-select” installed by the packet “suse-prime” of Opensuse. Again I had mixed experiences: This worked sometimes from the command line and sometimes not. There were multiple things which were somehow interwoven:

  • bbswitch intervened or was used by prime-select when switching to Intel – and when it did and turned the nvidia card off, you could activate it again, but afterward the Nvidia device it was not recognized by the native Nvida driver or by prime-select. Most often I had to reboot.<
  • When I was lucky and after reboots got a configuration where the Nvidia driver was loaded in parallel to the i915 for Intel and used “prime-select” together with an init 3 / init 5 sequence the display manager sddm did not come up. Others had this problem, too.
  • To switch between the graphics cards it was absolutely necessary to login into my graphical KDE desktop, use a root terminal and switch to the Nvidia card with prime-select from there. Then I had to log out and if I was lucky the display manager came up and the Nvidia card was really active.

But do not ask me, what I had to do in which order to get the aspired result. All in all the behavior of “prime-select” was a bit unpredictable. Then after updating a lot of packets yesterday I could no longer get prime-select to do the right things any more. Most often I got the message:

ERROR: Unable to query GPU information

Or : No such device found.

Solution Part 1: Deinstallation of unrequired RPMs and reinstallation of required RPMs

In the end I deinstalled Bumblebee (as recommended by posts in Suse forums) and also bbswitch. Afterward I reinstalled the packets “suse-prime” and “plasma5-applet-suse-prime” from the Leap 15.3 Update-repository (i.e. the Update repo for the Enterprise system) and the Nvidia-drivers from Opensuse’s Nvidia repository. I rebooted and my “sddm” display-manager came up – with the Intel driver active – but the Nvidia driver was loaded already nevertheless. Checked with lsmod.

Later, I found that all files in “/etc/prime” had been rewritten. I suspect that I had something in there which was no longer compatible with the latest drivers and prime-versions. In addition the file “90-nvidia.conf” has been replaced in “/etc/X11/xorg.conf.d“.

Solution Part 2: Use the “Suse Prime Selector” applet!

Then I used the applet in the KDE Plasma desktop to switch to Nvidia. This seemed to work and led to no errors. I just had to log out of my KDE Plasma session and in again to work with KDE on a running Nvidia card. (Ignore the message that you have to reboot).
Afterward I also tested switching by using the command “prime-select” as root in a terminal window of the KDE desktop. Worked perfectly, too.

Conclusion

I am not sure what the ultimate reason was to get prime-select running. The deinstallation of Bumblebee and bbswitch? The new Prime and Nvidia configuration files? Or a new udev during other updates?

Anyway – using the Suse Prime Selector applet or just using the command “prime-select” as root in a terminal window inside KDE Plasma has become a very stable way on my Leap 15.3 laptop with KDE to switch between graphics cards reliably. I still have to log in and log out again of the KDE session – but so far I have never experienced any problems with the display-manager again.

Just for information: I am using the following Nvidia drivers packages:

The prime-select packet version is:

Links

https://www.reddit.com/ r/ openSUSE/ comments/ ib9buv/ opensuse_kde_suse_ prime_selector_ applet_for/
https://forums.developer.nvidia.com/ t/ kubuntu-18-04-gives-black-screen-when-sddm-starts-no-login/ 61034/11
https://wiki.archlinux.org/ title/ PRIME# Configure_applications_%20 to_render_using_GPU
https://www.opensuse-forum.de/ thread/ 63871-suse-prime-error-unable-to-query-gpu-information/
https://opensuse.github.io/ openSUSE-docs-revamped-temp/hybrid_graphics/

Ceterum censeo: The worst living fascist and war criminal, who must be isolated, denazified and imprisoned, is the Putler.


Upgrade of a server host from Opensuse Leap 15.1 to 15.2 – II – smartd configuration, 3ware controllers, mdadm RAID

During the upgrade of one of my server systems from Opensuse Leap 15.1 to 15.2 I noticed that the smartd-daemon did not start successfully. Logs revealed that the upgrade itself was NOT the cause of this failure; it is nevertheless a good occasion to briefly point out how one can configure the smartd-daemon to keep an overview over the evolution of disk properties on a Leap 15.X system – even when the disks are an integral part of one or more Raid-arrays. “Overview” is also a reason why I use “rsyslog” in addition to a pure systemd journal log to track the SMART data.

A problem with a 3ware based Raid array

The main cause of the smartd-failure on the upgraded server was an active line with the command “DEVICESCAN” in Opensuse’s version of the configuration file “/etc/smartd.conf”. As the command’s name indicates, the system is scanned for disks to monitor. Unfortunately, smartd did not find any SMART enabled devices on my server.

Feb 05 17:01:55 MySRV smartd[14056]: Drive: DEVICESCAN, implied '-a' Directive on line 32 of file /etc/smartd.conf
Feb 05 17:01:55 MySRV smartd[14056]: Configuration file /etc/smartd.conf was parsed, found DEVICESCAN, scanning devices
Feb 05 17:01:55 MySRV smartd[14056]: Unable to monitor any SMART enabled devices. Try debug (-d) option. Exiting...
...

Well, this finding was correct. All internal disks of the server were members of Raid arrays on elderly 3ware controllers. 3ware controllers are supported by the Linux kernel – in my case via a module “3w_9xxx”. During the installation an Opensuse Leap system the driver module was automatically added to the configurations of GRUB, the initramfs and the list of modules loaded by the eventually booted kernel. Upgrades have respected the configuration so far.

But with hardware RAID controllers the attached individual disks are NOT directly accessible to standard “smartd” directives or a standard plain “smartctl” command. You need to a special options. The HW-RAID-array is seen by the Linux system and smartd as a block device – without an inner structure. And the block device corresponding to the HW-controlled RAID-array has no SMART capabilities – which is, of course, very reasonable. Thus DEVICESCAN fails.

I wondered a bit why I had not seen the problem on the same system with Leap 15.1. Actually, this was my fault: Looking into a backup I saw in the last logs of the host during its time with Leap 15.1 that the problem had existed already before the upgrade – and was caused by an old, original “smartd.conf”-file from SuSE with which I had accidentally overwritten my own version of “smartd.conf”. Stupid me! But the really concerning thing was that I should have noticed the consequences in some logs. But, since I became a almost full-time employee I have been too lazy to work regularly with specific filter-options of systemd’s command “journalctl” – so I missed the relevant messages within the flood of messages in the journal. Time to reactivate rsyslog to get specific information into specific files – see below.

Anyway … It is reasonable that the failure of a standard DEVICESCAN should lead to a failure of the smartd service. The attentive admin thus gets a clear hint that his intention to watch disk health variables is not working as expected – even if the “smartd.conf” should contain other valid lines. The comments in “/etc/smartd.conf” clearly say:

# The word DEVICESCAN will cause any remaining lines in this configuration file to be ignored: 
# it tells smartd to scan for all ATA and SCSI devices. DEVICESCAN may be followed by any of the
# Directives listed below, which will be applied to all devices that are found.
#  
# Most users should comment out DEVICESCAN and explicitly list the devices that they wish to monitor.

I changed the line breaks a bit to stress the last statement. The obvious
and trivial solution in my case was to comment out the DEVICESCAN-line and activate some explicit statements for the individual disks in the 3ware array. To make things a bit more interesting, let us look at a different system MySYS which uses a combination of 3ware controlled hard-disk arrays and mdadm controlled SSD-arrays.

Off-topic:
The server host discussed above does not require a particular high disk throughput. Storage capacity in TB is more important. Actually, I would never buy a 3ware or LSI controller again for a semi-professional Linux machine. Too much money for a too low performance. With Linux you are certainly better off with mdadm and SW-RAID on a modern multi-core-processor. The general impact on an i7 or i9 on the overall performance is negligible in my experience. Especially, when you have a lot of fast RAM. In addition mdadm gives you much (!) more flexibility. You can, for example, build a set of multiple RAID-arrays working in parallel with one and the same stack of disks/SSDs by assigning different partitions to different distinct arrays – which may even be of a different type. But this is another story …

Entries for disks attached to 3ware controllers and SSDs in mdadm-Raid-arrays in the “/etc/smartd.conf” file

In the system MySRV I use a configuration

  • of multiple mdadm RAID-arrays consisting of assigned SSD-partitions of a stack of 4 SSDs
  • and 4 conventional hard-disks attached to a 3ware controller, forming a RAID 10-array.

In addition the host contains a further stand alone SSD.

For disks attached to a 3ware-controller we need a special form of the directives in the “smartd.conf”-file. Actually, some examples for such directives are given in a 3ware-related commentary section of “/etc/smartd.conf”. You may find something directly suitable for your purposes there.

What about devices which are members of mdadm-controlled SW-Raid arrays? Well, the nice thing is that in contrast to HW-controlled Raid-disks the SMART-daemon can access SSDs (or hard disks) on a mdadm-controlled SW-Raid-array directly! Without any special options! Actually, folks familiar with “mdadm” would have expected this for very basic reasons … But this is yet another story … We just accept the fact as one example ofthe power of Linux.

Thus, for my special system MySYS I just disabled the line with “Devicescan” and inserted the following lines into “/etc/smartd.conf”:

...
DEFAULT -d removable -s (S/../../7/03)
...
#DEVICESCAN
...
# Monitor SSDs contributing to different mdadm based SSD-Raid-arrays via (vertical) stacks of partitions 
/dev/sda -d sat -a -o off
/dev/sdb -d sat -a -o off
/dev/sdc -d sat -a -o off
/dev/sdd -d sat -a -o off

# Monitor additional stand alone SSD 
/dev/sde -d sat -a -o off

# Monitor HDs attached to 3ware controller with a Raid 10 configuration 
/dev/twa0 -d 3ware,0 -F samsung -a -o off
/dev/twa0 -d 3ware,1 -F samsung -a -o off
/dev/twa0 -d 3ware,2 -F samsung -a -o off
/dev/twa0 -d 3ware,3 -F samsung -a -o off
...

Disclaimer: Never copy the statements and later discussed smartctl-commands above without a thorough study of the literature and documentation on smart, smartctl and smartd. Check the preconditions of applying the directives and commands carefully with respect to your actual HW-/SW-configuration and the type of SSDs and hard disks used there! You have to find out about the correct settings for your system-configuration on your own.
Warning: The effects of the “-a” option and especially of the planned automatic disk tests initiated via the “DEFAULT”-statement may be different for SCSI or SATA-disks. Some options may even lead to data loss on older Samsung disks. I will not take any responsibility
for any problems caused by applying the settings displayed above to YOUR systems. Get advice of a professional regarding RAID-configurations and smartctl ahead of any experiments.

Having this said, the expert sees that I plan short self tests of the disks on every Sunday at 3 AM. Such tests will temporarily reduce the performance of the affected disks and as a consequence also of the various RAID-configurations the disk or any of its partitions might be a part of. At least on my system such a test will, however, not render the defined RAID-arrays unusable.

I could test this for a SATA-device and mdadm e.g. by using a suitable smartctl-command as

smartctl -t short /dev/sdc

and watching the continuing operation of a related RAID-array by

mdadm -D /dev/mdxxx

The corresponding smartcl-command for a 3ware RAID-disk would e.g. be

smartctl -t short /dev/twa0 -d 3ware,3 -F samsung.

As said above: Be careful with such tests on productive systems.

By the way: Only for the 3ware disks you may get an information about the starting of the test in a smartd related log-file (see below). If no errors are found, the logs will NOT show any special message.

At least on an Opensuse system the other settings and options for the various disks are discussed and explained in the commentary sections of the file:

#   -d TYPE Set the device type: ata, scsi, marvell, removable, 3ware,N, hpt,L/M/N
#   -o VAL  Enable/disable automatic offline tests (on/off)
#   -H      Monitor SMART Health Status, report if failed
#   -l TYPE Monitor SMART log.  Type is one of: error, selftest
#   -f      Monitor for failure of any 'Usage' Attributes
#   -p      Report changes in 'Prefailure' Normalized Attributes
#   -u      Report changes in 'Usage' Normalized Attributes
#   -t      Equivalent to -p and -u Directives
#   -a      Default: equivalent to -H -f -t -l error -l selftest -C 197 -U 198
#   -F TYPE Use firmware bug workaround. Type is one of: none, samsung

and

# Monitor 4 ATA disks connected to a 3ware 6/7/8000 controller which uses
# the 3w-xxxx driver. Start long self-tests Sundays between 1-2, 2-3, 3-4, 
# and 4-5 am.
# NOTE: starting with the Linux 2.6 kernel series, the /dev/sdX interface
# is DEPRECATED.  Use the /dev/tweN character device interface instead.
# For example /dev/twe0, /dev/twe1, and so on.
#/dev/sdc -d 3ware,0 -a -s L/../../7/01
#/dev/sdc -d 3ware,1 -a -s L/../../7/02
#/dev/sdc -d 3ware,2 -a -s L/../../7/03
#/dev/sdc -d 3ware,3 -a -s L/../../7/04

On my system (with one a 3ware controller and mdadm Raid-arrays) the smartd daemon started without any problems afterwards.

Configure rsyslog to write smartd-information into a distinct separate log-file

Old fashioned as I am, I use rsyslog aside systemd’s journal-logging. rsyslog can easily be configured to write log entries for selected daemons/processes into predefined separate log-files. Such files can directly be opened as they are plain text-files. Let us configure rsyslog for the smartd daemon:

  • Step 1: We create an empty file “/var/log/smartd.log” (as root) on the host in question by the command

    “touch /var/log(smartd.conf”

  • Step 2: Change rights by “chmod 640 /var/log/smartd.log”
  • Step 3: Add the following line to the file “/etc/rsyslog.conf” (close to the end)

    :programname, isequal, “smartd” /var/log/smartd.log

  • Step 4: Restart the rsyslog-daemon by “systemctl restart rsyslog”

You
surely have noticed that this is for local logging. But it is easy to adapt the settings to logging on remote systems.

What do smartd-logs look like?

Depending on your hardware you may get specific messages for your devices at the start of the smartd-daemon. Depending on the execution of scheduled self-tests you may get some messages about starting such test. After some time you should (hopefully) see successful messages regarding short or long self-tests – depending on your settings. In my case:

2021-02-11T14:29:43.511950+01:00 MySYS smartd[1723]: Device: /dev/sda [SAT], previous self-test completed without error
...
2021-02-11T14:29:44.026256+01:00 MySYS smartd[1723]: Device: /dev/twa0 [3ware_disk_00], previous self-test completed without error
...

In addition that you will get continuous information about changes of variables describing the health-status of your disks. In my case only the variation of the temperature due to changing airflow is shown:

...
2021-02-11T14:59:43.340341+01:00 MySYS smartd[1723]: Device: /dev/sda [SAT], SMART Usage Attribute: 190 Airflow_Temperature_Cel changed from 76 to 78
2021-02-11T14:59:43.350339+01:00 MySYS smartd[1723]: Device: /dev/sdb [SAT], SMART Usage Attribute: 190 Airflow_Temperature_Cel changed from 77 to 78
2021-02-11T14:59:43.353660+01:00 MySYS smartd[1723]: Device: /dev/sdc [SAT], SMART Usage Attribute: 190 Airflow_Temperature_Cel changed from 77 to 79
2021-02-11T14:59:43.357007+01:00 MySYS smartd[1723]: Device: /dev/sdd [SAT], SMART Usage Attribute: 190 Airflow_Temperature_Cel changed from 77 to 79
2021-02-11T14:59:43.360136+01:00 MySYS smartd[1723]: Device: /dev/sde [SAT], SMART Usage Attribute: 190 Airflow_Temperature_Cel changed from 77 to 78
...

Conclusion

If for some reason the “smartd”-daemon and the related service does not start on a Linux host with Opensuse Leap 15.2 it is easy to get it running again. Even, when your disk devices are members of RAID arrays. The configuration file “/etc/smartd.log” contains a lot of hints how to set up reasonable directives regarding various HW-RAID-controllers supported by the kernel. A really good thing is that we do not need any special commands or options regarding disk devices whose partitions are members of mdamd-controlled SW-RAID arrays.

Links

https://linux.die.net/man/5/smartd.conf
https://linux.die.net/man/8/smartd

https://www.linux.com/topic/desktop/monitor-sata-and-ssd-health-smart/
https://linuxconfig.org/introduction-to-the-systemd-journal
https://www.debugpoint.com/2020/12/systemd-journalctl/