Opensuse 13.2, Subversion – sysconfig File "svnserve" fehlt

Opensuse 13.2 bietet einige Überaschungen und nicht immer positive. So wollte ich kürzlich auf einem neu installierten OS 13.2 einen einfachen Subversion-Server einrichten. Hierzu installierte ich mir die erforderlichen Pakete.

Natürlich unterliegt auch das Programm “svnserve” inzwischen der Kontrolle von systemd. Ein Startup-Skript unter “/etc/init.d” sollte also überflüssig sein und findet sich unter Opensuse 13.2 (im Gegensatz zu OS 13.1) auch nicht mehr.

Leider führte ein versuchsweises Absetzen des Kommandos

systemctl start svnserve.service”<&/p>
zu einem Fehler:

mytux:~ # systemctl start svnserve.service   
Job for svnserve.service failed. See "systemctl status svnserve.service" and "journalctl -xn" for details.
mytux:~ # systemctl status svnserve.service 
svnserve.service - Subversion protocol daemon
   Loaded: loaded (/usr/lib/systemd/system/svnserve.service; enabled)
   Active: failed (Result: resources) since Fri 2015-01-16 11:58:37 CET; 21s ago
  Process: 14949 ExecStart=/usr/bin/svnserve --daemon --pid-file=/var/run/svnserve/svnserve.pid $SVNSERVE_OPTIONS (code=exited, status=0/SUCCESS)
 Main PID: 14950 (code=killed, signal=TERM)

Jan 16 11:54:03 rux svnserve[14949]: DIGEST-MD5 common mech free
Jan 16 11:58:42 rux systemd[1]: svnserve.service failed to run 'start' task: No such file or directory
Jan 16 11:58:42 rux systemd[1]: Failed to start Subversion protocol daemon.
mytux:~ #

Fragt sich, was das fehlende File ist. Dazu muss man in der schönen Welt von “systemd” etwas in der Tiefe graben. Die Antwort findet sich im Verzeichnis “/etc/systemd/system/multi-user.target.wants/”. Dort gibt es einen Link “svnserve.service”, der auf die Datei
“/usr/lib/systemd/system/svnserve.service” verweist. Inhalt:

[Unit]
Description=Subversion protocol daemon
After=syslog.target network.target

[Service]
Type=forking
EnvironmentFile=/etc/sysconfig/svnserve
User=svn
Group=svn
PIDFile=/var/run/svnserve/svnserve.pid
ExecStart=/usr/bin/svnserve --daemon --pid-file=/var/run/svnserve/svnserve.pid $SVNSERVE_OPTIONS

[Install]
WantedBy=multi-user.target

Aha! Es stellt sich also die Frage, ob es das EnvironmentFile, das ich von früheren Opensuse-Versionen sehr gut kenne, im “/etc/sysconfig”-Bereich überhaupt noch findet? Antwort: Leider nein!

Da stimmt also womöglich was nicht mit dem Subversion-Paket. Ein Deinstallieren und Neuinstallieren half aber leider nichts. Eine anschließende Suche im gesamten Filesystem zeigte, das eine geeignete Konfigurationsdatei auch sonst nirgends zu finden war/ist.

Was also tun? Ich habe mir dann einfach ein entsprechendes sysconfig-File “svnserve” aus einer früheren Opensuse 13.1-Installation in das Verzeichnis “/etc/sysconfig” kopiert. In der nicht ganz unberechtigten Annahme, dass das File hoffentlich auch für systemd auswertbar sein würde, wenn es in der systemd-Konfiguration dort als “EnvironmentFile” erwartet wird. Inhalt:

## Path:	/etc/sysconfig/svnserve
## Description:	Basic configuration for svnserve
## Type:	string
## Default	"-d -R -r /srv/svn/repos"
#
# Default options for the svnserve process.
# The -R option enforces read-only access, i.e. write operations to the
# repository (such as commits) will not be allowed.
# Authentication should be configured before allowing write access.
# See http://svnbook.red-bean.com/en/1.8/svn.serverconfig.svnserve.html#svn.serverconfig.svnserve.auth
#
SVNSERVE_OPTIONS="-d -r /projekte/SVNserv"

## Type:	string
## Default	"svn"
#
# svnserve should 
run as unprivileged user.
# If you want to expose the repository via both svnserve and mod_dav_svn
# (Apache httpd) in parallel, ensure that the apache user is part of the
# svn group and the setgid flag is set on the repositories
# usermod -A svn wwwrun
# chmod -R g+s /srv/svn/repos
# See http://svnbook.red-bean.com/en/1.8/svn.serverconfig.multimethod.html
#
SVNSERVE_USERID="svn"

## Type:	string
## Default	"svn"
#
# svnserve should run as unprivileged user.
# If you want to expose the repository via both svnserve and mod_dav_svn
# (Apache httpd) in parallel, ensure that the apache user is part of the
# svn group and the setgid flag is set on the repositories
# usermod -A svn wwwrun
# chmod -R g+s /srv/svn/repos
# See http://svnbook.red-bean.com/en/1.8/svn.serverconfig.multimethod.html
#
SVNSERVE_GROUPID="svn"

Die Directory-Angabe am Ende der Variablen SVNSERVE_OPTIONS bezieht sich auf das Haupt-Repository, das ich auf besagtem System unter “/projekte” angelegt hatte. Diese Angabe muss man natürlich an eigene Verhältnisse anpassen. [Standard wäre unter Opensuse ein Repository namens “svn” im Verzeichnis “/srv/svn/”.]

Und siehe da:

mytux:~ # systemctl status svnserve.service 
svnserve.service - Subversion protocol daemon
   Loaded: loaded (/usr/lib/systemd/system/svnserve.service; enabled)
   Active: active (running) since Fri 2015-01-16 12:00:12 CET; 1h 18min ago
  Process: 15198 ExecStart=/usr/bin/svnserve --daemon --pid-file=/var/run/svnserve/svnserve.pid $SVNSERVE_OPTIONS (code=exited, status=0/SUCCESS)
 Main PID: 15199 (svnserve)
   CGroup: /system.slice/svnserve.service
           └─15199 /usr/bin/svnserve --daemon --pid-file=/var/run/svnserve/svnserve.pid -d -r /projekte/SVNserv

Jan 16 12:00:12 rux svnserve[15198]: DIGEST-MD5 common mech free

Hier erkennt man auch, dass systemd beim Start von “svnserve” den Inhalt der Variable SVNSERVE_OPTIONS aus dem EnvironmentFile zieht.

Ich hoffe, das hilft dem einen oder anderen OS 13.2-Umsteiger/Einsteiger weiter.

MySQL – SELECT INTO OUTPUT FILE – vermeide zusätzliche UNION Statements!

Wenn es um den Export relativ großer Tabellen in CSV-Dateien geht, greift man bei MySQL-Datenbanken auf eine spezielle Form des SELECT Statements, nämlich “SELECT INTO OUTPUT FILE … “. Ich nenne das nachfolgend der Einfachheit halber ein “Export SELECT”. Siehe hierzu:
http://dev.mysql.com/doc/refman/5.7/en/select-into.html

Oftmals benötigt man aber nicht nur die reinen Daten sondern eine CSV-Datei mit einer führenden Zeile, in der die Bezeichnungen der einzelnen Felder/Spalten auftauchen (“column heading”). Die gängige Empfehlung vieler Beiträge zu diesem Thema ist, das Ergebnis des oben genannten Statements “SELECT INTO OUTPUT FILE … ” per UNION mit einem “künstlichen SELECT-Statement zu verbinden, dass genau die Strings der ersten Zeile erzeugt. Siehe hierzu etwa
http://stackoverflow.com/questions/356578/how-to-output-mysql-query-results-in-csv-format (und dort einen entsprechenden Kommentar zum Lösungsansatz der Forums-Frage)
oder aber
http://www.mysqltutorial.org/mysql-export-table-to-csv/
und dort der Abschnitt zu “Export Data with Column Headings”.

Entsprechende Vorschläge folgen dem Muster A

(SELECT 'Name of Column 1', 'Name of Column 2', 'Name of Column 3')
UNION
(SELECT column_name_1, column_name_2, column_name_3
FROM TABLE_NAME
INTO OUTFILE 'absolute_path_to_csv_file'
FIELDS ENCLOSED BY '"' TERMINATED BY ';' ESCAPED BY '"'
LINES TERMINATED BY '\r\n');

Festzustellen ist hierzu Folgendes:

Ein solches Statement funktioniert zwar und produziert das gewünschte Ergebnis; aber es reduziert die Performance des Daten-Exports in eine Datei drastisch – speziell wenn man mit großen Tabellen und mehreren Millionenen oder gar Hunderten von Millionen Records arbeitet. Dann entfaltet sich das UNION-Statement zu einem echten Performance-Killer!

In einem konkreten Testbeispiel konnte ich den Export aus einer Datei mit einer Million Records vergleichen. Der Export mit einem Union Statement dauerte fast 50 Sekunden; läßt man die Kopfzeile dagegen nach dem Muster B

SELECT column_name_1, column_name_2, column_name_3
FROM TABLE_NAME
INTO OUTFILE 'absolute_path_to_csv_file'
FIELDS ENCLOSED BY '"' TERMINATED BY ';' ESCAPED BY '"'
LINES TERMINATED BY '\r\n';

weg, so dauerte der Export nur 1,8 Sekunden. Das Verhältnis wird noch schlimmer bei größeren Record-Zahlen der Tabelle.

Ein wenig tieferes Nachdenken und eine SQL-Analyse mit “Explain” machen auch klar, woran das liegt: Der Einsatz von UNIONS erfordert das Zusammenfügen der Resultsets der verschiedenen SELECTs. Dazu muss jedes Resultset aber erstmal generiert werden. Dazu müssen temporäre Datenhaltungsstrukturen aufgebaut werden. Dies kollidiert jedoch mit der ansonsten speziell optimierten Funktionalität des “SELECT INTO OUTPUT FILE”-Statements, nämlich die Tabelleninhalte aus den Datenbankfiles mit speziellen Methoden direkt auszulesen und sofort in eine Datei zu schreiben.

Ich kann daher nur jedem raten, beim Export wirklich großer Tabellen in CSV-Dateien auf jegliche Kombination des “SELECT INTO OUTPUT FILE”-Statements mit anderen SELECTS unter Rückgriff auf “UNION” zu verzichten. Das zieht ggf. den Verzicht auf eine erste führende Zeile nach sich.

Änderung und Nachtrag 08.01.2015:
In Fällen mit kleineren Dateien von bis zu n x 100 MByte kann es – je nach RAM-Ausstattung des Systems
– u.U. besser sein, zunächst den reinen Daten-Export (gem. Muster B) durchzuführen und danach die erzeugte Datei mit PHP File-Funktionen oder Systemfunktionen nachzueditieren und die gewünschte erste Zeile mit der Feldinformation hinzuzufügen. Das ist aber zu testen. In meinem Testfall mit 1 Million Datensätzen war das File kleiner als 50 MByte und lag auf einer SSD. Zudem ist das System hinsichtlich der Plattenzugriffe gut gepuffert. In diesem Fall erhöhte sich die benötigte Zeit durch das Hinzufügen der Kopfzeile untr PHP kaum spür- und messbar über die 1,8 Sekunden hinaus. Die Änderung war gegenüber dem oben erwähnten Zeitunterschied des UNION-Statements völlig vernachlässigbar.

Bei Dateigrößen von mehreren hundert Mbyte oder gar im GByte-Bereich wird ein nachträgliches Editieren unter PHP aber ebenfalls zu Problemen führen, da das File erst einmal zu lesen und dann mit dem String für die erste Zeil zu konkatenieren ist. Man muss in Tests prüfen,

  • ob das für solche Operationen erlaubte Memory unter PHP hinreichend ist (und es ggf. anpassen)
  • und ob sich die Lesezeit unter PHP als kleiner oder größer als die von MySQL aufgebrachte Zeit für ein UNION herausstellt.

Am besten erscheint es mir, bei wirklich großen Datenmengen im Sinne der Performance schlicht und einfach auf die führende Kopfzeile zu verzichten. Derjenige, der das exportierte CSV-File in irgendeiner Weise nutzen will, muss eben über die Feldreihenfolge Bescheid wissen.

PHP Code Content Assists und Inline Type Hinting in Eclipse

Vor ein paar Jahren war ich sehr happy, als ich entdeckte, dass Eclipse mit dem PHP Pluging (PDT) etliche Möglichkeiten im Bereich des PHP Content Assistings bietet. So nutze ich die Möglichkeiten des Type Hintings mittels “phpDocumentor tags” ausgiebig oberhalb der Deklaration von Class Member Variablen oder bei der Definition von Funktionen (frei oder als Objekt-Methoden). Es ist einfach schön, bequem und sehr effizient, wenn “Ctrl-Space” das Tippen von neuem Code in einem PHP-Projekt mit passenden Vorschlägen aufgrund der Definition von Klassen etc. in anderen Dateien unterstützt. Fast magisch !

Was ich bisher nicht hinbekommen hatte, war das Type Hinting und “Content Assisting” zu Variablen im PHP-Code, die im Rahmen einer dynamischen Namensgebung über die Nutzung der Funktion “call_user_func” als Objekt einer Klasse instanziiert werden. Das braucht man z.B., wenn man das Singleton-Pattern benutzt und das Singleton-Objekt entweder erstmalig instanziiert werden muss oder aber die Referenz auf das ggf. schon existierende Singleton-Objekt geholt werden soll – soweit es bereits woanders instanziiert wurde.

Aber auch das geht unter Eclipse PDT mit sog. “Inline Type Hinting”. Ein Beispiel:

	$get_instance ="getInstance"; 
	$Class_SS_Run_Data_Name = "Class_SS_Run_Data";
	$ay_SS_Run_Data		= array($Class_SS_Run_Data_Name, $get_instance);

	/* @var $SS_Run_Data Class_SS_Run_Data */		
	$SS_Run_Data = call_user_func($ay_SS_Run_Data);
	unset($ay_SS_Run_Data); 		

getInstance ist hier eine statische Methode, die gemäß des Singleton Patterns entweder das Objekt instanziiert oder die Referenz auf das Singleton Objekt aus einer statischen Variablen ermittelt.

Wichtig ist hier aber die Kommentar-Zeile und ihr Aufbau. Die Klasse “Class_SS_Run_Data” ist in einer anderen Datei definiert, deren Source Pfad natürlich im Bereich des BUILD Path des PHP-Projektes liegen muss.

Tippe ich nun später “$SS_Run_Data->” im Code erhalte ich je nach Einstellungen des Content Assistings umgehend oder spätestens über Ctrl-Space eine Vorschlagsliste zu Variablen oder Methoden der Klasse. Super !

Gelernt habe ich das nach Lesen eines Artikels von Norm McGarry, der sich mal die Mühe gemacht hat, die verschiedenen Arten des “Type Hintings” für “Content Assist”-Zwecke unter Eclipse PDT zusammenzustellen. Siehe:
PHP Type Hinting with Eclipse

Herzlichen Dank an Norm McGarry!

vsftp – temporary FTP access for a defined list of users

We adminster Opensuse servers for some of our customers at server hosters – e.g. at Strato, a Telekom subsidiary. Sometimes some web server files have to be upgraded either by us or by specific users of the customer. But only sometimes. Under normal operative conditions the FTP access to the server shall not be allowed.

To enable a FTP service we have installed “vsftp”. We further want the FTP users of our customers not to be able to access a shell on the server and restrict their FTP access to a certain directory. However, some of our own admins shall be able to access other server directories by FTP also.

Some basics of how you may set up and configure a vsftp server on an Opensuse system have already been described in my article
vsftp unter Opensuse 12.2 und 12.3.
The basic settings are valid for Opensuse 13.1, too. The settings discussed in the named article already restricted FTP users to a specific directory.

Sporadic FTP access

We solve the sporadic access requirement as follows:
The firewall on the server blocks all ports (with the exception of a dedicated SSH-Port for certificate based SSH logins and http/https ports) under normal operation conditions. But a trained user at the customer site can open a SSH connection and is allowed to start (but not change) a shell script (running with root rights) that temporarily opens ports for FTP connections for a defined IP (the WAN IP of the customer) to the vsftp server.

A simplified example for such a shell script that manipulates a IP chain called “zugriff” may look like:

#!/bin/bash
iptables -N zugriff 
iptables -F zugriff 
myip=CUSTOMER_IP_ADDRESS 
iptables -A zugriff -p TCP -s $myip --dport ftp -j ACCEPT
iptables -A zugriff -p TCP -s $myip --dport 62050:62100 -j ACCEPT
iptables -t filter -I INPUT 4 -j zugriff
echo "vsftp port and IP rules were set for : " $myip
systemctl start vsftpd.service
echo "vsftp started"

A related simple stop script would be:

#!/bin/bash
iptables -F zugriff
iptables -t filter -D INPUT -j zugriff
systemctl stop vsftpd.service
echo "FTP services stopped. FTP ports blocked in firewall."

The choice of the passive vsftp ports (in our example the range between 62050 and 62200) must of course correspond to the passive port settings in the vsftp configuration. Set the following options in the vsftpd.conf file:

pasv_enable=Yes
pasv_max_port=62050
pasv_min_port=62100

You may also combine the script commands given above with further commands to start a time interval after which the ports are blocked automatically again. (To prevent possible harm if your trained customer user forgets to stop the vsftp service manually by the given stop scipt).

Grant FTP access to users of a defined list

The vsftp configuration given in my previous article vsftp unter Opensuse 12.2 und 12.3. allows for the access of all locally defined users on the server. They get chrooted to a defined chroot directory.

Note that the single FTP user discussed in the named article got the shell “/bin/false”. Note further that we did not allow anonymous FTP access.

At our customer several users with different UIDs shall get the right to transfer files to the server. The different UIDs shall give us a chance to distinguish their actions in log protocols. (Note that logging the action of users may require special working contract conditions in Germany).

All of the FTP users become members of a special
group. The main FTP directory – let it e.g. be “/srv/www/htdocs/webs” – which becomes their home dir and to which they are restricted by the vsftpd options

chroot_local_user=YES
local_root=/srv/www/htdocs/webs

– gets group ownership of this special group. In addition the SGID bit is set. All of the customer’s FTP users get the shell “bin/false”.

Now, how to restrict the FTP access to defined users among others (e.g. from our own company) and how to extend the directory access for our own admins?

To restrict FTP access to users of a defined list requires the following options:

userlist_deny=NO
userlist_enable=YES
userlist_file=/etc/vsftpd.user_list

and a file “/etc/vsftpd.user_list” with just the UIDs of the users you want to rant FTP access – each UID in a separate line. The first option tells the vsftpd daemon that the users enlisted in the file “/etc/vsftpd.user_list” get the FTP access granted and shall not be denied it.

Note 1: I had considerable difficulties with my first userlist file, which I had generated and edited with vi on the server. Probably, I did some mistypes whilst editing… Be sure that your userlist file does not contain any special characters not visible on your terminal and that each UID is followed by a line break! Create the file from scratch if you experience unexplainable difficulties or read errors for the file in you FTP client. See: https://groups.google.com/forum/#!msg/alt-f/jtslOMt5aTA/1TW2kGkvmbkJ

Note 2: The file must be readable to the user running the vsftpd process on the server. On Opensuse systems this is presently “root” or “ftpsecure” – depending a bit on how you start the process. You may change ownership of the file to the user “ftpsecure” and drop the standard readability right for “others” – depending on security conditiosn.

Due to the vsftpd option “chroot_local_user=YES” the users get jailed to a certain directory (in our example to directories below “/srv/www/htdocs/webs”). We may want to circumvent this restriction for our own admins whereas for the customer’s users it shall hold and work. To define such an exception requires further vsftp options:

chroot_list_file=/etc/vsftpd.chroot_list
chroot_list_enable=YES

If “chroot_local_use” is set to “YES” then UIDs given (one per line) in the file “vsftpd.chroot_list” are NOT jailed to a chroot directory. In this case the file “/etc/vsftpd.chroot_list” defines exceptions from the chroot-rule. Note, however, that if you had set

chroot_local_user=NO

the opposite would be true: In this case the file “/etc/vsftpd.chroot_list” defines users to be explicitly jailed!

So, now we have combined all our objectives:
We open FTP access when we need it, we grant access to a list of users with most of them jailed to a certain directory
and we grant access to all directories for selected admins.

Have much fun with vsftp on Opensuse!

Character sets and Ajax, PHP, JSON – decode/encode your strings properly!

Ajax and PHP programs run in a more or less complex environment. Very often you want to transfer data from a browser client via Ajax to a PHP server and save them after some manipulation into a MariaDB or MySQL database. As you use Ajax you expect some asynchronous response sent from the PHP sever back at the client. This answer can have a complicated structure and may contain a combination of data from different sources – e.g. the database or from your PHP programs.

If and when all components and interfaces [web pages, Ajax-programs, the web server, files, PHP programs, PHP/MySQL interfaces, MySQL …) are set up for a UTF-8 character encoding you probably will not experience any problems regarding the transfer of POST data to a PHP server by Ajax and further on into a MySQL database via a suitable PHP/MySQL interface. The same would be true for the Ajax response. In this article I shall assume that the Ajax response is expected as a JSON object, which we prepare by using the function json_encode() on the PHP side.

Due to provider restrictions or customer requirements you may not always find such an ideal “utf-8 only” situation where you can control all components. Instead, you may be forced to combine your PHP classes and methods with programs others have developed. E.g., your classes may be included into programs of others. And what you have to or should do with the Ajax data may depend on settings others have already performed in classes which are beyond your control. A simple example where a lack of communication may lead to trouble is the following:

You may find situations where the data transfer from the server side PHP-programs into a MySQL database is pre-configured by a (foreign) class controlling the PHP/MySQL interface for a western character set iso-8859-1 instead of utf-8. Related settings of the MySQL system (SET NAMES) affect the PHP mysql, mysqli and pdo_mysql interfaces for the control program. In such situations the following statement would hold :

If your own classes and methods do not provide data encoded with the expected character set at your PHP/MySQL interface, you may get garbage inside the database. This may in particular lead to classical "Umlaut"-problems for German, French and other languages.

So, as a PHP developer you are prepared to decode the POST or GET data strings of an Ajax request properly before transferring such string data to the database! However, what one sometimes may forget is the following:

You have to encode all data contributing to your Ajax response – which you may deliver in a JSON format to your browser – properly, too. And this encoding may depend on the respective data source or its interface to PHP.

And even worse: For one Ajax request the response data may be fetched from multiple sources – each encoded for a different charset. In case you want to use the JSON format for the response data you probably use the json_encode() function. But this function may react allergic to an offered combination of strings encoded in different charsets! So, a proper and suitable encoding of string data from different sources should be performed before starting the json_encode()-process in your PHP-program ! This requires a complete knowledge and control over the encoding of data from all sources that contribute strings to an Ajax response !

Otherwise, you may never get any (reasonable) result data back to your javascript function handling the Ajax response data. This happened to me lately, when I deployed classes which worked perfectly in a UTF-8 environment on a French LAMP system where the PHP/MySQL interfaces were set up for a latin-1 character set (corresponding to iso-8859-1). Due to proper decoding on the server side Ajax data went correctly into a database –
however, the expected complex response data comprising database data, data from files and programs were not generated at all or incorrectly.

As I found it somewhat difficult to analyze what happened, I provide a short overview over some important steps for such Ajax situations below.

Setting a character set for the PHP/MySQL interface(s)

The character code setting for the PHP/MySQL-connections is performed from the PHP side by issuing a SQL command. For the old interface mysql-interface, e.g., this may look like

$sql_unames = “SET NAMES ‘latin1′”;
mysql_query($sql_unames, $this->db);

Note that this setting for the PHP/MySQL-interfaces has nothing to do with the MySQL character settings for the base, a specific table or a table row! The NAMES settings actually prepares the database for the character set of incoming and outgoing data streams. The transformation of string data to (or from) the character code defined in your database/tables/columns is additionally and internally done inside the MySQL RDBMS.

With such a PHP/MySQL setting you may arrive at situations like the one displayed in the following drawing:

ajax_encoding

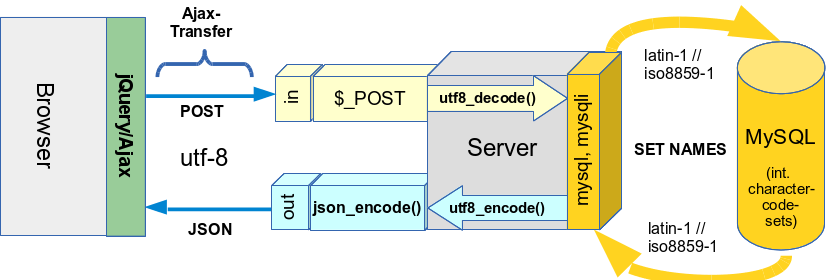
In the case sketched above I expect the result data to come back to the server in a JSON format.

Looking at the transfer processes, one of the first questions is: How does or should the Ajax transfer to the server for POST data work with respect to character sets ?

Transfer POST data of Ajax-requests encoded with UTF-8

Normally, when you transfer data for a web form to a server you have to choose between the GET or the POST mechanism. This, of course, is also true for Ajax controlled data transfers. Before starting an Ajax request you have to set up the Ajax environment and objects in your Javascript programs accordingly. But potentially there are more things to configure. Via e.g. jQuery you may define an option regarding the so called “ContentType” for the character encoding of the transfer data, the “type” of the data to be sent to the server and the “dataType” for the structural format of the response data:

$.ajaxSetup( { …..
    ContentType : ‘application/x-www-form-urlencoded; charset=UTF-8’
    type : ‘POST’
    dataType : ‘json’
…});

With the first option you could at least in principle change the charset for the encoding to iso-8859-1. However, I normally refrain from doing so, because it is not compliant with W3C-requirements. The jQuery/Ajax documentation says:

" The W3C XMLHttpRequest specification dictates that the charset is always UTF-8; specifying another charset will not force the browser to change the encoding."
(See: http://api.jquery.com/jquery.ajax/).

Therefore, I use the standard and send POST data in Ajax-requests utf-8 encoded. In our scenario this setting would lead to dramatic consequences on the PHP/MySQL side if you did not properly decode the sent data on the server before saving them into the database.

In case you have used the “SET NAMES” SQL command to activate a latin-1 encoded database connection, you must apply the function utf8_decode() to utf-8 encoded strings in the $_POST-array before you want to save these strings in some database table-
fields!

In case you want to deploy Ajax and PHP codes in an international environment where “SET NAMES” may vary from server to server it is wise to analyze your PHP/MySQL interface settings before deciding whether and how to decode. Therefore, the PHP/MySQL interface settings should be available information for your PHP methods dealing with Ajax data.

Note, that the function utf8_decode() decodes to the iso-8859-1-charset, only. For some cases this may not be sufficient (think of the €-sign !). Then the more general function iconv() is your friend on the PHP side.
See: http://de1.php.net/manual/de/function.iconv.php.

Now, you may think we have gained what we wanted for the “Ajax to database” transfer. Not quite:

The strings you eventually want to save in the database may be composed of substrings coming from different sources – not only from the $_POST array after an Ajax request. So, you need to control where from and in which charset the strings you compose come from. A very simple source is the program itself – but the program files (and/or includes) may have another charset than the $-POST-data! So, the individual strings may require a different de- or en-coding treatment! For that purpose the general “Multibyte String Functions” of PHP may be of help for testing or creating specific encodings. See e.g.: http://php.net/manual/de/function.mb-detect-encoding.php

Do not forget to encode Ajax response data properly!

An Ajax request is answered asynchronously. I often use the JSON format for the response from the server to the browser. It is easy to handle and well suited for Javascript. On the PHP the json_encode() function helps to create the required JSON object from the components of an array. However, the strings combined into a JSON conform Ajax data response object may come from different sources. In my scenario I had to combine data defined

  • in data files,
  • in PHP class definition files,
  • in a MySQL database.

All of these sources may provide the data with a different character encoding. In the most simple case, think about a combination (inclusion) of PHP files which some other developers have encoded in UTF-8 whereas your own files are encoded in iso-8859-1. This may e.g. be due to different standard settings in the Eclipse environments the programmers use.

Or let’s take another more realistic example fitting our scenario above:
Assume you have to work with some strings which contain a German “umlaut” as “ü”, “ö”, “ä” or “ß”. E.g., in your $_POST-array you may have received (via Ajax) some string “München” in W3C compliant UTF-8 format. Now, due to database requirements discussed above you convert the “München” string in $_POST[‘muc’] with

$str_x = utf8_decode($_POST[‘muc’]);

to iso-8859-1 before saving it into the database. Then the correct characters would appear in your database table (a fact which you could check by phpMyAdmin).

However, in some other parts of your your UTF-8 encoded PHP(5) program file (or in included files) you (or some other contributing programmers) may have defined a string variable $str_x that eventually also shall contribute to a JSON formatted Ajax response:

$str_y = “München”;

Sooner or later, you prepare your Ajax response – maybe by something like :

$ay_ajax_response[‘x’] = $str_x;
$ay_ajax_response[‘y’] = $str_y;
$ajax_response = json_encode($ay_ajax_response);
echo $ajax_response;

n
(Of course I oversimplify; you would not use global data but much more sophisticated things … ). In such a situation you may never see your expected response values correctly. Depending on your concrete setup of the Ajax connection in your client Javascript/jQuery program you may not even get anything on the client side. Why? Because the PHP function json_encode() will return “false” ! Reason:

json_encode() expects all input strings to be utf-8 encoded !

But this is not the case for your decoded $str_x in our example! Now, think of string data coming from the database in our scenario:

For the same reason, weird things would also happen if you just retrieved some data from a database without thinking about the encoding of the PHP/MySQL interface. If you had used “SET NAMES” to set the PHP/MySQL interface to latin-1, then retrieved some string data from the base and injected them directly – i.e. without a transformation to utf-8 by utf8_encode() – into your Ajax response you would run into the same trouble as described in the example above. Therefore:

Before using json_encode() make sure that all strings in your input array – from whichever source they may come – are properly encoded in UTF-8 ! Watch out for specific settings for the database connection which may have been set by database handling objects. If your original strings coming from the database are encoded in iso-8859-1 you can use the PHP function ut8_encode() to get proper UTF-8 strings!

Some rules

The scenario and examples discussed above illustrate several important points when working with several sources that may use different charsets. I try to summarize these points as rules :

  • All program files should be written using the same character set encoding. (This rule seems natural but is not always guaranteed if the results of different developer groups have to be combined)
  • You should write your program statements such that you do not rely on some assumed charsets. Investigate the strings you deal with – e.g. with the PHP multibyte string functions “mb_….()” and test them for their (probable) charset.
  • When you actively use “SET NAMES” from your PHP code you should always make this information (i.e. the character code choice) available to the Ajax handling methods of your PHP objects dealing with the Ajax interface. This information is e.g. required to transform the POST input string data of Ajax requests into the right charset expected by your PHP/MySQL-interface.
  • In case of composing strings from different sources align the character enprintcoding over all sources. Relevant sources with different charsets may e.g. be: data files, data bases, POST/GET data, ..
  • In case you have used “SET NAMES” to use some specific character set for your MySQL database connection do not forget to decode properly before saving into the database and to encode data fetched from the base properly into utf-8 if these data shall be part of the Ajax response. Relevant functions for utf-8/iso-8859-1 transformations may be utf8_encode(), utf8_decode and for more general cases iconv().
  • If you use strings in your program that are encoded in some other charset than utf-8, but which shall contribute to your JSON formatted Ajax response, encode all these strings in utf-8 before you apply json_encode() ! Verify that all strings are in UTF8 format before using json_encode().
  • Always check the return value of json_encode() and react properly by something like
    if (json_encode($…) === false
    ) {
    …. error handling code …
    }
  • Last but not least: When designing your classes and methods for the Ajax handling on the PHP side always think about some internal debugging features, because due to restrictions and missing features you may not be able to fully debug variables on the server. You may need extra information in your Ajax response and you may need switches to change from a Ajax controlled situation to a standard synchronous client/server situation where you could directly see echo/print_r – outputs from the server. Take into account that in some situation you may never get the Ajax response to the client …

I hope, these rules may help some people that have to work with jQuery/Ajax, PHP, MySQL and are confronted with more than one character set.