Erste Schritte mit Git für lokale und zentrale Repositories unter Eclipse – I

Seit Jahren arbeite ich unter Eclipse fast gewohnheitsmäßig mit SVN (Subversive Plugin und Polarion Connectoren) als Versionsverwaltungstool. Eine Frage, die mich dabei seit längerem verfolgt, ist:

Ist für Freiberufler wie mich, und damit in vielen Fällen für mobile Einzelkämpfer, trotz aller SVN-Affinität ein Wechsel auf Git sinnvoll? Woran kann man den Bedarf dingfest machen?

Steht ein Entwicklungsprojekt in einem überregional verteilten Team an, so setzen ja bereits viele andere Entwickler auch Git ein. Dann ist der Einsatz natürlich auch für mich unumgänglich. In der Situation befand ich mich aber noch nicht – deswegen habe ich eine ernsthafte Auseinandersetzung bislang auch immer wieder verschoben. Nun belasten mich ein paar Defizite von SVN aber zumindest für Entwicklungsaufgaben so, das ich das Thema wieder aufgreife.

Betrachten wir also mal eine sehr viel einfachere Situation als eine Entwicklung in einem verteilten Team. Nehmen wir an, das ich alleine etwas für einen Kunden entwickeln muss, aber den Kunden regelmäßig an einem anderen Ort (u.U. im Ausland) aufsuchen muss. Oder nehmen wir an, dass während der Entwicklungsarbeiten auch aus anderen gründen längere Abwesenheiten vom Arbeitsplatz-PC erforderlich sind, und in der Zwischenzeit am Laptop weitergearbeitet werden muss. Und gehen wir weiter von einer Situation aus, in der im Vor- und Nachfeld von Reisen der Status veränderter Projekt-Dateien regelmäßig versioniert und auf einfache Weise zwischen Arbeitsplatz-PC daheim und einem Laptop abgeglichen werden muss:

  1. Bewege ich mich zum Kunden, muss ich Dateien, die sich auf aktuell laufende Entwicklungsprojekte beziehen und an denen ich zuvor an meinem Arbeitsplatz gearbeitet habe, von meinem PC auf einfache automatisierte Weise auf einen Laptop transferieren. Dabei möchte ich aus entwicklungstechnischen Gründen (und in Beratungsprojekten z.B. zu Belegzwecken) immer die gesamte bisherige Versionshistorie der Dateien mit mir führen.
  2. Natürlich möchte ich answchließend zur Kontrolle weiterer Änderungen, die während der Reise anfallen, auf dem Laptop gerne ein lokales Versionsmanagement betreiben. Das gilt vor allem bei längerer Abwesenheit vom Heim/Firmenstandort. Und die während der Reise erreichten Zwischenstände möchte ich schon aus Backup-Gründen mit einem Repository im Internet abgleichen.
  3. Und natürlich sollen die auf dem Laptop erarbeiteten Ergebnisse nach dem Ende der Reise wieder in ein dortiges zentrales Repository des Haus-/Firmennetzes eingespielt werden. Von da dann wenn möglich auch weiter in ein lokales Repository auf meinem Arbeitsplatz-PC ..

Hier besteht also schon für einen Einzelkämpfer der Bedarf nach einer lokalen und einer zentraler Versionsverfolgung. Das bedingt zwangsläufig den Abgleich zwischen lokalen und zentralen Repositories zu sinnvoll gewählten Zeitpunkten. Will man solche Szenarien mit SVN abbilden steht man vor einem kleinen Dilemma, das erhebliche Klimmzüge erfordert.

SVN ist dafür gedacht, dass man sich mit einem (!) zentralen Server abgleicht. Der muss deshalb auch kontinuierlich erreichbar sein. Nun habe ich (gerade bei etwas längeren Auslandsaufenthalten) aber nicht immer eine Internetverbindung zur Verfügung. In einer solchen Situation bräuchte ich dann zwingend eine lokale Versionsverwaltung auf meinem Laptop, dessen Repository später mit Repositories mehrerer Server abgeglichen werden soll und muss. Das ist unter SVN wirklich ein Rezept für ein gediegenes Kuddelmuddel.

Unter Git ist das nach ersten Literaturstudien dagegen gut zu beherrschen. Git erlaubt das sichere Arbeiten mit einem lokalen und zentralen Repositories. In dieser Miniserie von Blog-Posts möchte ich deshalb für Interessierte
und Einsteiger, die Git unter Eclipse betreiben wollen, erste einfache Schritte beschreiben,

  • wie man lokale Repositorys mit Eclipse-Mitteln auf einem PC und auf einem Laptop aufsetzt,
  • wie man Repositories “cloned” und Clones zum Einrichten von Server-Repositories verwendet,
  • wie man ein lokales Repository dann mit einem ein zentralen Repository im Haus- oder Firmennetz verbindet
  • und gleichzeitig ein weiteres Repository im Internet als Backup- und Refernz-Repository benutzen kann.

Ich lasse dabei ein komplexes lokales und zentrales Feature- oder Release-Branching völlig außen vor. Um Release- und Feature-Branching kümmere ich mich evtl. in späteren Blog-Artikeln. Hier geht es nur um die Unterstützung eines quasi-sequentiellen Arbeitens an verschiedenen Geräten in folgendem Sinne:

Schritte eines Wunschszenarios für mobile Einzelkämpfer

  1. Entwicklung-/Dateiänderungen am Arbeitsplatz-PC. Versionierung mit Hilfe eines lokalen Repositorys auf dem PC
  2. => regelmäßiger Abgleich des Entwicklungsstandes auf dem PC mit einem zentralen Server-Repository im Hausnetz und einem zentralen Repository im Internet
  3. => Vorbereitung einer Reise: Abgleich des zentralen Server-Repositories mit dem lokalen Repositories eines Laptops
  4. => mobiles Arbeiten am Laptop und Versionsverwaltung mit einem dortigen lokalen Repository
  5. =>Abgleich neuer Versionsstände auf dem Laptop mit einem zentralen Repository im Internet
  6. => Rückkehr ins Firmennetz und Abgleich des Laptop-Repositories mit dem zentralen Git-Repository auf einem zuständigen Server des LANs
  7. => Abgleich zwischen Server-Repository und Arbeitsplatz-Repository
  8. => Arbeiten mit dem lokalen Repository am Arbeitsplatz und erneut Abgleich mit beiden Server-Repositories
  9. => Abgleich mit Laptop in Vorbereitung einer neuen Reise.
  10. Das ist ein denkbar einfaches Szenario, dass sich mit Hilfe einer IDE wie Eclipse nachbilden lassen sollte. Zur Vorbereitung benötigen wir jedoch einige generell Git-Begrifflichkeiten. Daher greife ich nachfolgend die Arbeitsschritte nochmal aus Eclipse-Perspektive auf und führe dabei gleichzeitig ein paar zentrale Begriffe aus der Git-Welt ein, an die man sich sowieso gewöhnen muss, wenn man ein Git-Plugin unter Eclipse einsetzen will.

    Wir leiten aus der Neubeschreibung der obigen Arbeitsschritte unseres Wunschszenarios nebenbei Aufgaben ab, deren Lösung später zu einer systematischen Abbildung der gewünschten Prozesse unter Eclipse führen wird.

    Das Wunschszenario in Git-Begriffen

    Zur Vertiefung betrachten wir folgende Skizze:

    Bin ich im firmeneigenen Netz arbeite ich normalerweise auf einer Linux-Workstation. Dort ist etwa “Eclipse Neon 3” mit dem Git-Plugin (Egit) installiert. Die Entwicklungsarbeit ist in Form von (Eclipse-) “Projekten” organisiert, zu denen jeweils ein Dateibaum gehört. In meinem Fall tummeln sich dort typischerweise PHP-, HTML,-, CSS-, Javascript- und auch mal Python-Dateien.

    Für unser Beispielszenario ziehen wir später die Dateien eines konkreten Eclipse-Projektes namens “alien1” heran. Die zugehörigen Dateien liegen dabei unter 4 Haupt-Verzeichnissen: includes, admin, interpreters,
    uploads. Das Projekt wurde in einem Eclipse-“Workspace” namens “ecl_alienx” platziert. Die genannten 4 Verzeichnisse sind im Beispiel deshalb unter einem Verzeichnis “/projekte/ecl_alienx/alien1” zu finden.

    Man könnte nun darüber streiten, ob die Aufbewahrung der Programm-Dateien innerhalb des Eclipse-Workspaces sinnvoll ist. Wir unterlassen diese Diskussion aber, da wir die Verzeichnislokation im Rahmen des Git-Einsatzes sowieso ändern werden.


    Was wollen wir nun im Detail erreichen?
    Zur Versionsverwaltung möchte ich in unserem Wunsch-Szenario zunächst ein lokales Git-Repository auf dem Arebitsplatz-PC benutzen, bis ich der Meinung bin, dass erreichte Zwischenergebnisse auch auf einem zentralen (Git-) Repository eines Servers im Haus-/Firmen-Netz zur Verfügung gestellt werden sollten. Ggf. für den Zugriff durch andere Nutzer/Tester, aber auch für zentrale Backups.

    Lokal checke ich eine erreichte neue (Zwischen-) Version zunächst als sogenannten “Commit” in das Git-Repository meiner Workstation ein. Manchmal muss man in der SW-Entwicklung von einer bestimmten Version aus unterschiedliche, und für eine Weile divergierende Wege zu neuen Versionen gehen. Man erhält dann “Verzweigungen” der Versionsstände; wie in SVN auch bezeichnet man diese Zweige in Git als “Branches“. Branches können zum Beispiel als Feature- oder Release-Branches angelegt werden zur experimentellen Entwicklung von Features in einem separaten Zweig bzw. zur Konsolidierung eingefrorener Versionsstände angelegt werden. Andee Branches mögen etwa auch einer Continuous Integration dienen. Zu und zwischen Branches – also definierten Abzweigungen in der Versionshistorie – möchte man ggf. wechseln. Unter Git spricht man hierbei (abweichend von anderen Versionsverwaltungssystemen) von sog. Checkouts. Warum wird später klarer werden. Würde man z.B. vom Master-Branch zu einem anderen Branch namens “Branch2″ wechseln, so würde Branch2” zum sog. “aktiven Branch” des Repositories werden.

    Jeder Commit entspricht grafisch gesehen einem “Knoten” eines Branches (s. die Skizze weiter unten); ein Knoten symbolisiert einen bestimmte Versionsstand des Branches (also eine eindeutigen Kombination aus definierten Versionsständen aller für die Versionsverwaltung erfassten Dateien). Ein Knoten in einem Branch entspricht also genau besehen nicht nur dem punktuellen Commit, der zu seiner Erzeugung führte, sondern im Kern der ganzen Historie aller vorangegangenen Commits auf den erfassten Dateien – ausgehend von einem initialen Commit. Die Rückkehr zu einem älteren Versionsstand (Knoten) in einem Branch nennt man unter Git einen sog. “Reset“.

    Für Aktionen wie Commits, eine Historienverfolgung, Branching, Checkouts, Resets etc. sollte im Grunde gar kein Server erforderlich sein; ich will mit meiner lokalen Versionsverwaltung und dem zugehörigen Repository wenn nötig auch einen ganze Weile völlig autonom arbeiten können ohne irgendwelche Kollegen zu belästigen.

    So weit so gut. Nun eine Einschränkung:

    In unserem Szenario konzentrieren wir uns weitgehend auf sukzessive voranschreitende Versionen – oder “Knoten” – in genau einem Branch jedes eingesetzten Repositories. Der ursprünglich erzeugte, erste und native Branch eines jeden Repositories ist dessen sog. Master-Branch. Wir beschäftigen uns in dieser Blog-Post-Serie also primär mit dem Abgleich zwischen den “Master”-Branches verschiedener Repositories. Wir lassen dabei für unser Wunschszenario die gewollte Erzeugung von Branches (Entwicklungszweigen) und das Wechseln zu einem anderen als dem “Master”-Branch weitgehend außen vor.

    Die Verzeichnisstruktur, in der die Dateien eines Eclipse-Projektes organisiert werden, muss sich in einem geeigneten Äquivalent im Rahmen der
    Repository-Verwaltung widerspiegeln. Ein solches Äquivalent ist der sog. “Working Tree” eines Repositories. Wir werden sehen, dass auch der Working Tree eine Verzeichnisstruktur darstellt; diese entspricht ferner einer Momentaufnahme eines definierten Knotens auf dem “aktuellen Branch”; in unserem Beispiel also auf dem Master-Branch. Achtung: Checkouts und Resets führen zu Veränderungen der Inhalte von Dateien im “Working Tree”.

    Typischerweise kann es sich ein Versionsverwaltungssystem aber nicht leisten, unterschiedliche und vollständige Varianten aller Dateiinhalte in normaler Dateiform aufzubewahren, um die Historie zu erfassen. Git arbeitet hier (wie andere System auch) inkrementell und verwahrt Differenzen zwischen Dateizuständen; zudem wird komprimiert: Im Ergebnis entstehen so Blobs einer Art Objekt-Datenbank. Die Objekte wiederum lassen sich eindeutig identifizieren und werden definierten Zustandsknoten von Branches (und damit auch Commits) zugeordnet. Eine eindeutige Identifizierung sowohl von Objekten als auch Commits (Knoten) wird in Git über Hashes ermöglicht, zwischen denen dann Relationen hergestellt werden. Weitere Details der Objektorganisation sind in unserem Kontext unwichtig.

    Der Working Tree stellt eine Momentaufnahme eines ausgewählten Knotens dar – in der Regel des letzten, also des jüngsten Knotens einer Branch-Historie. Dieser Knoten wird auch als HEAD des Branches bezeichnet.

    Die ersten Ziele, die wir unter Eclipse erreichen müssen, sind demnach folgende:

    • Aufgabe 1: Erstellen eines lokalen Repositories auf dem PC.
    • Aufgabe 2: Klärung: Wo liegt der “Working Tree”? Welchen Verzeichnisbaum zeigt Eclipse?
    • Aufgabe 3: Einbringen des Inhalts des Projektverzeichnisbaums in den Master-Branch des lokalen Repositories. Initiales Commit.
    • Aufgabe 4: Durchführung von Änderungen im Verzeichnisbaum des Projekts und Testen nachfolgender “Commits”. Blick auf die Git-Versionshistorie auf dem PC. Identifizierung des HEAD-Commmits bzw. -Knotens.

    Zu geeigneten Zeitpunkten möchte ich den aktuellen Stand meiner Dateien auch auf einem zentralen Git-Server (z.B. im Firmen-LAN) bereitstellen. Entsprechende Operation werden als “Push“-Operationen bezeichnet. Ziel (“Target”) eines Pushes ist also ein Branch aus einem anderen (Target-) Repository – hier also im Repository des Servers. Ein Pushvorgang erzeugt dort einen neuen Knoten.

    Andere bzw. auch ich selbst können später vom Server-Repository den dort festgehaltenen Entwicklungsstand auf andere Geräte (z.B. einen Laptop) und dortige lokale Repositories überführen. Dazu führen sie dann sog. Pull- oder Fetch-Operationen durch, mit denen der Versionsstand eines definierten Branches auf dem Server abgefragt und in das lokale Repository überführt und dort integriert wird. Auf den Unterschied zwischen Pull und Fetch gehe ich an passender Stelle in einem späteren Post dieser Serie kurz ein.

    In unserem Szenario “pullen” wir typischerweise den letzten Stand vom Master-Branch des Server-Repositories. Das Target eines Pulls ist also der aktuelle Branch in dem lokalen Repository, von dem aus ich auf ein anderes Repository als Quelle von Veränderungen zugreife. Der Pull erzeugt einen neuen Knoten in meinem lokalen Branch. In unserem Szenario finden Pulls normalerweise auf dem Laptop und später auch auf dem Arbeitsplatz-PC statt. Server-Repositories protokollieren in unserem Szenarion dagegen neue Versionsstände als Ergebnis von Push-Vorgängen zum einem dortigen Branch – bei uns dem Master-Branch des jeweiligen Server-Repositories.

    Sowohl bei einer Push- bzw. Pull-Operationen finden (automatisch) Merge-Prozesse mit dem Stand des betroffenen Branches auf dem Target-Repository statt. In unserem Szenario wird ein erster Push-Prozess also z.B. den Stand einer Datei (oder mehrerer Dateien) des Master-Branches auf einem lokalen PC-Repository mit dem Stand der entsprechenden Datei(en) (bzw. ihrer Objekte) im Master-Branch des Server-Repositorys zusammenführen. Das PC-Repository verändert sich dabei nicht; der neue Knoten entsteht auf dem Server. [Hat man Push/Pull-Vorgänge zwischen definierten Master-Branches unterschiedlicher Repositories verstanden, so sind spätere, komplexere Operationen zwischen anderen lokalen und zentralen Repository-Branches (als den Master-Branches) relativ einfach zu beherrschen.]

    Beim Zusammenführen unterschiedlicher Dateiänderungen in einem Merge können ggf. Konflikte auftreten; diese müssen dann ggf. manuell aufgelöst werden. Das erfordert ggf. detaillierte Vergleiche der in den unterschiedlichen Branches/Repositories vor dem Merge durchgeführten Änderungen. Wir werden aber sehen:

    Arbeitet man als Einzelperson phasenweise entweder ausschließlich auf dem Arbeitsplatz oder in einer anderen Phase ausschließlich auf dem Laptop und gleicht bei einem Übergang zwischen diesen Arbeitsphasen die jeweiligen lokalen Repositories mit einem zentralen Server-Repository in der oben angegebenen Schrittfolge ab, so treten Konflikte in der Regel nicht auf. In diesen Fällen kann Git die notwendigen Merges automatisch und auf einfache Weise erledigen. Man spricht dann auch von Fast-Forward-Merges (FF-Merges).

    Bei FF-Merges sind eigentlich nur neue Knoten in einem Branch zu erzeugen und Referenzen zu bereits bekannten Objekten aufzubauen. Letztere müssen möglicherweise zwischen Repositories kopiert werden; aber echte neue Objekte zu neuen Datenstrukturen sind nicht zu erzeugen. Es liegt dann kein Merge-Commit wie im Falle echter Zusammenführungen mehrer unterschiedlicher Änderungen in den Quell- und Target-Branches vor.

    Die Situation wird in folgender Skizze dargestellt. Wir sehen sukzessiv erstellte Knoten in den Master-Branches dreier Repositories. Echte Commits, bei denen Datenveränderungen vorgenommen wurden, sind als solche bezeichnet und durchnummeriert. Zu jedem Knoten findet man die ersten alphanumerischen Zeichen eines zugehörigen eindeutigen Hashes. In jedem Branch ist der führende Head-Knoten durch eine rote Füllung angedeutet.

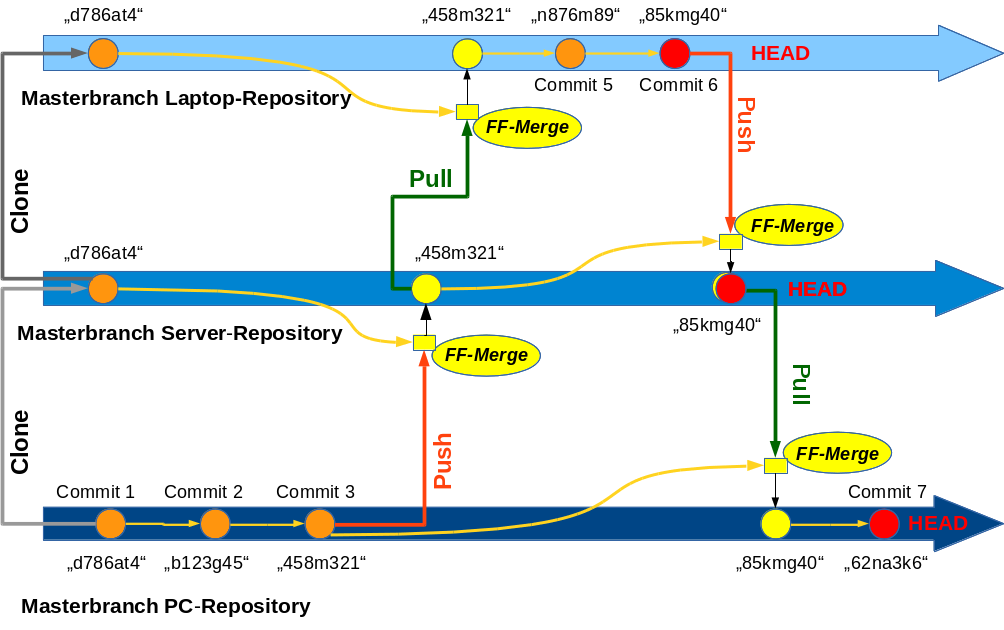
    Push und Pull-Aktionen führen in der rein sequentiellen Aktionsabfolge unseres einfachen Szenarios zu unkomplizierten und konfliktfreien FF-Merges, in die wir nicht eingreifen müssen.

    Komplizierter wäre das Mergen allerdings dann, wenn die zentralen Versionsstände zu Dateien, an denen man selbst in seinem lokalen Repository arbeitet, während einer Phase auch durch andere von anderen Stellen aus manipuliert werden würden. Das schließen wir für diese Artikelserie aber mal aus. Etwas schwieriger ist auch ein zwischenzeitlicher lokaler “Reset” auf alte Versionen beim Abgleich zwischen den verschiedenen Arbeitsphasen an unterschiedlichen Geräten zu bewältigen. Auch auch das lassen wir hier zunächst außen vor. Ich komme darauf aber in einem späteren Post der Serie zurück.

    Der eine oder andere wird sich noch die Frage stellen, wie man denn überhaupt zu einem Repository kommt. Unter Git (und damit auch mit entsprechenden Tools unter Eclipse) ist das sowohl über das gezielte Erzeugen und Initialisieren eines Repositories in einem Projekt-Verzeichnis möglich als auch über das Klonen (also Kopieren) von Repositories. Clones mit bestimmten Eigenschaften
    können auch auf Server verschoben und anschließend mit lokalen Repositories verbunden werden. Wir werden uns den Aufbau und das Klonen von Repositories mit Eclipse Tools später genauer ansehen.

    Wir können an dieser Stelle jedoch schon mehrere neue Aufgaben festhalten, die wir unter Eclipse lösen müssen:

    • Aufgabe 5: Erstellen eines zentralen Repositories auf einem Server im LAN. Hierzu werden wir unser lokales PC-Repository aus Aufgabe 1 in einer bestimmten Weise “klonen”. Der Clone wird dann auf dem Server in zugänglicher Weise platziert.
    • Aufgabe 6: Anbinden des zentralen Repositories an das lokale PC-Repository. (Verkopplung der Master-Branches). Klärung der Frage, ob man ein lokales Commit auf dem PC mit einem gleichzeitigen Push zum Server verbinden kann.
    • Aufgabe 7: testweises Überführen von neuen Änderungen, die wir auf dem PC am Projekt vornehmen werden, in den Master-Branch des Git-Server-Repositories.

    Wenden wir uns nun unserem Laptop zu. Im Wunschszenario ist beim Wechsel von einer Arbeitsphase am PC auf eine mobile Phase unter alleinigem Einsatz des Laptops zunächst also eine Push-Operation vom PC auf den Server und danach eine Pull-Operation auf dem Laptop erforderlich. Es ergeben sich also folgende weitere Aufgaben:

    • Aufgabe 8: Erzeugen eines passenden Projektes in einem geeigneten Eclipse-Workspace des Laptops. Klonen des Server-Repositorys und Bereitstellen auf dem Laptop. Verbinden mit dem Projekt. Hier stellt sich u.a. die Frage: Kann man diese Schritte unter Eclipse nicht irgendwie miteinander verbinden?
    • Aufgabe 9: Transfer von neuen Commits, die wir auf dem PC vornehmen, über das zwischengeschaltete Server-Repository in das lokale Repository des Laptops. Also: Commit auf dem PC, Push zum Server und Pull-Operation auf dem Laptop.

    Danach arbeitet man ausschließlich auf dem Laptop weiter:

    • Aufgabe 10: Durchführung von Änderungen und entsprechenden Commits auf dem Laptop. Blick auf die Versionshistorie des Laptops.

    Hinweis: Unter Git wäre prinzipiell auch ein direkter Abgleich zwischen den lokalen Repositories des Laptops und des PCs möglich gewesen. Aus verschiedenen Gründen halten wir aber in einem LAN den Weg über ein zentrales Repository für eine deutlich bessere Idee (Stern-Architektur). Ein Grund besteht etwa in Sicherheitsargumenten und einer Zugriffskontrolle: Nicht jedes System soll auf Verzeichnisstrukturen jedes andere im Netz zugreifen können. Die Zugriffsberechtigung auf bestimmte Repository-Daten lässt sich an zentraler Stelle gleich für mehrere Mitarbeiter steuern. Ein weiterer Grund ist die zentrale Zugriffsprotokollierung. Zudem stehen die Arbeitsergebnisse an zentraler Stelle auch für Backups und andere Mitarbeiter zur Verfügung.


    Betrachten wir die Situation die sich bei der Rückkehr von einer Reise ergibt. Will man dann ausschließlich auf dem Arbeitsplatz-PC weiterarbeiten, so gilt: Erforderlich ist zuerst eine Push-Operation vom Laptop in Richtung Server-Repository des Firmen-LANs und anschließend eine Pull-Operation am PC, bei der man den aktuellen Stand vom Server-Repository in das lokale Repository des PCs überführt.

    Man kann die gesamte Kette “PC => Server => Laptop => Server => PC”, die im Laufe einer Reise abgearbeitet wird, auch an der oben dargestellten Skizze nachvollziehen. Der Weg vom Laptop zum PC ist daher die Umkehrung von Aufgabe 9:

    • Aufgabe 11: Transfer von Änderungen auf dem Laptop über den zentralen LAN-Server auf den Arbeitsplatz-PC.

    Repository im Internet
    Was soll nun in unserem 1-Mann-Szenario der in der Skizze angedeutete weitere Server im Internet ?

    Ein Repository kann man auch als spezielle Backup-Datenbank für erzielte Arbeitsergebnisse betrachten. Zentrale Repositories schützen in diesem Sinne gegen lokale Verluste. Tatsächlich ist es mir schon mal passiert, dass eine Laptop-Platte auf einer Reise ihren Geist aufgegeben hat. Manchmal kann man sich dann sogar eine neue Platte beschaffen – und Linux wie Eclipse sind auch schnell installiert. Aber woher bekommt man in einem solchen Fall ein halbwegs aktuelles Repository? Hier hilft ein Server im Internet.

    Umgekehrt gilt: Auch ein Totalverlust des Laptops (z.B. durch Diebstahl) ist in der Regel weniger schlimm als der Verlust der auf diesem Gerät erzielten Arbeitsergebnisse. D.h., wir werden das Internet-Repository auch während einer Reise relativ regelmäßig mit den auf dem Laptop erzielten Versionsständen per Push-Abgleich versorgen. Soweit wir eben Zugang zu einer halbwegs vernünftigen Internet-Anbindung haben. Da Git inkrementell und komprimiert sichert, ist die Menge der zu transferierenden Daten dann oft gar nicht so groß, wie man meinen möchte. Natürlich gilt, dass man ein zentrales Repository im Internet auch für andere Zwecke wie die Arbeit in einem verteilten Team nutzen könnte.

    Wir benutzen also ein zentrales Git-Repository im Internet (oder mehrere solcher Repositories) als Backup-Instanz. Damit das Repository des Internet-Servers bereits zu Beginn einer Reise ordentlich gefüllt ist, werden wir vom PC aus rechtzeitig entsprechende Push-Aktionen durchführen. Im Sinne einer Backup-Übung sogar relativ regelmäßig. Selbstverständlich müssen unsere Administratoren dafür Sorge tragen, dass der Server und der Kommunikationsweg zum Repository hinreichend gegen Zugriffe anderer geschützt ist. Hier gelten die gleichen Maßnahmen, die man bei jedem anderen Cloud-Service auch treffen würde.

    Es ergeben sich folgende abschließende Aufgaben:

    • Aufgabe 12: Klonen des LAN-Server-Repositories und Verschieben des Clones auf einen Server im Internet. Ankopplung an die Git-Versionsverwaltung unter Eclipse auf dem PC.
    • Aufgabe 13: Testen von gezielten Push-Vorgängen vom PC und vom Laptop zum Repository auf dem Internet-Server. Klärung der Frage, ob wir unter Eclipse mit einem Commit zwei parallel Pushvorgänge zu den verschiedenen Server-Repositories im LAN und im Internet anstoßen können.
    • Aufgabe 14: Testweiser Pull eines per Laptop erzeugten Versionsstandes vom Internet-Repository auf den PC. Anschließend Push vom Laptop zum Repository auf dem LAN-Server (!) und nachfolgender erneuter Pull desselben Versionsstandes durch den PC auch vom LAN-Server. Wird die Identität der Versionsstände erkannt?

    Damit genug der Theorie. Wir haben unser Wunschszenario in Git-Begriffen ausgedeutet und uns dabei ein ordentliches Paket an Aufgaben zusammengestellt, das wir soweit möglich und sinnvoll unter Eclipse abarbeiten wollen. Im nächsten Post dieser Serie
    Erste Schritte mit Git für lokale und zentrale Repositories unter Eclipse – II
    bewegen wir uns dann in die Git-Praxis unter Eclipse und legen dort erstmal ein lokales Repository für unser Beispielprojekt “alien1” an.

Webclipse JSjet, Eclipse Neon 2 and the Outline View – what I like and what I do not like – part III

JSjet is an Eclipse plugin intended for Javascript developers, who are dissatisfied with the sparse information the present JSDT version provides you with in the Outline View and the code completion boxes. See:
Webclipse JSjet, Eclipse Neon 2 and the Outline View – what I like and what not – part I.

But a professional user would check the quality of the information provided by JSjet, too. In my last post of this mini series about JSjet
Webclipse JSjet, Eclipse Neon 2 and the Outline View – what I like and what not – part II
I discussed some strong indications that – given certain circumstances – one unfortunately cannot always trust the information JSjet provides in the Outline View. Equally important: Uncritically picking information from JSjet’s code completion dialog in Eclipse Neon 2/3 may – again under certain circumstances – lead to unintended errors in your Javascript code. It depends very much on your programming style and the philosophy behind it. Adding new properties and methods to specific objects may have severe consequences. And JSjet (Vers. 1.72.201703081933 / 2017 CI 3b) is not handling a prototypal inheritance pattern well. You should test this out in case you want to use JSjet for professional work!

Still, one may hope that Genuitec overcomes these problems in future versions. I base this hope on the fact that a conservative simple inheritance pattern is analyzed correctly with respect to variables and functions the code completion dialog can offer as valid choices. So, the required code analysis capabilities are there in the background of the duo JSjet/Tern – but they are not used properly in all cases, yet.

Are there more aspects you should think about when planning to use JSjet? Yes, in my opinion, there are. They have to do with licensing and license conditions – and what you or your company tolerates regarding data gathering about a developer’s interaction with Eclipse.

License fees – a really fair prize for one seat installations

You should be aware of the fact that Webclipse JSjet is not for free if you plan to do serious development work with it. By serious I mean work that requires more than just 8 days per month. JSjet follows your interaction with JSjet – after having used it on more of 8 days you will be asked to get a license. If I remember correctly it was not important how much you used it on these 8 days. There are company licenses and personal licenses available. Note that you would license the Webclipse product which contains much more than just JSjet; e.g., you would also get an Angular IDE.

For me as a freelancer the personal license was the interesting one. I think a price around 30 $ per year for one workstation and 2 different Eclipse installations on this machine is a fair offer. After the comments on the quality in my last post you may think differently – but, hey, what has the present JSDT to offer you instead? And their are more things included in Webclipse than just JSjet and the Outline view …

License terms – and the question of surveillance …

Now, we come to a much more critical and frustrating point – at least for Europeans with an increasing awareness of and about data gathering by IT providers. And I make a clear distinction between services which I do not have to pay money for and licensed services, which I pay in Euros or Dollars. Personally, I do not want to pay for a license and have no option to stop information gathering about my interactions with the computer and/or used programs. I do not want to pay extra with data that potentially allow for a personal work or
interest profile that an IT provider can and wants to distribute/sell to third parties without my consent. So, I get pretty annoyed when a reference to personal data is directly included in frequent information transfers about my work, interest or habits.

Actually, the license statement shown during installation of Webclipse makes it very clear that you accept data gathering when licensing. We read:

8.0 Consent to Collect, Store, and Use Information. Licensor respects your privacy rights and recognizes the importance of protecting any information collected about you. Solely for the purpose of improving Licensor Services to you, you hereby authorize and consent to the collection, storage and use of aggregate information and data related to or derived from your use of the Software and any information or data (including personally identifiable information) that you elect to provide to Licensor in connection with your use of the Software. By installing, accessing or using the Software, you consent to these information collection and usage terms, including (where applicable) the transfer of data into a country outside of the European Union and/or the European Economic Area or the United States of America. Licensor assumes no obligation to protect confidential or proprietary information that you elect to provide to Licensor (other than personally identifiable information) from disclosure, and Licensor will be free to reproduce, use, and distribute the Information (other than personally identifiable information) to others without restriction.

(Marking parts of the text with strong or cursive letters was done by me.) Ja, ja – we should trust you … It is all in our own interest …. Really? Why does it all remind me of MS Win 10? And how bad that I do not trust in any data provision via the Internet to providers where I have no control about what they do with my personalized or possibly personalizable data. So, what does Genuitec gather – and when is this information sent from Eclipse to Genuitec? Let us start with the second question first:

Information is at least sent to Genuitec via https each and every time you start Eclipse with installed Webclipse components. This will probably happen at least daily. How can you test it? I recommend Linux users to find the IP address of Genuitec (same as the website), set up corresponding firewall and log statements on your machine or network segment for outgoing traffic and analyze the packets sent. Check also for additional (!) traffic and come to your own conclusions about the frequency of information transfer !

Equally interesting is the question what kind of data is “accumulated” and where is it stored in between 2 sending processes. Regarding this question I recommend to look thoroughly through the “.metadata/.plugins” folder inside your Eclipse workspace folders. One interesting folder you find there should be “com.genuitec.eclipse.monitor“. Have a look at the contents of the file located there. Or even better: Follow its changes via a “tail -f -nxxx” command during your working processes and your interaction with Eclipse. Then think a bit about the fact that the monitoring file includes hashes for your machine/workspace. And that your license information is directly included in this file. And remember that your original license order required the provision of quite a lot of personal data. Now think once again about the frequency of data transmission. Come to your own conclusions ….

If you did what I suggested above, you may get the idea that one gets a relatively fine granular image in time of what you as a developer personally do with Eclipse – at least over each day at your workstation. And then you may start questioning what Genuitec means by “data (including personally identifiable information) that you elect to
provide to Licensor”
.

Elect“??? Where, actually, is the possibility within Eclipse or Webclipse settings to choose? If you find any possibility to “elect”, please inform me, via e-mail …. I would like to see the options for restricting the data gathered, setting the accumulation period and controlling the relation to my personal license. I did not find such options ….. Or do we need more rigorous measures to “elect“?

Needless to point out for my German readers that alone the gathering of the various of time based information on a person’s interaction with Eclipse/Webclipse is not compliant with German labor legislation. Which forbids even the possibility of following personal work activities closely without anonymization. But the data gathered in the file

.../.plugins/com.genuitec.eclipse.monitor/myeclipse-usage.properties

provides no anonymization at all and neither you nor your boss have any control about how these data are treated by Genuitec.

And in addition: By following the changes of this file closely even some of your colleagues with sufficient access rights to your workspace folder could build up a profile of your daily work and your efforts – down to a millisecond. Nice, eh …? All of course in your interest … And in the interest of all your other colleagues having separate installations on their workplaces … The collected data of a company wide Webclipse installation would allow for a work load profile of the developer department, which could be broken down to individuals. By people with sufficient rights inside your company but, of course, by Genuitec in the US, too.

Now, it may be the right time to inform the officer for personal data protection in your company. And your IT network administrator, who probably is as a friend of Linux, may start with some deeper meditation on file access rights and firewall policies for the development department of your company. And both may agree upon taking their chances to “elect” and enforce company wide data protection policies.

But be aware – simply blocking the https data transfer to Genuitec servers would have an impact on any updates based on Eclipse repositories (due to automatic dependency checks). Such updates would hang … However, if you and your admins have come to this point – you/they would know what to do to solve this problem – if it is one for you or your company, at all.

My dear friends at Genuitec – I like the direction of your work, BUT you should profoundly rethink your data gathering policies – independent of the fact that your new government recently allowed for data gathering on US users without asking for the users’ consent. Checking a license can be done totally independent of data gathering. And it would be easy to offer (European) users options on the type of data to be collected and the frequency of collection. Be sure – European Linux users will take their chances to “elect” – or leave your product.

Final conclusion

JSjet as a part of Webclipse looked and looks very promising with respect to providing a better Eclipse Outline structure for Javascript coders. You definitely get more information about the code structure than provided by JSDT.

However, in its present status the combination of JSjet/Tern also showed some profound weaknesses – and provided (in my opinion) even misleading information on classes and prototypes. As a developer you would have to adapt your coding style to these deficits to avoid unintended code errors when picking up functions from JSjet’s code completion window. And beware of using prototypal inheritance patterns! However, there is a good chance that the present problems may disappear in future versions of JSjet.

Regarding license policies: JSjet is not for free, if you have a serious workload. The license conditions include your consent to a substantial information gathering – and
you cannot separate this from the transfer of information about your personal license and workplace. The gathering of information on my interaction with Eclipse is clearly far beyond what I personally accept as tolerable. German companies should evaluate the consequences closely and in relation to the German “Arbeitsrecht” as well as local company policies. There are options to enforce such policies on the network administration side.

From Genuitec I expect options to control the data gathering on various levels, the data transfer period and a clear separation between license checks and gathering of data on user interactions with parts of Eclipse/Webclipse for the future. And of course corrections to the information presented in the Outliner – but here they may depend on the Tern project.


Webclipse JSjet, Eclipse Neon 2 and the Outline View – what I like and what I do not like – part II

My last blog post
Webclipse JSjet, Eclipse Neon 2 and the Outline View – what I like and what not – part I
started a mini series about JSjet, a product sold by the company Genuitec. In the first post I discussed some advantages “Webclipse JSjet” offers regarding the Outline View for Javascript code in Eclipse Neon 2 and 3 – at least in comparison with Eclipse’s present JSDT. A first test showed that we get a lot more information – especially on ES6 classes or constructor functions – than the present JSDT plugin of Eclipse is able to provide. This was a promising result and proofed basic claims of Genuitec.

However, I also indicated already in the last post that there are some points of JSjet’s information provision which are ambivalent and could be criticized. I even raised the question whether all the information presented by JSjet in the Eclipse Outline View is really valid. For a better analysis I set up a test file with valid Javascript code – but a relatively chaotic code structure.

The objectives and the results of my limited test are discussed below. The results were a bit surprising.

For reasons of completeness I add that I used a licensed Webclipse JSjet version 1.72.201703081933 / 2017 CI 3b. JSjet internally uses Tern modules. I do not distinguish between these two below and shall not speculate which component is responsible for what. When I name JSjet I always mean the duo of Webclipse JSjet and Tern. And I must warn you: This is going to be a long article – not only about JSjet but also about some Javascript aspects, which not everybody may be familiar with.

Excursion : Code analysis capabilities and the presentation of variables, of properties of objects and prototypes in an Outline View

The presentation of code hierarchy levels in an Outline view is not all one needs during a Javascript coding process; in addition one expects a reasonable quality of the code analysis concerning variable types and variable/function association with objects or classes.

Any information regarding the origin of variables and a clear distinction between the following variables/functions would be valuable for a Javascript developer – especially if he/she had to deal with code designed by others:

  • specific variables/functions set for and added to a specific object by related explicit statements in the JS code after object creation,
  • member variables/functions set by a constructor function at the creation of an object. (Rmemeber: the “this”-operator in a constructor function refers to the object being created by the constructor!)
  • and variables inherited as members of a prototype object (e.g. the prototype of a constructor function). (Remember: the protoype object of a constructor function is linked to the __proto__ property of the objects created with the help of the constructor).

Actually, JSjet and Tern do provide type hints in the Outline View and mark things they regard as “prototypes” with a “P” and specific objects derived from a constructor function (and its prototype) with an “O“. (The latter is, of course, also true for object literals.) Elements of classes, constructor functions and prototypes are displayed as sub-elements of a related “P“-section in the Outline View. The type of such variables and functions is revealed – if JSjet can determine it.

JSjet does, however, not distinguish between (this.)elements of a constructor function or elements (functions, variables) added explicitly to the prototype of the constructor function. Under a “P” section for a constructor function ”
F()” you would see everything that would be available in a specific object created by a “new F()” statement.

This is a bit problematic as it mixes different categories of variables/functions – the one’s that are directly created in a new object by the constructor and the variables plus functions coming from the inherent prototype object of the function F(). But OK …

The relation of a specific object with its constructor and prototype is indicated in the Outline View (at least in most cases) by a reference to the name of the basic class or the constructor function used during object creation.

Thus the type of information JSjet basically provides would certainly be sufficient

  • if you never changed the type of defined properties (i.e. member variables) by assigning “values” or code elements with different types after object creation in your code. I.e. if the types of member variables defined in the constructor or in parent prototypes would be kept throughout the whole code execution.
  • if you never extended certain objects by new (!) properties and methods.
  • if you only used conventional prototype or class oriented patterns for inheritance.
  • if you never used some specific objects directly as a prototype for Child constructor functions.

Meaning: If you followed a strict and conservative coding philosophy, where everything (!; i.e. all variables and methods used in the code), is based on classes or explicitly defined elements (properties/functions) of constructor functions and/or (their) prototypes.

But Javascript allows for two interesting things which give you a lot of flexibility:

  • The extension of existing specific objects by explicitly adding new property variables and new functions/methods – i.e. beyond the prototype members and the constructor variables provided at the object’s creation. You can always perform such an extension without modifying prototypes/constructors in the inheritance chain up to your specific object. Such properties/functions would, however, only be accessible by and through the particular object.
  • A direct prototypal pattern for object inheritance where the prototype of a temporary constructor (e.g. K()={};), which later on is used to create a “Child object” (e.g. “C”), is directly linked to an existing “Parent object” (e.g. “U”; K.prototype = U; C=new K();). This works because a prototype basically is nothing else than a special object. This is a kind of classless and very pragmatic inheritance pattern; it concentrates on the reuse of an existing object and its properties/methods for yet other derived objects. The latter then inherit all properties and functions defined so far for its/their Parent object. In contrast to other inheritance patterns we do not care about the history of the Parent object or the existence of a constructor function for it. In this approach – and close to the very core of Javascript – all that counts are objects and not abstract “classes”.

Note that the prototypal pattern is implemented in ES5 via the function Object.create().

A first warning regarding prototypal patterns:
As we shall see, JSjet does NOT display an existing specific object, which is used as the prototype of a new constructor function, as a structured “P” element in the Outline View.
I guess it was difficult to decide whether one should stress the role of such an object as an existing “object” or as a “prototype” for other objects. Whatever the reason, my JSjet version had no solution to offer for indicating both aspects of an object, which was used both in its role as an object AND as a prototype for other objects. But all properties/functions of such an object
would appear below the new constructor function “K()“.

But I would have hoped that at least the dependency of the new Child constructor function on the specific object was somehow indicated. But this is not the case either – as we shall see.

Expectation: Distinction of object specific properties from properties created by constructors or delivered via prototypes
However, as JSjet distinguishes between a constructor function (including its prototype) and objects derived from it, we would expect a proper distinction of variables added to a specific object on one side and the variables of the constructor function/prototype used to build the object on the other side. In addition variables or functions added to an object, which itself is used as a new prototype for further CHILD objects in the prototypal pattern should be associated correctly.

Unfortunately, regarding these points I stumbled over – in my opinion – problematic aspects of JSjet/Tern, which I want to discuss below.

A reasonably “chaotic” test script

Let us now look at a “chaotic” test script and the resulting Outline information of JSjet. Why do I want to use a seemingly unorganized “chaotic” code example instead of a ordered one? Well, I do not exactly know how a code analyzer works; but it seems reasonable to assume that it must pick up information whilst parsing the Javascript code of a file; furthermore the gathered information has to be systematically ordered afterwards and analyzed for relations between objects and their constructors/prototypes. Global variables have to be detected, global functions have to be distinguished form encapsulated ones, and, and, and … A code analysator for Outline purposes probably will not be so “intelligent” as the interpreter itself, but it must do a reasonable reordering of code fragments to display the structural code and object hierarchy and to point out relations between defined elements correctly.

For testing a code analysis tool a test script, therefore, should contain code in “chaotic” order – and it should, of course, comprise not only the most simple language constructs. Actually, for the purpose of a provocative testing we would also like to do things, which we normally would not do. The test code displayed in the next picture was compressed to get it onto one page; it has an erratic, jumpy order of statements – on purpose. Normally, I do not write such chaotic code; but the more unstructured, the better for this type of a test. If you do not understand it at once – why should a machine ….

So, how does it look like – and what does JSjet make of it and what does it reveal in the Outline View? Just click on image or download it in case it is too small to read its content. Or download the following txt file with the code jsjet_test_code – if you want to experiment with it.

With the exception of the statements in the last line – this is all valid Javascript code and can be tested. I used “alerts” instead of “console.log” statements to save some space. As you see, I have included some relatively advanced constructs like closures, immediate function declarations, callbacks and two most simple inheritance patterns. Note in addition that each of the last six statements would result in a Javascript error. All in all this limited script is certainly not a totally simple test task for the code analysis capabilities of JSjet.

So… what do we make of the information in the Outline View? Let me walk through some aspects of the information displayed
in the Outliner. I have closed some hierarchy parts of the Outline View to get it onto one page; but I shall show the contents of these points where necessary.

All global variables are detected by JSjet

I start with a positive point: Global variables not explicitly declared via “var” or “let” statements are gathered at the end of the Outline View – in our case starting with the variable “x”. Yes, in contrast to JSDT JSjet detects all global variables and displays them! However, one would wish a better distinction of these variables introduced in the code on the fly from explicitly declared variables.

Furthermore the object “GOC” included as a property in class Ufo’s constructor is analyzed for its elements:

Note, that the local variable “z” is missing however. We shall come back to this point.

But there are other more confusing things to talk about first ….

A new member variable “s” of class “Ufo”?

The first line that really looks fishy in the Outline View is the line that displays a property “s” : If we take the information of the Outliner literally we would assume that “s” is an element of our class Ufo (or of the respective internal constructor function and the latter’s prototype). However, we never declared any “s” as part of the class Ufo, Ufo‘s constructor or Ufo‘s methods!

Instead: “s” is added to a specific object “U” based on the constructor of class “Ufo” in the course of our test code (line 24 and 30).

Hmm, who else besides object U in our code example would really know about this property “s”? Who could use it? Have a look at the U-based objects “V” (line 26) and “L” (line 29). We recognize a very simple prototypal inheritance pattern for “L” in line 28/29 and for V via Object.create() in line 26. Yes, I mixed the ES6 class syntax with old fashioned prototype manipulations in lines 28/29. Not nice, but valid. What does it mean for the derived new constructor function “K()” – and how is the relation between K() and U represented in the Outline view?

The constructor function “K()” and its prototype U are analyzed by JSjet; reasonably enough all U-properties, including those coming from its class “Ufo”, are shown in the Outline view. We, therefore, expect the properties “x” and “y” to appear below K. But we would also expect the newly added property “s” of “U” in K’s outline, because U is used as a prototype for “K()“. (Ignore the other elements for a moment.)

Note, however, that the relation of the new constructor function K() to U is not directly reflected in the Outline View; but this is no real issue.

Technical aspects: The prototype of the constructor function K() points to object U. So, actually, object L, which is based on K(), should also know about a property “s” : namely by or the provided through prototype object U. The “Object.create()” function does something similar when creating object “V“. Also object “LL” defined in
line 30 knows about “s”.

But note: Any change of “U.s” would show up in the derived objects, too – at least and as long as we do not assign own s-value to our objects L, V, LL. So the outcome for the alert statement in line 31 is:

However, neither the constructor function of class Ufo nor its prototype are really affected by all these manipulations of object “U” and the objects based on “U” ! So, it makes NOT much sense to display “s” as an element of Ufo; it is an element of U, i.e. K’s prototype, of V, L, LL.

This is very clearly tested by creating an additional object “W” based on Ufo after all the fuss with the extension of U. As expected W does NOT know anything about a property “s”.

Nevertheless, even the code completion context menu of JSjet offers “s” as a possible property element of W. The next picture resulted from the code completion support triggered via “Ctrl+Space” after typing a “W.” in the code:

Is this problematic? Well, in our simple example picking up an “undefined” property form the code completion dialog would not matter much. But things would become much more dangerous if the JSjet code completion window offered undefined functions/methods! Guess what: It does! See below.

First conclusion

From our example we get the following impression: During code analysis JSjet picks up new properties (and possibly functions,too,) added to specific objects, which themselves were derived from a class constructor. JSjet then associates these properties/functions with the original class constructor; JSjet presents them as if they were elements of the related constructor/prototype and thus at the inheritance origin of all derived objects. This is misleading.

Just a strange way to analyze the ES6 “class” syntax? Well, you see this (misleading) pattern again when you look at how the property “ufo”, which is added to object L at the end of line 31, is reflected in the Outline information about the constructor function “K()” (see the picture on K above).

Undefined method/functions pfn() and fx()?

Note that in addition to “s” JSjet displays two methods/functions “pfn()” and “fx()” as elements of our class “Ufo” [better: its constructor/prototype] . But again: We never declared these methods for class “Ufo”!

Instead we did something very different: We added function “pfn()” to the prototype of K() (and thus indirectly to object U) (line 28). And much later (after the creation of V and L) we added function “fx()” directly to our object U (see line 40). So, after this point in the code both V, L and LL would know about fx(), too, and could execute it properly. Normally, one would not program in this dangerous way – but it is possible.

But what about W and another object “Z” based on the original class “Ufo“?
W and Z never see anything of pnf() or fx(). They do nothing about these functions! Therefore, if we called W.pfn() the Javascript code would run into an exception and stop. And as expected it really does at the first statement of the last code line:

Nevertheless, we get both functions offered as valid elements in the JSjet code completion support window when typing “W.“:

So:

Picking functions from the JSjet code completion dialog window whilst coding in Eclipse can under certain circumstances lead to code errors!

We additionally check that the original class properties are kept and are not modified throughout the code via our object “Z“; see line 42 (result : false) and line 59 (error).

Second conclusion

Presenting variables and functions, which are added to a specific object, as elements of and within the scope of the object’s “class” in the JSjet Outline View is at least misleading. Personally, I would even say that it is wrong! Offering such functions in the code completion dialog as possible elements of newly created objects, which are based on the original class, may lead to errors!

Is this a systematic bug or does it somehow depend on the relatively new ES6 class definition syntax? Nope, it goes wrong also for prototype based declarations of objects; see below.

Deficits when Object.create() of ES5 is used

Interestingly enough JSjet does NOT see what object V inherits from the prototype delivered to “Object.create()” – in this case the object “U” itself. In the Outline View V is only presented as a literal object – for whatever reasons.

Only one variable, “x”, is displayed as an element of V. That it appears at all probably results from an analysis of Ufo‘s function alpha() which is called a bit later via “V.alpha()” … [This assumption can be tested by modifying alpha().] So JSjet knows about the indirect dependency of “V” on class Ufo – but this knowledge is not used for V‘s presentation the Outline View.

No display of private variables

The next remarkable point in our Outline View is that we do not see our private variable “z” defined in the constructor of class “Ufo”. This is unfortunate; especially as we have defined a (different) global variable “z”, too. And even more unfortunate, the JSjet code completion dialog offers us only an unspecific “z” (described as an element of our js-file) when requesting code completion:

So, here we see a clear limitation of the analysis depth of JSjet/Tern: Private variables are neither shown in the Outline View nor do they appear in a safe and distinguished way in the code completion dialogs.

In general: Private variables defined in any kind of function are out of the scope of the Outliner. This is annoying; especially because the code analysis actually does seem to know something about the existence and even the
type of “z”: the type of the return value of the GOC-method funx(), namely “z”, is detected correctly.

Wrong backward association of variable type changes in distinct objects with the variable types in constructor functions/prototypes

Let us turn to the constructor function “DO()” (and its prototype): The Outliner tells us that there is a variable “x” having 3 different types. It is claimed that “x” is an object! But we did NOT define any string or array values for the variable “x” of function “DO()” or its prototype. Neither did we declare “x” as a function! Instead “x” was explicitly given a number-value in the DO-function’s body!

Again, our problem is that JSjet’s Outliner does not distinguish sufficiently enough between variables and functions of a specific object and variables/functions of the constructor or prototype, from which the object was derived. In the course of our (chaotic) code we assigned a string to an object “D“, which is based on the DO() constructor function, via D[‘x’] = ‘str13’ (line 27). In addition, near the end of the test code, we assigned an array to “D.x” via the statement “D.x=[‘1′,’2’]” (line 54). And in between we assigned a function to the member variable “x” of an object “E” via “E.x=closuretest(..)”; “E” was derived from the constructor function “DO()“, too.

But what do these object specific changes of properties have to do with the original variable “x” of the constructor function and its type there? Answer: Nothing! So, again JSjet/Tern provides us with somewhat misleading information about the elements of the DO() constructor.

In my opinion, the object specific modifications should have been displayed beneath the affected objects and not below the DO() function. The constructor itself will always deliver a “number” for the “x”-variable of any object created by “new DO()”.

The only piece of information that would make us suspicious in this case is the presentation of “x” as an object (!) in the Outliner. We could interpret this as a warning about how the variable “x” is used later on in specific objects; but even this would be confusing as, unfortunately, the original type of a number is not displayed.

Wrong association of added object variables and functions with constructor functions and parent prototypes

As we did for our class “Ufo” we tested the consequences of an extension of objects created by a “new DO()“. We added again a variable “s” to some of these objects. Furthermore, we also supplemented functions – directly or indirectly. See the statements “D[‘s’]=5” in line 27, “E.s = closuretest(..);”, “E.x = closuretest(..);” in line 36 and E.e = E.show(‘s’) in line 37.

As a first consequence we get a variable “s” in the information about the constructor DO() (or its prototype). Which – in my opinion – is misleading and wrong. Again, “s” also and wrongly appears in the code completion dialog.

The presentation of the functions “hilfe()“, “help()“, “hilf()” as elements of DO() is equally problematic. Again these functions are assigned to and cross referenced by properties added of specific objects! They are not part of the constructor function or its prototype. The Outliner does not make this clear! And the code completion window offers these functions unconditionally! E.g. for object D when typing “D.” followed by “Ctrl+Space”:

Now let us have a look at the information about ”
E.e“. The type of this member variable is not specified in the Outline View. This is interesting because “E.s” was correctly detected as a function before. “E.s” is a function assigned by a closure, and E.e uses E.s. But the fact that we set “E.e=E.show[‘s’]”, which only indirectly points to a the function E.s(), seems to block the type recognition. And after that even the explicit call as a function “E.e();” in the code does not help. But OK — it is always difficult to follow indirect assignments … What we must complain about, however, is again the fact that “e()” nevertheless is offered as a legitimate function (!) in the code completion menu for object D (see the picture above). But: E.e() will never be available for object D !

Third Conclusion

The problematic display of variables and functions, which are added to specific objects, as elements of the “prototype”, from which the object was derived, is also found when we use classical constructor functions (and their prototypes) for creating objects. In addition JSjet either does not recognize the relation of an object with a prototype object when Object.create() is used, or JSjet does not indicate this relation in the Outline View.

No display of private variables in closures

Regarding the global function “closuretest()” we again bemoan the missing display of the private variable “i”, which actually makes this function a closure (“i” is manipulated in the returned and encapsulated function’s body). Closures are one of the possibilities to provide real private variables in a lot of JS patterns – but JSjet/Tern does not help us here. In the code completion dialog the origin of the offered “i” is not specified either (we are only told that “i” appears in JS file). In this case i’s location and meaning would be clear; but what in longer real life codes?

Infinite recursion of the display of named functions encapsulated in immediate function brackets

The next strange point is the handling of an immediate function statement with a named (!) function inside; see the declaration of “var tt”, whose resulting type is recognized correctly. I admit: The naming (“ft”) of the encapsulated function does not make much sense, but interestingly the analysis of JSjet seems to run into an infinite loop for displaying the internal structure of the “anonymous” function block – containing the “ft()”. See the following picture! Really confusing! And compare this with the unnamed immediate function in the declaration of variable “var t”.

The use of “var” impacts the display of immediate named functions

But it gets even more confusing! In the code that follows after the definition of “ft()” we find a direct counterexample – namely the definition for the variable “fun” in line 43 – which was not declared via a “var”-statement. Here we also have used a named function encapsulated in brackets for immediate execution. However, in this case we do NOT get a display of a seemingly infinite hierarchy structure in the Outline View!

And something positive In addition: The type of the global variable “fun” is recognized correctly as an object defined by a literal. But the encapsulated immediate function is ignored in the Outline View; function “duper()” does not appear there at all.

However: As soon as you replace the assignment statement by “var fun = “, an infinite hierarchy recursion appears for function “duper()” in the Outliner, too! Try it yourself, if you do not believe it!

Association of added object properties/
functions with Child constructors?

At the end of our example code we test a simple kind of a 2 step inheritance pattern. The statement “DOChild.prototype = new DO();” leads to the fact that the internal structure displayed for “DOChild()” is exactly the same (and wrong) one as displayed above for DO itself.

Also there the variable “s” and functions as “hilfe()” etc. appear – which we know is wrong. But now we are a step further down in the prototype chain! So, it is even more misleading to display the elements in question in the Outline View for the Child constructor!

But it would be more dangerous if the code completion dialog of JSjet offered functions as “hilfe()” as valid elements of objects created with the DOChild() constructor! No object created with the help of the DOChild constructor (and its prototype) would know anything about these properties/functions! If we put “CH.hilfe();” as the first statement in line 59, we would get:

So, what happens in the code completion dialog? Actually, and somewhat surprisingly:

Good news! We do not see anything wrong! The information in the code completion dialog about available elements of a child object following a standard inheritance pattern is totally correct! This makes the appearance of the critical functions in the Outline View as elements of the constructor function DOChild() (or its prototype) even more mysterious!

OK, but what about the information transport across a prototypal inheritance pattern? To be able to test this we had created an object “B” based on Ufo in line 25. We equipped B with an added method “b()“. Now, e.g. LL is based on K() which uses U as a prototype. But not B! So, we should not see b() as a valid function offered for LL in the code completion. We are optimistic! However:

What a mess ! A method added to particular object derived from a parent class appears in the list of functions offered by JSjet’s code completion as valid members of a Child object created by the constructor of a prototypal chain based on another object. Not good !

Eventually, we may also remark that the results of the code analysis reflected in the Outline View depend a bit on the order of statements. I recommend to play a bit yourself with similar test codes and the order of statements before buying a license.

Summary and conclusions

The amount of information given by JSjet/Tern in the Outliner is significantly bigger and contains more structural elements and type hints than the information provided by today’s JSDT. However, the depth and quality of the code and object structure analysis is limited – and some information is actually misleading.

In my opinion the most critical point is the fact that properties/functions added or supplemented to specific objects are gathered and displayed as if they were elements of the objects’ constructor function, its prototype or the objects’ basic class (if you used the ES6 class syntax) – i.e. as elements of the elementary constructor/prototype from which the particular objects were
derived.

This way of gathering and associating added variables and functions of specific objects can even affect the structural information about CHILD constructor functions defined in simple inheritance pattern: The Outline View displays all variables/functions added incoherently to various specific objects derived from a PARENT Constructor as valid elements of the CHILD constructor function (or its prototype).

The wrong association of new and object specific variables/functions with the basic constructor/prototype of these objects is unfortunately also transferred to the code completion support. This, already, may lead to coding mistakes! But, even worse: The information about the wrong association is transferred across a prototypal inheritance chain: Functions added only to specific objects, which are different from an object “U” but based on the same constructor as “U”, will appear in the code completion dialog for any Child object created with the help of a new constructor K() that used “U” (!) directly as its prototype.

I regard this as a really negative aspect of the JSjet/Tern toolset – which may even lead to coding errors!

However – and really surprisingly – as long as we follow a standard inheritance pattern for a Child constructor function the code completion dialog does NOT offer any critical undefined variables or functions. In contrast to the information provided in the Outline View! And in contrast to a prototypal approach.

What I would have expected of JSjet in any case is to display object specific elements below the respective objects in the Outline View and not below their classes/constructors. In addition: Such specific properties/functions of a particular object should only appear in a derived CHILD constructor function when and if this constructor function uses the particular object explicitly as its (i.e. the function’s) prototype.

I must say that the findings described above frustrated and depressed me a bit. However, you can still use the information in the JSjet Outline VIEW for navigation purposes. But you should be extremely careful with its interpretation and the use of the code completion!

And you should program cautiously and very conservatively!

Outlook on the last post of this series

I am a person who is very concerned about digital data privacy. So, beyond technical aspects I thought it would be interesting to investigate a bit whether and what data a licensed JSjet installation may gather about you or your interaction with Eclipse. See my next blog post for this topic:

Webclipse JSjet, Eclipse Neon 2 and the Outline View – what I like and what not – part III

Webclipse JSjet, Eclipse Neon 2 and the Outline View – what I like and what I do not like – part I

Some time ago I wrote a blog post about the still unsatisfactory Javascript support by the JSDT plugin for Eclipse – at that time for “Eclipse Neon R”. See:
Eclipse Neon 1 – Standard-JSDT mit Schwächen – zusätzliche Plugins

I can very well imagine how difficult it must be to create a new and better basis for JSDT. In addition there may be general limitations imposed by the Eclipse Neon platform itself. However, this kind of awareness won’t help me much as a web developer who needs or at least wants to use Eclipse Neon 2 or 3 for Javascript projects or PHP projects with Ajax/Ajaj clients.

In particular, I did and do not like the present limitations of the JSDT Outline View. I shall describe some of these deficits only briefly below. Anyone who recently used Eclipse Neon for Javascript development knows what I am talking about.

The Eclipse plugin Webclipse JSjet offered by the US company Genuitec (in combination with Tern) helps to overcome some of these deficits. So, I found it interesting to try using JSjet within Eclipse Neon 2 in a real project I am presently working on. Instead of going back to Eclipse Mars …

At first I was very happy to get more information in the Outline view than with JSDT when coding Javascript objects and methods. Compared with Neon’s JSDT it felt like a big step forward. However, not all that shines is real gold. So, in a second round of testing I looked a bit closer at code analysis capabilities of JSjet/Tern. And already with a relatively small test file I found some problematic aspects of the JSjet Outline information presented for object oriented Javascript code. This is the topic of a second post coming soon.

In addition I must say, that JSjet is not for free – at least not for a reasonable amount of development work per month. And ordering a license comes with a – in my opinion – strong negative side aspect – which I do not like at all. It has to do with the automatic and periodic information transfer to the company behind JSjet. This is the topic of a third post.

Deficits of the Outline View information presented by JSDT for Neon 2

JSDT supports ES6 and ES2015 – at least as far as I have tested. But for conventional prototype based object and inheritance structures the JSDT Outline View was/is not of much practical use in Neon R or Neon 2. Reason: It did and does not show the full internal structure of Javascript functions, of constructor functions and their prototypes, of ES6 classes, of objects derived from constructor functions or classes or of objects in a prototype chain.

When testing “Neon R” I still hoped for an improvement in Eclipse Neon 2. Now I work with PHP on a Neon 2 and Neon 3 platform. But the JSDT Outliner has become even worse. An editorial of the company Genuitec – although cluttered with advertisement – rightly criticizes some major deficits of JSDT in Eclipse Neon; see: https://www.genuitec.com/boost-eclipse-neon-javascript-development-with-jsjet/. In my own words:

The present JSDT Outliner provides only some deeper information on classes and methods declared by the newer “class” statement of Ecmascript 6. However, even then we do not see properties (member variables) of a ES6 “class”. For constructor functions we cannot see see any deeper hierarchy structure at all – only the topmost class/function declaration itself. But no internal structure. E.g. no functions and , their prototype based “methods” (i.e. defined functions of the prototype)

So, no “methods” (i.e. functions of prototype objects) are listed in the Outliner. Tested on a freshly installed Neon 2. See below the very simple test code (really,
only for testing; I normally do avoid global variables … ).

Frankly, I think this is a bit of a mess; you may also note that the global variable “x”, which is not declared explicitly with a “var” or let statement, does not appear at all in the JSDT Outliner.

You can’t work and navigate with such an Outliner in real world projects, especially when you do some more complex Ajax/Ajaj development ….. Also code changes show up in the JSDT Outliner only when and after a you explicitly save your JS file.

Probably, I am not the only one who has to support older Javascript modules based on the prototype declarations of objects and prototype based inheritance patterns. In times before and up to Eclipse Mars I used the Outliner a lot for navigation and quick oversight purposes. If you have more than just one object in a code and more than only a few methods your coding efficiency depends on a reasonable IDE functionality presenting the code structure and its hierarchy over a sufficient amount of hierarchy levels. The present JSDT does not help you much regarding this point.

Alternatives for JSDT? Webclipse JSjet?

So, I started to look for alternatives for or supplements to JSDT in Eclipse Neon. One could think about Aptana Studio. However, the Jenkins repository for Aptana 3.4.x on the Eclipse marketplace is presently not working (since midth of Feb 2017 by the way; due to license and legal aspects). And for the Aptana studio plugin for Eclipse I have always experienced some conflicts with other plugin packages and their editor components in the past. So, I tried some other things as e.g. Vjet, but nothing really convinced me.

Eventually, some weeks ago, I came across “Webclipse JSjet” of the US company Genuitec. Genuitec claims that JSjet provides significantly more information about the code and object structure than pure JSDT. Basically, this is true. However, not all and everything is satisfactory with the JSjet solution either. Below and in the forthcoming posts I discuss only some more or less obvious points regarding the Outline View – so this is not going to be an in depth review. But it may at least give other Eclipse users some orientation. However, and to be fair: There are more interesting JSjet/Webclipse features than covered in my small blog post series. And some of these features are really worth a closer look and some tests. One example is the support of Javascript code debugging.

JSjet and the Eclipse Outliner – What is good?

I should first of all mention the following 2 points – which are related to the presentation of the code hierarchy, objects and object elements in the Outliner:

  • Information about the code hierarchy structure and internals of constructor functions and classes
    JSjet provides you with information about all global variables and functions it finds during its analysis of your Javascript code. In contrast to JSDT, JSjet detects all global variables – whether they explicitly declared by “var” or “let” statements or not.

    Functions that are used as constructors in a “new” statement or functions with explicit prototype declarations are marked with a “P” for “prototype”. This is certainly helpful for a quick orientation.

    JSjet provides you with information about general objects (e.g. declared by using literals). It informs you about their member variables and their functions/methods – i.e. you get an overview over the first inner hierarchy level of objects. (For comparison: The present PHP Outliner of PDT does not
    provide you with more hierarchy levels.)

    Because a function is an object itself in Javascript you expect an overview about the elements of any constructor function and its prototype, too. And yes, JSjet provides you with information gathered about elements of a constructor functions and their prototype.

    For concrete objects derived from a constructor function, only the relation with the constructor and its prototype is indicated in the Outline View. This also works for objects defined via simple inheritance patterns using a prototype chain. In most cases this is sufficient – as you can look up inherited properties in the displayed structure of the constructor. (The interesting question, how changes of properties applied for object instances or extensions of concrete object instances with additional properties or methods are handled, will be discussed in the forthcoming post.)

    For arrays you get an oversight over the different types of the array’s elements. See the test example of my next post for a display of this property of JSjet.

    By the way: The same depth of information is provided by the “Quick Outliner” which one can activate by pressing “Ctrl O” or via opening a context menu point after a “right mouse click” on a code element.

  • Project wide or local code analysis of the present file via “Tern”
    When you install JSjet some more Eclipse plugin modules from the French “Tern” project are installed. Tern itself uses a local “node.js”-installation provided automatically in your home directory under the subdirectory “~/.webclipse”. The basic task of Tern is a project wide code analysis.

    In the “preferences” settings for “Javascript” new menu points for the Tern configuration appear; in addition you will find a point named “Performance”. It gives you a dialog where you can set the scope, quality and performance of the Tern-based analysis.

    The default for the scope is “Entire project“. For this setting you will e.g. notice that that e.g. (global) variables or functions previously defined in some other files of your project are NOT shown in the Outliner. You may get more information about missing points and their location via an additional context feature, namely the “Call Hierarchy“.

    In the beginning I found this type of analysis and display a bit confusing. Meanwhile, I consider it helpful because it forces you to watch your naming of variables, objects, functions, prototypes and to think about the proper use of namespaces or modules.

    On the other side: If you want to keep several versions of a Javascript-file inside one and the same project folder structure the Tern analysis may lead to trouble and misunderstandings. In such cases the Tern scope can be reduced to the “Current File“. However, just switching via Eclipses’s preferences won’t always make this change work at once. Probably due to caching. Most of the time, however, I got success with closing all js-files and opening them again.

  • Availability of information on variables, functions, objects, prototypes in the code completion dialog Knowledge which the duo JSjet/Tern has gathered on global variables, functions, constructor functions, elements of prototypes and classes is also made available in the code completion dialog window. This helps a lot when coding – at least theoretically (see, however, the next post!).

The analysis of a realistic Javascript code example with several objects included, therefore, provides a sufficient amount of information to get an overview and to support navigation throughout the code. See the following picture:

So – this looks good on a first glimpse. A deeper analysis
is the topic of the next blog post. With ambivalent results …

JSjet and the Outliner – what is missing?

There are more things which felt not satisfactory when testing JSjet. There are some obvious deficits, which you find very quickly when doing real work with it.

  • No display of “private” variables
    As will be discussed in more detail in the next post, no private variables defined either with the old “var” or the new “let” statements inside functions, constructor functions, closures or class methods are shown. This is really a pity! One would like to now what a developer wanted/wants to keep private in a piece of code. Especially, if you work with code not designd by yourself.

    However, private variables defined inside functions or object methods do appear in the code completion dialog! But using it you may get confused, if there exists a global variable with the same name as a variable declared for the present function scope! The code completion window of JSjet will not make a clear distinction between these two different variables. The variable name will only be referenced once – and the only hint you get is its general occurrence in the code file. We shall see more on this topic in the next blog post.

  • Missing shortcut icons and control actions for the Outline view
    Another missing feature is a collection of shortcut icons at the top of the Outline View for useful operations like a simple full collapse of the code hierarchy structure. Instead the icon area at the top of the JSjet Outline view is extremely reduced in comparison to the standard one for JSDT.

    You start missing an overall collapse option as soon as you have real life and complicated code structures. JSjet opens the Outline View in a mode where the all hierarchy levels of constructor functions and classes are displayed fully expanded. So you must collapse object for object and hierarchy level for hierarchy level by yourself.

    In addition there is no option to set on/off a link to the editor actions. JSjet is automatically linked to the editor – which is not always desirable.

  • No filter options for the Outline View
    The worst deficit in my opinion is the lack of filters – in the sense of e.g. “show only objects”, “show functions only”, “do not show variables”, … . Just to avoid clattering of the Outline view with presently uninteresting things during the development of longer, complex programs.

Most of these points were working at last in old versions of JSDT (Kepler, Mars).

Are there usage problems?

Yes, I experienced that the outliner did not always give me complete information on objects – even when reducing Tern’s scope to the present file. This tends to happen sometimes after having used the “hierarchy call” feature of Eclipse JSDT, sometimes after a long time doing nothing on a project in the same workspace or after having worked on another project in the same workspace. It also happens when you switch the Tern analysis scope. …. or when you work with 2 eclipse windows …. It is unclear to me, what the real cause is – but it happened a few times with Eclipse 2. Maybe computing the Outline contents is not triggered correctly under some circumstances. The behavior became better after a recent update to Neon 3 and setting the Tern settings to quality instead of performance. In most cases closing all “.js” files and opening them again helped.

First conclusion

JSjet and Tern overcome the problem of JSDT which provides too few information in the Eclipse Neon Outline view. From JSjet you get sufficient information for keeping an overview over your code and object structure and for navigating between functions, prototypes and derived objects.

However, after some real work with JSjet/Tern I got a bit confused about some hints in the Outliner which
seemed to be at least misleading. So, I decided to test the code analysis of JSjet roughly. And this led to the question :

Is all of the information provided by JSjet in the Outline view really valid?

See the next blog post
Webclipse JSjet, Eclipse Neon 2 and the Outline View – what I like and what not – part II
for the results!

Ad hoc Apache Log Analyse mit Webalizer per Kommandozeile

Webalizer ist neben “awstats” ein Urgestein zur Analyse des Verlaufs von Webseitenzugriffen. Webalizer wertet Webserver-Log-Dateien aus; letztere müssen dafür eines unter mehreren normierten Formaten (z.B. das clf-Format; s. https://en.wikipedia.org/ wiki/ Common_Log_Format) aufweisen.

Ergebnis der Auswertung sind HTML-Seiten und Grafiken, die man z.B. über einen Webserver abrufen kann. Man installiert das Tool deshalb normalerweise auf einem zentralen Analyse-Webserver. Über periodische cron-Jobs

  • sammelt man sich dann regelmäßig aktuelle Log-Dateien anderer, zu analysierender produktiver Webserver zusammen,
  • transferiert die Logs dann zu der zentralen webalizer-Installation auf dem Analyse-Server,
  • lässt dort die Analyse durchführen
  • und ruft dann nach Bedarf die aufbereiteten Ergebnis-HTMLs auf.

Hört sich kompliziert an. Tatsächlich kann man sich als Anfänger schon mal im Gestrüpp der Konfigurationsoptionen und des Webserver-Setups verheddern. Die meisten Manuals und “docs” konzentrieren sich auf das obige Szenario – und verstellen so leider ein wenig den Blick auf das Wesentliche. In vielen Fällen geht es nämlich auch viel einfacher:

“webalizer” lässt sich auch auf der Kommandozeile einsetzen und ein Webserver ist überhaupt nicht nötig, wenn man mal ad hoc eine Log-Auswertung durchführen möchte oder muss.

Vor kurzem hatte ich einen solchen Fall – und fand das interessant genug, diesen kleinen Blog-Post zu schreiben.

Die Aufgabenstellung

Vor ein paar Tagen wandte sich ein Bekannter aus Norwegen, dessen Webseite plötzlich über fast 48 Stunden nicht mehr erreichbar war, an meine Frau. Als Ursache ergab sich schließlich, dass der dortige Weg-Hosting-Provider, der interessanterweise über einen sekundären Provider in den USA hosten lässt, Parameter zur Begrenzung der Bandbreite der Webserver-Zugriffe gesetzt hatte. (Off Topic: Dieses gestaffelte Hosting (man spricht auch von “Web-Hotels” – ist in Norwegen Gang und Gebe – ohne dass die Kunden erfahen würden, dass ihre Daten in die USA wandern. Aber da der Durchschnittsnorweger nach meiner Erfahrung an Datenschutz kaum interessiert ist, ist das dort auch kein Thema.)

Gedacht war die Bandbreitenbegrenzung nach erhaltener Auskunft wohl als einfache Sicherheitsmaßnahme; akut führte das Überschreiten der relativ geringen Grenzwerte aber zum Ausfall der Website über fast 2 Tage hinweg.

Nun hätte man ja vielleicht erwarten können, dass sich der norwegische Provider auch um die Ursache der offenbar gestiegenen Bandbreitenanforderungen kümmern würde. Auf Anfrage hatte unser Bekannte aber nur die lapidare Auskunft erhalten, es handele sich wohl um einen “normalen Anstieg des Datenverkehrs auf der Webseite”. So etwas macht mich immer misstrauisch. Es ist zwar nicht unser Job, die Webseite zu überwachen, aber wir haben uns dann im Auftrag des Bekannten mal die Apache Log-Dateien vom Provider zuschicken lassen.

Ich war gerade unterwegs und hatte nur meinen Laptop dabei, als die Log-Dateien eines ganzen Jahres per Mail eintrafen. Für eine erste Analyse genügten dann tatsächlich ein

  • Internetzugang (inkl. DNS-Server-Zugang),
  • “webalizer” auf der Kommandozeile
  • und ein Browser.

Einen Internetzugang erhielt ich über das Hotel, in dem ich abgestiegen war. Die bescheidenen Voraussetzungen sind natürlich nützlich, wenn man mal aus der Ferne Ursachenforschung betreiben soll und keinen Zugang zum betroffenen Webserver hat.

Webalizer auf der Kommandozeile

Man hat also
einen Haufen von Log-Dateien vorliegen und will die auswerten. Wie geht man vor?

  • Schritt 1: Zunächst muss man sich webalizer natürlich aus einem Paket-Repository seiner Linux-Distribution installieren. Dabei treten nach meiner Erfahrung keine Besonderheiten auf.
  • Schritt 2: Um die Arbeit etwas zu organisieren, sollte man sich ein “Log-Verzeichnis” zur Aufbewahrung der Log-Dateien bzw. ein “Zielverzeichnis” für die von webalizer erzeugten Output-Dateien anlegen. Bezeichnen wir die Pfade für unseren Fall mal mit “Path_To_Logs/logs_nw” bzw. “Path_To_Results/webalizer_nw”. Für systematische Arbeiten sollten die Verzeichnisse natürlich sprechende Namen bekommen.
  • Schritt 3: Es schadet nie, einen kurzen filternden Blick in die man-Seiten eines neuen Kommandos zu werfen. Wir lassen uns durch die Vielfalt der dortigen Optionen zu webalizer aber nicht verwirren. Die Kommandostruktur ist einfach:
    “webalizer [Optionen] Pfad_zu_einer_Log-Datei”.

    Nun zu den Optionen:

    • “-v” für “verbose” ist für das Experimentiern mit Linux-Kommandos immer gut.
    • Ferner erschient es logisch, dass wir die Ergebnisse irgendwie bezeichnen müssen; wir entdecken hierzu die Optionen “-n” und “-t” .
    • Dann ist klar, dass wir mehrere Dateien hintereinander auswerten müssen, ohne die Ergebnisse vorheriger Arbeit verlieren zu wollen. Wir finden hierzu die Option “-p” für “Incremental”.
    • Das Output-Verzeichnis muss bekannt gegeben werden; hierzu dient die Option “-o”.

    Für alles andere verlassen wir uns im Moment mal optimistisch auf Standardwerte.

  • Schritt 4: Wir bemühen schließlich die Kommandozeile – in meinem Fall mit:
    ich@mytux:~>webalizer -v -p -n norway-domain -t nw-since-2016 -o Path_To_Results/webalizer_nw  Path_To_Logs/logs_nw/LOG_FILE

LOG_FILE” ist oft von der Form “Domain-Bezeichnung_Monat-Jahr.gz” – z.B.: anracom.com-Jan-2016.gz”. Ja, gezippte Dateien sind zulässig; webalizer kümmert sich intern selbst um den Aufruf von “gunzip”.

Das war’s auch schon. Nun kann man auf der Kommandozeile seine vielen Log-Files händisch aufrufen. Oder aber ein kleines Script schreiben, das den Aufruf der verschiedenen Logdateien und die nötige Variation des Zeitanteils im Dateinamen für einen erledigt.

Während der Auswertung (mit der Option “-v”) erhält man auf der Standardausgabe (im Terminalfenster) typischerweise viele Meldungen zur Reverse-DNS-Analyse.

Ergebnisdarstellungen

Sieht man in das Zielverzeichnis und auf die dort erzeugten Dateien, so bietet sich einem ausschnittsweise etwa folgendes Bild

Es gibt also viel Grafik-Dateien, weitere Hilfsdateien und eine “index.html“-Datei. Letztere können wir aber im Browser unserer Wahl (meist über einen Menüpunkt “Datei öffnen”) direkt aufrufen.

Die Ergebnisse der Auswertungen werden uns danach in Form einfacher Tabellen und Grafiken im Browserfenster präsentiert. In meinem Fall ergab sich etwa folgende Einstiegsseite:

nExtrem auffällig ist hier sofort der ungewöhnlich hohe Wert an transferierten Daten – insbesondere im Februar 2017. Schauen wir uns das mal genau an, indem wir auf den Link für Februar klicken; ich zeige nachfolgend nur Ausschnitte aus der detaillierten Seite für selbigen Monat:

Diese Grafik spricht schon mal dafür, dass die Hauptzugriffe nicht aus einer mitteleuropäischen Zeitzone erfolgen. Faktisch zeigen weitere Graphen, die ich hier nicht abbilde, dass viele Besucher in den USA lokalisiert waren.

Es lohnt sich, danach eine Blick auf die vielen anderen Grafiken zu werfen, die einem webalizer zu anderen Zusammenhängen bzgöl. erfasster Zugriffsdaten anbietet. Als ich mir etwa die Zuordnung der Datentransfermenge zu Ursprungsadressen ansah, ergab sich Folgendes:

Aha, da erkennen wir, dass die großen Dateitransfers von einigen wenigen Hosts erzeugt werden. Eine genauere nachfolgende Analyse führt dann etwa über die Ermittlung der zugehörigen IP-Adressen (z.B. mit ping oder gezielten DNS-Abfragen) und ein systematisches Durchsuchen von Blacklists im Internet.

So erhalten wir für den Hauptbösewicht “ec2-52-3-105-23.compute-1.amazonaws.com” (IP: 52.3.127.144), der sich auf er Website des Bekannten schon in früheren Monaten hervorgetan hatte, einen Eintrag bei https://www.abuseipdb.com/ und http://ipaddress.com/blacklist-check/:

Und auch hier ist der ungebetene Gast des norwegischen Bekannten zu finden: https://myip.ms/view/blacklist/872644496/52.3.127.144 und http://whatismyipaddress.com/blacklist-check

Fazit: This guy is up to no good!

Generell gilt, dass bei anonymen Bot-/Crawler-Systemen, die unter Amazon AWS gehostet sind und die Daten von Webseiten komplett herunterladen, Vorsicht geboten ist.

Unser Plagegeist gehört ferner zu einem Bot-Netz namens “ltx71”:
https://udger.com/resources/ua-list/bot-detail?bot=ltx71
https://myip.ms/view/web_bots/1239532/Known_Web_Bots_ltx71_http_ltx71_com.html

Was Gutes ist über “ltx71” im Internet nicht in Erfahrung zu bringen. Die “Homepage” beinhaltet nur 2 Sätze: Ja, wir crawlen das Netz, aber für Sicherheitszwecke. Echt? Menschheitsfreunde? Auch ansonsten findet man auffallend wenig:
http://review.easycounter.com/ltx71-scam-report
http://www.diamantnetz.de/ wzn/a_infos/ botdestages.php
http://scamanalyze.com/check/ltx71.com.html
http://www.scamaider.com/is-ltx71.com-safe-legal.html

Der größte Traffic zu ltx71 kommt ferner angeblich von russischen
Systemen. (Sagen Analyseseiten zu Domainen). Was immer das bedeutet … Zudem umgehen ltx71-Crawler blockierende Anweisungen in einer evtl. angelegten “robots.txt”-Datei einer Zieldomäne. Alles nicht gut!

Bzgl. der Analyse verfährt man dann genauso mit den anderen, von webalizer ausgewiesenen dubiosen Datengreifern. In unserem Fall stellte sich heraus, dass ein weiterer Besucher auch zu ltx71 gehört.

Für mich gilt in einer solchen, nicht völlig klaren Situation die Leitlinie: Es gibt keine Freunde im Internet.

Schon gar nicht, wenn deren Systeme meine teuer bezahlten Ressourcen für dubiose Zwecke verbrauchen würden.

Gegenmaßnahmen?

Wir konnten unserem norwegischen Bekannten jedenfalls Bericht erstatten und erste Hinweise geben. Kümmern muss sich nun sein Provider.

Nur der Vollständigkeit halber: Sperren könnte man die dubiosen Crawler-Bots zunächst mal über Einträge in einer “.htaccess”-Datei im Hauptverzeichnis auf dem Webserver nach dem Muster

order allow,deny
deny from 52.3.127.144
deny from 52.23.169.223
deny from 52.207.224.143
deny from 54.225.29.79
deny from 52.3.105.23
deny from 54.172.241.121
deny from 104.197.241.64
allow from all

Das wird auf Dauer bei einem Botnetz aber nicht viel helfen; es werden im nächsten Monat mit Sicherheit andere IP-Adressen auftauchen. Dann muss man zu anderen Mitteln greifen, die aber nicht Gegenstand dieses Posts sein sollen.

Jedenfalls kann man Betreibern von Websites, deren Ressourcen in ungewöhnlicher Weise mit Beschlag belegt werden, nur raten, sich die Logs der betroffenen Websites regelmäßig und genau anzusehen. Dabei kann der sehr einfache durchzuführende Einsatz von webalizer bereits erste wertvolle Erkenntnisse zeitigen.

Links

http://www.webalizer.org/
http://www.techrepublic.com/ article/ analyzing-web-sites-with-webalizer/
https://lf.net/support/ techinfo/webserver/ webalizer.php
http://www.linux-community.de/ Internal/Artikel/ Print-Artikel/LinuxUser/2011/04/Zugriffsdaten-auswerten-mit-Webalizer
https://privatstrand.dirkschmidtke.de/ 2011/05/10/ webalizer-auf-logfiles-loslassen/