A simple CNN for the MNIST dataset – V – about the difference of activation patterns and features

In my last article of my introductory series on “Convolutional Neural Networks” [CNNs] I described how we can visualize the output of different maps at convolutional (or pooling) layers of a CNN.

A simple CNN for the MNIST dataset – IV – Visualizing the activation output of convolutional layers and maps
A simple CNN for the MNIST dataset – III – inclusion of a learning-rate scheduler, momentum and a L2-regularizer
A simple CNN for the MNIST datasets – II – building the CNN with Keras and a first test
A simple CNN for the MNIST datasets – I – CNN basics

We are now well equipped to look a bit closer at the maps of a trained CNN. The output of the last convolutional layer is of course of special interest: It is fed (in the form of a flattened input vector) into the MLP-part of the CNN for a classification analysis. As an MLP detects “patterns” the question arises whether we actually can see common “patterns” in the visualized maps of different images belonging to the same class. In our case we shall have a look at the maps of different MNIST images of a handwritten “4”.

Note for my readers, 20.08.2020:
This article has recently been revised and completely rewritten. It required a much more careful description of what we mean by “patterns” and “features” – and what we can say about them when looking at images of activation outputs on higher convolutional layers. I also postponed a thorough “philosophical” argumentation against a humanized usage of the term “features” to a later article in this series.

Objectives

We saw already in the last article that the images of maps get more and more abstract when we move to higher convolutional layers – i.e. layers deeper inside a CNN. At the same time we loose resolution due to intermediate pooling operations. It is quite obvious that we cannot see much of any original “features” of a handwritten “4” any longer in a (3×3)-map, whose values are produced by a sequence of complex transformation operations.

Nevertheless people talk about “feature detection” performed by CNNs – and they refer to “features” in a very concrete and descriptive way (e.g. “eyes”, “spectacles”, “bows”). How can this be? What is the connection of abstract activation patterns in low resolution maps to original “features” of an image? What is meant when CNN experts claim that neurons of higher CNN layers are allegedly able to “detect features”?

We cannot give a full answer, yet. We still need some more Python programs tools. But, wat we are going to do in this article are three things:

  1. Objective 1: I will try to describe the assumed relation between maps and “features”. To start with I shall make a clear distinction between “feature” patterns in input images and patterns in and across the maps of convolutional layers. The rest of the discussion will remain a bit theoretical; but it will use the fact that convolutions at higher layers combine filtered results in specific ways to create new maps. For the time being we cannot do more. We shall actually look at visualizations of “features” in forthcoming articles of this series. Promised.
  2. Objective 2: We follow three different input images, each representing a “4”, as they get processed from one convolutional layer to the next convolutional layer of our CNN. We shall compare the resulting outputs of all feature maps at each convolutional layer.
  3. Objective 3: We try to identify common “patterns” for our different “4” images across the maps of the highest convolutional layer.

We shall visualize each “map” by an image – reflecting the values calculated by the CNN-filters for all points in each map. Note that an individual value at a map point results from adding up many weighted values provided by the maps of lower layers and feeding the result into an activation function. We speak of “activation” values or “map activations”. So our 2-nd objective is to follow the map activations of an input image up to the highest convolutional layer. An interesting question will be if the chain of complex transformation operations leads to visually detectable similarities across the map outputs for the different images of a “4”.

The eventual classification of a CNN is done by its embedded MLP which analyzes information collected at the last convolutional layer. Regarding this input to the MLP we can make the following statements:

The convolutions and pooling operations project information of relatively large parts of the original image into a representation space of very low dimensionality. Each map on the third layer provides a 3×3 value tensor, only. However, we combine the points of all (128) maps together in a flattened input vector to the MLP. This input vector consists of more nodes than the original image itself.

Thus the sequence of convolutional and pooling layers in the end transforms the original images into another representation space of somewhat higher dimensionality (9×128 vs. 28×28). This transformation is associated with the hope that in the new representation space a MLP may find patterns which allow for a better classification of the original images than a direct analysis of the image data. This explains objective 3: We try to play the MLPs role by literally looking at the eventual map activations. We try to find out which patterns are representative for a “4” by comparing the activations of different “4” images of the MNIST dataset.

Enumbering the layers

To distinguish a higher Convolutional [Conv] or Pooling [Pool] layer from a lower one we give them a number “Conv_N” or “Pool_N”.

Our CNN has a sequence of

  • Conv_1 (32 26×26 maps filtering the input image),
  • Pool_1 (32 13×13 maps with half the resolution due to max-pooling),
  • Conv_2 (64 11×11 maps filtering combined maps of Pool_1),
  • Pool_2 (64 5×5 maps with half the resolution due to max-pooling),
  • Conv_3 (128 3×3 maps filtering combined maps of Pool_2).

Patterns in maps?

We have seen already in the last article that the “patterns” which are displayed in a map of a higher layer Conv_N, with N ≥ 2, are rather abstract ones. The images of the maps at Conv_3 do not reflect figurative elements or geometrical patterns of the input images any more – at least not in a directly visible way. It does not help that the activations are probably triggered by some characteristic pixel patterns in the original images.

The convolutions and the pooling operation transform the original image information into more and more abstract representation spaces of shrinking dimensionality and resolution. This is due to the fact that the activation of a point in a map on a layer Conv_(N+1) results

  • from a specific combination of multiple maps of a layer Conv_N or Pool_N
  • and from a loss of resolution due to intermediate pooling.

It is not possible to directly guess in what way active points or activated areas within
a certain map at the third convolutional layer relate to or how they depend on “original and specific patterns in the input image”. If you do not believe me: Well, just look at the maps of the 3rd convolutional layer presented in the last article and tell me: What patterns in the initial image did these maps react to? Without some sophisticated numerical experiments you won’t be able to figure that out.

Patterns in the input image vs. patterns within and across maps

The above remarks indicate already that “patterns” may occur at different levels of consideration and abstraction. We talk about patterns in the input image and patterns within as well as across the maps of convolutional (or pooling) layers. To avoid confusion I already now want to make the following distinction:

  • (Original) input patterns [OIP]: When I speak of (original) “input patterns” I mean patterns or figurative elements in the input image. In more mathematical terms I mean patterns within the input image which correspond to a kind of fixed and strong correlation between the values of pixels distributed over a sufficiently well defined geometrical area with a certain shape. Examples could be line-like elements, bow segments, two connected circles or combined rectangles. But OIPs may be of a much more complex and abstract kind and consist of strange sub-features – and they may not reflect a real world entity or a combination of such entities. An OIP may reside at one or multiple locations in different input images.
  • Filter correlation patterns [FCP]: A CNN produces maps by filtering input data (Conv level 1) or by filtering maps of a lower layer and combining the results. By doing so a higher layer may detect patterns in the filter results of a lower layer. I call a pattern across the maps of a convolutional or pooling layer Conv_N or Pool_N as seen by Conv_(N+1) a FCP.
    Note: Because a 3×3 filter for a map of Conv_(N+1) has fixed parameters per map of the previous layer Conv_N or Pool_N, it combines multiple maps (filters) of Conv_N in a specific, unique way.

Anybody who ever worked with image processing and filters knows that combining basic filters may lead to the display of weirdly looking, combined information residing in complex regions on the original image. E.g., a certain combination of filters may emphasize diagonal lines or bows with some distance in between and suppress all other features. Therefore, it is at least plausible that a map of a higher convolutional layer can be translated back to an OIP. Meaning:

A high activation of certain or multiple points inside a map on Conv_3 may reflect some typical OIP pattern in the input image.

But: At the moment we have no direct proof for such an idea. And it is not at all obvious what kind of OIP pattern this may be for a distinct map – and whether it can directly be described in terms of basic geometrical elements of a figurative number representation in the MNIST case. By just looking at the maps of a layer and their activated points we do not get any clue about this.

If, however, activated maps somehow really correspond to OIPs then a FCP over multiple maps may be associated with a combination of distinct OIPs in an input image.

What are “features” then?

In many textbooks maps are also called “feature maps“. As far I understand it the authors call a “feature” what I called an OIP above. By talking about a “feature” the authors most often refer to a pattern which a CNN somehow detects or identifies in the input images.

Typical examples of “features” text-book authors often discuss and even use in illustrations are very concrete: ears, eyes, feathers, wings, a mustache, leaves, wheels, sun-glasses … I.e., a lot of authors typically name features which human beings identify as physical entities or as entities, for which we have clear conceptual ideas in our mind. I think such examples trigger ideas about CNNs which are too far-fetched and which “humanize” stupid algorithmic processes.

The arguments in favor of the detection of features in the sense of conceptual entities are typically a bit nebulous – to say the least. E.g. in a relatively new book on “Generative Deep Learning” you see a series of CNN neuron layers associated with rather dubious and unclear images of triangles etc. and at the last convolutional layer we suddenly see pretty clear sketches of a mustache, a certain hairdress, eyes, lips, a shirt, an ear .. “. The related text goes like follows (I retranslated the text from the German version of the book): “Layer 1 consists of neurons which activate themselves stronger, when they recognize certain elementary and basic features in the input image, e.g. borders. The output of these neurons is then forwarded to the neurons of layer 2 which can use this information to detect more complex features – and so on across the following layers.” Yeah, “neurons activate themselves” as they “recognize” features – and suddenly the neurons at a high enough layer see a “spectacle”. 🙁

I think it would probably be more correct to say the following:

The activation of a map of a high convolutional layer may indicate the appearance of some kind of (complex) pattern or a sequence of patterns within an input image, for which a specific filter combination produces relatively high values in a low dimensional output space.

Note: At our level of analyzing CNNs even this carefully formulated idea is speculation. Which we will have to prove somehow … Where we stand right now, we are unfortunately not yet ready to identify OIPs or repeated OIP sequences associated with maps. This will be the topic of forthcoming articles.

It is indeed an interesting question whether a trained CNN “detects” patterns in the sense of entities with an underlying “concept”. I would say: Certainly not. At least not pure CNNs. I think, we should be very careful with the use of the term “feature”. Based on the filtering convolutions perform we might say:

A “feature” (hopefully) is a pattern in the sense of defined geometrical pixel correlation in an image.

Not more, not less. Such a “feature” may or may not correspond to entities, which a human being could identify and for which he or she has a concept for. A feature is just a pixel correlation whose appearance triggers output neurons in high level maps.

By the way there are 2 more points regarding the idea of feature detection:

  • A feature or OIP may be located at different places in different images of something like a “5”. Due to different sizes of the depicted “5” and translational effects. So keep in mind that if maps do indeed relate to features it has to be explained how convolutional filtering can account for any translational invariance of the “detection” of a pattern in an image.
  • The concrete examples given for “features” by many authors imply that the features are more or less the same for two differently trained CNNs. Well, regarding the point that training corresponds to finding a minimum on a rather complex multidimensional hyperplane this raises the question how well defined such a (global) minimum really is and whether it or other valid side minima are approached.

Keep these points in mind until we come back to related experiments in further articles.

From “features” to FCPs on the last Conv-layer?

However and independent of how a CNN really reacts to OIPs or “features”, we should not forget the following:
In the end a CNN – more precisely its embedded MLP – reacts to FCPs on the last convolutional level. In our CNN an FCP on the third convolutional layer with specific active points across 128 (3×3)-maps obviously can obviously tell the MLP something about the class an input image belongs to: We have proven already that the MLP part of our simple CNN guesses the class the original image belongs to with a surprisingly high accuracy. And by construction it obviously does so by just analyzing the 128 (3×3)-activation values of the third layer – arranged into a flattened vector.

From a classification point of view it, therefore, seems to be legitimate to look out for any FCP across the maps on Conv_3. As we can visualize the maps it is reasonable to literally look for common activation patterns which different images of handwritten “4”s may trigger on the maps of the last convolutional level. The basic idea behind this experimental step is:

OIPs which are typical for images of a “4” trigger and activate certain maps or points within certain maps. Across all maps we then may see a characteristic FCP for a “4”, which not only a MLP but also we intelligent humans could identify.

Or: Multiple characteristic features in images of a “4” may trigger characteristic FCPs which in turn can be used indicators of a class an image belongs to by an MLP. Well, let us see how far we get with this kind of theory.

Levels of “abstractions”

Let us take a MNIST image which represents something which a European would consider to be a clear representation of a “4”.

In the second image I used the “jet”-color map; i.e. dark blue indicates a low intensity value while colors from light blue to green to yellow and red indicate growing intensity values.

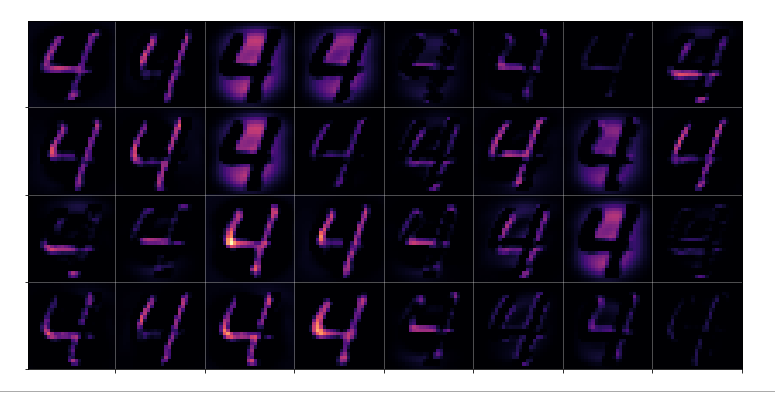
The first conv2D-layer (“Conv2d_1”) produces the following 32 maps of my chosen “4”-image after training:

We see that the filters, which were established during training emphasize general contours but also focus on certain image regions. However, the original “4” is still clearly visible on very many maps as the convolution does not yet reduce resolution too much.

By the way: When looking at the maps the first time I found it surprising that the application of a simple linear 3×3 filter with stride 1 could emphasize an overall oval region and suppress the pixels which formed the “4” inside of this region. A closer look revealed however that the oval region existed already in the original image data. It was emphasized by an inversion of the pixel values …

Pooling
The second Conv2D-layer already combines information of larger areas of the image – as a max (!) pooling layer was applied before. We loose resolution here. But there is a gain, too: the next convolution can filter (already filtered) information over larger areas of the original image.

But note: In other types of more advanced and modern CNNs pooling only is involved after two or more successive convolutions have happened. The direct succession of convolutions corresponds to a direct and unique combination of filters at the same level of resolution.
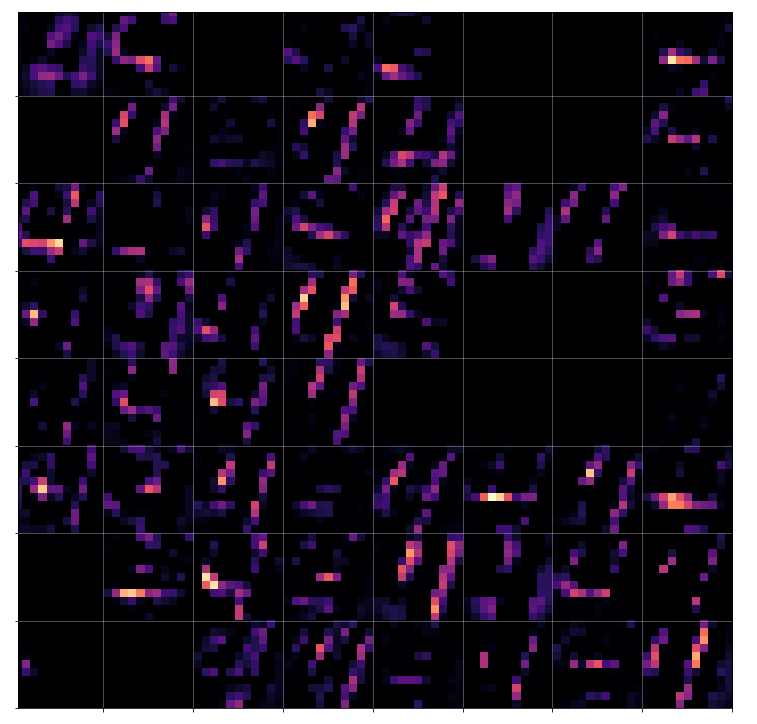
The 2nd convolution
As we use 64 convolutional maps on the 2nd layer level we allow for a multitude of different new convolutions. It is to be understood that each new map at the 2nd cConv layer is the result of a special unique combination of filtered information of all 32 previous maps (of Pool_1). Each of the previous 32 maps contributes through a specific unique filter and respective convolution operation to a single specific map at layer 2. Remember that we get 3×3 x 32 x 64 parameters for connecting the maps of Pool_1 to maps of Conv_2. It is this unique combination of already filtered results which enriches the analysis of the original image for more complex patterns than just the ones emphasized by the first convolutional filters.

As the max-condition of the pooling layer was applied first and because larger areas are now analyzed we are not too astonished to see that the filters dissolve the original “4”-shape and indicate more general geometrical patterns – which actually reflect specific correlations of map patterns on layer Conv_1.

I find it interesting that our “4” triggers more horizontally activations within some maps on this already abstract level than vertical ones. One should not confuse these patterns with horizontal patterns in the original image. The relation of original patterns with these activations is already much more complex.

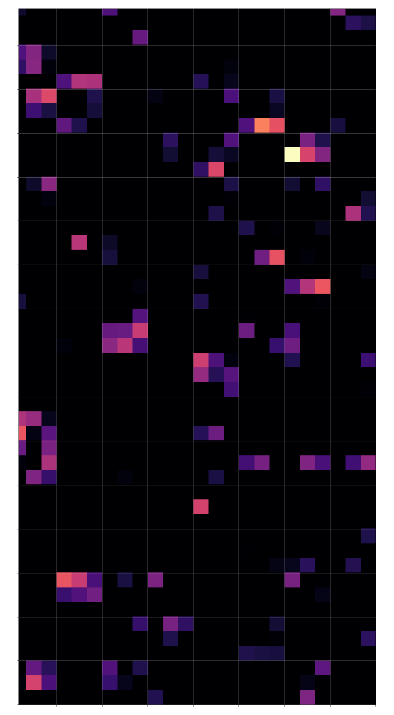
The third convolutional layer applies filters which now cover almost the full original image and combine and mix at the same time information from the already rather abstract results of layer 2 – and of all the 64 maps there in parallel.

We again see a dominance of horizontal patterns. We see clearly that on this level any reference to something like an arrangement of parallel vertical lines crossed by a horizontal line is completely lost. Instead the CNN has transformed the original distribution of black (dark grey) pixels into multiple abstract configuration spaces with 2 axes, which only coarsely reflecting the original image area – namely by 3×3 maps; i.e. spaces with a very poor resolution.

What we see here are “correlations” of filtered and transformed original pixel clusters over relatively large areas. But no constructive concept of certain line arrangements.

Now, if this were the level of “FCP-patterns” which the MLP-part of the CNN uses to determine that we have a “4” then we would bet that such abstract patterns (active points on 9×9 grids) appear in a similar way on the maps of the 3rd Conv layer for other MNIST images of a “4”, too.

Well, how similar do different map representations of “4”s look like on the 3rd Conv2D-layer?

What makes a four a four in the eyes of the CNN?

The last question corresponds to the question of what activation outputs of “4”s really have in common. Let us take 3 different images of a “4”:

The same with the “jet”-color-map:


Already with our eyes we see that there are similarities but also quite a lot of differences.

Different “4”-representations on the 2nd Conv-layer

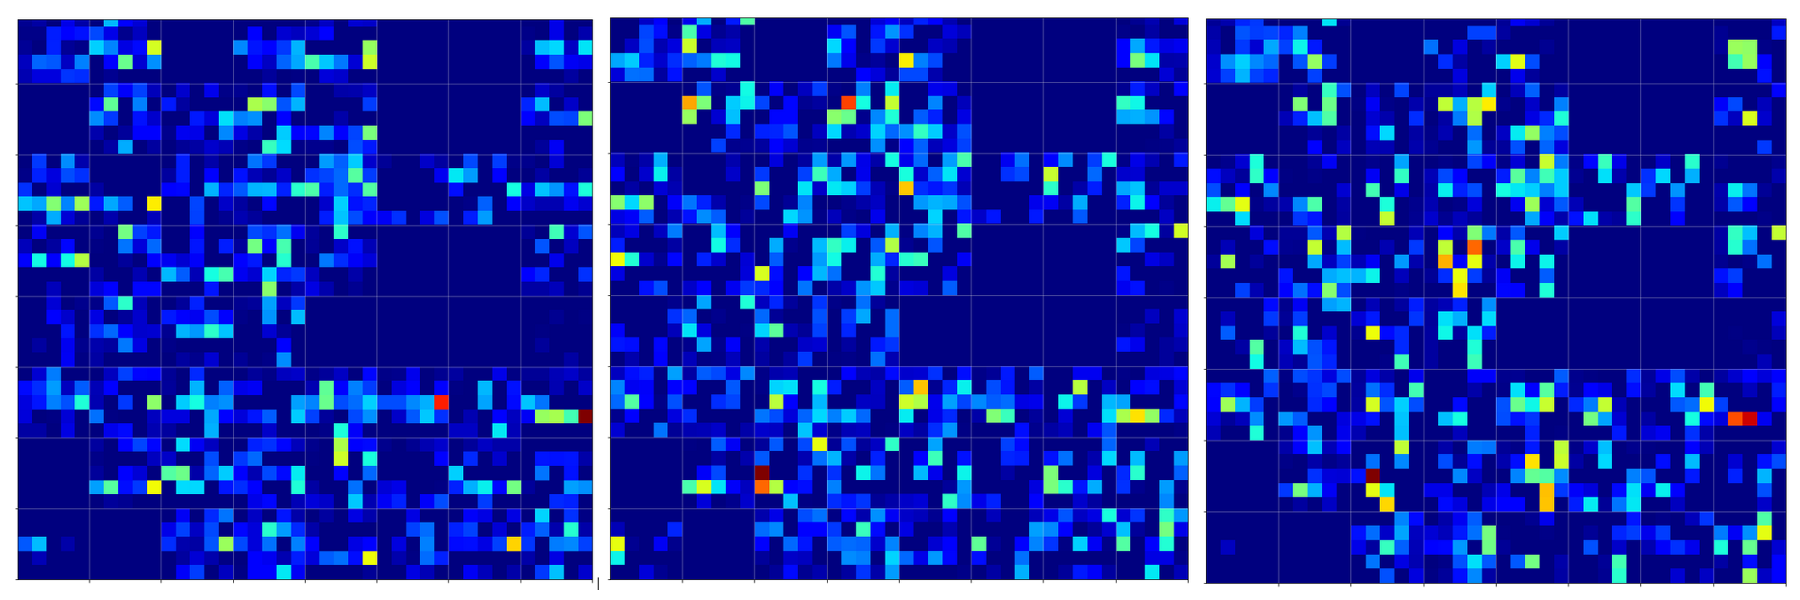
Below we see comparison of the 64 maps on the 2nd Conv-layer for our three “4”-images.

If you move your head backwards and ignore details you see that certain maps are not filled in all three map-pictures. Unfortunately, this is no common feature of “4”-representations. Below you see images of the activation of a “1” and a “2”. There the same maps are not activated at all.

We also see that on this level it is still important which points within a map are activated – and not which map on average. The original shape of the underlying number is reflected in the maps’ activations.

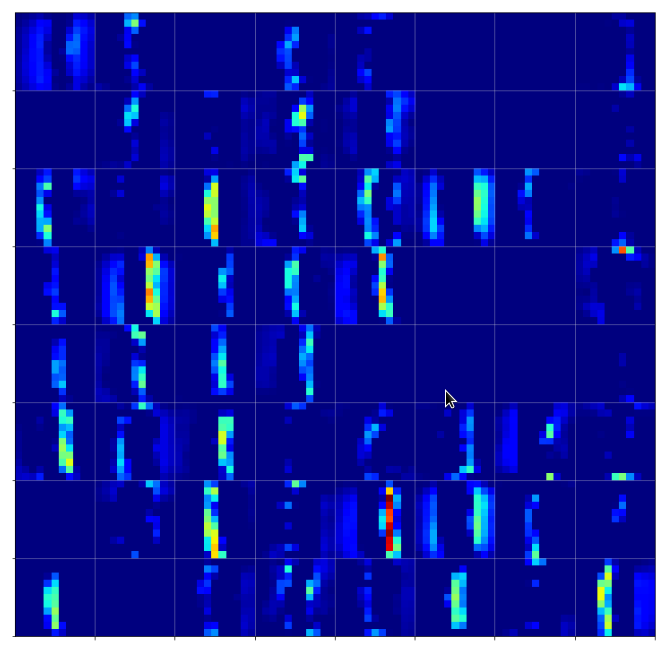
Now, regarding the “4”-representations you may say: Well, I still recognize some common line patterns – e.g. parallel lines in a certain 75 degree angle on the 11×11 grids. Yes, but these lines are almost dissolved by the next pooling step:

Consider in addition that the next (3rd) convolution combines 3×3-data of all of the displayed 5×5-maps. Then, probably, we can hardly speak of a concept of abstract line configurations any more …

“4”-representations on the third Conv-layer

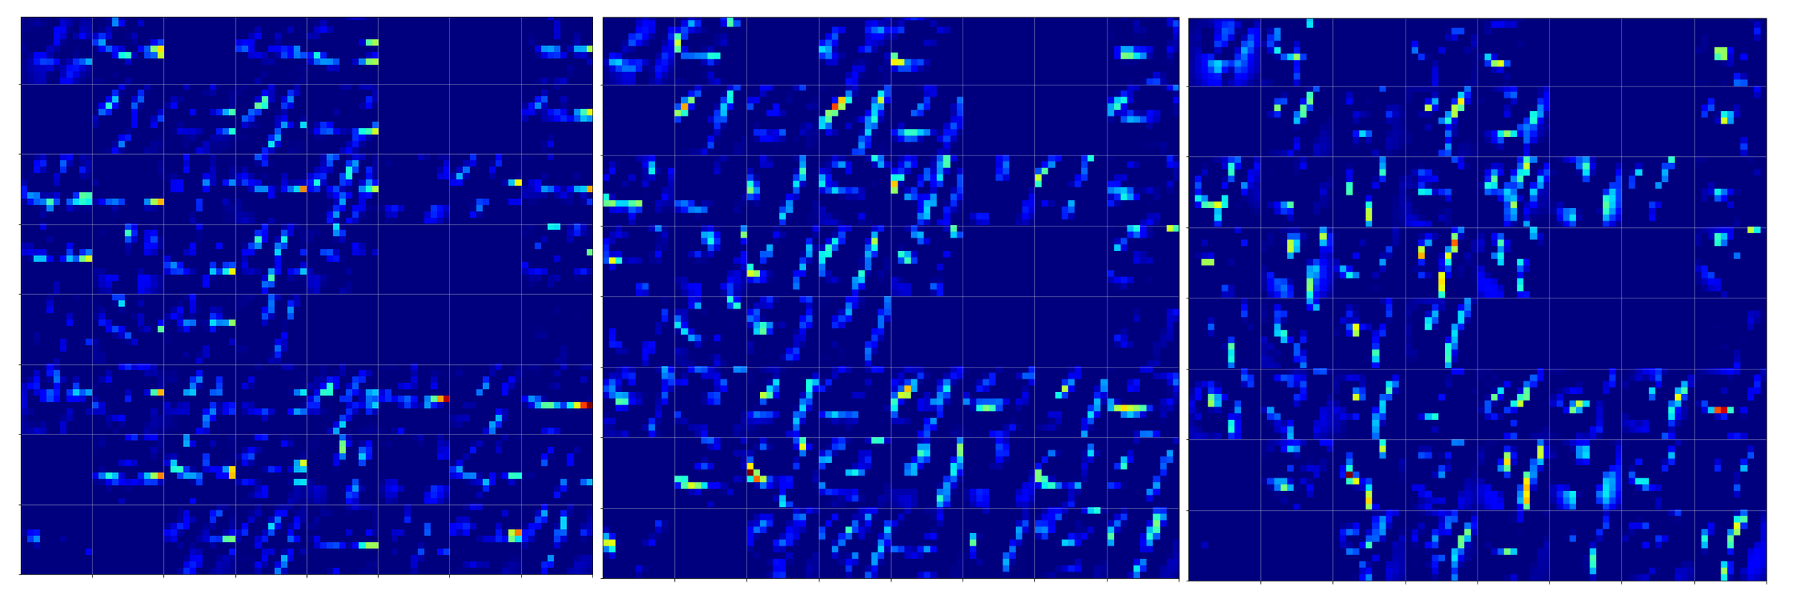
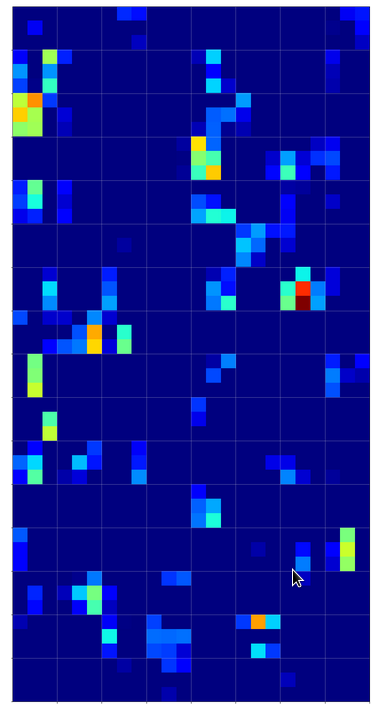
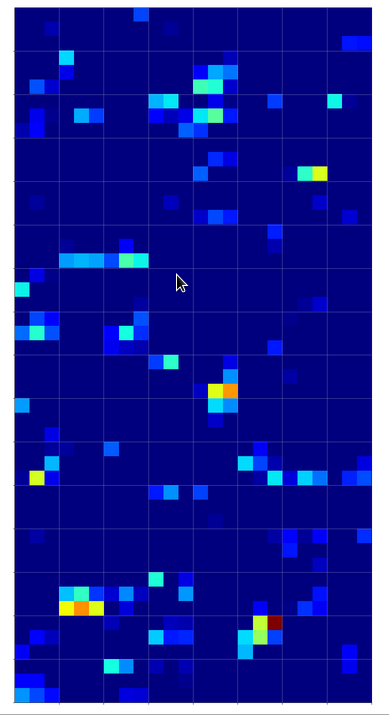
Below you find the activation outputs on the 3rd Conv2D-layer for our three different “4”-images:

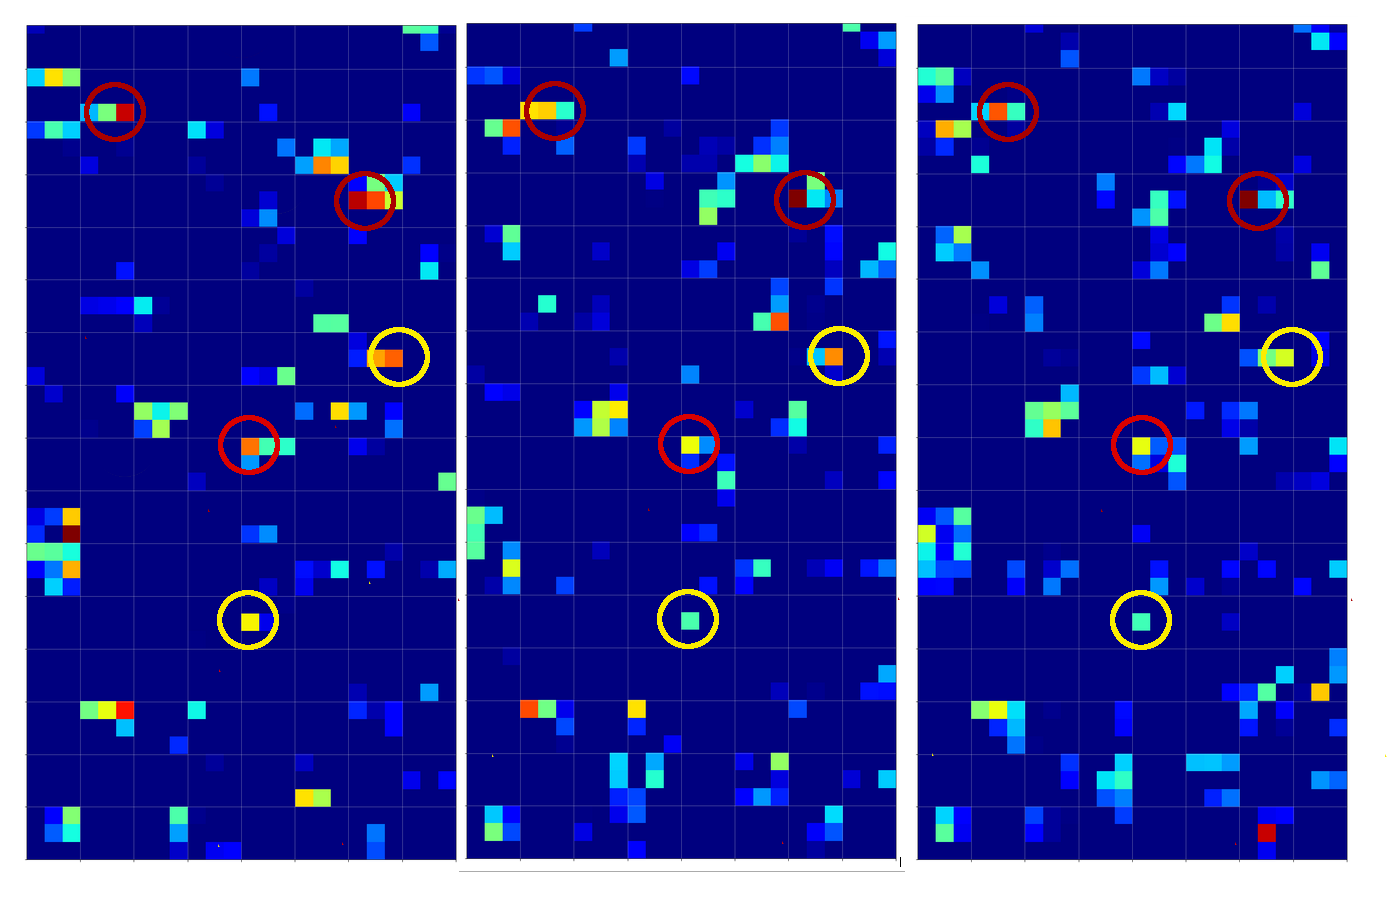
When we look at details we see that prominent “features” in one map of a specific 4-image do NOT appear in a fully comparable way in the eventual convolutional maps for another image of a “4”. Some of the maps (i.e. filters after 4 transformations) produce really different results for our three images.

But there are common elements, too: I have marked only some of the points which show a significant intensity in all of the maps. But does this mean these individual common points are decisive for a classification of a “4”? We cannot be sure about it – probably it is their combination which is relevant.

So, what we ended up with is that we find some common points or some common point-relations in a few of the 128 “3×3”-maps of our three images of handwritten “4”s.

But how does this compare with maps of images of other digits? Well, look at he maps on the 3rd layer for images of a “1” and a “2” respectively:

On the 3rd layer it becomes more important which maps are not activated at all. But still the activation patterns within certain maps seem to be of importance for an eventual classification.

Conclusion

The maps of a CNN are created by an effective and guided optimization process. The results indicate the eventual detection of rather abstract patterns within and across filter maps on higher convolutional layers.

But these patterns (FCP-patterns) should not be confused with figurative elements or “features” in the original input images. Activation patterns at best vaguely remind of the original image features. At our level of analysis of a CNN we can only speculate about some correspondence of map activations with original features or patterns in an input image.

But it seems pretty clear that patterns in or across maps do not indicate any kind of constructive concept which describes how to build a “4” from underlying more elementary features in the sense of combine-able independent entities. There is no sign of conceptual constructive idea of how to denote a “4”. At least not in pure CNNs … Things may be a bit different in convolutional “autoencoders” (combinations of convolutional encoders and decoders), but this is another story we will come back to in this blog. Right now we would say that abstract (FCP-) patterns in maps of higher convolutional layers result from intricate filter combinations. These filters may react to certain patterns in an input image – but whether these patterns correspond to entities a human being would use to write down and thereby construct a “4” or an “8” is questionable.

We saw that the abstract information maps at the third layer of our CNN do show some common elements between the images belonging to the same class – and delicate differences with respect to activations resulting from images of other classes. However, the differences reside in details and the situation remains complicated. In the end the MLP-part of a CNN still has a lot of work to do. It must perform its classification task based on the correlation or anti-correlation of “point”-like elements in a multitude of maps – and probably even based on the activation level (i.e. output numbers) at these points.

This is seemingly very different from a conscious consideration process and weighing of alternatives which a human brain performs when it looks at sketches of numbers. When in doubt our brain tries to find traces consistent with a construction process defined for writing down a “4”, i.e. signs of a certain arrangement of straight and curved lines. A human brain, thus, would refer to arrangements of line elements, bows or circles – but not to relations of individual points in an extremely coarse and abstract representation space after some mathematical transformations. You may now argue that we do not need such a process when looking at clear representations of a “4” – we look and just know that its a “4”. I do not doubt that a brain may use maps, too – but I want to point out that a conscious intelligent thought process and conceptual ideas about entities involve constructive operations and not just a passive application of filters. Even from this extremely simplifying point of view CNNs are stupid though efficient algorithms. And authors writing about “features” should avoid any kind of a humanized interpretation.

In the next article

A simple CNN for the MNIST dataset – VI – classification by activation patterns and the role of the CNN’s MLP part

we shall look at the whole procedure again, but then we compare common elements of a “4” with those of a “9” on the 3rd convolutional layer. Then the key question will be: ” What do “4”s have in common on the last convolutional maps which corresponding activations of “9”s do not show – and vice versa.

This will become especially interesting in cases for which a distinction was difficult for pure MLPs. You remember the confusion matrix for the MNIST dataset? See:
A simple Python program for an ANN to cover the MNIST dataset – XI – confusion matrix
We saw at that point in time that pure MLPs had some difficulties to distinct badly written “4”s from “9s”. We will see that the better distinction abilities of CNNs in the end depend on very few point like elements of the eventual activation on the last layer before the MLP.

Further articles in this series

A simple CNN for the MNIST dataset – VII – outline of steps to visualize image patterns which trigger filter maps
A simple CNN for the MNIST dataset – VI – classification by activation patterns and the role of the CNN’s MLP part


A simple CNN for the MNIST dataset – IV – Visualizing the activation output of convolutional layers and maps

In the first three articles of this series on a (very) simple CNN for the MNIST dataset

A simple CNN for the MNIST dataset – III – inclusion of a learning-rate scheduler, momentum and a L2-regularizer
A simple CNN for the MNIST datasets – II – building the CNN with Keras and a first test
A simple CNN for the MNIST datasets – I – CNN basics

we invested some work into building layers and into the parameterization of a training run. Our rewards comprised a high accuracy value of around 99.35% and watching interactive plots during training.

But a CNN offers much more information which is worth and instructive to look at. In the first article I have talked a bit about feature detection happening via the “convolution” of filters with the original image data or the data produced at feature maps of previous layers. What if we could see what different filters do to the underlying data? Can we have a look at the output selected “feature maps” produce for a specific input image?

Yes, we can. And it is intriguing! The objective of this article is to plot images of the feature map output at a chosen convolutional or pooling layer of our CNN. This is accompanied by the hope to better understand the concept of abstract features extracted from an input image.

I follow an original idea published by F. Chollet (in his book “Deep Learning mit Python und Keras”, mitp Verlag) and adapt it to the code discussed in the previous articles.

Referring to inputs and outputs of models and layers

So far we have dealt with a complete CNN with a multitude of layers that produce intermediate tensors and a “one-hot”-encoded output to indicate the prediction for a hand-written digit represented by a MNIST image. The CNN itself was handled by Keras in form of a sequential model of defined convolutional and pooling layers plus layers of a multi-layer perceptron [MLP]. By the definition of such a “model” Keras does all the work required for forward and backward propagation steps in the background. After training we can “predict” the outcome for any new digit image which we feed into the CNN: We just have to fetch the data form th eoutput layer (at the end of the MLP) after a forward propagation with the weights optimized during training.

But now, we need something else:

We need a model which gives us the output, i.e. a 2-dimensional tensor – of a specific map of an intermediate Conv-layer as a prediction for an input image!

I.e. we want the output of a sub-model of our CNN containing only a part of the layers. How can we define such an (additional) model based on the layers of our complete original CNN-model?

Well, with Keras we can build a general model based on any (partial) graph of connected layers which somebody has set up. The input of such a model must follow rules appropriate to the receiving layer and the output can be that of a defined subsequent layer or map. Setting up layers and models can on a very basic level be done with the so called “Functional API of Keras“. This API enables us to directly refer to methods of the classes “Layer”, “Model”, “Input” and “Output”.

A model – as an instance of the Model-class – can be called like a function for its input (in tensor form) and it returns its output (in tensor form). As we deal with classes you will not be surprised over the fact that we can refer to the input-layer of a general model via the model’s instance name – let us say “cnnx” – and an instance attribute. A model has a unique input layer which later is fed by tensor input data. We can refer to this input layer via the attribute “input” of the model object. So, e.g. “cnnx.input” gives us a clear unique reference to the input layer. With the attribute “output” of a model we get a reference to the output layer.

But, how can we refer to the output of a specific layer or map of a CNN-model? If you look it up in the Keras documentation you will find that we can give each layer of a model a specific “name“. And a Keras model, of course, has a method to retrieve a reference to a layer via its name:

cnnx.get_layer(layer_name) .

Each convolutional layer of our CNN is an instance of the class “Conv2D-Layer” with an attribute “output” – this comprises the multidimensional tensor delivered by the activation function of the layer’s nodes (or units in Keras slang). Such a tensor has in general 4 axes for images:

sample-number of the batch, px width, px height, filter number

The “filter number” identifies a map of the Conv2D-layer. To get the “image”-data provided of a specific map (identified by “map-number”) we have to address the array as

cnnx.get_layer(layer_name)[sample-number, :, :, map-number]

We know already that these data are values in a certain range (here above 0, due to our choice of the activation function as “relu”).

Hint regarding wording: F. Chollet calls the output of the activation functions of the nodes of a layer or map the “activation” of the layer or map, repsectively. We shall use this wording in the code we are going to build.

Displaying a specific image

It may be necessary later on to depict a chosen input image for our analysis – e.g. a MNIST image of the test data set. How can we do this? We just fill a new Jupyter cell with the following code:

ay_img = test_imgs[7:8]
plt.imshow(ay_img[0,:,:,0], cmap=plt.cm.binary)

This code lines would plot the eighths sample image of the already shuffled test data set.

Using layer names and saving as well as restoring a model

We first must extend our previously defined functions to be able to deal with layer names. We change the code in our Jupyter Cell 8 (see the last article) in the following way:

Jupyter Cell 8: Setting up a training run

  
# Perform a training run 
# ********************

# Prepare the plotting 
# The really important command for interactive (=interediate) plot updating
%matplotlib notebook
plt.ion()

#sizing
fig_size = plt.rcParams["figure.figsize"]
fig_size[0] = 8
fig_size[1] = 3

# One figure 
# -----------
fig1 = plt.figure(1)
#fig2 = plt.figure(2)

# first figure with two plot-areas with axes 
# --------------------------------------------
ax1_1 = fig1.add_subplot(121)
ax1_2 = fig1.add_subplot(122)
fig1.canvas.draw()

# second figure with just one plot area with axes
# -------------------------------------------------
#ax2 = fig2.add_subplot(121)
#ax2_1 = fig2.add_subplot(121)
#ax2_2 = fig2.add_subplot(122)
#fig2.canvas.draw()

# ~~~~~~~~~~~~~~~~~~~~~~~~~~~~~~~~~~~~~~~~~~~~~
# Parameterization of the training run 

#build = False
build = True
if cnn == None:
    build = True
    x_optimizer = None 
batch_size=64
epochs=80
reset = False 
#reset = True # we want training to start again with the initial weights

nmy_loss    ='categorical_crossentropy'
my_metrics =['accuracy']

my_regularizer = None
my_regularizer = 'l2'
my_reg_param_l2 = 0.001
#my_reg_param_l2 = 0.01
my_reg_param_l1 = 0.01


my_optimizer      = 'rmsprop'       # Present alternatives:  rmsprop, nadam, adamax 
my_momentum       = 0.5           # momentum value 
my_lr_sched       = 'powerSched'    # Present alternatrives: None, powerSched, exponential 
#my_lr_sched       = None           # Present alternatrives: None, powerSched, exponential 
my_lr_init        = 0.001           # initial leaning rate  
my_lr_decay_steps = 1               # decay steps = 1 
my_lr_decay_rate  = 0.001           # decay rate 


li_conv_1    = [32, (3,3), 0] 
li_conv_2    = [64, (3,3), 0] 
li_conv_3    = [128, (3,3), 0] 
li_Conv      = [li_conv_1, li_conv_2, li_conv_3]
li_Conv_Name = ["Conv2D_1", "Conv2D_2", "Conv2D_3"]
li_pool_1    = [(2,2)]
li_pool_2    = [(2,2)]
li_Pool      = [li_pool_1, li_pool_2]
li_Pool_Name = ["Max_Pool_1", "Max_Pool_2", "Max_Pool_3"]
li_dense_1   = [100, 0]
#li_dense_2  = [30, 0]
li_dense_3   = [10, 0]
li_MLP       = [li_dense_1, li_dense_2, li_dense_3]
li_MLP       = [li_dense_1, li_dense_3]
input_shape  = (28,28,1)

try: 
    if gpu:
        with tf.device("/GPU:0"):
            cnn, fit_time, history, x_optimizer  = train( cnn, build, train_imgs, train_labels, 
                                            li_Conv, li_Conv_Name, li_Pool, li_Pool_Name, li_MLP, input_shape, 
                                            reset, epochs, batch_size, 
                                            my_loss=my_loss, my_metrics=my_metrics, 
                                            my_regularizer=my_regularizer, 
                                            my_reg_param_l2=my_reg_param_l2, my_reg_param_l1=my_reg_param_l1,  
                                            my_optimizer=my_optimizer, my_momentum = 0.8,  
                                            my_lr_sched=my_lr_sched, 
                                            my_lr_init=my_lr_init, my_lr_decay_steps=my_lr_decay_steps, 
                                            my_lr_decay_rate=my_lr_decay_rate,  
                                            fig1=fig1, ax1_1=ax1_1, ax1_2=ax1_2
                                            )
        print('Time_GPU: ', fit_time)  
    else:
        with tf.device("/CPU:0"):
            cnn, fit_time, history = train( cnn, build, train_imgs, train_labels, 
                                            li_Conv, li_Conv_Name, li_Pool, li_Pool_Name, li_MLP, input_shape, 
                                            reset, epochs, batch_size, 
                                            my_loss=my_loss, my_metrics=my_metrics, 
                                            my_regularizer=my_regularizer, 
                                            my_reg_param_l2=my_reg_param_l2, my_reg_param_l1=my_reg_param_l1,  
                                            my_optimizer=my_optimizer, my_momentum = 0.8, 
                                            my_lr_sched=my_lr_sched, 
                                            my_lr_init=my_lr_init, my_lr_decay_steps=my_lr_decay_steps, 
                                            my_lr_decay_rate=my_lr_decay_rate,  
                                            fig1=fig1, ax1_1=ax1_1, ax1_2=ax1_2
                                            )
        print('Time_CPU: ', fit_time)  
except SystemExit:
    print("stopped due to exception")

 
You see that I added a list

li_Conv_Name = [“Conv2D_1”, “Conv2D_2”, “Conv2D_3”]

li_Pool_Name = [“Max_Pool_1”, “Max_Pool_2”, “Max_Pool_3”]

which provides names of the (presently three) defined convolutional and (presently two) pooling layers. The interface to the training function has, of course, to be extended to accept these arrays. The function “train()” in Jupyter cell 7 (see the last article) is modified accordingly:

Jupyter cell 7: Trigger (re-) building and training of the CNN

# Training 2 - with test data integrated 
# *****************************************
def train( cnn, build, train_imgs, train_labels, 
           li_Conv, li_Conv_Name, li_Pool, li_Pool_Name, li_MLP, input_shape, 
           reset=True, epochs=5, batch_size=64, 
           my_loss='categorical_crossentropy', my_metrics=['accuracy'], 
           my_regularizer=None, 
           my_reg_param_l2=0.01, my_reg_param_l1=0.01, 
           my_optimizer='rmsprop', my_momentum=0.0, 
           my_lr_sched=None, 
           my_lr_init=0.001, my_lr_decay_steps=1, my_lr_decay_rate=0.00001,
           fig1=None, ax1_1=None, ax1_2=None
):
    
    if build:
        # build cnn layers - now with regularizer - 200603 rm
        cnn = build_cnn_simple( li_Conv, li_Conv_Name, li_Pool, li_Pool_Name, li_MLP, input_shape, 
                                my_regularizer = my_regularizer, 
                                my_reg_param_l2 = my_reg_param_l2, my_reg_param_l1 = my_reg_param_l1)
        
        # compile - now with lr_scheduler - 200603
        cnn = my_compile(cnn=cnn, 
                         my_loss=my_loss, my_metrics=my_metrics, 
                         my_optimizer=my_optimizer, my_momentum=my_momentum, 
                         my_lr_sched=my_lr_sched,
                         my_lr_init=my_lr_init, my_lr_decay_steps=my_lr_decay_steps, 
                         my_lr_decay_rate=my_lr_decay_rate)        
        
        # save the inital (!) weights to be able to restore them  
        cnn.save_weights('cnn_weights.h5') # save the initial weights 
         
        
    # reset weights(standard)
    if reset:
        cnn.load_weights('cnn_weights.h5')
 
    # Callback list 
    # ~~~~~~~~~~~~~
    use_scheduler = True
    if my_lr_sched == None:
        use_scheduler = False
    lr_history = LrHistory(use_scheduler)
    callbacks_list = [lr_history]
    if fig1 != None:
        epoch_plot = EpochPlot(epochs, fig1, ax1_1, ax1_2)
        callbacks_list.append(epoch_plot)
    
    start_t = time.perf_counter()
    if reset:
        history = cnn.fit(train_imgs, train_labels, initial_epoch=0, epochs=epochs, batch_size=batch_size, verbose=1, shuffle=True, 
                  validation_data=(test_imgs, test_labels), callbacks=callbacks_list) 
    else:
        history = cnn.fit(train_imgs, train_labels, epochs=epochs, batch_size=batch_size, verbose=1, shuffle=True, 
                validation_data=(test_imgs, test_labels), callbacks=callbacks_list ) 
    end_t = time.perf_counter()
    fit_t = end_t - start_t
    
    # save the model 
    cnn.save('cnn.h5')
    
    return cnn, fit_t, history, x_optimizer  # we return cnn to be able to use it by other Jupyter functions

 
We transfer the name-lists further on to the function “build_cnn_simple()“:

Jupyter Cell 4: Build a simple CNN

# Sequential layer model of our CNN
# ***********************************

# important !!
# ~~~~~~~~~~~
cnn = None
x_optimizers = None 

# function to build the CNN 
# ~~~~~~~~~~~~~~~~~~~~~~~~~~~~
def build_cnn_simple(li_Conv, li_Conv_Name, li_Pool, li_Pool_Name, li_MLP, input_shape, 
                     my_regularizer=None, 
                     my_reg_param_l2=0.01, my_reg_param_l1=0.01 ):

    use_regularizer = True
    if my_regularizer == None:
        use_regularizer = 
False  
    
    # activation functions to be used in Conv-layers 
    li_conv_act_funcs = ['relu', 'sigmoid', 'elu', 'tanh']
    # activation functions to be used in MLP hidden layers  
    li_mlp_h_act_funcs = ['relu', 'sigmoid', 'tanh']
    # activation functions to be used in MLP output layers  
    li_mlp_o_act_funcs = ['softmax', 'sigmoid']

    # dictionary for regularizer functions
    d_reg = {
        'l2': regularizers.l2,  
        'l1': regularizers.l1
    }
    if use_regularizer: 
        if my_regularizer not in d_reg:
            print("regularizer " + my_regularizer + " not known!")
            sys.exit()
        else: 
            regul = d_reg[my_regularizer] 
        if my_regularizer == 'l2':
            reg_param = my_reg_param_l2
        elif my_regularizer == 'l1':
            reg_param = my_reg_param_l1
    
    
    # Build the Conv part of the CNN
    # ~~~~~~~~~~~~~~~~~~~~~~~~~~~~~~~
    num_conv_layers = len(li_Conv)
    num_pool_layers = len(li_Pool)
    if num_pool_layers != num_conv_layers - 1: 
        print("\nNumber of pool layers does not fit to number of Conv-layers")
        sys.exit()
    rg_il = range(num_conv_layers)

    # Define a sequential CNN model
    # ~~~~~~~~~~~~~~~~~~~~~~~~~-----
    cnn = models.Sequential()

    # in our simple model each con2D layer is followed by a Pooling layer (with the exeception of the last one) 
    for il in rg_il:
        # add the convolutional layer 
        num_filters  = li_Conv[il][0]
        t_fkern_size = li_Conv[il][1]
        cact         = li_conv_act_funcs[li_Conv[il][2]]
        cname        = li_Conv_Name[il]
        if il==0:
            cnn.add(layers.Conv2D(num_filters, t_fkern_size, activation=cact, name=cname,  
                                  input_shape=input_shape))
        else:
            cnn.add(layers.Conv2D(num_filters, t_fkern_size, activation=cact, name=cname))
        
        # add the pooling layer 
        if il < num_pool_layers:
            t_pkern_size = li_Pool[il][0]
            pname        = li_Pool_Name[il] 
            cnn.add(layers.MaxPooling2D(t_pkern_size, name=pname))
            

    # Build the MLP part of the CNN
    # ~~~~~~~~~~~~~~~~~~~~~~~~~~~~~~~
    num_mlp_layers = len(li_MLP)
    rg_im = range(num_mlp_layers)

    cnn.add(layers.Flatten())

    for im in rg_im:
        # add the dense layer 
        n_nodes = li_MLP[im][0]
        if im < num_mlp_layers - 1:  
            m_act   =  li_mlp_h_act_funcs[li_MLP[im][1]]
            if use_regularizer:
                cnn.add(layers.Dense(n_nodes, activation=m_act, kernel_regularizer=regul(reg_param)))
            else:
                cnn.add(layers.Dense(n_nodes, activation=m_act))
        else: 
            m_act   =  li_mlp_o_act_funcs[li_MLP[im][1]]
            if use_regularizer:
                cnn.add(layers.Dense(n_nodes, activation=m_act, kernel_regularizer=regul(reg_param)))
            else:
                cnn.add(layers.Dense(n_nodes, activation=m_act))
                
    return cnn 

 
The layer names are transferred to Keras via the parameter “name” of the Model’s method “model.add()” to add a layer, e.g.:

cnn.add(layers.Conv2D(num_filters, t_fkern_size, activation=cact, name=cname))

Note that all other Jupyter cells remain unchanged.

Saving and restoring a model

Predictions of a neural network require a forward propagation of an input and thus a precise definition of layers and weights. In the last article we have already seen how we save and reload weight data of a model. However, weights make only a part of the information defining a model in a certain state. For seeing the activation of certain maps of a trained model we would like to be able to reload the full model in its trained status. Keras offers a very simple method to save and reload the complete set of data for a given model-state:

cnn.save(filename.h5′)
cnnx = models.load_model(‘filename.h5’)

This statement creates a file with the name name “filename.h5” in the h5-format (for large hierarchically organized data) in our Jupyter environment. You would of course replace “filename” by a more appropriate name to characterize your saved model-state. In my combined Eclipse-Jupyter-environment the standard path for such files points to the directory where I keep my notebooks. We included a corresponding statement at the end of the function “train()”. The attentive reader has certainly noticed this fact already.

A function to build a model for the retrieval and display of the activations of maps

We now build a new function to do the plotting of the outputs of all maps of a layer.

Jupyter Cell 9 – filling a grid with output-images of all maps of a layer

# Function to plot the activations of a layer 
# -------------------------------------------
# Adaption of a method originally designed by F.Chollet 

def img_grid_of_layer_activation(d_img_sets, model_fname='cnn.h5', layer_name='', img_set="test_imgs", num_img=8, 
                                 scale_img_vals=False):
    '''
    Input parameter: 
    -----------------
    d_img_sets: dictionary with available img_sets, which contain img tensors (presently: train_imgs, test_imgs)  
    model_fname: Name of the file containing the models data 
    layer_name: name of the layer for which we plot the activation; the name must be known to the Keras model (string) 
    image_set: The set of images we pick a specific image from (string)
    num_img: The sample number of the image in the chosen set (integer) 
    scale_img_vals: False: Do NOT scale (standardize) and clip (!) the pixel values. True: Standardize the values. (Boolean)
        
    Hints: 
    -----------------
    We assume quadratic images 
    '''
    
    # Load a model 
    cnnx = models.load_model(model_fname)
    
    # get the output of a certain named layer - this includes all maps
    # https://keras.io/getting_started/faq/#how-can-i-obtain-the-output-of-an-intermediate-layer-feature-extraction
    cnnx_layer_output = cnnx.get_layer(layer_name).output

    # build a new model for input "cnnx.input" and output "output_of_layer"
    # ~~~~~~~~~~~~~~~~~
    # Keras knows the required connections and intermediat layers from its tensorflow graphs - otherwise we get an error 
    # The new model can make predictions for a suitable input in the required tensor form   
    mod_lay = models.Model(inputs=cnnx.input, outputs=cnnx_layer_output)
    
    # Pick the input image from a set of respective tensors 
    if img_set not in d_img_sets:
        print("img set " + img_set + " is not known!")
        sys.exit()
    # slicing to get te right tensor 
    ay_img = d_img_sets[img_set][num_img:(num_img+1)]
    
    # Use the tensor data as input for a prediction of model "mod_lay" 
    lay_activation = mod_lay.predict(ay_img) 
    print("shape of layer " + layer_name + " : ", lay_activation.shape )
    
    # number of maps of the selected layer 
    n_maps   = lay_activation.shape[-1]

    # size of an image - we assume quadratic images 
    img_size = lay_activation.shape[1]

    # Only for testing: plot an image for a selected  
    # map_nr = 1 
    #plt.matshow(lay_activation[0,:,:,map_nr], cmap='viridis')

    # We work with a grid of images for all maps  
    # ~~~~~~~~~~~~~~~----------------------------
    # the grid is build top-down (!) 
with num_cols and num_rows
    # dimensions for the grid 
    num_imgs_per_row = 8 
    num_cols = num_imgs_per_row
    num_rows = n_maps // num_imgs_per_row
    #print("img_size = ", img_size, " num_cols = ", num_cols, " num_rows = ", num_rows)

    # grid 
    dim_hor = num_imgs_per_row * img_size
    dim_ver = num_rows * img_size
    img_grid = np.zeros( (dim_ver, dim_hor) )   # horizontal, vertical matrix  
    print(img_grid.shape)

    # double loop to fill the grid 
    n = 0
    for row in range(num_rows):
        for col in range(num_cols):
            n += 1
            #print("n = ", n, "row = ", row, " col = ", col)
            present_img = lay_activation[0, :, :, row*num_imgs_per_row + col]

            # standardization and clipping of the img data  
            if scale_img_vals:
                present_img -= present_img.mean()
                if present_img.std() != 0.0: # standard deviation
                    present_img /= present_img.std()
                    #present_img /= (present_img.std() +1.e-8)
                    present_img *= 64
                    present_img += 128
                present_img = np.clip(present_img, 0, 255).astype('uint8') # limit values to 255

            # place the img-data at the right space and position in the grid 
            # ~~~~~~~~~~~~~~~~~~~~~~~~~~~~~~~~~~~~~~~~~~~~~~~~~~~~~~~~~~~~~~
            # the following is only used if we had reversed vertical direction by accident  
            #img_grid[row*img_size:(row+1)*(img_size), col*img_size:(col+1)*(img_size)] = np.flip(present_img, 0)
            img_grid[row*img_size:(row+1)*(img_size), col*img_size:(col+1)*(img_size)] = present_img
 
    return img_grid, img_size, dim_hor, dim_ver 

 
I explain the core parts of this code in the next two sections.

Explanation 1: A model for the prediction of the activation output of a (convolutional layer) layer

In a first step of the function “img_grid_of_layer_activation()” we load a CNN model saved at the end of a previous training run:

cnnx = models.load_model(model_fname)

The file-name “Model_fname” is a parameter. With the lines

cnnx_layer_output = cnnx.get_layer(layer_name).output
mod_lay = models.Model(inputs=cnnx.input, outputs=cnnx_layer_output)

we define a new model “cnnx” comprising all layers (of the loaded model) in between cnnx.input and cnnx_layer_output. “cnnx_layer_output” serves as an output layer of this new model “cnnx”. This model – as every working CNN model – can make predictions for a given input tensor. The output of this prediction is a tensor produced by cnnx_layer_output; a typical shape of the tensor is:

shape of layer Conv2D_1 :  (1, 26, 26, 32)

From this tensor we can retrieve the size of the comprised quadratic image data.

Explanation 2: A grid to collect “image data” of the activations of all maps of a (convolutional) layer

Matplotlib can plot a grid of equally sized images. We use such a grid to collect the activation data produced by all maps of a chosen layer, which was given by its name as an input parameter.

The first statements define the number of images in a row of the grid – i.e. the number of columns of the grid. With the number of layer maps this in turn defines the required number of rows in the grid. From the number of pixel data in the tensor we can now define the grid dimensions in terms of pixels. The double loop eventually fills in the image data extracted from the tensors produced by the layer maps.

If requested by a function parameter “scale_img_vals=True” we standardize the image data and limit the pixel values to a maximum of 255 (clipping). This can in some cases be useful to get a better graphical representation of the
activation data with some color maps.

Our function “mg_grid_of_layer_activation()” returns the grid and dimensional data.

Note that the grid is oriented from its top downwards and from the left to the right side.

Plotting the output of a layer

In a further Jupyter cell we prepare and perform a call of our new function. Afterwards we plot resulting information in two figures.

Jupyter Cell 10 – plotting the activations of a layer

# Plot the img grid of a layers activation 
# ~~~~~~~~~~~~~~~~~~~~~~~~~~~~~~~~~~~~~~~~~

# global dict for the image sets 
d_img_sets= {'train_imgs':train_imgs, 'test_imgs':test_imgs}

# layer - pick one of the names which you defined for your model 
layer_name = "Conv2D_1"

# choose a image_set and an img number 
img_set = "test_imgs"
num_img = 19


# Two figures 
# -----------
fig1 = plt.figure(1)  # figure for th einput img
fig2 = plt.figure(2)  # figure for the activation outputs of th emaps 

ay_img = test_imgs[num_img:num_img+1]
plt.imshow(ay_img[0,:,:,0], cmap=plt.cm.binary)

# getting the img grid 
img_grid, img_size, dim_hor, dim_ver = img_grid_of_layer_activation(
                                        d_img_sets, model_fname='cnn.h5', layer_name=layer_name, 
                                        img_set=img_set, num_img=num_img, 
                                        scale_img_vals=False)
# Define reasonable figure dimensions by scaling the grid-size  
scale = 1.6 / (img_size)
fig2 = plt.figure( figsize=(scale * dim_hor, scale * dim_ver) )
#axes 
ax = fig2.gca()
ax.set_xlim(-0,dim_hor-1.0)
ax.set_ylim(dim_ver-1.0, 0)  # the grid is oriented top-down 
#ax.set_ylim(-0,dim_ver-1.0) # normally wrong

# setting labels - tick positions and grid lines  
ax.set_xticks(np.arange(img_size-0.5, dim_hor, img_size))
ax.set_yticks(np.arange(img_size-0.5, dim_ver, img_size))
ax.set_xticklabels([]) # no labels should be printed 
ax.set_yticklabels([])

# preparing the grid 
plt.grid(b=True, linestyle='-', linewidth='.5', color='#ddd', alpha=0.7)

# color-map 
#cmap = 'viridis'
#cmap = 'inferno'
#cmap = 'jet'
cmap = 'magma'

plt.imshow(img_grid, aspect='auto', cmap=cmap)

 
The first figure contains the original MNIST image. The second figure will contain the grid with its images of the maps’ output. The code is straightforward; the corrections of the dimensions have to do with the display of intermittent lines to separate the different images. Statements like “ax.set_xticklabels([])” set the tick-mark-texts to empty strings. At the end of the code we choose a color map.

Note that I avoided to standardize the image data. Clipping suppresses extreme values; however, the map-related filters react to these values. So, let us keep the full value spectrum for a while …

Training run to get a reference model

I performed a training run with the following setting and saved the last model:

build = True
if cnn == None:
    build = True
    x_optimizer = None 
batch_size=64
epochs=80
reset = False # we want training to start again with the initial weights
#reset = True # we want training to start again with the initial weights

my_loss    ='categorical_crossentropy'
my_metrics =['accuracy']

my_regularizer = None
my_regularizer = 'l2'
my_reg_param_l2 = 0.001
#my_reg_param_l2 = 0.01
my_reg_param_l1 = 0.01


my_optimizer      = 'rmsprop'       # Present alternatives:  rmsprop, nadam, adamax 
my_momentum       = 0.5           # momentum value 
my_lr_sched       = 'powerSched'    # Present alternatrives: 
None, powerSched, exponential 
#my_lr_sched       = None           # Present alternatrives: None, powerSched, exponential 
my_lr_init        = 0.001           # initial leaning rate  
my_lr_decay_steps = 1               # decay steps = 1 
my_lr_decay_rate  = 0.001           # decay rate 


li_conv_1    = [32, (3,3), 0] 
li_conv_2    = [64, (3,3), 0] 
li_conv_3    = [128, (3,3), 0] 
li_Conv      = [li_conv_1, li_conv_2, li_conv_3]
li_Conv_Name = ["Conv2D_1", "Conv2D_2", "Conv2D_3"]
li_pool_1    = [(2,2)]
li_pool_2    = [(2,2)]
li_Pool      = [li_pool_1, li_pool_2]
li_Pool_Name = ["Max_Pool_1", "Max_Pool_2", "Max_Pool_3"]
li_dense_1   = [100, 0]
#li_dense_2  = [30, 0]
li_dense_3   = [10, 0]
li_MLP       = [li_dense_1, li_dense_2, li_dense_3]
li_MLP       = [li_dense_1, li_dense_3]
input_shape  = (28,28,1)


This run gives us the following results:

and

Epoch 80/80
933/938 [============================>.] - ETA: 0s - loss: 0.0030 - accuracy: 0.9998
present lr:  1.31509732e-05
present iteration: 75040
938/938 [==============================] - 4s 5ms/step - loss: 0.0030 - accuracy: 0.9998 - val_loss: 0.0267 - val_accuracy: 0.9944

Tests and first impressions of the convolutional layer output

Ok, let us test the code to plot the maps’ output. For the input data

# layer - pick one of the names which you defined for your model 
layer_name = "Conv2D_1"

# choose a image_set and an img number 
img_set = "test_imgs"
num_img = 19

we get the following results:

Layer “Conv2D_1”

Layer “Conv2D_2”

Layer “Conv2D_3”

Conclusion

Keras’ flexibility regarding model definitions allows for the definition of new models based on parts of the original CNN. The output layer of these new models can be set to any of the convolutional or pooling layers. With predictions for an input image we can extract the activation results of all maps of a layer. These data can be visualized in form of a grid that shows the reaction of a layer to the input image. A first test shows that the representations of the input get more and more abstract with higher convolutional layers.

In the next article

A simple CNN for the MNIST dataset – V – about the difference of activation patterns and features

we shall have a closer look of what these abstractions may mean for the classification of certain digit images.

Links

https://keras.io/getting_started/faq/#how-can-i-obtain-the-output-of-an-intermediate-layer-feature-extraction

https://machinelearningmastery.com/how-to-visualize-filters-and-feature-maps-in-convolutional-neural-networks/

https://towardsdatascience.com/visualizing-intermediate-activation-in-convolutional-neural-networks-with-keras-260b36d60d0

https://hackernoon.com/visualizing-parts-of-convolutional-neural-networks-using-keras-and-cats-5cc01b214e59

https://colab.research.google.com/github/fchollet/deep-learning-with-python-notebooks/blob/master/5.4-visualizing-what-convnets-learn.ipynb

Getting a Keras based MLP to run with Cuda 10.2, Cudnn 7.6 and TensorFlow 2.0 on an Opensuse Leap 15.1 system

During last weekend I wanted to compare the performance of an old 20-line Keras setup for a simple MLP with the performance of a self-programmed Python- and Numpy-based MLP regarding training epochs on the MNIST dataset. The Keras code was set up in a Jupyter notebook last autumn – at that time for TensorFlow 1 and Cuda 10.0 for my Nvidia graphics card. I thought it might be a good time to move everything to Tensorflow 2 and the latest Cuda libraries on my Opensuse Leap 15.1 system. This was more work than expected – and for some problems I was forced to apply some dirty workarounds. I got it running. Maybe the necessary steps, which are not really obvious, are helpful for others, too.

Install Cuda 10.2 and Cudnn on an Opensuse Leap 15.1

Before you want to use TensorFlow [TF] on a Nvidia graphics card you must install Cuda. The present version is Cuda 10.2. I was a bit naive to assume that this should be the right version – as it has been available for some time already. Wrong! Afterwards I read somewhere that TensorFlow2 [TF2] is working with Cuda 10.1, only, and not yet fully compatible with Cuda 10.2. Well, at least for my purposes [MLP training] it seemed to work nevertheless – with some “dirty” additional library links.

There is a central Cuda repository available at this address: cuda10.2. Actually, the repo offers both cuda10.0, cuda10.1 and cuda10.2 (plus some nvidia drivers). I selected some central cuda10.2 packages for installation – just to find out where the related files were placed in the filesystem. I then ran into a major chain of packet dependencies, which I had to resolve during many tedious steps . Some packages may not have been necessary for a basic installation. In the end I was too lazy to restrict the libs to what is really required for Keras. The bill came afterwards: Cuda 10.2 is huge! If you do not know exactly what you need: Be prepared to invest up to 3 GB on your hard disk.

The Cuda 10.2 RPM packets install most of the the required “*.so”-shared library files and many other additional files in a directory “/usr/local/cuda-10.2/”. To make changes between different versions of Cuda possible we also find a link “/usr/local/cuda” pointing to
“/usr/local/cuda-10.2/” after the installation. Ok, reasonable – we could change the link to point to “/usr/local/cuda-10.0/”. This makes you assume that the Tensorflow 2 libraries and other modules in your virtual Python3 and Jupyter environment would look for required Cuda files in the central directory “/usr/local/cuda” – i.e. without special version attributes of the files. Unfortunately, this was another wrong assumption. 🙁 See below.

In addition to the Cuda packages you must install the present “cudnn” libraries from Nvidia – more precisely: The runtime and the development package. You get the RPMs from here. Be prepared to give Nvidia your private data. 🙁

I should add that I ignored and ignore the Nvidia drivers from the Cuda repository, i.e. I never installed them. Instead, I took those from the standard Nvidia community repository. They worked and work well so far – and make my update life on Opensuse easier.

Installation of Tensorflow2 modules in your (virtual) Python3 environment

I use a virtual Python3 environment and update it regularly via “pip”. Regarding TF2 an update via the command “pip install –upgrade tensorflow” should be sufficient – it will resolve dependencies. (By the way: If you want to bring all Python libs to their present version you can also use “pip-review –auto”. Note that under certain circumstances you may need the “–force” option for special upgrades. I cannot go into
details in this article.)

Multiple complaints about missing libraries …

Unfortunately, the next time I started my virtual Python environment I got the warning that the dynamic library “libnvinfer.so.6” could not be found, but was required in case I planned to use TensorRT. What? Well, you may find some information here
https://blogs.nvidia.com/blog/2016/08/22/difference-deep-learning-training-inference-ai/
https://developer.nvidia.com/tensorrt

I leave it up to you whether you really need TensorRT. You can ignore this message – TF will run for standard purposes without it. But, dear TF-developers: a clear message in the warning would in my opinion have been helpful. Then I checked whether some version of the Nvidia related library “libnvinfer.so” came with Cuda or Cudnn onto my system. Yeah, it did – unfortunately version 7 instead of 6. :-(.
So, we are confronted with a dependency on a specific file version which is older than the present one. I do not like this style of development. Normally, it should be the other way round: If a newer version is required due to new capabilities you warn the user. But under normal circumstances a backward compatibility of libs should be established. You would assume such a backward compatibility and that TF would search for the present version via looking for files “libnvinfer.so” and “libnvinfer_plugin.so” which do exist and point to the latest versions. But, no, in this case they want it explicitly to be version 6 … Makes you wonder whether the old Cudnn version is still available. I did not check it. Ok, ok – backward compatibility is not always possible ….

Just to see how good the internal checking of the alleged dependency is, I did something you normally do not do: I created a link “libnvinfer.so.6” in “/usr/lib64” to “libnvinfer.7.so”. Had to do the same for “libnvinfer_plugin.so.6”. Effect: I got rid of the warning – so much about dependency checking. I left the linking. You see I trust in coming developments sometimes and run some risks ….

Then came the next surprise. I had read a bit about changed statements in TF2 (compared to TF1) – and thought I was prepared for this. But, when I tried to execute some initial commands to configure TF2 from a Jupyter cell as e.g.

 
import time 
import tensorflow as tf
from tensorflow import keras as K
from keras.datasets import mnist
from keras import models
from keras import layers
from tensorflow.python.client import device_lib

import os
#os.environ["CUDA_VISIBLE_DEVICES"] = "-1"

tf.config.optimizer.set_jit(True)
tf.config.threading.set_intra_op_parallelism_threads(4)
tf.config.threading.set_inter_op_parallelism_threads(4)
tf.debugging.set_log_device_placement(True)

device_lib.list_local_devices()  

I at once got a complaint in the shell from which I had started the Jupyter notebook – saying that a lib called “libcudart.so.10.1” was missing. Again – an explicit version dependency 🙁 . On purpose or just a glitch? Just one out of many files version dependent? Without a clear information? If this becomes the standard in the interaction between TF2 and Cuda – well, no fun any longer. In my opinion the TF2 developers should not use a search for files via version specific names – but do an analysis of headers and warn explicitly that the present version requires a specific Cuda version. Would be much more convenient for the user and compatible with the link mechanism described above.

Whilst a bunch of other dynamic libs was loaded by their name without a version in this case TF2 asks for a very specific version – although there is a corresponding lib available in the directory “/usr/lib/cuda-10.2″…. Nevertheless with full trust again in a better future
I offered TF2 a softlink “libcudart.so.10.1” in “/usr/lib64/” pointing to the “/usr/local/cuda-10.2/lib64/libcudart.so”. It cleared my way to the next hurdle. And my Keras MLP worked in the end …

Missing “./bin” directory … and other path related problems

When I tried to run specific Keras commands, which TF2 wanted to compile as XLA-supported statements, I again got complaints that files in a local directory “./bin” were missing. This was a first clear indication that Cuda paths were totally ignored in my Python/Jupyter environment. But what directory did the “./” refer to? Some experiments revealed:

I had to link an artificial subdirectory “./bin” in the directory where I kept my Jupyter notebooks to “/usr/local/Cuda-10.2/bin”.

But the next problems with other directories waited directly around the corner. Actually many … To make a long story short – the installation of TF2 in combination with Cuda 1.2 does not evaluate paths or ask for paths when used in a Python3/Jupyter environment. We have to provide and export them as shell environment variables. See below.

Warnings and errors regarding XLA capabilities

Another thing which drove me nuts was that TF2 required information about XLA-flags. It took me a while to find out that this also could be handled via environment variables.

All in all I now start the shell from which I launch my virtual Python environment and Jupyter notebooks with the following command sequence:

myself@mytux:/projekte/GIT/....../ml> export XLA_FLAGS=--xla_gpu_cuda_data_dir=/usr/local/cuda
myself@mytux:/projekte/GIT/....../ml> export TF_XLA_FLAGS=--tf_xla_cpu_global_jit
myself@mytux:/projekte/GIT/....../ml_1> export OPENBLAS_NUM_THREADS=4              
myself@mytux:/projekte/GIT/....../ml_1> source bin/activate
(ml) myself@mytux:/projekte/GIT/....../ml_1> jupyter notebook 

The first two commands did the magic regarding the path-problems! TF2 worked afterwards both for XLA-capable CPUs and Nvidia GPUs. So, a specific version may or may not have advantages – I do not know – but at least you can get TF2 running with Cuda 10.2.

Changed commands to control threading and memory consumption

Without the use of explicit compatibility commands TF2 does not support commands like

config = tf.ConfigProto(intra_op_parallelism_threads=num_cores,
                        inter_op_parallelism_threads=num_cores, 
                        allow_soft_placement=True,
                        device_count = {'CPU' : num_CPU,
                                        'GPU' : num_GPU}, 
                        log_device_placement=True

                       )
config.gpu_options.per_process_gpu_memory_fraction=0.4
config.gpu_options.force_gpu_compatible = True  

any longer. But as with TF1 you probably do not want to pick all the memory from your graphics card and you do not want to use all cores of a CPU in TF2. You can circumvent the lack of a “ConfigProto” property in TF2 by the following commands:

# configure use of just in time compiler 
tf.config.optimizer.set_jit(True) 
# limit use of parallel threads 
tf.config.threading.set_intra_op_parallelism_threads(4) 
tf.config.threading.set_inter_op_parallelism_threads(4)
# Not required in TF2: tf.enable_eager_execution()
# print out use of certain device (at first run)
tf.debugging.set_log_device_placement(True)
#limit use of graphics card memory 
gpus = tf.config.experimental.list_physical_devices('GPU')
if gpus:
  try:
    tf.config.experimental.set_virtual_device_configuration(gpus[0], 
          [tf.config.experimental.VirtualDeviceConfiguration(memory_limit=1024)])
  except RuntimeError as e:
    print(e)
# Not required in TF2: tf.enable_eager_execution()
# print out a list of usable devices
device_lib.list_local_devices()   

Addendum, 15.
05.2020:

Well, this actually proved to be correct for the limitation of the GPU memory, only. The limitations on the CPU cores do NOT work. At least not on my system. See also:
tensorflow issues 34415.

I give you a workaround below.

Test run with MNIST

Afterwards the following simple Keras MLP ran without problems and with the expected performance on a GPU and a multicore CPU:

Jupyter cell 1

import time 
import tensorflow as tf
#from tensorflow import keras as K
import keras as K
from keras.datasets import mnist
from keras import models
from keras import layers
from keras.utils import to_categorical
from tensorflow.python.client import device_lib
import os

# use to work with CPU (CPU XLA ) only 
# os.environ["CUDA_VISIBLE_DEVICES"] = "-1"

gpus = tf.config.experimental.list_physical_devices('GPU')
if gpus:
  try:
    tf.config.experimental.set_virtual_device_configuration(gpus[0], 
          [tf.config.experimental.VirtualDeviceConfiguration(memory_limit=1024)])
  except RuntimeError as e:
    print(e)
    
# if not yet done elsewhere 

tf.config.optimizer.set_jit(True)
tf.debugging.set_log_device_placement(True)

use_cpu_or_gpu = 1 # 0: cpu, 1: gpu

# The following can only be done once - all CPU cores are used otherwise  
#if use_cpu_or_gpu == 0:
#    tf.config.threading.set_intra_op_parallelism_threads(4)
#    tf.config.threading.set_inter_op_parallelism_threads(6)


# function for training 
def train(train_images, train_labels, epochs, batch_size):
    network.fit(train_images, train_labels, epochs=epochs, batch_size=batch_size)

# setup of the MLP
network = models.Sequential()
network.add(layers.Dense(200, activation='sigmoid', input_shape=(28*28,)))
network.add(layers.Dense(100, activation='sigmoid'))
network.add(layers.Dense(50, activation='sigmoid'))
network.add(layers.Dense(30, activation='sigmoid'))
network.add(layers.Dense(10, activation='sigmoid'))
network.compile(optimizer='rmsprop', loss='categorical_crossentropy', metrics=['accuracy'])

# load MNIST 
mnist = K.datasets.mnist
(X_train, y_train), (X_test, y_test) = mnist.load_data()
# simple normalization
train_images = X_train.reshape((60000, 28*28))
train_images = train_images.astype('float32') / 255
test_images = X_test.reshape((10000, 28*28))
test_images = test_images.astype('float32') / 255
train_labels = to_categorical(y_train)
test_labels = to_categorical(y_test)

Jupyter cell 2

# run it 
if use_cpu_or_gpu == 1:
    start_g = time.perf_counter()
    train(train_images, train_labels, epochs=45, batch_size=1500)
    end_g = time.perf_counter()
    test_loss, test_acc= network.evaluate(test_images, test_labels)
    print('Time_GPU: ', end_g - start_g)  
else:
    start_c = time.perf_counter()
    train(train_images, train_labels, epochs=45, batch_size=1500)
    end_c = time.perf_counter()
    test_loss, test_acc= network.evaluate(test_images, test_labels)
    print('Time_CPU: ', end_c - start_c)  

# test accuracy 
print('Acc: ', test_acc)

Switch to force Tensorflow to use the CPU, only

Another culprit is that – depending on the exact version of TF 2 – you may need to use the following statement to run (parts of) your code on the CPU only:

os.environ["CUDA_VISIBLE_DEVICES"] = "-1"

in the beginning. Otherwise Tensorflow 2.0 and version 2.1 will choose execution on the GPU even if you use a statement like

with tf.device("/CPU:0"):

(which worked in TF1).
It seems that this problem was solved with TF 2.2 (tested it on 15.05.2020)! But you may have to check it yourself.
You can
watch the involvement of the GPU e.g. with “watch -n0.1 nvidia-smi” on a terminal. Another possibility is to set

tf.debugging.set_log_device_placement(True)  

and get messages in the shell of your virtual Python environment or in the presently used Jupyter cell.

Addendum 16.05.2020: Limiting the number of CPU cores for Tensorflow 2.0 on Linux

After several trials and tests I think that both TF2 and the Keras version delivered with handle the above given TF2 statements to limit the number of CPU cores to use inefficiently. I addition the behavior of TF2/Keras has changed with the TF2 versions 2.0, 2.1 and now 2.2.

Strange things also happen, when you combine statements of the TF1 compat layer with pure TF2 restriction statements. You should refrain from mixing them.

So, it is either

Option 1: CPU only and limited number of cores

from tensorflow import keras as K
from tensorflow.python.keras import backend as B 
import os
os.environ["CUDA_VISIBLE_DEVICES"] = "-1"
...
config = tf.compat.v1.ConfigProto(intra_op_parallelism_threads=4, inter_op_parallelism_threads=1)
B.set_session(tf.compat.v1.Session(config=config))    
...

OR
Option 2: Mixture of GPU (with limited memory) and CPU (limited core number) with TF2 statements

import tensorflow as tf
from tensorflow import keras as K
from tensorflow.python.keras import backend as B 
from keras import models
from keras import layers
from keras.utils import to_categorical
from keras.datasets import mnist
from tensorflow.python.client import device_lib
import os

tf.config.threading.set_intra_op_parallelism_threads(6)
tf.config.threading.set_inter_op_parallelism_threads(1)
gpus = tf.config.experimental.list_physical_devices('GPU')
if gpus:
    try:
        tf.config.experimental.set_virtual_device_configuration(gpus[0], 
        [tf.config.experimental.VirtualDeviceConfiguration(memory_limit=1024)])
    except RuntimeError as e:
        print(e)

OR
Option 3: Mixture of GPU (limited memory) and CPU (limited core numbers) with TF1 compat statements

import tensorflow as tf
from tensorflow import keras as K
from tensorflow.python.keras import backend as B 
from keras import models
from keras import layers
from keras.utils import to_categorical
from keras.datasets import mnist
from tensorflow.python.client import device_lib
import os

#gpu = False 
gpu = True
if gpu: 
    GPU = True;  CPU = False; num_GPU = 1; num_CPU = 1
else: 
    GPU = False; CPU = True;  num_CPU = 1; num_GPU = 0

config = tf.compat.v1.ConfigProto(intra_op_parallelism_threads=6,
                        inter_op_parallelism_threads=1, 
                        allow_soft_placement=True,
                        device_count = {'CPU' : num_CPU,
                                        'GPU' : num_GPU}, 
                        log_device_placement=True

                       )
config.gpu_options.per_process_gpu_memory_fraction=0.35
config.gpu_options.force_gpu_compatible = True
B.set_session(tf.compat.v1.Session(config=config))

Hint 1:

If you want to test some code parts on the GPU and others on the CPU in the same session, I strongly recommend to use the compat statements in the form given by Option 3 above

The reason is that it – strangely enough – gives you a faster performance on a multicore CPU by more than 25% in comparison to the pure TF2 statements .

Afterwards you can use statements like:

batch_size=64
epochs=5

if use_cpu_or_gpu == 0:
    start_g = time.perf_counter()
    with tf.device("/GPU:0"):
        train(train_imgs, train_labels, epochs, batch_size)
    end_g = time.perf_
counter()
    print('Time_GPU: ', end_g - start_g)  
else:
    start_c = time.perf_counter()
    with tf.device("/CPU:0"):
        train(train_imgs, train_labels, epochs, batch_size)
    end_c = time.perf_counter()
    print('Time_CPU: ', end_c - start_c)  

Hint 2:
If you check the limitations on CPU cores (threads) via watching the CPU load on tools like “gkrellm” or “ksysguard”, it may appear that all cores are used in parallel. You have to set the update period of these tools to 0.1 sec to see that each core is only used intermittently. In gkrellm you should also see a variation of the average CPU load value with a variation of the parameter “intra_op_parallelism_threads=n”.

Hint 3:
In my case with a Quadcore CPU with hyperthreading the following settings seem to be optimal for a variety of Keras CNN models – whenever I want to train them on the CPU only:

...
config = tf.compat.v1.ConfigProto(intra_op_parallelism_threads=6, inter_op_parallelism_threads=1)
B.set_session(tf.compat.v1.Session(config=config)) 
...

Hint 4:
If you want to switch settings in a Jupyter session it is best to stop and restart the respective kernel. You can do this via the commands under “kernel” in the Jupyter interface.

Conclusion

Well, my friends the above steps where what I had to do to get Keras working in combination with TF2, Cuda 10.2 and the present version of Cudnn. I regard this not as a straightforward procedure – to say it mildly.

In addition after some tests I might also say that the performance seems to be worse than with Tensorflow 1. Especially when using Keras – whether the Keras included with Tensorflow 2 or Keras in form of separate Python lib. Especially the performance on a GPU is astonishingly bad with Keras for small networks.

This impression of sluggishness stands in a strange contrast to elementary tests were I saw a factor of 5 difference for a series of typical matrix multiplications executed directly with tf.matmul() on a GPU vs. a CPU. But this another story …..

Links

tensorflow-running-version-with-cuda-on-cpu-only


Nvidia GPU-support of Tensorflow/Keras on Opensuse Leap 15

When you start working with Google’s Tensorflow on multi-layer and “deep learning” artificial neural networks the performance of the required mathematical operations may sooner or later become important. One approach to better performance is the use of a GPU (or multiple GPUs) instead of a CPU. Personally, I am not yet in a situation where GPU support is really required. My experimental CNNs are too small, yet. But starting with Keras and Tensorflow is a good point to cover the use of a GPU on my Opensuse Leap 15 systems anyway. Actually, it is also helpful for some tasks in security related environments, too. One example is testing the quality of passphrases for encryption. With JtR you may gain a factor of 10 in performance. It is interesting, how much faster an old 960 GTX card will be for a simple Tensorflow test application than my i7 CPU.

I have used Nvidia GPUs almost all my Linux life. To get GPU support for Nvidia graphics cards you need to install CUDA in its present version. This is 10.1 in August 2019. You get download and install information for CUDA at
https://developer.nvidia.com/cuda-zone => https://developer.nvidia.com/cuda-downloads
For an RPM for the x86-64 architecture and Opensuse Leap see:
https://developer.nvidia.com/cuda-downloads?….

Installation of “CUDA” and “cudcnn”

You may install the downloaded RPM (in my “case cuda-repo-opensuse15-10-1-local-10.1.168-418.67-1.0-1.x86_64.rpm”) via YaST. After this first step you in a second step install the meta-packet named “cuda”, which is available in YaST at this point. Or just install all other packets with “cuda” in the name (with the exception of the source code and dev-packets) via YaST.

A directory “/usr/local/cuda” will be built; its entries are soft links to files in a directory “/usr/local/cuda-10.1“.

Note the “include” and the “lib64” sub-directories! After the installation, also links should exist in the central “/usr/lib64“-directory pointing to the files in “/usr/local/cuda/lib64“.

Note from the file-endings that the particular present version [Aug. 2019) of the files may be something like “10.1.168“.

Another important point is that you need to install “cudnn” (cudnn-10.1-linux-x64-v7.6.2.24.tgz) – a Nvidia specific library for certain Deep Learning program elements, which shall be executed on Nvidia GPU chips. You get these files via “https://developer.nvidi.com/cudnn“. Unfortunately, you must become member of the Nvidia developer community to get access to these special files. After you downloaded the tgz-file and expanded it, you find some directories “include” and “lib64” with relevant files. You just copy these files (as user root) into the directories “/usr/local/cuda/include” and “/usr/local/cuda/lib64”, respectively. Check the owner/group and rights of the copied files afterwards and change them to root/root and standard rights – just as given for the other files in teh target directories.

The final step is the follwoing:
Create links by dragging the contents of “/usr/local/cuda/include” to “/usr/include” and chose the option “Link here”. Do the same for the files of “/usr/local/cuda/lib64” with “/usr/lib64” as the target directory. If you look at the link-directories of the files now in “usr/include” and “usr/lib64” you see exactly which files were given by the CUDA and cudcnn installation.

nAdditional libraries
In case you want to use Keras it is recommended to install the “openblas” libraries including the development packages on the Linux OS level. On an Opensuse system just search for packages with “openblas” and install them all. The same is true for the h5py-libraries. In your virtual python environment execute:
< p style="margin-left:50px;"pip3 install --upgrade h5py

Problems with errors regarding missing CUDA libraries after installation

Two stupid things may happen after this straight-forward installation :

  • The link structure between “/usr/lib64” and the files in “/usr/local/cuda/include” and “/usr/local/cuda/lib64” may be incomplete.
  • Although there are links from files as “libcufftw.so.10” to something like “libcufftw.so.10.1.168” some libraries and TensorFlow components may expect additional links as “libcufftw.so.10.0” to “libcufftw.so.10.1.168”

Both points lead to error messages when I tried to use GPU related test statements on a PyDEV console or Jupyter cell. Watch out for error messages which tell you about errors when opening specific libraries! In the case of Jupyter you may find such messages on the console or terminal window from which you started your test.

A quick remedy is to use a file-manager as “dolphin” as user root, mark all files in “/usr/local/cuda/include” and “usr/local/cuda/lib64” and place them as (soft) links into “/usr/include” and “/usr/lib64”, respectively. Then create additional links there for the required libraries “libXXX.so.10.0” to “libXXX.so.10.1.168“, where “XXX” stands for some variable part of the file name.

A simple test with Keras and the mnist dataset

I assume that you have installed the packages for tensorflow, tensorflow-gpu (!) and keras with pip3 in your Python virtualenv. Note that the package “tensorflow-gpu” MUST be installed after “tensorflow” to make the use of the GPU possible.

Then a test with a simple CNN for the “mnist” datatset can deliver information on performance differences :

Cell 1 of a Jupyter notebook:

import time 
import tensorflow as tf
from keras import backend as K
from tensorflow.python.client import device_lib
from keras.datasets import mnist
from keras import models
from keras import layers
from keras.utils import to_categorical

# function to provide CPU/GPU information 
# ---------------------------------------
def get_CPU_GPU_details():
    print("GPU ? ", tf.test.is_gpu_available())
    tf.test.gpu_device_name()
    print(device_lib.list_local_devices())

# information on available CPUs/GPUs
# --------------------------------------
if tf.test.is_gpu_available(
    cuda_only=False,
    min_cuda_compute_capability=None):
    print ("GPU is available")
get_CPU_GPU_details()

# Setting a parameter GPU or CPU usage 
#--------------------------------------
#gpu = False 
gpu = True
if gpu: 
    GPU = True;  CPU = False; num_GPU = 1; num_CPU = 1
else: 
    GPU = False; CPU = True;  num_CPU = 1; num_GPU = 0
num_cores = 6

# control of GPU or CPU usage in the TF environment
# -------------------------------------------------
# See the literature links at the article's end for more information  

config = tf.ConfigProto(intra_op_parallelism_threads=num_cores,
                        inter_op_parallelism_threads=num_cores, 
                        allow_soft_placement=True,
                        device_count = {'CPU' : num_CPU,
                                        'GPU' : num_GPU}, 
                        log_device_placement=True

                       )
config.gpu_options.per_process_gpu_memory_
fraction=0.4
config.gpu_options.force_gpu_compatible = True
session = tf.Session(config=config)
K.set_session(session)

#--------------------------
# Loading the mnist datatset via Keras 
#--------------------------
(train_images, train_labels), (test_images, test_labels) = mnist.load_data()
network = models.Sequential()
network.add(layers.Dense(512, activation='relu', input_shape=(28*28,)))
network.add(layers.Dense(10, activation='softmax'))
network.compile(optimizer='rmsprop', loss='categorical_crossentropy', metrics=['accuracy'])
train_images = train_images.reshape((60000, 28*28))
train_images = train_images.astype('float32') / 255
test_images = test_images.reshape((10000, 28*28))
test_images = test_images.astype('float32') / 255
train_labels = to_categorical(train_labels)
test_labels = to_categorical(test_labels)

Output of the code in cell 1:

GPU is available
GPU ?  True
[name: "/device:CPU:0"
device_type: "CPU"
memory_limit: 268435456
locality {
}
incarnation: 17801622756881051727
, name: "/device:XLA_GPU:0"
device_type: "XLA_GPU"
memory_limit: 17179869184
locality {
}
incarnation: 6360207884770493054
physical_device_desc: "device: XLA_GPU device"
, name: "/device:XLA_CPU:0"
device_type: "XLA_CPU"
memory_limit: 17179869184
locality {
}
incarnation: 7849438889532114617
physical_device_desc: "device: XLA_CPU device"
, name: "/device:GPU:0"
device_type: "GPU"
memory_limit: 2115403776
locality {
  bus_id: 1
  links {
  }
}
incarnation: 4388589797576737689
physical_device_desc: "device: 0, name: GeForce GTX 960, pci bus id: 0000:01:00.0, compute capability: 5.2"
]

Note the control settings for GPU usage via the parameter gpu and the variable “config”. If you do NOT want to use the GPU execute

config = tf.ConfigProto(device_count = {‘GPU’: 0, ‘CPU’ : 1})

Information on other control parameters which can be used together with “tf.ConfigProto” is provided here:
https://stackoverflow.com/questions/40690598/can-keras-with-tensorflow-backend-be-forced-to-use-cpu-or-gpu-at-will

Cell 2 of a Jupyter notebook for performance measurement during training:

start_c = time.perf_counter()
with tf.device("/GPU:0"):
    network.fit(train_images, train_labels, epochs=5, batch_size=30000)
end_c = time.perf_counter()
if CPU: 
    print('Time_CPU: ', end_c - start_c)  
else:  
    print('Time_GPU: ', end_c - start_c)  

Output of the code in cell 2 :

Epoch 1/5
60000/60000 [==============================] - 0s 3us/step - loss: 0.5817 - acc: 0.8450
Epoch 2/5
60000/60000 [==============================] - 0s 3us/step - loss: 0.5213 - acc: 0.8646
Epoch 3/5
60000/60000 [==============================] - 0s 3us/step - loss: 0.4676 - acc: 0.8832
Epoch 4/5
60000/60000 [==============================] - 0s 3us/step - loss: 0.4467 - acc: 0.8837
Epoch 5/5
60000/60000 [==============================] - 0s 3us/step - loss: 0.4488 - acc: 0.8726
Time_GPU:  0.7899935730001744

Now change the following lines in cell 1

 
...
gpu = False 
#gpu = True 
...

Executing the code in cell 1 and cell 2 then gives:

Epoch 1/5
60000/60000 [==============================] - 0s 6us/step - loss: 0.4323 - acc: 0.8802
Epoch 2/5
60000/60000 [==============================] - 0s 7us/step - loss: 0.3932 - acc: 0.8972
Epoch 3/5
60000/60000 [==============================] - 0s 6us/step - loss: 0.3794 - acc: 0.8996
Epoch 4/5
60000/60000 [==============================] - 0s 6us/step - loss: 0.3837 - acc: 0.8941
nEpoch 5/5
60000/60000 [==============================] - 0s 6us/step - loss: 0.3830 - acc: 0.8908
Time_CPU:  1.9326397939985327

Thus the GPU is faster by a factor of 2.375 !
At least for the chosen batch size of 30000! You should play a bit around with the batch size to understand its impact.
2.375 is not a big factor – but I have a relatively old GPU (GTX 960) and a relatively fast CPU i7-6700K mit 4GHz Taktung: So I take what I get 🙂 . A GTX 1080Ti would give you an additional factor of around 4.

Watching GPU usage during Python code execution

A CLI command which gives you updated information on GPU usage and memory consumption on the GPU is

nvidia-smi -lms 250

It gives you something like

Mon Aug 19 22:13:18 2019       
+-----------------------------------------------------------------------------+
| NVIDIA-SMI 418.67       Driver Version: 418.67       CUDA Version: 10.1     |
|-------------------------------+----------------------+----------------------+
| GPU  Name        Persistence-M| Bus-Id        Disp.A | Volatile Uncorr. ECC |
| Fan  Temp  Perf  Pwr:Usage/Cap|         Memory-Usage | GPU-Util  Compute M. |
|===============================+======================+======================|
|   0  GeForce GTX 960     On   | 00000000:01:00.0  On |                  N/A |
| 20%   44C    P0    33W / 160W |   3163MiB /  4034MiB |      1%      Default |
+-------------------------------+----------------------+----------------------+
                                                                               
+-----------------------------------------------------------------------------+
| Processes:                                                       GPU Memory |
|  GPU       PID   Type   Process name                             Usage      |
|=============================================================================|
|    0      4124      G   /usr/bin/X                                   610MiB |
|    0      4939      G   kwin_x11                                      54MiB |
|    0      4957      G   /usr/bin/krunner                               1MiB |
|    0      4959      G   /usr/bin/plasmashell                         195MiB |
|    0      5326      G   /usr/bin/akonadi_archivemail_agent             2MiB |
|    0      5332      G   /usr/bin/akonadi_imap_resource                 2MiB |
|    0      5338      G   /usr/bin/akonadi_imap_resource                 2MiB |
|    0      5359      G   /usr/bin/akonadi_mailfilter_agent              2MiB |
|    0      5363      G   /usr/bin/akonadi_sendlater_agent               2MiB |
|    0      5952      C   /usr/lib64/libreoffice/program/soffice.bin    38MiB |
|    0      8240      G   /usr/lib64/firefox/firefox                     1MiB |
|    0     13012      C   /projekte/GIT/ai/ml1/bin/python3            2176MiB |
|    0     14233      G   ...uest-channel-token=14555524607822397280    62MiB |
+-----------------------------------------------------------------------------+

During code execution some of the displayed numbers – e.g for GPU-Util, GPU memory Usage – will start to vary.

Links

https://medium.com/@liyin2015/tensorflow-cpus-and-gpus-configuration-9c223436d4ef
https://www.tensorflow.org/beta/guide/using_gpu
https://stackoverflow.com/questions/40690598/can-keras-with-tensorflow-backend-be-forced-to-use-cpu-or-gpu-at-will
https://stackoverflow.com/questions/42706761/closing-session-in-tensorflow-
doesnt-reset-graph

http://www.science.smith.edu/dftwiki/index.php/Setting up Tensorflow 1.X on Ubuntu 16.04 w/ GPU support
https://hackerfall.com/story/which-gpus-to-get-for-deep-learning
https://towardsdatascience.com/measuring-actual-gpu-usage-for-deep-learning-training-e2bf3654bcfd