IP GeoLocation is useful – not only in the context of professional penetration testing, but also for answering very legitimate questions of both system administrators and normal users. E.g.: Where does my web hosting provider really host my website or all my cloud data? In Germany with relatively strict laws regarding personal data protection, the EU or somewhere else where privacy may not be respected to the full extent I expect?
The German provider 1&1, for example, is very active on the French market, too, but at least very many, if not all French websites seem to be hosted on servers in German computation centers. Good to know for a French customer, both legally and also in case of technical problems.
Also sometimes admins may need to clarify why and where there are latency problems, when a user tries to connect to e.g. web or database servers over the Internet. Another field where IP GeoLocation is very helpful is the analysis of the origin of spam mails from the IP information in mail headers. And, and …
Of course, there are GeoLocation services available on the Internet – but the documentation of result data very often is pretty inconvenient. Now, you could write e.g. a python program for GeoLocation on your own – which is a nice exercise, but you will soon find out that you must have a profound knowledge about networking protocol details. So, from the point of view of a standard Linux user or admin it would be nice to have an easy to use, graphical and open-source solution for IP GeoLocation available on the desktop. Such a program is “Open Visual Traceroute” [OVT] of Leo Lewis.
OVT is Java based; for IP GeoLocation it uses the CityLight-database of the company Mindmax. OVT has a nice graphical interface for the geographical display of the results of tracerouting. It has some simple but helpful log and documentation functionality – and even allows for some “sniffing” inspection into data traffic on network interfaces.
Note that using the latter capability has legal implications – so, always (!) get the explicit allowance from your company owners, if you intend to use this functionality of OVT – e.g. in the course of penetration test. In general: Consider possible legal restrictions of the use of OVT (especially in Germany) – and do it carefully.
This having said: Can we technically use OVT on an Opensuse Leap 42.1 system? The answer is yes, but …. The “BUT” in this case does not refer to functionality, but to general security considerations, which we shall discuss in a later article.
However, let us first have a look at some elementary obstacles which prevent the successful execution of the program on an Opensuse Leap desktop. Starting the application as a normal user leads to a variety of different error messages from the Java side, problems with X11 access and right problems regarding the essential package capturing functionality.
One reason for this behavior is a general problematic aspect of the program: It requires root rights for network analysis capabilities. You think of “sudo” ? Yeah, but …. Actually one can learn a bit about “sudo” when dealing with OVT.
In this article I shall describe 3 simple ways of using OVT on Opensuse Leap 42.1. Note that these approaches are only reasonable for single user machines! Actually, due to its special sniffing capabilities OVT is a program to which only selected users should get access to on a multiuser system. In addition running Java and network package analysis as root leaves us with an uneasy feeling …. But let us first get OVT running at all.
In a second article we restrict the usage of OVT to selected users – and improve the startup of OVT for these users a bit. During the discussion I touch some general “sudo” issues, which may be useful in other contexts. A third article then
argues for using the program in a chroot jail or virtual environment to improve security.
I have posted some of my approaches also in the discussion forum of OVT on Sourceforge (https://sourceforge.net/p/openvisualtrace/discussion/1799338/thread/76f2b798/).
Installation of OVT is quite simple and basically means to place a folder into some reasonable branch of the file system. A shell script is used to start the program.
The web site http://visualtraceroute.net/ offers the download of different installation packages for different operating systems. For our Opensuse system the most reasonable choice is “Download Universal”. The zip-file behind it expands on our SuSE machine into a folder “OpenVisualTraceRoute1.6.3” with a shell script “ovtr.sh” at the highest level and some required subfolders below. The additional “README.txt” file informs about the present and older versions of OVT – in my case I used version 1.6.3.
On my system I have placed the contents of the mentioned folder into a directory “/opt/ovt/”. But you may take another choice. We abbreviate the full path to this installation directory during the rest of this article by “/PATH/TO/OVT/” and call it “OVT-directory”. The OVT-directory contains a “lib” subdirectory which supplies the required “jar” archives.
In principle the OVT program could be started from the OVT-directory by executing the “ovtr.sh” script there. However, this does not work on OS Leap 42.1 – and results in a variety of error messages.
All steps to overcome the cascade of different errors can better be understood by the regarding the four requirements that must be fulfilled to get access to OVT’s capabilities:
- The program must find the “libpcap” library. Actually, in the present version OVT assumes that this library can be found in form of a file “libpcap.so.0.8” in some directory of the PATH environment variable. However, such a file does not exist on Opensuse Leap 42.1!
- The program needs to run with root rights (or certain network privileges on a system that support file capabilities). The reason is that it uses libpcap, i.e. network packet capturing on detected network interfaces.
- OVT must find and read the shell environment variable DISPLAY – which under some circumstances is not completely trivial.
- OVT must get the right to access the X11 display of the non-privileged user who started the X11 desktop.
This list is the result of some trial and error testing plus a closer look at some discussions at Sourceforge.
To get the program running at all for a non-privileged user we must modify the startup script on Opensuse. So, please, change the content of “ovtr.sh” to
#!/bin/bash
#sudo java -Xmx512m -jar org.leo.traceroute.jar
java -Xmx512m -jar org.leo.traceroute.jar
I.e., omit the “sudo” command. The reason for this will become clearer later on. In addition you must the assign execution right to “ovtr.sh”. You then get OVT running in the following form:
me@mytux:/opt/ovt> ./ovtr.sh
13:01:33.276 [main] INFO  org.leo.traceroute.Main - Open Visual Traceroute 1.6.3
13:01:33.284 [main] INFO  org.leo.traceroute.install.Env - Java run-time version: 1.8.0_91
13:01:33.285 [main] INFO  org.leo.traceroute.
install.Env - NASA World Wind Java 2.0 2.0.0
13:01:33.285 [main] INFO  org.leo.traceroute.install.Env - /usr/java/packages/lib/amd64:/usr/lib64:/lib64:/lib:/usr/lib
13:01:33.285 [main] INFO  org.leo.traceroute.install.Env - OS:Linux / arch:amd64
Locale en_GB
13:01:36.063 [SwingWorker-pool-1-thread-1] INFO  o.leo.traceroute.core.geo.GeoService - Use geoip db /home/rmo/ovtr/GeoLiteCity.dat which is 8 day(s) old
13:01:36.772 [SwingWorker-pool-1-thread-1] WARN  o.leo.traceroute.core.ServiceFactory - Cannot find a suitable network device for tracing.
java.lang.UnsatisfiedLinkError: /opt/ovt/native/linux/x64/libjpcap.so: libpcap.so.0.8: Kann die Shared-Object-Datei nicht öffnen: Datei oder Verzeichnis nicht gefunden
        at java.lang.ClassLoader$NativeLibrary.load(Native Method) ~[na:1.8.0_91]
        at java.lang.ClassLoader.loadLibrary0(ClassLoader.java:1941) ~[na:1.8.0_91]
        at java.lang.ClassLoader.loadLibrary(ClassLoader.java:1857) ~[na:1.8.0_91]
        at java.lang.Runtime.loadLibrary0(Runtime.java:870) ~[na:1.8.0_91]
        at java.lang.System.loadLibrary(System.java:1122) ~[na:1.8.0_91]
        at jpcap.JpcapCaptor.<clinit>(JpcapCaptor.java:251) ~[jpcap.jar:na]
        at org.leo.traceroute.core.network.JPcapNetworkService.init(JPcapNetworkService.java:90) ~[org.leo.traceroute.jar:na]
        at org.leo.traceroute.core.ServiceFactory.init(ServiceFactory.java:110) [org.leo.traceroute.jar:na]
        at org.leo.traceroute.Main$4.doInBackground(Main.java:115) [org.leo.traceroute.jar:na]
        at org.leo.traceroute.Main$4.doInBackground(Main.java:111) [org.leo.traceroute.jar:na]
        at javax.swing.SwingWorker$1.call(SwingWorker.java:295) [na:1.8.0_91]
        at java.util.concurrent.FutureTask.run(FutureTask.java:266) [na:1.8.0_91]
        at javax.swing.SwingWorker.run(SwingWorker.java:334) [na:1.8.0_91]
        at java.util.concurrent.ThreadPoolExecutor.runWorker(ThreadPoolExecutor.java:1142) [na:1.8.0_91]
        at java.util.concurrent.ThreadPoolExecutor$Worker.run(ThreadPoolExecutor.java:617) [na:1.8.0_91]
        at java.lang.Thread.run(Thread.java:745) [na:1.8.0_91]
13:01:36.776 [SwingWorker-pool-1-thread-1] WARN  o.l.t.c.n.JNetCapNetworkService - Cannot find a suitable network device for tracing.
java.lang.UnsatisfiedLinkError: /opt/ovt/native/linux/x64/libjnetpcap.so: libpcap.so.0.8: Kann die Shared-Object-Datei nicht öffnen: Datei oder Verzeichnis nicht gefunden
        at java.lang.ClassLoader$NativeLibrary.load(Native Method) ~[na:1.8.0_91]
        at java.lang.ClassLoader.loadLibrary0(ClassLoader.java:1941) ~[na:1.8.0_91]
        at java.lang.ClassLoader.loadLibrary(ClassLoader.java:1857) ~[na:1.8.0_91]
        at java.lang.Runtime.loadLibrary0(Runtime.java:870) ~[na:1.8.0_91]
        at java.lang.System.loadLibrary(System.java:1122) ~[na:1.8.0_91]
        at org.jnetpcap.Pcap.<clinit>(Unknown Source) ~[jnetpcap.jar:1.3.0]
        at org.leo.traceroute.core.network.JNetCapNetworkService.init(JNetCapNetworkService.java:71) ~[org.leo.traceroute.jar:na]
        at org.leo.traceroute.core.ServiceFactory.init(ServiceFactory.java:111) [org.leo.traceroute.jar:na]
        at org.leo.traceroute.Main$4.doInBackground(Main.java:115) [org.leo.traceroute.jar:na]
        at org.leo.traceroute.Main$4.doInBackground(Main.java:111) [org.leo.traceroute.jar:na]
        at javax.swing.SwingWorker$1.call(SwingWorker.java:295) [na:1.8.0_91]
        at java.util.concurrent.FutureTask.run(FutureTask.java:266) [na:1.8.0_91]
        at javax.swing.SwingWorker.run(SwingWorker.java:334) [na:1.8.0_91]
        at java.util.concurrent.ThreadPoolExecutor.runWorker(ThreadPoolExecutor.java:1142) [na:1.8.0_91]
        at java.util.concurrent.ThreadPoolExecutor$Worker.run(ThreadPoolExecutor.java:617) [na:1.8.0_91]
        at java.lang.Thread.run(Thread.java:745) [na:1.8.0_91]
13:01:37.272 [AWT-EventQueue-0] INFO  org.leo.traceroute.Main - Startup completed in 4001ms
Despite the many warnings the application opens and displays the following graphical elements, which are quite self-explanatory.
However, trying to traceroute some web-address by pressing the orange button results in the displayed error. The reason is that “/usr/sbin” is not included in the PATH variable. Actually, at http://visualtraceroute.net/installation it is recommend to also include
export PATH=”$PATH:/usr/sbin/”; java -Xmx512m -jar -Djava.awt.headless=false org.leo.traceroute.jar
in “ovtr.sh”. Lets do it
#!/bin/bash
export PATH="$PATH:/usr/sbin/"; java -Xmx512m -jar org.leo.traceroute.jar
Afterwards, we can run “traceroute” ….
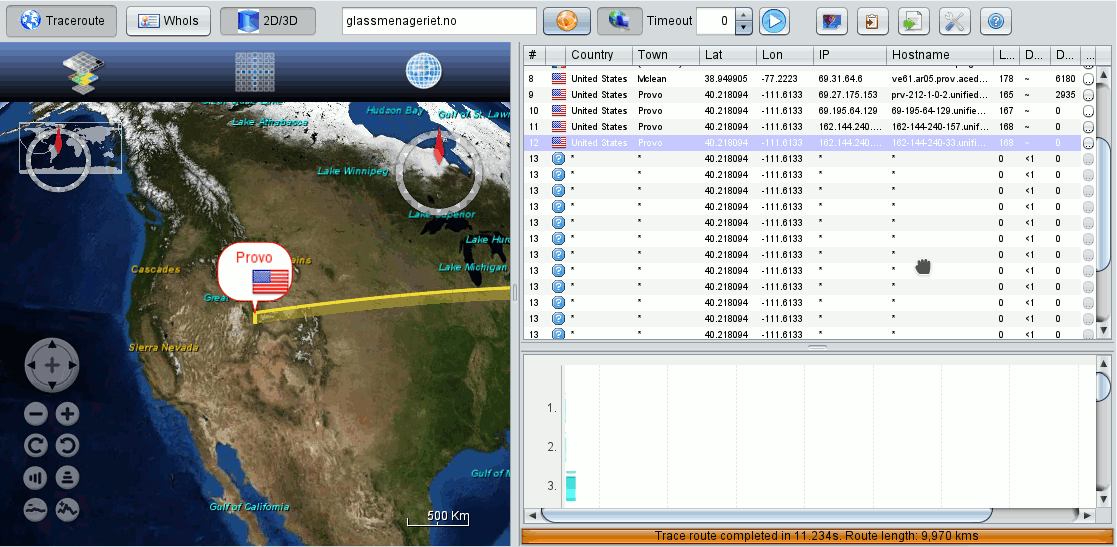
However, if we compare our screenshot with illustrations on the site http://visualtraceroute.net/ we detect that our interface lacks a button, e.g. for sniffing. We come back to this a bit later.
Why did we need the “/usr/sbin” in our PATH? Because OVT actually uses the “OS’s traceroute” command as a fallback – if it cannot analyze network packages itself another way. We can conclude this fact from OVT’s “settings”-options (tools button on the right):
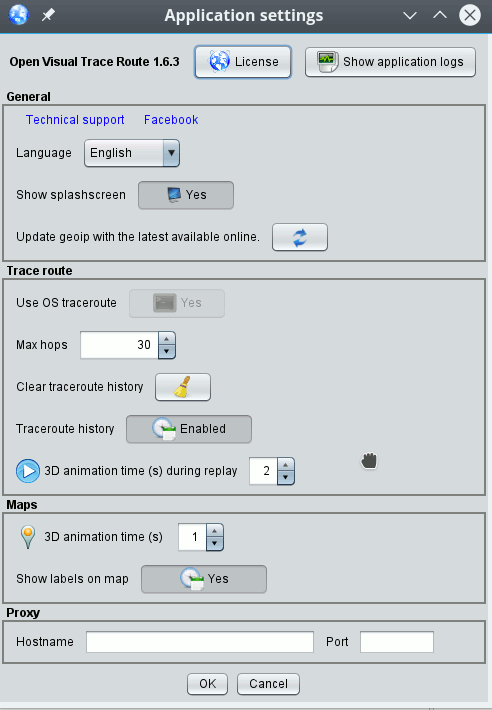
The option “Use OS traceroute” is set to “Yes” in the combobox – and, under the given conditions, this option cannot be changed.
Actually, the native Linux traceroute command is a bit limited in its capabilities. Therefore, its results are sometimes not convincing – in very many examples the traceroute analysis is stopped by restrictions in intermediate computation centers. A look at the discussions on OVT at Sourceforge and the version history reveals that OVT, therefore, has its own traceroute program, which is based on capturing and analyzing network protocol packets:
The access to “libpcap” is not only required for sniffing, but also for tracerouting!
The feedback on our terminal from the program start shows 2 times that “libpcap.so.0.8” is missing. In my opinion, for Linux systems, it would have been more reasonable to search for “libpcap.so.1”. But things are easy to remedy. As root we search for “libpcap.so*”, find it under “/usr/lib64” and simply add a new soft link there:
mytux:/usr/lib64 # ln -s /usr/lib64/libpcap.so.1 libpcap.so.0.8
Actually, “libpcap.so.1” itself is linked to the real version presently used on Opensuse Leap 42.1 systems, namely “libpcap.so.1.5.3”:
mytux:/usr/lib64 # ls -lisa | grep libpcap
 793187     0 lrwxrwxrwx   1 root root       23 Aug 12 15:00 libpcap.so.0.8 -> /usr/lib64/libpcap.so.1
 797513     0 lrwxrwxrwx   1 root root       16 Oct 29  2015 libpcap.so.1 -> libpcap.so.1.5.3
 793262   276 -rwxr-xr-x   1 root root   279312 Oct 25  2015 libpcap.so.1.5.3
A new OVT start now results in clean messages without any errors or warnings
me@mytux:/opt/ovt> ./ovtr.sh
15:03:33.154 [main] INFO  org.leo.traceroute.Main
- Open Visual Traceroute 1.6.3
15:03:33.166 [main] INFO  org.leo.traceroute.install.Env - Java run-time version: 1.8.0_91
15:03:33.167 [main] INFO  org.leo.traceroute.install.Env - NASA World Wind Java 2.0 2.0.0
15:03:33.167 [main] INFO  org.leo.traceroute.install.Env - /usr/java/packages/lib/amd64:/usr/lib64:/lib64:/lib:/usr/lib
15:03:33.168 [main] INFO  org.leo.traceroute.install.Env - OS:Linux / arch:amd64
Locale en_GB
15:03:35.468 [SwingWorker-pool-1-thread-1] INFO  o.leo.traceroute.core.geo.GeoService - Use geoip db /home/rmo/ovtr/GeoLiteCity.dat which is 8 day(s) old
15:03:36.906 [AWT-EventQueue-0] INFO  org.leo.traceroute.Main - Startup completed in 3757ms
However, still no sniffing button and no change in the OVT settings – OVT still uses “/usr/sbin/traceroute”.
The reason why OVT still does not work as expected is that packet capturing requires root rights or – on systems supporting file capabilities – the setting of some special rights for certain files (we come back to this in the last article of this mini series). Ever tried “wireshark” or “tcpdump”? For these programs – or parts of them – special rights are required, too. To get a step further we now again take the original, unmodified “ovtr.sh” with the sudo command
#!/bin/bash
sudo java -Xmx512m -jar org.leo.traceroute.jar
and try to run it as user “root”. The “sudo” included in the script should do no harm now as we already are root. Or, at least we think so …
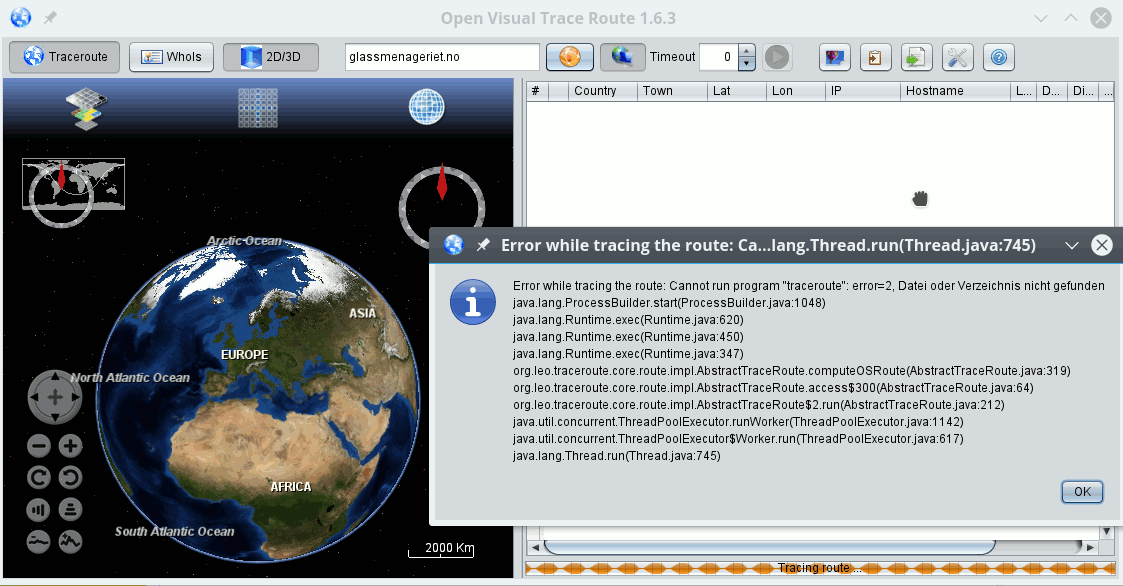
So, as an unprivileged user we open a root terminal on our desktop, type in the root password to get shell access or use “su -” in a standard terminal. But, unfortunately, we get a new error:
mytux:/opt/ovt # ./ovtr.sh
15:26:39.153 [main] INFO  org.leo.traceroute.Main - Open Visual Traceroute 1.6.3
15:26:39.161 [main] INFO  org.leo.traceroute.install.Env - Java run-time version: 1.8.0_91
15:26:39.161 [main] INFO  org.leo.traceroute.install.Env - NASA World Wind Java 2.0 2.0.0
15:26:39.162 [main] INFO  org.leo.traceroute.install.Env - /usr/java/packages/lib/amd64:/usr/lib64:/lib64:/lib:/usr/lib
15:26:39.162 [main] INFO  org.leo.traceroute.install.Env - OS:Linux / arch:amd64
Locale en_GB
15:26:39.636 [main] ERROR org.leo.traceroute.Main - Uncaught error
java.awt.HeadlessException:
No X11 DISPLAY variable was set, but this program performed an operation which requires it.
        at java.awt.GraphicsEnvironment.checkHeadless(GraphicsEnvironment.java:204) ~[na:1.8.0_91]
        at java.awt.Window.<init>(Window.java:536) ~[na:1.8.0_91]
        at java.awt.Frame.<init>(Frame.java:420) ~[na:1.8.0_91]
        at javax.swing.JFrame.<init>(JFrame.java:232) ~[na:1.8.0_91]
        at org.leo.traceroute.ui.TraceRouteFrame.<init>(TraceRouteFrame.java:52) ~[org.leo.traceroute.jar:na]
        at org.leo.traceroute.Main.main(Main.java:87) ~[org.leo.traceroute.jar:na]
What is the reason for this failure? No X11 DISPLAY variable? An “env” command shows:
mysystem:/opt/ovt # env | grep DISPL
DISPLAY=:0
It took me a bit to see it: The origin of the error actually is the sudo-command in “ovtr.sh” ! Why? The important thing to be aware of is:
“sudo” does not invoke any kind of shell. So, even if the user root had defined special startup scripts for login or execution shells, which specified the export of DISPLAY, such scripts would not be invoked by “sudo” and as a result the DISPLAY variable would be missing. Therefore, Java complains about the X11 DISPLAY variable!
But, as we know, on Opensuse systems a graphical program started from a root terminal/shell
under KDE does know the DISPLAY variable and does start on the unprivileged user’s X11 desktop.
[ Off topic: On OS LEAP 42.1 KDE programs are actually started from the root terminal with ignoring basic KDE settings (font sizes, etc.) of the unprivileged and the root user – which is a mess in general, but it is unimportant here as Java’s AWT is responsible for the graphics, fonts, etc of the OVT interface.]
So, again: What about turning off the “sudo”?
Actually, any normal user on a standard (!) unmodified Opensuse system would have to know the root password in case he/she wanted to perform a command with “sudo”. The reason for this is a standard entry in the file “/etc/sudoers”:
Defaults targetpw
Note: On other systems (as Kali) this entry may not be active after installation. But with this entry you may as well start OVT directly from a root shell. “sudo” would ask you for the root password anyway. So, our first working solution will be to start OVT as user root from a root shell, but without the “sudo” in the start script “ovtr.sh”:
#!/bin/bash
java -Xmx512m -jar org.leo.traceroute.jar
And really:
mysystem:/opt/ovt # ./ovtr.sh
19:17:23.021 [main] INFO  org.leo.traceroute.Main - Open Visual Traceroute 1.6.3
19:17:23.029 [main] INFO  org.leo.traceroute.install.Env - Java run-time version: 1.8.0_91
19:17:23.030 [main] INFO  org.leo.traceroute.install.Env - NASA World Wind Java 2.0 2.0.0
19:17:23.030 [main] INFO  org.leo.traceroute.install.Env - /usr/java/packages/lib/amd64:/usr/lib64:/lib64:/lib:/usr/lib
19:17:23.030 [main] INFO  org.leo.traceroute.install.Env - OS:Linux / arch:amd64
Locale en_GB
19:17:25.377 [SwingWorker-pool-1-thread-1] INFO  o.leo.traceroute.core.geo.GeoService - Use geoip db /root/ovtr/GeoLiteCity.dat which is 0 day(s) old
19:17:27.110 [pool-2-thread-1] INFO  o.leo.traceroute.core.ServiceFactory - Try using device eth0 null
19:17:27.275 [pool-2-thread-2] INFO  o.leo.traceroute.core.ServiceFactory - Try using device br0 null
19:17:27.446 [pool-2-thread-3] INFO  o.leo.traceroute.core.ServiceFactory - Try using device virbr_vmw null
19:17:28.509 [pool-2-thread-8] INFO  o.leo.traceroute.core.ServiceFactory - Try using device virbr1 null
19:17:29.659 [pool-2-thread-9] INFO  o.leo.traceroute.core.ServiceFactory - Try using device vmnet1 null
19:17:30.682 [pool-2-thread-10] INFO  o.leo.traceroute.core.ServiceFactory - Try using device virbr2 null
19:17:31.665 [pool-2-thread-11] INFO  o.leo.traceroute.core.ServiceFactory - Try using device virbr3 null
19:17:32.666 [pool-2-thread-12] INFO  o.leo.traceroute.core.ServiceFactory - Try using device vmnet3 null
19:17:33.683 [pool-2-thread-13] INFO  o.leo.traceroute.core.ServiceFactory - Try using device virbr4 null
19:17:34.703 [pool-2-thread-14] INFO  o.leo.traceroute.core.ServiceFactory - Try using device virbr5 null
19:17:35.688 [pool-2-thread-15] INFO  o.leo.traceroute.core.ServiceFactory - Try using device virbr6 null
19:17:36.718 [pool-2-thread-17] INFO  o.leo.traceroute.core.ServiceFactory - Try using device lo null
19:17:38.806 [AWT-EventQueue-0] INFO  org.leo.traceroute.Main - Startup completed in 15790ms
Obviously, OVT now detects some network devices on the system. Do not worry, you probably will not see as many network devices as I do. I have a lot of virtual machines installed and attached to a virtual Linux bridge of my test system… 🙂
And, hey, we now see the button for
sniffing – and therefore know that packet capturing is active.
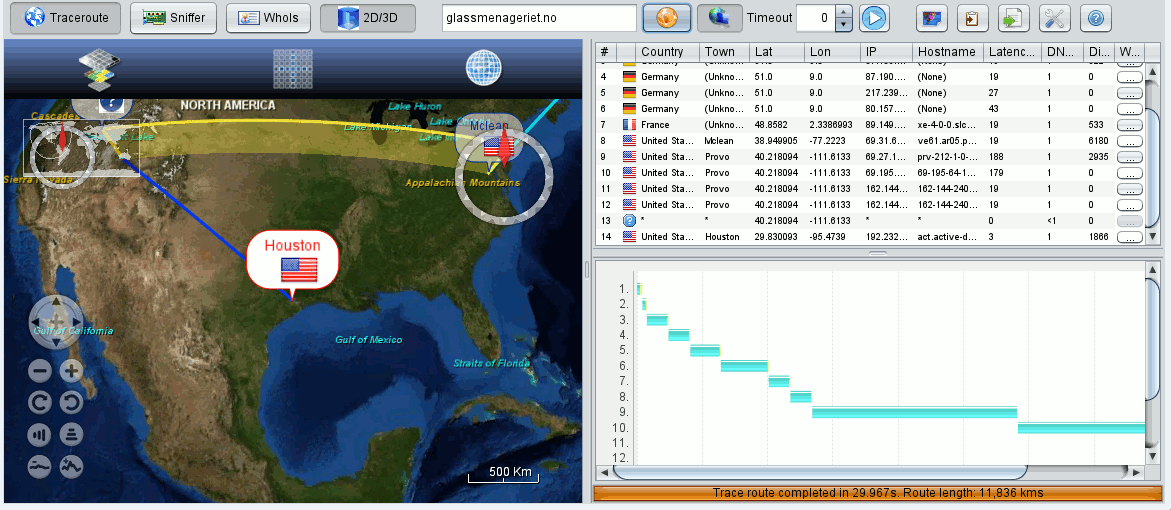
And: By some clever intelligence of OVT’s packet analysis we now arrive at the real hosting place of the web address we tracerouted (compare the above image with the first picture where the Linux traceroute was used). Good!
I have experienced the better and more thorough analysis of OVT’s own traceroute routine in other examples, too.
The next challenge for me was to make the sudo-command in the standard script work. The required trick is pretty simple: as sudo itself does not invoke a shell by itself, we must explicitly force sudo to do it:
#!/bin/bash
sudo /bin/bash -c ‘export DISPLAY=:0; java -Djava.awt.headless=false -Xmx512m -jar org.leo.traceroute.jar’
Take care of the positions of single quotation marks! When we now start “ovtr.sh” as an unprivileged user, we are prepared to enter the root password. And then – what do you guess?
me@mysystem:/opt/ovt> ./ovtr.sh
14:55:43.581 [main] INFO  org.leo.traceroute.Main - Open Visual Traceroute 1.6.3
14:55:43.589 [main] INFO  org.leo.traceroute.install.Env - Java run-time version: 1.8.0_91
14:55:43.590 [main] INFO  org.leo.traceroute.install.Env - NASA World Wind Java 2.0 2.0.0
14:55:43.590 [main] INFO  org.leo.traceroute.install.Env - /usr/java/packages/lib/amd64:/usr/lib64:/lib64:/lib:/usr/lib
14:55:43.590 [main] INFO  org.leo.traceroute.install.Env - OS:Linux / arch:amd64
Locale en_GB
Invalid MIT-MAGIC-COOKIE-1 key14:55:43.875 [main] ERROR org.leo.traceroute.Main - Uncaught error
java.lang.NoClassDefFoundError: Could not initialize class sun.awt.X11.XToolkit
        at java.lang.Class.forName0(Native Method) ~[na:1.8.0_91]
        at java.lang.Class.forName(Class.java:264) ~[na:1.8.0_91]
        at java.awt.Toolkit$2.run(Toolkit.java:860) ~[na:1.8.0_91]
        at java.awt.Toolkit$2.run(Toolkit.java:855) ~[na:1.8.0_91]
        at java.security.AccessController.doPrivileged(Native Method) ~[na:1.8.0_91]
        at java.awt.Toolkit.getDefaultToolkit(Toolkit.java:854) ~[na:1.8.0_91]
        at java.awt.KeyboardFocusManager.initPeer(KeyboardFocusManager.java:446) ~[na:1.8.0_91]
        at java.awt.KeyboardFocusManager.<init>(KeyboardFocusManager.java:442) ~[na:1.8.0_91]
        at java.awt.DefaultKeyboardFocusManager.<init>(DefaultKeyboardFocusManager.java:65) ~[na:1.8.0_91]
        at java.awt.KeyboardFocusManager.getCurrentKeyboardFocusManager(KeyboardFocusManager.java:225) ~[na:1.8.0_91]
        at java.awt.KeyboardFocusManager.getCurrentKeyboardFocusManager(KeyboardFocusManager.java:216) ~[na:1.8.0_91]
        at javax.swing.plaf.synth.SynthLookAndFeel.initialize(SynthLookAndFeel.java:616) ~[na:1.8.0_91]
        at javax.swing.plaf.nimbus.NimbusLookAndFeel.initialize(NimbusLookAndFeel.java:105) ~[na:1.8.0_91]
        at javax.swing.UIManager.setLookAndFeel(UIManager.java:538) ~[na:1.8.0_91]
        at javax.swing.UIManager.setLookAndFeel(UIManager.java:583) ~[na:1.8.0_91]
        at org.leo.traceroute.Main.main(Main.java:75) ~[org.leo.traceroute.jar:na]
me@mysystem:/opt/ovt>
What the hack!? However, this problem is simple one. We started Java from a subshell as root. But why should root get access to our X11 display from such an environment? Actually, even root cannot do this without special precautions!
In the case of starting a KDE root terminal as in “solution 1” KDE and pam take care of the X11 access. Also, in case of a ”
su -” command at the prompt this is handled by pam. See the “/etc/pam.d/su” file and look for a line
session optional pam_xauth.so
Let us quickly test our theory about a missing X11 access right by using the “xhost”-command in addition:
me@mysystem:/opt/ovt> xhost +SI:localuser:root
localuser:root being added to access control list
me@mysystem:/opt/ovt> ./ovtr.sh
root's password:
15:40:20.920 [main] INFO  org.leo.traceroute.Main - Open Visual Traceroute 1.6.3
15:40:20.928 [main] INFO  org.leo.traceroute.install.Env - Java run-time version: 1.8.0_91
15:40:20.929 [main] INFO  org.leo.traceroute.install.Env - NASA World Wind Java 2.0 2.0.0
15:40:20.929 [main] INFO  org.leo.traceroute.install.Env - /usr/java/packages/lib/amd64:/usr/lib64:/lib64:/lib:/usr/lib
15:40:20.929 [main] INFO  org.leo.traceroute.install.Env - OS:Linux / arch:amd64
Locale en_GB
15:40:23.313 [SwingWorker-pool-1-thread-1] INFO  o.leo.traceroute.core.geo.GeoService - Use geoip db /root/ovtr/GeoLiteCity.dat which is 0 day(s) old
15:40:24.913 [pool-2-thread-1] INFO  o.leo.traceroute.core.ServiceFactory - Try using device eth0 null
15:40:25.090 [pool-2-thread-2] INFO  o.leo.traceroute.core.ServiceFactory - Try using device br0 null
15:40:25.279 [pool-2-thread-3] INFO  o.leo.traceroute.core.ServiceFactory - Try using device virbr_vmw null
15:40:26.317 [pool-2-thread-8] INFO  o.leo.traceroute.core.ServiceFactory - Try using device vmnet1 null
15:40:27.339 [pool-2-thread-9] INFO  o.leo.traceroute.core.ServiceFactory - Try using device virbr1 null
15:40:28.394 [pool-2-thread-10] INFO  o.leo.traceroute.core.ServiceFactory - Try using device virbr2 null
15:40:29.417 [pool-2-thread-11] INFO  o.leo.traceroute.core.ServiceFactory - Try using device vmnet3 null
15:40:30.445 [pool-2-thread-12] INFO  o.leo.traceroute.core.ServiceFactory - Try using device virbr3 null
15:40:31.469 [pool-2-thread-13] INFO  o.leo.traceroute.core.ServiceFactory - Try using device virbr4 null
15:40:32.492 [pool-2-thread-14] INFO  o.leo.traceroute.core.ServiceFactory - Try using device virbr5 null
15:40:33.512 [pool-2-thread-15] INFO  o.leo.traceroute.core.ServiceFactory - Try using device virbr6 null
15:40:34.534 [pool-2-thread-17] INFO  o.leo.traceroute.core.ServiceFactory - Try using device lo null
15:40:36.711 [AWT-EventQueue-0] INFO  org.leo.traceroute.Main - Startup completed in 15796ms
...
15:40:47.831 [Shutdown] INFO  org.leo.traceroute.install.Env - Preferences saved.
15:40:47.833 [Shutdown] INFO  o.leo.traceroute.ui.TraceRouteFrame - Application exited.
me@mysystem:/opt/ovt> xhost -SI:localuser:root
localuser:root being removed from access control list
me@mysystem:/opt/ovt>
Success! But, do not forget to retrieve the access right after having used OVT.
How can we automatize the X11 access a bit? A look at the settings in the simple standard “/etc/sudoers”-file of Opensuse reveals that it should be possible to run the “sudo”-command in our “ovtr.sh” also with the option “-E” (= –preserve-env):
#!/bin/bash
export PATH="$PATH:/usr/sbin/"
env | grep XAUTHO
sudo -E /bin/bash -c 'export DISPLAY=:0; env | grep XAUTHO;  java -Djava.awt.headless=false  -Xmx512m -jar org.leo.traceroute.jar'
And really:
me@mysystem:/opt/ovt> ./ovtr.sh
XAUTHORITY=/tmp/xauth-1011-_0
root's password:
SUDO_COMMAND=/bin/bash -c export DISPLAY=:0; env |
grep XAUTHO;  java -Djava.awt.headless=false  -Xmx512m -jar org.leo.traceroute.jar
XAUTHORITY=/tmp/xauth-1011-_0
19:31:41.610 [main] INFO  org.leo.traceroute.Main - Open Visual Traceroute 1.6.3
...
....
19:31:45.617 [pool-2-thread-1] INFO  o.leo.traceroute.core.ServiceFactory - Try using device eth0 null
...
It works ! I do not recommended to invoke the environment of a standard user this way, but this test just gave us the right idea. The following has the same effect – and is safer as we only use the contents of one variable (XAUTHORITY) of the unprivileged environment:
#!/bin/bash
sudo XAUTHORITY=$XAUTHORITY /bin/bash -c 'export DISPLAY=:0; java -Djava.awt.headless=false  -Xmx512m -jar org.leo.traceroute.jar'
My objective in this post was to present some elementary steps to get OVT running on an Opensuse Leap 42.1 system. We have seen that we need to make the right “libpcap.so” library available and that the “sudo” command in the start script has to be adapted to guarantee both the recognition of the DISPLAY variable and the access to the X11 display. In a first test we have futhermore seen that OVT’s internal traceroute is a bit better than the standard Linux traceroute.
On a multi-user system, however, we need to restrict the access to OVT to a group of trustworthy users. This will be the topic of the next article.
Have some fun with testing out OVT in the meantime!