Matplotlib, Jupyter and updating multiple interactive plots

For experiments in Machine Learning [ML] it is quite useful to see the development of some characteristic quantities during optimization processes for algorithms – e.g. the behaviour of the cost function during the training of Artificial Neural Networks. Beginners in Python the look for an option to continuously update plots by interactively changing or extending data from a running Python code.

Does Matplotlib offer an option for interactively updating plots? In a Jupyter notebook? Yes, it does. It is even possible to update multiple plot areas simultanously. The magic (meta) commands are “%matplotlib notebook” and “matplotlib.pyplot.ion()”.

The following code for a Jupyter cell demonstrates the basic principles. I hope it is useful for other ML- and Python beginners as me.

# Tests for dynamic plot updates
#-------------------------------
%matplotlib notebook
import numpy as np
import matplotlib.pyplot as plt
import time

x = np.linspace(0, 10*np.pi, 100)
y = np.sin(x)

# The really important command for interactive plot updating
plt.ion()

# sizing of the plots figure sizes 
fig_size = plt.rcParams["figure.figsize"]
fig_size[0] = 8
fig_size[1] = 3

# Two figures 
# -----------
fig1 = plt.figure(1)
fig2 = plt.figure(2)

# first figure with two plot-areas with axes 
# --------------------------------------------
ax1_1 = fig1.add_subplot(121)
ax1_2 = fig1.add_subplot(122)

fig1.canvas.draw()

# second figure with just one plot area with axes
# -------------------------------------------------
ax2 = fig2.add_subplot(121)
line1, = ax2.plot(x, y, 'b-')
fig2.canvas.draw()

z= 32
b = np.zeros([1])
c = np.zeros([1])
c[0] = 1000

for i in range(z):
    # update data 
    phase = np.pi / z * i 
    line1.set_ydata(np.sin(0.5 * x + phase))
    b = np.append(b, [i**2])
    c = np.append(c, [1000.0 - i**2])
    
    # re-plot area 1 of fig1  
    ax1_1.clear()
    ax1_1.set_xlim (0, 100)
    ax1_1.set_ylim (0, 1000)
    ax1_1.plot(b)
    
    # re-plot area 2 of fig1  
    ax1_2.clear()
    ax1_2.set_xlim (0, 100)
    ax1_2.set_ylim (0, 1000)
    ax1_2.plot(c)
    
    # redraw fig 1 
    fig1.canvas.draw()

    # redraw fig 2 with updated data  
    fig2.canvas.draw()
    
    time.sleep(0.1)

As you see clearly we defined two different “figures” to be plotted – fig1 and fig2. The first figure ist horizontally splitted into two plotting areas with axes “ax1_1” and “ax1_2”. Such a plotting area is created via the “fig1.add_subplot()” function and suitable parameters. The second figure contains only one plotting area “ax2”.

Then we update data for the plots within a loop witrh a timer of 0.1 secs. We clear the respective areas, redefine the axes and perform the plot for the updated data via the function “plt.figure.canvas.draw()”.

In our case we see two parabolas develop in the upper figure; the lower figure shows a sinus-wave moving slowly from the right to the left.

The following plots show screenshots of the output in a Jupyter notebook in th emiddle of the loop and at its end:

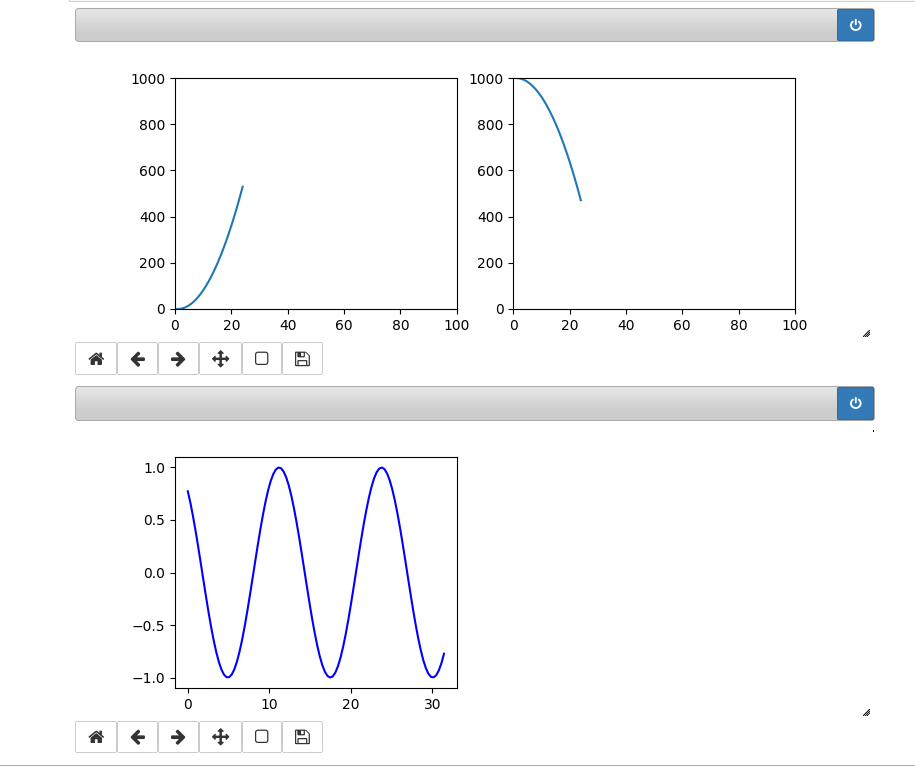
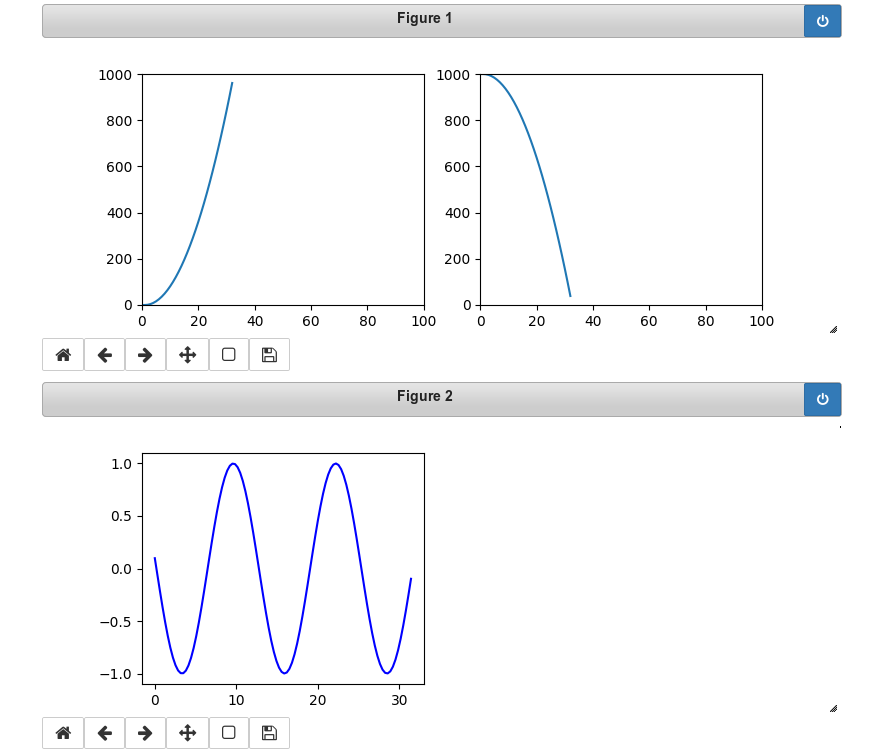
You see that we can deal with 3 plots at the same time. Try it yourself!

Hint:
There is small problem with the plot sizing when you have used the zoom-functionality of Chrome, Chromium or Firefox. You should work with interactive plots with the browser-zoom set to 100%.

Opensuse Leap 15.1, Nvidia, xorg.conf – and a problem with powerdevil

Today, I found the origin of a small problem, which drove me nuts the last months. Some time after an upgrade from Opensuse Leap 15.0 to Leap 15.1 I found that I could no longer bring up the power management functionality in “systemsettings5” of KDE. So, configuring time intervals for switching my monitors into an energy saving mode was no longer possible. In addition, bringing the whole system down into stand-by or hibernation did not work either.

KDE gave me error messages like:

Power management configuration module could not be loaded.
The Power Management Service appears not to be running.
This can be solved by starting or scheduling it inside “Startup and Shutdown”

Unfortunately, no “power management service” was available in the list of the KDE backgroud services …. So, the message did not help at all.

KDE plasma controls power management via a module called “powerdevil”. Powerdevil requires a running daemon named “uppower”. So, as a next step, I checked the list of running processes for the upower. Result: The daemon was running healthily, and systemd’s journactl showed me a message about its the successful start, too. “journalctl”, however, gave me some strange messages regarding powerdevil:

2019-12-25T10:43:20.598118+01:00 mytux org_kde_powerdevil[7147]: The X11 connection broke: Unsupported extension used (code 2)
2019-12-25T10:43:56.793629+01:00 mytux systemsettings5[7461]: powerdevil: ("LowBattery", "Battery", "AC") ()
2019-12-25T10:43:56.793813+01:00 mytux systemsettings5[7461]: powerdevil: "Bildschirm-Energieverwaltung"  has a runtime requirement
2019-12-25T10:43:56.794221+01:00 mytux systemsettings5[7461]: powerdevil: There was a problem in contacting DBus!! Assuming the action is ok.

These messages came user-independent and also for freshly created users. So, the problem had nothing to do with any of the settings in KDE’s configuration files below “~/.config/”. Searching on the Internet showed that others were having similar problems, but none of the offered suggestions helped. Time to dig a bit deeper at other places …

The monitors on my workstation are handled by a Nvidia graphics card. I use the file “/etc/X11/xorg.conf” to inform the card (independently of “XrandR”) about a certain TwinView or Xinerama screen configuration during early start-up phases. To avoid confusion with mouse movement I of course do this in a way consistent with KDE’s later settings for a combined screen across different monitors – which you can configure via
“systemsettings5 => Hardware => “Display and Monitors”.
As far as I know, KDE5 uses XrandR to perform the configuration of the Plasma display.

Now, sometimes I switch to the Nvidia installation mechanism for the latest driver or for testing a beta-driver from the NVidia web-site. Afterwards, I return to the native Opensuse driver installation via the Nvidia community repository. In my experience this seldom leads to changes in the file “/etc/X11/xorg.conf”. But it may happen …

Today, I therefore checked the contents of the “xorg.conf” file. There I found – to my surprise – a statement in the “monitor“-section for one of my monitors which disabled DPMS:

Option “DPMS” “false”

Section "Monitor"
    Identifier     "Monitor0"
    VendorName     "Unknown"
    ModelName      "DELL U2515H"
    HorizSync       30.0 - 113.0
    VertRefresh     56.0 - 86.0
    Option         "DPMS" "false"

I cannot recall how and why the entry for DPMS deactivation appeared in one of the monitor sections. All my monitors support DPMS. …??? …

Anyway: Commenting the line out

Section "Monitor"
    Identifier     "Monitor0"
    
VendorName     "Unknown"
    ModelName      "DELL U2515H"
    HorizSync       30.0 - 113.0
    VertRefresh     56.0 - 86.0
#    Option         "DPMS" "true"

or setting the option to “true” enabled the interface to powerdevil again in “systemsettings5” of KDE5.

Obviously, in its present state powerdevil requires an active DPMS on all monitors used.

I hope this finding will help others. Note that in some installations there may exit a Nvidia configuration file in the directory “/etc/X11/xorg.conf.d” instead of a central “/etc/X11/xorg.conf”. You should check all relevant files for a statement which deactivates DPMS for any of the monitors you use in a X11 based KDE5 plasma session.

Unfortunately, I do not know whether a similar problem can arise with Wayland and how it could be solved then.

A simple Python program for an ANN to cover the MNIST dataset – VI – the math behind the “error back-propagation”

I continue with my article series on how to program a training algorithm for a multi-layer perceptron [MLP]. In the course of my last articles

A simple program for an ANN to cover the Mnist dataset – V – coding the loss function
A simple program for an ANN to cover the Mnist dataset – IV – the concept of a cost or loss function
A simple program for an ANN to cover the Mnist dataset – III – forward propagation
A simple program for an ANN to cover the Mnist dataset – II – initial random weight values
A simple program for an ANN to cover the Mnist dataset – I – a starting point

we have already created code for the “Feed Forward Propagation” algorithm [FFPA] and two different cost functions – “Log Loss” and “MSE”. In both cases we took care of a vectorized handling of multiple data records in mini-batches of training data.

Before we turn to the coding of the so called “error back-propagation” [EBP], I found it usefull to clarify the math behind behind this method for ANN/MLP-training. Understanding the basic principles of the gradient descent method for the optimization of MLP-weights is easy. But comprehending

  • why and how gradient descent method leads to the back propagation of error terms
  • and how we cover multiple training data records at the same time

is not – at least not in my opinion. So, I have discussed the required analysis and resulting algorithmic steps in detail in a PDF which you find attached to this article. I used a four layer MLP as an example for which I derived the partial derivatives of the “Log Loss” cost function for weights of the hidden layers in detail. I afterwards generalized the formalism. I hope the contents of the PDF will help beginners in the field of ML to understand what kind of matrix operations gradient descent leads to.

PDF on the math behind Error Back_Propagation

In the next article we shall encode the surprisingly compact algorithm for EBP. In the meantime I wish all readers Merry Christmas …

Addendum 01.01.2020 / 23.02.2020 : Corrected a missing “-” for the cost function and resulting terms in the above PDF.