In the last article of this series
CSV file upload with ZIP containers, jQuery, Ajax and PHP 5.4 progress tracking – III
CSV file upload with ZIP containers, jQuery, Ajax and PHP 5.4 progress tracking – II
CSV file upload with ZIP containers, jQuery, Ajax and PHP 5.4 progress tracking – I
we saw that PHP 5.4 may write progress information about file uploads into special elements of the $_SESSION-array on the server. We discussed that the PHP session must already be established before the upload process is started by the web client via an Ajax process.
Furthermore, we have understood the following: The PHP target program which is called by the original Ajax request – i.e. the request that starts the file upload – will not be of any use for sending progress information about the file transfer to the client: The code execution of this PHP program only starts after all POST data, including all file data, have completely been transferred to the server.
So, how do we get the progress information which the server continuously updates in the PHP $_SESSION array from the server to our web client during the upload process? In this article we look at a solution based upon a general polling scheme and respective prerequisites on the client, i.e. on the Javascript side. As we want to transfer the status information in the background we again talk about Ajax controlled jobs.
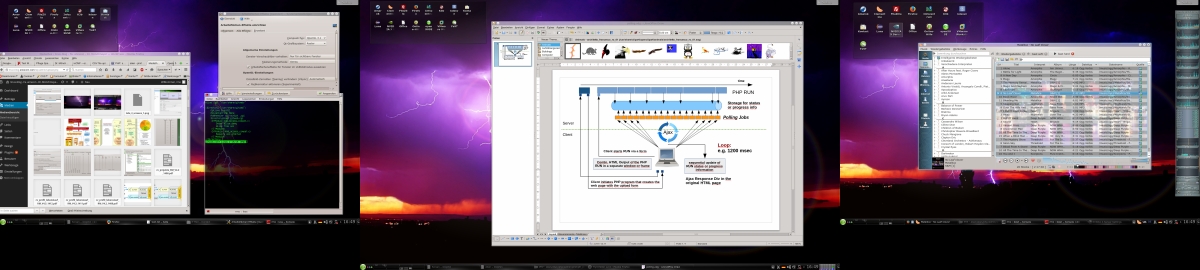
A sequence of Ajax polling jobs
The situation is very much the same as for long lasting PHP jobs [server RUNs] whose status shall be followed by an Ajax mechanism. This can be solved by starting a sequence of periodic Ajax jobs from the same web page from which the original PHP RUN was started. See e.g. the article
Fallen beim Statuscheck lang laufender PHP-Jobs mit Ajax – IV
in this blog and the following drawing:
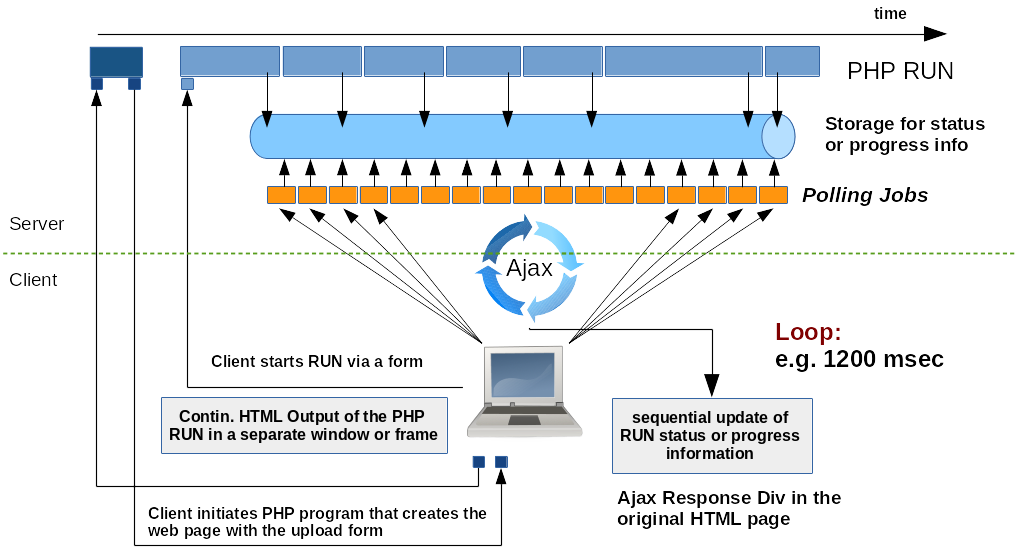
These periodic jobs “poll” the progress information from some storage on the server – in our case from the $_SESSION array. Therefore, we call the periodic jobs “progress polling jobs”.
A status monitoring with polling jobs has advantages and disadvantages. One advantage is that it does not depend on special HTML 5 properties or a special jQuery plugin. Another advantage is that we get complete control over what data are exchanged between server and client. One disadvantage is – as we shall see – that we may need to dynamically adapt the polling time interval to the measured rate of the file transfer. A further potential disadvantage is that it may become difficult to react to problems occurring during the ongoing transfer of the file data. We shall have to come back to this point in a later article.
However, in the present article we ignore potential problems and sketch the basic outline of the polling control.
A form for sending information together with each Ajax polling request
On the web page we associate a small form with the polling jobs. This form is
added in a special separate “progress” DIV contaimer of our Template [TPL] for the web page. See: CSV file upload with ZIP containers, jQuery, Ajax and PHP 5.4 progress tracking – II
	<!-- A div to display the upload progress -->
	<div id="progress">
		<form id="form_upl_progr" style="height:0;" action="check_progress.php5" method="POST">
			<input type="hidden" name="progr_key_name" id="hinp_upl_progress_key_name" value="upl">
		</form>
		<div id="progress_bar_div">
			<div class="outer_bar_div">
				<div id="bar"></div>
			</div>
		</div>
		<div id="progr_msg_cont">
			<div id="progr_msg_bg"></div>
			<div id="progr_msg_div"><p id="progr_msg"></p></div>
		</div>
		<div id="trf_msg_cont">
			<div id="trf_msg_bg"></div>
			<div id="trf_msg_div"><p id="trf_msg"></p></div>
		</div>
		<div id="imp_msg_cont">
			<div id="imp_msg_bg"></div>
			<div id="imp_msg_div"><p id="imp_msg"></p></div>
		</div>
		.....
		.....
	</div>
Obviously, we have named the PHP target program collecting status data “check_progress.php5“. In our very basic example the form’s only contents is a hidden input field whose value is the identifier for the upload process.
As we have seen in the last article this identifier information is required to compose the key for accessing progress information in the $_SESSION array. Note that the identifier value is identical to the one of the corresponding hidden input field in the original upload form we discussed in our last article. (In a productive example both these values should be set by the TCO (template controller object) that uses the TPL to create the web page.)
Note: In a real world example it may be necessary to send more information to the server – especially for error or problem handling. Our simple form can easily be extended by more variables to be sent to the server.
In the HTML code of our DIV we have already included some elements whose purpose later on will be to display specific information about the file transfer progress and also the following import of files into the database. The DIV with the id=”bar” will simulate a growing progress bar. For those who prefer a picture – we intend to display something like this:

Our “progress” DIV encapsulates the elements of the lower part. There is no need to discuss CSS properties here.
A Javascript CtrlO for the “Progress Information Area” on the web page
We follow our overall Javascript policy to create a “Control object” – a CtrlO – for the “progress” DIV which encapsulates all event handling for the HTML elements plus all Ajax communication handling. We call the correspondent constructor function “Ctrl_Upl_Progr()“.
This CtrlO shall be created as a typical singleton and as part of a GOC object (= Global Object Controller) – i.e. its handle or reference will be assigned to some variable
window.GOC.Obj_Upl_Progr
when the web page is loaded. The GOC may also dispatch information about the existence and the address of the object “GOC.Obj_Upl_
Progr” to other CtrlOs. Without going into details we indicate “dispatching” by a method “GOC.push_object_references()” :
Excerpts from Javascript code of a JS file loaded in the <header>-tag of the upload web page
// Function called by the web page at the onLoad event
function init() {
	...
	// The CtrlO object for the DIV displaying a form to upload files
	GOC.Obj_File_Upl = new Ctrl_File_Upl('File_Upl');

	// The CtrlO object for the Control of the DIV with progress information
	GOC.Obj_Upl_Progr = new Ctrl_Upl_Progr('Upl_Progr');
	...
	...
	// Dispatch references of all other CtrlOs to each of the CtrlOs
	GOC.push_object_references();
}
....
.....
// Constructor function
function Ctrl_Upl_Progr(my_name) {

	// Required only for possible references to other CtrlOs
	this.GOC = GOC;
	// The singleton object in the GOC
	this.obj_name = "Obj_" + my_name;

	// Selectors
	this.id_progr_form	= "#form_upl_progr";
	this.id_progr_div 	= "#progr_bar_div";
	this.id_bar 		= "#bar";
	this.progr_msg_cont 	= "#progr_msg_cont";
	this.progr_msg_p 	= "#progr_msg";
	this.trf_msg_cont	= '#trf_msg_cont";
	this.trf_msg		= '#trf_msg";

	// Register some events
	this.register_events();

	// timer and initial interval for retrieving progress information
	this.upl_min_polling_interval = 1200;
 	this.upl_polling_interval = 1200;
	this.upl_max_polling_interval = 2000;
	this.upl_progr_timer = null;
	this.upl_progr_count = 0;
	this.upl_progr_count_limit = 100;

	// did the last poll job return ?
	this.poll_return = 1;

	// some progress information
	this.file_size 	= 0;
	this.last_upl_percentage = 0;
	this.present_upl_percentage = 0;

	// rate of bytes per msec
	this.present_rate = -1.0;
	this.diff_bytes	= 0.0;
	this.diff_secs = 0.0;
	this.first_bytes = 0.0;
	this.first_secs = 0.0;
	this.bytes = 0;

	// start time
	this.start_time = Date.now();

	// deal with race condition between messages from the last polling job
	// and response messages from the executing main PHP job
	this.race_finalized = 0;

	// Parameters for the Ajax connections
	this.ajax_url = $(this.id_progr_form).attr('action');
	this.ajax_return_data_type = 'json';

	// Ajax return messages
	this.err = 0;
	this.msg = '';
	this.err_msg = '';
	this.sys_msg = '';
}
....
....
/* Container for global objects - the "this"-operator refers here to the Global object - becoming "window" in browsers */
this.GOC = new Global_Objects();
For the meaning and purpose of the GOC see also a comment to the second article of our series.
The CtrlO “Obj_File_Upl” for the upload form should already be familiar from a previous article. Although one may dispute the approach of assuming and using “singleton” objects in the context of other Javascript tasks, I find the CtrlO approach very clear and convenient for dealing with well defined web page areas providing a certain service: The reason is that such UI areas are relatively individual; so they should be controlled by equally individual CtrlOs. Nevertheless we still try to obey two rules to avoid any dependency on the “singleton” property :
- The CtrlO methods should not require any special knowledge about the internal structure of the GOC.
- The CtrlO methods should still work even if several CtrlO objects of the same type are created (full encapsulation).
The latter may become relevant later; e.g. if you want to upload several distinct files for different purposes on the same web page.
Note that we
call a method “register_events()” to register methods for handling events occurring for elements of our DIV container. This is a central element of a CtrlO.
Polling frequency and progress update period on the server
Note that we set the initial polling time interval on the client to be 1200 msec. This means that (initially) every 1200 msec an Ajax request will be sent to the server. OK – but this raises the question:
How often is the progress information in the $_SESSION array updated on the server? What is the update frequency on the server compared with our polling frequency?
Not surprisingly, the progress update period on the server is defined by some parameters in the file “/etc/php5/apache2/php.ini“:
; How frequently the upload progress should be updated.
; Given either in percentages (per-file), or in bytes
; Default Value: "1%"
session.upload_progress.freq =  "1%"

; The minimum delay between updates, in seconds
; Default Value: 1
session.upload_progress.min_freq = "1"
The latter value min_freq has to be an integer. Please, keep in mind that some of the logic we later on implement in our CtrlO only makes sense only if the polling interval on the client is always chosen to be somewhat longer than min_freq on the server.
Now we consider an important question about the whole approach: Can a constant polling interval lead to trouble?
Yes, this is possible. Think about the following situation:
If our connection and the data transfer are very slow we may not see any transfer progress for some polling intervals due to the consequences of the php.ini parameters named above. The progress values may not change although file data arrive continuously – but slowly – at the server.
This may give us a false impression of what is going on and it may impact program decisions whether to stop the polling due to a (falsely) detected potential error situation. In case of a small data transfer rate we obviously should use a relatively long polling time interval to see progress between two consecutive polls. Already this consideration indicates that we need an adaptive polling time interval. Furthermore, we also need to deal with situations where the server responds slowly – i.e. with a period longer than our polling interval. A reasonable approach in such a case is that we should only send a new polling job to the server if we already have received a response to our last polling job. If this is not possible with the chosen polling interval we have to change it. We shall come back to both points below.
Methods of our new CtrlO
What methods does our CtrlO need to control the sequence of Ajax jobs? According to our drawing we need to trigger a time loop. A proper Javascript function for this purpose would be “setInterval()“. However, as the context of the function “setInterval()” is the global object (i.e. the browser window) we have to be careful about how we call the function/method
get_status_by_ajax()
that we want to execute periodically :
// method to initiate the time loop for progress control
Ctrl_Upl_Progr.prototype.get_status_by_ajax = function(setStartTime) {

    	if (typeof setStartTime === "undefined" ) {
    		setStartTime = 0;
    	}
	if ( setStartTime == 1) {
		this.start_time = Date.now();
	}
	this.upl_progr_timer = setInterval(this.progr_submit.bind(this),
 this.upl_polling_interval);
	if ( this.upl_status_timer != null ) {
		console.log ("upl_progr_timer is set !");
	}

	// cleaning the message area of our web page
    	if ( setStartTime == 1  ) {
    		this.SO_Msg.show_msg(0, '');
    	}
};

// Method to trigger submit events for progress polling jobs
Ctrl_Upl_Progr.prototype.progr_submit = function() {
	$(this.id_progr_form).submit();
};

// Register events and delegate responsibility to local methods
Ctrl_Upl_Progr.prototype.register_events = function() {
	$(this.id_progr_form).submit(
		jQuery.proxy(this, 'poll_progress')
	);
};
The method triggered periodically is obviously one of our CtrlO object – “progr_submit“. This method triggers the submit event for our new form which in turn is registered with a CtrlO callback method “poll_progress“. To delegate the responsibility for the submit event to a local method of the CtrlO we used jQuery’s proxy mechanism. As we used $.proxy() in a previous article of this series we are already familiar with this approach to encapsulate all control mechanisms inside the local CtrlO object.
In addition we introduced a parameter “setStartTime” that distinguishes between the start of a file upload and later calls of the method “get_status_by_ajax(setStartTime)“.
Invocation of a local CtrlO method in setInterval()
A closer look shows that we called the “progr_submit()” method in a special way: Why do we need to attach the “.bind(this)” method to the callback function?
As so often with Javascript and jQuery the question behind this “trick” is what the context of the “this” operator in an objects method will be, when this method is indirectly called as a callback. Naturally, we want the “this” operator to point to our CtrlO, because we want to encapsulate everything there. But as a matter of fact the “this” operator of the methods/functions called by setInterval() will point to the global context! But even this depends a bit on how exactly you call the method:
A call as
this.upl_progr_timer = setInterval(this.progr_submit, this.upl_polling_interval);
would not work for us because the “this” context would point to the global object when the callback is invoked.
A call as
this.upl_progr_timer = setInterval(this.progr_submit(), this.upl_polling_interval);
would work – but only once. Here the context really refers to that of the outside calling function “get_status_by_ajax()”. But this context of the calling function is destroyed directly after the first call. Working around this specific problem would require a closure – see:
http://stackoverflow.com/questions/10944004/how-to-pass-this-to-window-setinterval
http://stackoverflow.com/questions/2749244/javascript-setinterval-and-this-solution
Both closure approaches discussed in the named articles are nice – but actually not necessary for present browsers.
Actually, there is one special way of enforcing the context of the “Obj_Upl_Progr” correctly via using the object’s address in the global context explicitly:
this.upl_progr_timer = setInterval(“GOC.Obj_Upl_Progr.progr_submit()”, this.upl_polling_interval);
Note that the brackets “()” after the method name are required in this type of approach (at least in FF)!
However, you may set a big question mark behind such a program design and its implied consequences because explicit knowledge about the usage of the “Upl_Progr”
class in the GOC is required and the whole approach will only work with singletons. Nevertheless: Our overall design of CtrlOs naturally deals with singletons and a GOC dispatcher – so this solution is somewhat noteworthy. It violates, however, our 2 rules set above.
So, if you want to stay clean use “bind(this)” as in our suggested solution:
this.upl_progr_timer = setInterval(this.progr_submit.bind(this), this.upl_polling_interval);
“bind(context)” sets the context explicitly to the local object from where setInterval is called and will even work in IE > 9. Note that in this approach we do not need to invoke any specific global knowledge about the GOC and that it is not restricted to singletons!
Where from do we start the time loop for polling?
OK, we now have a method to start the time loop for polling. But, we have not yet answered the question, from where and when we start this method. This must of course be done directly after the main job for the file upload has been started. We remember that in
CSV file upload with ZIP containers, jQuery, Ajax and PHP 5.4 progress tracking – II
we started the main job for file uploading and processing by a special method of the responsible CtrlO “Ctrl_File_Upl”. We extend the code now a bit:
Ctrl_File_Upl.prototype.upl_file = function(e) {
	....
	....
	// Ajax submit

	// URL
	console.log('upl_file :: url = ' + this.url);
	url = this.url + "?file";
	console.log('upl_file :: submitted url = ' + url);

	// Time
	this.date_start = new Date();
	this.ajax_transfer_start = this.date_start.getTime();

	// Setup and submit Ajax
	$.ajax({
		// contentType: "application/x-www-form-urlencoded; charset=ISO-8859-1",
		url: url,
		context:  GOC[this.obj_name],
		timeout: this.timeout,
		data: form_data,
		type: 'POST',
		cache: false,
		dataType: 'json',
		contentType: false,
		processData: false,

		error: this.error_ajax_file_upl,
		success: this.success_ajax_file_upl
	});

	// Start the progress polling
	// --------------------------
        this.SO_Upl_Progr.race_finalized = 0;
        this.time_start = Date.now();
        this.SO_Upl_Progr.get_status_by_ajax(1);

};
We just addes some statements that refer to our new CtrlO
“Ctrl_Upl_Progr”. Our GOC dispatcher has made this CtrlO available locally in the CtrlO “Ctrl_File_Upl” via the variable
“this.SO_Upl_Progr”. Hence:
this.SO_Upl_Progr.get_status_by_ajax(1);
The other statements set values to other variables used in the CtrlO “Ctrl_File_Upl” later on.
Ajax Polling Requests
As you already may have expected we now set up and trigger an Ajax request with the method poll_progress(). As our form is fairly simple, we can just serialize the form data and e.g. use the $.post variant of jQuery’s Ajax interface:
Ctrl_Upl_Progr.prototype.poll_progress = function(e) {

	//always count polling steps
	this.upl_progr_count++;

	// prevent default action of the submit event
 	e.preventDefault();

	// check against a maximum of periodic calls
 	if ( this.upl_progr_count > this.upl_progr_count_limit ) {
 		clearInterval(this.upl_progr_timer);

console.log("progress timer eliminated");
 		this.err_msg += "<br><br>Progress polling was stopped due to max request number reached!";
 		this.display_msgs();
 		return 1;
 	}

	// Increase the polling interval if poll_return is not 1
 	// No new polling job is started if the last did not yet return
	if (this.poll_return == 0 ) {
		// Adjust interval
		if (this.upl_polling_interval < this.upl_max_polling_interval ) {
			clearInterval(this.upl_progr_timer);
			this.upl_polling_interval += 100;
			// delay a bit
			setTimeout(this.get_status_by_ajax.bind(this), 100, 0);
		}
		// jump over one execution
		else {
			return 2;
		}
	}

	// start next poll job
	else {
		console.log("Upl_Progr object - poll_progress() :: ajax url = " + this.ajax_url);
		var form_data = $(this.id_progr_form).serialize();
		$.ajaxSetup({
			context:  this
		});
		$.post(this.ajax_url, form_data, this.progress_response, this.ajax_return_data_type);
		this.poll_return = 0;
		console.log("Upl_Progr object :: submitted Ajax progress polling query to server" );
	}
};
Note that we set the context of the Ajax interface explicitly! Thus, we guarantee that the method
this.progress_response
which deals with the JSON answer to our request gets our CtrlO as the context – meaning that the “this” operator will point to our CtrlO and not to some HTML element. We like to emphasize:
Not setting the context for the “this” operator is a common source of errors and mistakes when using callback methods to handle status events or responses in course of Ajax transactions.
Of course, we could have included all parametrization and the call of the Ajax target program in one statement as in our last article. The usage of $.post() in our example has no other reason than showing and discussing an alternative. The parameter for the type of the return data had already been set to “json” in the constructor function.
Remark 28.07.2105:
Due to a mail of a reader I like to point out that using a combination of $.ajaxSetup() with $.post() may have disadvantages because $.ajaxSetup() sets standards for all coming Ajax transactions. Certainly, you do not want the context of all future Ajax transactions point to “Ctrl_Upl_Progr”. So, you would have to take care to reset this value as required later on. If you absolutely want to use $.post(), a much more intelligent solution would therefore be to use it in the form “jQuery.post([settings])” with “settings” representing an Ajax key/value parametrization object. See http://api.jquery.com/jquery.post/#jQuery-post-settings. Or just keep using $.ajax() here, too.
Counting the number of executing “progress_poll()” is going on unconditionally until a maximum of allowed calls is reached. This helps to avoid an unlimited time loop. Note in addition that we do not submit a new job if the last one did not yet return some answer. If we experience such a situation we adapt by extending our polling interval slowly but systematically until a maximum value is reached. Thereby, we react adaptively to slow servers or slow connections.
Now you may ask: What happens if the upload progress is going on slowly and the maximum allowed numbers of polling calls is too small? Good point! We will react to this by changing the maximum allowed number of poll calls when dealing with the answers of the server – but only if some upload progress is still measurable. See below.
Dealing with the JSON response of the polling jobs
from the server
Now, let us do something about the Ajax response. We expect some element of the JSON object to deliver information about the total size of the file whose upload is ongoing in the background and some information about the percentage of data already transferred to the server. As a simple variant we suggest a method similar to the following code:
Ctrl_Upl_Progr.prototype.progress_response = function(json_progr_result, success_code, jqxhr) {

	var msg, err_msg, sys_msg, end_time, count;
	var poll_soll, poll_diff, poll_rel, time_remain, time_remain_str, time_spent, time_spent_str, time_msg;
	var div, div_long, p_float_stop, span, span_w;
	var fs, fs_str, by, upl_bytes, upl_bytes_str, upl_by;

	// Response  status
	console.log("Progress response :: received Ajax JSON object from server" );
	var status = jqxhr.status;
	var status_txt = jqxhr.statusText;

	// polling can be continued
	this.poll_return = 1;

	// error detected by the server ?
	this.err = json_progr_result.err;
	if ( this.err > 0 ) {
		.....
		// general error treatment
		.....
	}

	// different message types contained in the JSON response
	this.msg = json_progr_result.msg;
	this.err_msg = json_progr_result.err_msg;
	this.sys_msg = json_progr_result.sys_msg;

	// progress information delivered by the server
	this.present_upl_percentage = json_progr_result.percentage;
	this.present_rate = json_progr_result.rate;
	this.file_size = json_progr_result.total;

	// Current number of uploaded bytes
	this.bytes = json_progr_result.bytes;
	var upl_bytes 	= this.bytes / 1024.0;
	var upl_by 	= " KB";
	if ( upl_bytes > 1024 ) {
		upl_bytes = this.bytes/(1024 * 1024);
		upl_by = " MB";
	}
	upl_bytes = upl_bytes.toFixed(2);
	upl_bytes_str = upl_bytes + upl_by;

	// file_size
	fs = this.file_size/1024.0;
	by = " KB";
	if ( fs > 1024 ) {
		fs = this.file_size/(1024 * 1024);
		by = " MB";
	}
	fs = fs.toFixed(2);
	fs_str = fs + by;

	// Checking for upload finalization
	end_time  = json_progr_result.end_time;

	// Shall the associated time loop be stopped ?
	if ( end_time.length > 0 || this.present_upl_percentage == 100 ) {
		clearInterval(this.upl_progr_timer);
		console.log("progress timer stopped regularly do to finished upload process on the server");
		// this.present_upl_percentage = 100;
		this.msg += "<br>File transfer to the server is complete !<br>";
	}

	// Set the limit up if the max number is reached but upload is still processing regularly
	else {
		if (this.present_upl_percentage > 0 && this.present_upl_percentage > this.last_upl_percentage
		&& ( this.upl_progr_count + 2 > this.upl_progr_count_limit	) ) {
			this.upl_progr_count_limit += 100;
			console.log("limit for polling counts raised by 100!" );
		}
	}

	// Display information about percentage - e.g. in form of a progress bar
	if (this.present_upl_percentage > 0 ) {
		this.last_upl_percentage = this.present_upl_percentage;
		this.display_upl_percentage();
		if ( this.last_upl_percentage < 100 ) {
			this.msg += "<br>File upload is progressing!<br>"
		}
		this.msg += this.last_upl_percentage.toFixed(2) + " percent of the file have been transferred";

		// Display info in special field
		var msg_trf = "Transfer: " + upl_bytes_str + " of " + fs_str + " :: " + this.last_upl_percentage.toFixed(2) + " %";
		$(this.id_progr_msg_p).html(msg_trf);
	}

	// concatenate upload messages and display them
	if ( this.err_msg != '' ) {
	       	this.msg += "<br><br>" + "<span style=\"color:#
A90000;\">" + this.err_msg + "</span>";
	}
	if ( this.sys_msg != '' ) {
		this.msg += "<br><br>" + this.sys_msg;
	}
	// Only display messages in a special message area if you do not overwrite
	// messages coming already from the main PHP job or if an error occurred
	if (this.race_finalized == 0 || this.err > 0  ) {
		this.display_msgs();
	}

        // switch of setInterval's timer in case of error signals from the server
       	if ( this.err > 0 ) {
       		// For all of the following error types
       		if ( 1 <= this.err <= 3 )
        		clearInterval(this.upl_progr_timer);
        	}
	}

	// Adaption of the polling interval and time estimates
	if ( this.err == 0 && this.present_upl_percentage > 3 && this.present_rate > 0 ) {
		poll_soll = 1.2 * this.file_size / 100.0 / this.present_rate;
		poll_soll = Math.round(poll_soll) + 100;
		poll_diff = poll_soll - this.upl_polling_interval;
		poll_rel = ( Math.abs(poll_soll - this.upl_polling_interval) ) / this.upl_polling_interval

		// Only do something if the deviation is bigger than a limit
		if ( poll_rel > 0.10 ) {
			// Limit the relative change
			if ( poll_rel > 0.2 ) {
				if (poll_diff < 0 ) {
					poll_soll = 0.8 * this.upl_polling_interval;
				}
				else {
					poll_soll = 1.2 * this.upl_polling_interval;
				}
			}
			else {
				if (poll_diff < 0 ) {
					poll_soll = (1.0 - poll_rel) * this.upl_polling_interval;
				}
				else {
					poll_soll = (1.0 + poll_rel) * this.upl_polling_interval;
				}
			}

			if ( poll_soll > this.upl_min_polling_interval) {
				this.upl_polling_interval = poll_soll;
				if (poll_soll > this.upl_max_polling_interval ) {
					this.upl_max_polling_interval = poll_soll + 100;
				}
				clearInterval(this.upl_progr_timer);
				// delay a bit
				setTimeout(this.get_status_by_ajax.bind(this), poll_soll, 0);
			}
		}

		// time estimate
		time_remain 	= ( (this.file_size - this.bytes) / this.present_rate) / 1000.0;
		time_remain_str = time_remain.toFixed(1) + "s";

		// time spent
		time_spent 	= (Date.now() - this.start_time);
		time_spent_str 	= (time_spent / 1000.0).toFixed(1) + "s";
		time_msg = "time: " + time_spent_str + " :: " + time_remain_str;

		$(this.trf_msg_cont).css('display', 'block');
		$(this.trf_msg).css('color', "#666");
		$(this.trf_msg).html(time_msg);
	}

	// Reset cursor
	document.body.style.cursor = 'default';
};

// Adjust a progress bar
Ctrl_Upl_Progr.prototype.display_upl_percentage = function() {
	width = this.present_upl_percentage + '%';
	$(this.id_bar).css('width', width);
	console.log("\r\nPresent upload percentage = " + this.present_upl_percentage + "\r\n");
};

// use another specialized CtrlO for handling a special message display area on the web page
Ctrl_Upl_Progr.prototype.display_msgs = function() {
	this.SO_Msg.show_msg(0, this.msg);
};
Explanations:
We just split the JSON response object into its components. The next article will show how we get these values on the server and send them back via Ajax. Components of the JSON response object are:
- an indicator for potential errors detected by the PHP polling program
- messages of different types (created during execution of the PHP polling program on the server)
- progress information in form of a percentage value
- a value for the transfer rate measured on the server
- the total file size in bytes
- the number of bytes received on the server so far
- an end time value (date down to seconds) on the server when the file transfer was finished
We first transform both the uploaded bytes and the file size to KBytes or MBytes. The end time information is also used as a signal to stop the time loop for polling jobs on the client. This means that it will only be sent as a non blank string if our PHP polling program finds that the upload has finalized.
Please, note that we raise the number of allowed polling calls to the server when we are approaching the limit of allowed calls – if we still see any progress of the upload. Oops – what if the rate is so small that we fall below the discussed server’s limit of a 1% change during the polling time interval and progress information is not updated ? Then our monitoring would be stopped! Yes, this would be true if we did not adapt the polling period ….
Adaption of the polling time period
We just saw that it may become essential for our polling based progress monitoring to determine whether there is any progress at all. However, due to the parameter settings for the update interval of the progress information a too small polling period may lead to the false impression of zero progress over one or several polling intervals in case of slow connections.
This is a major reason for adapting the polling time interval to the transfer rate. We do this in our example after 3% of the file is loaded (assuming that our initial interval allows for such a progress during the first hundred polls. If it does not, than our polling interval really is much too small and we need to give it a higher initial value or increase the maximum initial number of allowed polls). In our simple adaption algorithm we set an ideal progress rate to 1.2% of the file size per polling interval. (To choose this a bit bigger than the limit of 1% for updates on the server is done on purpose!)
Furthermore, we only do something with our period if the polling time interval deviates more than 10% from the ideal time interval – and we never go below an interval of 1200 msec. In addition we limit changes to a maximum of 20% of the present value to avoid a jumpy behavior during the first steps of the transfer when the rate may change grossly. Thus, we try to change the polling time interval rather smoothly.
We leave it up to the kind reader to improve our simple adaption algorithm. I may say, however, that it works quite well for my aDSL and vDSL connections where reasonable rates are possible. I do not regard the lower limit of 1200 msec as a problem: If the whole file is loaded in one polling interval – hey, I am happy. Monitoring is needed for slower connections.
Note that we we deliver a parameter “0” to the callback of
setTimeout(this.get_status_by_ajax.bind(this), poll_soll, 0);
This kind of passing a parameter to a callback works in FF and Chrome. Unfortunately, it does not work in MS IE, Version <= 9. Fortunately, our method "get_status_by_ajax()" already takes care of an undefined function parameter.
Some Output
As indicated some received progress information is displayed in special DIV containers; the percentage information may be used to simulate a progress bar by a dynamical change of the width of some colored DIV.
Some other messages from the server are, however, handled by a special CtrlO for a message display and formatting area on our web page. The reader may design such an area by himself and write a related CtrlO. In our example we indicated the use of a message handling CtrlO by the statement “this.SO_Msg.show_msg(0, this.msg);”
Note that we did not discuss any handling of error messages from the server yet. We leave this to
the reader. You may use a boolean element “json_progr_result.err” of the JSON response object to indicate an error and its type – and react properly to it. We do not elaborate this here.
In this article we have shown some basic ingredients on the Javascript side for polling progress information about a file transfer from a PHP server. In the next article of this series
CSV file upload with ZIP containers, jQuery, Ajax and PHP 5.4 progress tracking – V
we shall have a look a the PHP side.