Zeichensatzvorgaben für MySQL und PHP – SET NAMES – und leere Strings durch htmlentities()

Gestern ist mir ein dummer Fehler passiert, dessen Analyse mich Zeit gekostet hat. Dabei erwies sich die Sache am Ende als trivial. Es ging letztlich um konsistente Zeichensatzeinstellungen für PHP und MySQL – allerdings mit einem mir bislang unbekannten Nebeneffekt.

Zeichensätze im Kontext von PHP und MySQL sind ein Thema vieler Foren- und Q&A-Artikel im Internet – und nicht immer trifft man auf zufriedenstellende Antworten. Ich hoffe, dieser Artikel trägt anhand eines Beispiels zu etwas mehr Klarheit bei.

Voraussetzungen und aufgetretener Fehler

Unsere hausinternen Apache- und Datenbank-Server laufen normalerweise vollständig unter UTF-8. Inklusive der eigenen Datenbank- und Tabellen-Kollationen unter MySQL- oder MariaDB-Systemen. Aber für Tests müssen wir immer mal wieder gezielt eine Kompatibilität zu den festgelegten Kollationen für MySQL-Banken/Tabellen auf Kundenservern herstellen. Meist kommt dann Latin1 (iso-8859-1) ins Spiel.

Gestern mussten wir für einen solchen Test Datensätze eines von uns entwickelten, php-basierten CMS von einem gehosteten MySQL-Kundenserver in unsere lokale Test-Datenbank übernehmen. Diese Datensätze beinhalteten viele Text-Strings mit deutschen Umlauten. Da es sich nur um wenige Records handelte, haben wir die Daten in diesem Fall mit Copy/Paste und mit Hilfe von Eingabefeldern unserer CMS-Verwaltungsoberfläche übernommen. Das CMS lief dabei unter einer lokalen UTF8-Standarddomäne. Unsere aktuellen CMS-Programme zeigten die fraglichen Textstrings denn auch korrekt in der Web-Oberfläche des CMS an.

Es gab aber andere zu untersuchende Punkte im Layout. Um die Unstimmigkeiten zu testen, haben wir zusätzlich eine separate Testdomäne angelegt und diverse PHP-Klassen vom Kundenserver (auf dem dortigen Versionsstand) in bestimmte Verzeichnisse des zugehörigen Web-Spaces auf unserem lokalen Server geladen. Ergebnis: 2 Domainen mit z.T. unterschiedlichen Versionsständen von PHP-Klassen.

Und dann passierte es:

Bei einem Aufruf der Webseiten in der Testdomäne verschwanden plötzlich fast alle Text-Strings aus der Web-Oberfläche.

Bilder und grundsätzlicher Aufbau der Webseiten bleiben jedoch erhalten. Ich war zunächst völlig verblüfft über diesen Effekt. Zumal der Einsatz unserer lokalen Versionen der gleichen PHP-Klassen kein Verschwinden der Textstrings zeitigte.

Die Analyse war nicht ohne, da ich zunächst nicht wusste, wonach ich zu suchen hatte. Man denkt da zunächst natürlich an Unterschiede im Programmcode selbst. Am Schluss entpuppten sich aber eine im wesentlichen unmodifizierte Klasse, die die Datenbankverbindung steuert, sowie eine Klasse, die die Strings aus Sicherheitsgründen nach unerlaubten Sequenzen filtert, als Kerne des Übels. Ausschlaggebend waren allerdings nicht Programmunterschiede sondern bestimmte Parameter-Setzungen sowie Server- und Zeichensatzeinstellungen. Aber der Reihe nach.

Zeichensatzeinstellungen in der Kommunikationskette zwischen einem PHP-Server und einer MySQL-Datenbank

In der Datenaustausch-Kette zwischen einer MySQL-Datenbank und PHP-Modulen auf einem Web-Server (und natürlich auch bei der Übersendung eines HTML-/XML- oder JSON-Outputs an Web-Clients) spielen verschiedene Zeichensatzeinstellungen eine Rolle. Einige davon können vom Entwickler beeinflusst werden. Andere wiederum nicht immer.

Für unseren Fall waren vor allem die nachfolgenden Punkte relevant; sie betreffen den Web-Server (mit PHP-Modul) und die MySQL-Datenbank:

  1. Zeichensätze (“Kollationen”) der MySQL-Datenbank und zugehöriger Datenbanktabellen.
  2. Zeichensatz-Vorgaben zur MySQL-Verbindung und zum Datentransfer von und zu (PHP-)Programmen, die mittels der SQL-Direktive “SET NAMES” vorgenommen wurden.
  3. Einstellungen für den Default-Character-Set des PHP-Apache-Moduls.
  4. Zeichensatzeinstellungen für die PHP-Funktion “htmlentities()”.

Zeichensätze in der Datenbank und die Direktive “SET NAMES”

Für die Kollation der relevanten MySQL-Datenbank und ihrer Tabellen war auf dem Kundenserver “latin1_german2_ci” gewählt worden. Unsere Einstellungen im lokalen Testsystem waren dazu auf Tabellenebene kompatibel. Die Kollation einer Datenbanktabelle bestimmt letztlich aber nur die interne Ablage der Daten in der Tabelle und nicht den Zeichensatz, unter dem z.B. per SQL ermittelte Resultsets an weiterverarbeitende Programme übermittelt werden.

Für letzteres sind andere Parameter verantwortlich, die man als Entwickler für eine spezifische Verbindung zur MySQL-Datenbank einstellen kann. Unter MySQL und der MariaDB nutzt man dafür etwa die SQL-Direktive “SET NAMES” (oder aber die Funktion mysqli_set_charset(); s.u.).

“SET NAMES” führt zur gleichzeitigen Festlegung dreier RDBMS-Parameter für die Behandlung einer spezifischen Datenbankverbindung. Diese Parameter sind: character_set_client, character_set_connection, character_set_results.

Siehe hierzu etwa
https://dev.mysql.com/doc/refman/5.7/en/set-names.html
und
https://dev.mysql.com/doc/refman/5.7/en/server-system-variables.html#sysvar_character_set_results.

Die Datenbankverbindung wird unter dem PHP/mysqli-Interface dabei über das Connection-Objekt

$dbi = mysqli_connect(….)

identifiziert. Im Wesentlichen legen die genannten Parameter Folgendes fest:

  • character_set_client: Zeichensatz, unter dem Daten, die vom Datenbank-Client zum RDBMS-Server transferiert werden, interpretiert werden.
  • character_set_connection: Handhabung bestimmterErsetzungen und Konversionen, u.a. von Numbers zu Strings.
  • character_set_results: Zeichensatz, unter dem Daten, die vom RDBMS zu Client-Programmen übermittelt werden interpretiert werden.

Der “Client” ist in unserem Fall natürlich ein PHP-Programm auf einem Apache-Server. Die Anwendung des “SET NAMES”-Statements durch ein PHP-Programm, z.B.

$sql_unames = “SET NAMES ‘utf8′”;
$this->dbi->query($sql_unames);
//dbi->Datenbank-Connection Object
//$this->dbi = mysqli_connect(….)

ist somit von zentraler Bedeutung für die Kommunikation zwischen einem PHP-Programm und einer MySQL/MariaDB! Solange eine hinreichende Konvertierung verwendeter Zeichen gewährleistet ist, muss der Zeichensatz, unter dem Resultsets zum PHP-Programm übermittelt werden, nicht zwingend mit dem der Datenbanktabellen selbst identisch sein.

Es sei darauf hingewiesen, dass es zu “SET NAMES” auch Alternativen gibt, die man im Rahmen des mysqli-Interfaces einsetzen kann und sollte (s.u.). Dass wir in einigen Programmen noch SET NAMES verwenden, hat lediglich historische Gründe. Die hier beschriebene Problematik gilt aber unabhängig vom genauen Werkzeug zur Einstellung der Zeichensatzparameter.

Konsistenz zu Zeichensatzvorgaben für PHP – Einstellungen in der php.ini

Das PHP-Programm muss in jedem Fall mit dem gewählten Zeichensatz für Resultsets adäquat umgehen können; s.u.. Der rechte Bereich der folgenden Skizze, die ich aus einem anderen Artikel dieses Blogs entliehen habe, verdeutlicht das für den Fall “SET NAMES ‘latin1′” :

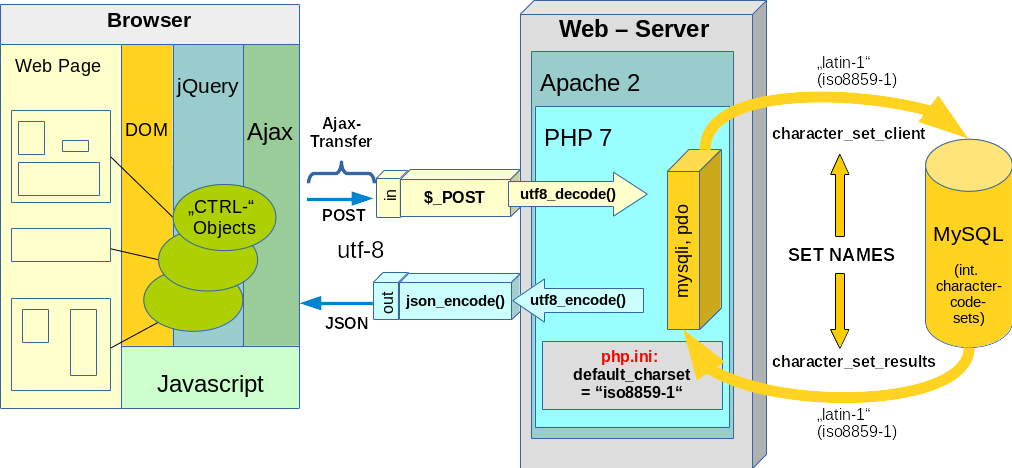
Nun könnte man in seinen PHP-Programmen natürlich spezifische Umwandlungsfunktionen (u.a. iconv(), mb_convert_encoding(), utf8-encode(), utf8-decode) für die Zeichensatzkonvertierung aus- und eingehender Strings bemühen. Die linke Seite der Skizze liefert hierfür Beispiele (s. den dazu gehörigen Abschnitt weiter unten).

Wenn möglich, kann man aber auch einen Standardzeichensatz für die PHP-Verarbeitung von Strings vorgeben und sich darauf bzgl. der Datenbankinteraktion verlassen.

Entsprechende Einstellungen nimmt man in der Konfigurationsdatei
/etc/php7/apache2/php.ini
vor. Die relevanten Parameter sind dort:

; PHP's default character set is set to UTF-8.
; http://php.net/default-charset
default_charset = "UTF-8"

; PHP internal character encoding is set to empty.
; If empty, default_charset is used.
; http://php.net/internal-encoding
;internal_encoding =

; PHP input character encoding is set to empty.
; If empty, default_charset is used.
; http://php.net/input-encoding
;input_encoding =

; PHP output character encoding is set to empty.
; If empty, default_charset is used.
; mbstring or iconv output handler is used.
; See also output_buffer.
; http://php.net/output-encoding
;output_encoding =

Die hierfür gesetzten Werten sollte natürlich mit den Einstellungen für die Datenbankverbindung zusammenpassen.

Kundenvorgaben

Wir parametrieren in Kundenprojekten die PHP-Methoden für den Verbindungsaufbau zum Datenbankserver meist gemäß expliziter Kundenvorgaben. In unserem Fall hatten wir “SET NAMES ‘latin1′” gewählt. (Hinweis: Die Zeichensatz-Namen auf einem MySQL-Server enthalten grundsätzlich keine Trennzeichen; daher ist statt iso8859-1 “latin1” zu verwenden).

Der Grund dafür war, dass das Apache-PHP-Modul des (gehosteten) Kunden-Web-Servers auf “iso-8859-1” eingestellt war. Das bestätigte eine Überprüfung mit phpinfo(). Diese Einstellungen sollten wir gem. Kundenvorgabe nicht ändern, da auf dem Web-Server auch andere PHP-Programme als unsere eigenen laufen müssen.

Auf dem Kundenserver waren die Zeichensatzeinstellungen also konsistent.

Ursache unseres Problems und die Rolle von htmlentities()

Man ahnt es bereits: Durch das Kopieren der PHP-Klasse für die Steuerung von Datenbankverbindungen vom Kundenserver auf die Testdomäne unseres lokalen Web-Servers entstand dort u.a. eine Inkonsistenz zwischen der Zeichensatzbehandlung unter PHP (utf8!) und dem Zeichensatz für den Transfer von Resultsets aus der MySQL-Datenbank (latin1).

Diese Inkonsistenz kam jedoch noch nicht zum Tragen, als wir die Daten per Copy/Paste über lokale Web-Interfaces einer UTF8-Standard-Domäne in die Bank einbrachten.

Für unsere Testdomäne dagegen muss man jedoch u.a. eine fehlerhafte Konvertierung von deutschen Umlauten erwarten! Warum aber verschwanden die Text-Strings in Gänze aus den Web-Oberflächen?

Die Antwort lieferte schließlich eine von mir bislang zu wenig beachtete Eigenschaft der PHP-Funktion “htmlentities()”.

Unsere Web-Generatoren jagen Strings vor einer Web-Darstellung durch eine Reihe von Prüfroutinen, Transformatoren für erlaubte Zeichenfolgen und durch Filter (u.a. HTMLPurifier, aber auch eigene Filter). Dabei wird in einem Zwischenschritt (nach einer vorhergehenden Konvertierung erlaubter HTML-Zeichenfolgen) auch “htmlentities()” eingesetzt.

htmlentities() erlaubt selbst eine Vorgabe des “Character Sets” über einen Parameter. Ein Check zeigte: Dieser Parameter stand in der lokalen Testdomäne explizit auf “UTF-8”. Diese Einstellung betrifft jedoch eine Konvertierung in den gewünschten Ziel-Zeichensatz für den HTML-Output. Hier hatten wir kein Problem, da die
HTML-Header der Webseiten bzw. die vom Apache-Server generierten HTTP-Header tatsächlich auf UTF-8 ausgerichtet waren.

Allerdings sorgten schon die vorhergehenden Widersprüche zwischen dem Zeichensatz der Datenbank-Resultsets und dem Zeichensatz für die anschließende Behandlung von Strings durch PHP. Das hatte gravierende Folgen. Unter http://php.net/manual/de/function.htmlentities.php findet man nämlich folgenden Hinweis:

Rückgabewerte
Gibt die kodierte Zeichenkette zurück. Enthält der string eine in dem übergebenen encoding ungültige Code Unit Sequenz, wird eine leere Zeichenkette zurückgegeben, sofern weder das ENT_IGNORE noch das ENT_SUBSITUTE Flag gesetzt sind.

(Hervorhebung durch mich).

Das war des Rätsels Lösung:

Eine Inkonsistenz in der Zeichensatzbehandlung im Datenaustausch zwischen unserer MySQL-Datenbank und PHP führte zu nicht behandelbaren Zeichen bei der Anwendung von htmlentities() auf Strings – und diese Funktion produzierte dann gemäß ihrer Default-Einstellungen leere Strings.

Trivial – man muss es halt nur wissen! Ein Test mit

“SET NAMES ‘utf8′”

ließ denn alle verschwundenen Strings auch in unserer Testdomäne prompt wieder erscheinen!

Notwendige Checks vor der Anwendung von SET NAMES (oder von mysqli_set_charset())

Hat man die Kette der Zeichensatzsetzungen bzw. Zeichensatzbehandlung im Austausch zwischen PHP und einer MySQL-Datenbank erst einmal verstanden, so ist auch klar, wo man mit vorbeugenden Maßnahmen ansetzen kann. Solche Vorkehrungen sind – wie das Beispiel zeigt – vor allem dann notwendig, wenn man die Zeichensatz-Einstellungen für PHP nicht auf allen involvierten Web-Servern beeinflussen kann oder darf.

Bevor man “SET NAMES” (oder mysqli_set_charset(); s.u.) in einem PHP-Programm tatsächlich anwendet, sollte man die Setzung des “Default Character Sets” in der php.ini für den aktuellen Server explizit abfragen – mittels

ini_get(‘default_charset’);

– und dann mit der ebenfalls abfragbaren Kollation der Datenbanktabellen vergleichen. Das Ergebnis dieses Vergleichs kann man dann nach bestimmten Regeln behandeln:

Z.B. Warnhinweise bei (ernsthafter) Inkompatibilität ausgeben. Oder wenn man wirklich sicher ist, dass nur deutsche Umlaute zu potentiellen Problemen führen können: Wahl des zu den PHP-Einstellungen konsistenten Zeichensatzes für den Transfer von Resultsets aus der Datenbank. In unserem Fall also “utf8”.

Alternative: Ändern der php.ini-Vorgaben für den Zeichensatz durch und für das laufende PHP-Programm

Auf festgestellte Inkonsistenzen in den Zeichensatzeinstellungen kann man u.U. – nämlich wenn man die dafür nötigen Rechte besitzt – auch mit einer Modifikation der php.ini-Vorgaben für das laufende Programm reagieren. Dazu muss man natürlich die Funktion ini_set() bemühen; Bsp.:

ini_set( string ‘default_charset’, ‘ISO-8859-1’)

bemühen.

Empfohlener Weg zum Setzen des “Character Sets” für eine MySQL-Verbindung

Ich möchte explizit darauf hinweisen, dass es andere Möglichkeiten als die SQL-Direktive “SET NAMES” gibt, Character Sets für die Datenbankverbindung zu setzen. Das PHP-Manual empfiehlt explizit, die Funktion

mysqli_set_charset(mysqli $link , string $charset)

anstelle von SQL und “Set Names” zu verwenden. Siehe: http://php.net/manual/de/mysqli.set-charset.php

Zeichensätze und die Web-Client-Seite

Obwohl nicht Kernthema dieses Artikels werfen wir noch einen ergänzenden Blick auf den
Datenaustausch des PHP/Web-Servers mit Web-Clients (z.B. einem Browser). Die Zeichensatzthematik setzt sich natürlich auch auf dieser Kommunikationsstrecke fort; der linke Teil der obigen Skizze verdeutlicht das am Beispiel von Ajax/Ajaj-Programmen. Diese erfordern i.d.R. UTF-8 für einen ordnungsgemäßen Datenaustausch mit dem Web-Server.

Ist der Parameter “default_charset” in der php.ini-Datei aber auf “iso-8859-1” gesetzt, so muss man ein- und ausgehende Daten entsprechend konvertieren. Dafür eignen sich die Funktionen utf8_decode() für einlaufende POST-/GET-Daten aus Ajax-Programmen und utf8_encode() bei der Erzeugung des Ajax/Ajaj-Outputs in Richtung Web-Client.

Für reinen HTML-Output gilt analoges; dabei sind aber auch HTTP- und HTML-Header-Anweisungen für Character Sets zu setzen. Siehe hierzu:
http://www.html-info.eu/php/php-als-script-sprache/item/zeichensatz-latin1-oder-unicode-utf-8.html

Fazit

In unbeabsichtigter Weise kann htmlentities() plötzlich zu einer Testfunktion für die Konsistenz zwischen

  • der Zeichensatz-Einstellungen durch “SET NAMES” bzw. mysqli_set_charset() für die MySQL/MariaDB-Datenbankanbindung an ein PHP-Programm
  • und den Zeichensatzeinstellungen für das PHP-Modul selbst auf dem Webserver

werden – und in letzter Konsequenz zu leeren Strings auf Webseiten führen.

Es lohnt sich vor einem Einsatz von “SET NAMES” – oder besser mysqli_set_charset() – eigentlich immer, die Einstellungen in der “php.ini” bzgl. des “default_charset” und verwandter Parameter abzufragen und daraus angemessene Konsequenzen für den Aufbau der Datenbankverbindung zu ziehen.

Dies gilt vor allem dann, wenn man im Rahmen von Tests und Produktivierungen auf verschiedenen Servern arbeiten will oder muss – und dabei nicht alle Konfigurationsparameter der Server selbst beeinflussen kann und darf.

Neben dem Setzen von Server- und Verbindungsparametern kann man auf festgestellte oder vorgegebene Zeichensatzanforderungen oder Zeichensatzdiskrepanzen aber auch gezielt mit verschiedenen Funktionen reagieren, die PHP für eine Zeichensatz-Detektion und eine explizite Zeichensatzkonvertierung von Strings anbietet.

CSV file upload with ZIP containers, jQuery, Ajax and PHP 5.4 progress tracking – VI

In the previous articles of this series about an Ajax controlled file upload with PHP progress tracking

CSV file upload with ZIP containers, jQuery, Ajax and PHP 5.4 progress tracking – V
CSV file upload with ZIP containers, jQuery, Ajax and PHP 5.4 progress tracking – IV
CSV file upload with ZIP containers, jQuery, Ajax and PHP 5.4 progress tracking – III
CSV file upload with ZIP containers, jQuery, Ajax and PHP 5.4 progress tracking – II
CSV file upload with ZIP containers, jQuery, Ajax and PHP 5.4 progress tracking – I

we have shown how we can measure and display the progress of a file upload process with a series of Ajax controlled polling jobs and the progress tracking features of PHP > 5.4. At least in our test example this worked perfectly.

However, for practical purposes and especially when our server users deal with large files we must in addition take better care of some limiting PHP parameters on the server. Both a good server admin and a program developer would, of course, try to find out what file sizes are to be expected on a regular basis and adjust the server parameters accordingly. However, you never know what our beloved users may do. What happens if we talked about file sizes of less than 100MB and suddenly a file with 200MB is transferred to the server?

For which limiting PHP parameters on the server may we run into serious trouble?

Due to security considerations the PHP module interaction with incoming data streams is limited by parameters set for the Apache server. The relevant configuration file is e.g. on Opensuse located at

/etc/php5/apache2/php.ini

The most important limits (set in different sections of the file) are:

; Maximum amount of time each script may spend parsing request data. It’s a good
; idea to limit this time on productions servers in order to eliminate unexpectedly
; long running scripts.
; Default Value: -1 (Unlimited)
; Production Value: 60 (60 seconds)
; http://php.net/max-input-time
max_input_time = 200
 
; Maximum size of POST data that PHP will accept.
; Its value may be 0 to disable the limit. It is ignored if POST data reading
; is disabled through enable_post_data_reading.
; http://php.net/post-max-size
post_max_size = 200M
 
; Maximum allowed size for uploaded files.
; http://php.net/upload-max-filesize
upload_max_filesize =150M
 
; Maximum amount of memory a script may consume (128MB)
; http://php.net/memory-limit
memory_limit = 500M

The description of the first parameter above is somewhat unclear. What is meant by the “time spent on parsing request data”? Is this a part of the (also limited) execution time of the PHP target program of our Ajax transaction? Or is this limit imposed on the time required to read incoming POST data and to fill the $_POST array? If the latter were true a small bandwidth could lead to a violation of the “max_input_time” limit …

Regarding the second parameter the question turns up, whether this
limit is imposed on all transferred POST data including the file data?

The third parameter seems to speak for itself. There is a limit for the size of a file that can be transmitted to the server. However, it is not clear how this parameter affects real world scenarios. Does it stop a transfer already before it starts or only when the limit is reached during the transfer?

Regarding the 4th parameter we may suspect that it becomes important already during the handling (reading, parsing) of the incoming POST data. So, how much of memory (RAM) do we need at the server to handle large files during an upload process?

Warning regarding PHP parameter changes for multi-user situation on real world servers

We were and are discussing a privileged situation in this article series: Only one user uploads exactly one big Zip-container file to a server.

In such a situation it is relatively safe to fiddle around with PHP parameters of the central “php.ini” file (or PHP parameter settings in directory specific files; see the last section of this article). However, as an administrator of a server you should always be aware of the consequences of PHP parameter changes, e.g for memory limits, in a multi-user environment.

In addition you must also take into account that our code examples may be extended towards the case that one user may upload multiple files in parallel in one Ajax transaction.

Remarks on “max_input_time” – you can probably ignore it!

If you look up information about “max_input_time” available on the Internet you may experience that some confusion over the implications of this parameter remains. Especially as PHP’s own documentation is a bit contradictory – just compare what is said in the following manual pages:

 
Therefore, I tested a bit with files up to 1 GByte over slow and fast connections to PHP servers on the Internet. I came to the conclusion that the answer in the following “stackoverflow” discussion
http://stackoverflow.com/questions/11387113/php-file-upload-affected-or-not-by-max-input-time
describes the server behavior correctly. This means:

This parameter has no consequences with respect to connection bandwidth and the resulting upload time required for file data: It does not limit the required upload time. Neither does it reduce the amount of allowed maximum execution time of the PHP program triggered at the end of the file transfer process to the server.

“max_input_time” imposes a limit on the time to read/parse the data

  • after they have completely arrived at the server
  • and before the PHP program, which shall work with the data, is started.

This “parsing” time normally is very small and the standard value of 60 secs should be enough under most circumstances. If these findings are true we do not need to care much about this parameter during our file transfer process to the server. A value of 60 secs should work even for large files of 1 GB ore more on modern servers. At least for a server with sufficient resources under average load.

See also:

 
However, I can imagine circumstances on a server with many users under heavy load, for which this parameter nevertheless needs to be adjusted.

What does the PHP documentation say about the parameters “post_max_size”, “upload_max_filesize” and “memory_limit”?

Regarding these parameters we get at least some clear – though disputable – recommendation from the PHP documentation. At

 
we find the following explanation for “post_max_size”:

Sets max size of post data allowed. This setting also affects file upload. To upload large files, this value must be larger than upload_max_filesize. If memory limit is enabled by your configure script, memory_limit also affects file uploading. Generally speaking, memory_limit should be larger than post_max_size. When an integer is used, the value is measured in bytes. Shorthand notation, as described in this FAQ, may also be used. If the size of post data is greater than post_max_size, the $_POST and $_FILES superglobals are empty. This can be tracked in various ways, e.g. by passing the $_GET variable to the script processing the data, i.e. <form action=”edit.php?processed=1″>, and then checking if $_GET[‘processed’] is set.

Off topic: For those who find the track-recommendation in the last sentence confusing as it refers to $_GET, see e.g.

 
You can add parameters to your URL and these parameters will appear in $_GET, but if you decided to use the POST mechanism for data transfer these URL-parameters are included in the POST data mechanism of HTTP.

The recommendation for memory sizing is misleading in case of file uploads!

Following the recommendation quoted above would lead to the following relation for the PHP setup:

memory_limit > post_max_size > ( upload_max_file_size * number of files uploaded in parallel ).

Regarding the right side: My understanding is that “upload_max_file_size” sets a limit for each individual file during an upload process. See

 
Actually, I find the recommendation for the parameter “memory_limit” very strange. This would mean that somebody who has to deal with an upload file with a size of 2 GByte would have to allow for memory allocation for a single PHP process in the RAM > 2 GByte. Shall we take such a requirement seriously?

My
answer is NO ! But, of course, you should always test yourself ….

To me only the last relation on the right side of the relation chain makes sense during an upload process. Of course PHP needs some RAM and during file uploads also buffering requires sufficient server RAM. But several GByte to control a continuous incoming stream of data which shall be saved as a file into a directory (for temporary files) on the server? No way! I did some tests – e.g. limit the memory to 32 MB and successfully upload a 1 GB file. Therefore, I agree completely with the findings in the following article:

 
See also:

 
So:

Despite you need RAM for buffering during file uploads it is NOT required to use as much physical RAM as the size of the file you want to upload.

However, it may be wise to have as much RAM as possible if you intend to operate on the file as a whole. This may e.g. become important during phases when a PHP program wants to rewrite file data or read them as fast as possible for whatever purpose. A typical example where you may need sufficient memory is image manipulation.

Nevertheless: Regarding the file transfer process to the server itself the quoted recommendation is in my opinion really misleading. And: Do not forget that a high value for “memory_limit” may lead to server problems in a multi-user situation.

“post_max_size” and “upload_max_filesize” as the main limiting PHP parameters for file uploads

So, only the following condition remains:

post_max_size > upload_max_file_size * number of files uploaded in parallel

But this condition should be taken seriously! There are several things that need to be said about these parameters.

  1. A quick test shows: “post_max_size” imposes a limit on all POST data transferred from client – including file data.
  2. Even for situations in which only one file is uploaded I personally would choose “post_max_size” to be several MBs bigger than “upload_max_filesize”. Just to account for overhead.
  3. In case of an upload of multiple files in parallel (i.e. a situation, which we have not studied in this article series) you have to get an idea about the typical size and number of files to be uploaded in parallel. In such a situation you may also want to adjust the parameter

    ; Maximum number of files that can be uploaded via a single request
    max_file_uploads = 20

  4. There may be differences depending on the PHP version of how and when the server reacts to a violation of either of both parameters. For PHP 5.4 it seems that the server does not allow for an upload if either of the parameters is violated by the size of the transferred file(s) – meaning: the upload does not even start. This in turn may lead to different error situations on the server and
    messages issued by the server – depending on which parameter was violated.
  5. From a developer’s perspective it is a bit annoying that the PHP servers reaction to a violation of “upload_max_filesize” is indeed very different from its reaction a violation of “post_max_size”. See below.

Server reactions to violations of “post_max_size” and “upload_max_filesize”

We need to discuss a bit the reactions of a PHP server towards a violation of the named parameters before we can decide how to react within our PHP or Javascript programs in the course of an Ajax transaction.

Server reaction to a violation of “upload_max_filesize”
The Apache/PHP server reacts to a violation of “upload_max_filesize” by a clear message in

$_FILES[‘userfile’][“error”]

where ‘userfile’ corresponds to the “name” attribute of the HTML file input element. A reasonable way how to react to PHP error messages in $_FILES by PHP applications is described in the highest ranked comment of
http://php.net/manual/en/features.file-upload.errors.php
and also here
https://blog.hqcodeshop.fi/archives/185-PHP-large-file-uploads.html

Server reaction to a violation of “post_max_size”
What about a violation of “post_max_size”? We can only react reliably to an error via our PHP target programs if an error number or a clear, structured message is provided. Unfortunately, this is not the case when the sum of uploaded data via POST becomes bigger than “post_max_size”. When the server detects the violation no content at all is made available in $_POST or $_FILES. So, we have no error-message there a PHP program could react to.

However, we can combine

  • a test for emptiness of the superglobals $POST and $_FILES
  • with some HTTP information from the client, which is saved in $_SERVER,

to react properly in our PHP programs. Such a reaction within our Ajax transactions would naturally include

  • the creation of an error code and an error-message
  • and sending both back within the JSON response to the Javascript client for error control.

When we make a POST request to the server a value of the POST content size is provided by the client and available via the variable

$_SERVER[‘CONTENT_LENGTH’].

See:

 
So, for the purpose of error control we will need to add some test code to the “initial” PHP target program “handle_uploaded_init_files.php5” of our Ajax transaction which started the file upload.

Reasonable reactions of our PHP upload and polling programs to a violation of “post_max_size”

Remember that our initial Ajax transaction for upload triggered the server file “handle_uploaded_init_files.php5”. Therefore, we should some additional code that investigates the violation of post_max_size” there. This would probably look similar to:

if (
	isset( $_SERVER['REQUEST_METHOD'] )      &&
        ($_SERVER['REQUEST_METHOD'] === 'POST' ) &&
        isset( $_SERVER['CONTENT_LENGTH'] )      &&
        (
 empty( $_POST ) )
 ) {
	$max_post_size = ini_get('post_max_size');
	$content_length = $_SERVER['CONTENT_LENGTH'] / 1024 / 1024;
	if ($content_length > $max_post_size ) {
		....
		// Our error treatment ....
		$err_code = ....;
		// create an error message and send it to the Ajax client 
		$err_post_size_msg = ".....";
		....
	}

	....
	....
	// transfer the error code and error message to some named element of the JSON object 
	....
	$ajax_response['err_code'] = $err_code;
	$ajax_response['err_msg'] = $err_post_size_msg;
	.....
	$response = json_encode($ajax_response);
	echo $response;
	exit;
}

 
See also:

&nbsP;
Note that we cannot assume a certain timing of the reaction of the main program in comparison to our polling jobs. It may happen that we have already started the polling sequence before the error messages from our first Ajax transaction arrive at the client. Therefore, also our polling jobs “check_progress.php5” should be able to react to empty superglobals $_POST and $_FILES :

if ( ( empty( $_POST ) ) && empty ( $_FILES ) ) {
	// Our error treatment ....
	// create an error message and send it to the Ajax client 
	// refer to messages that may turn up in parallel from the main PHP program
	....
}

 
The different Javascript client methods which receive their respective Ajaj messages should evaluate the error messages and error numbers from the server, display them and, of course, stop the polling loop in case it is still active. As these are trivial programming steps we do not look deeper into them.

Avoid trouble with limiting PHP parameters before starting the file upload

Although we can react to error situations as described above I think it is better to avoid them. Therefore, I suggest to check file size limits before starting any upload process.

In our special situation with just one big Zip-file to upload we can initiate a file size limit check on the server as soon as we choose the file on the client. This means that the Javascript client must be enabled to react to the file selection action and request some information about the parameters “post_max_size” and “upload_max_filesize” from the server. In addition we need a method to compare the server limits with the size of the chosen file.

Looking into
CSV file upload with ZIP containers, jQuery, Ajax and PHP 5.4 progress control – II
we see that we had defined a proper Javascript Control Object [CtrlO] for the upload form

<form id="form_upload" name="init_file_form"  action="handle_uploaded_init_files.php5" method="POST" enctype="multipart/form-data" >

 
which – among other things – contains the file selection input tag:

<input type="
file" name="init_file" id="inp_upl_file" >

 
However, we had not assigned any method to the file selection process itself. We are changing this now:

function Ctrl_File_Upl(my_name) {
	
	this.obj_name = "Obj_" + my_name; 
	
	// Controls related to GOC and dispatched object addresses
	this.GOC = GOC;
        this.SO_Tbl_Info = null; 
        this.SO_Msg      = null; 
			
	// ay to keep the selected file handles 
	this.ay_files = new Array(); 
		
	// msg for 1st Ajax phasefor file upload; 
	this.msg1 = ''; 
		
	// Timeout for file transfer process
	// this.timeout = 500000; // internet servers  
	this.timeout = 300000; 
		
	// define selectors (form, divs) 
	this.div_upload_cont_sel 	= "#" + "div_upload_cont";
	this.div_upload_sel 		= "#" + "div_upload";
	this.p_header_upload_sel 	= "#" + "upl_header" + " > span";
			
	this.form_upload_sel 		= "#" + "form_upload";
	this.input_file_sel 		= "#" + "inp_upl_file";
	this.upl_submit_but 		= "#" + "but_submit_upl";

	this.hinp_upl_tbl_num_sel	= "#" + "hinp_upl_tbl_num";			
	this.hinp_upl_tbl_name_sel	= "#" + "hinp_upl_tbl_name";			
	this.hinp_upl_tbl_snr_sel	= "#" + "hinp_upl_tbl_snr";			
	this.hinp_upl_succ_sel 		= "#" + "hinp_upl_succ";			
	this.hinp_upl_run_type_sel 	= "#" + "hinp_upl_run_type";			
	this.hinp_upl_file_name_sel 	= "#" + "hinp_upl_file_name";			
	this.hinp_upl_file_pipe_sel 	= "#" + "hinp_upl_file_pipe";

	// display the number of extracted and processed files 
	this.num_open_files_sel		= '#' + "num_open_files";
	this.num_extracted_files_sel 	= '#' + "num_extracted_files";
	
	// Other objects on the web page - progress area 
	this.trf_msg_cont	= '#' + "trf_msg_cont";
	this.trf_msg		= '#' + "trf_msg";
	this.imp_msg_cont	= '#' + "imp_msg_cont";
	this.imp_msg		= '#' + "imp_msg";
				
	// Status (!) message box (not the right msg box) 
	this.status_div_cont = '#' + "status_div_cont";
	this.id_progr_msg_p  = "#progr_msg"; 
	
	//progress bar 
	this.id_bar = "#bar"; 
			
	// right msg block
	this.span_main_msg	= "span_msg"; 
	
	// variables to control the obligatory check of the file size 
	this.file_size_is_ok = 1; 
			
	// variables for the Ajax response 
	this.upl_file_succ 	= 0; 
	this.upl_file_name 	= ''; 
        
	// File associated variables
	this.file_name      = '';
        this.file_size_js   = 0; 	// file size detected by JS
        this.file_size      = '';	// file size detected by server
        this.allowed_file_size = 0;	// allowed file size for uploads on the server  
        
	// Processing of files     
        this.num_extracted_files = 0;
	this.file_pipeline 	 = 0; 
	this.import_time 	 = 0; 
	this.transfer_time 	 = 0; 
        
	this.name_succ_dir = ''; 
	this.num_open_files = 1;  

	// transfer time measurement 
	this.date_start = 0;   
	this.date_end = 0; 
	this.ajax_transfer_start = 0; 
	this.ajax_transfer_end 	 = 0; 
			
	// database import time measurement 
	this.date_data_import_start = 0; 
	this.date_data_import_end = 0; 
	this.data_import_start = 0; 
	this.data_import_end = 0; 
			
	this.transfer_time	= 0; 
	this.processing_time = 0; 
	this.time_start = 0; 
			
	// Determine URL for the Form 
	this.url = $(this.form_upload_sel).attr('action'); 
	console.log("Form_Upload_file - url = " + this.url);  				

	// Register methods for event handling 
	this.register_form_events(); 
			 
}	
	
// Method to start uploading the file  
// -------------------------------------------------------------------
Ctrl_File_Upl.prototype.register_form_events = function() {
			
	$(this.input_file_sel).
click(
		$.proxy(this, 'select_file') 
	);
			
	$(this.input_file_sel).change(
		$.proxy(this, 'fetch_allowed_file_size') 
	);
	
	$(this.upl_submit_but).click(
		$.proxy(this, 'submit_form') 
	);
				
	$(this.form_upload_sel).submit( 
		$.proxy(this, 'upl_file') 
	); 
					
}; 

 
The reader recognizes that in contrast to the version of the CtrlO “Ctrl_File_Upl” discussed in previous articles of this series we have added some selector IDs for fields of some other web page areas. But the really important change is an extension of the methods for additional events in “Ctrl_File_Upl.prototype.register_form_events()”:

First, we react to a click of the file selection button of the file input field. This only serves the purpose of resetting fields and message areas on the web page. But we react also to the file selection itself by using the change event of the file input field. This triggers a method “fetch_allowed_file_size()” which retrieves the parameter “upload_max_filesize” from the server.

Note:
We assume here that the server admin was clever enough to set post_max_size > upload_max_filesize!
Therefore, we only will perform a file size comparison with the value of “upload_max_filesize”. If you do not trust your server admin just extend the methods and programs presented below by an additional and separate check for file sizes bigger than “post_max_size”. This should be an easy exercise for you.

Now, let us have a look at the new methods of our Javascript CtrlO :

	
// Method to react to a click on the file selection box 
// ---------------------------------------------------- 
Ctrl_File_Upl.prototype.select_file = function (e) {
	// Call method to reset information and message fields 
	// Note: The following method also deactivates the file submit button !  
	this.reset_upl_info(); 
};

	
// Method to check whether file size is too big   
// ---------------------------------------------
// We check whether the file size is too big 
Ctrl_File_Upl.prototype.fetch_allowed_file_size = function (e) {
			
	this.file_size_is_ok = 0; 
			
	// size of the file im MByte determined on the client 
	this.file_size_js = $(this.input_file_sel)[0].files[0].size/1024/1024;
	console.log("actual file size of chosen file = " + this.file_size_js); 	
			
	// Now trigger an Ajaj transaction 
	var ajax_url = "../func/get_allowed_file_size.php5"; 
	var form_data = ''; 
			
	// 03.07.2015: we avoid setup as this would be taken as the standard for subsequent Ajax jobs 
	$.ajax({
                //contentType: "application/x-www-form-urlencoded; charset=ISO-8859-1",
                // context:  Ctrl_Status
                url: ajax_url, 
		context:  this, 
		data: form_data, 
		type: 'POST', 
		dataType: 'json', 
                success: this.response_allowed_file_size, 
                error: this.error_allowed_file_size
        });
};

// Method for Ajaj error handling during file size check transaction 		
// --------------------------------------------------------------	
Ctrl_File_Upl.prototype.error_allowed_file_size = function(jqxhr, error_type) {
			
	// Reset the cursor 
	$('body').css('cursor', 'default' ); 

	// Error handling
	console.log("From Ctrl_File_Upl ::  got Ajax error for fetch_allowed_file_size" );  
	var status = jqxhr.status; 
	var status_txt = jqxhr.statusText; 
	console.log("From Ctrl_File_Upl.prototype.error_allowed_file_size() ::  status = " + status );  
	console.log("From Ctrl_File_Upl.prototype.allowed_file_size ::  status_text = " + status_txt ); 
	console.log("From Ctrl_File_Upl.prototype.allowed_file_size ::  error_type = " + error_type ); 
			
	var 
msg = "<br>Status: " + status + "  Status text: " + status_txt;    
	this.SO_Msg.show_msg(1, msg); 
};

// Method for Ajaj rsponse handling after file size check transaction 		
// --------------------------------------------------------------			
Ctrl_File_Upl.prototype.response_allowed_file_size = function (json_response, success_code, jqxhr) {
	
	// Reset the cursor 
	$('body').css('cursor', 'default' ); 
				
	var new_msg; 
	var status = jqxhr.status; 
	var status_txt = jqxhr.statusText; 
	console.log("response_allowed_fsize: status = " + status + " , status_text = " + status_txt ); 	

	// The allowed file size on the server
	this.allowed_file_size = json_response['allowed_size'];	
	// parseInt required due to possible MB or GB endings on the server 
	this.allowed_file_size = parseInt(this.allowed_file_size); 
	console.log("allowed file size on server = " + this.allowed_file_size); 	

	// size comparison
	// ----------------
	if ( this.file_size_js > this.allowed_file_size ) {
		this.file_size_is_ok = 0; 
		new_msg = $(this.span_main_msg).html();
		if (new_msg == undefined) {
			new_msg = ""; 
		}
		new_msg += "<br><span style=\"color:#A90000;\">File size too big.</span><br>" +
		"The server allows for files with a size ≤ " +  	
		parseFloat(this.allowed_file_size).toFixed(2) + " MB." + "<br>" + 
		"The size of the chosen file is " + parseFloat(this.file_size_js).toFixed(2) + " MB." + "<br><br>" + 
		"<span style=\"color:#A90000;\">Please choose a different file or reduce the contents !</span>" + "<br><br>" + 
		"If you permanently need a bigger file size limit on the server, please contact your administrator"; 
					
		this.SO_Msg.show_msg(0, new_msg); 
				
	// file size within limits 
	// -------------------------
	else {
		this.file_size_is_ok = 1; 
					
		new_msg = $(this.span_main_msg).html();
		if (new_msg == undefined) {
			new_msg = ""; 
		}
		new_msg += "<br><span style=\"color:#007700;\">File size within server limits.</span><br>" +
		"The server allows for files with a size ≤ " +  parseFloat(this.allowed_file_size).toFixed(2) + " MB." + "<br>" + 
		"The size of the chosen file is " + parseFloat(this.file_size_js).toFixed(2) + " MB." + "<br><br>" + 
		"<span style=\"color:#007700;\">Use the "Start Upload" button to start the file upload!</span>"; 
					
		this.SO_Msg.show_msg(0, new_msg); 
					
		// reactivate the submit button 
		// -----------------------------
		$(this.upl_submit_but).on("click", $.proxy(this, 'submit_form') ); 
		$(this.upl_submit_but).css("color", "#990000"); 
	}
};
	
// Method to reset some form and information fields on the web page 
// ---------------------------------------------------------------
// We have to reset some form and message fields
Ctrl_File_Upl.prototype.reset_upl_info = function() {
				
	var msg_progr = ''; 
	$(this.id_progr_msg_p).html('');
				
	var msg_trf = ''; 
	$(this.trf_msg_cont).css('display', 'none');
	$(this.trf_msg).css('color: #666'); 
	$(this.trf_msg).html(msg_trf);
		    	
	var msg_imp = ''; 
	$(this.imp_msg_cont).css('display', 'none'); 
	$(this.imp_msg).css('color: #666'); 
	$(this.imp_msg).html(msg_imp); 
		    	
	// Deactivate the "Start Upload" Button 
	// ------------------------------------
	$(this.upl_submit_but).off("click"); 
	$(this.upl_submit_but).css("color", "#BBB"); 

	// Reset also the main message area  
	// ----------------------------------------------
	this.SO_Msg.show_msg(0, ''); 

};	

 
This is all pretty straightforward and parts of it are already well known of our
previous descriptions for handling the Ajaj interactions with the server by the help of jQuery functionality.

A short description of what happens is:

  • When you click on the button of the file selection input field contents of fields in the message area of our web page and information fields about upload progress are reset as we assume that a new upload will be started.
  • During reset also the form’s submit button to start a file upload via Ajax/Ajaj is disabled. Note that we use jQuery’s “off(‘event’)”-functionality to to this.
  • As soon as the user selects a specific file we trigger a method which determines and saves the size of the chosen file to a variable and starts an Ajax transaction afterwards. This Ajax interaction calls a target PHP program “get_allowed_file_size.php5” in some directory.
  • The JSON-response of the PHP program is handled by the method
    Ctrl_File_Upl.prototype.response_allowed_file_size.

      The main purpose of this method is to make a comparison of the already determined file size with the limit set on the server and issue some warnings or positive messages. If the file size of the chosen file is within the server’s limit we reactivate our “submit” button of the upload form. (Note that we use jQuery’s “on(‘event’)”-functionality to to this.) Otherwise we keep it inactive – until a more suitable file is chosen by the user.

Thus, by very simple means we prevent any unreasonable upload process already before it can be started by the user.

It remains to show an excerpt of the simple PHP target file:

<?php

// start session and output buffer
session_start();
ob_start(); 

$file_size_limit = ini_get("upload_max_filesize");
$ajax_response = array();
$ajax_response['allowed_size'] = $file_size_limit; 

$ajax_response['sys_msg'] .= ob_get_contents();
ob_end_clean();

$response = json_encode($ajax_response);
echo $response;
exit; 

?>

Nothing special to discuss here.

Can we change the limiting parameters during PHP program execution?

No, we can not. But as a developer you may be able to define directory specific settings both for “post_max_size” and “upload_max_filesize” on the server by uploading “.htaccess”-files or “.user.ini”-files to program directories – if this is allowed by the administrator.

The web page php.net/manual/en/ini.core.php shows a column “Changeable” for all important parameters and the respective allowed change mechanisms.
See also:
http://php.net/manual/en/ini.list.php

Different methods of how to change PHP parameters as a user are described here:

 
However, if you are not a developer but a server admin, preventing users from changing PHP ini-paramters may even be more important for you:

 
Enough for today. In the next article of this series

CSV file upload with ZIP containers, jQuery, Ajax and PHP 5.4 progress tracking – VII

we shall have a look at possible problems resulting from timeout limits set for our Ajax transactions.

CSV file upload with ZIP containers, jQuery, Ajax and PHP 5.4 progress tracking – III

In the first 2 articles of this series I described a bit of what had to be done on the JS/jQuery client side to trigger the first phase (Phase I) of an Ajax controlled file upload (here: of a Zip container file). See:

CSV file upload with ZIP containers, jQuery, Ajax and PHP 5.4 progress tracking – I
CSV file upload with ZIP containers, jQuery, Ajax and PHP 5.4 progress tracking – II

In this third article, we take a first glimpse at what has to be done on the server side – in our case in the PHP 5.4 target program of our Ajax request. There are of course very many and different ways to deal with the initial treatment of an uploaded file. What I normally do is to create a “File_Handler” object based on a class which encapsulates and provides all required methods. However, for the sake of a better understandability the code fragments presented below do not always follow a stringent OO line of code development and are sometimes very basic. We only show code elements that are of fundamental importance.

The reader may remember that the method of our Javascript CtrlO for controlling the upload form (see the last article) called a PHP target program named

handle_uploaded_init_files.php5?file

.
The attached GET-parameter distinguishes the first phase of the upload from several following phases. One of the initial things our PHP program should do is to open/access a PHP session, to start PHP output buffering and to check whether the $_GET element $_GET[‘file’] exists:

Excerpts from the PHP target program of Phase I – handle_uploaded_init_files.php5:

	$time_0 = microtime(true); 
	session_start();
	ob_start(); 
	....
	// Deal with phase I of the upload 
	if ( isset( $_GET['file'] )) {
		...
		$response = handle_transferred_file(); 
		ob_end_clean(); 
		echo $response;  
	}

(Side remark: Note that the attached Get parameter is nevertheless transferred via the POST mechanism of HTTP !)

$response represents a prepared encoded JSON-Object which is sent back to the JS-Ajax-client at the end of the program. By the “if”-statement we just distinguish the actions of Phase I from later phases where we deal with each file transferred in our large Zip-container file. The main work for our phase I is in our example obviously done inside a function “handle_transferred_file()”.

The use of “session_start()” seems to be quite reasonable. The PHP manual
http://php.net/manual/en/session.upload-progress.php
describes that upload progress information is supplied via $_SESSION. This is just the way the progress tracking of PHP 5.4 works!

However, we shall come back to this point at the bottom of this article and we shall see that things are not that simple. But, we may use the $_SESSION array also for keeping other interesting information. Anyway, using a PHP-session (=opening/accessing a session) will do no harm here.

But why do we need ob_start() ?
In the last article of our series the Ajax answer to the client was requested to have the form of a JSON object. So, our Ajax driven client program expects exactly one information stream in the form of a JSON object. However, if your own PHP code accidentally produces strings by executing some echo, print or print_r statements this rule will be violated. The client will receive the first PHP output as the expected Ajax JSON answer and
will not be able to parse it. This would result in an Ajax client error! Another source of unwanted and not JSON encoded output may come from the PHP engine itself which may create warnings and error messages during code execution. Therefore, it is a good habit to gather all such information in the output buffer and put it eventually as a special string element (as “system_mgs”) of an array which we shall encode as the final JSON object. See below.

A function and an array for producing the JSON answer of upload Phase I

Let us now turn to our function dealing with phase I. In our simple test case it basically does 2 things:

  • It creates a singleton object for performing progress tracking and later some file operations. This object then does the necessary things itself and produces an array which we in our example receive in the variable $response.
  • It enriches the response array with some information and encodes it as a JSON object.

That we have split the required actions into these steps is again more for the sake of illustration purposes.

function handle_transferred_file() {
	...
	// Some local variables 
	$ctrl_msg = '';
	
	// Includes
	require_once $my_include_path . 'class_file_handler.php5';
	require_once $my_include_path . 'class_file_handler_params.php5';
		
	// Parameter Singleton with parameters to control the file handling  	
	$F_Params = new FileHandlerParams(); 
		
	// File handler object (singleton) 	
	$F_Handler = new Basic_Class_File_Handler( $F_Params );
	if (isset($FCheck->msg)) {
		$ctrl_msg .= "\r\nFCheck initialized";
		$ctrl_msg .= "\r\nInitial msg = " . $FCheck->msg;
	}

	// Transfer the file to its directory location and unzip its contents 
	$F_Handler->check_and_save_uploaded_file(); 

	// Required time and response enrichment 		
	$time_f = microtime(true);
	$dtime_f = $time_f - $time_0;
	$F_Handler->ay_ajax_response_1["transfer_time"] = $dtime_f;
	
	// Response enrichment by system messages form the output buffer 
	$F_Handler->ay_ajax_response_1['sys_msg'] .= ob_get_contents(); 
	
	// return JSON encoded array 
	$response =json_encode($F_Handler->ay_ajax_response_1);
	return $response; 
}

This is fairly simple to understand: We load some class definitions – one for the handling of the file transferred into the $_FILE superglobal and one with a bunch of parameters. We then create a singleton object $F_Handler which does most of the required actions of Phase I. Its property “$F_Handler->ay_ajax_response_1” obviously is an array which is enriched by the contents of the PHP output buffer and some time information (just for illustration purposes). This array is eventually encoded as the required JSON answer object.

Typically the element $F_Handler->ay_ajax_response_1[‘sys_msg’] is used on the client side for tests only via the console.log() statement of Javascript.

Possible parameters of the File Handler object $F_Handler

What kind of parameters may be required? E.g.: the path of the directory where we want to save our transferred Zip-file and/or its contents on the server. The expected file ending. The maximum file size allowed. A parameter defining whether we really want to check the progress of the upload. The reader may think about more useful parameters.

In our example such parameters can be gathered and maintained via properties of the class “FileHandlerParams”. The F_Handler object may extract them from the respective Parameter object given as an argument to its constructor, and write them afterward into internal property variables.

Main elements of a Basic_File_Handler class

The “Basic_File_Handler_Class of our example may contain the following methods:

class Basic_Class_File_Handler {
	
	var $file_key; 		// Key of uploaded file in $_FILES[$key]
	var $file_name = ''; 	// Name of present file (uploaded or part of a pipeline)  
	var $file_mime = ''; 	// Mime-Type of present file 
	var $file_end = ''; 	// Suffix (ending) of present file 
	
	var $file_expected_end = array("csv", "zip");	// Allowed suffixes of the transferred file 
	
	var $file_size; 		// Size of present file 
	var $max_file_size = 100000000;	// Maximum allowed size 100MBytes
	var $check_progress = 0; 	// Check progress by means of PHP 5.4  ?
	var $sess_key_progress = ''; 	// The key of $_SESSION where to find upload progress infos 
	
	// Upload dir 
	var $upl_dir;  			// The given short name of the dir without root path 
	var $target_dir; 		// The full path of the target dir on the PHP server 

	var $ziel_file_name_oe; 	// Target name of file without ending and "."
	var $ziel_file_name; 		// Full target name of file 
	var $ziel_file_pfad; 		// Full target path relative to web domain dir  
	var $ziel_file_pfad_dom;	// Full target path rel. to PHP root on the server 

	var $root;   			// rel. path of present application to PHP application root
	var domain_root;		// rel. path of present application to Web domain root 
	
	var $upload_success = 0; 
	var $msg = ''; 
	var $sys_msg = ''; 
	var $err = 0; 
	var $err_msg = '';  
	
	// zip file info 
	var $num_extracted_files = 1; 
	var $file_pipeline = 0;  // will be set to 1 if the zip-file contains more than 1 files 
	
	// Ajax response array 
	var $ay_ajax_response_1 = array();   // For phase 1 	
	
	.....
			
// Main methods 
// -----------
	// constructor 
	function __construct($Params)  {
 		...
	}

	// function to check properties of the uploaded file and save it in a target directory on the server  
	function check_and_save_uploaded_file() {
		....
	}		
	
	// Method to prepare Ajax (JSON) response array for phase 1 of upload 
	function prepare_ajax_response_phase_1() {
		...
	}
		
	// Check existence of transferred file in $_FILES
	function check_file_existence_and_props() {
		...
	}
	
	// Check suffix = file ending 
	function get_and_check_file_suffix() {
		...
	}
	
	// Check File_Size
	function check_file_size() {
		...
	}
		
	// Delete all existing files in the upload dir 
	function delete_files_from_upload_dir() {
		...
	}
	
	// Move the uploaded file or the content files of an uploaded zip file to the target directory 
	function move_file_to_upload_dir() {
		...
	}
	
	// function to determine the number of extracted files and the name of the next file to handle  
	function determine_num_files_and_next_file_name() {
		...
	}
	
	// Method to handle a zip archive 
	function handle_zip_archive( $dest_file, $dest_dir) {
		...
	}
	...
	...

// End of class definition  
}

We shall look at some details of these methods in the articles to come.

The key to session information about the progress of the ongoing upload progress

The constructor of our Basic_File_Handler class gets the task to read in parameters. In addition we use it here and try to retrieve some (initial?) progress information from the $_SESSION array – just for learning purposes. Actually, we shall see that this trial will NOT give us any progress information at all or only a trivial one.

function __construct($Params_ext) {
	
	// read external parameters 
	$num_args = func_num_args(); 
	if (num_args == 1 ) {
		$Params = func_get_arg(0);
		if ( is_object($Params) && get_class($Params) == "FileHandlerParams" ) {
			$this->file_key  = $Params->file_key; 
			if( is_array($Params->file_types) && count($Params->file_type) > 0 ) {
				$this->file_type = $Params->file_types; 
			}
			$this->upl_dir 	= $Params->upload_dir . "/";
			$this->max_file_size	= $Params->max_file_size; 
			$this->check_progress= $Params->check_progress; 
		}
	}
	// Error treatment 
	else {
		...
		$this->ay_ajax_response_1[sys_msg] .= "\r\nWrong Parameter object!"; 
	}		
		
	// Test the progress information in $_SESSION (Is this reasonable here ???) 
	if ( $this->check_progress == 1 ) {
		// Get the required string end for the key of progress info in the $_SESSION array
		// This information was delivered via $_POST by the Ajax client program 
		$this->sess_key_progress = '';
		$key_POST = ini_get("session.upload_progress.name");
		if (isset( $_POST[$key_POST] ) ) {
			$this->sess_key_progress .= ini_get("session.upload_progress.prefix"). $_POST[$key_POST];
			$this->sys_msg .= "<br>sess_key_progress = " . $this->sess_key_progress;  
			$this->ay_ajax_response_1['sess_key_progress'] = $this->sess_key_progress;  
			$_SESSION['progress_key'] = $this->sess_key_progress;
			
			// Write a test value into a special Session variable 
			$current = -1;
			if (isset($_SESSION[$this->sess_key_progress]) && !empty($_SESSION[$this->sess_key_progress])) {
				$current 	= $_SESSION[$this->sess_key_progress]["bytes_processed"];
				$total 		= $_SESSION[$this->sess_key_progress]["content_length"];
				$current	= ($current < $total) ? ceil($current / $total * 100) : 100;
			}
			$this->sys_msg .= "<br>Initial progress value of the file transfer was " . $current; 
		}
	}	
		
	// set the TARGET DIR for saving the file
	$this->target_dir 	= $this->root . $this->upl_dir;
			
	return;
}

 
$this->check_progress is set by the parameters transferred.

Note that progress tracking and the delivery of related information in the $_SESSION array requires the following setting in the php.ini file (“/etc/php5/apache2/php.ini” on Opensuse)

; Enable upload progress tracking in $_SESSION
; http://php.net/session.upload-progress.enabled
session.upload_progress.enabled = On

In the lower part of the PHP code we see how the key for the element of the $_SESSION array which contains information about the upload progress is composed:

We first need a parameter from the php.ini file which we read by ini_get(“session.upload_progress.prefix”). Then we need another parameter of our php.ini file on the server which gives us a special index of the $_POST array:
$key_POST = ini_get(“session.upload_progress.name”).
This index points to an element of the $_POST array which (hopefully) contains a unique identifier of our presently progressing upload process. We must submit this identifier by our Ajax client method initiating the whole file transfer; see the last article in this series. Eventually, we combine both pieces of information to get the index ($this->sess_key_progress) of an element of the $_SESSION array which will contain progress information about our upload.

In the code above we write this information into our output array as part of an Ajax response.

When and how is the progress information
available in the $_SESSION array?

The next code section then uses our composed key to read a test status value of the upload (at the point of code execution) from the $_SESSION array. Now let us assume that we really used our coding above – what values would we get ? Some integer numbers between 0 and 100 ?

The answer clearly is NO – we would always get “-1”. Why ?

You may say – maybe the connection is too fast and the $_SESSION variables may get erased when the upload has finalized. Well there is some truth in this also:

If we really wanted to test progress tracking in a LAN we may need to reduce the bandwidth of your network connection. Information about how one can achieve this can be found in the article
Geschwindigkeit/Übertragungsrate eines Netzwerkinterfaces unter Linux reduzieren

And yes – depending on the parameter setting in the “php.ini”-file the progress related elements of the $_SESSION array may get eliminated:

; Cleanup the progress information as soon as all POST data has been read
; (i.e. upload completed).
; Default Value: On
; Development Value: On
; Production Value: On
; http://php.net/session.upload-progress.cleanup
session.upload_progress.cleanup = On

But even if you reduced your bandwidth considerably in comparison to your transferred file you would nevertheless only get “-1” ! And even if you set the cleanup parameter to “Off” you would only get a trivial answer: 100.

The real reason for our failure is simply that the code execution of our PHP target program only starts when all data sent via the POST mechanism are completely received – this includes the file data!

This is very logical! The core purpose of the PHP job triggered by our file upload form in the last article is to deal with the uploaded file. It cannot be used for progress tracking by principle! We need a different and independent mechanism – in our case independent polling jobs.

So, when the PHP code listed above is executed on the server the file is already fully uploaded and the $_SESSION elements of $_SESSION which contained the progress information may no longer exist if the cleanup parameter is ON in php.ini settings!

The fact that the PHP job started by the upload form is of no use for progress tracking has two important implications:

First: By what should or could the PHP session for progress tracking be started at all in our Ajax controlled job environment? One assumption could be that the PHP engine does it by itself as soon as it somehow recognizes upload circumstances. However, this is not the case – and uncontrolled automatic session starts would actually introduce security risks into PHP. In fact we have reached an important point :

The PHP session must have been started already before our Ajax controlled file transmission from the client starts!

Otherwise the whole progress tracking process will not work! It uses a PHP session that must have been opened before!

How could we do this? Now, I may remind the kind reader about a note in the last article: Our HTML page with the upload form was created by a PHP program – which itself may use method of the classes of a template engine like Smarty. So, the PHP program that creates our initial web page already could open the required PHP session! An alternative would be that our client starts a precursor Ajax job with the sole purpose of opening a PHP session. Not very efficient, but possible.

And another aspect has become very clear now that would also be valid for independent polling jobs:

If we want to access the progress information in the $_SESSION array about the ongoing upload process we MUST have the $_
POST information about the upload process identifier available as the first information reaching the server – i.e. before the file data themselves start running in! This is the very reason why we had to take care about the order by which data are sent from the client to the server – see the related remarks in the previous article!

Note in addition that we did not destroy the session or unset its cookie at the end of our target program program function for Phase I. The reason is that we may use the session also in later phases.

Enough for today. Please, note also that the only substantial and effective things we have discussed so far on the PHP side were:

  • to access a hopefully already existing (!) PHP session,
  • to initiate the PHP output buffer

However, we have learned something about the key we use for accessing progress information in the $_SESSION array and understood its relation to a $_POST parameter, which must be provided by the client.

We shall come back to the treatment of the fully uploaded file by the methods listed above in a later article.
In the next article

CSV file upload with ZIP containers, jQuery, Ajax and PHP 5.4 progress tracking – IV

we shall instead look at the required sequence of Ajax controlled “polling” jobs started by the client to retrieve information about the upload progress status from the server. Independently of our main PHP job ….