KVM/qemu mit QXL – hohe Auflösungen und virtuelle Monitore im Gastsystem definieren und nutzen – II

Diese Artikelserie befasst sich mit der Möglichkeit, hohe Monitor-Auflösungen auch beim Arbeiten mit Linux-Gastsystemen unter einem KVM/QEMU-Hypervisor zu nutzen. Dabei sollen das Spice-Protokoll und ein QXL-Device als virtuelle Grafikkarte des Gastsystems genutzt werden.

Wenn man mit einem virtualisierten System arbeitet, kann der Zugriff auf dessen Desktop entweder am KVM-Host selbst oder aber von einem Remote-System aus erfolgen. Bis auf weiteres konzentrieren wir uns auf das erstere Szenario, d.h. wir greifen unter einem Desktop des KVM-Hostes auf den Desktop des Gastes zu. Wir betrachten also den Fall mehrerer am Host selbst angeschlossener, hochauflösender Monitore, auf dem die Desktop-Umgebung des virtualisierten Gastsystems in einem oder mehreren Fenstern dargestellt werden soll. In einem solchen Szenario ist der durch Netzwerkprotokolle entstehende zusätzliche Komplexitätsgrad irrelevant.

Ausgangspunkt unserer Überlegungen des ersten Artikels war die Feststellung, dass nicht immer alle Möglichkeiten der physikalischen Monitore automatisch und richtig erkannt werden. Und selbst wenn das geschehen sollte, wird die Information nicht unbedingt korrekt an das Gastsystem weitergegeben. Dies gilt u.a. für externe Monitore. Dann ist Handarbeit angesagt. Besondere Vorkehrungen sind i.d.R. auch erforderlich, wenn man ggf. mehrere virtuelle Monitore eines Gastsystems nutzen und auf die physikalischen Schirme des Hosts verteilen will.

Im letzten Beitrag

KVM/qemu mit QXL – hohe Auflösungen und virtuelle Monitore im Gastsystem definieren und nutzen – I

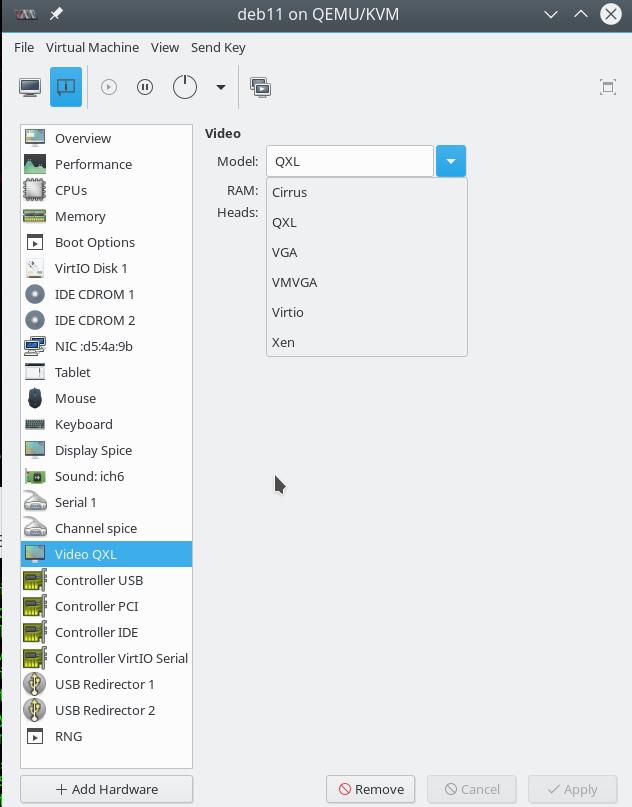
hatte ich das Universaltool xrandr zur Konfiguration von Auflösung und Orientierung von Bildschirmen unter X-Window vorgestellt und bereits auf einem exemplarischen KVM-Host (Laptop mit Opensuse) eingesetzt. Danach hatten wir uns dem mittels “virt-manager” und QEMU virtualisierten Gastsystem zugewandt und uns ein wenig damit befasst, wie denn eine virtuelle Grafikkarte vom Typ QXL aussieht und wie man den dortigen Video RAM für hohe Auflösungen konfiguriert.

Wir gehen nun auf die Frage ein, welche Vorkehrungen im Gastsystems noch erforderlich sind, um einen oder mehrere hochauflösende virtuelle Monitore performant nutzen zu können. Abschließend wenden wir dann “xrandr” im Gastsystem an.

Zusammenspiel benötigter Komponenten

Wie greifen eigentlich die in unserem Szenario benötigten Komponenten Spice, virt-manager, libvirt, Qemu, QXL ineinander? Ich habe mal versucht, das in einer Skizze zu verdeutlichen:

Die Skizze stellt die Situation für einen Virtualisierungshost dar, an dem 3 physikalische Monitore angeschlossen sind. Ein auf diesem KVM-Host angemeldeter User greift mittels Spice-Clients auf das dort installierte Gastsystem zu. (Das ist ein typisches Szenario für Entwickler-Laptops oder Linux-Workstations, in dem man mittels Virtualisierung Eigenschaften eines Zielsystems darstellt.) Das Gast-OS läuft in einer virtualisierten Umgebung, die durch QEMU im Zusammenspiel mit KVM bereitgestellt wird; das virtualisierte System (also der “Gast”) wurde in der Skizze als QEMU VM (Virtual Machine) bezeichnet.

Die Spice-Komponenten sind gelblich dargestellt. “virt-viewer” und “remote-viewer” sind verschiedene Spice-Clients, die mit dem Spice-Server kommunizieren können. Diese Clients ermöglichen die Darstellung des grafischen Outputs des Gastsystems in einem Fenster. Ähnliches leistet auch die in “virt-
manager” integrierte “grafische Spice-Konsole“.

Ich habe versucht, in der Skizze anzudeuten, dass der Spice-Client “remote-viewer” ganz unabhängig von libvirt-Komponenten funktioniert (s. hierzu etwa Red Hat Virtualization Guide für RHEL 6, Kap. 17.2 .

Eine Skizze zur genaueren Struktur des QXL-Devices der QEMU VM mit bis zu vier “heads” für vier virtuelle Monitore von Linux-Gastsystemen hatte ich bereits im vorhergehenden Artikel geliefert. In der hiesigen Skizze habe ich die Situation für 2 “heads” angedeutet; 2 virtuelle Monitore des Gastes werden auf zwei physikalischen Monitoren in Spice-Client-Fenstern angezeigt.

Anmerkungen zur Client-Server-Struktur

Aus der Skizze geht die Client/Server-Struktur der Komponenten nicht so recht hervor, da im dargestellten Fall ja alles auf dem Virtualisierungshost abläuft. Aber sowohl Spice als auch libvirt/qemu sind netzwerkfähig und somit als Client/Server-Systeme ausgelegt. Der “Spice-Server” wie auch der Dämon “libvirtd” sind dabei immer auf dem Virtualisierungs-Server (also dem KVM-Host) zu installieren. Zur Konfiguration der Protokoll-Einstellungen auf einem Linux-Remote-System, von dem aus die Spice-Clients “Spice Console des virt-managers” bzw. der stand-alone Spice-Client “remote-viewer” über ein Netz mit ihren Gegenparts auf dem Virtualisierungshost kommunizieren sollen, siehe
https://www.spice-space.org/spice-user-manual.html
bzw.
https://libvirt.org/docs.html
https://wiki.ubuntuusers.de/virt-manager/.
Virtualization-Administration-Guide von Red Hat für RHEL 6

Im virt-manager bietet der Punkt “File” > Add new connection” Felder zur Konfiguration einer Verbindung an. Spice kann über SSH getunnelt werden; für virt-manager wird eh’ qemu+ssh angeboten.

Wie einleitend festgestellt, werden uns in dieser Artikelserie zunächst mit einer Konfiguration, wie sie auf der Skizze dargestellt ist, begnügen. Spezielle Netzwerk-Einstellungen entfallen dann.

QXL-Treiber und spice-vdagent

Auf der rechten Seite der obigen Skizze erkennt man das virtuelle QXL-Device. Die Skizze deutet hier an, dass im Betriebssystem [OS] des Gastes zwei Komponenten erforderlich sind, um die notwendige Unterstützung zu liefern – ein Treiber und ein sogenannter “spice-vdagent”. Wir müssen uns nun mit deren Bereitstellung im Gastsystem befassen. Es gilt:

  • Der qxl-Treiber ist, wie Video-Treiber für reale Karten auch, ein drm-fähiges Kernelmodul. “drm” steht dabei für “direct rendering manager”; https://de.wikipedia.org/ wiki/ Direct_Rendering_Manager).
  • Der spice-vdagent wird dagegen als Dämon bereitgestellt und ist als Service zu aktivieren.

Versionsabhängigkeiten und Test-Setup

Leider muss ich vor weiteren Details vorausschicken, dass sowohl das Laden des qxl-Kernel-Moduls als auch die faktische Wirkungsweise von qxl-Treiber und spice-vdagent stark von der Art/Version des Linux-Gastsystems, dessen Kernel und zu allem Überfluss auch noch von der dortigen Desktop-Version abhängen. Ich nehme als Beispiel mal Debian 8 “Jessie”:

Unter dem ursprünglichen Kernel 3.16 von Jessie lässt sich das qxl-Modul nicht ohne weiteres laden. Es verlangt einen mir
unbekannten Parameter. In Installationen, die Debian-Backport-Pakete nutzen, wird ab Kernelversion 4.2 das qxl-Modul dagegen automatisch geladen. Ferner hat das Laden des qxl-Moduls – je nach Kernelversion und Desktop-Version unterschiedliche Auswirkungen auf automatische Auflösungsanpassungen. Ich komme darauf in einem weiteren Artikel zurück.

Wer die nachfolgend beschriebenen Punkte in einer konsistenten Weise nachvollziehen will, sollte bzgl. der Gastsysteme deshalb auf ein aktuelles Debian 9 (“Stretch”) (mit Gnome, KDE 5) oder aber ein Kali 2017 (mit Gnome) zurückgreifen. Diese Systeme bilden im Moment aus meiner Sicht den Sollzustand am besten ab.

Wählt man dagegen Opensuse Leap 42.2, so bitte mit Gnome. Mit debian-8-basierten Systemen, neueren Kernel-Versionen, unterschiedlichen libvirt/spice-Versionen aus Backport Repositories sowie mit dem offiziellen Plasma5-KDE5/KDE4-Mix unter Opensuse 42.1/42.2 kann es dagegen abweichende Resultate geben. “Red Hat”-Gastsysteme habe ich bislang nicht getestet.

Test-Setup

  • KVM-Gast: Debian 9 “Stretch” (mit Gnome und KDE5) / Kali2017 (Gnome). Virtuelles Grafik-Device: QXL mit maximaler ram/vram-Bestückung.
  • KVM-Host: Linux-Systeme mit Opensuse Leap 42.2 und dem dortigen KDE5/Plasma5/KDE4-Mix; darunter auch der im letzten Artikel angesprochene Laptop mit einem externen HDMI-Schirm.
  • Grafischer Spice-Client für einen virtuellen Monitor: die “grafische Spice Konsole”, die in virt-manager integriert ist.
  • Grafischer Spice-Client für mehrere virtuelle Monitore: “remote-viewer” (muss ggf. über das Paket “virt-viewer” nachinstalliert werden).

Bereitstellung QXL-Treiber im Gastsystem

Die Kapazitäten und die Performance einer Grafikkarte können nur mit einem geeigneten Treiber vollständig genutzt werden. Das ist für virtuelle Grafik-Devices wie das QXL-Device nicht anders.

Für einen KVM-Gast kann man in einem Spice-Client in jedem Fall Auflösungen bis zu 1024×768 erreichbar – auch wenn der device-spezifische QXL-Treiber im Gastystem gar nicht installiert ist. (Dies wird durch einen Fallback auf einen “standard vga”-Treiber bzw. ein VESA Framebuffer-Device ermöglicht.) Will man dagegen mit höheren Auflösungen arbeiten, so kann dies ggf. auch ohne QXL-Treiber funktonieren; allein aus Performancegründen lohnt es sich aber zu überprüfen, ob der QXL-Treiber im Gastsystem geladen ist:

root@deb11:~# lsmod | grep -iE "(video|qxl|drm)"
qxl                    69632  3
ttm                    98304  1 qxl
drm_kms_helper        155648  1 qxl
drm                   360448  6 qxl,ttm,drm_kms_helper

 
Falls das nicht der Fall sein sollte, muss man ggf. SW-Pakete nachinstallieren. Das Kernelmodul wird unter Debian über das Paket “xserver-xorg-video-qxl” bereitgestellt; unter Opensuse ist dagegen das Paket “xf86-video-qxl” erforderlich. (Zudem sollte “qemu-vgabios” installiert sein).

U.a. unter Opensuse Leap 42.2 lädt das Gastsystem den QXL-Treiber dann aber immer noch nicht zwingend automatisch. Das Modul ist in solchen Fällen also von Hand über “modprobe qxl” zu laden; den X-Server muss man dann neu starten. Ferner muss man sich darum kümmern, in welcher Weise man in seinem (Gast-) Betriebssystem dafür sorgen kann, dass Kernelmodule bereits beim Booten geladen werden:

Automatisches Laden des qxl-Kernelmoduls unter Opensuse Leap
Unter Opensuse kann man etwa “dracut -f” oder “mkinit” bemühen, nachdem man einer Datei “/etc/dracut.conf.d/01-dist.conf” einen Eintrag
force_drivers+=”qxl”
hinterlassen hat. Dabei wird das initramfs bemüht.
 
Alternativ und soweit systemd aktiv ist:
Im Verzeichnis “/etc/modules-load.d/” eine Datei “qxl.conf” anlegen und dort einfach “qxl” eintragen.
 
Als weitere Möglichkeit, die ich aber nicht getestet habe, legt man unter “/etc/X11/xorg.conf.d/50-device.conf” einen Eintrag der Form

Section "Device"
 Identifier "device0"
 Driver "qxl"
EndSection

an.

Automatisches Laden des qxl-Kernelmoduls unter Debian
Unter Debian-Systemen nimmt man dagegen einfach einen Eintrag in der Datei “etc/modules” vor. Debian 9 lädt das qxl-Modul aber eh’ schon automatisch, wenn es erkennt, dass es unter KVM/QEMU virtualisiert läuft und ein QXL-Device vorhanden ist .

OS-unabhängig über einen systemd-Service
Persönlich finde ich eigentlich ein kleines eigenes Skript, das man mit einer Service-Datei (qxl.service) versieht, am besten. Dort kann man nämlich z.B. über “lspci” vorab analysieren, ob überhaupt ein QXL Device zur Verfügung steht. Ich gehe auf diese Lösung aus Platzgründen aber nicht weiter ein.

Für alle Varianten gilt: Der Treiber sollte jedenfalls geladen sein, bevor der X- oder Wayland-Server gestartet wurde.

Bedeutung und Aktivierung des spice-vdagent

Der sog. “spice-vdagent” hat/hatte mehrere wichtige Aufgaben; ich stelle sie mal nach meinem Verständnis dar:

  • Kommunikations- und Event-Support: Der vdagent triggert und optimiert die Kommunikation zwischen dem Gast OS über den Spice-Server mit dem (remote) Spice-Client auf dem KVM-Host oder auf einem Remote-Host. U.a. werden Mouse-Positionen zwischen KVM-Gastsystem und Host abgeglichen und interpretiert – das ermöglicht u.a. ein nahtloses Verlassen von Spice-Fenstern auf dem Host.
  • Copy/Paste: Der vdagent ermöglicht beidseitiges Copy/Paste zwischen Applikationen des (Remote-) Host-Systems, auf dem das Spice-Fenster zur Ansicht des Gast-Desktops läuft, und Applikationen des KVM-Gast-Systems.
  • Multi-Monitor-Support: Er unterstützt im Zusammenspiel mit dem qxl-Treiber Gast-Systeme mit mehreren virtuellen Monitoren, deren Output in mehreren Spice-Remote-Viewer-Fenstern dargestellt werden kann. U.a. übernimmt er dabei das korrekte Mouse-Handling auf der Gast- wie der (Remote-) Host-Seite.
  • Auflösungsanpassung: Er ermöglichte eine automatische Anpassung der Auflösung des Gast-Desktops an die gewählte Größe des Spice-Client-Fensters auf dem (Remote-) Host.
    Hinweis: Das wird in aktuelleren Linux-Systemen aber wohl anders gemacht; s. hierzu den nächsten Artikel.
  • File-Transfer: Freigabe eines Zugriff des Gastsystems auf bestimmte Verzeichnisse des (Remote-) Hostes; File-Transfer mittels Drag & Drop

Man sieht: Der spice-vdagent hat etwa solche Aufgaben wie die “VMmware-Tools”, die in einem VMware-Gastsystem zu installieren sind.

Einen detaillierteren Überblick verschaffen die Web-Seiten https://www.spice-space.org/spice-user-manual.html#agent und https://www.spice-space.org/features.html
Die Platzierung des Agents im KVM-Gast und in der Kommunikationsstruktur entnimmt man der Skizze auf der Seite https://www.spice-space.org/index.html.

Die Nutzung des spice-vdagent erfordert bestimmte Voraussetzungen:

Vorbereitung der QEMU VM auf dem KVM-Host
Der Einsatz des spice-vdagents erfordert bestimmte Features der virtuellen Maschine und zugehörige Startoptionen für die QEMU VM. So muss ein bestimmtes Serial-Device vorhanden sein (s. die Skizze oben) und ein Kommunikationskanal für den Spice-Agent reserviert werden (https://wiki.archlinux.org/ index.php/ QEMU#SPICE). Man kann sich einige händische Arbeit durch das Anlegen der virtuellen Maschinen (“Domänen” im QEMU-Slang) mittels “virt-manager” ersparen:
“virt-manager” gibt die notwendigen Features automatisch vor und konfiguriert die zugehörigen QEMU-Optionen für den Start der virtuellen Maschine.

Maßnahmen im Gast-OS
Der spice-vdagent ist als systemd-Service ausgelegt und kann als solcher im KVM-Gastsystem enabled (über den nächsten Reboot hinaus) und gestartet werden.

root@guest:~#  systemctl enable spice-vdagentd.service
root@guest:~#  systemctl start spice-vdagentd.service

 
(Nachtrag 22.02.2018: Natürlich muss man den Agent erstmal installieren; hierzu nutzt man das Paket-Management des Gastsystems; unter Debian mittels “apt-get install spice-vdagent”. Um nach dem “Enablen” des zugehörigen Service z.B. Copy/Paste in beide (!) Richtungen zwischen Spiece-Konsole und der Umgebung ausführen zu können, muss man zudem die virtuelle Maschine und deren Konsole neu starten.)

Damit haben wir alles erledigt, was zur Performance-Optimierung, einer vernünftigen Mouse-Steuerung etc. notwendig war.

Einsatz von xrandr für unerkannte Auflösungsmodes im Gastsystem

Wir kommen nun wieder auf unser Laptop-Problem mit einer unerkannten Auflösung von 2560x1440_44Hz aus dem letzten Artikel zurück. Dort hatten wir bereits beschrieben, wie man den KVM-Host vorbereitet und die dort bislang unerkannte Auflösung auf einem externen HDMI1-Monitor mittels xrandr aktiviert. Wird dann die für den Host-Desktop bereitgestellte Auflösung auch auf dem Gastsystem automatisch erkannt?

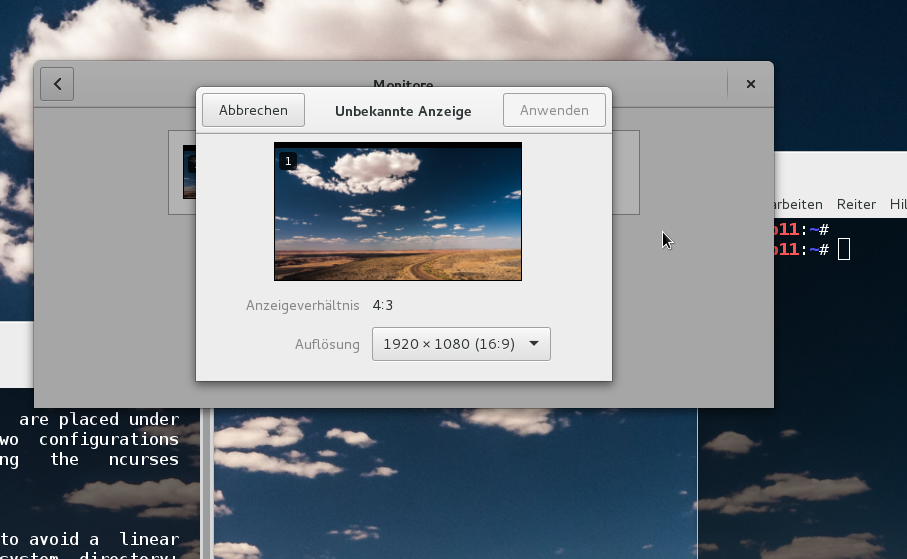
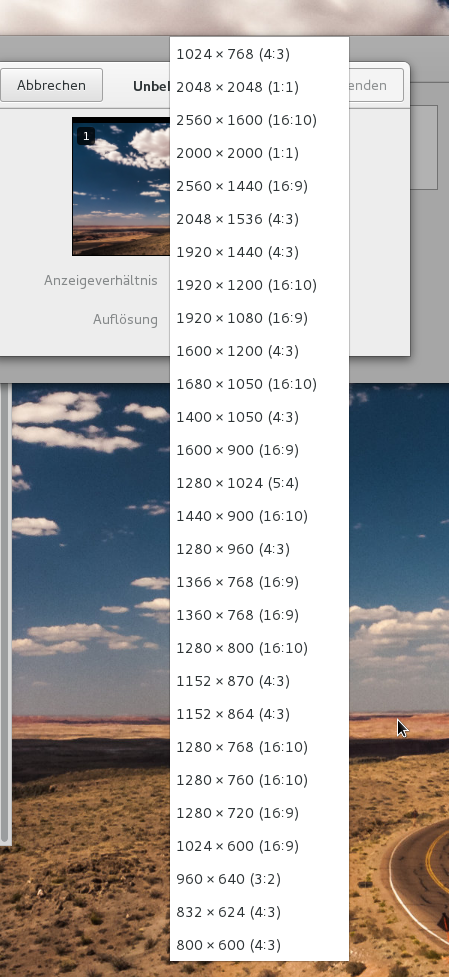
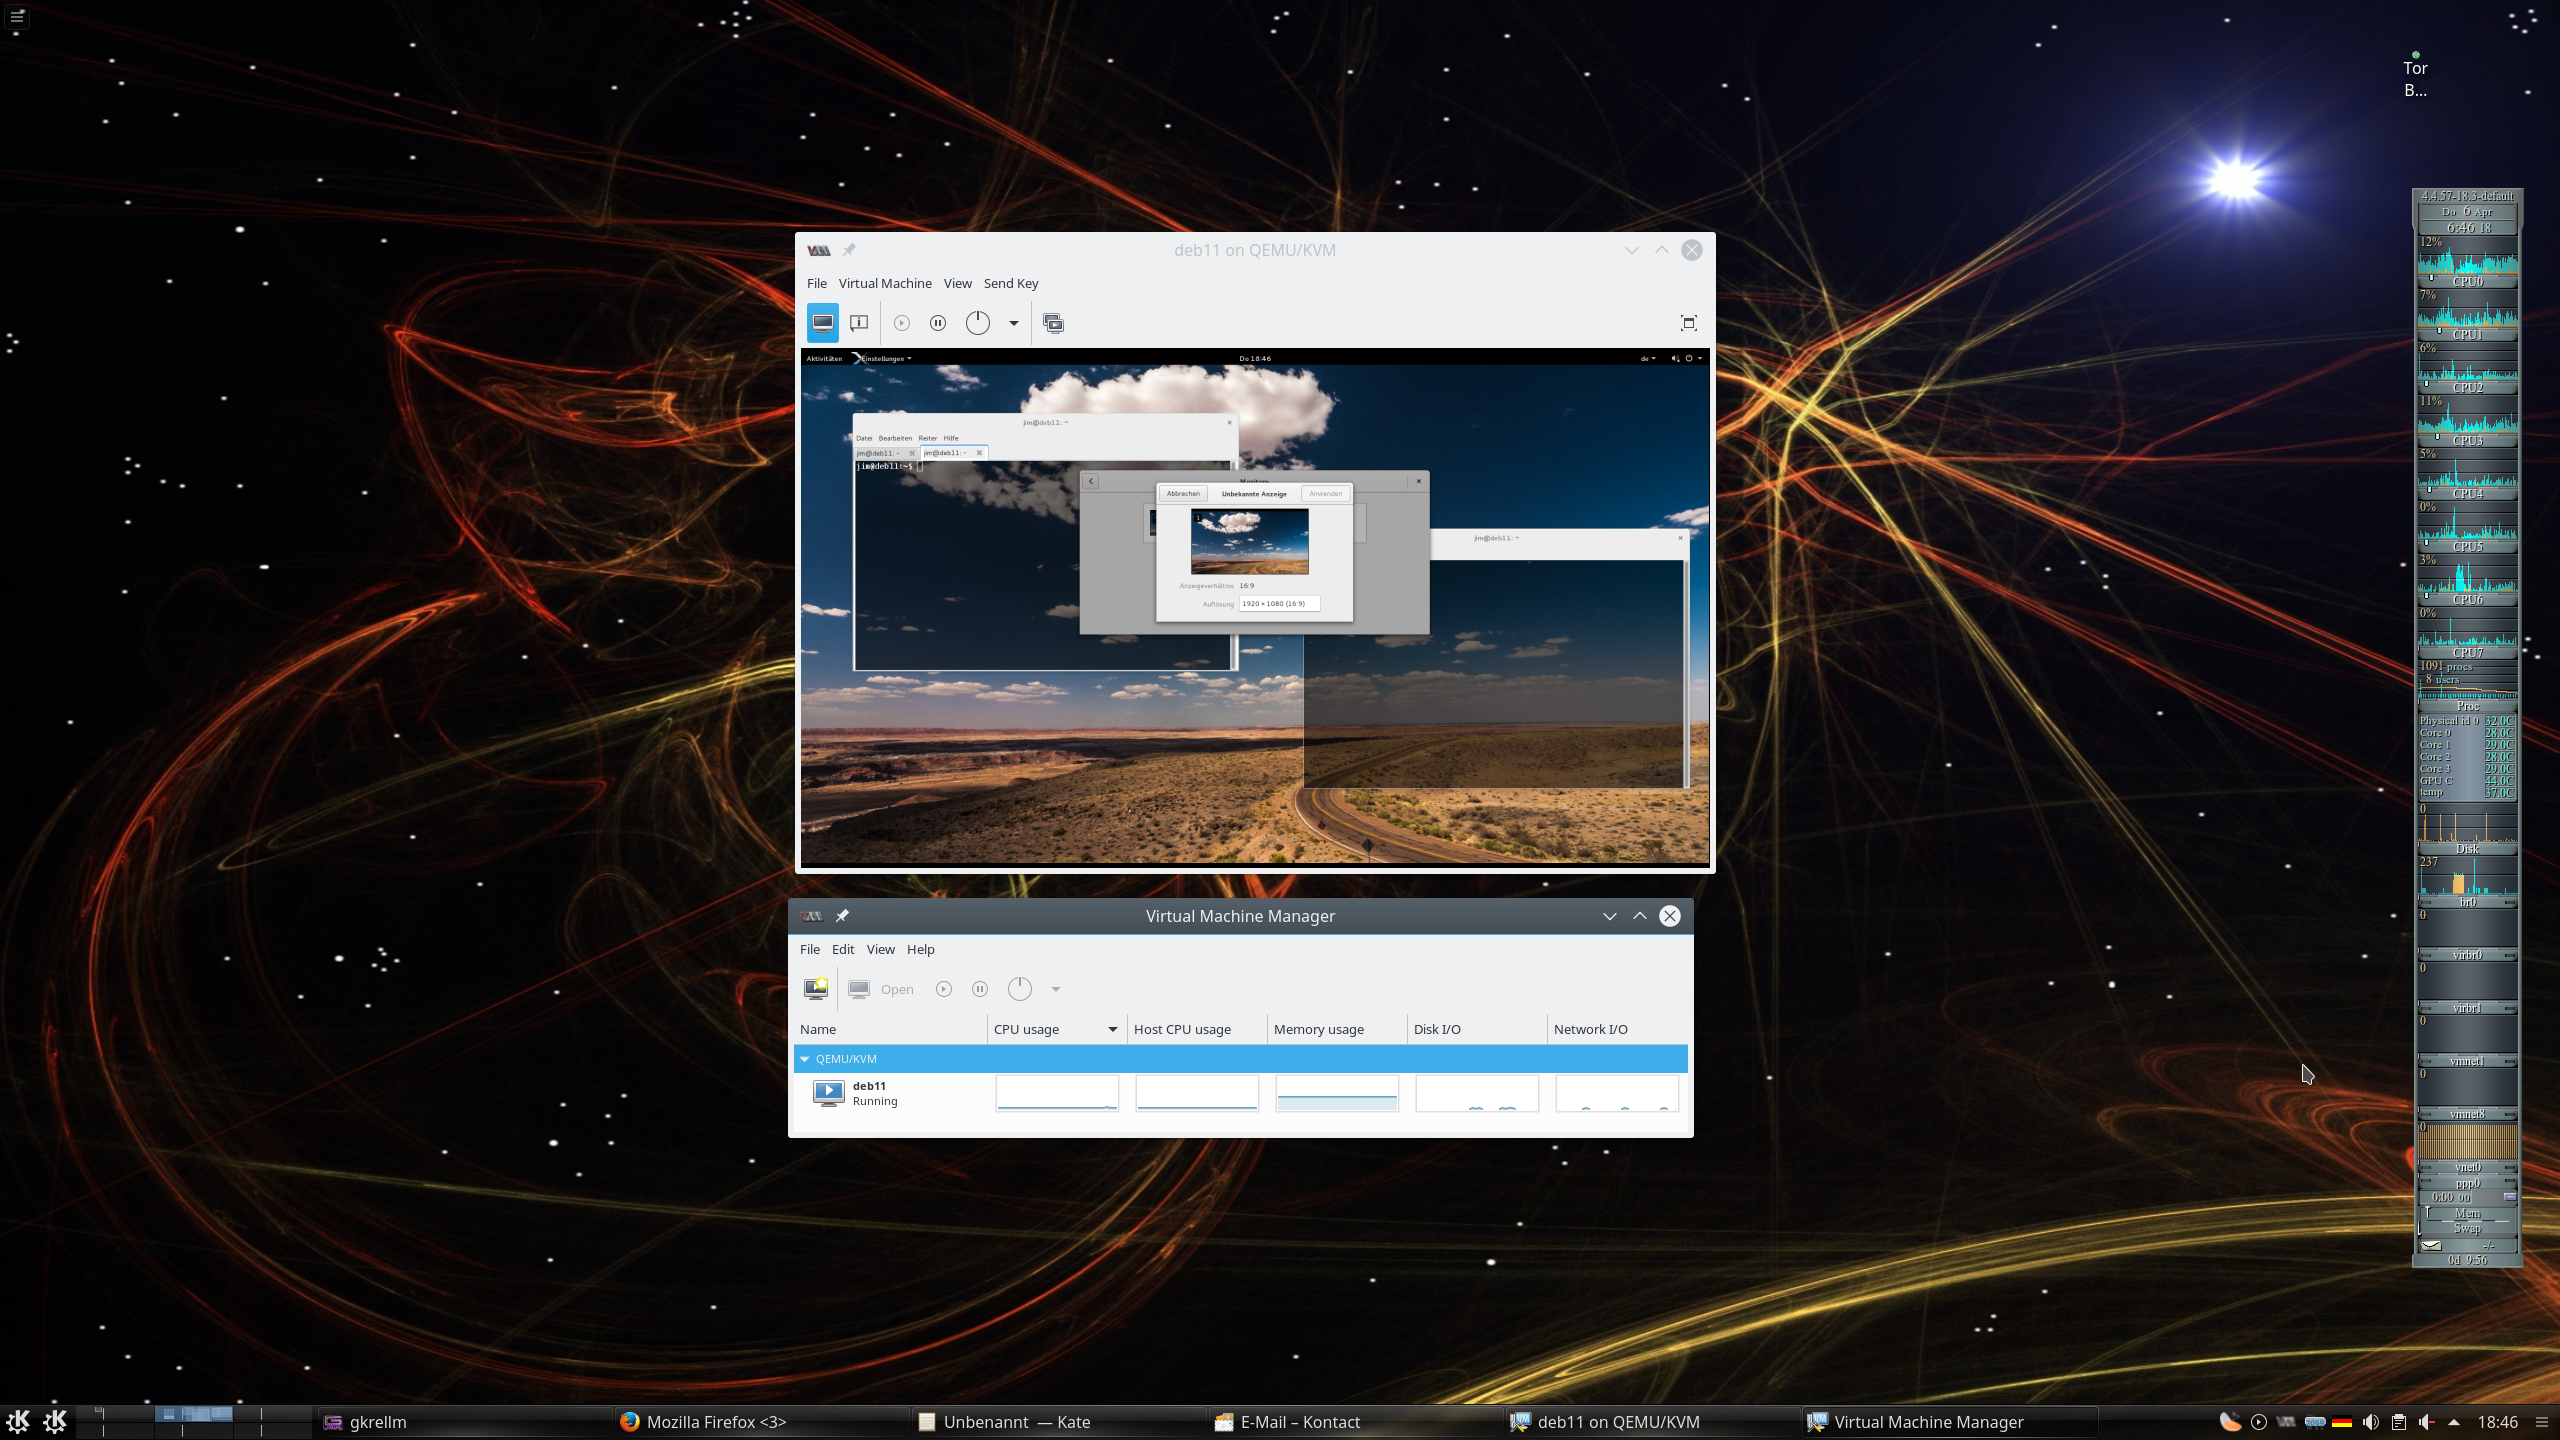
Wir starten über “virt-manager” z.B. einen “Kali2017”-Gast und betrachten ihn über die grafische Spice-Konsole des virt-managers auf dem HDMI-Monitor; dabei unterbinden wir zunächst eine automatische Skalierung der Gastauflösung (darauf kommen wir später zurück):

Leider bieten dann weder ein Kali2017- noch ein Debian-Stretch-Gast die maximal mögliche Auflösung an:

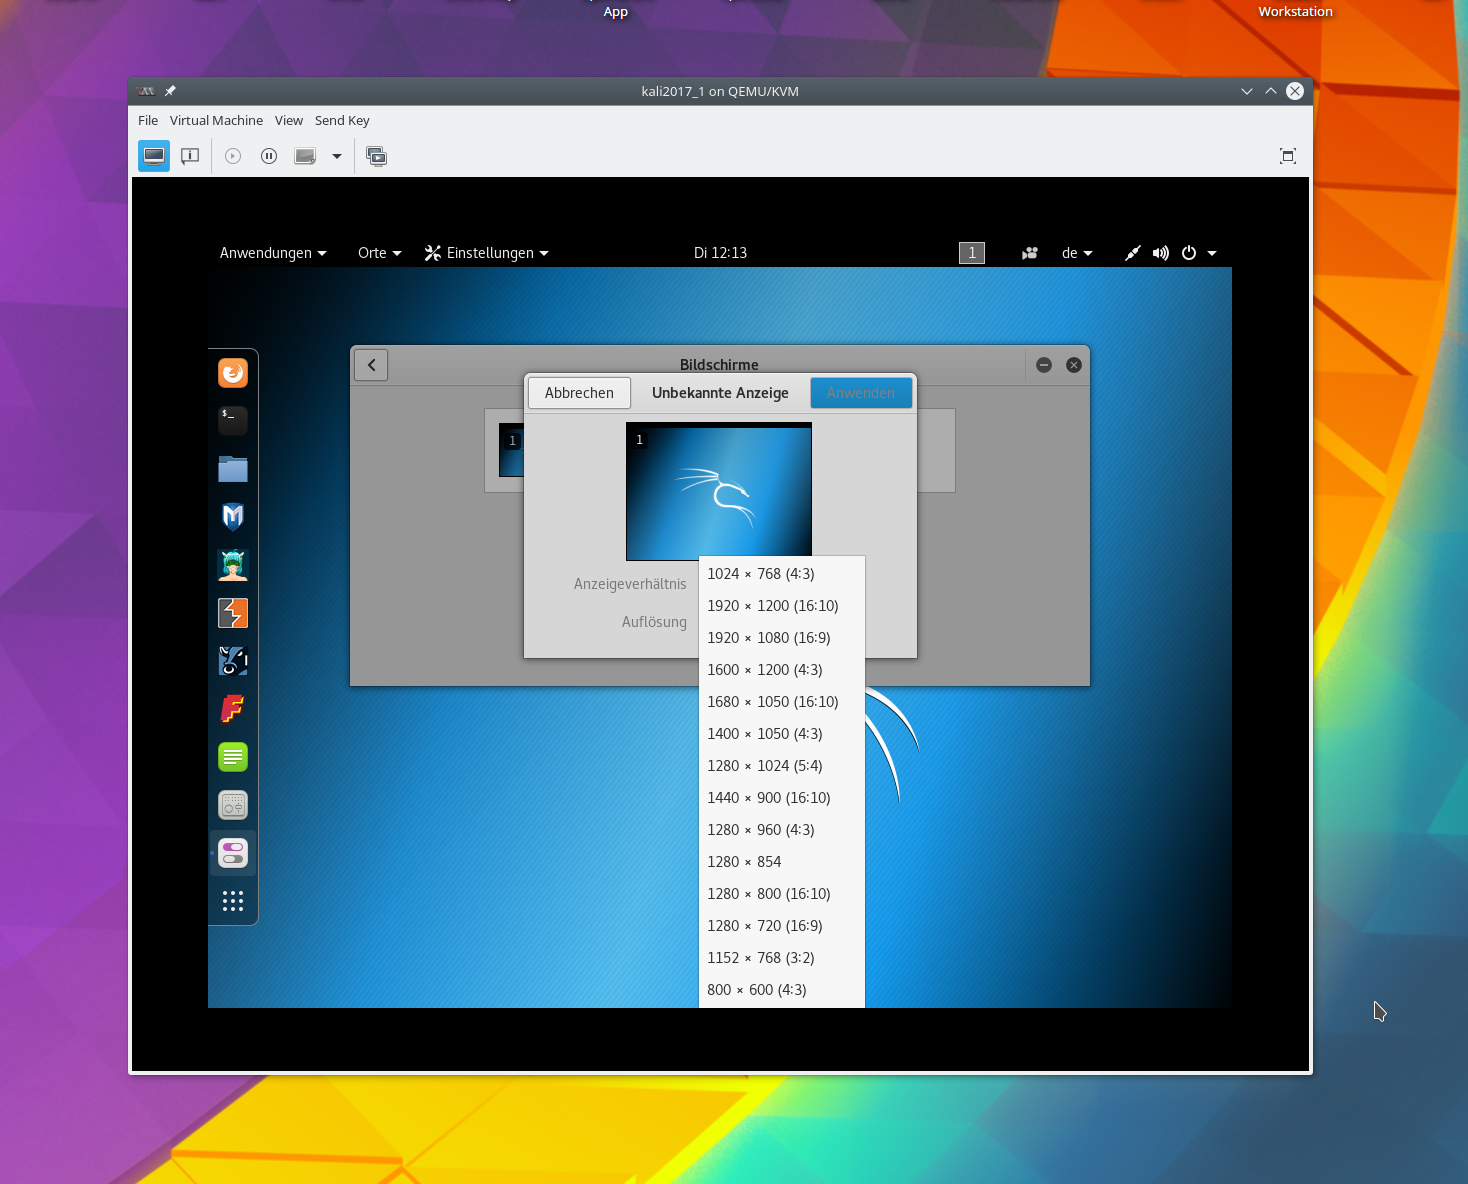
Der Einsatz des QXL-Treibers und des vdagents hat in dieser Hinsicht also nichts verbessert. Dass beide SW-Komponenten samt QXL-Device im Gastsystem vorhanden sind, belegt folgender Output:

root@kali2017-1:~# lsmod | grep qxl
qxl                    69632  3
ttm                    98304  1 qxl
drm_kms_helper        155648  1 qxl
drm                   360448  6 qxl,ttm,drm_kms_helper
root@kali2017-1:~# 

root@kali2017-1:~# systemctl status spice-vdagentd.service
● spice-vdagentd.service - Agent daemon for Spice guests
   Loaded: loaded (/lib/systemd/system/spice-vdagentd.service; enabled; vendor p
   
Active: active (running) since Thu 2017-07-13 09:49:54 CEST; 5min ago
  Process: 397 ExecStart=/usr/sbin/spice-vdagentd $SPICE_VDAGENTD_EXTRA_ARGS (co
  Process: 390 ExecStartPre=/bin/rm -f /var/run/spice-vdagentd/spice-vdagent-soc
 Main PID: 427 (spice-vdagentd)
    Tasks: 1 (limit: 4915)
   CGroup: /system.slice/spice-vdagentd.service
           └─427 /usr/sbin/spice-vdagentd

root@kali2017-1:~# dmesg | grep drm
[    2.272876] [drm] Initialized
[    2.391864] [drm] Device Version 0.0
[    2.391865] [drm] Compression level 0 log level 0
[    2.391866] [drm] Currently using mode #0, list at 0x488
[    2.391866] [drm] 114686 io pages at offset 0x4000000
[    2.391867] [drm] 67108864 byte draw area at offset 0x0
[    2.391867] [drm] RAM header offset: 0x1fffe000
[    2.391868] [drm] rom modes offset 0x488 for 142 modes
[    2.391916] [drm] qxl: 64M of VRAM memory size
[    2.391917] [drm] qxl: 511M of IO pages memory ready (VRAM domain)
[    2.391917] [drm] qxl: 512M of Surface memory size
[    2.392479] [drm] main mem slot 1 [a0000000,1fffe000]
[    2.392479] [drm] surface mem slot 2 [c0000000,20000000]
[    2.392481] [drm] Supports vblank timestamp caching Rev 2 (21.10.2013).
[    2.392482] [drm] No driver support for vblank timestamp query.
[    2.392739] [drm] fb mappable at 0xA0000000, size 3145728
[    2.392740] [drm] fb: depth 24, pitch 4096, width 1024, height 768
[    2.392772] fbcon: qxldrmfb (fb0) is primary device
[    2.405136] qxl 0000:00:02.0: fb0: qxldrmfb frame buffer device
[    2.418839] [drm] Initialized qxl 0.1.0 20120117 for 0000:00:02.0 on minor 0

 
Hinweis:

Ob der spice-vdagent tatsächlich seinen Job tut, verifiziert man am einfachsten dadurch, indem man Copy/Paste-Übertragungen von Text zwischen Host- und Gast-System ausprobiert.

Einsatz von xrandr

Wir greifen im Gast nun zum gleichen Trick wie auf dem Host. Ein Absetzen des Befehls xrandr zeigt, dass der relevante (virtuelle) Monitor des Gastsystems “Virtual_0” heißt:

root@kali2017-1:~# xrandr
Screen 0: minimum 320 x 200, current 1024 x 768, maximum 8192 x 8192
Virtual-0 connected primary 1024x768+0+0 0mm x 0mm
   1024x768      59.92*+
   1920x1200     59.88  
   1920x1080     59.96  
   1600x1200     59.87  
   1680x1050     59.95  
   1400x1050     59.98  
   1280x1024     59.89  
   1440x900      59.89  
   1280x960      59.94  
   1280x854      59.89  
   1280x800      59.81  
   1280x720      59.86  
   1152x768      59.78  
   800x600       59.86  
   848x480       59.66  
   720x480       59.71  
   640x480       59.38  
Virtual-1 disconnected
Virtual-2 disconnected
Virtual-3 disconnected

 
Also:

root@kali2017-1:~# cvt 2560 1440 44
# 2560x1440 43.99 Hz (CVT) hsync: 65.06 kHz; pclk: 222.75 MHz
Modeline "2560x1440_44.00"  222.75  2560 2720 2992 3424  1440 1443 1448 1479 -hsync +vsync

root@kali2017-1:~# xrandr --newmode 2560x1440_44  222.75  2560 2720 2992 3424  1440 1443 1448 1479 -hsync +vsync
root@kali2017-1:~# xrandr --addmode Virtual-0 2560x1440_44
root@kali2017-1:~# xrandr --output Virtual-0 --mode 2560x1440_44


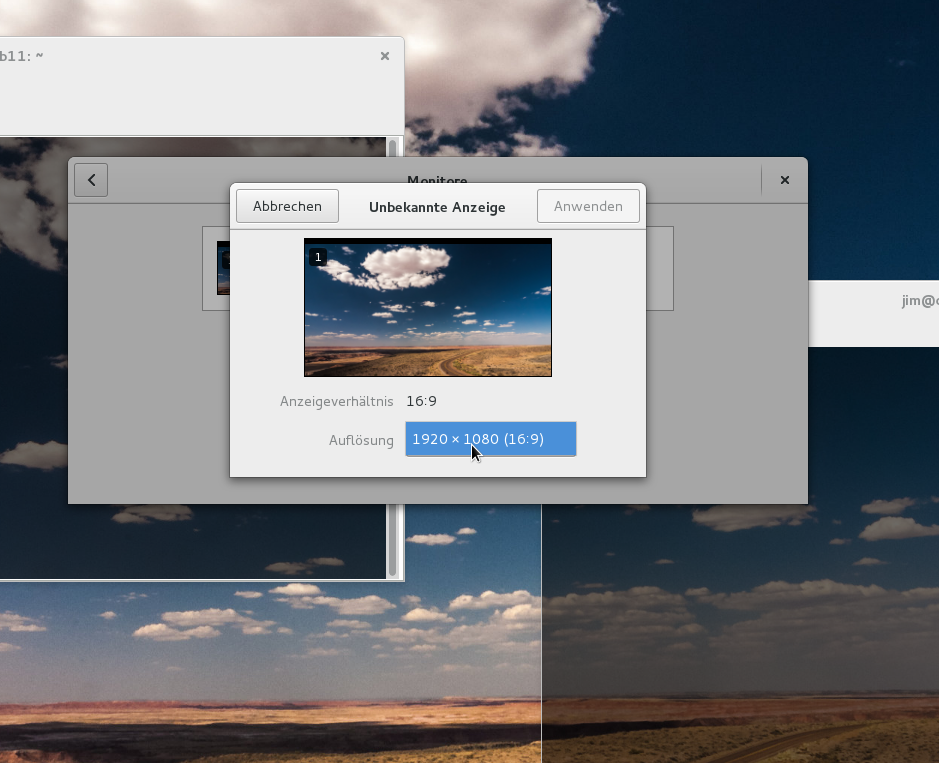
Und schon ist unsere gewünschte hohe Auflösung nach ein wenig Flackern im Spice-Fenster aktiv :

root@kali2017-1:~# xrandr --current
Screen 0: minimum 320 x 200, current 2560 x 1440, maximum 8192 x 8192
Virtual-0 connected primary 2560x1440+0+0 0mm x 0mm
   1024x768      59.92 +
   1920x1200  
   59.88  
   1920x1080     59.96  
   1600x1200     59.87  
   1680x1050     59.95  
   1400x1050     59.98  
   1280x1024     59.89  
   1440x900      59.89  
   1280x960      59.94  
   1280x854      59.89  
   1280x800      59.81  
   1280x720      59.86  
   1152x768      59.78  
   800x600       59.86  
   848x480       59.66  
   720x480       59.71  
   640x480       59.38  
   2560x1440_44  43.99* 
Virtual-1 disconnected
Virtual-2 disconnected
Virtual-3 disconnected


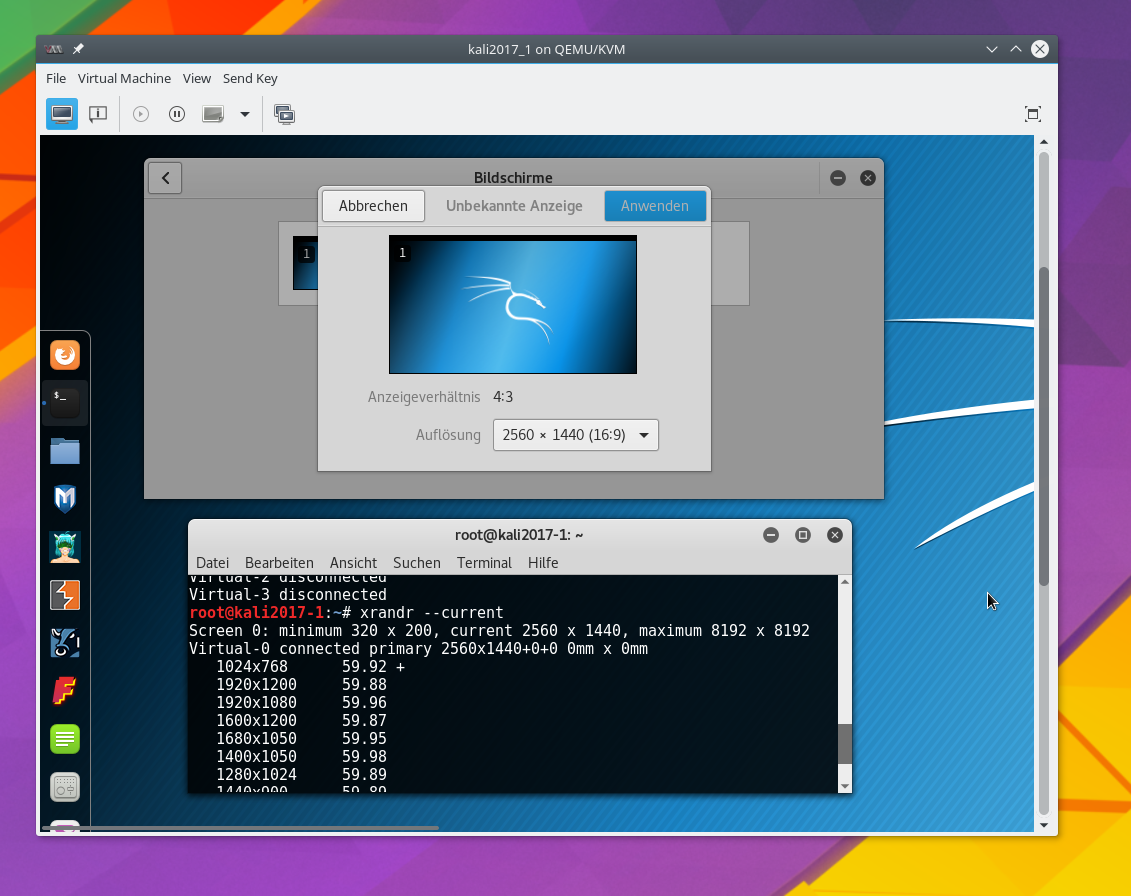
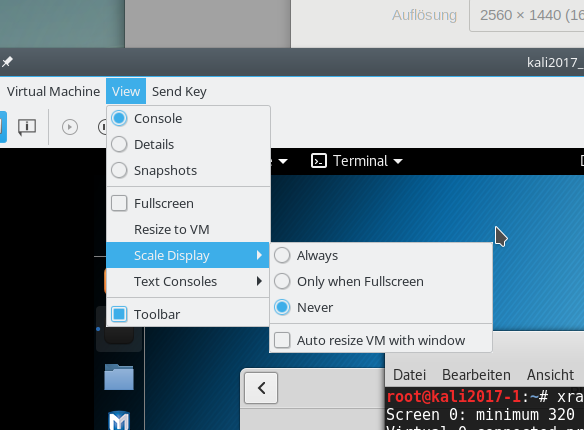
Das im Bildausschnitt erkennbare farbige Hintergrundsbild außerhalb der Spice-Konsole stammt vom KDE-Desktop des Opensuse-Hosts; es wurde für den HDMI-Schirm festgelegt. Man erkennt, dass das Fenster der grafischen Spice-Konsole Scrollbalken anbietet, wenn der aktuelle Fensterrahmen zu klein für die Auflösung des Gast-Desktops ist. Wegen meines GTK-Themes werden die Scrollbalken nur angezeigt, wenn die Maus dem jeweiligen Fensterrand nahe kommt. Deshalb ist im Bild nur der vertikale Balken sichtbar.

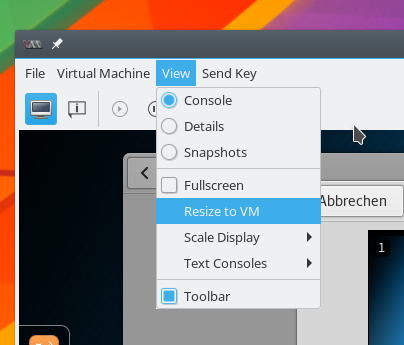
Natürlich kann man das Spice-Fenster auf dem externen HDMI-Monitor auch im Vollbild-Modus betreiben. Am einfachsten geht das, indem man die Fenstergröße an die Gastauflösung anpassen lässt; die Spice-Konsole bietet aber unter “View” zudem einen eigenen Menüpunkt zum Wechsel in den Vollbild-Modus an:

Mein HDMI-Schirm mit 2560×1440 zeigt dann folgendes Bild:

Genau das war aber unser erstes Ziel:

Wir können die hohe Auflösung eines physikalischen Host-Monitors, auf dem ein Spice-Client-Fenster im Vollbild-Modus läuft, nun für die Darstellung des Desktops eines unter KVM/QEMU virtualisierten Gastsystems nutzen.

Anzumerken bleibt auch, dass die Spice/QXL-Performance selbst mit der relativ schwachbrüstigen Intel HD4000, die in der Laptop-CPU integriert ist, völlig annehmbar ist. Zu verdanken ist das vor allem dem Einsatz des QXL-Treibers.

Ausblick

Im nächsten Artikel

KVM/qemu mit QXL – hohe Auflösungen und virtuelle Monitore im Gastsystem definieren und nutzen – III

befassen wir uns damit, wie man die mit CVT und xrandr gefundenen bzw. definierten Modes persistent im Gast-System hinterlegt, so dass sie auch einen Boot-Vorgang überstehen. Zudem wollen wir die Auflösung auch für den Display-Manager (etwa gdm3) hinterlegen. Danach wenden wir uns der Frage zu, ob und wie eine automatische Auflösungsanpassung an den Fensterrahmen der Spice-Clients möglich ist.

KVM, video QXL und video virtio Treiber – Video-Auflösung des Gnome-Desktops eines Debian 8-Gastystems einstellen

Das Gespann KVM/Qemu ist großartig und aus meinem Linux-Leben nicht mehr wegzudenken. Vorgestern habe ich ein “Debian 8”-Gast-System für Testzwecke auf einem KVM-Host aufgesetzt, der unter “Opensuse Leap 42.2” betrieben wird. Dabei fiel mir auf, dass bzgl. des Punktes “Video” (-System) während der Konfiguration der virtuellen Maschine mittels “virt-manager” nun neben dem guten und vertrauten qxl auch eine “virtio”-Komponente zur Auswahl bereitsteht. Beide Varianten verkörpern unterschiedliche “Treiber” mit denen das Gastsystem eine virtuelle Grafikkarte ansprechen kann. Als Kommunikationsprotokoll für den Transport der Grafikinformation zum Host setze ich typischerweise Spice ein.

Mir stellte sich dann die Frage, wie man eigentlich als User die Auflösung bestimmen kann, mit der das Spice-Fenster für den Gast-Desktop (hier: Gnome 3) unter dem X-Window-System des Hosts (hier: unter KDE-Plasma5) dargestellt wird. Das ist vor allem für den Fall des “virtio”-Treiber interessant. Da der Hypervisor hier wohl direkt über die Hostsystem-Treiber auf die Grafikkarte des Hostes (bzw. Speicheradressen der Graka) zugreift, war es für mich unklar, was ich an Einstellmöglichkeiten erwarten darf. Die Maximalauflösung des Hauptschirms am Host? Eine Liste von verschiedenen Auflösungen unterhalb einer Maximalauflösung?

Voraussetzung

Auf meinem Test-Host betreibe ich 3 Schirme im “xinerama”-Verbund an einer Nvidia-Grafikkarte (GTX 960; proprietärer Treiber der Version 375). Ich möchte natürlich das KVM-Fenster (genauer das Spice-Fenster) für den Gast nicht mit der Maximalauflösung des xinerama-Verbunds (7040×1440 Pixel) betreiben. Umso wichtiger ist für den User also eine angemessene, einfache Einstellmöglichkeiten im Gast-System selbst, die sich dann auf die Darstellung des Gast-Fensters auf dem Host niederschlagen soll.

Unterschiede in den Einstellmöglichkeiten beim Einsatz von QXL und virtio

Installiert man einen KVM-Gast unter “virt-manager” und kümmert sich nicht weiter um die Konsolen-Auflösung, so richtet geht libvirt von einer Standardauflösung von 800x600x16 für die Darstellung der GUI des Gast-Systems unter dem Spice-Protokoll aus. Diese Auflösung schlägt dann typischerweise auch auf einen Gnome- oder KDE-Desktop des Gastes durch. Entsprechend klein ist dann anfänglich auch das Spice-Display-Fenster auf dem Host.

Nun wird man als Standarduser versuchen, diese Auflösung im Gastsystem über die Einstellmöglichkeiten des jeweiligen Gast-Desktop-Systems (Gnome’s “gnome-control-center” bzw. KDE’s “systemsettings5”) zu verändern.

Hat man man als Video-Einheit, also die virtuelle Graka, des Gastsystems qxl gewählt, so kann man unter der Gnome- oder KDE-GUI des Gastes die Auflösung des Desktops tatsächlich dynamisch – d.h. im laufenden Betrieb – abändern.

Entscheidet man sich bei der Konfiguration des Gastes allerdings für “virtio” als Video-System, so erleidet man unter Debian 8 Schiffbruch: Die Einstellmöglichkeit beschränkt sich dann genau auf die bereits vorgegebene Größe von 800×600.

Ich bespreche die Standard-Einstellmöglichkeiten nachfolgend zunächst für QXL, den Gnome-Desktop und auch für TTYs; anschließend gehe ich auch kurz auf eine Einstellmöglichkeit für “virtio” ein. Weitergehende Einstellmöglichkeiten – wie etwa über “xrandr” werde ich auf Wunsch eines Lesers in einem späteren Artikel aufgreifen.

Gnome-Desktop-Auflösung des Gastes unter qxl setzen

Das nachfolgende Bild zeigt den Gnome 3 Desktop eines Debian-8-Gastes mit “qxl” in einer Auflösung von 1920x1080x32 auf einem KDE-Schirm des SuSE-KVM-Hostes mit einer 2560x1440x32-Auflösung.

Die Auflösung des Gnome-Desktops eines KVM-Gastsystems kann man (zumindest im Falle von QXL) sehr einfach über die “Gnome-Einstellungen=>Monitore” festlegen.

Das mögliche Auflösungsspektrum wird dabei offenbar nur durch die Auflösung der aktuellen Host-Schirme begrenzt. De facto bietet mir das System in meinem Fall Auflösungen bis zu 4K an. Diese Einstellungen beziehen sich aber nur auf den Desktop des Gastes – nicht jedoch dessen Konsolen-TTYs !

Hinweis: Hat man einen KVM-Gast mit KDE-Plasma5 so verwendet man “systemsettings5 &” und dort den Punkt “Anzeige und Monitor”, um die KDE-Auflösung festzulegen.

Das Tolle ist: Man kann unter QXL/Spice auch bei den gezeigten hohen Auflösungen wirklich flüssig arbeiten! Auch mit transparenten Fenstern! Da ist in den letzten Jahren ganze Arbeit geleistet worden. Vielen Dank an die Entwickler! (Vor allem wohl bei Red Hat.)

Auflösung der Debian8-Gast-TTYs setzen

Das “virt-manager”-Unterfenster zur Anzeige eines Gastes über Spice bietet einem dankenswerterweise einen Menüpunkt “Send Key” an, mit dessen Hilfe man Steuersequenzen wie Ctrl-Alt-F1 auch an den KVM-Gast schicken kann. So gelangt man dann u.a zu den Gast-Konsolen-TTYs “tty1” bis tty6. Um deren Auflösung von 800×600 auf vernünftige Werte abzuändern, muss der Framebuffer-Support des Hypervisors beeinflusst werden. Dies ist unter Debian 8 über Grub-Einstellungen möglich.

Hierzu editiert man mit Root-Rechten die Datei “/etc/default/grub” bzgl. zweier Zeilen (eine davon ist auszukommentieren):

GRUB_GFXMODE=1920x1080x32
GRUB_GFXPAYLOAD_LINUX=keep

Natürlich kann man auch eine andere definierte Standard-Auflösung als die für meinen Fall angegebene wählen.

Danach ist nach einem unten angegebenen Link nur noch das Absetzen eines “update-grub” (erfordert Root-Rechte) nötig. Und tatsächlich: Nach einem Reboot wiesen meine TTYs die gewünschte Konsolenauflösung auf.

Was kann man bei einem Wechsel von QXL zu “virtio” tun?

Wie gesagt, bietet die unter Opensuse Leap 42.2 verfügbare KVM-Implementierung die Möglichkeit an, für das Video-Device eines KVM-Gastes “virtio” statt QXL (oder weit weniger leistungsfähigen Treibern) zu wählen.

Welche Folgen hat ein Wechsel zu dieser Darstellungsart, bei der direkt auf die Host-HW zugegriffen wird?
Auf meinem System bislang keinerlei offenkundig negativen. Das Zeichnen der einzelnen Gnome-Fenster auf dem Gastdesktop geht bei sehr schnellen Bewegungen dieser Fenster über die Fläche des Gastdesktops gefühlt noch etwas flüssiger
als beim Einsatz von QXL. Das ganze grafische Verhalten des Gastes im “virt-manager”-Fenster ist danach so gut, dass man auch bei höchster Auflösung von der 2D-Grafik her praktisch keinen Unterschied zur Arbeit auf einem nativen System mehr merkt. Das ist wirklich beeindruckend gut!

Einen Wehrmutstropfen muss man als Standard-User unter Debian 8 (mit Kernel 3.16) aber dennoch hinnehmen:

Unter den “Gnome-Einstellungen=>Monitore” lässt sich die Auflösung nicht mehr dynamisch wie im Fall von QXL ändern. Für das Einblenden des grafischen Gast-Outputs in den Speicherbereich der realen Graka zählt unter Debian 8 offenbar allein die Auflösung, die man wie oben beschrieben für die Unterstützung des virtuellen Gast-Framebuffers durch den Hypervisor eingestellt hat.

Immerhin steht einem dadurch aber eine Einstellmöglichkeit zur Verfügung – wenn auch keine dynamische! Damit kann ich aber gut leben; wenn ich jemals eine dynamische Änderung des Gnome-Desktops eines KVM-Gastes brauchen sollte, verwende ich halt “qxl”.

Nachtrag, 29.06.2017:
Faktisch gilt die obige festgestellte Einschränkung für Debian 8 nur für Kernel 3.X. Mindestens ab Kernel 4.9 bietet der virtio-Treiber eine ganze Liste an Auflösungen an, aus denen man wählen kann. Siehe hierzu den Artikel

KVM, video virtio, Debian 8 guest, host with Intel HD 4000 – install a 4.9 kernel on the guest for optimal 2D graphics performance!

Nachtrag, 03.07.2017:
Ein User hat mich angeschrieben und zu Recht angemerkt, dass die im Gastsystem angebotenen Auflösungen unter “qxl” nicht immer an die Maximal-Auflösung der Schirme des Hosts heranreichen. Auf die Frage, was man dann tun kann, gehe ich gerne in einem weiteren Artikel ein. Sobald ich Zeit finde, den zu schreiben … Den entsprechenden Link werde ich dann hier nachtragen. Der Schlüssel liegt dabei vor allem in der Nutzung von “xrandr”. Bei der Gelegenheit gehe ich dann auch kurz auf das Thema von mehreren “virtuellen” Monitoren unter qxl ein.

Skalierung des Fensterinhaltes

Hingewiesen sei auch darauf, dass sich die Darstellung das gesamte Fenster zur Darstellung des KVM/Qemu-Gastes, das man vom virt-manager aus geöffnet hat, bei entsprechender Einstellung unter dem Menüpunkt “View” dynamisch skalieren lässt.

Auch das geht sehr flüssig und verzögerungsfrei!

Viel Freude weiterhin mit Linux und KVM/Qemu!

Links

https://superuser.com/questions/598374/how-to-change-the-resolution-of-the-bash-for-a-debian-vm

VMware WS – bridging of Linux bridges and security implications

Virtual bridges must be treated with care when security aspects get important. I stumbled into an unexpected kind of potential security topic when I experimented with a combination of KVM and VMware Workstation on one and the same Linux host. I admit that the studied scenario was a very special and academic one, but it really gave me an idea about the threat that some programs may change important and security relevant bridge parameters on a Linux system in the background – and you as an admin may only become aware of the change and its security consequences indirectly.

The scenario starts with a virtual Linux bridge “br0” (created with “brctl”). This Linux bridge gets an IP-address and uses an assigned physical NIC for direct bridging to a physical LAN. You may want to read my previous blog article
Opensuse – manuelles Anlegen von Bridge to LAN Devices (br0, br1, …) für KVM Hosts
for more information about this type of direct bridging.

In our scenario the Linux brigde itself then gets enslaved as an ethernet capable device by a VMware bridge. See also: Opensuse/Linux – KVM, VMware WS – 3 virtuelle Brücken zwischen den Welten (see the detailed description of “Lösungsansatz 2”).

Under which circumstances may such a complicated arrangement be interesting or necessary?

Direct attachment of virtualization guests to physical networks

A Linux host-system for virtualization may contain KVM guests as well as VMware Workstation [WS] guests. A simple way to attach a virtual guest to some physical LAN of the Linux host (without routing) is to directly “bridge” a physical device of the host – as e.g. “enp8s0” – and then attach the guest to the virtual bridge. Related methods are available both for KVM and VMware. (We do not look at routing models for the communication of virtual guests with physical networks in this article).

However, on a host, on which you started working with KVM before you began using VMware, you may already have bridged the physical device with a standard Linux bridge “br0” before you began/begin with the implementation of VMware guests.

Opensuse, e.g., automatically sets up Linux bridges for all physical NICs when you configure the host for virtualization with YaST2. Or you yourself may have configured the Linux bridge and attached both the physical device and virtual “tap”-devices via the “brctl” and the “tunctl” commands. Setting up KVM guests via virt-manager also may have resulted in the attachment of further virtual NIC (tap-) devices to the bridge.

The following sketch gives you an idea about a corresponding scenario:

kvm_vmware_b2b_bridge_4

Ignore for a moment the upper parts and the displayed private virtual networks there. In the lower part you recognize our Linux host’s “direct bridge to LAN” in grey color with a red stitched border line. I have indicated some ports in order to visualize the association with assigned (named) virtual and physical network devices.

The bridge “br0” plays a double role: On one side it provides all the logic for packet forwarding to its target ports; on the other side it delivers the packets meant for the host itself to the Linux-kernel as if the bridge were a normal ethernet device. This is not done via an additional tap device of the host but directly. To indicate the difference “br0” is not sketched as a port.

The virtual and
physical devices are also visible e.g. in the output of CLI commands like “ifconfig”, “ip” or “wicked” with listing options as soon as the guest systems are started. The command “brctl show br0” would in addition inform you what devices are enslaved (via virtual ports) by the bridge “br0”.

Note that the physical device has to operate in the so called “promiscuous mode” in this scenario and gets no IP-address.

Bridging the Linux bridge by VMware

Under such conditions VMware still offers you an option to bridge the physical device “enp8s0” – but after some tests you will find out that you are not able to transmit anything across the NIC “enp8s0” – because it is already enslaved by your Linux bridge … Now, you may think : Let us create an additional Linux TAP-device on the host, add it to bridge “br0” and then set up a VMware network bridged to the new tap device. However, I never succeeded with bridging from VMware directly to a Linux tap device. (If you know how to do this, send me an email …).

There are 2 other possibilities for directly connecting your VMware guests (without routing) to the LAN. One is to “bridge the Linux bridge br0” – by administrative means of VMware WS. The other requires a direct connection of the VMware switch via its Host Interface to the Linux-bridge with the spanning tree protocol enabled. We only look at the solution based on “bridging the bridge” in this article.

We achieve a cascaded bridge configuration in which the VMware switch enslaves a Linux bridge via VMwares “Virtual network editor”:

vmware_vne_8

Such a solution is working quite well. The KVM guests can communicate with the physical LAN as well as with the VMware guests as long as all guests NICs are configured to be part of the same network segment. And the VMware guests reach the physical LAN as well as the KVM guests.

The resulting scenario is displayed in the following sketch:

kvm_vmware_b2b_bridge_5

In the lower part you recognize the “cascaded bridging”: The ethernet device corresponding to the bridge “br0” is enslaved by the VMware bridge “vmnet3” in the example. The drawing is only schematic – I do not really know how the “bridging of the bridge” is realized internally.

Interestingly enough the command “brctl” on the Linux side does NOT allow for a similar type of cascaded “bridging of a Linux bridge”. You cannot attach a Linux bridge to a Linux bridge port there.

We shall see that there is a good reason for this (maybe besides additional kernel module aspects and recursive stack handling).

Basic KVM guest “isolation” on a Linux bridge ?

A physical IEEE 802.1D bridge/switch may learn what MAC-addresses are reachable through which port, keep this information in an internal table and forward packets directly between ports without flooding packets to all ports. Is there something similar for virtual Linux bridges? The Linux bridge code implements a subset of the ANSI/IEEE 802.1d standard – see e.g. http://www.linuxfoundation.org/ collaborate/ workgroups/ networking/ bridge#What_does_ a_bridge_do.3F.
So, yes, in a way: There is a so called “ageing” parameter of the bridge. If you set the ageing time to “0” by

brctl setageingtime br0 0

this setting brings the bridge into a “hub” like mode – all accepted packets are sent to all virtual ports – and a privileged user of a KVM guest
may read all packets destined for all guests as well as for the LAN/WAN as soon as he switches the guest’s ethernet device into the “promiscuous mode”.

However, if you set the ageing parameter to a reasonable value like “30” or “40” then the bridge works in a kind of “switch” mode which isolates e.g. KVM guests attached to it against each other. The bridge then keeps track of the MAC adresses attached to its virtual ports and forwards packets accordingly and exclusively (see the man pages of “brctl”). Later on in this article we shall prove this by the means of a packet sniffer. (We assume normal operation here – it is clear that also a virtual bridge can be attacked by methods of ARP-spoofing and/or ARP-flooding).

Now, let us assume a situation with

brctl setageingtime br0 40

and let our Linux bridge be bridged by VMware. If I now asked you whether a KVM guest could listen to the data traffic of a VMware guest to the Internet, what would you answer?

What does “wireshark” tell us about KVM guest isolation without VMware started?

Let us first look at a situation where you have 2 KVM guests and VMware deactivated by

/etc/init.d/vmware stop

KVM guest 1 [kali2] may have an address of 192.168.0.20 in our test scenario, guest 2 [kali3] gets an address of 192.168.0.21. Both guests are attached to “br0” and can communicate with each other:

kvm_ne_12

kvm_ne_13

We first set explicitly

brctl setageing br0 30

on the host. Does KVM guest 1 see the network traffic of KVM guest 2 with Internet servers?

To answer this question we start “wireshark” on guest “kali3”, filter for packets of guest “kali2” and first look at ping traffic directly sent to “kali3”:
kvm_ne_14

Ok, as expected. Now, if we keep up packet tracking on kali3 and open a web page with “iceweasel” on kali2 we will not see any new packets in the wireshark window. This is the expected result. (Though it can not be displayed as it is difficult to visualize a non-appearance – you have to test it yourself). The Linux virtual bridge works more or less like a switch and directs the internet traffic of kali2 directly and exclusively to the attached “enp8s0”-port for the real ethernet NIC of the host. And incoming packets for kali2 are forwarded directly and exclusively from enp8s0 to the port for the vnet-device used by guest kali2. Thus, no traffic between guest “kali2” and a web server on the Tnternet can be seen on guest “kali3”.

But now let us change the ageing-parameter:

brctl setageing br0 0

and reload our web page on kali2 again:

kvm_ne_15

Then we, indeed, see a full reaction of wireshark on guest kali3:
kvm_ne_16

All packets to and from the server are visible! Note that we have not discussed any attack vectors for packet sniffing here. We just discussed effects of special setting for the Linux bridge.

Intermediate result: Setting the ageing-parameter
on a linux bridge helps to isolate the KVM guests against each other.

Can we see an Internet communication of a VMware guest on a KVM guest?

We now reset the ageing parameter of the bridge and start the daemons for VMware WS on our Opensuse host:

 
mytux:~ # brctl setageing br0 30 
mytux:~ # /etc/init.d/vmware start
Starting VMware services:                                                                 
   Virtual machine monitor                                             done               
   Virtual machine communication interface                             done               
   VM communication interface socket family                            done               
   Blocking file system                                                done               
   Virtual ethernet                                                    done               
   VMware Authentication Daemon                                        done               
   Shared Memory Available                                             done               
mytux:~ #               

 
Then we start a VMware guest with a reasonably configured IP address of 192.168.0.41 within our LAN segment:
kvm_ne_18
Then we load a web page on the VMware guest and have a parallel view at a reasonably filtered wireshark output on KVM guest “kali3”:

kvm_ne_19

Wireshark:
kvm_ne_20

Hey, we can see – almost – everything! A closer look reveals that we only capture ACK and data packets from the Internet server (and other sources, which is not visible in our picture) but not packages from the VMware guest to the Internet server or other target servers.

Still and remarkably, we can capture all packets directed towards our VMware windows guest on a KVM guest. Despite an ageing parameter > 0 on the bridge “br0”!

Guest isolation in our scenario is obviously broken! To be able to follow TCP-packets and thereby be able to decode the respective data streams fetched from a server to a distinct virtualization guest from other virtualization guests is not something any admin wants to see on a virtualization host! This at least indicates a potential for resulting security problems!

So, how did this unexpected “sniffing” become possible?

Bridges and the promiscuous mode of an attached physical device

What does a virtual layer 2 Linux bridge with an attached (physical) device to a LAN do? It uses this special device to send packets from virtualization guests to the LAN and further into the Internet – and vice versa it receives packets from the Internet/LAN sent to the multiple attached guests or the host. Destination IP addresses are resolved to MAC-addresses via the ARP-protocol. A received packet is then transferred to the specific target guest attached at the bridge’s virtual ports. If the ageing parameter is set > 0 the bridge remembers the MAC-address/port association and works like a switch – and thus realizes the basic guest isolation discussed above.

Let us have a look at the Linux bridge of our host :

 
mytux:/proc/net # brctl show br0 
bridge name     bridge id               STP enabled     interfaces
br0             8000.1c6f653dfd1e       no              enp8s0
                
                                        vnet0
                                                        vnet4

 
The physical device “enp8s0” is attached. The additional network interfaces “vnet0”, “venet4” devices are tun-devices assigned to our 2 virtual KVM guests “kali2” and “kali3”.

There is a very basic requirement for the bridge to be able to distribute packets coming from the LAN to their guest targets: The special physical device – here “enp8s0” – must be put into the “promiscuous mode”. This is required for the device to be able to receive and handle packets for multiple and different MAC- and associated IP-addresses.

How can we see that the “enp8s0”-device on my test KVM host really is in a promiscuous state? Good question: Actually and as far as I know, this is a bit more difficult than you may expect. Most standard tools you may want to use –
ifconfig, ip, “netstat -i” – fail to show the change if done in the background by bridge tools. However, a clear indication in my opinion is delivered by

mytux:/proc/net # cat /sys/class/net/enp8s0/flags 
0x1303

Watch the 3rd position! If I understand the settings corrrectly, I would assume that anything bigger than 1 there indicates that the IFF_PROMISC flag of a structure describing NIC properties is set – and this means promiscuous mode. It is interesting to see what happens if you remove the physical interface from the bridge

 
mytux:/proc/net # brctl delif br0 enp8s0
mytux:/proc/net # cat /sys/class/net/enp8s0/flags 
0x1003
mytux:/proc/net # brctl addif br0 enp8s0
mytux:/proc/net # cat /sys/class/net/enp8s0/flags 
0x1303
mytux:/proc/net # cat /sys/class/net/enp9s0/flags 
0x1003
mytux:/proc/net # cat /sys/class/net/vnet0/flags 
0x1303
mytux:/proc/net # cat /sys/class/net/vnet4/flags 
0x1303
mytux:/proc/net # 

 
The promiscuous mode is obviously switched on by the “brctl addif”-action. As a comparison see the setting for the physical ethernet device “enp9s0” not connected to the bridge. (By the way: all interfaces attached to the bridge are in the same promiscuous mode as “enp8s0”. That does not help much for sniffing if the bridge works in a switch-like mode).

Another way of monitoring the promiscuous state of a physical ethernet device in virtual bridge scenarios is to follow the and analyze the output of systemd’s “journalctl”:

mytux:~ # brctl delif br0 enp8s0
mytux:~ # brctl addif br0 enp8s0

The parallel output of “journalctl -f” is:

 
...
.Jan 12 15:21:59 rux kernel: device enp8s0 left promiscuous mode
Jan 12 15:21:59 rux kernel: br0: port 1(enp8s0) entered disabled state
....
....
Jan 12 15:22:10 mytux kernel: IPv4: martian source 192.168.0.255 from 192.168.0.200, on dev enp8s0
....
....
Jan 12 15:22:13 mytux kernel: device enp8s0 entered promiscuous mode
Jan 12 15:22:13 mytux kernel: br0: port 1(enp8s0) entered forwarding state
...


Promiscuous or non promiscuous state of the Linux bride itself?

An interesting question is: In which state is our bridge – better the ethernet device it also represents (besides its port forwarding logic)? With stopped vmware-services? Let us see :

mytux:~ # /etc/init.d/vmware stop
....
mytux:~ # cat /sys/class/net/br0/flags 
0x1003

 
Obviously not in promiscuous mode. However, the bridge itself can work with ethernet packets addressed to it. In our configuration the bridge itself got an IP-address – associated with the
host:

mytux:~ # wicked show  br0 enp8s0 vnet0 vnet4
enp8s0          enslaved
      link:     #2, state up, mtu 1500, master br0
      type:     ethernet, hwaddr 1c:6f:65:3d:fd:1e
      config:   compat:/etc/sysconfig/network/ifcfg-enp8s0

br0             up
      link:     #5, state up, mtu 1500
      type:     bridge
      config:   compat:/etc/sysconfig/network/ifcfg-br0
      addr:     ipv4 192.168.0.19/24
      route:    ipv4 default via 192.168.0.200

vnet4           device-unconfigured
      link:     #14, state up, mtu 1500, master br0
      type:     tap, hwaddr fe:54:00:27:4e:0a

vnet0           device-unconfigured
      link:     #18, state up, mtu 1500, master br0
      type:     tap, hwaddr fe:54:00:85:20:d1
mytux:~ # 

 
This means that the bridge “br0” also acts like a normal non promiscuous NIC for packets addressed to the host. As the bridge itself is not in promiscuous mode it will NOT handle packets not addressed to any of its attached ports (and associated MAC-addresses) and just throw them away. The attached ports – and even the host itself (br0) – thus would not see any packets not addressed to them. Note: That the virtual bridge can separate the traffic between its promiscuous ports and thereby isolate them with “ageing > 0” is a reasonable but additional internal feature.

What impact has VMware’s “bridging the bridge” on br0 ?

However, “br0” becomes a part of a VMware bridge in our scenario – just like “enp8s0” became a part of the linux bridge “br0”. This happens in our case as soon as we start a virtual VMware machine inside the user interface of VMware WS. Thinking a bit makes it clear that the VMware bridge – independent of how it is realized internally – must put the device “br0″ (receiving external data form the LAN) into the promiscuous mode”. And really:

mytux:/sys/class/net # cat /sys/class/net/br0/flags 
0x1103
mytux:/sys/class/net # 

 
This means that the bridge now also accepts packets sent from the Internet/LAN to the VMware guests attached to the VMware bridge realized by a device “vmnet3”, which can be found under the “/dev”-directory. These packets arriving over “enp8s0” first pass the bridge “br0” before they are by some VMware magic picked up sat the output side of the Linux bridge and transmitted/forwarded to the VMware bridge.

But, obviously the Linux program responsible for the handling of packets reaching the bridge “br0” via “enp8s0” and the further internal distribution of such packets kicks in first (or in parallel) and gets a problem as it now receives packets which cannot be directed to any of its known ports.

Now, we speculate a bit: What does a standard physical 802.1D switch typically do when it gets packets addressed to it – but cannot identify the port to which it should transfer the packet? It just distributes or floods it to all of its ports!

And hey – here we have found a very plausible reason for our the fact that we can read incoming traffic to our VMware guest from all KVM guests!

Addendum 29.01.2016:
Since Kernel 3.1 options can be set for controlling and stopping the flooding of packets for unknown target MACs to specific ports of a Linux bridge. See e.g.:
http://events.linuxfoundation.org/ sites/ events/ files/ slides/ LinuxConJapan2014 _makita_0.pdf
The respective command would be :

echo 0 > /sys/class/net//brport/unicast_flooding

It would have to be used on all tap ports (for the KVM guests) on the Linux bridge. Such a procedure may
deliver a solution to the problem described above. I have tested it, yet.

Conclusion

Although our scenario is a bit special we have learned some interesting things:

  1. Bridging a Linux bridge as if it were a normal ethernet device from other virtualization environments is a dangerous game and should be avoided on productive virtualization hosts!
  2. A Linux bridge may be set into promiscuous mode by background programs – and you may have to follow and analyze flag entries in special files for a network device under “/sys/class/net/” or “journalctl” entries” to get notice of the change! Actually, on a productive system one should monitor these sources for status changes of network devices.
  3. A Linux bridge in promiscuous mode may react like a 802.1D device and flood its ports with packets for which it has not learned MAC adresses yet – this obviously has security and performance implications – especially when the flooding becomes a permanent action as in our scenario.
  4. Due to points 2 and 3 the status of a Linux bridge to a physical ethernet device of a host must be monitored with care.

Regarding VMware and KVM/Linux-Bridges – what are possible alternatives for “linking” the virtual bridges of both sides to each other and enable communication between all attached guests?

One simple answer is routing (via the virtualization host). But are there also solutions without routing?

From what we have learned a scenario in which the virtual VMware switch is directly attached to a Linux bridge port seems to be preferable in comparison to “bridging the bridge”. Port specific MAC addresses for the traffic could then be learned by the Linux bridge – and we would get a basic guest isolation. Such a solution would be a variation of what I have described as “Lösung 3” in a previous article about “bridges between KVM and VMware”:
KVM, VMware WS – 3 virtuelle Brücken zwischen den Welten
However, in contrast to “Lösung 3” described there we would require a Linux bridge with activated STP protocol – because 2 ethernet devices would be enslaved by the Linux bridge. Whether such a scenario is really more secure, we may study in another article of this blog.

Links

See especially pages 301 – 304

http://www.linuxfoundation.org/ collaborate/ workgroups/ networking/ bridge# What_does_a_ bridge_do.3F
See especially the paragraph “Why is it worse than a switch?”

Promiscuous mode analysis
https://www.kernel.org/ doc/ Documentation/ ABI/ testing/ sysfs-class-net
http://grokbase.com/ t/ centos/ centos/ 1023xtt5fd/ how-to-find-out-promiscuous-mode
https://lists.centos.org/ pipermail/ centos/ 2010-February/ 090269.html
Wrong info via “netstat -i ”
http://serverfault.com/ questions/ 453213/ why-is-my-ethernet-interface-in-promiscuous-mode