
Today server services should offer network connectivity for clients with encryption. On Linux StartTLS based services are common – for LDAP, email/groupware servers as well as web servers. To set up SSL/TLS/StartTLS based services we need certificates and encryption keys issued by a central CA – which we trust. Administering your own local CA and server certificates can be a bit challenging without graphical tools – even in smaller networks with a dozen server instances.
In our networks with mainly Opensuse and Debian servers I had used YaST’s CA-module to create a CA and server certificates signed by this CA. The stupid thing is that the required “yast2-ca”-module and its RPM are missing since Opensuse Leap 15.0. This was not a major problem so far; the update processes respected existing certificates, of course. However, some days ago two of my central server certificates – namely the one for my LDAP-server and an Apache2-server – expired. This in turn lead to a breakdown of several other services on other (virtual) machines: SSSD, IMAP, Postfix (SMTP, because these services use the LDAP server among other things as a backend for user authentication. (SSSD itself provides a TLS connection to LDAP.)
The Opensuse documentation cha.security.yast_ca.html is really misleading because it claims to be valid for Opensuse Leap 15.1 – which it is not, as there still is no yast-ca-module available. For me this kind of policy of Opensuse is unbelievable; doesn’t Leap provide the basic platform for SLES? How shall SLES admins in smaller companies tackle the resulting problems? Buy a PKI tool? Everybody talks about secuirty …. but SuSE (???)
I wanted some cost free alternative for my own network – and as a first trial I went for “TinyCA2“.
This became more of an adventure than expected. Part of the hurdles were due to Opensuse specific settings – but also due to the very many different configuration files which had to be adapted for the certificate of my new CA – which came in addition to my old one. (I did not yet want to give up the old CA as some (virtual) servers still have valid server certificates from it.) Another obstacle appeared when Opensuse deleted any new files in “/etc/ssl/certs” after a system restart. Also the GUI of TinyCA2 has some strange “features” regarding default values, which I did not become aware of during my first trials. In addition it seemed to be necessary to replace SHA1 by SHA256. And in the end I got e.g. Apache running with its new server certificate, but not e.g. the slapd.service – due to a access rights problem which was difficult to see.
In this article I shall describe most of the required steps for switching to a TinyCA2 CA and adjusting server settings. I shall concentrate on some simple services as examples. But I hope the general pattern of how to proceed will become clear and help others, who work with Opensuse, to save a bit of time.
Installing and patching TinyCA2
Both Opensuse Leap 15.0 and Opensuse Leap 15.1 provide RPMs for TinyCA2 version 0.7.5. Which is from 2015. If you have a look at GitHub (see the link in the last section of this article) you may also find some (important) patches. On an Opensuse system You install the RPM easily with the help of YaST (yast2). After the installation you find the Perl files of TinyCA2 in the directory “/usr/share/TinyCA2/lib“.
When you start TinyCA2 via the command “tinyca2 &” the first thing you may stumble across is the fact that (among other digests) MD5 and SHA1 are offered as hashing algorithms. Look at the bottom part of the following screenshot:
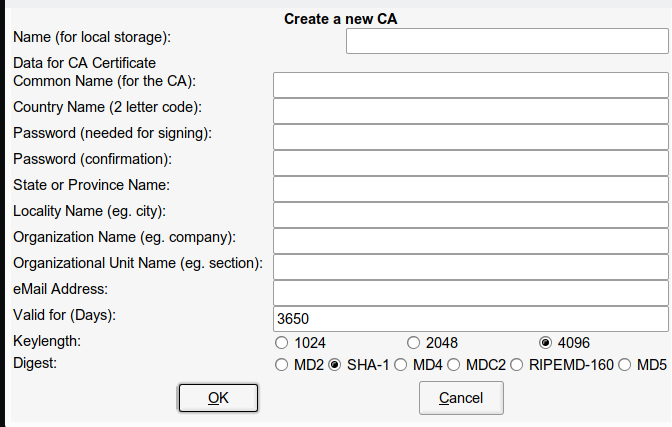
(By the way: The layout – especially the icons – may look different on your system. It depends on your graphical desktop and your settings for GTK applications)
You see that we get a variety of hashing algorithms offered under the category “Digest”. Most of them are regarded insecure today. So, even in a semiprofessional environment you would like to see something better – e.g. SHA256. Fortunately, another guy (Bill Thorsteinson) had the same problem and he has created a patch for TinyCA2 which enables SHA256. You find the patch at
https://www.systemajik.com/tinyca-sha2/.
Let us try this out; on my ssh session to my central server “myserv” (this is the one with LDAP):
myserv:~ # mkdir /extras/Updates/tinyca
myserv:~ # wget https://www.systemajik.com/wp-uploads/2014/10/tinyca_sha256.patch_.txt -O /central/Updates/tinyca/tinyca_sha256.patch_.txt
--2019-07-20 12:44:57--  https://www.systemajik.com/wp-uploads/2014/10/tinyca_sha256.patch_.txt
Resolving www.systemajik.com (www.systemajik.com)... 206.47.13.3, 2001:470:1f11:b22::8
Connecting to www.systemajik.com (www.systemajik.com)|206.47.13.3|:443... connected.
HTTP request sent, awaiting response... 200 OK
Length: 4863 (4.7K) [text/plain]
Saving to: ‘/central/Updates/tinyca/tinyca_sha256.patch_.txt’

/central/Updates/tinyca/tinyca_sha256.pat 100%[=================>]   4.75K  --.-KB/s    in 0s

2019-07-20 12:44:58 (138 MB/s) - ‘/central/Updates/tinyca/tinyca_sha256.patch_.txt’ saved [4863/4863]

myserv:~ #
myserv:~ # cd /usr/share/TinyCA2/lib
myserv:/usr/share/TinyCA2/lib # cp /extras/Updates/tinyca/tinyca_sha256.patch_.txt .
myserv:/usr/share/TinyCA2/lib # patch --verbose -p1 < tinyca_sha256.patch_.txt
Hmm...  Looks like a unified diff to me...
The text leading up to this was:
--------------------------
|From e5e25e55f8da2b4d2bad584f2145ca0ff6b3a92a Mon Sep 17 00:00:00 2001
|From: Bill Thorsteinson <bill.git@systemajik.com>
|Date: Thu, 30 Oct 2014 22:26:47 -0400
|Subject: [PATCH] Apply changes
|
|---
...
...
|--- a/REQ.pm
|+++ b/REQ.pm
--------------------------
patching file REQ.pm
Using Plan A...
Hunk #1 succeeded at 59.
Hunk #2 succeeded at 426.
Hmm...  Ignoring the trailing garbage.
done
Note: The “-p1” in “patch –verbose -p1 < tinyca_sha256.patch_.txt” reads “-pONE” and not “-pL” with a small L-letter.
A “tinyca2” command now produces:
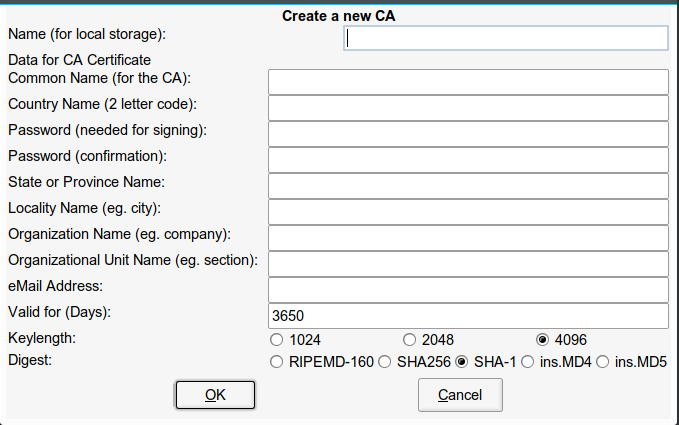
Much better !
Importing the old CA from Opensuse?
If you play around with the menus of TinyCA2 you find an option to import other CAs. Could this work with my old YaST-CA? To make a long story short – I did not succeed with this. The reasons are still unclear to me …. TinyCA could not read the relevant information.
So, I really was forced to set up a new CA – with all consequences as issuing and deploying new server certificates and the (trusted) CA certificate on my servers (and the CA cert also on my client machines). Which even in my little network (12 servers- thanks to virtualization) is painstaking …
Creating a new TinyCA2 based CA
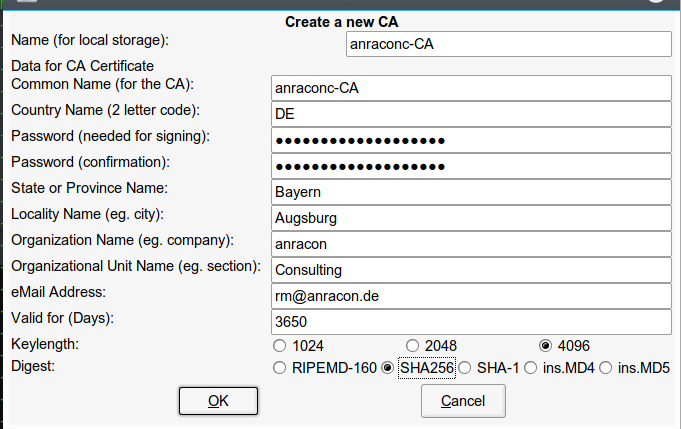
Let us create a new CA with TinyCA2. We have some freedom regarding the “common name“. I choose a reference to my main internal domain “anraconc.de” – so my common name is: “anraconc-CA”. (It only looks like an official Internet domain; but actually it is an internal domain, only, and my DNS server is configured accordingly.)
Important hint:
Change the settings for Keylength and Digest by explicitly clicking first on other values and then the real choice again! If you do not change anything explicitly you may get a surprise regarding default values. They may not be what is indicated. Seems to be a bug. Do not disregard this hint if you want to save time ….
Now, a click on the “OK”-button gives us:
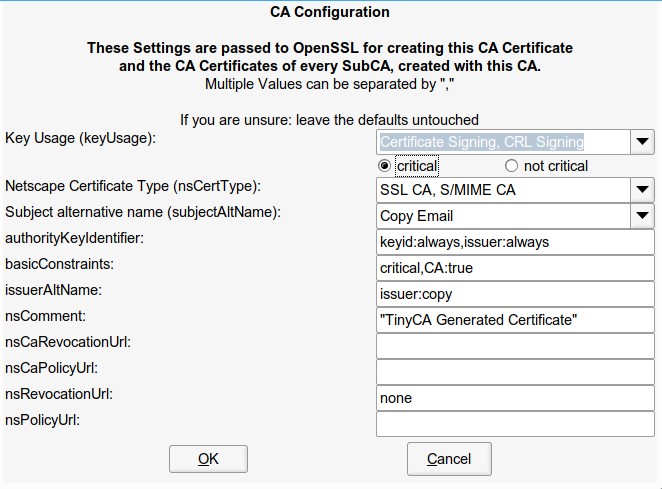
We set the keyUsage to “critical” (this certificate extension is used by some applications). And we eventually get all the information about our CA certificate:
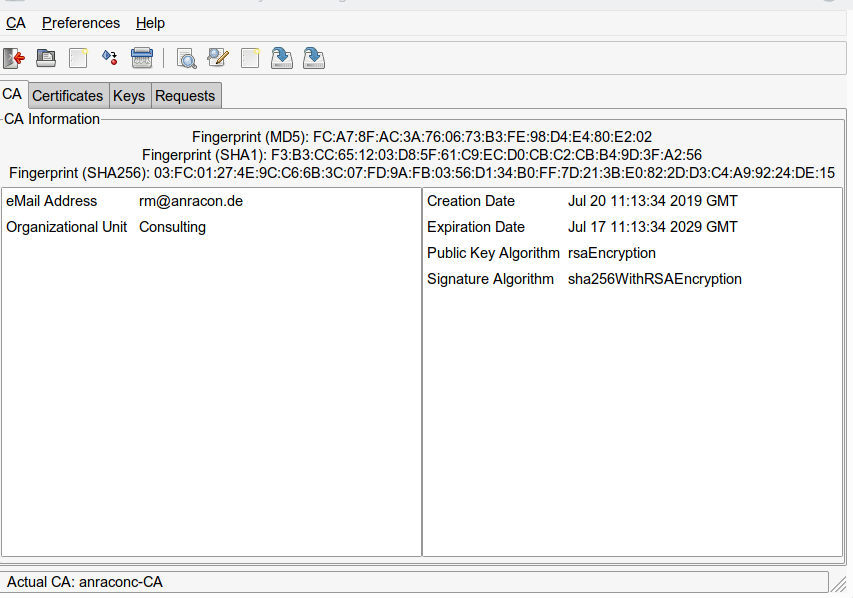
The data – and especially the private key – can be found in the directory “/root/.TinyCA/anraconc-CA/”. TinyCA2 creates such a directory for every main CA. (If you use sub-CAs you will find respective directories below it).
myserv:~/.TinyCA # cd anraconc-CA/
myserv:~/.TinyCA/anraconc-CA # la
total 44
drwx------ 7 root root 4096 Jul 20 13:13 .
drwx------ 5 root root 4096 Jul 20 13:12 ..
-rw------- 1 root root 3311 Jul 20 13:13 cacert.key
-rw------- 1 root root 2504 Jul 20 13:13 cacert.pem
drwx------ 2 root root 4096 Jul 20 13:12 certs
drwx------ 2 root root 4096 Jul 20 13:13 crl
-rw------- 1 root root    0 Jul 20 13:12 index.txt
drwx------ 2 root root 4096 Jul 20 13:12 keys
drwx------ 2 root root 4096 Jul 20 13:12 newcerts
-rw------- 1 root root 3872 Jul 20 13:13 openssl.cnf
drwx------ 2 root root 4096 Jul 20 13:12 req
-rw------- 1 root root    2 Jul 20 13:12 serial
Hint: You should make a backup of the CA directories on a periodic basis.
Now, you can export the CA certificate in form of a standard pem-file to some intermediate place where you gather your own certificates and keys – in my case this is a directory “/etc/certs” – which so far survived any Opensuse upgrades. Depending on what else you intend to save there (private keys?), you should make this place accessible to root only! We click on the second to last icon in the icon row of TinyCA2:
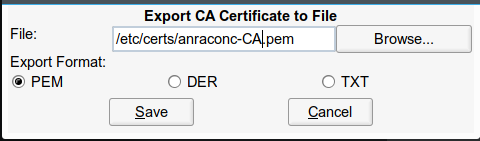
Note: In general you have any freedom here to give the exported file any kind of name – whatever you like. However, it is a good policy to use the “common name” which you gave to the CA certificate. See below for the reason.
Place the CA certificate at a central location for trusted CAs
We can now export this certificate file with public information to servers into directories where we gather the public certificates (keys) of all trusted CAs. Of course we need to do this on the server “myserv”, too, as some services may refer to it. In my age my first guess is “/etc/ssl/certs“; old habit form a decade ago where this directory was used more frequently.
myserv:~/.TinyCA/anraconc-CA # cp /etc/certs/anraconc-CA.pem /etc/ssl/certs
myserv:~/.TinyCA/anraconc-CA # chmod 640 /etc/ssl/certs/anraconc-CA.pem
myserv:~/.TinyCA/anraconc-CA #
A wrong decision in the end – see below. But for our present session this will work.
Note: If we would create Sub-CAs we would have to export all respective pem files to such a central location – the whole CA-chain must be reflected there for the verification of a service whose “server certificate” has been issued by a sub-CA. I do not use Sub-CAs in this article – but it my be necessary in your organization!
Create a server certificate
Now, we need to create “server certificates” or even service specific certificates. It depends on your policy of how far you want to discriminate services.
In this article I follow the path of a server wide central “server certificate” for all the services implemented there. As examples we shall later have a look at a local OpenLDAP service and a local Apache web server. My central server “myserv” with OpenLDAP has a FQDN of “myserv.anraconc.de”.
Important note: You must use the FQDN as a “common name” in server certificates – consistent with DNS settings. Otherwise you may risk warnings of security aware applications that the server certificate does not fit the server!
in our TinyCA2 window we click on the tab “Certificates” and then on the empty sheet icon:
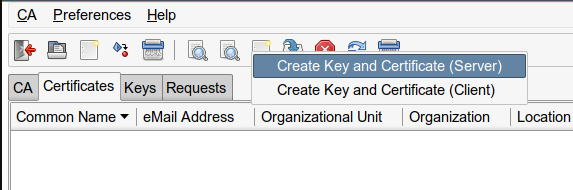
We fill in the required data. As keys protected by a password may cause trouble for services during automated system startups we try to leave the password-fields empty:
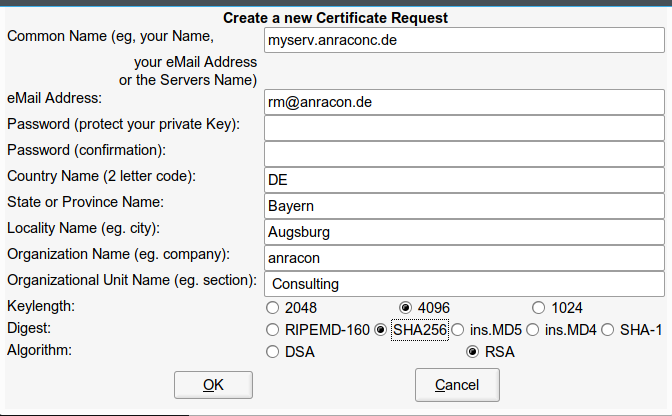
But this approach is not accepted!

So we type in some lengthy password – and set the options for Digest and Algorithm again explicitly – by clicking a bit around first (see above). Then we click on “OK” and get:
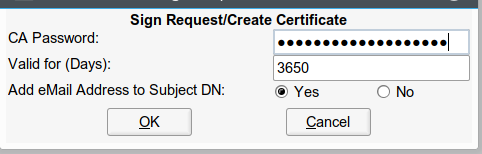
Think a bit about the validity! Actually, the length of the validity period should be somewhat shorter than the period for your CA! E.g. 5 years. Otherwise you will get a warning. Eventually:

If you click on the tab “Keys” you will see a related (private) key, too.
Important Note:
We have taken a shortcut here. You could have started in a different way – namely via a certificate “request”. In a first step you would then have issued such a “request” under the tab “Requests” and filled out an initial form there. Afterwards, you explicitly need to sign the requested certificate with the CA’s signature. You get the option for signing by right-clicking on the request entry after its creation. This approach also leads to a valid certificate.
Exporting the server certificate and the key to a central location on the Opensuse system
We need to export the certificate and the (private) key to some
save location on our server “myserv” – only accessible to root (and maybe read accessible to some special system user). On an Opensuse Leap system the location for server certificates should be “/etc/ssl/servercerts“. For exporting the certificate we right-click on the entry:
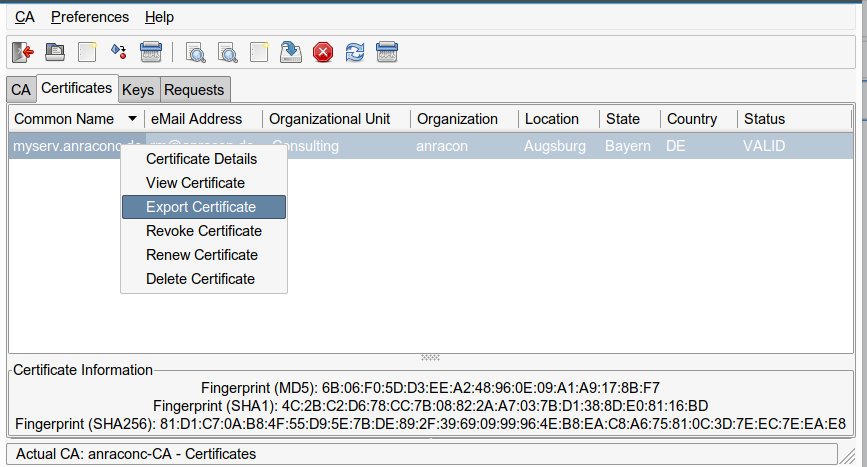
Then we switch to the tab “Keys” and do the same there:

Important note:
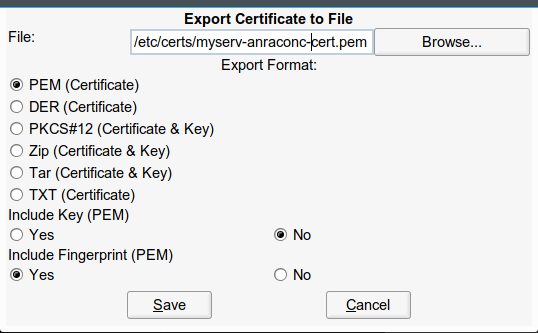
At this point we get an option to export the key without a password. I have chosen this option. This implicates security risks – your exported private key is protected by nothing afterwards. So be very careful where you save it and with which access rights. On the other side such a key will allow for automated service starts – otherwise someone would have to provide the password during startup. I do not want to deepen the discussion here. But be careful with unprotected private keys!
You saw that I exported into my intermediate directory “/etc/certs”. There we change rights for security reasons to:
myserv:/etc/ssl # chmod 600 /etc/certs/myserv-anraconc-key.pem
Note:
If you instead export your key with the password there is a way to get rid of it afterwards:
myserv:/etc/certs # openssl rsa -in /etc/certs/myserv-anraconc-key.pem -out /etc/certs/myserv-anraconc-key_new.pem
Enter pass phrase for /etc/certs/myserv-anraconc-key.pem:
writing RSA key
myserv:/etc/certs # cp /etc/certs/myserv-anraconc-key_new.pem /etc/certs/myserv-anraconc-key.pem
This creates a key without password! Actually I recommend to use this approach – we do not know details of TinyCA2’s export procedure, but “openssl” will always create the key in the format required for further processing.
Now, before any further steps, I make a backup of everything existing in the folder “/etc/ssl/servercerts“. This is important! If you loose your previous certificates and keys they are gone and you have no chance to get services running with them.
Then we overwrite the existing entries:
myserv:/etc/ssl # cp /etc/certs/myserv-anraconc-cert.pem /etc/ssl/servercerts/servercert.pem
myserv:/etc/ssl # cp /etc/certs/myserv-anraconc-key.pem /etc/ssl/servercerts/serverkey.pem
myserv:/etc/ssl # chmod 600 /etc/ssl/servercerts/serverkey.pem
Note: The last step is of fundamental importance due to security reasons! See the discussion below if this leads to trouble for some services and the related system user.
You may try “644” in the beginning to avoid any problems with system users running special services. But if you do this then DO NOT FORGET to restrict the read rights again in the end and after your tests.
Note that replacing the contents of /etc/ssl/severcerts” will probably lead to a breakdown of all services which base their TLS/SSL functionality on these files. In most cases the reason for this will be that the configuration will refer to a wrong CA-certificate. Therefore, you must reconfigure your local services step by step.
Conclusion
Enough for today. We have seen how TinyCA2 can be patched for SHA256, how it can be used to create a CA and server certificates. In the next article
TinyCA2 as a replacement for YaST’s CA-tools on Opensuse Leap servers with TLS/SSL – II
we shall reconfigure an Apache and an LDAP service to work with the new server certificate. And I shall show how we can make the CA-certificate permanently available in “/etc/ssl/certs” – across any server reboot. Stay tuned !
Links
CAs and Certificates – general information
https://wiki.ubuntuusers.de/CA/
stackexchange.com: what-role-do-hashes-play-in-tls-ssl-certificate-validation
stackexchange.com how-does-ssl-tls-work
robpol86.com root certificate authority
https://roll.urown.net/ca/ca_cert.html
TinyCA2
https://github.com/glennie/tinyca2
linux-magazin 2008: eigene zertifikatsstelle mit tinyca
TinyCA2 patches
https://www.systemajik.com/tinyca-sha2/.
Critical
stackexchange.com: which-properties-of-a-x-509-certificate-should-be-critical-and-which-not