TinyCA2 as a replacement for YaST’s CA-tools on Opensuse Leap servers with TLS/SSL – II

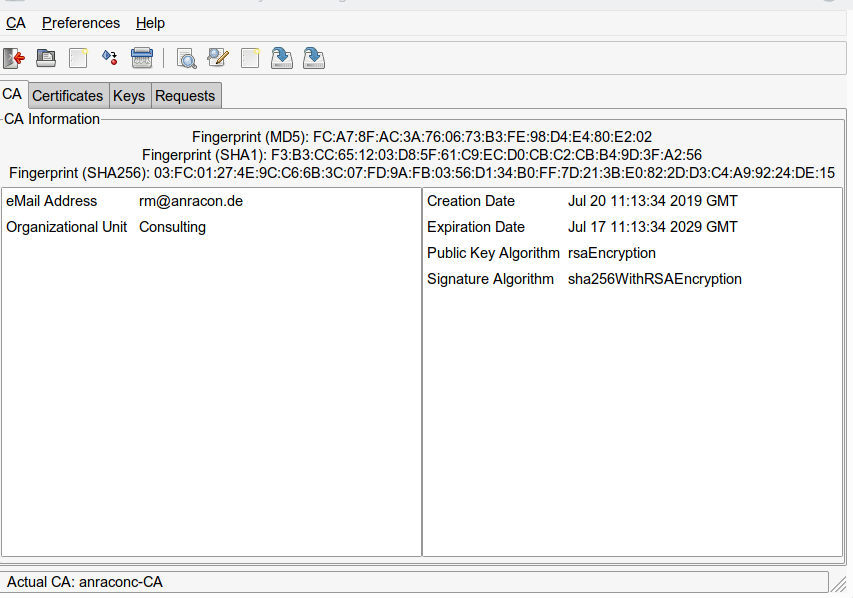
In my last article on TinyCA2

TinyCA2 as a replacement for YaST’s CA-tools on Opensuse Leap servers with TLS/SSL – I

I discussed how to open an new CA and how to create a server certificate (plus private key) with SHA256 as the preferred hashing algorithm. We saw that TinyCA2 offers an option to export the certificate’s private key with or without password. I also gave an “openssl” command for stripping a key off its password later on – even if it was exported with a password in the beginning.

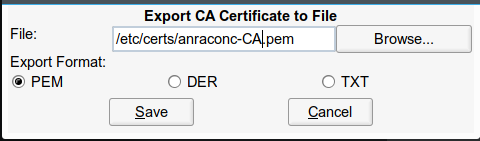
We have followed a policy of using a server wide TLS/SSL-certificate for all TLS/SSL-based services run on a server – in our case on a server “myserv.anraconc.de”. Therefore we have copied the certificate’s pem file and the key’s pem file to the directory “/etc/ssl/servercerts” with file names “servercert.pem” and “serverkey.pem”.

In addition we naively copied the CA certificate as file “anraconc-CA.pem” into the central directory “/etc/ssl/certs” which contains (links to) all trusted certificates on an Opensuse system.

If the private key was exported with a password we have a problem with automated system and service starts: As the private key of a server certificate must in some cases also by system users starting and running services we would be asked to provide a password interactively, whenever the service is started – e.g. during system startup. To avoid such a situation we need a private key without password – hence we have to deal carefully with read access rights. Actually, we need to find out which services – not started or run by root – need the access right for its special system user. For the time being we took away all read rights for “others” from the server key for the system “myserv”.

In this second article I discuss the changes to be made to the configuration of two services – Apache2 and OpenLDAP on server “myserv”. After a test we shall detect that Opensuse rebuilds the contents of “/etc/ssl/certs” during a reboot – and references of our services to the CA’s certificate will fail. I shall show where to save our CA certificate to make it permanently available.

Re-configuring a local Apache service for the new CA and the changed server certificate

As I had used a server wide certificate on “myserv” already at times when YaST’s CA-administration was still available, I expected that the required changes to the service configuration would be limited to providing the path to the new CA certificate. The example of the Apache service proved that this really was true.

In my case I use virtual domains with my Apache server for Intranet sites. The configuration of the SSL-setup then is to be found in either a central file as “/etc/apache2/ssl-global.conf” or in “/etc/apache2/vhosts.d/vhost-ssl.conf” for individual domains. I used the latter file. I shall only show the most simple case here – with just a main standard domain associated on an Opensuse system with the directory “/srv/www/htdocs”. Other domains would get the same SSL settings (if you do not plan to issue different certificates for each intranet domain):

<VirtualHost *:443>

        #  General setup for the virtual host
        DocumentRoot "/srv/www/htdocs/"
        ServerName myserv
        #ServerAdmin webmaster@example.com
        ErrorLog /var/log/apache2/error_log
        TransferLog /var/log/apache2/access_log

        #   SSL Engine Switch:
        #   Enable/Disable SSL for this virtual host.
        SSLEngine on

        #   SSL Cipher Suite:
        #   List the ciphers that the client is permitted to negotiate.
        #   See the mod_ssl documentation for a complete list.
        SSLCipherSuite ALL:!
ADH:!EXPORT56:RC4+RSA:+HIGH:+MEDIUM:+LOW:+SSLv2:+EXP:+eNULL

        #   Server Certificate:
        #   Point SSLCertificateFile at a PEM encoded certificate.  If
        #   the certificate is encrypted, then you will be prompted for a
        #   pass phrase.  
        SSLCertificateFile /etc/ssl/servercerts/servercert.pem

        #   Server Private Key:
        #   If the key is not combined with the certificate, use this
        #   directive to point at the key file.  
        SSLCertificateKeyFile /etc/ssl/servercerts/serverkey.pem

        #   Server Certificate Chain:
        #   Point SSLCertificateChainFile at a file containing the
        #   concatenation of PEM encoded CA certificates which form the
        #   certificate chain for the server certificate. 
        SSLCertificateChainFile /etc/ssl/certs/anraconc-CA.pem
        #
        # NOTE: here you should later on use the Common Name of your CA certificate !
        # See below ! 
.....
......

Note that I referred to the CA certificate at “/etc/ssl/certs” in the CA chain setting. The server certificate and key files are referred to already by the standard paths “/etc/ssl/servercerts/servercert.pem” and “/etc/ssl/servercerts/serverkey.pem”.

With this changed configuration file we restart our Apache service:

myserv:/etc/apache2/vhosts.d # vi vhost-ssl.conf
myserv:/etc/apache2/vhosts.d # systemctl restart apache2.service
myserv:/etc/apache2/vhosts.d # systemctl status apache2.service
● apache2.service - The Apache Webserver
   Loaded: loaded (/usr/lib/systemd/system/apache2.service; enabled; vendor preset: disabled)
   Active: active (running) since Sat 2019-07-20 15:37:29 CEST; 11s ago
  Process: 20435 ExecStop=/usr/sbin/start_apache2 -DSYSTEMD -DFOREGROUND -k graceful-stop (code=exited, status=0/SUCCESS)
 Main PID: 20443 (httpd-prefork)
   Status: "Total requests: 0; Current requests/sec: 0; Current traffic:   0 B/sec"
    Tasks: 6
   CGroup: /system.slice/apache2.service
           ├─20443 /usr/sbin/httpd-prefork -DSYSCONFIG -DSSL -C PidFile /var/run/httpd.pid -C Include /etc/apache2/sysconfig.d//loadmodule.conf -C Include /etc/a>
           ├─20449 /usr/sbin/httpd-prefork -DSYSCONFIG -DSSL -C PidFile /var/run/httpd.pid -C Include /etc/apache2/sysconfig.d//loadmodule.conf -C Include /etc/a>
           ├─20450 /usr/sbin/httpd-prefork -DSYSCONFIG -DSSL -C PidFile /var/run/httpd.pid -C Include /etc/apache2/sysconfig.d//loadmodule.conf -C Include /etc/a>
           ├─20451 /usr/sbin/httpd-prefork -DSYSCONFIG -DSSL -C PidFile /var/run/httpd.pid -C Include /etc/apache2/sysconfig.d//loadmodule.conf -C Include /etc/a>
           ├─20452 /usr/sbin/httpd-prefork -DSYSCONFIG -DSSL -C PidFile /var/run/httpd.pid -C Include /etc/apache2/sysconfig.d//loadmodule.conf -C Include /etc/a>
           └─20453 /usr/sbin/httpd-prefork -DSYSCONFIG -DSSL -C PidFile /var/run/httpd.pid -C Include /etc/apache2/sysconfig.d//loadmodule.conf -C Include /etc/a>

Jul 20 15:37:29 myserv systemd[1]: Starting The Apache Webserver...
Jul 20 15:37:29 myserv start_apache2[20443]: [Sat Jul 20 15:37:29.522427 2019] [so:warn] [pid 20443] AH01574: module authn_core_module is already loaded, skipping
Jul 20 15:37:29 myserv systemd[1]: Started The Apache Webserver.

Obviously, only root needs to read “/etc/ssl/servercerts/serverkey.pem” for starting the service – although multiple “httpd-prefork” processes later on are run by the system user “wwwrun”. However, the first one is run by root.

Note:
If you get any trouble here, please have a look into the Apache log files (in my case in “/var/log/apache2/error.log”). If you see something there like

[Sat Jul 20 14:56:15.132380 2019] [ssl:emerg] [pid 13320] AH02561: Failed to configure certificate myserv:443:0, check /etc/ssl/servercerts/servercert.pem
[Sat Jul 20 14:56:15.
132404 2019] [ssl:emerg] [pid 13320] SSL Library Error: error:140AB18E:SSL routines:SSL_CTX_use_certificate:ca md too weak
AH00016: Configuration Failed
[Sat Jul 20 15:00:53.251242 2019] [ssl:emerg] [pid 14285] AH02561: Failed to configure certificate myserv:443:0, check /etc/ssl/servercerts/servercert.pem
[Sat Jul 20 15:00:53.251268 2019] [ssl:emerg] [pid 14285] SSL Library Error: error:140AB18E:SSL routines:SSL_CTX_use_certificate:ca md too weak
AH00016: Configuration Failed

then you are confronted with a point I mentioned in my first article. The error message criticizes that the “md”-hashing algorithm is too weak. But didn’t we use SHA256?

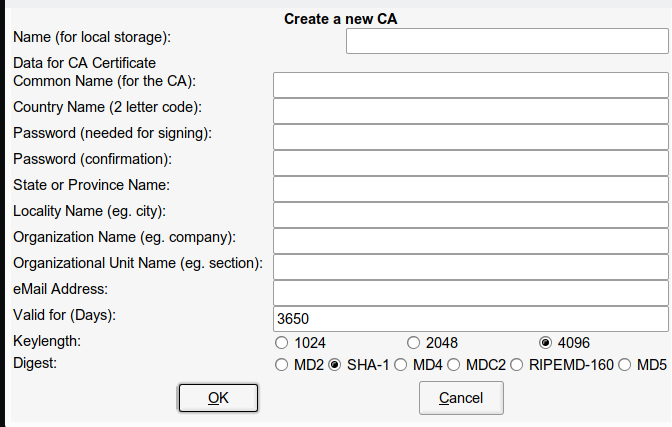
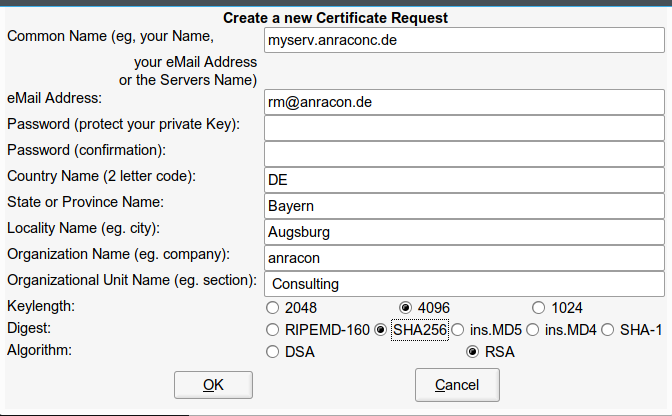
Well, you meant to do so – because it my have been shown as the option chosen by default for the “Digest”. And you did not change this setting. However, if you did not click the radio button explicitly after some other value you may not have gotten what you saw. Without your explicit interaction with the radio buttons the default is “md”. So, it is important for all certificates to explicitly choose a different value first and then click on the right radio button for a digest again. The same is true for the setting of the key length and other options.

For other services than Apache2 you would basically proceed in an analogous way. So far – so good. Unfortunately, our approach is still not good enough!

How to make a CA certificate pem file system wide and permanently available on Opensuse Leap 15.x?

One of the most frustrating things that may happen to you is that you think everything you changed works now and then – after a system restart – you find a mess of non-starting or working services again. Well, this is exactly what happens if you just place a CA’s certificate (pem) file into the location “/etc/ssl/certs”. Just try a reboot; you will find that the file /etc/ssl/certs/anraconc-CA.pem” does not start any more afterwards – with severe consequences for the services referring to it.

“/etc/ssl/certs” is in so far a reasonable central directory as legacy applications may read it for CA certificates. So, one would use it also for our TLS/SSL-dependent server services. Especially, because you may really find it as a default in some configuration files.

The location “/etc/ssl/certs” actually is a link to “/var/lib/ca-certificates/pem” which will not help much as the contents of this directory is refreshed after each system restart, too. I was too lazy to analyze this in detail. However, you find some information in the scripts under “/usr/lib/ca-certificates/update.d/“.

Another substantial piece of information is provided by the the answer to a related question at “Stack Exchange” : how-do-i-install-a-system-wide-ssl-certificate-on-opensuse.

Here, as well as in one of the “update.d”-files, the directory “/etc/pki/trust/anchors” is mentioned as a suitable place to save CA certificate files by the admin for system wide usage. So, we may think that it is enough to copy our CA pem file into the directory “/etc/pki/trust/anchors/“.

Before you get frustrated again: The “trust”-program which among other things refreshes “/etc/ssl/certs” is intelligent:
It extracts the “Common Name” from the certificate and uses it to name the pem-file which it writes at system start into “/etc/ssl/certs”.

So, here are the rules if all your SSL-based services shall be configured to read your trusted CA certificate at “/etc/ssl/certs”:

  1. Place your CA’s certificate file (as exported from TinyCA2) into “/etc/pki/trust/anchors” (and if you have sub-CAs also their certificate files!)
  2. Then refer to the file “/etc/ssl/certs/CAs_COMMON_NAME.pem” – where CAs_COMMON_NAM is the common name you used when you set up your CA. Do not use any other name you may originally have given your exported CA certificate (pem) files.

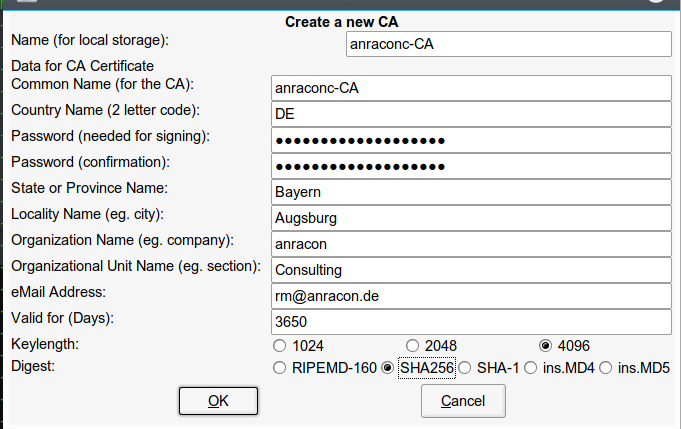
In our case we need the file name “anraconc-CA.pem”. So, this is already consistent with the name which we chose at export time in the first article. However, this happened by chance, only. We could have chosen quite a different name for the pem-file. (Well, I knew about the pitfall 🙂 )

If you had given your file a name like “myCA-cacert.pem”, you would experience some trouble after having placed it into “/etc/pki/trust/anchors” and referred to it in CA chain configuration settings for any service by “/etc/ssl/certs/myCA-cacert.pem”. Despite the files name “myCA-cacert.pem” it would in our case appear in “/etc/ssl/certs” with the name “anraconc-CA.pem”. It took me a little while to figure this out !

SSL-reconfiguration for OpenLDAP and missing rights for the system user “ldap”

After we have made our CA certificate permanent, we proceed to the reconfiguration of the OpenLDAP service. This is a bit more complicated due to two reasons: There are potentially more configuration files to take care of and there may appear a problem with read rights. In addition you have to think of the “sssd.service” for providing encrypted connections to clients for authentication services – here for LDAP-clients.

The first point depends a bit on your specific configuration. There may be a file “/etc/ldap.conf” (controlling local LDAP-clients). In my case I had to change the entry for “tls_cacertfile“:

bind_policy soft
uri ldap://myserv.anraconc.de
base dc=anraconc,dc=de
nss_map_attribute uniqueMember member
ssl start_tls
pam_password exop
pam_filter objectClass=posixAccount
tls_cacertdir /etc/ssl/certs
tls_cacertfile /etc/ssl/certs/anraconc-CA.pem
....
...

However, your main configuration will probably reside in “/etc/openldap/”. There is also a “/etc/openldap/ldap.conf“, which we need to modify:

tls_cacert      /etc/ssl/certs/anraconc-CA.pem

Then we have in addition the central file “slapd.conf” which must get proper TLS/SSL entries :

...
TLSCACertificateFile /etc/ssl/certs/anraconc-CA.pem
TLSCertificateFile /etc/ssl/servercerts/servercert.pem
TLSCertificateKeyFile /etc/ssl/servercerts/serverkey.pem
...

Hint: On Opensuse systems the file “/etc/sysconfig/openldap” should also contain a line:

...
OPENLDAP_START_LDAP="yes"
...
## Type:           yesno
## Default:        no
## ServiceRestart: ldap
# If set to "yes" the "ldap over ssl" feature of slapd will be enabled. Don't
# forget to add the "TLSCertificateFile" and "TLSCertificateKeyFile" options 
# to the /etc/openldap/slapd.conf (man slapd.conf).
# Note: Don't confuse this with "START_TLS", the preferred method for 
#       making encrypted LDAP connections, which is enabled as soon as You
#       specify "TLSCertificateFile" and "TLSCertificateKeyFile" in your config
#       file
#
OPENLDAP_START_LDAPS="yes"
...

But setting the right value for “TLSCACertificateFile” in “/etc/openldap/ldap.conf” is not enough:

The SSL settings also play a decisive role in the file “cn=config.ldif” (in “/etc/openldap/slapd.d/”) as the core of modern LDAP services is configured by ldif-files.

Warning:
When editing the file “cn= config.ldif” file you have to be extremely careful. Make a backup first! One normally should not edit this file directly!. But as our LDAP service is not running any more we are brave and use

myserv:/etc/openldap/slapd.d # vi cn\=config.ldif

Note the escaping backslash. Then you edit the following entries

...
olcTLSCACertificateFile: /etc/ssl/certs/anraconc-CA.pem
olcTLSCertificateFile: /etc/ssl/servercerts/servercert.pem
olcTLSCertificateKeyFile: /etc/ssl/servercerts/serverkey.pem
....

This may afterwards lead to some warnings in log files regarding the checksum for this file. You could correct this later on by using “ldapmodify” to reedit the entries again on the then (hopefully) running LDAP-server.

Unfortunately, a service restart leads to trouble:

myserv:/etc/openldap/slapd.d # rcslapd restart
Job for slapd.service failed because the control process exited with error code.
See "systemctl  status slapd.service" and "journalctl  -xe" for details.

myserv:/etc/openldap/slapd.d # rcslapd status
● slapd.service - OpenLDAP Server Daemon
   Loaded: loaded (/usr/lib/systemd/system/slapd.service; enabled; vendor preset: disabled)
   Active: failed (Result: exit-code) since Sat 2019-07-20 16:45:37 CEST; 45s ago
  Process: 13254 ExecStart=/usr/lib/openldap/start (code=exited, status=1/FAILURE)
 Main PID: 11608 (code=exited, status=0/SUCCESS)

Jul 20 16:45:37 myserv slapd[13254]: main: TLS init def ctx failed: -1
Jul 20 16:45:37 myserv slapd[13254]: slapd stopped.
Jul 20 16:45:37 myserv slapd[13254]: connections_destroy: nothing to destroy.
Jul 20 16:45:37 myserv start[13254]: Starting ldap-server
Jul 20 16:45:37 myserv systemd[1]: slapd.service: Control process exited, code=exited status=1
Jul 20 16:45:37 myserv systemd[1]: Failed to start OpenLDAP Server Daemon.
Jul 20 16:45:37 myserv systemd[1]: slapd.service: Unit entered failed state.
Jul 20 16:45:37 myserv systemd[1]: slapd.service: Failed with result 'exit-code'.

You see the message in the middle? main: TLS init def ctx failed: -1

Now, you could google. It will not help much! It took me some time to find out that I simply had a rights problem! I saw this when comparing the old contents of /etc/ssl/servercerts” from a backup with the new one:

myserv:/etc/ssl # la servercerts.orig
total 16
drwxr-xr-x  2 root root 4096 May 30  2013 .
drwxr-xr-x  7 root root 4096 Jul 20 15:03 ..
-rw-r--r--  1 root root 2155 Jul 10  2017 servercert.pem
-rw-------+ 1 root root 3272 Jul 10  2017 serverkey.pem
myserv:/etc/ssl # la servercerts
total 16
drwxr-xr-x 2 root root 4096 Jul 20 16:40 .
drwxr-xr-x 7 root root 4096 Jul 20 15:03 ..
-rw-r--r-- 1 root root 2492 Jul 20 15:19 servercert.pem
-rw------- 1 root root 3243 Jul 20 15:22 serverkey.pem

You see the tiny difference? The “+” – sign in the original rights?
Oops! ACL-settings? What for?

myserv:/etc/ssl # getfacl servercerts.orig/serverkey.pem 
# file: servercerts.orig/serverkey.pem
# owner: root
# group: root
user::rw-
user:ldap:r--
group::r--
mask::r--
other::---

OK! lets try this for the user “ldap” in the new setup:

 
myserv:/etc/ssl # setfacl -m u:ldap:r servercerts/serverkey.pem 
myserv:/etc/ssl # setfacl -m g::- servercerts/serverkey.pem
myserv:/etc/ssl # getfacl servercerts/serverkey.pem 
# file: servercerts/serverkey.pem
# owner: root
# group: root
user::rw-
user:ldap:r--
group::---
group:root:---
mask::r--
other::---

myserv:/etc/ssl # systemctl restart slapd.service
myserv:/etc/ssl # systemctl status slapd.service
● slapd.service - OpenLDAP Server Daemon
   Loaded: loaded (/usr/lib/systemd/system/slapd.service; enabled; vendor preset: disabled)
   Active: active (running) since Sat 2019-07-20 17:00:21 CEST; 5s ago
  Process: 15869 ExecStart=/usr/lib/openldap/start (code=exited, status=0/SUCCESS)
 Main PID: 15889 (slapd)
    Tasks: 3 (limit: 4915)
   CGroup: /system.slice/slapd.service
           └─15889 /usr/sbin/slapd -h ldap:/// ldaps:/// 
ldapi:/// -F /etc/openldap/slapd.d -u ldap -g ldap -o slp=off

Jul 20 17:00:21 myserv systemd[1]: Stopped OpenLDAP Server Daemon.
Jul 20 17:00:21 myserv systemd[1]: Starting OpenLDAP Server Daemon...
Jul 20 17:00:21 myserv slapd[15869]: @(#) $OpenLDAP: slapd 2.4.46 $
                                          opensuse-buildservice@opensuse.org
Jul 20 17:00:21 myserv slapd[15869]: ldif_read_file: checksum error on "/etc/openldap/slapd.d/cn=config.ldif"
Jul 20 17:00:21 myserv slapd[15869]: ldif_read_file: checksum error on "/etc/openldap/slapd.d/cn=config/olcDatabase={0}config.ldif"
Jul 20 17:00:21 myserv slapd[15889]: slapd starting
Jul 20 17:00:21 myserv start[15869]: Starting ldap-server
Jul 20 17:00:21 myserv systemd[1]: Started OpenLDAP Server Daemon.
myserv:/etc/ssl # 

Obviously, the user “ldap” needs read rights on the (private) key of the server certificate!
Note that the user which runs the slapd.service may have a different name on your system – e.g. “openldap”.

One can dispute whether ACLs is a reasonable way to handle this problem. Of course you could try and do something else. For other services I found in backups for older SuSE installations a special group “tls” which contained root and system users which needed read rights. This group was then assigned to “/etc/ssl/servercerts/serverkey.pem”.

E.g. in case you are concerned about any of these solutions you could create a separate special certificate for the LDAP service and place the key in a special directory with read access rights for the file limited to root and the user “ldap”. Of course, in this case, the service’s configuration files must be adjusted for all TLS/SSL relevant data. However, before you follow such an approach of different certificates for services on one and the same server, think a bit about side consequences. As the FQDN of the server has to be identical to the certificate’s common name you would have to issue certificates for different common names of your various server services.
This in turn makes your network and DNS configuration more complicated – you either need to associate one IP with multiple FQDNs or provide multiple IPs for one and the same server. To avoid such trouble I would rather combine this with a container approach for each separate service.

Adjusting the configuration of the SSSD-service

Having a running LDAP service does not mean that external clients can access it. On modern systems the exchange of auth-information between clients and server services is often handled by the “sssd”-service. This is true in my case, too. Therefore, a running slapd will not be sufficient if we use the LDAP-service for authentication from some clients in the network. We need to adjust the sssd-configuration, too. The relevant file is “/etc/sssd/sssd.conf” :

...
[sssd]
config_file_version = 2
services = nss,pam
domains = default
# SSSD will not start if you do not configure any domains.
# Add new domain configurations as [domain/<NAME>] sections, and
[nss]
filter_groups = root
filter_users = root
[pam]
# Section created by YaST
[domain/default]
ldap_uri = ldap://myserv.anraconc.de
ldap_search_base = dc=anraconc,dc=de
ldap_schema = rfc2307bis
id_provider = ldap
ldap_user_uuid = entryuuid
ldap_group_uuid = entryuuid
;ldap_id_use_start_tls = True
ldap_id_use_start_tls = False
enumerate = True
chpass_provider = ldap
auth_provider = ldap
cache_credentials = False

ldap_tls_cacertdir = /etc/ssl/certs
ldap_tls_cacert = /etc/ssl/certs/anraconc-CA.pem
....
...

Again, the most important settings are done in the last 2 lines displayed.
The setting for start_tls is up to you. If you use “start_tls” then the OpenLDAP configuration must provide the necessary entries.

Note: You have to provide similar sssd-settings on external LDAP-client-systems! One such client could be an email/imap-server – we shall have a look at its configuration in the next article.

On “myserv” we restart the “sssd.service”:

myserv:/etc/ssl # vi /etc/sssd/sssd.conf
myserv:/etc/ssl # rcsssd restart
myserv:/etc/ssl # systemctl status sssd.service 
● sssd.service - System Security Services Daemon
   Loaded: loaded (/usr/lib/systemd/system/sssd.service; enabled; vendor preset: disabled)
   Active: active (running) since Sat 2019-07-20 17:29:11 CEST; 18s ago
 Main PID: 20021 (sssd)
    Tasks: 4 (limit: 4915)
   CGroup: /system.slice/sssd.service
           ├─20021 /usr/sbin/sssd -i --logger=files
           ├─20022 /usr/lib/sssd/sssd_be --domain default --uid 0 --gid 0 --logger=files
           ├─20023 /usr/lib/sssd/sssd_nss --uid 0 --gid 0 --logger=files
           └─20024 /usr/lib/sssd/sssd_pam --uid 0 --gid 0 --logger=files

Jul 20 17:29:10 myserv systemd[1]: Starting System Security Services Daemon...
Jul 20 17:29:10 myserv sssd[20021]: Starting up
Jul 20 17:29:11 myserv sssd[be[20022]: Starting up
Jul 20 17:29:11 myserv sssd[20024]: Starting up
Jul 20 17:29:11 myserv sssd[20023]: Starting up
Jul 20 17:29:11 myserv systemd[1]: Started System Security Services Daemon.

Conclusion

We can use TinyCA2 to replace the missing YaST-feature for an effective administration both of CAs and server certificates. The major work has to be done in adjusting the configuration of the services. But after the method for installing a CA certificate server wide and permanently became clear the service configuration became reduced to a more or less dumb editing job. This job could be delegated to a script; but be careful to check the specific names of the relevant SSL/TLS entries for each service!

A special challenge came with the LDAP service; the related system user must get read rights to the used server certificate’s private key!

In the next and final article of this series

TinyCA2 as a replacement for YaST’s CA-tools on Opensuse Leap servers with TLS/SSL – III

we shall have a look at the reconfiguration of a cyrus and posfix service on a different server “mymail”, which would then be a client for the LDAP service on “myserv” (for the authentication of IMAP/SMTP-users).

Links

Server wide and permanent installation of a trusted CA’s certificate
stackexchange.com: how-do-i-install-a-system-wide-ssl-certificate-on-opensuse


TinyCA2 as a replacement for YaST’s CA-tools on Opensuse Leap servers with TLS/SSL – I

Today server services should offer network connectivity for clients with encryption. On Linux StartTLS based services are common – for LDAP, email/groupware servers as well as web servers. To set up SSL/TLS/StartTLS based services we need certificates and encryption keys issued by a central CA – which we trust. Administering your own local CA and server certificates can be a bit challenging without graphical tools – even in smaller networks with a dozen server instances.

In our networks with mainly Opensuse and Debian servers I had used YaST’s CA-module to create a CA and server certificates signed by this CA. The stupid thing is that the required “yast2-ca”-module and its RPM are missing since Opensuse Leap 15.0. This was not a major problem so far; the update processes respected existing certificates, of course. However, some days ago two of my central server certificates – namely the one for my LDAP-server and an Apache2-server – expired. This in turn lead to a breakdown of several other services on other (virtual) machines: SSSD, IMAP, Postfix (SMTP, because these services use the LDAP server among other things as a backend for user authentication. (SSSD itself provides a TLS connection to LDAP.)

The Opensuse documentation cha.security.yast_ca.html is really misleading because it claims to be valid for Opensuse Leap 15.1 – which it is not, as there still is no yast-ca-module available. For me this kind of policy of Opensuse is unbelievable; doesn’t Leap provide the basic platform for SLES? How shall SLES admins in smaller companies tackle the resulting problems? Buy a PKI tool? Everybody talks about secuirty …. but SuSE (???)

I wanted some cost free alternative for my own network – and as a first trial I went for “TinyCA2“.

This became more of an adventure than expected. Part of the hurdles were due to Opensuse specific settings – but also due to the very many different configuration files which had to be adapted for the certificate of my new CA – which came in addition to my old one. (I did not yet want to give up the old CA as some (virtual) servers still have valid server certificates from it.) Another obstacle appeared when Opensuse deleted any new files in “/etc/ssl/certs” after a system restart. Also the GUI of TinyCA2 has some strange “features” regarding default values, which I did not become aware of during my first trials. In addition it seemed to be necessary to replace SHA1 by SHA256. And in the end I got e.g. Apache running with its new server certificate, but not e.g. the slapd.service – due to a access rights problem which was difficult to see.

In this article I shall describe most of the required steps for switching to a TinyCA2 CA and adjusting server settings. I shall concentrate on some simple services as examples. But I hope the general pattern of how to proceed will become clear and help others, who work with Opensuse, to save a bit of time.

Installing and patching TinyCA2

Both Opensuse Leap 15.0 and Opensuse Leap 15.1 provide RPMs for TinyCA2 version 0.7.5. Which is from 2015. If you have a look at GitHub (see the link in the last section of this article) you may also find some (important) patches. On an Opensuse system You install the RPM easily with the help of YaST (yast2). After the installation you find the Perl files of TinyCA2 in the directory “/usr/share/TinyCA2/lib“.

When you start TinyCA2 via the command “tinyca2 &” the first thing you may stumble across is the fact that (among other digests) MD5 and SHA1 are offered as hashing algorithms. Look at the bottom part of the following screenshot:

(By the way: The layout – especially the icons – may look different on your system. It depends on your graphical desktop and your settings for GTK applications)

You see that we get a variety of hashing algorithms offered under the category “Digest”. Most of them are regarded insecure today. So, even in a semiprofessional environment you would like to see something better – e.g. SHA256. Fortunately, another guy (Bill Thorsteinson) had the same problem and he has created a patch for TinyCA2 which enables SHA256. You find the patch at
https://www.systemajik.com/tinyca-sha2/.

Let us try this out; on my ssh session to my central server “myserv” (this is the one with LDAP):

myserv:~ # mkdir /extras/Updates/tinyca
myserv:~ # wget https://www.systemajik.com/wp-uploads/2014/10/tinyca_sha256.patch_.txt -O /central/Updates/tinyca/tinyca_sha256.patch_.txt
--2019-07-20 12:44:57--  https://www.systemajik.com/wp-uploads/2014/10/tinyca_sha256.patch_.txt
Resolving www.systemajik.com (www.systemajik.com)... 206.47.13.3, 2001:470:1f11:b22::8
Connecting to www.systemajik.com (www.systemajik.com)|206.47.13.3|:443... connected.
HTTP request sent, awaiting response... 200 OK
Length: 4863 (4.7K) [text/plain]
Saving to: ‘/central/Updates/tinyca/tinyca_sha256.patch_.txt’

/central/Updates/tinyca/tinyca_sha256.pat 100%[=================>]   4.75K  --.-KB/s    in 0s      

2019-07-20 12:44:58 (138 MB/s) - ‘/central/Updates/tinyca/tinyca_sha256.patch_.txt’ saved [4863/4863]

myserv:~ # 
myserv:~ # cd /usr/share/TinyCA2/lib
myserv:/usr/share/TinyCA2/lib # cp /extras/Updates/tinyca/tinyca_sha256.patch_.txt .
myserv:/usr/share/TinyCA2/lib # patch --verbose -p1 < tinyca_sha256.patch_.txt
Hmm...  Looks like a unified diff to me...
The text leading up to this was:
--------------------------
|From e5e25e55f8da2b4d2bad584f2145ca0ff6b3a92a Mon Sep 17 00:00:00 2001
|From: Bill Thorsteinson <bill.git@systemajik.com>
|Date: Thu, 30 Oct 2014 22:26:47 -0400
|Subject: [PATCH] Apply changes
|
|---
...
...
|--- a/REQ.pm
|+++ b/REQ.pm
--------------------------
patching file REQ.pm
Using Plan A...
Hunk #1 succeeded at 59.
Hunk #2 succeeded at 426.
Hmm...  Ignoring the trailing garbage.
done

Note: The “-p1” in “patch –verbose -p1 < tinyca_sha256.patch_.txt” reads “-pONE” and not “-pL” with a small L-letter.

A “tinyca2” command now produces:

Much better !

Importing the old CA from Opensuse?

If you play around with the menus of TinyCA2 you find an option to import other CAs. Could this work with my old YaST-CA? To make a long story short – I did not succeed with this. The reasons are still unclear to me …. TinyCA could not read the relevant information.

So, I really was forced to set up a new CA – with all consequences as issuing and deploying new server certificates and the (trusted) CA certificate on my servers (and the CA cert also on my client machines). Which even in my little network (12 servers- thanks to virtualization) is painstaking …

Creating a new TinyCA2 based CA

Let us create a new CA with TinyCA2. We have some freedom regarding the “common name“. I choose a reference to my main internal domain “anraconc.de” – so my common name is: “anraconc-CA”. (It only looks like an official Internet domain; but actually it is an internal domain, only, and my DNS server is configured accordingly.)

Important hint:
Change the settings for Keylength and Digest by explicitly clicking first on other values and then the real choice again! If you do not change anything explicitly you may get a surprise regarding default values. They may not be what is indicated. Seems to be a bug. Do not disregard this hint if you want to save time ….

Now, a click on the “OK”-button gives us:

We set the keyUsage to “critical” (this certificate extension is used by some applications). And we eventually get all the information about our CA certificate:

The data – and especially the private key – can be found in the directory “/root/.TinyCA/anraconc-CA/”. TinyCA2 creates such a directory for every main CA. (If you use sub-CAs you will find respective directories below it).

myserv:~/.TinyCA # cd anraconc-CA/
myserv:~/.TinyCA/anraconc-CA # la
total 44
drwx------ 7 root root 4096 Jul 20 13:13 .
drwx------ 5 root root 4096 Jul 20 13:12 ..
-rw------- 1 root root 3311 Jul 20 13:13 cacert.key
-rw------- 1 root root 2504 Jul 20 13:13 cacert.pem
drwx------ 2 root root 4096 Jul 20 13:12 certs
drwx------ 2 root root 4096 Jul 20 13:13 crl
-rw------- 1 root root    0 Jul 20 13:12 index.txt
drwx------ 2 root root 4096 Jul 20 13:12 keys
drwx------ 2 root root 4096 Jul 20 13:12 newcerts
-rw------- 1 root root 3872 Jul 20 13:13 openssl.cnf
drwx------ 2 root root 4096 Jul 20 13:12 req
-rw------- 1 root root    2 Jul 20 13:12 serial

Hint: You should make a backup of the CA directories on a periodic basis.

Now, you can export the CA certificate in form of a standard pem-file to some intermediate place where you gather your own certificates and keys – in my case this is a directory “/etc/certs” – which so far survived any Opensuse upgrades. Depending on what else you intend to save there (private keys?), you should make this place accessible to root only! We click on the second to last icon in the icon row of TinyCA2:

Note: In general you have any freedom here to give the exported file any kind of name – whatever you like. However, it is a good policy to use the “common name” which you gave to the CA certificate. See below for the reason.

Place the CA certificate at a central location for trusted CAs

We can now export this certificate file with public information to servers into directories where we gather the public certificates (keys) of all trusted CAs. Of course we need to do this on the server “myserv”, too, as some services may refer to it. In my age my first guess is “/etc/ssl/certs“; old habit form a decade ago where this directory was used more frequently.

myserv:~/.TinyCA/anraconc-CA # cp /etc/certs/anraconc-CA.pem /etc/ssl/certs
myserv:~/.TinyCA/anraconc-CA # chmod 640 /etc/ssl/certs/anraconc-CA.pem 
myserv:~/.TinyCA/anraconc-CA # 

A wrong decision in the end – see below. But for our present session this will work.

Note: If we would create Sub-CAs we would have to export all respective pem files to such a central location – the whole CA-chain must be reflected there for the verification of a service whose “server certificate” has been issued by a sub-CA. I do not use Sub-CAs in this article – but it my be necessary in your organization!

Create a server certificate

Now, we need to create “server certificates” or even service specific certificates. It depends on your policy of how far you want to discriminate services.

In this article I follow the path of a server wide central “server certificate” for all the services implemented there. As examples we shall later have a look at a local OpenLDAP service and a local Apache web server. My central server “myserv” with OpenLDAP has a FQDN of “myserv.anraconc.de”.

Important note: You must use the FQDN as a “common name” in server certificates – consistent with DNS settings. Otherwise you may risk warnings of security aware applications that the server certificate does not fit the server!

in our TinyCA2 window we click on the tab “Certificates” and then on the empty sheet icon:

We fill in the required data. As keys protected by a password may cause trouble for services during automated system startups we try to leave the password-fields empty:

But this approach is not accepted!

So we type in some lengthy password – and set the options for Digest and Algorithm again explicitly – by clicking a bit around first (see above). Then we click on “OK” and get:

Think a bit about the validity! Actually, the length of the validity period should be somewhat shorter than the period for your CA! E.g. 5 years. Otherwise you will get a warning. Eventually:

If you click on the tab “Keys” you will see a related (private) key, too.

Important Note:
We have taken a shortcut here. You could have started in a different way – namely via a certificate “request”. In a first step you would then have issued such a “request” under the tab “Requests” and filled out an initial form there. Afterwards, you explicitly need to sign the requested certificate with the CA’s signature. You get the option for signing by right-clicking on the request entry after its creation. This approach also leads to a valid certificate.

Exporting the server certificate and the key to a central location on the Opensuse system

We need to export the certificate and the (private) key to some
save location on our server “myserv” – only accessible to root (and maybe read accessible to some special system user). On an Opensuse Leap system the location for server certificates should be “/etc/ssl/servercerts“. For exporting the certificate we right-click on the entry:

Then we switch to the tab “Keys” and do the same there:

Important note:
At this point we get an option to export the key without a password. I have chosen this option. This implicates security risks – your exported private key is protected by nothing afterwards. So be very careful where you save it and with which access rights. On the other side such a key will allow for automated service starts – otherwise someone would have to provide the password during startup. I do not want to deepen the discussion here. But be careful with unprotected private keys!

You saw that I exported into my intermediate directory “/etc/certs”. There we change rights for security reasons to:

myserv:/etc/ssl # chmod 600 /etc/certs/myserv-anraconc-key.pem 

Note:
If you instead export your key with the password there is a way to get rid of it afterwards:

myserv:/etc/certs # openssl rsa -in /etc/certs/myserv-anraconc-key.pem -out /etc/certs/myserv-anraconc-key_new.pem
Enter pass phrase for /etc/certs/myserv-anraconc-key.pem:
writing RSA key
myserv:/etc/certs # cp /etc/certs/myserv-anraconc-key_new.pem /etc/certs/myserv-anraconc-key.pem

This creates a key without password! Actually I recommend to use this approach – we do not know details of TinyCA2’s export procedure, but “openssl” will always create the key in the format required for further processing.

Now, before any further steps, I make a backup of everything existing in the folder “/etc/ssl/servercerts“. This is important! If you loose your previous certificates and keys they are gone and you have no chance to get services running with them.

Then we overwrite the existing entries:

 
myserv:/etc/ssl # cp /etc/certs/myserv-anraconc-cert.pem /etc/ssl/servercerts/servercert.pem 
myserv:/etc/ssl # cp /etc/certs/myserv-anraconc-key.pem /etc/ssl/servercerts/serverkey.pem 
myserv:/etc/ssl # chmod 600 /etc/ssl/servercerts/serverkey.pem 

Note: The last step is of fundamental importance due to security reasons! See the discussion below if this leads to trouble for some services and the related system user.

You may try “644” in the beginning to avoid any problems with system users running special services. But if you do this then DO NOT FORGET to restrict the read rights again in the end and after your tests.

Note that replacing the contents of /etc/ssl/severcerts” will probably lead to a breakdown of all services which base their TLS/SSL functionality on these files. In most cases the reason for this will be that the configuration will refer to a wrong CA-certificate. Therefore, you must reconfigure your local services step by step.

Conclusion

Enough for today. We have seen how TinyCA2 can be patched for SHA256, how it can be used to create a CA and server certificates. In the next article

TinyCA2 as a replacement for YaST’s CA-tools on Opensuse Leap servers with TLS/SSL – II

we shall reconfigure an Apache and an LDAP service to work with the new server certificate. And I shall show how we can make the CA-certificate permanently available in “/etc/ssl/certs” – across any server reboot. Stay tuned !

Links

CAs and Certificates – general information
https://wiki.ubuntuusers.de/CA/
stackexchange.com: what-role-do-hashes-play-in-tls-ssl-certificate-validation
stackexchange.com how-does-ssl-tls-work
robpol86.com root certificate authority
https://roll.urown.net/ca/ca_cert.html

TinyCA2
https://github.com/glennie/tinyca2
linux-magazin 2008: eigene zertifikatsstelle mit tinyca

TinyCA2 patches
https://www.systemajik.com/tinyca-sha2/.

Critical
stackexchange.com: which-properties-of-a-x-509-certificate-should-be-critical-and-which-not


Mail-server-upgrade to Opensuse Leap 15 – and some hours with authentication trouble …

Some of my readers know that the mail server in my private LAN resides in an encrypted KVM/qemu guest. It provides IMAP- and SMTP-services to mail-clients – and receives emails from several hosted servers on the Internet via a fetchmail system in a DMZ. It was/is my policy that any access to a mail service account on my private mail server requires authentication against user entries on a separate LDAP-server. The accounts the IMAP/SMTP-service-daemons deal with are not to be confused with Linux user accounts: On the mail server NO Linux user accounts are required for mail handling. I regard the absence of standard Linux user accounts on the mail-server as a small, but effective contribution to security. No mail user can login into the mail server as a Linux user. Nevertheless authentication for the use of mail services is required.

Upgrade top Leap 15 resulted in unusable mail services

The manual upgrade of the mail server system from OS Leap 42.3 to Leap 15 seemed to work perfectly. I got no serious warnings. As root I could login to the virtual KVM guest via ssh – and systemd had started all required services: Fetchmail operated on external servers in the DMZ and transferred new mails to the upgraded mail server. There my postfix queues and secondary services for virus and spam checks seemed to work perfectly. Regarding IMAP I could also see that new entries for new mails appeared in various email accounts (more precisely: in related spool directories). Everything looked great …

However, the big surprise came pretty soon: No mail user could login to the IMAP-service – neither with Kmail, nor Mutt, nor Thunderbird. Access to the SMTP service for sending email was not possible either. System messages appeared on the GUIs saying that there was an authentication error. A very unpleasant situation which required analysis ….

In the meantime I had to start a backup copy of the old mailserver guest installation. On this front
virtualization proved its strengths and simplicity – I had made a copy of the whole KVM guest before the upgrade and just had to include the copy as a virtualization domain into the KVM setup of the virtualization host. But, as the upgraded server had already processed some new mails, I needed to transfer these mails between the servers and reconstruct and reindex some IMAP accounts … A simple, but a task which can be done by some scripts ….

Error analysis

It took me quite a while to figure out where the origin of the upgrade problem was located. I first checked my local firewall protocols both on the mail server and on the LDAP server. Nothing special there … Then I checked the LDAP access protocols – there were successful data requests from various systems – but astonishingly not from the mail server. So it seemed that the mail services did not even try to authenticate their users … strange ….
I then created a new IMAP test user based on a new local Linux user account, i.e. with an entry in “/etc/passwd” and “/etc/shadow”. Guess what? This user could work without any problems. So, obviously the communication of the mail services with the LDAP service for authentication was not triggered or failed in a strange way. I, therefore, tried a manual data request to the LDAP server from the mail server – and got a perfect answer. So, there seemed to be no fundamental problem with the required sssd-daemon and client-configurations. What else was wrong? A bit of despair was in the air …

The role of PAM in the game

Then I tried to remember what I had done in the past to separate the email accounts from the Linux user accounts. Over the last years I had actually forgotten how I had treated this problem. After some reading in old diaries my attention eventually turned to PAM …

The PAM-layer offers Linux admins the possibility of fine-tuning access/authentication conditions for the usage
of a service; among other things you can request certain PAM-modules to authenticate a user via given credentials against defined resources. A sequential series of required, sufficient or optional criteria can be set up. ( When a service needs additional Linux user account information during a session NSS can in addition request information from name resolution backends as “/etc/passwd”. However, this is NOT required for mail services. )

Linux mail services often use the SASL-framework and the saslauthd daemon to perform authentication. SASL can communicate with a variety of authentication backends directly – but it can also use PAM as an intermediate layer. And, in fact, I had used PAM to access my independent LDAP-server with mail account credentials via the PAM-module for SSSD.

I have described my simple approach in a previous article
https://linux-blog.anracom.com/2014/03/15/cyrus-imap-mit-sasl-pam-sssd-und-ldap-opensuse-12-313-1-ii/
Unfortunately, only in German. I, therefore, summarize the basic ideas shortly (see also the graphics in the referenced article).

The things one has to do to force IMAP and/or a SMTP services to use LDAP, but other services to use local authentication resources is:

  • We direct local login-services, ssh-services, etc. on the server via PAM to local resources, only.
  • We eliminate any UIDs corresponding to email account names from local resources as “/etc/passwd” and “/etc/shadow” (and NIS if used).
  • We do not create any local home-directories for email account names.
  • We eliminate LDAP as a usable NSS resource from nsswitch.conf; i.e. we eliminate all LDAP references there.
  • We setup special PAM files in “/etc/pam.d” for the IMAP-service and the SMTP-service. These files will necessarily include pam-modules for the “sss“-service (pam_sss.so).
  • We select entries on the LDAP server for users which for any reasons shall NOT or NO LONGER get access to the mail service accounts, set the “host”-attribute for these entries and configure sssd to use the host-attribute. Or deny certain user names access to the IMAP-service by the help of IMAP -configuration files; cyrus e.g offers the maintenance of a list “userdeny_db”.

This strategy worked very conveniently already on an Opensuse 12.3 platform. Examples for the required special files “/etc/pam.d/imap” and “/etc/pam.d/smtp” are given in the article named above. The mix and sequence of the statements there is due to the fact that locally defined system users as “cyrus” must get access to the IMAP-service, too.

What had happened during the Leap 15 upgrade?

My configuration had survived multiple upgrades of the virtualized server in the past. But not the one to Leap 15! What had happened?

After having remembered the importance of the PAM configuration, I eventually had a look into the directory “/etc/pam.d” on the upgraded system and compared it to the respective directory on the original system. Whereas during previous upgrades “personal” PAM configuration files for services had been respected, the upgrade to Leap 15 simply had removed my PAM configuration files for SMTP and IMAP – without a backup! Incredible, but true! Actually and astonishingly, the contents of some other standard PAM files had been transferred to a backup ….

A restoration of my PAM files for the mail services lead to an immediate success – authentication for the access of mail accounts on the upgraded server was possible again. Some hours in the hell for Linux admins came to an end.

Conclusion

Never (!) trust a standard upgrade of a whole Linux system procedure to keep configuration files in “/etc/pam.d” untouched. Keep an admin or system diary for unusual approaches. And – of course: Full
backups of critical systems before backups are a MUST ….