Upgrade workstation from Opensuse Leap 15.1 to Leap 15.2

Two weeks ago I upgraded my main Linux-Workstation from Leap 15.1 to Leap 15.2. Some first impressions:

  • Leap 15.2 with KDE/X11 works relatively well. Some minor setting-options for the Plasma desktop have changed.
  • KDE/Wayland with Nvidia cards does not work – unusable for production.
  • No problems with QEMU based KVM- and LXC-container virtualization – my old Debian and Kali guest systems worked as expected on the Leap 15.2-host. No problems with multi-screen configurations of the guests with remote-viewer either.
  • Unexpected high power consumption of the Nvidia card – it has increased by about 5% to 8%. I am not sure whether this is a KDE or a driver problem.
  • The usual suspects for problems during the upgrade are the Nvidia drivers, Pulseaudio, VMware and this time – to my big surprise – CUPS.
  • You may have to change/reset some KDE config and rc-files in your home-directory – especially for the plasma desktop itself.
  • Chromium showed some glitches.

I shortly describe the upgrade process and some obstacles I had to overcome.

Basic upgrade process

I always prepare for a quick restoration of my running system configuration (here: Leap 15.1). Ahead of any upgrade activity, I therefore create a backup of my Leap 15.1 “/”-filesystem on an external drive and in addition create another copy in a target partition on one of my bootable disks. I use the “dd“-command for both purposes. As all productive application and development data as mails, project documents, PHP- and Python modules are on independent partitions or on network locations anyway, the risk of running into major problems afterwards is relatively small. In addition I comment certain critical entries in the “/etc/fstab” out.
In case of a major disaster a recovery can be achieved very quickly by just re-copying the copy of the Leap 15.1 partition back to its original place.

Regarding the backup of the “/”-filesystem to an external disk you have the choice between creating a copy of a partition and creating a (zipped) file. See e.g.:
https://www.poftut.com/linux-dd-command-backup-examples/
https://linoxide.com/linux-command/linux-dd-command-create-1gb-file/
I just made simple partition copies. Regarding the blocksize “bs” option of “dd” I am very generous with SSDs; I use a size like bs=1M or bs=4M to get a reasonable performance. When copying around 100 GB you probably do not want to wait for an hour :-). E.g.:

dd if=/dev/sdg1 of=/dev/sdh5 bs=4M status=progress

Warning 1:

If you copy your partition with “/”-filesystem into another partition, then the target partition must at least have the size of the original one. Really take care of this point! I always try to achieve the exact same size with a partition tool (gparted or YaST partitioner).

Warning 2:

Do not forget to change the UUID of the partition’s copy if the target partition resides on an internal disk; you should never have two filesystems with the same UUID on a system! But write down the original UUID at a safe place. Use “uuidgen
” and the “tune2fs -U” commands to change the copied filesystem’s UUID, afterwards.

See: how-to-change-filesystem-uuid-2-same-uuid

And: In case of an emergency restoration, i.e. after having copied the backup filesystem into its old position, you, of course, have to change the UUID back to the old one.

Why are these UUID-precautions required?
Because of your boot-loader – probably Grub2. Depending on its configuration (and some other system settings) it will probably have created entries in the “/boot/grub2/grub.cfg” which refer to the UUIDs of the bootable partitions. And if such a UUID-reference cannot be resolved in a unique way you may in the best case boot a system you did not want to boot, but you may also experience worse conflicts. Now, you may ask:

What is the copy on the same or another internal hard disk good for anyway?
I create the copy on my main SSD (or another internal disk) not only for restoration purposes, but also for the purpose of transforming it into a fully bootable filesystem at its new position later on – i.e. after the upgrade. I shall return this point in an extra section below.

Upgrade process

After the backup procedures I followed the guideline of the Brasilian Linux Kamarada for the upgrade; see
https://kamarada.github.io/en/2020/09/01/linux-kamarada-and-opensuse-leap-how-to-upgrade-from-151-to-152

Their way of upgrading Opnesuse systems is straight-forward and well-tested. I also liked their recent inclusion of the “releasever“-variable …

I tend to use multiple repositories besides the standard upgrade repository of Opensuse. Therefore, I had to delete quite an amount of repositories following the Kamarada recipe. If you are in the same position, you should make a screenshot of the repository-configuration in YaST to be able to reconfigure them after the upgrade. During the upgrade zypper may recognize many packages for which it has to change the repository. It is a bit of an ordeal to answer to all of the related questions, but I recommend to follow the questions with focused concentration: The order of offered alternatives may change!

Hint: Take care of sufficient filesystem-space! The download of new packages requires extra space during the upgrade period – and usually also the total size of used disk space after an upgrade typically tends to grow somewhat. Therefore: Have at least 20GB available on your “/”-filesystem. (LVM is your friend – if you use(d) it …).

After the upgrade you have to reboot (init 6). If your graphics card is from Nvidia you probably will find yourself on some console terminal and not at a desktop-manager-login (e.g. sddm or gdm3) at the end of the boot process. We must install the (new) Nvidia drivers afterwards.

Nvidia re-setup

There are at least two ways of installing Nvidia-drivers on an Opensuse-system: 1) Directly, i.e. by a manual installation with the help of of the downloaded driver installation scripts. 2) With the help of YaST and the Nvidia community repository. I have used the latter option during the last 2 years. Either way you probably prohibited loading the Opensource Nouveau driver already at some point in the past – e.g. by blacklisting the related kernel module in some of the files in “/etc/modprobe.d”. If not – it is time to do so now.

When you rebooted after the Leap 15.2 upgrade the old Nvidia modules did not work as they were not compiled for the new kernel which was installed during the upgrade. So, from the console login, which you hopefully have reached, you need to invoke YaST in ASCII-mode, activate the
Nvidia community repository and reinstall the proprietary Nvidia drivers from there. In my case the packages

nvidia-computeG05, nvidia-gfxG05-kmp-default, nvidia-glG05, x11-video-nvidiaG05

A compilation is done automatically during this update.
Hint: I also suggest to issue “mkinitrd” immediately after the driver installation to be on the safe side regarding the “initramfs”-phase of the boot-process.
This worked pretty well in may case. After a reboot I got to my SDDM-login screen afterwards. My standard X11-based graphical KDE Plasma desktop started smoothly afterwards. I also tested the functionality of my Cuda installation for Keras and Tensorflow2 – worked perfectly.

Increased idle power consumption of the graphics card on a running KDE plasma desktop (Version 5.18)
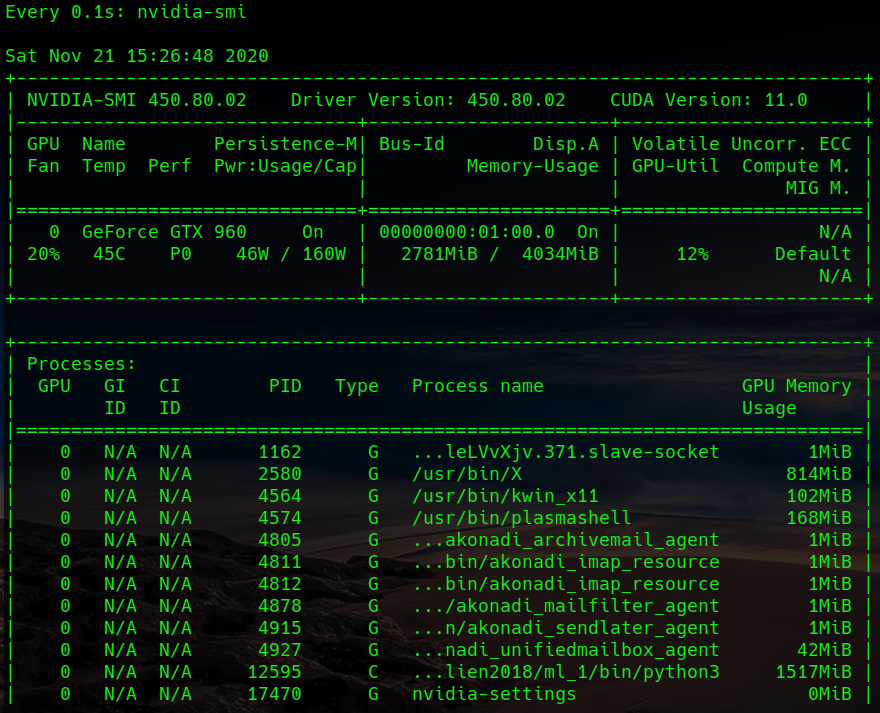
A unwelcome surprise regarding Nvidia was the following: When watching the power consumption of my graphics card with

watch -n0.1 nvidia-smi

I saw a rise in the average consumption.
An average value of the GPU load (with “Force Composition Pipeline” activated on all my 3 screens) now had a value of 15%; on my old Leap 15.1 it was below 10%. All with having set the Powermizer mode to “Adaptive” (via (nvidia-settings). I fiddled a bit around with some Nvidia settings – but found no real solution, yet. When I changed a desktop theme (with the help of “systemsettings5”) I observed a drop of power consumption to 11% – but after some movement of windows across my 3 screens it settles again at 15% – quite independent of style and desktop settings. At least with an OpenGL-compositor activated (systemsettings5 >> “screen … >> compositor”. Choosing “Xrender” leads to a drop of GPU-consumption to 9%.

What brought me down a bit to 12% with an activated OpenGL-compositor (OpenGL2 or OpenGL3.1) was to deactivate keeping window-previews:

I did not experience any real disadvantages by doing so. On Leap 15.1 the average consumption with a driver a bit older was still lower by 4% to 5%. We talk about 2 Watt here, but still I do not like such unexpected changes. I do not know whose fault this is – KDE’s or Nvidia’s. We shall see what happens with the next driver version ….

Reconfigure KDE settings

The screen order on my Plasma 5.18 desktop was OK. No screen-tearing (see: Opensuse, KDE Plasma, X11, Nvidia – stop video and screen tearing); my old “xorg.conf“-settings were respected and active.

However, when trying to change design- and plasma-style-settings via “systemsettings5” a click on the “plasma-style”-icon led to a window crash and a Plasma error. This is usually a sign that something is wrong with the KDE configuration files:

Because the KDE setting- and configuration files in the home-directory survive the upgrade untouched some may not be compatible with the new KDE version.

I do not know about an easy way to find out which of the files are to be recreated. My standard way is to make a copy of the “~/.config-directory (with a new suitable name), delete the original directory, wait until it is automatically created again (with new default settings). We
make a copy of this new default-“.config” version (with a unique name), too, and then copy the original version into its standard place again. In the end we have 3 “.config”- directories with different names – one in place with the user’s original settings, one with the new default settings and one with the original settings as “.config”.
Then I overwrite files in the “.config”-file with the new default files, at least those for which I suspect some problems – starting with the plasma-specific “plasma…..rc”-files, then the “systemsettingrc”, then “kwinrc”. Thus, the problems with “plasma-style”-settings could be resolved quickly.

I also got some problems with a standard activation of the OpenGL-compositor at the start of the plasma desktop. A change of the respective settings in the “kwinrc”-file helped – especially “Enabled=True”:

[Compositing]
AnimationSpeed[$d]
Backend=OpenGL
Enabled=true
GLCore=true
GLPreferBufferSwap=a
GLTextureFilter=1
HiddenPreviews=4
OpenGLIsUnsafe=false
WindowsBlockCompositing=false
XRenderSmoothScale=false

Pulseaudio [PA]

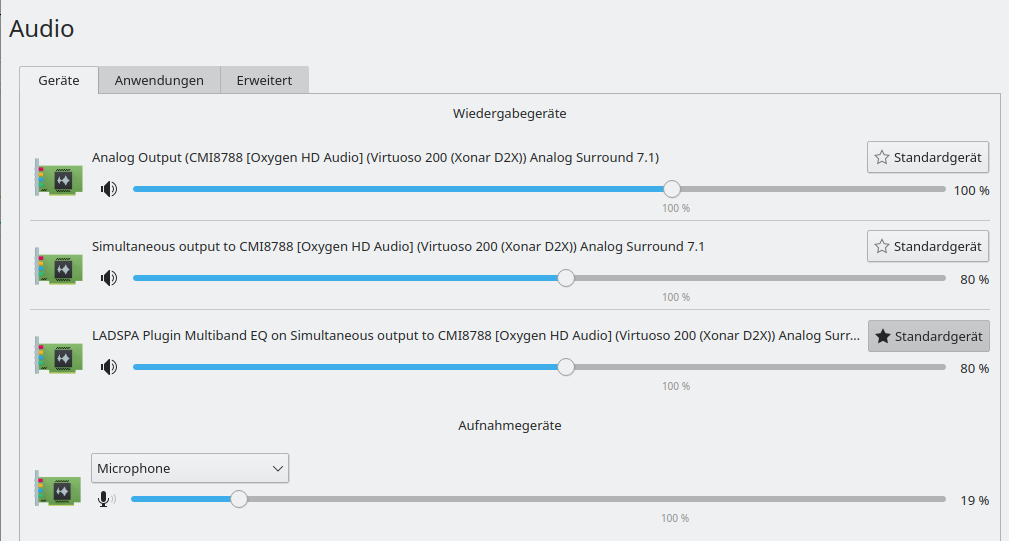
A major frustration came up when I tried to start Clementine and listen to some songs – all my PA-settings were gone with the exception of the PA-LADSPA-equalizer. This had partially to do with changes in the Phonon-settings – now to be found under “systemsettings5 >> Audio“. I had to turn off my onboard HD sound card, activate my mainly used Xonar D2X explicitly and also deactivate an existing XFI-Card, too.

The dialog for setting the KDE/Phonon “standard device” have changed once again :-(. You cannot choose priorities for different sources (audio, video, …) any longer. Simplification? I hate this new KDE politics of taking more and more configuration options away from the standard user. I had to make the equalizer the “standard device” in the new dialog to direct all streams (from browsers and players) through this device.

Compare this to the settings in Leap 15.1; see KDE, Pulseaudio and Browsers – make the LADSPA equalizer the default sink.
In addition: We cannot play test sounds for the various sinks any more. This does no longer work in “YaST Audio” either … I do not call such things progress.

With PA activated “pavucontrol” serves as my primary mixer. It worked more or less as expected though some functionality has been removed there, too. E.g. the ability to remove some input channels completely. Another stupid thing which happens now regarding the default channel for volume adjustment via kmix is now that you may choose “Simultaneous output ….” – but volume controls will affect the Xonar channels, too – at least as long as no device uses the equalizer ….

It took some fiddling until I got back most of my old functionality and sound quality. I found again that its worth to reduce the Clementine input in pavucontrol down to 80% to avoid some oversteering and sound-distortion. Do not forget to set the default channel for sound control with kmix to “Simultaneous output …” for your multi-channel soundcard!

One can in addition install and activate the XFCE-mixer, which basically is a graphical frontend to an alsa mixer. This allows additional shifts of the different channels against each other – performed after pulseaudio’s own mixer settings, namely those of “pavucontrol”.

A major problem with sound and the onboard card:
For some reason a switch from the graphical terminal to a console terminal (by “Ctrl Alt F3”) automatically
activates an Nvidia HDMI stereo device on my system now. It comes up again even if I explicitly deactivated it in the KDE or PA audio settings. I have no solution for this, yet. It affects, however, at least a running Chromium (see below) – and leads to a restart of desktop effects when I return to the graphical session. I get a corresponding explicit message from Plasma ….

VMware – a yearly game of money …

VMware Workstation 15.5 Pro does not work on a Leap 15.2 host without special prerequisites. See e.g.:
https://forums.opensuse.org/showthread.php/540779-vmware-worksation-pro-15-5-not-failed
https://www.opensuse-forum.de/thread/63542-vmware-workstation-pro-leap-15-2b/?pageNo=1
https://communities.vmware.com/t5/VMware-Workstation-Pro/Can-t-compile-wmware-workstation-15-5-on-leap-15-2/m-p/2286237

However, WS Pro 16.0 does. I upgraded to this version. My Win 10 guests felt a bit more sluggish than with WS 15.5. But this may also have to do with a subsequent Upgrade of Win 10 to the 2004 version.

By the way: Note that VMware wants you to pay extra maintenance support, if you order it from SW resellers – at least here in Germany. The cheapest choice was to order it directly from the VMware shop. Do we like such anti-competition monopoly and customer control measures? No, we do not like it => time to get Windows 10 guests running on KVM machines … and to forget VMware for the future. See:
https://getlabsdone.com/10-easy-steps-to-install-windows-10-on-linux-kvm/#Customizing-the-Hardware-for-Windows-10

Hint: Be a bit reluctant with changing the HW compatibility of your VMware virtual machine for two reasons: You may want the virtual image to continue running in your old 15.1 implementation, too – until you feel that Leap 15.2 is stable enough. Second reason: Changing too much of HW settings may lead to a reactivation of your Windows license key.

CUPS bug – reconfigure printers – use the CUPS packages from the printing repository

I have two printers in my network. They can be addressed both by a local configuration and via a cups server in the net, which offers a variety of queues.
The reconfiguration of the local settings were a piece of cake with YaST. The updated HP-drivers simply worked.
However, printing from my system via a CUPS server in the net and its queues did not work any more. In contrast to all previous upgrades of at least the last 4 years :-(.
It took me a while to find out that this is due to a major bug in the present CUPS version delivered by the standard Update repository of Opensuse. Use the CUPS version > 2.3.0 from the “Printing repository“.
Then your server based queues will work again!

Chromium: Problems with HW acceleration / sound from Chromium does not get upmixed on a multichannel sound card

I had some problems with Chromium. Maybe I had them already before, but I noticed them now:
I had to refrain from HW-acceleration: Whenever I changed to one of the console terminals (e.g. Ctrl-Alt-F2) and returned to the graphical terminal the Chromium user interface got totally destroyed. Not funny when you were editing a blog :-(.
In addition: Chromium sound does not get upmixed completely – the probable reason is that Chromium supports real 7.1 channel sound these days. So, stereo may remain stereo or only gets upmixed by some special soundcard setting to 4.0, 6.0 – but not by PA. Despite such
settings on my Xonar card, I had some disturbing experiences: When changing to a console terminal and back to the graphical one, the upmixing changed from 4.0 to 2.0 …. :-(. When I rebooted afterwards, the 4.0 upmixing was there again. The whole effect probably was due to an automatic activation of some onboard/oncard Nvidia HDMI sound channels during the switch to the console terminals.

Firefox sound, however, which sends a pure stereo signal to the system as, gets properly upmixed by PA to 7.1 sound and this remains stable during switches between console and graphical terminals. So, for the time being, I do not use chromium for TV streaming any longer. Maybe the Chromium developers should have a talk with the PA developer …. It seems to be a difficult problem to me – you would have to analyze that only stereo sound is coming despite a 8 channel signal. A simple workaround would be that we get a switch in the chromium browser which allows to set its operation from multichannel to stereo, only.

For those who like to experiment with “pactl” commands (like “pactl list sinks” as standard user) I would like to draw your attention to work others ave done regarding PA and upmixing:
https://gist.github.com/dex4er/8646669
https://bbs.archlinux.de/viewtopic.php?id=16093

It should be possible to write two scripts one activating a certain upmixing with pactl commands and one deactivating it again. But my time is so limited that I haven’t tried it myself, yet.

KDE Plasma, Nvidia and Wayland do not work

As with Leap 15.1, KDE and Wayland lead to a direct crash on my workstation with Nividia graphics. The system freezes. You have to enforce a reset of your PC and start a reboot. However, on a laptop with a i915 Intel driver for a CPU integrated graphics Wayland works. So, we have a clear Nvidia topic here.

After the upgrade: Make the copy of our original partition of Leap 15.1 a bootable one

If you had copied your original Leap 15.1 partition into another partition on your hard disk you may want to make it a bootable fully functional system offered as an entry in the Grub2 menu. This requires some additional efforts.

Firstly, you have to change all references to the modified UUID in the internal boot-relevant files of the moved filesystem – i.e. in the “/etc/fstab”  AND  in the “/boot/grub2/grub.cfgthere on the Leap 15.1-partition. For this purpose you must mount the copied Leap 15.1 partition on your running Leap 15.2 system and edit the entries in both files of the mounted Leap 15.1 filesystem very carefully with respect to the changed UUID (see the sections on backups above). Take care that you do not change the files on the running Leap 15.2 system. And, please, make copies of both files before you change them! You may need the original contents.

Instead ofchnaging entries in the “/boot/grub2/grub.cfg” of the Leap 15.1 copy you can also rename the “/boot/grub2/grub.conf” on the Leap 15.1 partition to something like “grub.conf_orig” (you want to keep the contents!). This gives the grub “os-prober” on you Leap 15.2 installation a chance to create correct entries regarding the address of the partition.

Then we remove the “/boot/grub2/grub.cfg” in the Leap 15.2 installation and run “grub2-mkconfig -o /boot/grub2/grub.cfg” again to give the os-prober there a chance to create valid entries. Please, cou check these entries first before you install the grub loader from your running Leap 15.2 again! If you find correct UUID or other references to the partition the you can reinstall the bootloader. I always do this with YaST. Afterwards you should be able to boot both your new Leap 15.2 and your old 15.1 installation a respective entries in the Grub2 menu. Thus we have our old Leap 15.1
installation available for comparisons.

Conclusion

An upgrade of a Linux workstation from Opensuse Leap 15.1 to Leap 15.2 brought no major problems with it. One remarkable exception is a bug in the CUPS package – for which you find a solution in form of a newer package in another Suse repository. The fact that Wayland does not work with KDE on Nvidia graphics came not unexpected – although I think its a shame for Nvidia. The same could be said about the increased power consumption of the Nvidia card.

Have fun with Leap 15.2.

Upgrading Win 7 to Win 10 guests on Opensuse/Linux based VMware hosts – I – some experiences

As my readers know I am not a fan of MS or any “Windows N” operating system – whatever the version number N. But some of you may be facing the same situation as me:

A customer or an employer enforces the use of MS products – as e.g. MS Office, clients for MS Exchange, Skype for Business, Sharepoint, components for effort booking and so on. For the fulfillment of most of your customer’s demands you can use browser based interfaces or Linux clients.

However, something that regularly leads to problems is the heavy use of MS Office programs or graphics tools in their latest versions. Despite other claims: A friction-less back and forth between Libreoffice and MS Office is still a dream. Crossover Office is nice – but the latest MS Office versions are often not yet covered when you need them. Another very reasonable field of using MS Windows guests on Linux is, by the way, training for pen-testing and security measures.

So, even Linux enthusiasts are sometimes forced to work with or within a native Windows environment. We would use a virtualized Windows guest machine then – on a Linux host with the help of VMware, KVM or Virtualbox. Regarding graphical performance, support of basic 3D features, Direct X and of the latest USB-versions in the emulated system environment I have a tendency to use VMware Workstation, despite its high price. Get me right: I practically never use VMware to virtualize Linux systems – for this purpose I use LXC containers or KVM. But for “Win 7” or “Win 10” VMware seemed to be a good choice – so far.

Upgrade to Win 10

During the last days of orchestrated panic regarding the transition from Windows 7 to Windows 10 I eventually gave in and upgraded some of my VMware-virtualized Windows 7 systems to Windows 10. More because of having some free time to get into this process than because assuming a sudden drop in security. (As if we ever trusted in the security of Windows system … I come back to security and privacy aspects in a second article.) However, on a perspective of some weeks or months the transition from Win 7 to Win 10 is probably unavoidable – if you cannot isolate your Windows machine completely from the Internet and/or from other external servers which bring a potential attack risk with them. The latter may even hold for servers of your clients.

I was a bit skeptical about the outcome of the upgrade procedure and the effort it would require on my side. A good friend of mine, who sells and administers Windows system professionally, had told me that he had experienced a whole variety of different problems – depending on the Win 7 setup, the amount and character of application SW installed, hardware drivers and the validity of licenses.

Well, my Windows 7 Pro clients were equipped with rather elementary SW: MS Office in different versions, MS Project, Lexware, Adobe Creative suite in an old version, some mind mapping SW, Adobe Reader, Anti malware SW. The “hardware” of the virtual machines is standard, partially emulated by VMware with appropriate drivers. So, no need to be especially nervous.

To be on the safe side I also ordered a VMware WS Pro upgrade to version 15.X. (I own WS 12.5.9 and WS 14 licenses.) Reason: I had read that only the WS 15.5 Pro supports the latest Win 10 versions fully. Well reading without thinking may lead to a waste of resources – see below.

Another rumor you often hear is that Windows 10 requires rather new hardware and is quite resource-demanding. MS itself recommends to buy a new PC or laptop on its web-sites – of course often followed by advertisement for MS notebook models on the very same web page. Yeah, money makes the world turn around. Well, regarding resources for my Windows guest systems I was/am rather restrictive:

Virtual machines for MS Win never get a lot of RAM from me – a maximum of 4 GB at most. This is enough for office purposes. (All really resource craving
things I do on Linux 🙂 ). Neither do my virtualized Win systems get a lot of disk space – typically < 60 GB. I mostly use vmdk-files to provide virtual hard disks – without full space allocation at startup, but dynamically added 4GB extents. vdmk files allow for an easy movement of virtual machines and simple backup procedures. And I usually give my virtual Win machines a maximum of 2 processor cores. So, these limitations contributed a bit to my skepticism. In addition I have 3D support on for my Win 7 guests in the virtual machine setup.

Meanwhile, I have successfully performed multiple upgrades on a rather old Linux host with an i7 950 CPU and newer hosts with I7 6700 K and modern i9 9900 processors. The operative system on all hosts run Opensuse Leap 15.1; I did not find the time to test my Debian hosts, yet.

I had some nice and some annoying experiences. I also found some aspects which you should take care of ahead of the Win 7 to Win 10 upgrade.

Make a backup!

As always with critical operations: Make a backup first! This is quite easy with a VMware virtual machine based on “vmdk”-files: Just copy the machines directory with all its files to some Linux formatted backup medium and keep up all the access rights during copying (=> cp -dpRv). In case of partition based virtual machines – make a copy of the partition with “dd”.

If you should need to restore the virtual machine in its old state again and to copy your backup files to their old places: VMware will notice this and will ask you whether you moved or copied the guest. Then answer “moved” (!) – which appears a bit paradox. But otherwise there is a very high probability that trouble with your Windows license will follow. VMware interprets a “copy”-operation as a duplication of a virtual machine and puts a related information somewhere (?) which Windows evaluates. Windows will almost certainly ask for a reactivation of your installation in case that your Win license was/is an individual one – as e.g. an OEM license.

Good news and potentially bad news regarding the upgrade to Win 10

The good news is:

  • Provided that you have valid licences for your Win 7 and for all SW components installed and provided that there is enough real and virtual disk space available, the Win 7 to Win 10 upgrade works smoothly. However, it takes a considerable amount of time.
  • I did not experience any performance problems after the upgrades – not even regarding transparency effects and other gimmicks in comparison to Windows 7. VMware’s 3D support for Win works – in WS 15 even for DirectX 10.

The requirement for time depends partially on the bandwidth of your Internet connection and partially on the performance of your disk access as well as your CPU and the available RAM. In my case I had to invest around 1 hr – in those cases when everything went straight through.

The potentially bad news comprises the following points:

  • The upgrade requires a considerable amount of free space on your virtual machine’s hard disk, which will be used temporarily. So, you should carefully check the available disk space – inside the virtual machine and – a bit surprising – also on the Linux filesystem keeping the vmdk-files. I ran into problems with limited space for multiple upgrades on both sides; see below. Whether you will experience something similar depends on your safety margin policies with respect to disk space in the guest and on the host.
  • A really annoying
    aspect of the upgrade had to do with VMware’s development and market strategy. From advertisement you may conclude that it would be best to use VMware WS 14 or 15 to handle Windows 10. However, on older Intel based systems you should absolutely check whether the CPU is compatible with VMware WS 14 and 15. Check it, before you think upgrading a Vmware WS 12 license to anything higher. On my Intel i7 950 neither WS 14 nor WS 15 did work at all. Even if you get these WS versions working by a trick (see below) they perform badly.
  • Then there is a certain privacy aspect. As said, the upgrade takes a lot of time during which you are connected to the Internet and to Microsoft servers. This is only partially due to the fact that Win 10 SW has to be downloaded during the upgrade process; there are more phases of information exchange. It is also quite understandable that MS has to analyze and check your system on a full scale. But do we know what Big Brother [BB] MS is doing during this time and what information/data they transfer to their own systems? No, we do not. So, if you have any sensitive data files on your system – how to protect them? You cannot isolate your Windows 10 during the upgrade. And even worse: Later on you will be more or less forced to perform updates within certain periods. So, how to keep sensitive data inaccessible for BB during the upgrade and beyond?

I address the first two aspects below. The last point of privacy is an interesting but complicated one. I shall discuss it in a separate article.

Which VMware workstation version should I use?

Do not get misguided by reports or advertisement on the Internet that certain MS Win 10 require the latest version of VMware Workstation! WS 12 Pro was the first version which supported Win 10 in late 2015. Now VMware 15.X has arrived. And yes, there are articles that claim incompatibility of VMware WS 12, WS 14 and early subversions of WS 15 with some of the latest Win 10 builds and updates. See the following links and discussions therein:
https://communities.vmware.com/thread/608589
https://www.borncity.com/blog/2019/10/03/windows-10-update-kb4522015-breaks-vmware-workstation/
https://www.askwoody.com/forums/topic/vmware-12-and-newer-incompatible-with-windows-10-1903/

But read carefully: The statements on incompatibility refer mostly (if not only) to using a MS Win 10 system as a host for VMware! But we guys are using Linux systems as hosts.

Therefore the good message is:

Windows 10 as a VMware guest is already supported by VM WS 12.5.9 Pro, which runs also on older CPUs. For all practical purposes and 2D graphics a Win 10 guest installation works quite well on a Linux host with VMware 12.5.9.

At least, I have not yet noticed anything wrong on my hosts with Opensuse Leap 15.1 and VMware WS 12.5.9 PRO for a Win 10 guests. (Neither did I see problems with WS 14 or WS 15 on those hosts where I could use these versions).

The compatibility of WS 12.5 with Win 10 guest on Linux is more important than you may think if your host has an older CPU. If you really want to spend money and use WS 14 or WS 15 please note:

WS 14 Pro and WS 15 Pro require that your CPU provides Intel VT-x virtualization technology and EPT abilities.

So, the potentially bad message for you as the still proud owner of an older but capable CPU is:

The present VMware WS versions 14 and 15 which support Win 10 fully (as guest and host system) may not be compatible with your CPU!

Check
compatibility twice BEFORE you intend to upgrade VMware Workstation ahead of a “Win7 to Win 10”-upgrade. It would be a major waste of money if your CPU is not supported. And as stated: Win 12.5 does a good job with Win 10 guests.

VMware has deserved a lot of criticism with their decision to ignore older processors with WS Pro versions > 14. See
https://communities.vmware.com/thread/572931
https://vinfrastructure.it/2018/07/vmware-workstation-pro-14-issues-with-old-cpu/
https://www.heise.de/newsticker/meldung/VMware-Workstation-14-braucht-juengere-Prozessoren-3847372.html
For me this is a good reason to try a bit harder with KVM for the virtualization of Windows – and drop VMware wherever possible.

There is a small trick, though, to get WS 14 Pro running on an i7 950 and other older processors: In the file “/etc/vmware/config” you can add the setting

monitor.allowLegacyCPU = “true”

See https://communities.vmware.com/thread/572804.

But: I have tested this and found that a Win 7 start takes around 3 minutes! You really have to be very patient… This is crazy – and for me unacceptable. After you once are logged in, performance of Win 7 seems to be OK – maybe a bit sluggish. Still I cannot bear the waiting at boot time. So, I went back to WS 12 Pro on the machine with an i7 950.

Another problem for you may be that the installation of WS 12.5.9 on both Opensuse Leap 15.0 and 15.1 requires some special settings and tricks which I have written about in this blog. See:
Upgrade auf Opensuse Leap 15.0 – Probleme mit Nvidia-Treiber aus dem Repository und mit VMware WS 12.5.9
Upgrade Laptop to Opensuse 42.3, Probleme mit Bumblebee und VMware WS 12.5, Workarounds
The first article is relevant also for Opensuse 15.1.

Use the Windows Upgrade site and the Media Creation Tool page to save money

If you have a valid Win 7 license for all of your virtualized Win 7 installations it is not required to spend money on a new Win 10 license. Microsoft’s offer for a cost free upgrade to Win 10 still works. See e.g.:
https://www.cnet.com/how-to/windows-10-dont-wait-on-free-upgrade-because-windows-7-officially-done/
https://www.techbook.de/apps/kostenloses-update-windows-10
Follow the steps there – as I have done successfully myself.

Problems with disk space within the VMware Windows 7 guest during upgrade

My first Win7 to Win10 upgrade trial ran into trouble twice. The first problem occurred during the upgrade process and within the virtual machine:
I got a warning from the upgrade program at its start that I should free at least some 8.5 GByte.

Not so funny – as said, I am a bit picky about resources. The virtual guest machine had only a 60 GB C-disk. Fortunately, there were a lot of temporary files which could be deleted. Actually Gigabytes and partially years old – makes you wonder why Win 7 kept those files piled up. I also could move a bunch of data files to a D-disk. And I deinstalled some programs. All in all – it just worked out. The upgrade itself afterwards went friction-free and without

So one
message is:

Ensure that you have around 15 GB free on your virtual C-disk.

It is better to solve the problems with freeing C-disk space inside Win 7 without pressure – meaning: ahead of the upgrade to Win 10. If you run into the described problem it may be better to abort the Win 10 upgrade. I have tested this – and the Win 7 system was restored – apparently in good health. I got a strange message during reboot that the system was prepared for first use – but after everything was as before.

On another system I got a warning during the upgrade, when the “search for updates” began, that I should clear some 10 GByte of temporarily required disk space or attach an external drive (USB) to be used for temporary operations. The latter went OK in this case. But be careful the USB disk must be kept attached to the virtual machine over some reboots. Do not touch it until the upgrade has finalized.

So, a second message is:

Be prepared to have some external device with some free 20 GB ready if you have a complex installation with a lot of application SW and/or a complex virtual HW configuration.

I advise you to check your external USB drive, USB stick or whatever you use for filesystem errors before attaching it. And have your VMware window active whilst attaching the device! VMware will then warn you that the Linux host may claim access to the device and you just have to click the buttons in the dialog boxes to give the VMware guest full control instead of the host OS.

If you now should think about a general enlargement of the virtual disk(s) of your existing Win 7 installation please take into account the following:

On the one hand side an enlargement is of course possible and relatively easy to handle if you use vdmk files for disk virtualization and have free space on the Linux partition which hosts the vmdks. VMware supports the resizing process in the disk section of the virtual machine “settings”. On Win 7 you afterward can use the Win admin tools to extend the NTFS filesystem to the full extent of the newly configured disk.

But, on the other side, please, consider that Windows may react allergic to a change of the main C-disk and request a new activation due to major hardware changes. 🙁

This is one of the points why we do not like Windows ….
So, how you solve a potential free disk problem depends a bit on what you think is the bigger problem – reactivation or freeing disk space by deletions, movement of files or deinstallations.

Addendum: Also check old restore points Win 7 may have created over time! After a successful upgrade to Win 10 I stumbled across an option to release all restore information for old installations (in this case for Win 7 and its kept restore points). This will give you again many Gigabytes if you had not deleted “restore point” data for a long time in your Win 7. In my case I gained remarkable 17 GB! => Should have deleted some old restore points data already before the upgrade.

Problems with disk space on the Linux host

The second problem with disk space occurred after or during some upgrades to Win 10: I ran out of space in the Linux filesystem containing the vmdk files of my virtual machine. In one case the upgrade simply stopped. In another case the problem occurred a while after the upgrade – without me actually doing much on the new Win 10 installation. VMware suddenly issued a warning regarding the Linux file system and paused the virtual machine. I was first a bit surprised as I had not experienced this lack of space during normal usage of the previous Win 7 installation.

The explanation was simple: As said, I had set up the virtual disk such that the required space was not allocated at once, but as required. Due to the upgrade the VMware had created all 4GB-extends
to provide the full disk space the guest needed. In addition I had activated “Autoprotect Snapshots” on VMware (3 per day) – the first automatically created snapshot after the upgrade required a lot of additional space on the Linux file system – due to heavy changes on the hard disk.

My virtualized machines most often reside on specific (encrypted) LVM-based Linux partitions. And there it just got tight – when VMware stopped the virtual machine only 3.5 GB were left free. Not funny: You cannot kill snapshots on a paused virtual guest – the guest must be running or be shut down. And if you want to enlarge a Linux partition – which is possible if there is (neighboring) space free on your hard disk – then the filesystem should best be unmounted. Well, you can enlarge a GPT-partition with the ext4-filesystem in operation (e.g. with YaST) – but it gives you an uncomfortable feeling.

In my case I decided to brutally power down the virtual machines. In one case where this problem occurred I could at least eliminate one snapshot. I could start the virtual machine then again and let Windows check the NTFS filesystems for errors. Then I shut down the virtual machine again, deleted another snapshot and used the tools of VMware to defragment and compact the virtual disks. This gave me a considerable amount of free GBs. Good!
Afterwards I additionally reduced the number of protection snapshots – if this still seemed to be necessary.

On another system with a more important Win 7/10 installation I really extended the Linux partition and its ext4 filesystem by 20 GB – I had some spare space, fortunately – and then followed the steps just described.

So, there is a whole spectrum of options to regain disk space after the upgrade. See also:
thebackroomtech.com : reduce-size-virtual-machine-disk-vmware-workstation/

My third message is:

Ensure a reasonable amount of free space in the Linux filesystem – for required extents and snapshots!
After the backup of your old Win 7 installation, eliminate all VMware snapshots which you do not absolutely need – in the snapshot manager from the left to the right. Also use the VMware tools to defragment and compact your virtual disks ahead of the upgrade.

By the way: I hope that it is clear that snapshots do NOT replace backups. You should make a backup of your successfully upgraded Win 10 installation after you have tested the functionality of your applications and before you start working seriously with your new Win 10. You do not want to go through the upgrade procedure again ..

Addendum: Circumvent the enforcement of Windows 10 updates after your upgrade

Updates on Windows 7 have often lead to trouble in the past – and as an administrator you were happy to have some control over the download and installation points for updates in time. After reading a bit, I got the impression that the situation has not changed much: There have occurred some major problems related to updates of Win 10 since 2016. Yet, Windows 10 enforces updates more rigidly than Win 7.

I, therefore, generally recommend the following:

Delay or stop automatic updates on Win 10. Then use VMware’s snapshot mechanism before manual updates to be able to turn back to a running Win 10 guest version. In this order.

The first point is not so easy as it may seem – there are no basic and directly accessible options to only get informed about available updates as on Win 7. Win 10 enforces updates if you have enabled “Windows Update”; there is no “inform only” or “download only”. You have to either disable updates totally or to delay them. The latter only works for a maximum period of 35 days. How to deactivate updates completely is described here:

https://www.easeus.com/todo-backup-resource/how-to-stop-windows-10-from-automatically-update.html
https://www.t-online.de/digital/software/id_77429674/windows-10-automatische-updates-deaktivieren-so-geht-s.html

There is also a description on “Upgrade” values for a related registry entry:
www.deskmodder.de/wiki/index.php/Automatische-Updates-deaktivieren-oder-auf-manuell-setzen-Windows-10#Windows_10_1607.2C-1703-Pro-Updates-auf-manuell-setzen-oder-deaktivieren

I am not sure whether this works on Win 10 Pro build 1909 – we shall see.

Conclusion

Win 7 and Win 10 can be run on VMware WS Pro versions 12.5 up to 15.5 on Linux hosts. Before you upgrade VMware WS check for compatibility with your CPU! An upgrade of a Win 7 Pro installation on a VMware virtual machine to Win 10 Pro basically works smoothly – but you should take care of providing enough disk space within the virtual machine and also on the host’s filesystem containing the vdmk-files for the virtual disks.

It is not necessary to change the quality of the virtualized hardware configuration. Win 10 appears to be running with at least the same performance as the old Win 7 on a given virtual machine.

In the next article I will discuss some privacy aspects during the upgrade and after. The main question there will be: What can we do to prevent the transfer of sensitive data files from a Win 10 installation?