The moons dataset and decision surface graphics in a Jupyter environment – IV – plotting the decision surface

In this article series

The moons dataset and decision surface graphics in a Jupyter environment – I
The moons dataset and decision surface graphics in a Jupyter environment – II – contourplots
The moons dataset and decision surface graphics in a Jupyter environment – III – Scatter-plots and LinearSVC

we used the moons data set to build up some basic knowledge about using a Jupyter notebook for experiments, Pipelines and SVM-algorithms of SciKit-Sklearn and plotting functionality of matplotlib.

Our ultimate goal is to write some code for plotting a decision surface between the moon shaped data clusters. The ability to visualize data sets and related decision surfaces is a key to quickly testing the quality of different SVM-approaches. Otherwise, you would have to run some kind of analysis code to get an impression of what is going on and possible deficits of the determined separation surface.

In most cases, a visual impression of the separation surface for complexly shaped data sets will give you much clearer information. With just one look you get answers to the following questions:

  • How well does the decision surface really separate the data points of the clusters? Are there data points which are placed on the wrong side of the decision surface?
  • How reasonable does the decision surface look like? How does it extend into regions of the representation space not covered by the data points of the training set?
  • Which parameters of our SVM-approach influences what regarding the shape of the surface?

In the second article of this series we saw how we would create contour-plots. The motivation behind this was that a decision surface is something as the border between different areas of data points in an (x1,x2)-plane for which we get different distinct Z(x1,x2)-values. I.e., a contour line separating contour areas is an example of a decision surface in a 2-dimensional plane.

During the third article we learned in addition how we could visualize the various distinct data points of a training set via a scatter-plot.

We then applied some analysis tools to analyze the moons data – namely the “LinearSVC” algorithm together with “PolynomialFeatures” to cover non-linearity by polynomial extensions of the input data.

We did this in form of a Sklearn Pipeline for a step-wise transformation of our data set plus the definition of a predictor algorithm. Our LinearSVC-algorithm was trained with 3000 iterations (for a polynomial degree of 3) – and we could predict values for new data points.

In this article we shall combine all previous insights to produce a visual impression of the decision interface determined by LinearSVC. We shall put part of our code into a wrapper function. This will help us to efficiently visualize the results of further classification experiments.

Predicting Z-values for a contour plot in the (x1,x2) representation space of the moons dataset

To allow for the necessary interpolations done during contour plotting we need to cover the visible (x1,x2)-area relatively densely and systematically by data points. We then evaluate Z-values for all these points – in our case distinct values, namely 0 and 1. To achieve this we build a mesh of data points both in x1-
and x2-direction. We saw already in the second article how numpy’s meshgrid() function can help us with this objective:

resolution = 0.02
x1_min, x1_max = X[:, 0].min()  - 1, X[:, 0].max() + 1
x2_min, x2_max = X[:, 1].min()  - 1, X[:, 1].max() + 1
xm1, xm2 = np.meshgrid( np.arange(x1_min, x1_max, resolution), 
                        np.arange(x2_min, x2_max, resolution))

We extend our area quite a bit beyond the defined limits of (x1,x2) coordinates in our data set. Note that xm1 and xm2 are 2-dim arrays (!) of the same shape covering the surface with repeated values in either coordinate! We shall need this shape later on in our predicted Z-array.

To get a better understanding of the structure of the meshgrid data we start our Jupyter notebook (see the last article), and, of course, first run the cell with the import statements

import numpy as np
import matplotlib
from matplotlib import pyplot as plt
from matplotlib import ticker, cm
from mpl_toolkits import mplot3d

from matplotlib.colors import ListedColormap
from sklearn.datasets import make_moons

from sklearn.pipeline import Pipeline
from sklearn.preprocessing import StandardScaler
from sklearn.preprocessing import PolynomialFeatures
from sklearn.svm import LinearSVC
from sklearn.svm import SVC

Then we run the cell that creates the moons data set to get the X-array of [x1,x2] coordinates plus the target values y:

X, y = make_moons(noise=0.1, random_state=5)
#X, y = make_moons(noise=0.18, random_state=5)
print('X.shape: ' + str(X.shape))
print('y.shape: ' + str(y.shape))
print("\nX-array: ")
print(X)
print("\ny-array: ")
print(y)

Now we can apply the “meshgrid()”-function in a new cell:

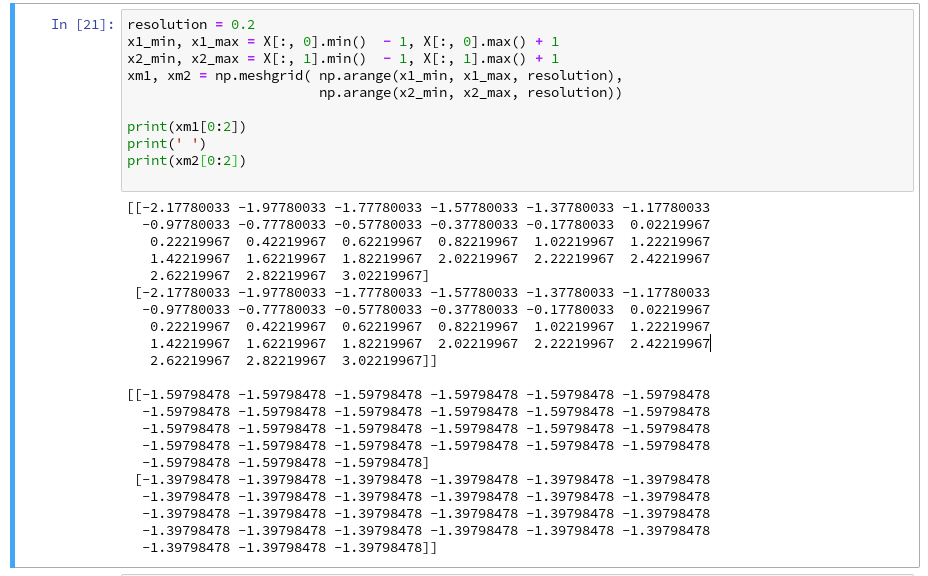
You see the 2-dim structure of the xm1- and xm2-arrays.

Rearranging the mesh data for predictions
How do we predict data values? In the last article we did this in the following form

z_test = polynomial_svm_clf.predict([[x1_test_1, x2_test_1], 
                                     [x1_test_2, x2_test_2], 
                                     [x1_test_3, x2_test_3],
                                     [x1_test_3, x2_test_3]
                                    ])      

“polynomial_svm_clf” was the trained predictor we got by our pipeline with the LinearSVC algorithm and a subsequent training.

The “predict()”-function requires its input values as a 1-dim array, where each element provides a (x1, x2)-pair of coordinate values. But how do we get such pairs from our strange 2-dimensional xm1- and xm2-arrays?

We need a bit of array- or matrix-wizardry here:

Numpy gives us the function “ravel()” which transforms a 2d-array into a 1-d array AND numpy also gives us the possibility to transpose a matrix (invert the axes) via “array().T“. (Have a look at the numpy-documentation e.g. at https://docs.scipy.org/doc/).

We can use these options in the following way – see the test example:

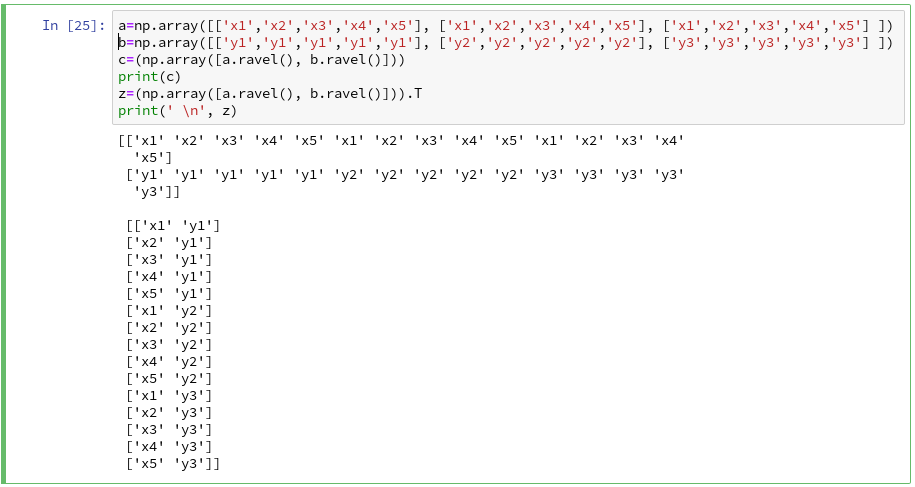
The involved logic should be clear by now. So, the next step should be something like

Z = polynomial_svm_clf.predict( np.array([xm1.ravel(), xm2.ravel()] ).T)

However, in the second article we already learned that we need Z in the same
shape as the 2-dim mesh coordinate-arrays to create a contour-plot with contourf(). We, therefore, need to reshape the Z-array; this is easy – numpy contains a method reshape() for numpy-array-objects : Z = Z.reshape(xm1.shape). It is sufficient to use xm1 – it has the same shape as xm2.

Applying contourf()

To distinguish contour areas we need a color map for our y-target-values. Later on we will also need different optical markers for the data points. So, for the contour-plot we add some statements like

markers = ('s', 'x', 'o', '^', 'v')
colors = ('red', 'blue', 'lightgreen', 'gray', 'cyan')
# fetch unique values of y into array and associate with colors  
cmap = ListedColormap(colors[:len(np.unique(y))])

Z = Z.reshape(xm1.shape)

# see article 2 for the use of contourf()
plt.contourf(xm1, xm2, Z, alpha=0.4, cmap=cmap)  

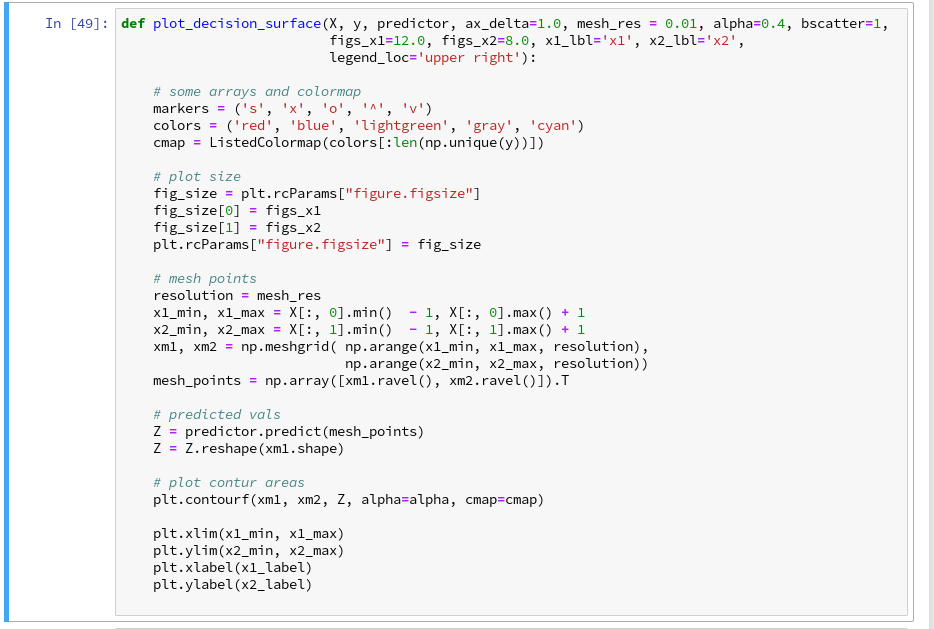
Let us put all this together; as the statements to create a plot obviously are many, we first define a function “plot_decision_surface()” in a notebook cell and run the cell contents:

Now, let us test – with a new cell that repeats some of our code of the last article for training:

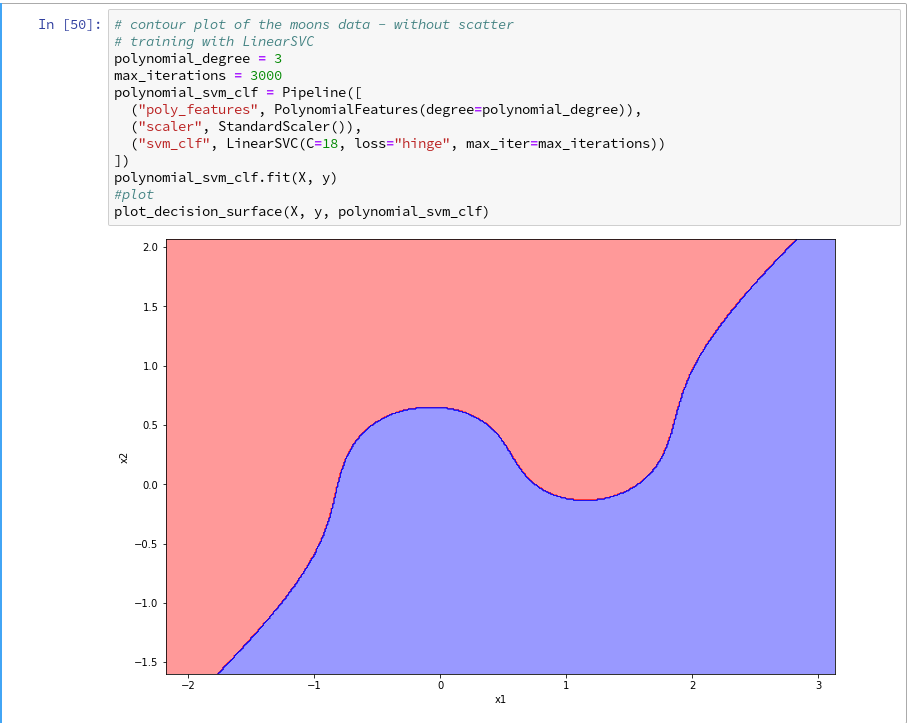
Yeah – we eventually got our decision surface!

But this result still is not really satisfactory – we need the data set points in addition to see how good the 2 clusters are separated. But with the insights of the last article this is now a piece of cake; we extend our function and run the definition cell

def plot_decision_surface(X, y, predictor, ax_delta=1.0, mesh_res = 0.01, alpha=0.4, bscatter=1,  
                          figs_x1=12.0, figs_x2=8.0, x1_lbl='x1', x2_lbl='x2', 
                          legend_loc='upper right'):

    # some arrays and colormap
    markers = ('s', 'x', 'o', '^', 'v')
    colors = ('red', 'blue', 'lightgreen', 'gray', 'cyan')
    cmap = ListedColormap(colors[:len(np.unique(y))])

    # plot size  
    fig_size = plt.rcParams["figure.figsize"]
    fig_size[0] = figs_x1 
    fig_size[1] = figs_x2
    plt.rcParams["figure.figsize"] = fig_size

    # mesh points 
    resolution = mesh_res
    x1_min, x1_max = X[:, 0].min()  - 1, X[:, 0].max() + 1
    x2_min, x2_max = X[:, 1].min()  - 1, X[:, 1].max() + 1
    xm1, xm2 = np.meshgrid( np.arange(x1_min, x1_max, resolution), 
                            np.arange(x2_min, x2_max, resolution))
    mesh_points = np.array([xm1.ravel(), xm2.ravel()]).T

    # predicted vals 
    Z = predictor.predict(mesh_points)
    Z = Z.reshape(xm1.shape)

    # plot contur areas 
    plt.contourf(xm1, xm2, Z, alpha=alpha, cmap=cmap)

    # add a scatter plot of the data points 
    if (bscatter == 1): 
        alpha2 = alpha + 0.4 
        if (alpha2 > 1.0 ):
            alpha2 = 1.0
        for idx, yv in enumerate(np.unique(y)): 
            plt.scatter(x=X[y==yv, 0], y=X[y==yv, 1], 
                        alpha=alpha2, c=[cmap(idx)], marker=markers[idx], label=yv)
            
    plt.xlim(x1_min, x1_max)
    plt.ylim(x2_min, x2_max)
    plt.xlabel(x1_label)
    plt.ylabel(x2_label)
    if (bscatter == 1):
        plt.legend(loc=legend_loc)

Now we get:

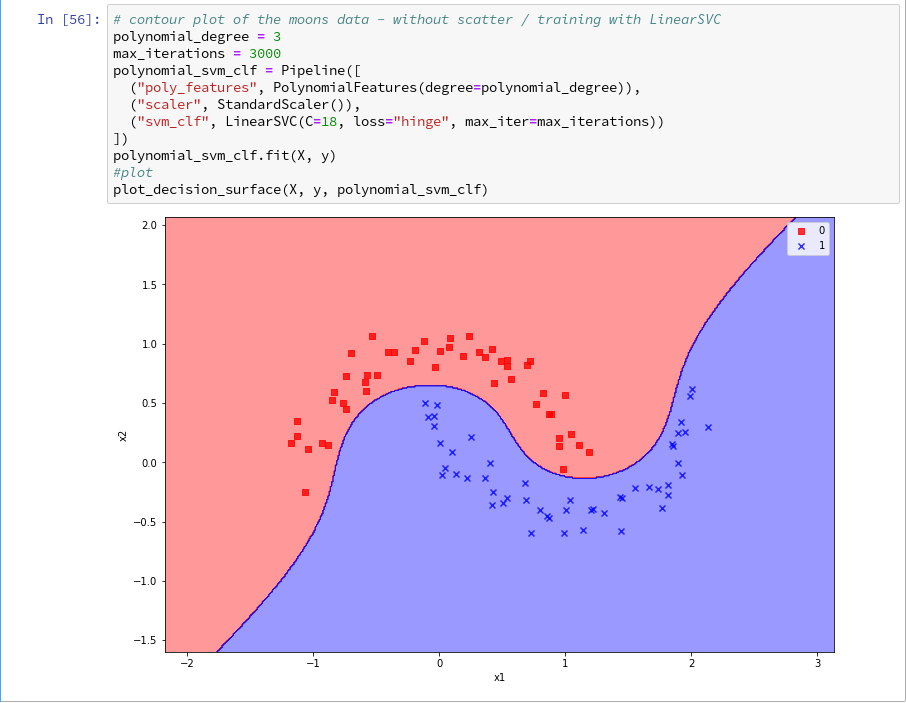
So far, so good ! We see that our specific model of the moons data separates the (x1,x2)-plane into two areas – which has two wiggles near our data points, but otherwise asymptotically approaches almost a diagonal.

Hmmm, one could bet that this is model specific. Therefore, let us do a quick test for a polynomial_degree=4 and max_iterations=6000. We get

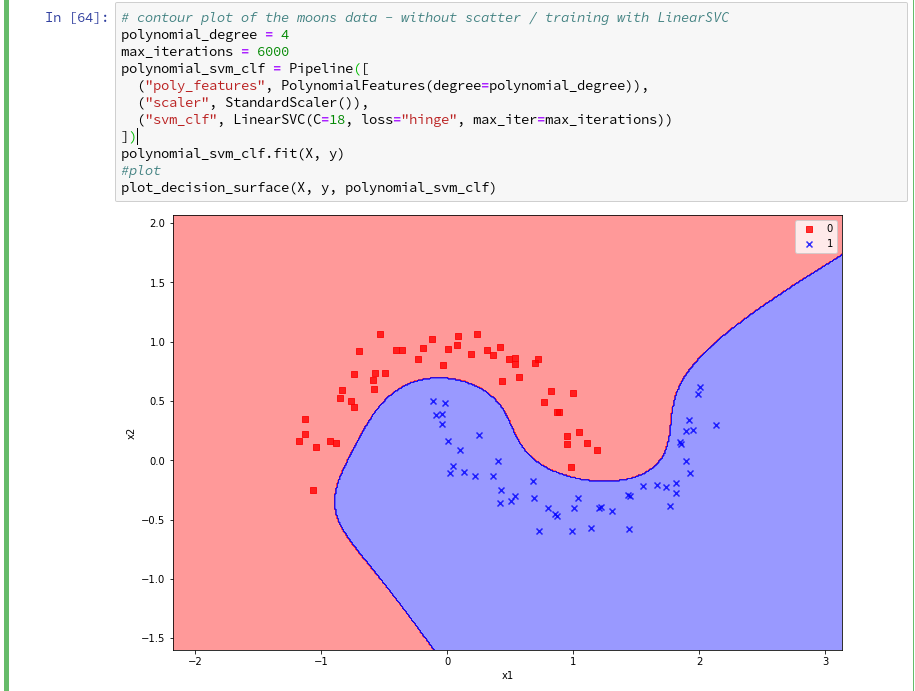
Surprise, surprise … We have already 2 different models fitting our data.

Which one do you believe to be “better” for extrapolations into the big (x1,x2)-plane? Even in the vicinity of the leftmost and rightmost points in x1-direction we would get different predictions of our models for some points. We see that our knowledge is insufficient – i.e. the test data do not provide enough information to really distinguish between different models.

Conclusion

After some organization of our data we had success with our approach of using a contour plot to visualize a decision surface in the 2-dimensional space (x1,x2) of input data X for our moon clusters. A simple wrapper function for surface plotting equips us now for further fast experiments with other algorithms.

To become better organized, we should save this plot-function for decision surfaces as well as a simpler function for pure scatter plots in a Python class and import the functionality later on.

We shall create such a class within Eclipse PyDev as a first step in the next article:

The moons dataset and decision surface graphics in a Jupyter environment – V – a class for plots and some experiments

Afterward we shall look at other SVM algorithms – as the “polynomial kernel” and the “Gaussian kernel”. We shall also have a look at the impact of some of the parameters of the algorithms. Stay tuned …

The moons dataset and decision surface graphics in a Jupyter environment – II – contourplots

I proceed with my present article series on the “moons dataset” as an example for classification tasks in the field of “machine learning” [ML]. My objective is to gather basic knowledge on Python related tools for performing related experiments. In my last blog article

The moons dataset and decision surface graphics in an Jupyter environment – I

In the case of the “moons dataset” we can apply and train support vector machines [SVM] algorithms for solving the classification task: The trained algorithm will predict to which of the 2 clusters a new data point probably belongs. The basic task for this kind of information reduction is to find a (curved) decision surface between the data clusters in the n-dimensional representation space of the data points during the training of the algorithm.

As the moons feature space is only 2-dimensional the decision surface would be a curved line. Of course, we would like to add this line to the 2D-plot of the moons clusters shown in the last article.

The challenge of plotting data points and decision surfaces for our moon clusters

  1. is sufficiently simple for a Python- and AI/ML-beginner as me,
  2. is a good opportunity to learn how to work with a Jupyter notebook,
  3. gives us a reason to become acquainted with some basic plotting functions of matplotlib,
  4. an access to some general functions of SciKit – and some specific ones for SVM-problems.

Much to learn from one little example. Points 2 and 3 are the objectives of this article.

Contour plots !

But what kind of plots should we be interested in? We need to separate areas of a 2-dimensional parameter space (x1,x2) for which we get different (integer) target or y-values, i.e. to distinguish between a set of distinct classes to which data points may belong – in our case either to a class “0” of the first moon like cluster and a class “1” for data points around the second cluster.

In applied mathematics there is a very similar problem: For a given function z(x1,x2) we want to visualize regions in the (x1,x2)-plane for which the z-values cover a range between 2 selected distinct z-values, so called contour areas. Such contour areas are separated by contour lines. Think of height lines in a map of a mountain region. So, there is an close relation between a contour line and a decision surface – at least in a two dimensional setup. We need contour plots!

Let us see how we start a Jupyter environment and how we produce nice 2D- and even 3D-contour-plots.

Starting a Jupyter notebook from a virtual Python environment on our Linux machine

I discussed the setup of a virtual Python environment (“virtualenv”) already in the article Eclipse, PyDev, virtualenv and graphical output of matplotlib on KDE – I of this blog. I refer to the example and the related paths there. The “virtualenv” has a name of “ml1” and is located at “/projekte/GIT/ai/ml1”.

In the named article I had also shown how to install the Jupyter package with the help of “pip3” within this environment. You can verify the Jupyter installation by having a look into the directory “/projekte/GIT/ai/ml1/bin” – you should see some files “ipython3” and “jupyter” there. I had also prepared a directory
“/projekte/GIT/ai/ml1/mynotebooks”
to save some experimental notebooks there.

How do we start a Jupyter notebook? This is simple – we just use a
terminal window and enter:

myself@mytux:/projekte/GIT/ai/ml1> source bin/activate 
(ml1) myself@mytux:/projekte/GIT/ai/ml1> jupyter notebook 
[I 16:16:27.734 NotebookApp] Writing notebook server cookie secret to /run/user/1004/jupyter/notebook_cookie_secret
[I 16:16:29.040 NotebookApp] Serving notebooks from local directory: /projekte/GIT/ai/ml1
[I 16:16:29.040 NotebookApp] The Jupyter Notebook is running at:
[I 16:16:29.040 NotebookApp] http://localhost:8888/?token=942e6f5e75b0d014659aea047b1811d1992ca77e4d8cc714
[I 16:16:29.040 NotebookApp] Use Control-C to stop this server and shut down all kernels (twice to skip confirmation).
[C 16:16:29.054 NotebookApp] 
    
    To access the notebook, open this file in a browser:
        file:///run/user/1004/jupyter/nbserver-19809-open.html
    Or copy and paste one of these URLs:
        http://localhost:8888/?token=942e6f5e75b0d014659aea047b1811d1992ca77e4d8cc714

We see that a local http-server is started and that a http-request is issued. In the background on my KDE desktop a new tag in my standard browser “Firefox” is opened for this request:

Note that a standard port 8888 is used; this port should not be used by other services on your machine.

On the displayed web page we can move to the “mynotebooks” directory. We open a new notebook there by clicking on the “New”-button on the right side of the browser window:

We choose Python3 as the relevant interpreter and get a new browser window:

We give the notebook a title by clicking on “File >> Save as …” before start using the provided input “cell” for coding

I name it “moons1” in the next input form and check afterward in a terminal that the file “/projekte/GIT/ai/ml1mynotebooks/moons1.ipynb” really has been created; you see this also in the address bar of the browser – see below.

Lets do some plotting within a notebook

Most of the icons regarding the notebook screen are self explanatory. The interesting and pretty nice thing about a Jupyter notebook is that the multiple lines of Python code can be filled into cells. All lines can be executed in a row by first choosing a cell via clicking on a it and then clicking on the “Run” button.

As a first exercise I want to do some plotting with “matplotlib” (which I also installed together with the numpy package in a previous article). We start by importing the required modules:

A new cell for input opens automatically (it is clever to separate cells for imports and for real code). Let us produce a most simple plot there:

No effort in comparison to what we had to do to prepare an Eclipse environment for plotting (see Eclipse, PyDev, virtualenv and graphical output of matplotlib on KDE – II). Calling plot routines simply works – no special configuration is required. Jupyter and the browser do all the work for us. We save our present 2 cells by clicking on the “Save“-icon.

How do we plot contour lines or contour areas?

Later on we need to plot a separation line in a 2-dimensional parameter space between 2 clustered sets of data. This task is very similar to plotting a contour line. As this is a common task in math we expect matplotlib to provide some functionality for us. Our ultimate goal is to wrap this plotting functionality into a function or class which also accepts an SVM based ML-method of SciKit to prepare and evaluate the basic data first. But let us proceed step by step.

Some research on the Internet shows: The keys to contour plotting with matplotlib are the functions “contour()” and “contourf()” (matplotlib.pyplot.contourf):

contour(f)([X, Y,] Z, [levels], **kwargs)

“contour()” plots lines, only, whilst “contourf()” fills the area between the lines with some color.

Both functions accept data sets in the form of X,Y-coordinates and Z-values (e.g. defined by some function Z=f(X,Y)) at the respective points.

X and Y can be provided as 1-dim arrays; Z-values, however, must be given by a 2-dim array, such that len(X) == M is the number of columns in Z and len(Y) == N is the number of rows in Z. We cover the X,Y-plane with Z-values from bottom to top (Y, lines) and from the left to the right (X, columns).

Somewhat counter-intuitively, X and Y can also be provided as 2-dim arrays – with the same dimensionality as Z.
There is a nice function “meshgrid” (of packet numpy) which allows for the creation of e.g. a mesh of two 2-dimensional X- and separately Y-matrices. See for further information (numpy.meshgrid). Both arrays then have a (N,M)-layout (shape); as the degree of information of one coordinate is basically 1-dimensional, we do expect repeated values of either coordinate in the X-/Y-meshgrid-matrices.

The function “shape” gives us an output in the form of (N lines, M columns) for a 2-dim array. Lets apply all this and create a rectangle shaped (X,Y)-plane:

The basic numpy-function “arange()” turns a range between two limiting values into an array of equally spaced values. We see that meshgrid() actually produces two 2-dim arrays of the same “shape”.

For test purposes let us use a function

Z1=-0.5* (X)**2 + 4*(Y)**2.

For this function we expect elliptical contours with the longer axis in X-direction. The “contourf()”-documentation shows that we can use the parameters “levels“, “cmap” and “alpha” to set the number of contour levels (= number of contour lines -1), a so called colormap, and the opacity of the area
coloring, respectively.

You find predefined colormaps and their names at this address: matplotlib colormaps. If you add an “_r” to the colormap-name you just reverse the color sequence.

We combine all ingredients now to create a 2D-plot (with the “plasma” colormap):

Our first reasonable contour-plot within a Jupyter notebook! We got the expected elliptic curves! Time for a coffee ….

Changing the plot size

A question that may come to your mind at this stage is: How can we change the size of the plot?

Well, this can be achieved by defining some basic parameters for plotting. You need to do this in advance of any of your specific plots. One also wants to add some labels for all axis. We, therefore, extend the code in our cell a bit by the following statements and click again on “Run”:

You see that “fig_size = plt.rcParams[“figure.figsize”]” provides you with some kind of array- or object like information on the size of plots. You can change this by assigning new values to this object. “figure” is an instance of a container class for all plot elements. “plt.xlabel” and “plt.ylabel” offer a simple option to add some text to an axis of the plot.

What about a 3D-representation …

As we are here – isn’t our function for Z1 not a good example to get a 3D-representation of our data? As 3D-plots are helpful in other contexts of ML, lets have a quick side look at this. You find some useful information at the following addresses:
PythonDataScienceHandbook and mplot3d-tutorial

I used the given information in form of the following code:

You see that we can refer to a special 3D-plot-object as the output of plt.axes(projection=’3d’). The properties of such an object can be manipulated by a variety of methods. You also see that I manipulated the number of ticks on the z-axis to 5 by using a function “set_major_locator(plt.MaxNLocator(5)“. I leave it to the reader to dive deeper into manipulation options for a plot axis.

Addendum – 07.07.2019: Adding a colorbar

A reader asked me to show how one can set ticks and add a color-bar to the plots. I give an example code below:

The result is:

For the 3D-plots we get:

Conclusion

Enough for today. We have seen that it is relatively simple to create nice contour and even 3D-plots in a Jupyter notebook environment. This new knowledge provides us with a good basis for a further approach to our objective of plotting a decision surface for the moons dataset. In the next article

The moons dataset and decision surface graphics in a Jupyter environment – III – scatter-plots and LinearSVC

we first import the moons data set into our Jupyter notebook. Then we shall create a so called “scatter plot” for all data points. Furthermore we shall train a specific SVM algorithm (LinearSVC) on the dataset.

Links

https://codeyarns.com/2014/10/27/how-to-change-size-of-matplotlib-plot/
matplotlib.pyplot.contourf
https://stackoverflow.com/questions/12608788/changing-the-tick-frequency-on-x-or-y-axis-in-matplotlib