Fun with veth-devices, Linux bridges and VLANs in unnamed Linux network namespaces – III

In the first blog post
Fun with veth-devices, Linux bridges and VLANs in unnamed Linux network namespaces – I
of this series about virtual networking between network namespaces I had discussed some basic CLI Linux commands to set up and enter network namespaces on a Linux system. In a second post
Fun with veth-devices, Linux bridges and VLANs in unnamed Linux network namespaces – II
I suggested and described several networking experiments which can quickly be set up by these tools. As containers are based on namespaces we can study virtual networking between containers on a host in principle just by connecting network namespaces. Makes e.g. the planning of firewall rules and VLANs a bit easier …

The virtual environment we want to build up and explore step by step is displayed in the following graphics:

In this article we shall cover experiment 1 and experiment 2 discussed in the last article – i.e. we start with the upper left corner of the drawing.

Experiment 1: Connect two network namespaces directly

This experiments creates the dotted line between netns1 and netns2. Though simple this experiments lays the foundation for all other experiments.

We place the two different Ethernet interfaces of a veth device in the two (unnamed) network namespaces (with hostnames) netns1 and netns2. We assign IP addresses (of the same network class) to the interfaces and check a basic communication between the network namespaces. The situation corresponds to the following simple picture:

What shell commands can be used for achieving this? You may put the following lines in a file for keeping them for further experiments or to create a shell script:

unshare --net --uts /bin/bash &
export pid_netns1=$!
nsenter -t $pid_netns1 -u hostname netns1
unshare --net --uts /bin/bash &
export pid_netns2=$!
nsenter -t $pid_netns2 -u hostname netns2
ip link add veth11 netns $pid_netns1 type veth peer name veth22 netns $pid_netns2
nsenter -t $pid_netns1 -u -n /bin/bash
ip addr add 192.168.5.1/24 brd 192.168.5.255 dev veth11
ip link set veth11 up
ip link set lo up
ip a s
exit
nsenter -t $pid_netns2 -u -n /bin/bash
ip addr add 192.168.5.2/24 brd 192.168.5.255 dev veth22
ip link set veth22 up
ip a s
exit
lsns -t net -t uts

If you now copy these lines to the prompt of a root shell of some host “mytux” you will get something like the following:

mytux:~ # unshare --net --uts /bin/bash &
[2] 32146
mytux:~ # export pid_netns1=$!

[2]+  Stopped                 unshare --net --uts /bin/bash
mytux:~ # nsenter -t $pid_netns1 -u hostname netns1
mytux:~ # unshare --net --uts /bin/bash &
[3] 32154
mytux:~ # export pid_netns2=$!

[3]+  Stopped                 unshare --net --uts /bin/bash
mytux:~ # nsenter -t $pid_netns2 -u hostname netns2
mytux:~ # ip link add veth11 netns $pid_netns1 type veth peer name veth22 netns $pid_netns2
mytux:~ # nsenter -t 
$pid_netns1 -u -n /bin/bash
netns1:~ # ip addr add 192.168.5.1/24 brd 192.168.5.255 dev veth11
netns1:~ # ip link set veth11 up
netns1:~ # ip link set lo up
netns1:~ # ip a s
1: lo: <LOOPBACK,UP,LOWER_UP> mtu 65536 qdisc noqueue state UNKNOWN group default qlen 1
    link/loopback 00:00:00:00:00:00 brd 00:00:00:00:00:00
    inet 127.0.0.1/8 scope host lo
       valid_lft forever preferred_lft forever
    inet6 ::1/128 scope host 
       valid_lft forever preferred_lft forever
2: veth11: <NO-CARRIER,BROADCAST,MULTICAST,UP> mtu 1500 qdisc noqueue state DOWN group default qlen 1000
    link/ether da:34:49:a6:18:ce brd ff:ff:ff:ff:ff:ff link-netnsid 0
    inet 192.168.5.1/24 brd 192.168.5.255 scope global veth11
       valid_lft forever preferred_lft forever
netns1:~ # exit
exit
mytux:~ # nsenter -t $pid_netns2 -u -n /bin/bash
netns2:~ # ip addr add 192.168.5.2/24 brd 192.168.5.255 dev veth22
netns2:~ # ip link set veth22 up
netns2:~ # ip a s
1: lo: <LOOPBACK> mtu 65536 qdisc noop state DOWN group default qlen 1
    link/loopback 00:00:00:00:00:00 brd 00:00:00:00:00:00
2: veth22: <NO-CARRIER,BROADCAST,MULTICAST,UP,LOWER_UP> mtu 1500 qdisc noqueue state DOWN group default qlen 1000
    link/ether f2:ee:52:f9:92:40 brd ff:ff:ff:ff:ff:ff link-netnsid 0
    inet 192.168.5.2/24 brd 192.168.5.255 scope global veth22
       valid_lft forever preferred_lft forever
    inet6 fe80::f0ee:52ff:fef9:9240/64 scope link tentative 
       valid_lft forever preferred_lft forever
netns2:~ # exit
exit
mytux:~ # lsns -t net -t uts
        NS TYPE NPROCS   PID USER  COMMAND
4026531838 uts     387     1 root  /usr/lib/systemd/systemd --switched
4026531963 net     385     1 root  /usr/lib/systemd/systemd --switched
4026532178 net       1   581 root  /usr/sbin/haveged -w 1024 -v 0 -F
4026540861 net       1  4138 rtkit /usr/lib/rtkit/rtkit-daemon
4026540984 uts       1 32146 root  /bin/bash
4026540986 net       1 32146 root  /bin/bash
4026541078 uts       1 32154 root  /bin/bash
4026541080 net       1 32154 root  /bin/bash
rux:~ # 

Of course, you recognize some of the commands from my first blog post. Still, some details are worth a comment:

Unshare, background shells and shell variables

We create a separate network (and uts) namespace with the “unshare” command and background processes.

unshare –net –uts /bin/bash &

Note the options! We export shell variables with the PIDs of the started background processes [$!] to have these PIDs available in subshells later on. Note: From our original terminal window (in my case a KDE “konsole” window) we can always open a subshell window with:

mytux:~ # konsole &>/dev/null

You may use another terminal window command on your system. The output redirection is done only to avoid KDE message clattering. In the subshell you may enter a previously created network namespace netnsX by

nsenter -t $pid_netnsX -u -n /bin/bash

Hostnames to distinguish namespaces at the shell prompt

Assignment of hostnames to the background processes via commands like

nsenter -t $pid_netns1 -u hostname netns1

This works through the a separation of the uts namespace. See the first post for an explanation.

Create veth devices with the “ip” command

The key command to create a veth device and to assign its two interfaces to 2 different network namespaces is:

ip link add veth11 netns $pid_netns1 type veth peer name veth22 netns $pid_netns2

Note, that we can use PIDs to identify the target network namespaces! Explicit names of the network namespaces are not required!

The importance of a running lo-device in each network namespace

We intentionally did not set the loopback device “lo” up in netns2. This leads to an interesting observation, which many admins are not aware of:

The lo device is required (in UP status) to be able to ping network interfaces (here e.g. veth11) in the local namespace!

This is standard: If you do not specify the interface to ping from via an option “-I” the ping command will use device lo as a default! The ping traffic runs through it! Normally, we just do not realize this point, because lo almost always is UP on a standard system (in its root namespace).

For testing the role of “lo” we now open a separate terminal window:

mytux:~ # konsole &>/dev/null 

There:

mytux:~ # nsenter -t $pid_netns2 -u -n /bin/bash
netns2:~ # ping 192.168.5.2
PING 192.168.5.2 (192.168.5.2) 56(84) bytes of data.
^C
--- 192.168.5.2 ping statistics ---
2 packets transmitted, 0 received, 100% packet loss, time 1008ms

netns2:~ # ip link set lo up
netns2:~ # ping 192.168.5.2 -c2
PING 192.168.5.2 (192.168.5.2) 56(84) bytes of data.
64 bytes from 192.168.5.2: icmp_seq=1 ttl=64 time=0.017 ms
64 bytes from 192.168.5.2: icmp_seq=2 ttl=64 time=0.033 ms

--- 192.168.5.2 ping statistics ---
2 packets transmitted, 2 received, 0% packet loss, time 998ms
rtt min/avg/max/mdev = 0.017/0.034 ms

And: Within the same namespace and “lo” down you cannot even ping the second Ethernet interface of a veth device from the first interface – even if they belong to the same network class:
Open anew sub shell and enter e.g. netns1 there:

netns1:~ # ip link add vethx type veth peer name vethy 
netns1:~ # ip addr add 192.168.20.1/24 brd 192.168.20.255 dev vethx 
netns1:~ # ip addr add 192.168.20.2/24 brd 192.168.20.255 dev vethy 
netns1:~ # ip link set vethx up
netns1:~ # ip link set vethy up
netns1:~ # ping 192.168.20.2 -I 192.168.20.1
PING 192.168.20.2 (192.168.20.2) from 192.168.20.1 : 56(84) bytes of data.
^C
--- 192.168.20.2 ping statistics ---
4 packets transmitted, 0 received, 100% packet loss, time 3000ms
netns1:~ # ip link set lo up
netns1:~ # ping 192.168.20.2 -I 192.168.20.1                                                                               
PING 192.168.20.2 (192.168.20.2) from 192.168.20.1 : 56(84) bytes of data.                                                 
64 bytes from 192.168.20.2: icmp_seq=1 ttl=64 time=0.019 ms                                                                
64 bytes from 192.168.20.2: icmp_seq=2 ttl=64 time=0.052 ms                                                                
^C                                                                                                                         
--- 192.168.20.2 ping statistics ---                                                                                       
2 packets transmitted, 2 received, 0% packet loss, time 999ms                                                              
rtt min/avg/max/mdev = 0.019/0.035/0.052/0.017 ms                                                                          
netns1:~ #                                           

Connection test

Now back to our experiment. Let us now try to ping netns1 from netns2:

netns2:~ # ip a s
1: lo: <LOOPBACK,UP,LOWER_UP> mtu 65536 qdisc noqueue state UNKNOWN group default qlen 1
    link/loopback 00:00:00:00:00:00 brd 00:00:00:00:00:00
    inet 127.0.0.1/8 scope host lo
       valid_lft forever preferred_lft forever
    inet6 ::1/128 scope host 
       valid_lft forever preferred_lft forever
2: veth22: <BROADCAST,MULTICAST,UP,LOWER_UP> mtu 1500 qdisc noqueue state UP group default qlen 1000
    link/ether f2:ee:52:f9:92:40 brd ff:
ff:ff:ff:ff:ff link-netnsid 0
    inet 192.168.5.2/24 brd 192.168.5.255 scope global veth22
       valid_lft forever preferred_lft forever
    inet6 fe80::f0ee:52ff:fef9:9240/64 scope link 
       valid_lft forever preferred_lft forever
netns2:~ # ping 192.168.5.1
PING 192.168.5.1 (192.168.5.1) 56(84) bytes of data.
64 bytes from 192.168.5.1: icmp_seq=1 ttl=64 time=0.030 ms
64 bytes from 192.168.5.1: icmp_seq=2 ttl=64 time=0.033 ms
64 bytes from 192.168.5.1: icmp_seq=3 ttl=64 time=0.036 ms
^C
--- 192.168.5.1 ping statistics ---                                                                  
3 packets transmitted, 3 received, 0% packet loss, time 1998ms                                       
rtt min/avg/max/mdev = 0.030/0.033/0.036/0.002 ms                                                    
netns2:~ #     

OK! And vice versa:

mytux:~ #  nsenter -t $pid_netns1 -u -n /bin/bash
netns1:~ #  nsenter -t $pid_netns2 -u -n /bin/bash
netns1:~ # ping 192.168.5.2 -c2
PING 192.168.5.2 (192.168.5.2) 56(84) bytes of data.
64 bytes from 192.168.5.2: icmp_seq=1 ttl=64 time=0.023 ms
64 bytes from 192.168.5.2: icmp_seq=2 ttl=64 time=0.023 ms

--- 192.168.5.2 ping statistics ---
2 packets transmitted, 2 received, 0% packet loss, time 1003ms
rtt min/avg/max/mdev = 0.023/0.023/0.023/0.000 ms
netns1:~ # 

Our direct communication via veth works as expected! Network packets are not stopped by network namespace borders – this would not make much sense.

Experiment 2: Connect two namespaces via a bridge in a third namespace

We now try a connection of netns1 and netns2 via a Linux bridgebrx“, which we place in a third namespace netns3:

Note:

This is a standard way to connect containers on a host!

LXC tools as well as libvirt/virt-manager would help you to establish such a bridge! However, the bridge would normally be place inside the host’s root namespace. In my opinion this is not a good idea:

A separate 3rd namespace gets the the bridge and related firewall and VLAN rules outside the control of the containers. But a separate namespace also helps to isolate the host against any communication (and possible attacks) coming from the containers!

So, let us close our sub terminals from the first experiment and kill the background shells:

mytux:~ # kill -9 32146
[2]-  Killed                  unshare --net --uts /bin/bash
mytux:~ # kill -9 32154
[3]+  Killed                  unshare --net --uts /bin/bash

We adapt our setup commands now to create netns3 and bridge “brx” there by using “brctl bradd“. Futhermore we add two different veth devices; each with one interface in netns3. We attach the interface to the bridge via “brctl addif”:

unshare --net --uts /bin/bash &
export pid_netns1=$!
nsenter -t $pid_netns1 -u hostname netns1
unshare --net --uts /bin/bash &
export pid_netns2=$!
nsenter -t $pid_netns2 -u hostname netns2
unshare --net --uts /bin/bash &
export pid_netns3=$!
nsenter -t $pid_netns3 -u hostname netns3
nsenter -t $pid_netns3 -u -n /bin/bash
brctl addbr brx  
ip link set brx up
exit 
ip link add veth11 netns $pid_netns1 type veth peer name veth13 netns $pid_netns3
ip link add veth22 netns $pid_netns2 type veth peer name veth23 netns $pid_netns3
nsenter -t $pid_netns1 -u -n /bin/bash
ip addr add 192.168.5.1/24 brd 192.
168.5.255 dev veth11
ip link set veth11 up
ip link set lo up
ip a s
exit
nsenter -t $pid_netns2 -u -n /bin/bash
ip addr add 192.168.5.2/24 brd 192.168.5.255 dev veth22
ip link set veth22 up
ip a s
exit
nsenter -t $pid_netns3 -u -n /bin/bash
ip link set veth13 up
ip link set veth23 up
brctl addif brx veth13
brctl addif brx veth23
exit

It is not necessary to show the reaction of the shell to these commands. But note the following:

  • The bridge has to be set into an UP status.
  • The veth interfaces located in netns3 do not get an IP address. Actually, a veth interface plays a different role on a bridge than in normal surroundings.
  • The bridge itself does not get an IP address.

Bridge ports

By attaching the veth interfaces to the bridge we create a “port” on the bridge, which corresponds to some complicated structures (handled by the kernel) for dealing with Ethernet packets crossing the port. You can imagine the situation as if e.g. the veth interface veth13 corresponds to the RJ45 end of a cable which is plugged into the port. Ethernet packets are taken at the plug, get modified sometimes and then are transferred across the port to the inside of the bridge.

However, when we assign an Ethernet address to the other interface, e.g. veth11 in netns1, then the veth “cable” ends in a full Ethernet device, which accepts network commands as “ping” or “nc”.

No IP address for the bridge itself!
We do NOT assign an IP address to the bridge itself; this is a bit in contrast to what e.g. happens when you set up a bridge for networking with the tools of virt-manager. Or what e.g. Opensuse does, when you setup a KVM virtualization host with YaST. In all these cases something like

ip addr add 192.168.5.100/24 brd 192.168.5.255 dev brx 

happens in the background. However, I do not like this kind of implicit politics, because it opens ways into the namespace surrounding the bridge! And it is easy to forget this bridge interface both in VLAN and firewall rules.

Almost always, there is no necessity to provide an IP address to the bridge itself. If we need an interface of a namespace, a container or the host to a Linux bridge we can always use a veth device. This leads to a much is much clearer situation; you see the Ethernet interface and the port to the bridge explicitly – thus you have much better control, especially with respect to firewall rules.

Enter network namespace netns3

Now we open a terminal as a sub shell (as we did in the previous example) and enter netns3 to have a look at the interfaces and the bridge.

mytux:~ # nsenter -t $pid_netns3 -u -n /bin/bash
netns3:~ # brctl show brx
bridge name     bridge id               STP enabled     interfaces
brx             8000.000000000000       no
netns3:~ # ip a s
1: lo: <LOOPBACK> mtu 65536 qdisc noop state DOWN group default qlen 1
    link/loopback 00:00:00:00:00:00 brd 00:00:00:00:00:00
2: brx: <BROADCAST,MULTICAST,UP,LOWER_UP> mtu 1500 qdisc noqueue state UP group default qlen 1000
    link/ether ce:fa:74:92:b5:00 brd ff:ff:ff:ff:ff:ff
    inet6 fe80::1c08:76ff:fe0c:7dfe/64 scope link 
       valid_lft forever preferred_lft forever
3: veth13@if2: <BROADCAST,MULTICAST,UP,LOWER_UP> mtu 1500 qdisc noqueue master brx state UP group default qlen 1000
    link/ether ce:fa:74:92:b5:00 brd ff:ff:ff:ff:ff:ff link-netnsid 0
    inet6 fe80::ccfa:74ff:fe92:b500/64 scope link 
       valid_lft forever preferred_lft forever
4: veth23@if2: <BROADCAST,MULTICAST,UP,LOWER_UP> mtu 1500 qdisc noqueue master brx state UP group default qlen 1000
    link/ether fe:5e:0b:d1:44:69 brd ff:ff:ff:ff:ff:ff link-netnsid 1
    inet6 fe80::fc5e:
bff:fed1:4469/64 scope link 
       valid_lft forever preferred_lft forever
netns3:~ # bridge link
3: veth13 state UP @brx: <BROADCAST,MULTICAST,UP,LOWER_UP> mtu 1500 master brx state forwarding priority 32 cost 2 
4: veth23 state UP @brx: <BROADCAST,MULTICAST,UP,LOWER_UP> mtu 1500 master brx state forwarding priority 32 cost 2 

Useful commands

Let us briefly discuss some useful commands:

Incomplete information of “brctl show”
Unfortunately, the standard command

brctl show brx

does not work properly inside network namespaces; it does not produce a complete output. E.g., the attached interfaces are not shown. However, the command

ip a s

shows all interfaces and their respective “master“. The same is true for the very useful “bridge” command :

bridge link

If you want to see even more details on interfaces use

ip -d a s

and grep the line for a specific interface.

Just for completeness: To create a bridge and add a veth devices to the bridge, we could also have used:

ip link add name brx type bridge
ip link set brx up
ip link set dev veth13 master brx
ip link set dev veth23 master brx

Connectivity test with ping
Now, let us turn to netns1 and test connectivity:

mytux:~ # nsenter -t $pid_netns1 -u -n /bin/bash
netns1:~ # ip a s 
1: lo: <LOOPBACK,UP,LOWER_UP> mtu 65536 qdisc noqueue state UNKNOWN group default qlen 1
    link/loopback 00:00:00:00:00:00 brd 00:00:00:00:00:00
    inet 127.0.0.1/8 scope host lo
       valid_lft forever preferred_lft forever
    inet6 ::1/128 scope host 
       valid_lft forever preferred_lft forever
2: veth11@if3: <BROADCAST,MULTICAST,UP,LOWER_UP> mtu 1500 qdisc noqueue state UP group default qlen 1000
    link/ether 6a:4d:0c:30:12:04 brd ff:ff:ff:ff:ff:ff link-netnsid 0
    inet 192.168.5.1/24 brd 192.168.5.255 scope global veth11
       valid_lft forever preferred_lft forever                                                       
    inet6 fe80::684d:cff:fe30:1204/64 scope link                                                     
       valid_lft forever preferred_lft forever                                                       
netns1:~ # ping 192.168.5.2
PING 192.168.5.2 (192.168.5.2) 56(84) bytes of data.
64 bytes from 192.168.5.2: icmp_seq=1 ttl=64 time=0.039 ms
64 bytes from 192.168.5.2: icmp_seq=2 ttl=64 time=0.045 ms
64 bytes from 192.168.5.2: icmp_seq=3 ttl=64 time=0.054 ms
^C
--- 192.168.5.2 ping statistics ---
3 packets transmitted, 3 received, 0% packet loss, time 1998ms
rtt min/avg/max/mdev = 0.039/0.046/0.054/0.006 ms
netns1:~ # nc -l 41234

Note that – as expected – we do not see anything of the bridge and its interfaces in netns1! Note that the bridge basically is a device on the data link layer, i.e. OSI layer 2. In the current configuration we did nothing to stop the propagation of Ethernet packets on this layer – this will change in further experiments.

Connectivity test with netcat
At the end of our test we used the netcat command “nc” to listen on a TCP port 41234. At another (sub) terminal we can now start a TCP communication from netns2 to the TCP port 41234 in netns1:

mytux:~ # nsenter -t $pid_netns2 -u -n /bin/bash
netns2:~ # nc 192.168.5.1 41234
alpha
beta

This leads to an output after the last command in netns1:

netns1:~ # nc -l 41234
alpha
beta

So, we have full connectivity – not only for ICMP packets, but also for TCP packets. In yet another terminal:

  
mytux:~ # nsenter -t $pid_netns1 -u -n /bin/bash
netns1:~ # netstat -a
Active 
Internet connections (servers and established)
Proto Recv-Q Send-Q Local Address           Foreign Address         State      
tcp        0      0 *:41234                 *:*                     LISTEN      
tcp        0      0 192.168.5.1:41234       192.168.5.2:45122       ESTABLISHED 
Active UNIX domain sockets (servers and established)
Proto RefCnt Flags       Type       State         I-Node Path
netns1:~ # 

Conclusion

It is pretty easy to connect network namespaces with veth devices. The interfaces can be assigned to different network namespaces by using a variant of the “ip” command. The target network namespaces can be identified by PIDs of their basic processes. We can link to namespaces directly via the interfaces of one veth device.

An alternative is to use a Linux bridge (for Layer 2 transport) in yet another namespace. The third namespace provides better isolation; the bridge is out of the view and control of the other namespaces.

We have seen that the commands “ip a s” and “bridge link” are useful to get information about the association of bridges and their assigned interfaces/ports in network namespaces.

In the coming article
Fun with veth-devices, Linux bridges and VLANs in unnamed Linux network namespaces – IV
we extend our efforts to creating VLANs with the help of our Linux bridge. Stay tuned ….

Fun with veth devices, Linux virtual bridges, KVM, VMware – attach the host and connect bridges via veth

Typically, virtual “veth” Ethernet devices are used for connecting virtual containers (as LXC) to virtual bridges like an OpenVswitch. But, due to their pair nature, veth” devices promise flexibility also in other, much simpler contexts of virtual network construction. Therefore, the objective of this article is to experiment a bit with “veth” devices as tools to attach the virtualization host itself or other (virtual) devices like a secondary Linux bridge or a VMware bridge to a standard Linux bridge – and thus enable communication with and between virtualized guest systems.

Motivation

I got interested in “veth”-devices when trying to gain flexibility for quickly rebuilding and rearranging different virtual network configurations in a pen-testing lab on Linux laptops. For example:

  • Sometimes you strongly wish to avoid giving a Linux bridge itself an IP. Assigning an IP to a Linux bridge normally enables host communication with KVM guests attached to the bridge. However, during attack simulations across the bridge the host gets very exposed. In my opinion the host can better and more efficiently be protected by packet filters if it communicates with the bridge guests over a special “veth” interface pair which is attached to the bridge. In other test or simulation scenarios one may rather wish to connect the host like an external physical system to the bridge – i.e. via a kind of uplink port.
  • There are scenarios for which you would like to couple two bridges, each with virtual guests, to each other – and make all guests communicate with each other and the host. Or establish communication from a guest of one Linux bridge to VMware guests of a VMware bridge attached to yet another Linux bridge. In all these situations all guests and the host itself may reside in the same logical IP network segment, but in segregated parts. In the physical reality admins may have used such a segregation for improving performance and avoiding an overload of switches.
  • In addition one can solve some problems with “veth” pairs which otherwise would get complicated. One example is avoiding the assignment of an IP address to a special enslaved ethernet device representing the bridge for the Linux system. Both libvirt’s virt-manager and VMware WS’s “network editor” automatically perform such an IP assignment when creating virtual host-only-networks. We shall come back to this point below.

As a preparation let us first briefly compare “veth” with “tap” devices and summarize some basic aspects of Linux bridges – all according to my yet limited understanding. Afterwards, we shall realize a simple network scenario as for training purposes.

vtap vs veth

A virtual “tap” device is a single point to point device which can be used by a program in user-space or a virtual machine to send Ethernet packets on layer 2 directly to the kernel or receive packets from it. A file descriptor (fd) is read/written during such a transmission. KVM/qemu virtualization uses “tap” devices to equip virtualized guest system with a virtual and configurable ethernet interface – which then interacts with the fd. A tap device can on the other side be attached to a virtual Linux bridge; the kernel handles the packet transfer as if it occurred over a virtual bridge port.

“veth” devices are instead created as pairs of connected virtual Ethernet interfaces. These 2 devices can be imagined as being connected by a network cable; each veth-device of a pair can be attached to different virtual entities as OpenVswitch bridges, LXC containers or Linux standard bridges. veth pairs are ideal to connect virtual devices to each other.

While not supporting veth directly, a KVM guest can bridge a veth device via
macVtap/macVlan (see https://seravo.fi/2012/virtualized-bridged-networking-with-macvtap.

In addition, VMware’s virtual networks can be bridged to a veth device – as we shall show below.

Aspects and properties of Linux bridges

Several basic aspects and limitations of standard Linux bridges are noteworthy:

  • A “tap” device attached to one Linux bridge cannot be attached to another Linux bridge.
  • All attached devices are switched into the promiscuous mode.
  • The bridge itself (not a tap device at a port!) can get an IP address and may work as a standard Ethernet device. The host can communicate via this address with other guests attached to the bridge.
  • You may attach several physical Ethernet devices (without IP !) of the host to a bridge – each as a kind of “uplink” to other physical switches/hubs and connected systems. With the spanning tree protocol activated all physical systems attached to the network behind each physical interface may communicate with physical or virtual guests linked to the bridge by other physical interfaces or virtual ports.
  • Properly configured the bridge transfers packets directly between two specific bridge ports related to the communication stream of 2 attached guests – without exposing the communication to other ports and other guests. The bridge may learn and update the relevant association of MAC addresses to bridge ports.
  • The virtual bridge device itself – in its role as an Ethernet device – does not work in promiscuous mode. However, packets arriving through one of its ports for (yet) unknown addresses may be flooded to all ports.
  • You cannot bridge a Linux bridge directly by or with another Linux bridge (no Linux bridge cascading). You can neither connect a Linux bride to another Linux bridge via a “tap” device.

In combination with VMware (on a Linux host) some additional aspects are interesting:

  • A virtual Linux bridge in its role as an Ethernet device can be bridged by non-native Linux bridges – e.g. by VMware bridges – and thereby be switched into promiscuous mode. The VMware (master) bridge then uses a Linux bridge as an attached (slave) device. This type of bridge cascading may have security impacts: packets arriving via a physical port at the Linux bridge and being destined to VMware guests connected to their VMware master bridge may become visible at the Linux bridge ports. See:
    VMware WS – bridging of Linux bridges and security implications
  • The “vmnet”-Ethernet device related to a VMware bridge on a Linux host can be attached (without an IP-address) to a Linux bridge thus enabling communication between VMware guests attached to a VMware bridge and KVM guests connected to the Linux bridge. However, as this is an uplink like situation we must get rid of any IP address assigned to the “vmnet”-Ethernet device.
  • A test scenario

    I want to realize the following test scenario with the help of veth-pairs:

    Our virtual network shall contain two coupled Linux bridges, each with a KVM guest. The host “mytux” shall be attached via a regular bridge port to only one of the bridges. In addition we want to connect a VMware bridge to one of the Linux bridges. All KVM/VMware guests shall belong to the same logical layer 3 network segment and be able to communicate with each other and the host (plus external systems via routing).

    veth6

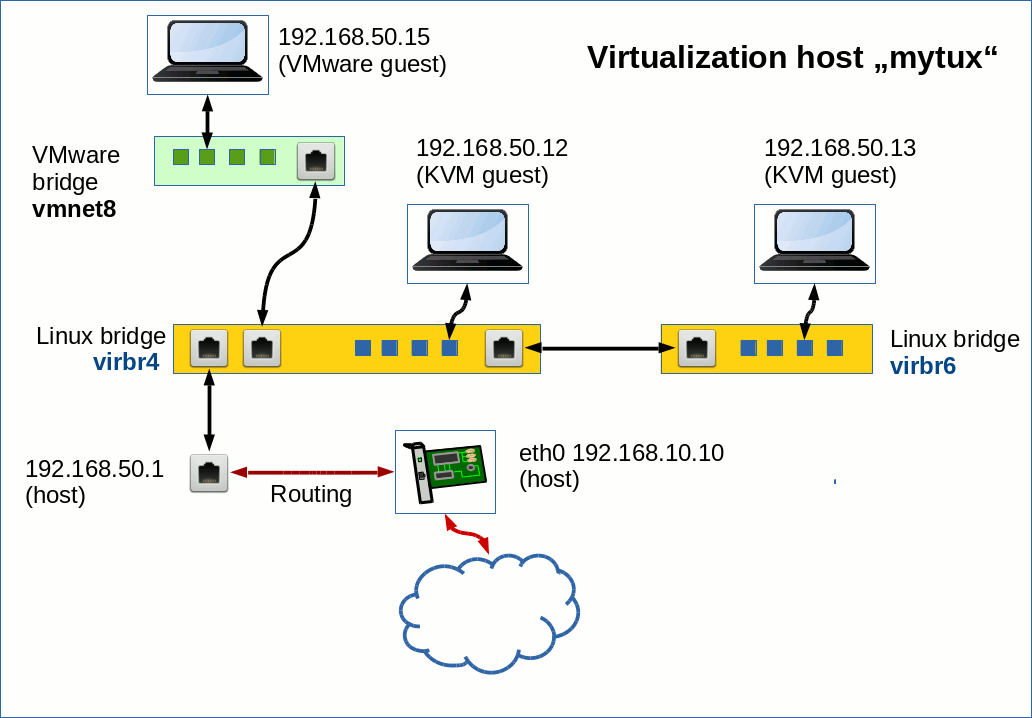
    The RJ45 like connectors in the picture above represent veth-devices – which occur in pairs. The blue small rectangles on the Linux bridges instead represent ports associated with virtual tap-devices. I admit: This scenario of a virtual network inside a host is a bit academic. But it allows us to test what is possible with “veth”-pairs.

    Building the bridges

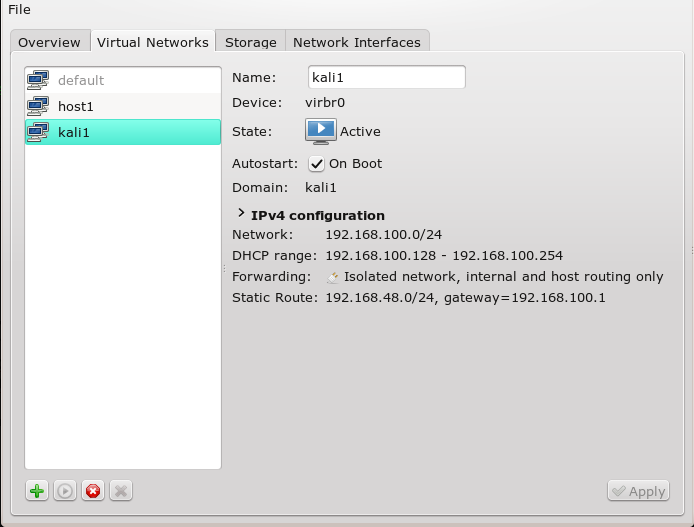
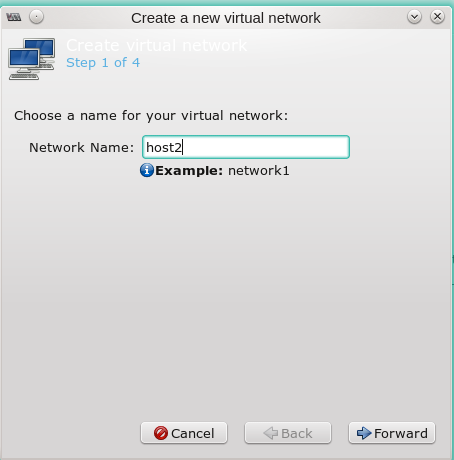
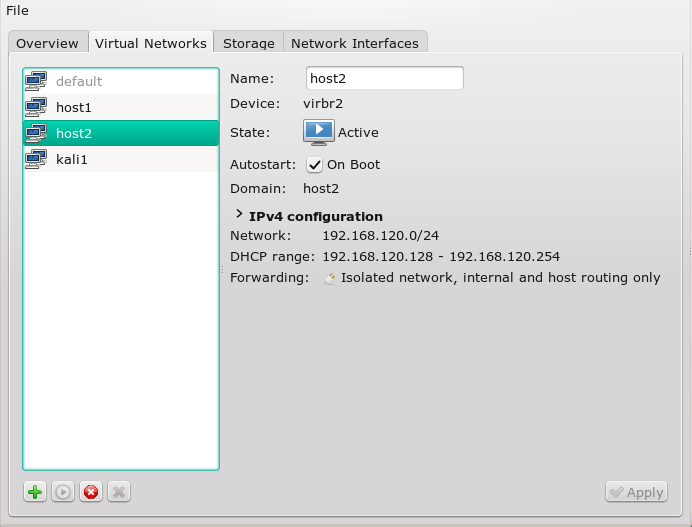
    On our Linux host we use virt-manager’s “connection details >> virtual networks” to define 2 virtual host only networks with bridges “virbr4” and “virbr6”.

    veth7

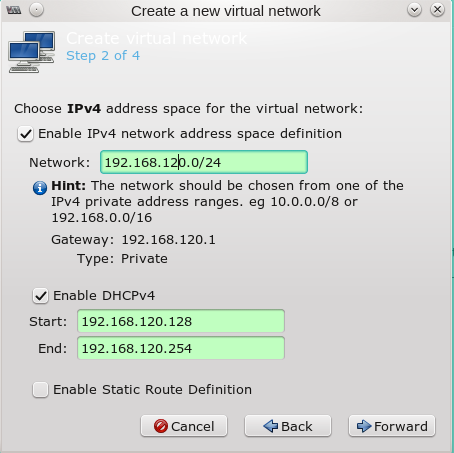
    Note: We do not allow for bridge specific “dhcp-services” and do not assign network addresses. We shall later configure addresses of the guests manually; you will find some remarks on a specific, network wide DHCP service at the end of the article.

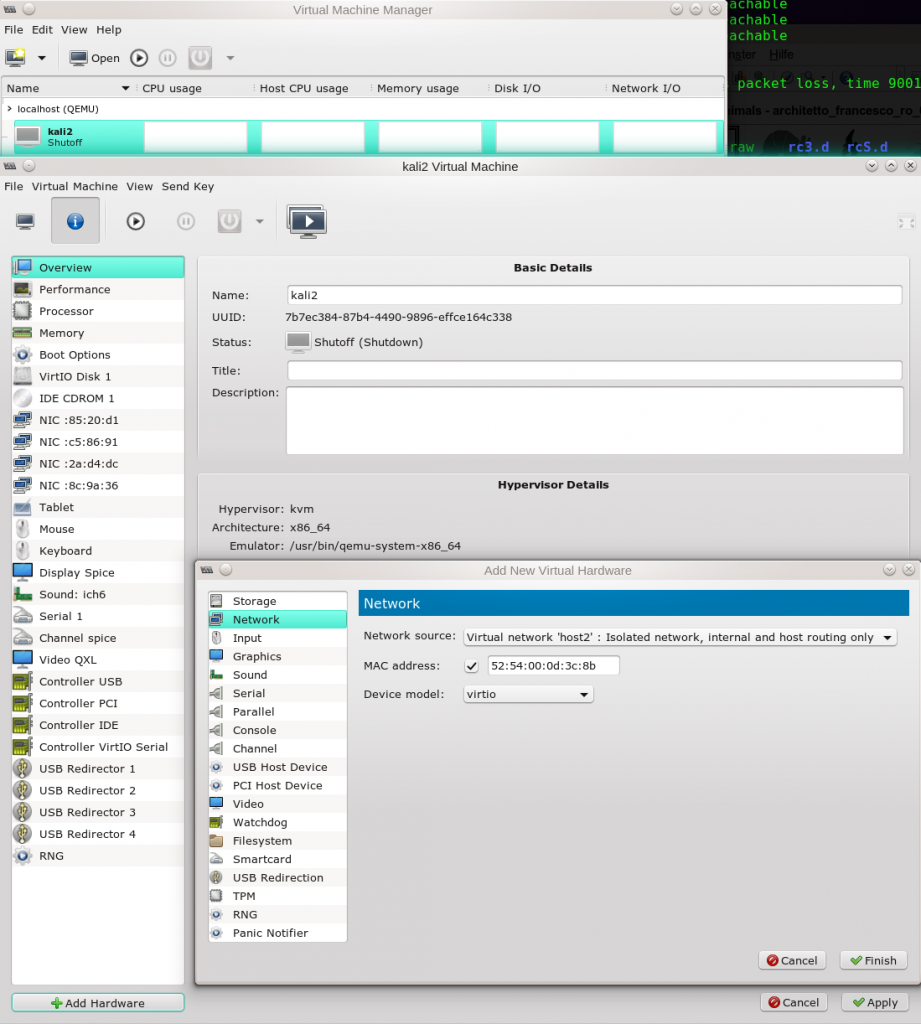
    Then we implement and configure 2 KVM Linux guests (here Kali systems) – one with an Ethernet interface attached to “vibr4”; the other guest will be connected to “virbr6”. The next picture shows the network settings for guest “kali3” which gets attached to “virbr6”.

    veth8

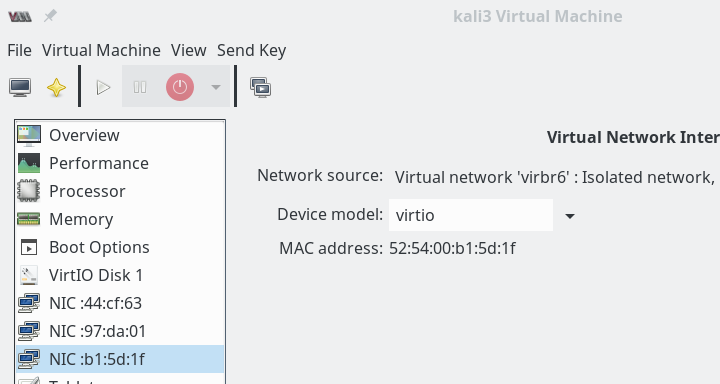
    We activate the networks and boot our guests. Then on the guests (activate the right interface and deactivate other interfaces, if necessary) we need to set IP-addresses: The interfaces on kali2, kali3 must be configured manually – as we had not activated DHCP. kali2 gets the address “192.168.50.12”, kali3 the address “192.168.50.13”.

    veth9

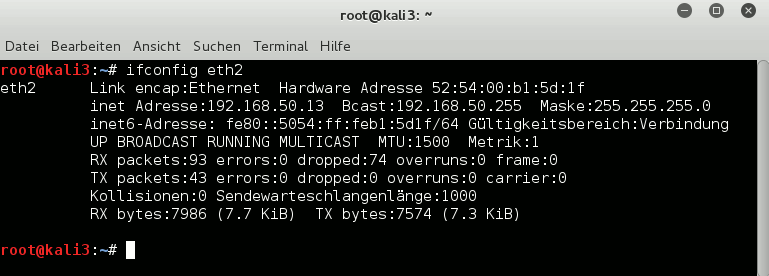
    If we had defined several tap interfaces on our guest system kali3 we may have got a problem to identify the right interface associated with bridge. It can however be identified by its MAC and a comparison to the MACs of “vnet” devices in the output of the commands “ip link show” and “brctl show virbr6”.

    Now let us look what information we get about the bridges on the host :

    mytux:~ # brctl show virbr4
    bridge name     bridge id               STP enabled     interfaces
    virbr4          8000.5254007e553d       yes             virbr4-nic
                                                            vnet6
    mytux:~ # ifconfig virbr4 
    virbr4    Link encap:Ethernet  HWaddr 52:54:00:7E:55:3D  
              UP BROADCAST RUNNING MULTICAST  MTU:1500  Metric:1
    mytux:~ # ifconfig vnet6
    vnet6     Link encap:Ethernet  HWaddr FE:54:00:F2:A4:8D  
              inet6 addr: fe80::fc54:ff:fef2:a48d/64 Scope:Link
    ....
    mytux:~ # brctl show virbr6
    bridge name     bridge id               STP enabled     interfaces
    virbr6          8000.525400c0b06f       yes             virbr6-nic
                                                            vnet2
    mytux:~ # ip addr show virbr6 
    22: virbr6: <BROADCAST,MULTICAST,UP,LOWER_UP> mtu 1500 qdisc noqueue state UP group default 
        link/ether 52:54:00:c0:b0:6f brd ff:ff:ff:ff:ff:ff
    mytux:~ # ifconfig vnet2
    vnet2     Link encap:Ethernet  HWaddr FE:54:00:B1:5D:1F  
              inet6 addr: fe80::fc54:ff:feb1:5d1f/64 Scope:Link
    .....
    mytux:~ # 


    Note that we do not see any IPv4-information on the “tap” devices vnet5 and vnet2 here. But note, too, that no IP-address has been assigned by the host to the bridges themselves.

    Ok, we have bridges virbr4 with guest “kali2” and a separate bridge virbr6 with KVM guest “kali3”. The host has no
    role in this game, yet. We are going to change this in the next step.

    Note that virt-manager automatically started the bridges when we started the KVM guests. Alternatively, we could have manually set
    mytux:~ # ip link set virbr4 up
    mytux:~ # ip link set virbr6 up
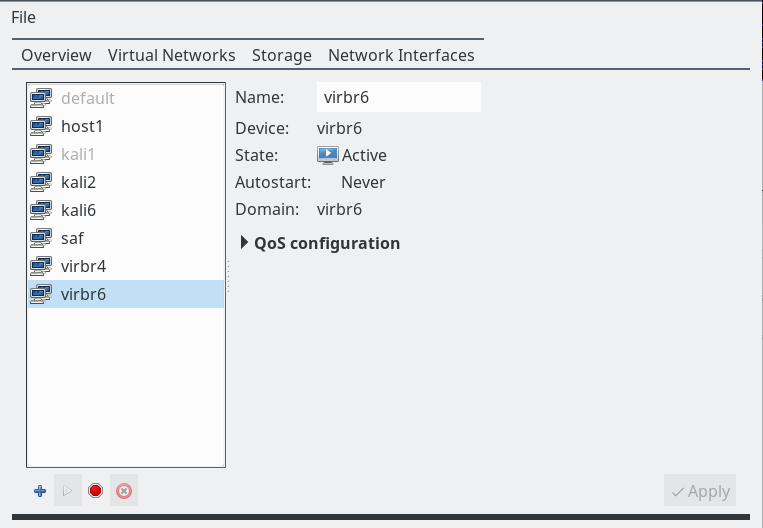
    We may also configure the bridges with “virt-manager” to be automatically started at boot time.

    Attaching the host to a bridge via veth

    According to our example we shall attach the host now by the use of a veth-pair to virbr4 . We create such a pair and connect one of its Ethernet interfaces to “virbr4”:

    mytux:~ # ip link add dev vmh1 type veth peer name vmh2       
    mytux:~ # brctl addif virbr4 vmh1
    mytux:~ # brctl show virbr4 
    bridge name     bridge id               STP enabled     interfaces
    virbr4          8000.5254007e553d       yes             virbr4-nic
                                                            vmh1
                                                            vnet6


    Now, we assign an IP address to interface vmh2 – which is not enslaved by any bridge:

    mytux:~ # ip addr add 192.168.50.1/24 broadcast 192.168.50.255 dev vmh2
    mytux:~ # ip addr show vmh2
    6: vmh2@vmh1: <BROADCAST,MULTICAST,M-DOWN> mtu 1500 qdisc noop state DOWN group default qlen 1000
        link/ether 42:79:e6:a7:fb:09 brd ff:ff:ff:ff:ff:ff
        inet 192.168.50.1/24 brd 192.168.50.255 scope global vmh2
           valid_lft forever preferred_lft forever


    We then activate vmh1 and vmh2. Next we need a route on the host to the bridge (and the guests at its ports) via vmh2 (!!) :

    mytux:~ # ip  link set vmh1 up
    mytux:~ # ip  link set vmh2 up
    mytux:~ # route add -net 192.168.50.0/24 dev vmh2
    mytux:~ # route
    Kernel IP routing table
    Destination     Gateway         Genmask         Flags Metric Ref    Use Iface
    default         ufo             0.0.0.0         UG    0      0        0 br0
    192.168.10.0    *               255.255.255.0   U     0      0        0 br0
    ...
    192.168.50.0    *               255.255.255.0   U     0      0        0 vmh2
    ...


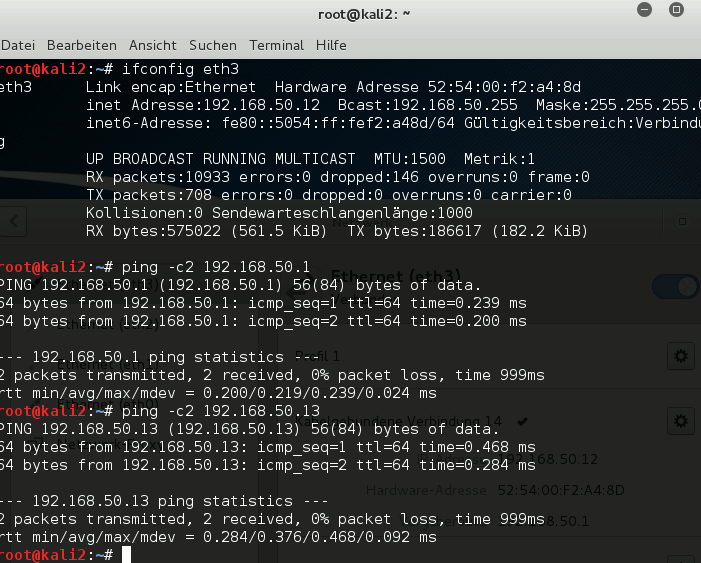
    Now we try whether we can reach guest “kali2” from the host and vice versa:

    mytux:~ # ping 192.168.50.12
    PING 192.168.50.12 (192.168.50.12) 56(84) bytes of data.
    64 bytes from 192.168.50.12: icmp_seq=1 ttl=64 time=0.291 ms
    64 bytes from 192.168.50.12: icmp_seq=2 ttl=64 time=0.316 ms
    64 bytes from 192.168.50.12: icmp_seq=3 ttl=64 time=0.322 ms
    ^C
    --- 192.168.50.12 ping statistics ---
    3 packets transmitted, 3 received, 0% packet loss, time 1999ms
    rtt min/avg/max/mdev = 0.291/0.309/0.322/0.024 ms
    
    root@kali2:~ # ping 192.168.50.1
    PING 192.168.50.1 (192.168.50.1) 56(84) bytes of data.
    64 bytes from 192.168.50.1: icmp_seq=1 ttl=64 time=0.196 ms
    64 bytes from 192.168.50.1: icmp_seq=2 ttl=64 time=0.340 ms
    64 bytes from 192.168.50.1: icmp_seq=3 ttl=64 time=0.255 ms
    ^C
    --- 192.168.50.1 ping statistics ---
    3 packets transmitted, 3 received, 0% packet loss, time 1998ms
    rtt min/avg/max/mdev = 0.196/0.263/0.340/0.062 ms


    So, we have learned that the host can easily be connected to a Linux bridge via an veth-pair – and that we do not need to assign an IP address to the bridge itself. Regarding the connection links the resulting situation is very similar to bridges where you use a physical “eth0” NIC as an uplink to external systems of a physical network.

    All in all I like this situation much better than having a bridge with an IP. During critical penetration tests we now can just plug vmh1 out of the bridge. And regarding packet-
    filters: We do not need to establish firewall-rules on the bridge itself – which has security implications if only done on level 3 – but on an “external” Ethernet device. Note also that the interface “vmh2” could directly be bridged by VMware (if you have more trust in VMware bridges) without producing guest isolation problems as described in a previous article (quoted above).

    Linking of two Linux bridges with each other

    Now, we try to create a link between our 2 Linux bridges. As Linux bridge cascading is forbidden, it is interesting to find out whether at least bridge linking is allowed. We use an additional veth-pair for this purpose:

    mytux:~ # ip link add dev vethb1 type veth peer name vethb2       
    mytux:~ # brctl addif virbr4 vethb1
    mytux:~ # brctl addif virbr4 vethb2
    mytux:~ # brctl show virbr4
    bridge name     bridge id               STP enabled     interfaces
    virbr4          8000.5254007e553d       yes             vethb1
                                                            virbr4-nic
                                                            vmh1
                                                            vnet6
    mytux:~ # brctl show virbr6
    bridge name     bridge id               STP enabled     interfaces
    virbr6          8000.2e424b32cb7d       yes             vethb2
                                                            virbr6-nic
                                                            vnet2
    
    
    mytux:~ # ip link set vethb1 up 
    mytux:~ # ip link set vethb2 up 


    Note, that the STP protocol is enabled on both bridges! (If you see something different you can manually activate STP via options of the brctl command.)

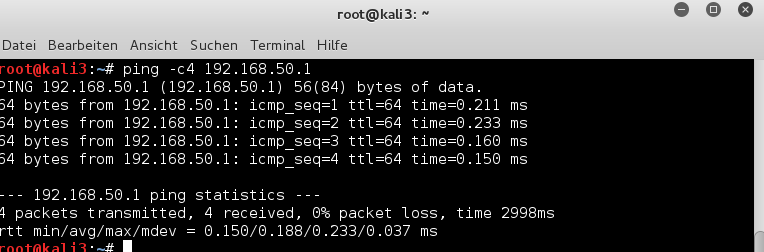
    Now, can we communicate from “kali3” at “virbr6” over the veth-pair and “virbr4” with the host?
    [Please, check the routes on all involved machines for reasonable entries first and correct if necessary; one never knows …].

    veth10
    and
    veth11

    Yes, obviously we can – and also the host can reach the virtual guest kali3.

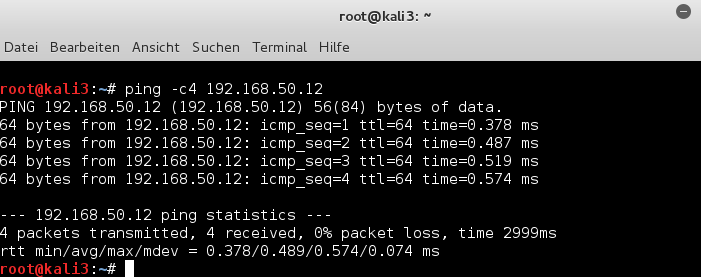
    mytux:~ # ping -c4 192.168.50.13
    PING 192.168.50.13 (192.168.50.13) 56(84) bytes of data.
    64 bytes from 192.168.50.13: icmp_seq=1 ttl=64 time=0.259 ms
    64 bytes from 192.168.50.13: icmp_seq=2 ttl=64 time=0.327 ms
    64 bytes from 192.168.50.13: icmp_seq=3 ttl=64 time=0.191 ms
    64 bytes from 192.168.50.13: icmp_seq=4 ttl=64 time=0.287 ms
    
    --- 192.168.50.13 ping statistics ---
    4 packets transmitted, 4 received, 0% packet loss, time 2998ms
    rtt min/avg/max/mdev = 0.191/0.266/0.327/0.049 ms


    and of course
    veth12

    This was just another example of how we can use veth-pairs. We can link Linux bridges together – and all guests at both bridges are able to communicate with each other and with the host. Good !

    Connecting a virtual VMware bridge to a Linux bridge via a veth-pair

    Our last experiment involves a VMware WS bridge. We could use the VMware Network Editor to define a regular “VMware Host Only Network”. However, the bridge for such a network will automatically be created with an associated, enslaved Ethernet device for and on the host. And the bridge itself would automatically get an IP address – namely 192.168.50.1. There is no way known to me to avoid this – we
    would need to manually eliminate this address afterward.

    So, we take a different road:
    We first create a pair of veth devices – and then bridge (!) one of these veth devices by VMware:

    mytux:~ # ip link add dev vmw1 type veth peer name vmw2
    mytux:~ # brctl link virbr4 vmw1   
    mytux:~ # ip link set vmw1 up
    mytux:~ # ip link set vmw2 up
    mytux:~ # /etc/init.d/vmware restart


    To create the required VMware bridge to vmw2 we use VMware’s Virtual Network Editor”:

    veth13

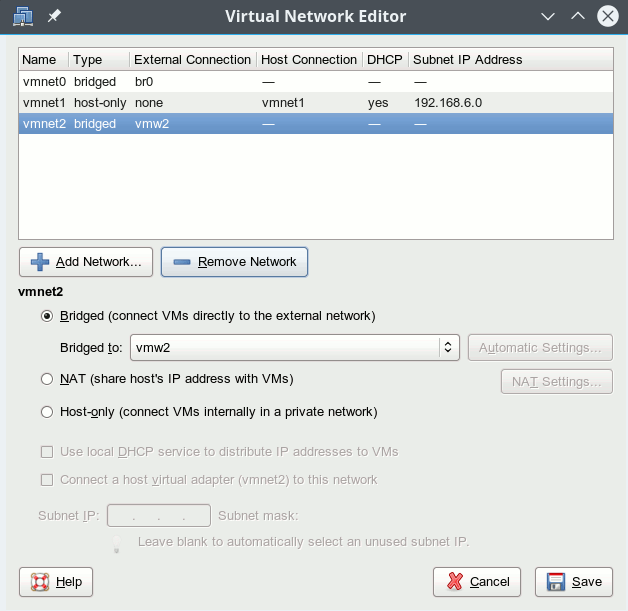
    Note that by creating a specific bridge to one of the veth devices we have avoided any automatic IP address assignment (192.168.50.1) to the Ethernet device which would normally be created by VMware together with a host only bridge. Thus we avoid any conflicts with the already performed address assignment to “vmh2” (see above).

    In our VMware guest (hier a Win system) we configure the network device – e.g. with address 192.168.50.21 – and then try our luck:

    veth14

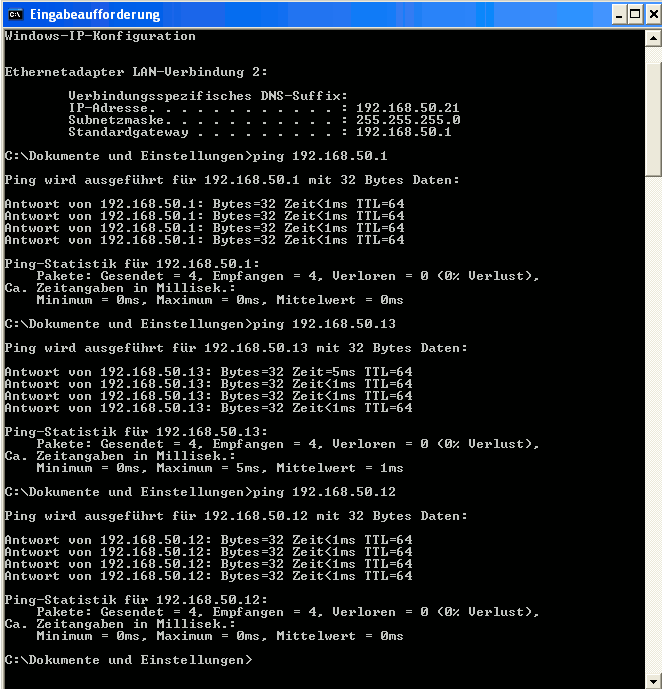
    Great! What we expected! Of course our other virtual clients and the host can also send packets to the VMware guest. I need not show this here explicitly.

    Summary

    veth-pairs are easy to create and to use. They are ideal tools to connect the host and other Linux or VMware bridges to a Linux bridge in a well defined way.

    A remark on DHCP

    Reasonable and precisely defined address assignment to the bridges and or virtual interfaces can become a problem with VMware as well as with KVM /virt-manager or virsh. Especially, when you want to avoid address assignment to the bridges themselves. Typically, when you define virtual networks in your virtualization environment a bridge is created together with an attached Ethernet interface for the host – which you may not really need. If you in addition enable DHCP functionality for the bridge/network the bridge itself (or the related device) will inevitably (!) and automatically get an address like 192.168.50.1. Furthermore related host routes are automatically set. This may lead to conflicts with what you really want to achieve.

    Therefore: If you want to work with DHCP I advise you to do this with a central DHCP service on the Linux host and not to use the DHCP services of the various virtualization environments. If you in addition want to avoid assigning IP addresses to the bridges themselves, you may need to work with DHCP pools and groups. This is beyond the scope of this article – though interesting in itself. An alternative would, of course, be to set up the whole virtual network with the help of a script, which may (with a little configuration work) be included as a unit into systemd.

    Make veth settings persistent

    Here we have a bit of a problem with Opensuse 13.2/Leap 42.1! The reason is that systemd in Leap and OS 13.2 is of version 210 and does not yet contain the service “systemd-networkd.service” – which actually would support the creation of virtual devices like “veth”-pairs during system startup. To my knowledge neither the “wicked” service used by Opensuse nor the “ifcfg-…” files allow for the definition of veth-pairs, yet. Bridge creation and address assignment to existing ethernet devices are, however, supported. So, what can we do to make things persistent?

    Of course, you can write a script that creates and configures all of your required veth-pairs. This script could be integrated in the boot process as a systemd-service to be started before the “wicked.service”. In addition you may
    configure the afterward existing Ethernet devices with “ifcfg-…”-files. Such files can also be used to guarantee an automatic setup of Linux bridges and their enslavement of defined Ethernet devices.

    Another option is – if you dare to take some risks – to fetch systemd’s version 224 from Opensuse’s Tumbleweed repository. Then you may create a directory “/etc/systemd/network” and configure the creation of veth-pairs via corresponding “….netdev”-files in the directory. E.g.:

    mytux # cat veth1.netdev 
    [NetDev]
    Name=vmh1
    Kind=veth
    [Peer]
    Name=vmh2


    I tried it – it works. However, systemd version 224 has trouble with the rearrangement of Leap’s apparmor startup. I have not looked at this in detail, yet.

    Nevertheless, have fun with veth devices in your virtual networks !