Fun with veth-devices, Linux bridges and VLANs in unnamed Linux network namespaces – VIII

In the last post of this series

Fun with veth-devices, Linux bridges and VLANs in unnamed Linux network namespaces – VII [Theoretical considerations regarding the connection of a network namespace or container to two separated VLANs]

we discussed two different approaches to connect a network namespace (or container) “netns9” to two (or more) separated VLANs. Such a network namespace could e.g. represent an administrative system (for example in form of a LXC container) for both VLANs. It has its own connection to the virtual Linux bridge which technically defines the VLANs by special port configurations. See the picture below, where we represented a VLAN1 by a member network namespace netns1 and a VLAN2 by a member netns4:

The solution on the left side is based on a bridge in an intermediate network namespace and packet tagging up into the namespace for the VLANs’ common member system netns9. The approach on the right side of the graphics uses a bridge, too, but without packet tagging along the connection to the common VLAN member system. In our analysis in the last post we assumed that we would have to compensate for this indifference by special PVID/VID settings.

The previous articles of this series already introduced general Linux commands for network namespace creation and the setup of VLANs via Linux bridge configurations. See e.g.: Fun with … – IV [Virtual VLANs for network namespaces (or containers) and rules for VLAN tagging at Linux bridge ports]. We shall use these methods in the present and a coming post to test configurations for a common member of two VLANs. We want to find out whether the theoretically derived measures regarding route definitions in netns9 and special PVID/VID-settings at the bridge work as expected. A test of packet filtering at bridge ports which we regarded as important for security is, however, postponed to later posts.

Extension of our test environment

First, we extend our previous test scenario by yet another network namespace “netns9“.

Our 2 VLANs in the test environment are graphically distinguished by “green” and “pink” tags (corresponding to different VLAN ID numbers). netns9 must be able to communicate with systems in both VLANs. netns9 shall, however, not become a packet forwarder between the VLANs; the VLANs shall remain separated despite the fact that they have a common member. We expect, that a clear separation of communication paths to the VLANs requires a distinction between network targets already inside netns9.

Bridge based solutions with packet tagging and veth sub-interfaces

There are two rather equivalent solutions for the connection of netns9 to brx in netns3; see the schematic graphics below:

Both solutions are based on veth sub-interfaces inside netns9. Thus, both VLAN connections are properly terminated in netns9. The approach depicted on the right side of the graphics uses a pure trunk port at the bridge; but also this solutions makes use of packet tagging between brx and netns9.

Note that we do not need to used tagged packets along the connections from bridge brx to netns1, netns2, netns4, netns5. The VLANs are established by the PVID/VID settings at the bridge ports and forwarding rules inside a VLAN aware bridge. Note also that our test environment contains an additional bridge bry and additional network namespaces.

We first concentrate on the solution on the left side with veth sub-interfaces at the bridge. It is easy to switch to a trunk port afterwards.

The required commands for the setup of the test environment are given below; you may scroll and copy the commands to the prompt of a terminal window for a root shell:

unshare --net --uts /bin/bash &
export pid_netns1=$!
unshare --net --uts /bin/bash &
export pid_netns2=$!
unshare --net --uts /bin/bash &
export pid_netns3=$!
unshare --net --uts /bin/bash &
export pid_netns4=$!
unshare --net --uts /bin/bash &
export pid_netns5=$!
unshare --net --uts /bin/bash &
export pid_netns6=$!
unshare --net --uts /bin/bash &
export pid_netns7=$!
unshare --net --uts /bin/bash &
export pid_netns8=$!
unshare --net --uts /bin/bash &
export pid_netns9=$!

# assign different hostnames  
nsenter -t $pid_netns1 -u hostname netns1
nsenter -t $pid_netns2 -u hostname netns2
nsenter -t $pid_netns3 -u hostname netns3
nsenter -t $pid_netns4 -u hostname netns4
nsenter -t $pid_netns5 -u hostname netns5
nsenter -t $pid_netns6 -u hostname netns6
nsenter -t $pid_netns7 -u hostname netns7
nsenter -t $pid_netns8 -u hostname netns8
nsenter -t $pid_netns9 -u hostname netns9
     
# set up veth devices in netns1 to netns4 and in netns9 with connections to netns3  
ip link add veth11 netns $pid_netns1 type veth peer name veth13 netns $pid_netns3
ip link add veth22 netns $pid_netns2 type veth peer name veth23 netns $pid_netns3
ip link add veth44 netns $pid_netns4 type veth peer name veth43 netns $pid_netns3
ip link add veth55 netns $pid_netns5 type veth peer name veth53 netns $pid_netns3
ip link add veth99 netns $pid_netns9 type veth peer name veth93 netns $pid_netns3

# set up veth devices in netns6 and netns7 with connection to netns8   
ip link add veth66 netns $pid_netns6 type veth peer name veth68 netns $pid_netns8
ip link add veth77 netns $pid_netns7 type veth peer name veth78 netns $pid_netns8

# Assign IP addresses and set the devices up 
nsenter -t $pid_netns1 -u -n /bin/bash
ip addr add 192.168.5.1/24 brd 192.168.5.255 dev veth11
ip link set veth11 up
ip link set lo up
exit
nsenter -t $pid_netns2 -u -n /bin/bash
ip addr add 192.168.5.2/24 brd 192.168.5.255 dev veth22
ip link set veth22 up
ip link set lo up
exit
nsenter -t $pid_netns4 -u -n /bin/bash
ip addr add 192.168.5.4/24 brd 192.168.5.255 dev veth44
ip link set veth44 up
ip link set lo up
exit
nsenter -t $pid_netns5 -u -n /bin/bash
ip addr add 192.168.5.5/24 brd 192.168.5.255 dev veth55
ip link set veth55 up
ip link set lo up
exit
nsenter -t $pid_netns6 -u -n /bin/bash
ip addr add 192.168.5.6/24 brd 192.168.5.255 dev veth66
ip link set veth66 up
ip link set lo up
exit
nsenter -t $pid_netns7 -u -n /bin/bash
ip addr add 192.168.5.7/24 brd 192.168.5.255 dev veth77
ip link set veth77 up
ip link set lo up
exit
nsenter -t $pid_netns9 -u -n /bin/bash
ip addr add 192.
168.5.9/24 brd 192.168.5.255 dev veth99
ip link set veth99 up
ip link set lo up
exit

# set up bridge brx and its ports 
nsenter -t $pid_netns3 -u -n /bin/bash
brctl addbr brx  
ip link set brx up
ip link set veth13 up
ip link set veth23 up
ip link set veth43 up
ip link set veth53 up
brctl addif brx veth13
brctl addif brx veth23
brctl addif brx veth43
brctl addif brx veth53
exit

# set up bridge bry and its ports 
nsenter -t $pid_netns8 -u -n /bin/bash
brctl addbr bry  
ip link set bry up
ip link set veth68 up
ip link set veth78 up
brctl addif bry veth68
brctl addif bry veth78
exit

# set up 2 VLANs on each bridge 
nsenter -t $pid_netns3 -u -n /bin/bash
ip link set dev brx type bridge vlan_filtering 1
bridge vlan add vid 10 pvid untagged dev veth13
bridge vlan add vid 10 pvid untagged dev veth23
bridge vlan add vid 20 pvid untagged dev veth43
bridge vlan add vid 20 pvid untagged dev veth53
bridge vlan del vid 1 dev brx self
bridge vlan del vid 1 dev veth13
bridge vlan del vid 1 dev veth23
bridge vlan del vid 1 dev veth43
bridge vlan del vid 1 dev veth53
bridge vlan show
exit
nsenter -t $pid_netns8 -u -n /bin/bash
ip link set dev bry type bridge vlan_filtering 1
bridge vlan add vid 10 pvid untagged dev veth68
bridge vlan add vid 20 pvid untagged dev veth78
bridge vlan del vid 1 dev bry self
bridge vlan del vid 1 dev veth68
bridge vlan del vid 1 dev veth78
bridge vlan show
exit

# Create a veth device to connect the two bridges 
ip link add vethx netns $pid_netns3 type veth peer name vethy netns $pid_netns8
nsenter -t $pid_netns3 -u -n /bin/bash
ip link add link vethx name vethx.50 type vlan id 50
ip link add link vethx name vethx.60 type vlan id 60
brctl addif brx vethx.50
brctl addif brx vethx.60
ip link set vethx up
ip link set vethx.50 up
ip link set vethx.60 up
bridge vlan add vid 10 pvid untagged dev vethx.50
bridge vlan add vid 20 pvid untagged dev vethx.60
bridge vlan del vid 1 dev vethx.50
bridge vlan del vid 1 dev vethx.60
bridge vlan show
exit

nsenter -t $pid_netns8 -u -n /bin/bash
ip link add link vethy name vethy.50 type vlan id 50
ip link add link vethy name vethy.60 type vlan id 60
brctl addif bry vethy.50
brctl addif bry vethy.60
ip link set vethy up
ip link set vethy.50 up
ip link set vethy.60 up
bridge vlan add vid 10 pvid untagged dev vethy.50
bridge vlan add vid 20 pvid untagged dev vethy.60
bridge vlan del vid 1 dev vethy.50
bridge vlan del vid 1 dev vethy.60
bridge vlan show
exit

# Add subinterfaces in netns9
nsenter -t $pid_netns9 -u -n /bin/bash
ip link add link veth99 name veth99.10 type vlan id 10
ip link add link veth99 name veth99.20 type vlan id 20
ip link set veth99 up
ip link set veth99.10 up
ip link set veth99.20 up
exit

# Add subinterfaces in netns3
nsenter -t $pid_netns3 -u -n /bin/bash
ip link add link veth93 name veth93.10 type vlan id 10
ip link add link veth93 name veth93.20 type vlan id 20
ip link set veth93 up
ip link set veth93.10 up
ip link set veth93.20 up
brctl addif brx veth93.10
brctl addif brx veth93.20
bridge vlan add vid 10 pvid untagged dev veth93.10
bridge vlan add vid 20 pvid untagged dev veth93.20
bridge vlan del vid 1 dev veth93.10
bridge vlan del vid 1 dev veth93.20
exit

We just have to extend the command list of the experiment conducted already in the second to last post by some more lines which account for the setup of netns9 and its connection to the bridge “brx” in netns3.

Now, we open a separate terminal, which inherits the defined environment variables (e.g. on KDE by “konsole &>/dev/null &”), and try a ping from netns9 to netns7:

mytux:~ # nsenter -t $pid_netns9 
-u -n /bin/bash
netns9:~ # ping 192.168.5.1
PING 192.168.5.1 (192.168.5.1) 56(84) bytes of data.
^C
--- 192.168.5.1 ping statistics ---
2 packets transmitted, 0 received, 100% packet loss, time 1008ms

netns9:~ # ping 192.168.5.7
PING 192.168.5.7 (192.168.5.7) 56(84) bytes of data.
^C
--- 192.168.5.7 ping statistics ---
2 packets transmitted, 0 received, 100% packet loss, time 1006ms

netns9:~ # 

Obviously, the pings failed! The reason is that we forgot to set routes in netns9! Such routes are, however, vital for the transport of e.g. ICMP answering and request packets from netns9 to members of the two VLANs. See the last post for details. We add the rules for the required routes:

#Set routes in netns9 
nsenter -t $pid_netns9 -u -n /bin/bash
route add 192.168.5.1 veth99.10                                                     
route add 192.168.5.2 veth99.10                                                    
route add 192.168.5.4 veth99.20
route add 192.168.5.5 veth99.20                                                    
route add 192.168.5.6 veth99.10
route add 192.168.5.7 veth99.20
exit

By these routes we, obviously, distinguish different paths: Packets heading for e.g. netns1 and netns2 go through a different interface than packets sent e.g. to netns4 and netns5. Now, again, in our second terminal window:

mytux:~ # nsenter -t $pid_netns9 -u -n /bin/bash 
netns9:~ # ping 192.168.5.1 -c2
PING 192.168.5.1 (192.168.5.1) 56(84) bytes of data.
64 bytes from 192.168.5.1: icmp_seq=1 ttl=64 time=0.067 ms
64 bytes from 192.168.5.1: icmp_seq=2 ttl=64 time=0.083 ms

--- 192.168.5.1 ping statistics ---
2 packets transmitted, 2 received, 0% packet loss, time 999ms
rtt min/avg/max/mdev = 0.067/0.075/0.083/0.008 ms
netns9:~ # ping 192.168.5.7 -c2
PING 192.168.5.7 (192.168.5.7) 56(84) bytes of data.
64 bytes from 192.168.5.7: icmp_seq=1 ttl=64 time=0.079 ms
64 bytes from 192.168.5.7: icmp_seq=2 ttl=64 time=0.078 ms

--- 192.168.5.7 ping statistics ---
2 packets transmitted, 2 received, 0% packet loss, time 999ms
rtt min/avg/max/mdev = 0.078/0.078/0.079/0.008 ms
netns9:~ # ping 192.168.5.4 -c2
PING 192.168.5.4 (192.168.5.4) 56(84) bytes of data.
64 bytes from 192.168.5.4: icmp_seq=1 ttl=64 time=0.151 ms
64 bytes from 192.168.5.4: icmp_seq=2 ttl=64 time=0.076 ms

--- 192.168.5.4 ping statistics ---
2 packets transmitted, 2 received, 0% packet loss, time 999ms
rtt min/avg/max/mdev = 0.076/0.113/0.151/0.038 ms

Thus, we have confirmed our conclusion from the last article that we need route definitions in a common member of two VLANs if and when we terminate tagged connection lines by veth sub-interfaces inside such a network namespace or container.

But are our VLANs still isolated from each other?
We open another terminal and try pinging from netns1 to netns4, netns7 and netns2:

mytux:~ # nsenter -t $pid_netns1 -u -n /bin/bash
netns1:~ # ping 192.168.5.4
PING 192.168.5.4 (192.168.5.4) 56(84) bytes of data.
^C
--- 192.168.5.4 ping statistics ---
3 packets transmitted, 0 received, 100% packet loss, time 2015ms

netns1:~ # ping 192.168.5.7
PING 192.168.5.7 (192.168.5.7) 56(84) bytes of data.
^C
--- 192.168.5.7 ping statistics ---
2 packets transmitted, 0 received, 100% packet loss, time 1007ms

netns1:~ # ping 192.168.5.2
PING 192.168.5.2 (192.168.5.2) 56(84) bytes of data.
64 bytes from 192.168.5.2: icmp_seq=1 ttl=64 time=0.195 ms
64 bytes from 192.168.5.2: icmp_seq=2 ttl=64 time=0.102 ms
^C
--- 192.168.5.
2 ping statistics ---
2 packets transmitted, 2 received, 0% packet loss, time 999ms
rtt min/avg/max/mdev = 0.102/0.148/0.195/0.048 ms
netns1:~ # 

And in reverse direction :

mytux:~ # nsenter -t $pid_netns5 -u -n /bin/bash                                               
netns5:~ # ping 192.168.5.4
PING 192.168.5.4 (192.168.5.4) 56(84) bytes of data.                                           
64 bytes from 192.168.5.4: icmp_seq=1 ttl=64 time=0.209 ms                                     
64 bytes from 192.168.5.4: icmp_seq=2 ttl=64 time=0.071 ms                                     
^C                                                                                             
--- 192.168.5.4 ping statistics ---                                                            
2 packets transmitted, 2 received, 0% packet loss, time 999ms                                  
rtt min/avg/max/mdev = 0.071/0.140/0.209/0.069 ms                                              
netns5:~ # ping 192.168.5.1
PING 192.168.5.1 (192.168.5.1) 56(84) bytes of data.                                           
^C                                                                                             
--- 192.168.5.1 ping statistics ---
2 packets transmitted, 0 received, 100% packet loss, time 1008ms

netns5:~ # 

Good! As expected!

Forwarding between two VLANs?

We have stressed in the last post that setting routes should clearly be distinguished from “forwarding” if we want to keep our VLANs separated:

We have NOT enabled forwarding in netns9. If we had done so we would have lost the separation of the VLANs and opened a direct communication line between the VLANs.

Let us – just for fun – test the effect of forwarding in netns9:

netns9:~ # echo 1 > /proc/sys/net/ipv4/conf/all/forwarding
netns9:~ # 

But still:

netns5:~ # ping 192.168.5.1
PING 192.168.5.1 (192.168.5.1) 56(84) bytes of data.
^C
--- 192.168.5.1 ping statistics ---
3 packets transmitted, 0 received, 100% packet loss, time 1999ms

Enabling forwarding in netns9 alone is obviously not enough to enable a packet flow in both directions! A little thinking , however, shows:

If we e.g. want ARP resolution and pinging from netns5 to netns1 to work via netns9 we must establish further routes both in netns1 and netns5. Reason: Both network namespaces must be informed that netns9 now works as a gateway for both request and answering packets:

netns1:~ # route add 192.168.5.5 gw 192.168.5.9
netns5:~ # route add 192.168.5.1 gw 192.168.5.9

Eventually:

netns5:~ # ping 192.168.5.1
PING 192.168.5.1 (192.168.5.1) 56(84) bytes of data.
64 bytes from 192.168.5.1: icmp_seq=1 ttl=63 time=0.186 ms
64 bytes from 192.168.5.1: icmp_seq=2 ttl=63 time=0.134 ms
^C
--- 192.168.5.1 ping statistics ---
2 packets transmitted, 2 received, 0% packet loss, time 999ms
rtt min/avg/max/mdev = 0.134/0.160/0.186/0.026 ms
netns5:~ # 

So, yes, forwarding outside the bridge builds a connection between otherwise separated VLANs. In connection with a packet filter this could be used to allow some hosts of a VLAN1 to reach e.g. some servers in a VLAN2. But this is not the topic of this post. So, do not forget to disable the forwarding in netns9 again for further experiments:

netns9:~ # echo 0 > /proc/sys/net/ipv4/conf/all/forwarding
netns9:~ # 

Bridge based solutions with packet tagging and a trunk port at the Linux bridge

The following commands replace the sub-interface ports veth93.10 and veth93.20 at the bridge by a single trunk port:

# Change veth93 to trunk like interface in brx 
nsenter -t $pid_netns3 -u -n /bin/bash
brctl delif brx veth93.10
brctl delif brx veth93.20
ip link del dev veth93.10
ip link del dev veth93.20
brctl addif brx veth93
bridge vlan add vid 10 tagged dev veth93
bridge vlan add vid 20 tagged dev veth93
bridge vlan del vid 1 dev veth93
bridge vlan show
exit 

Such a solution works equally well:

netns9:~ # ping 192.168.5.4 -c2
PING 192.168.5.4 (192.168.5.4) 56(84) bytes of data.
64 bytes from 192.168.5.4: icmp_seq=1 ttl=64 time=0.145 ms
64 bytes from 192.168.5.4: icmp_seq=2 ttl=64 time=0.094 ms

--- 192.168.5.4 ping statistics ---
2 packets transmitted, 2 received, 0% packet loss, time 999ms
rtt min/avg/max/mdev = 0.094/0.119/0.145/0.027 ms
netns9:~ # ping 192.168.5.6 -c2
PING 192.168.5.6 (192.168.5.6) 56(84) bytes of data.
64 bytes from 192.168.5.6: icmp_seq=1 ttl=64 time=0.177 ms
64 bytes from 192.168.5.6: icmp_seq=2 ttl=64 time=0.084 ms

--- 192.168.5.6 ping statistics ---
2 packets transmitted, 2 received, 0% packet loss, time 999ms
rtt min/avg/max/mdev = 0.084/0.130/0.177/0.047 ms
netns9:~ # 

Summary and outlook

It is easy to make a network namespace or container a common member of two separate VLANs realized by a Linux bridge. You have to terminate virtual veth connections, which transport tagged packets from both VLANs, properly inside the common target namespace by sub-interfaces. As long as we do not enable forwarding in the common namespace the VLANs remain separated. But routes need to be defined to direct packets from the common member to the right VLAN.

In the next post we look at commands to realize a connection of bridge based VLANs to a common network namespace with untagged packets. Such solutions are interesting for connecting multiple virtual VLANs to routers to external networks.


Fun with veth-devices, Linux bridges and VLANs in unnamed Linux network namespaces – VI

I continue my excursion into virtual networking based on network namespaces, veth devices, Linux bridges and virtual VLANs.

  1. Fun with veth-devices, Linux bridges and VLANs in unnamed Linux network namespaces – I
    [Commands to create and enter (unnamed) network namespaces via shell processes]
  2. Fun with …. – II [Suggested experiments for virtual networking between network namespaces/containers]
  3. Fun with … – III[Connecting network namespaces (or containers) by veth devices and virtual Linux bridges]
  4. Fun with … – IV[Virtual VLANs for network namespaces (or containers) and VLAN tagging at Linux bridge ports based on veth (sub-) interfaces]
  5. Fun with … – V[Creation of two virtual VLANs for 2 groups of network namespaces/containers by a Linux bridge]

Although we worked with Linux network namespaces only, the basic setups, commands and rules discussed so far are applicable for the network connection of (LXC) containers, too. Reason: Each container establishes (at least) its own network namespace – and the latter is where the container’s network devices operate. So, at its core a test of virtual networking between the containers means a test of networking between different network namespaces with appropriate (virtual) devices. We do not always require full fledged containers; often the creation of network namespaces with proper virtual Ethernet devices is sufficient to check the functionality of a virtual network and e.g. packet filter rules for its devices.

Virtual network connectivity (of containers) typically depends on veth devices and virtual bridges/switches. In this post we look at virtual VLANs spanning 2 bridges.

Our achievements so far

We know already the Linux commands required to create and enter simple (unnamed) network namespaces and give them individual hostnames. We connected these namespaces directly with veth devices and with the help of a virtual Linux bridge. But namespaces/containers can also be arranged in groups participating in a separate isolated network environment – a VLAN. We saw that the core setup of virtual VLANs can be achieved just by configuring virtual Linux bridges appropriately: We define one or multiple VLANs by assigning VIDs/PVIDs to Linux bridge ports. The VLAN is established inside the bridge by controlling packet transport between ports. Packet tagging outside a bridge is not required for the creation of simple coexisting VLANs.

However, the rules governing the corresponding packet tagging at bridge ports depend on the port type: We, therefore, listed up rules both for veth sub-interfaces and trunk interfaces attached to bridges – and, of course, for incoming and outgoing packets. The tagging rules discussed in post IV allow for different setups of more complex VLANs – sometimes there are several solutions with different advantages and disadvantages.

Our first example in the last post were two virtual VLANs defined by a Linux bridge. Can we extend this simple scenario such that the VLANs span several hosts and/or several bridges on the same host? Putting containers (and their network namespaces) into separate VLANs which integrate several hosts is no academic exercise: Even in small environments we may find situations, where containers have to be placed on different hosts with independent HW resources.

Simulating the connection of two hosts

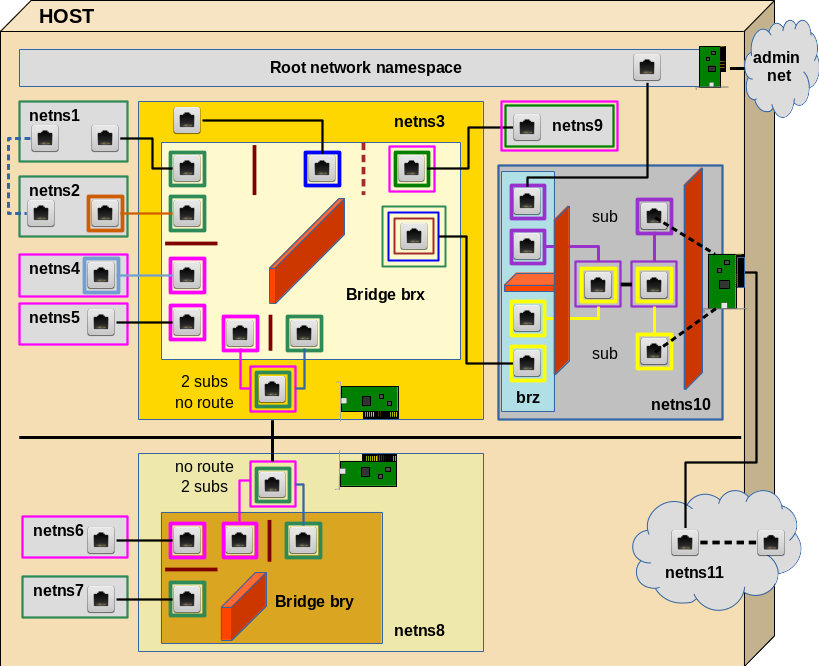
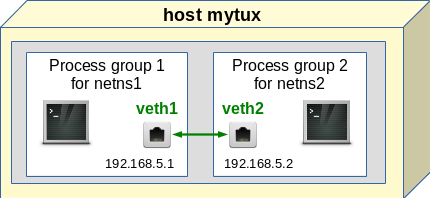
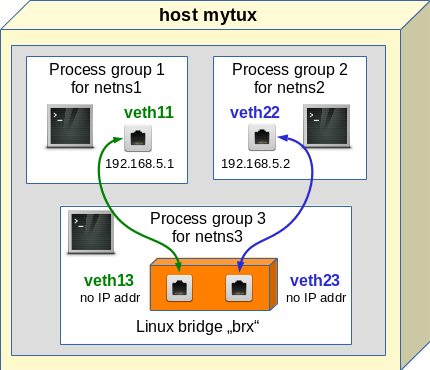
In reality two hosts, each with its own Linux bridge for network namespaces (or containers), would be connected by real Ethernet cards, possibly with sub-interfaces, and a cable. Each Ethernet card (or their sub-interfaces) would be attached to the local bridge of each host. Veths give us the functionality of 2 Ethernet devices connected by a cable. In addition, one can split each veth interfaces into sub-interfaces (see the last post!). So we can simulate all kinds of host connections by bride connections on one and the same host. In our growing virtual test environment (see article 2) we construct the area encircled with the blue dotted line:

Different setups for the connection of two bridges

Actually, there are two different ways how to connect two virtual bridges: We can attach VLAN sensitive sub-interfaces of Ethernet devices to the bridges OR we can use the standard interfaces and build “trunk ports“.

Both variants work – the tagging of the Ethernet packets, however, occurs differently. The different ways of tagging become important in coming experiments with hosts belonging to 2 VLANs. (The differences, of course, also affect packet filter rules for the ports.) So, its instructive to cover both solutions.

Experiment 5.1 – Two virtual VLANs spanning two Linux bridges connected by (veth) Ethernet devices with sub-interfaces

We study the solution based on veth sub-interfaces first. Both virtual bridges shall establish two VLANs: “VLAN 1” (green) and “VLAN 2” (pink). Members of the green VLAN shall be able to communicate with each other, but not with members of the pink VLAN. And vice versa.

To enable such a solution our veth cable must transport packets tagged differently – namely according to their VLAN origin/destination. The following graphics displays the scenario in more detail:

PVID assignments to ports are indicated by dotted squares, VID assignments by squares with a solid border. Packets are symbolized by diamonds. The border color of the diamonds correspond to the tag color (VLAN ID).

Note that we also indicated some results of our tests of “experiment 4” in the last post:

At Linux bridge ports, which are based on sub-interfaces and which got a PVID assigned, any outside packet tags are irrelevant for the tagging inside the bridge. Inside the bridge a packet gets a tag according to the PVID of the port through which the packet enters the bridge!

If we accept this rule then we should be able to assign tags (VLAN IDs) to packets moving through the veth cable different from the tags used inside the bridges. Actually, we should even be able to use altogether different VIDs/PVIDs inside the second bridge, too, as long as we separate the namespace groups correctly. But let us start simple …

Creating the network namespaces, Linux bridges and the veth sub-interfaces

The following command list sets up the environment including two bridges brx (in netns3) and bry (in netns8). Scroll to see all commands and copy it to a root shell prompt …

unshare --net --uts /bin/bash &
export pid_netns1=$!
nsenter -t $pid_netns1 -u hostname netns1
unshare --net --uts /bin/bash &
export pid_netns2=$!
unshare --net --uts /bin/bash &
export pid_netns3=$!
unshare --net --uts /bin/bash &
export pid_netns4=$!
unshare --net --uts /bin/bash &
export pid_netns5=$!
unshare --net --uts /bin/bash &
export pid_netns6=$!
unshare --net --uts /bin/bash &
export pid_netns7=$!
unshare --net --uts /bin/bash &
export pid_netns8=$!

# assign different hostnames  
nsenter -t $pid_netns1 -u hostname netns1
nsenter -t $pid_netns2 -u hostname netns2
nsenter -t $pid_netns3 -u hostname netns3
nsenter -t $pid_netns4 -u hostname netns4
nsenter -t $pid_netns5 -u hostname netns5
nsenter -t $pid_netns6 -u hostname netns6
nsenter -t $pid_netns7 -u hostname netns7
nsenter -t $pid_netns8 -u hostname netns8

#set up veth devices in netns1 to netns4 with connection to netns3  
ip link add veth11 netns $pid_netns1 type veth peer name veth13 netns $pid_netns3    
ip link add veth22 netns $pid_netns2 type veth peer name veth23 netns $pid_netns3
ip link add veth44 netns $pid_netns4 type veth peer name veth43 netns $pid_netns3
ip link add veth55 netns $pid_netns5 type veth peer name veth53 netns $pid_netns3

#set up veth devices in netns6 and netns7 with connection to netns8   
ip link add veth66 netns $pid_netns6 type veth peer name veth68 netns $pid_netns8
ip link add veth77 netns $pid_netns7 type veth peer name veth78 netns $pid_netns8    

# Assign IP addresses and set the devices up 
nsenter -t $pid_netns1 -u -n /bin/bash
ip addr add 192.168.5.1/24 brd 192.168.5.255 dev veth11
ip link set veth11 up
ip link set lo up
exit
nsenter -t $pid_netns2 -u -n /bin/bash
ip addr add 192.168.5.2/24 brd 192.168.5.255 dev veth22
ip link set veth22 up
ip link set lo up
exit
nsenter -t $pid_netns4 -u -n /bin/bash
ip addr add 192.168.5.4/24 brd 192.168.5.255 dev veth44
ip link set veth44 up
ip link set lo up
exit
nsenter -t $pid_netns5 -u -n /bin/bash
ip addr add 192.168.5.5/24 brd 192.168.5.255 dev veth55
ip link set veth55 up
ip link set lo up
exit
nsenter -t $pid_netns6 -u -n /bin/bash
ip addr add 192.168.5.6/24 brd 192.168.5.255 dev veth66
ip link set veth66 up
ip link set lo up
exit
nsenter -t $pid_netns7 -u -n /bin/bash
ip addr add 192.168.5.7/24 brd 192.168.5.255 dev veth77
ip link set veth77 up
ip link set lo up
exit

# set up bridge brx and its ports 
nsenter -t $pid_netns3 -u -n /bin/bash
brctl addbr brx  
ip link set brx up
ip link set veth13 up
ip link set veth23 up
ip link set veth43 up
ip link set veth53 up
brctl addif brx veth13
brctl addif brx veth23
brctl addif brx veth43
brctl addif brx veth53
exit

# set up bridge bry and its ports 
nsenter -t $pid_netns8 -u -n /bin/bash
brctl addbr bry  
ip link set bry up
ip link set veth68 up
ip link set veth78 up
brctl addif bry veth68
brctl addif bry veth78
exit

Set up the VLANs

The following commands configure the VLANs by assigning PVIDs/VIDs to the bridge ports (see the last 2 posts for more information):

# set up 2 VLANs on each bridge 
nsenter -t $pid_netns3 -u -n /bin/bash
ip link set dev brx type bridge vlan_filtering 1   
bridge vlan add vid 10 pvid untagged dev veth13
bridge vlan add vid 10 pvid untagged dev 
veth23
bridge vlan add vid 20 pvid untagged dev veth43
bridge vlan add vid 20 pvid untagged dev veth53
bridge vlan del vid 1 dev brx self
bridge vlan del vid 1 dev veth13
bridge vlan del vid 1 dev veth23
bridge vlan del vid 1 dev veth43
bridge vlan del vid 1 dev veth53
bridge vlan show
exit
nsenter -t $pid_netns8 -u -n /bin/bash
ip link set dev bry type bridge vlan_filtering 1   
bridge vlan add vid 10 pvid untagged dev veth68
bridge vlan add vid 20 pvid untagged dev veth78
bridge vlan del vid 1 dev bry self
bridge vlan del vid 1 dev veth68
bridge vlan del vid 1 dev veth78
bridge vlan show
exit

We have a whole bunch of network namespaces now. Use “lsns” to get an overview. See the first 2 articles of the series, if you need an explanation of the commands used above and additional commands to get more information about the created namespaces and processes.

Note that we used VID 10, PVID 10 on the bridge ports to establish VLAN1 (green) and VID 20, PVID 20 to establish VLAN2 (pink). Note in addition that there is NO VLAN tagging required outside the bridges; thus the flag “untagged” to enforce Ethernet packets to leave the bridges untagged. Consistently, no sub-interfaces have been defined in the network namespace 1, 2, 4, 5, 6, 7. Note also, that we removed the PVID/VID = 1 default values from the ports.

The bridges are not connected, yet. Therefore, our next step is to create a connecting veth device with VLAN sub-interfaces – and to attach the sub-interfaces to the bridges :

# Create a veth device to connect the two bridges 
ip link add vethx netns $pid_netns3 type veth peer name vethy netns $pid_netns8    
nsenter -t $pid_netns3 -u -n /bin/bash
ip link add link vethx name vethx.50 type vlan id 50   
ip link add link vethx name vethx.60 type vlan id 60
brctl addif brx vethx.50
brctl addif brx vethx.60
ip link set vethx up
ip link set vethx.50 up
ip link set vethx.60 up
bridge vlan add vid 10 pvid untagged dev vethx.50
bridge vlan add vid 20 pvid untagged dev vethx.60
bridge vlan del vid 1 dev vethx.50
bridge vlan del vid 1 dev vethx.60
bridge vlan show
exit

nsenter -t $pid_netns8 -u -n /bin/bash
ip link add link vethy name vethy.50 type vlan id 50
ip link add link vethy name vethy.60 type vlan id 60
brctl addif bry vethy.50
brctl addif bry vethy.60
ip link set vethy up
ip link set vethy.50 up
ip link set vethy.60 up
bridge vlan add vid 10 pvid untagged dev vethy.50
bridge vlan add vid 20 pvid untagged dev vethy.60
bridge vlan del vid 1 dev vethy.50
bridge vlan del vid 1 dev vethy.60
bridge vlan show
exit

Note that we have used VLAN IDs 50 and 60 outside the bridge! Note also the VID/PVID settings and the flag “untagged” at our bridge ports vethx.50, vethx.60, vethy.50, vethy.60. The bridge internal tags of outgoing packets are first removed; afterwards the veth sub-interfaces re-tag outgoing packets automatically with tags for VLAN IDs 50,60.

However, we have kept up consistent tagging histories for packets propagating between the bridges and along the vethx/vethy line:

“10=>50=>10”

and

“20=>60=>20”

So, Ethernet packets nowhere cross the borders of our separated VLANs – if our theory works correctly.

Routing? 2 or 4 VLANs?

Routes for 192.168.5.0/24 were set up automatically in the network namespaces netns1, 2, 4, 5, 6, 7. You may check this by entering the namespaces with a shell (nsenter command) and using the command “route“.

Note that we have chosen all IP address to be in the same class. All our virtual devices work on the network link layer (L1/2 of the OSI model). Further IP routing across the bridges is not required on this level. The correct association of IP addresses and MAC addresses across the bridges and all VLANs is instead managed by the ARP protocol.

Our network namespaces should be able to get into contact – as long as they belong to the “same” VLAN.

Note: Each bridge sets up its own 2 VLANs; so, actually, we have built 4 VLANs!. But the bridges are connected in such a way that packet transport works across these 4 VLANs as if they were only two VLANs spanning the bridges.

Tests

We first test whether netns7 can communicate with e.g. netns5, which it should. On the other side netns7 should not be able to ping e.g. netns1. It is instructive to open several terminal windows from our original terminal (on KDE e.g. by “konsole &>/dev/null &”) and to enter different namespaces there to get an impression of what happens.

mytux:~ # nsenter -t $pid_netns7 -u -n /bin/bash
netns7:~ # ping 192.168.5.1 -c2
PING 192.168.5.1 (192.168.5.1) 56(84) bytes of data.
From 192.168.5.7 icmp_seq=1 Destination Host Unreachable
From 192.168.5.7 icmp_seq=2 Destination Host Unreachable

--- 192.168.5.1 ping statistics ---
2 packets transmitted, 0 received, +2 errors, 100% packet loss, time 1008ms   
pipe 2
netns7:~ # ping 192.168.5.5 -c2
PING 192.168.5.5 (192.168.5.5) 56(84) bytes of data.
64 bytes from 192.168.5.5: icmp_seq=1 ttl=64 time=0.170 ms
64 bytes from 192.168.5.5: icmp_seq=2 ttl=64 time=0.087 ms

--- 192.168.5.5 ping statistics ---
2 packets transmitted, 2 received, 0% packet loss, time 999ms
rtt min/avg/max/mdev = 0.087/0.128/0.170/0.043 ms
netns7:~ # 

And at the same time inside bry in netns8 :

mytux:~ # nsenter -t $pid_netns8 -u -n /bin/bash
netns8:~ # tcpdump -n -i bry  host 192.168.5.1 -e
tcpdump: verbose output suppressed, use -v or -vv for full protocol decode
listening on bry, link-type EN10MB (Ethernet), capture size 262144 bytes
14:38:48.780367 8a:1e:62:e8:f3:c3 > ff:ff:ff:ff:ff:ff, ethertype 802.1Q (0x8100), length 46: vlan 20, p 0, ethertype ARP, Request who-has 192.168.5.1 tell 192.168.5.7, length 28   
14:38:49.778559 8a:1e:62:e8:f3:c3 > ff:ff:ff:ff:ff:ff, ethertype 802.1Q (0x8100), length 46: vlan 20, p 0, ethertype ARP, Request who-has 192.168.5.1 tell 192.168.5.7, length 28
14:38:50.778574 8a:1e:62:e8:f3:c3 > ff:ff:ff:ff:ff:ff, ethertype 802.1Q (0x8100), length 46: vlan 20, p 0, ethertype ARP, Request who-has 192.168.5.1 tell 192.168.5.7, length 28    
^C
3 packets captured
3 packets received by filter
0 packets dropped by kernel
netns8:~ # tcpdump -n -i bry  host 192.168.5.5 -e
tcpdump: verbose output suppressed, use -v or -vv for full protocol decode
listening on bry, link-type EN10MB (Ethernet), capture size 262144 bytes
14:39:30.045117 8a:1e:62:e8:f3:c3 > ff:ff:ff:ff:ff:ff, ethertype 802.1Q (0x8100), length 46: vlan 20, p 0, ethertype ARP, Request who-has 192.168.5.5 tell 192.168.5.7, length 28
14:39:30.045184 2e:75:26:04:a9:70 > 8a:1e:62:e8:f3:c3, ethertype 802.1Q (0x8100), length 46: vlan 20, p 0, ethertype ARP, Reply 192.168.5.5 is-at 2e:75:26:04:a9:70, length 28
14:39:30.045193 8a:1e:62:e8:f3:c3 > 2e:75:26:04:a9:70, ethertype 802.1Q (0x8100), length 102: vlan 20, p 0, ethertype IPv4, 192.168.5.7 > 192.168.5.5: ICMP echo request, id 21633, seq 1, length 64    
14:39:30.045247 2e:75:26:04:a9:70 > 8a:1e:62:e8:f3:c3, ethertype 802.1Q (0x8100), length 102: vlan 20, p 0, ethertype IPv4, 192.168.5.5 > 192.168.5.7: ICMP echo reply, id 21633, seq 1, length 64   
14:39:31.044106 8a:1e:62:e8:f3:c3 > 2e:75:26:04:a9:70, ethertype 802.1Q (0x8100), length 102: vlan 20, p 0, ethertype IPv4, 192.168.5.7 > 192.168.5.5: ICMP echo request, id 21633, seq 2, length 64   
14:39:31.044165 2e:75:26:04:a9:70 > 8a:1e:62:e8:f3:c3, ethertype 802.1Q (0x8100), length 102: vlan 20, p 0, ethertype IPv4, 192.168.5.5 > 192.168.5.7: ICMP echo reply, id 21633, seq 2, length 64  
14:39:35.058576 2e:75:26:04:a9:70 > 8a:1e:62:e8:f3:c3, ethertype 802.1Q (0x8100), length 46: vlan 20, p 0, ethertype ARP, Request who-has 192.168.5.7 tell 192.168.5.5, length 28
14:39:35.058587 8a:1e:62:e8:f3:c3 > 2e:75:26:04:a9:70, ethertype 802.1Q (0x8100), length 46: vlan 20, p 0, ethertype ARP, Reply 192.168.5.7 is-at 8a:1e:62:e8:f3:c3, length 28
^C
8 packets captured
8 packets received by filter
0 packets dropped by kernel
netns8:~ # 

And parallel at vethx in netns3 :

mytux:~ # nsenter -t $pid_netns3 -u -n /bin/bash
netns3:~ # tcpdump -n -i vethx  host 192.168.5.1 -e
tcpdump: verbose output suppressed, use -v or -vv for full protocol decode
listening on vethx, link-type EN10MB (Ethernet), capture size 262144 bytes
14:38:48.780381 8a:1e:62:e8:f3:c3 > ff:ff:ff:ff:ff:ff, ethertype 802.1Q (0x8100), length 46: vlan 60, p 0, ethertype ARP, Request who-has 192.168.5.1 tell 192.168.5.7, length 28
14:38:49.778582 8a:1e:62:e8:f3:c3 > ff:ff:ff:ff:ff:ff, ethertype 802.1Q (0x8100), length 46: vlan 60, p 0, ethertype ARP, Request who-has 192.168.5.1 tell 192.168.5.7, length 28
14:38:50.778594 8a:1e:62:e8:f3:c3 > ff:ff:ff:ff:ff:ff, ethertype 802.1Q (0x8100), length 46: vlan 60, p 0, ethertype ARP, Request who-has 192.168.5.1 tell 192.168.5.7, length 28
^C
3 packets captured
3 packets received by filter
0 packets dropped by kernel
netns3:~ # tcpdump -n -i vethx  host 192.168.5.5 -e
tcpdump: verbose output suppressed, use -v or -vv for full protocol decode
listening on vethx, link-type EN10MB (Ethernet), capture size 262144 bytes
14:39:30.045131 8a:1e:62:e8:f3:c3 > ff:ff:ff:ff:ff:ff, ethertype 802.1Q (0x8100), length 46: vlan 60, p 0, ethertype ARP, Request who-has 192.168.5.5 tell 192.168.5.7, length 28
14:39:30.045182 2e:75:26:04:a9:70 > 8a:1e:62:e8:f3:c3, ethertype 802.1Q (0x8100), length 46: vlan 60, p 0, ethertype ARP, Reply 192.168.5.5 is-at 2e:75:26:04:a9:70, length 28
14:39:30.045210 8a:1e:62:e8:f3:c3 > 2e:75:26:04:a9:70, ethertype 802.1Q (0x8100), length 102: vlan 60, p 0, ethertype IPv4, 192.168.5.7 > 192.168.5.5: ICMP echo request, id 21633, seq 1, length 64   
14:39:30.045246 2e:75:26:04:a9:70 > 8a:1e:62:e8:f3:c3, ethertype 802.1Q (0x8100), length 102: vlan 60, p 0, ethertype IPv4, 192.168.5.5 > 192.168.5.7: ICMP echo reply, id 21633, seq 1, length 64
14:39:31.044123 8a:1e:62:e8:f3:c3 > 2e:75:26:04:a9:70, ethertype 802.1Q (0x8100), length 102: vlan 60, p 0, ethertype IPv4, 192.168.5.7 > 192.168.5.5: ICMP echo request, id 21633, seq 2, length 64    
14:39:31.044163 2e:75:26:04:a9:70 > 8a:1e:62:e8:f3:c3, ethertype 802.1Q (0x8100), length 102: vlan 60, p 0, ethertype IPv4, 192.168.5.5 > 192.168.5.7: ICMP echo reply, id 21633, seq 2, length 64   
14:39:35.058573 2e:75:26:04:a9:70 > 8a:1e:62:e8:f3:c3, ethertype 802.1Q (0x8100), length 46: vlan 60, p 0, ethertype ARP, Request who-has 192.168.5.7 tell 192.168.5.5, length 28
14:39:35.058589 8a:1e:62:e8:f3:c3 > 2e:75:26:04:a9:70, ethertype 802.1Q (0x8100), length 46: vlan 60, p 0, ethertype ARP, Reply 192.168.5.7 is-at 8a:1e:62:e8:f3:c3, length 28
^C
8 packets captured
8 packets received by filter
0 packets dropped by kernel
netns3:~ # 
 

How does netns7 see the world afterwards?

netns7:~ # ip a s
1: lo: <LOOPBACK,UP,LOWER_UP> mtu 65536 qdisc noqueue state UNKNOWN group default qlen 1
    link/loopback 00:00:00:00:00:00 brd 00:00:00:00:00:00
    inet 127.0.0.1/8 scope host lo
 
      valid_lft forever preferred_lft forever
    inet6 ::1/128 scope host 
       valid_lft forever preferred_lft forever
2: veth77@if3: <BROADCAST,MULTICAST,UP,LOWER_UP> mtu 1500 qdisc noqueue state UP group default qlen 1000      
    link/ether 8a:1e:62:e8:f3:c3 brd ff:ff:ff:ff:ff:ff link-netnsid 0
    inet 192.168.5.7/24 brd 192.168.5.255 scope global veth77
       valid_lft forever preferred_lft forever
    inet6 fe80::881e:62ff:fee8:f3c3/64 scope link 
       valid_lft forever preferred_lft forever
netns7:~ # arp -a
? (192.168.5.1) at <incomplete> on veth77
? (192.168.5.5) at 2e:75:26:04:a9:70 [ether] on veth77    
netns7:~ #                 

We have a mirrored situation on netns6 with respect to netns1 and netns5. netns6 can reach netns1, but not netns5.

These results prove what we have claimed:

  • We have a separation of the VLANs across the bridges.
  • Inside the bridges only the ports’ PVID-settings determine the VLAN tag (here 20) of incoming packets.
  • Along the veth “cable” we have a completely different tag (here 60 for packets which originally got tag 20 inside bry).

Let us cross check for netns2:

mytux:~ # nsenter -t $pid_netns2 -u -n /bin/bash
netns2:~ # ping 192.168.5.7 -c2
PING 192.168.5.7 (192.168.5.7) 56(84) bytes of data.
From 192.168.5.2 icmp_seq=1 Destination Host Unreachable
From 192.168.5.2 icmp_seq=2 Destination Host Unreachable

--- 192.168.5.7 ping statistics ---
2 packets transmitted, 0 received, +2 errors, 100% packet loss, time 999ms
pipe 2
netns2:~ # ping 192.168.5.6 -c2
PING 192.168.5.6 (192.168.5.6) 56(84) bytes of data.
64 bytes from 192.168.5.6: icmp_seq=1 ttl=64 time=0.154 ms
64 bytes from 192.168.5.6: icmp_seq=2 ttl=64 time=0.092 ms

--- 192.168.5.6 ping statistics ---
2 packets transmitted, 2 received, 0% packet loss, time 999ms
rtt min/avg/max/mdev = 0.092/0.123/0.154/0.031 ms
netns2:~ # 

And how do the bridges see the world?

In netns8 and netns3 we have a closer look at the bridges:

netns8:~ # ip a s
1: lo: <LOOPBACK> mtu 65536 qdisc noop state DOWN group default qlen 1
    link/loopback 00:00:00:00:00:00 brd 00:00:00:00:00:00
2: veth68: <BROADCAST,MULTICAST,UP,LOWER_UP> mtu 1500 qdisc noqueue master bry state UP group default qlen 1000
    link/ether 0a:5b:60:31:7a:bd brd ff:ff:ff:ff:ff:ff link-netnsid 0
    inet6 fe80::85b:60ff:fe31:7abd/64 scope link 
       valid_lft forever preferred_lft forever
3: veth78@if2: <BROADCAST,MULTICAST,UP,LOWER_UP> mtu 1500 qdisc noqueue master bry state UP group default qlen 1000    
    link/ether 3e:f3:4b:26:02:46 brd ff:ff:ff:ff:ff:ff link-netnsid 1
    inet6 fe80::3cf3:4bff:fe26:246/64 scope link 
       valid_lft forever preferred_lft forever
4: bry: <BROADCAST,MULTICAST,UP,LOWER_UP> mtu 1500 qdisc noqueue state UP group default qlen 1000
    link/ether 0a:5b:60:31:7a:bd brd ff:ff:ff:ff:ff:ff
    inet6 fe80::30a5:8dff:fe54:987e/64 scope link 
       valid_lft forever preferred_lft forever
5: vethy@if7: <BROADCAST,MULTICAST,UP,LOWER_UP> mtu 1500 qdisc noqueue state UP group default qlen 1000
    link/ether 7a:86:31:14:57:2a brd ff:ff:ff:ff:ff:ff link-netnsid 2
    inet6 fe80::7886:31ff:fe14:572a/64 scope link 
       valid_lft forever preferred_lft forever
6: vethy.50@vethy: <BROADCAST,MULTICAST,UP,LOWER_UP> mtu 1500 qdisc noqueue master bry state UP group default qlen 1000   
    link/ether 7a:86:31:14:57:2a brd ff:ff:ff:ff:ff:ff
    inet6 fe80::7886:31ff:
fe14:572a/64 scope link 
       valid_lft forever preferred_lft forever
7: vethy.60@vethy: <BROADCAST,MULTICAST,UP,LOWER_UP> mtu 1500 qdisc noqueue master bry state UP group default qlen 1000  
    link/ether 7a:86:31:14:57:2a brd ff:ff:ff:ff:ff:ff
    inet6 fe80::7886:31ff:fe14:572a/64 scope link 
       valid_lft forever preferred_lft forever
netns8:~ # bridge vlan show
port    vlan ids
veth68   10 PVID Egress Untagged      
                                                                                                
veth78   20 PVID Egress Untagged                                        
                                                        
bry     None
vethy.50 10 PVID Egress Untagged

vethy.60 20 PVID Egress Untagged
netns8:~ # brctl showmacs bry 
port no mac addr                is local?       ageing timer   
  1     0a:5b:60:31:7a:bd       yes                0.00
  1     0a:5b:60:31:7a:bd       yes                0.00
  4     2e:75:26:04:a9:70       no                 3.62
  2     3e:f3:4b:26:02:46       yes                0.00
  2     3e:f3:4b:26:02:46       yes                0.00
  4     7a:86:31:14:57:2a       yes                0.00
  3     7a:86:31:14:57:2a       yes                0.00
  3     7a:86:31:14:57:2a       yes                0.00
  3     7a:86:31:14:57:2a       yes                0.00
  2     8a:1e:62:e8:f3:c3       no                 3.62


netns3:~ # ip a s
1: lo: <LOOPBACK> mtu 65536 qdisc noop state DOWN group default qlen 1
    link/loopback 00:00:00:00:00:00 brd 00:00:00:00:00:00
2: veth13: <BROADCAST,MULTICAST,UP,LOWER_UP> mtu 1500 qdisc noqueue master brx state UP group default qlen 1000
    link/ether 52:9b:43:56:37:df brd ff:ff:ff:ff:ff:ff link-netnsid 0
    inet6 fe80::509b:43ff:fe56:37df/64 scope link 
       valid_lft forever preferred_lft forever
3: veth23@if2: <BROADCAST,MULTICAST,UP,LOWER_UP> mtu 1500 qdisc noqueue master brx state UP group default qlen 1000   
    link/ether 06:81:88:12:5d:dc brd ff:ff:ff:ff:ff:ff link-netnsid 1
    inet6 fe80::481:88ff:fe12:5ddc/64 scope link 
       valid_lft forever preferred_lft forever
4: veth43@if2: <BROADCAST,MULTICAST,UP,LOWER_UP> mtu 1500 qdisc noqueue master brx state UP group default qlen 1000   
    link/ether 56:d6:b2:80:9a:de brd ff:ff:ff:ff:ff:ff link-netnsid 2
    inet6 fe80::54d6:b2ff:fe80:9ade/64 scope link 
       valid_lft forever preferred_lft forever
5: veth53@if2: <BROADCAST,MULTICAST,UP,LOWER_UP> mtu 1500 qdisc noqueue master brx state UP group default qlen 1000   
    link/ether 12:58:a6:73:6c:6e brd ff:ff:ff:ff:ff:ff link-netnsid 3
    inet6 fe80::1058:a6ff:fe73:6c6e/64 scope link 
       valid_lft forever preferred_lft forever
6: brx: <BROADCAST,MULTICAST,UP,LOWER_UP> mtu 1500 qdisc noqueue state UP group default qlen 1000
    link/ether 06:81:88:12:5d:dc brd ff:ff:ff:ff:ff:ff
    inet6 fe80::8447:28ff:fe22:7a90/64 scope link 
       valid_lft forever preferred_lft forever
7: vethx@if5: <BROADCAST,MULTICAST,UP,LOWER_UP> mtu 1500 qdisc noqueue state UP group default qlen 1000
    link/ether b6:e9:ef:3d:1c:b7 brd ff:ff:ff:ff:ff:ff link-netnsid 4
    inet6 fe80::b4e9:efff:fe3d:1cb7/64 scope link 
       valid_lft forever preferred_lft forever
8: vethx.50@vethx: <BROADCAST,MULTICAST,UP,LOWER_UP> mtu 1500 qdisc noqueue master brx state 
UP group default qlen 1000
    link/ether b6:e9:ef:3d:1c:b7 brd ff:ff:ff:ff:ff:ff
    inet6 fe80::b4e9:efff:fe3d:1cb7/64 scope link 
       valid_lft forever preferred_lft forever
9: vethx.60@vethx: <BROADCAST,MULTICAST,UP,LOWER_UP> mtu 1500 qdisc noqueue master brx state UP group default qlen 1000   
    link/ether b6:e9:ef:3d:1c:b7 brd ff:ff:ff:ff:ff:ff
    inet6 fe80::b4e9:efff:fe3d:1cb7/64 scope link 
       valid_lft forever preferred_lft forever
netns3:~ # bridge vlan show
port    vlan ids
veth13   10 PVID Egress Untagged

veth23   10 PVID Egress Untagged

veth43   20 PVID Egress Untagged

veth53   20 PVID Egress Untagged

brx     None       
vethx.50 10 PVID Egress Untagged   
                                                             
vethx.60 20 PVID Egress Untagged
netns3:~ # brctl showmacs brx
port no mac addr                is local?       ageing timer  
  2     06:81:88:12:5d:dc       yes                0.00
  2     06:81:88:12:5d:dc       yes                0.00
  4     12:58:a6:73:6c:6e       yes                0.00
  4     12:58:a6:73:6c:6e       yes                0.00
  4     2e:75:26:04:a9:70       no                 3.49
  1     52:9b:43:56:37:df       yes                0.00
  1     52:9b:43:56:37:df       yes                0.00
  3     56:d6:b2:80:9a:de       yes                0.00
  3     56:d6:b2:80:9a:de       yes                0.00
  6     8a:1e:62:e8:f3:c3       no                 3.49
  5     b6:e9:ef:3d:1c:b7       yes                0.00
  6     b6:e9:ef:3d:1c:b7       yes                0.00
  5     b6:e9:ef:3d:1c:b7       yes                0.00
  5     b6:e9:ef:3d:1c:b7       yes                0.00

And:

netns8:~ # brctl showmacs bry
port no mac addr                is local?       ageing timer    
  1     0a:5b:60:31:7a:bd       yes                0.00
  1     0a:5b:60:31:7a:bd       yes                0.00
  4     2e:75:26:04:a9:70       no                 7.37
  2     3e:f3:4b:26:02:46       yes                0.00
  2     3e:f3:4b:26:02:46       yes                0.00
  4     7a:86:31:14:57:2a       yes                0.00
  3     7a:86:31:14:57:2a       yes                0.00
  3     7a:86:31:14:57:2a       yes                0.00
  3     7a:86:31:14:57:2a       yes                0.00
  2     8a:1e:62:e8:f3:c3       no                 7.37
  3     96:e8:d1:2c:b8:ad       no                 3.84
  1     ce:48:c6:8c:ee:1a       no                 3.84
netns8:~ # 


netns3:~ # brctl showmacs brx
port no mac addr                is local?       ageing timer   
  2     06:81:88:12:5d:dc       yes                0.00
  2     06:81:88:12:5d:dc       yes                0.00
  4     12:58:a6:73:6c:6e       yes                0.00
  4     12:58:a6:73:6c:6e       yes                0.00
  4     2e:75:26:04:a9:70       no                12.48
  1     52:9b:43:56:37:df       yes                0.00
  1     52:9b:43:56:37:df       yes                0.00
  3     56:d6:b2:80:9a:de       yes                0.00
  3     56:d6:b2:80:9a:de       yes                0.00
  6     8a:1e:62:e8:f3:c3       no                12.48
  2     96:e8:d1:2c:b8:ad       no                 8.94
  5     b6:e9:ef:3d:1c:b7       yes                0.00
  6     b6:e9:ef:3d:1c:b7       yes                0.00
  5     b6:e9:ef:3d:1c:b7       yes                0.00
  5     b6:e9:ef:3d:1c:b7       yes                0.00
  5     ce:48:
c6:8c:ee:1a       no                 8.94
netns3:~ # 

Obviously, our bridges learn during pings …

Check of the independence of VLAN definitions on Bry

Just for fun: Let us change the PVID/VID setting on bry:

# Changing PVID/VID in bry 
nsenter -t $pid_netns8 -u -n /bin/bash
bridge vlan add vid 36 pvid untagged dev veth68
bridge vlan add vid 46 pvid untagged dev veth78
bridge vlan add vid 36 pvid untagged dev vethy.50   
bridge vlan add vid 46 pvid untagged dev vethy.60   
bridge vlan del vid 10 dev vethy.50
bridge vlan del vid 10 dev veth68
bridge vlan del vid 20 dev vethy.60
bridge vlan del vid 20 dev veth78
bridge vlan show
exit

This leads to:

netns8:~ # bridge vlan show
port    vlan ids
veth68   36 PVID Egress Untagged

veth78   46 PVID Egress Untagged

bry     None
vethy.50         36 PVID Egress Untagged    

vethy.60         46 Egress Untagged

But still:

netns2:~ # ping 192.168.5.7 -c2
PING 192.168.5.7 (192.168.5.7) 56(84) bytes of data.
From 192.168.5.2 icmp_seq=1 Destination Host Unreachable   
From 192.168.5.2 icmp_seq=2 Destination Host Unreachable

--- 192.168.5.7 ping statistics ---
2 packets transmitted, 0 received, +2 errors, 100% packet loss, time 1009ms    
pipe 2
netns2:~ # ping 192.168.5.6 -c2
PING 192.168.5.6 (192.168.5.6) 56(84) bytes of data.
64 bytes from 192.168.5.6: icmp_seq=1 ttl=64 time=0.120 ms
64 bytes from 192.168.5.6: icmp_seq=2 ttl=64 time=0.094 ms

--- 192.168.5.6 ping statistics ---
2 packets transmitted, 2 received, 0% packet loss, time 999ms   
rtt min/avg/max/mdev = 0.094/0.107/0.120/0.013 ms
netns2:~ # 


Experiment 5.2 – Two virtual VLANs spanning two Linux bridges connected by a veth based trunk line between trunk ports

Now let us look at another way of connecting the bridges. This time we use a real trunk connection without sub-interfaces. We then have to attach vethx directly to brx and vethy directly to bry. NO PVIDs must be used on the respective ports; however the flag “tagged” is required. And compared to the last settings in bry we have to go back to the PVID/VID values of 10, 20.

Our new connection model is displayed in the following graphics:

We need to change the present bridge and bridge port definitions accordingly. The commands, which you can enter at the prompt of your original terminal window are given below:

# Change vethx to trunk like interface in brx   
nsenter -t $pid_netns3 -u -n /bin/bash
brctl delif brx vethx.50
brctl delif brx vethx.60
ip link del dev vethx.50
ip link del dev vethx.60
brctl addif brx vethx  
bridge vlan add vid 10 tagged dev vethx   
bridge vlan add vid 20 tagged dev vethx
bridge vlan del vid 1 dev vethx
bridge vlan show
exit 

And

# Change vethy to trunk like interface in brx   
nsenter -t $pid_netns8 -u -n /bin/bash
brctl delif bry vethy.50
brctl delif bry vethy.60
ip link del dev vethy.50
ip link del dev vethy.60
brctl addif bry vethy
bridge vlan add vid 10 tagged dev vethy
bridge vlan add vid 20 tagged dev vethy
bridge vlan del vid 1 dev vethy
bridge vlan add vid 10 pvid untagged dev veth68  
bridge vlan add vid 20 pvid untagged dev veth78  
bridge vlan del vid 36 dev veth68
bridge vlan del vid 46 dev veth78
bridge vlan show
exit 

We get the following bridge/VLAN configurations:

netns8:~ # bridge vlan show            
           
port    vlan ids
veth68   10 PVID Egress Untagged   

veth78   20 PVID Egress Untagged

bry     None
vethy    10
         20

and

netns3:~ # bridge vlan show
port    vlan ids
veth13   10 PVID Egress Untagged    

veth23   10 PVID Egress Untagged

veth43   20 PVID Egress Untagged

veth53   20 PVID Egress Untagged

brx     None
vethx    10
         20

Testing 2 VLANs spanning two bridges/Hosts with a trunk connection

We test by pinging from netns7:

netns7:~ # ping 192.168.5.1 -c2
PING 192.168.5.1 (192.168.5.1) 56(84) bytes of data.
From 192.168.5.7 icmp_seq=1 Destination Host Unreachable    
From 192.168.5.7 icmp_seq=2 Destination Host Unreachable

--- 192.168.5.1 ping statistics ---
2 packets transmitted, 0 received, +2 errors, 100% packet loss, time 999ms     
pipe 2
netns7:~ # 

This gives at the bridge device bry in netns8:

netns8:~ # tcpdump -n -i bry  host 192.168.5.1 -e
tcpdump: verbose output suppressed, use -v or -vv for full protocol decode
listening on bry, link-type EN10MB (Ethernet), capture size 262144 bytes
15:31:15.527528 8a:1e:62:e8:f3:c3 > ff:ff:ff:ff:ff:ff, ethertype 802.1Q (0x8100), length 46: vlan 20, p 0, ethertype ARP, Request who-has 192.168.5.1 tell 192.168.5.7, length 28   
15:31:16.526542 8a:1e:62:e8:f3:c3 > ff:ff:ff:ff:ff:ff, ethertype 802.1Q (0x8100), length 46: vlan 20, p 0, ethertype ARP, Request who-has 192.168.5.1 tell 192.168.5.7, length 28   
15:31:17.526576 8a:1e:62:e8:f3:c3 > ff:ff:ff:ff:ff:ff, ethertype 802.1Q (0x8100), length 46: vlan 20, p 0, ethertype ARP, Request who-has 192.168.5.1 tell 192.168.5.7, length 28   
^C
3 packets captured
3 packets received by filter
0 packets dropped by kernel
netns8:~ # 

At the outer side of vethx in netns3 we get :

netns3:~ # tcpdump -n -i vethx  host 192.168.5.1 -e
tcpdump: verbose output suppressed, use -v or -vv for full protocol decode
listening on vethx, link-type EN10MB (Ethernet), capture size 262144 bytes
15:31:15.527543 8a:1e:62:e8:f3:c3 > ff:ff:ff:ff:ff:ff, ethertype 802.1Q (0x8100), length 46: vlan 20, p 0, ethertype ARP, Request who-has 192.168.5.1 tell 192.168.5.7, length 28   
15:31:16.526561 8a:1e:62:e8:f3:c3 > ff:ff:ff:ff:ff:ff, ethertype 802.1Q (0x8100), length 46: vlan 20, p 0, ethertype ARP, Request who-has 192.168.5.1 tell 192.168.5.7, length 28   
15:31:17.526605 8a:1e:62:e8:f3:c3 > ff:ff:ff:ff:ff:ff, ethertype 802.1Q (0x8100), length 46: vlan 20, p 0, ethertype ARP, Request who-has 192.168.5.1 tell 192.168.5.7, length 28   
^C
3 packets captured
3 packets received by filter
0 packets dropped by kernel
netns3:~ # 

You see, how the packet tags have changed now: Due to the missing PVIDs at the ports for vethx, vethy and the flag “tagged” we get packets on the vethx/vethy connection line, which carry the original 20 tag they had inside the bridges.

So :

netns7:~ # ping 192.168.5.5 -c2
PING 192.168.5.5 (192.168.5.5) 56(84) bytes of data.
64 bytes from 192.168.5.5: icmp_seq=1 ttl=64 time=0.042 ms    
64 bytes from 192.168.5.5: icmp_seq=2 ttl=64 time=0.092 ms

--- 192.168.5.5 ping statistics ---
2 packets transmitted, 2 received, 0% packet loss, time 999ms   
rtt min/avg/max/mdev = 0.042/0.067/0.092/0.025 ms
netns7:~ # 

Obviously, we can connect our bridges with a trunk line between trunk ports, too.

Exactly 2 VLANs spanning 2 bridges with a trunk connection

Note that we MUST provide identical PVID/VID values inside the bridges bry and brx when we use a trunk like connection! VLAN filtering at all bridge ports works in both directions – IN and OUT. As the Ethernet packets keep their VLAN tags
when they leave or enter a bridge, we can not choose the VID/PVID values to be different in bry from brx. So, in contrast to the connection model with the sub-interfaces, we have no choices for PVID/VID assignments; we deal with exactly 2 and not 4 coupled VLANs.

Still, packets leave veth68, 78 and veth13, 23, 43, 53 untagged! The VLANs get established by the bridge and their connection line, alone.

Which connection model is preferable?

The connection model based on trunk port configurations looks simpler than the model based on veth sub-interfaces. However, the connection model based on sub-interfaces allows for much more flexibility and freedom! In addition, it may make it easier to define port related iptables filtering rules.

So, you have the choice how to extend (virtual) VLANs over several bridges/hosts.
Unfortunately, I have not yet tested for any performance differences.

VLANs spanning hosts with Linux bridges

Our test examples were tested on just one host. Is there any major difference when we instead look at 2 hosts, each with a virtual Linux bridge? Not, really. Our devices vethx and vethy would then be two real Ethernet cards like ethx and ethy. But you could make them slaves of the bridges, too, and you could split them into sub-interfaces.

So, our VLANs based on Linux bridge configurations would also work, if the bridges were located on different hosts. For both connection models …

Conclusion

Network namespaces or containers can become members of virtual VLANs. The configuration of bridge ports determines the VLAN setup. We can easily extend such (virtual) VLANs from one bridge to other bridges – even if the bridges are located on different hosts. In addition, we have the choice whether we base the connection on ports based on sub-interfaces or pure trunk ports. This gives us a maximum of flexibility.

But: Our VLANs were strictly separated so far. In reality, however, we may find situations in which a host/container must be member of two VLANs (VLAN1 and VLAN2). How do the veth connections from/to a network namespace look like, if a user in this intermediate network namespace shall be able to talk to all containers/namespaces in VLAN1 and VLAN2?

This is the topic of the next post.

Fun with veth-devices, Linux bridges and VLANs in unnamed Linux network namespaces – VII

Again, there will be 2 different solutions ….


Fun with veth-devices, Linux bridges and VLANs in unnamed Linux network namespaces – III

In the first blog post
Fun with veth-devices, Linux bridges and VLANs in unnamed Linux network namespaces – I
of this series about virtual networking between network namespaces I had discussed some basic Linux commands to set up and enter network namespaces on a Linux system.

In a second post
Fun with veth-devices, Linux bridges and VLANs in unnamed Linux network namespaces – II
I suggested and described several networking experiments which can quickly be set up by these tools. As containers are based on namespaces we can study virtual networking between containers on a host in principle just by connecting network namespaces. Makes e.g. the planning of firewall rules and VLANs a bit easier …

The virtual environment we want to build up and explore step by step is displayed in the following graphics:

In this article we shall cover experiment 1 and experiment 2 discussed in the last article – i.e. we start with the upper left corner of the drawing.

Experiment 1: Connect two network namespaces directly

This experiments creates the dotted line between netns1 and netns2. Though simple this experiments lays a foundation for all other experiments.

We place the two different Ethernet interfaces of a veth device in the two (unnamed) network namespaces (with hostnames) netns1 and netns2. We assign IP addresses (of the same network class) to the interfaces and check a basic communication between the network namespaces. The situation corresponds to the following simple picture:

What shell commands can be used for achieving this? You may put the following lines in a file for keeping them for further experiments or to create a shell script:

unshare --net --uts /bin/bash &
export pid_netns1=$!
nsenter -t $pid_netns1 -u hostname netns1
unshare --net --uts /bin/bash &
export pid_netns2=$!
nsenter -t $pid_netns2 -u hostname netns2
ip link add veth11 netns $pid_netns1 type veth peer name veth22 netns $pid_netns2   
nsenter -t $pid_netns1 -u -n /bin/bash
ip addr add 192.168.5.1/24 brd 192.168.5.255 dev veth11
ip link set veth11 up
ip link set lo up
ip a s
exit
nsenter -t $pid_netns2 -u -n /bin/bash
ip addr add 192.168.5.2/24 brd 192.168.5.255 dev veth22
ip link set veth22 up
ip a s
exit
lsns -t net -t uts

If you copy these lines to the prompt of a root shell of some host “mytux” you will get something like the following:

mytux:~ # unshare --net --uts /bin/bash &
[2] 32146
mytux:~ # export pid_netns1=$!

[2]+  Stopped                 unshare --net --uts /bin/bash
mytux:~ # nsenter -t $pid_netns1 -u hostname netns1
mytux:~ # unshare --net --uts /bin/bash &
[3] 32154
mytux:~ # export pid_netns2=$!

[3]+  Stopped                 unshare --net --uts /bin/bash
mytux:~ # nsenter -t $pid_netns2 -u hostname netns2
mytux:~ # ip link add veth11 netns $pid_netns1 type veth peer name veth22 netns $pid_netns2   
mytux:~ # nsenter -t 
$pid_netns1 -u -n /bin/bash
netns1:~ # ip addr add 192.168.5.1/24 brd 192.168.5.255 dev veth11
netns1:~ # ip link set veth11 up
netns1:~ # ip link set lo up
netns1:~ # ip a s
1: lo: <LOOPBACK,UP,LOWER_UP> mtu 65536 qdisc noqueue state UNKNOWN group default qlen 1   
    link/loopback 00:00:00:00:00:00 brd 00:00:00:00:00:00
    inet 127.0.0.1/8 scope host lo
       valid_lft forever preferred_lft forever
    inet6 ::1/128 scope host 
       valid_lft forever preferred_lft forever
2: veth11: <NO-CARRIER,BROADCAST,MULTICAST,UP> mtu 1500 qdisc noqueue state DOWN group default qlen 1000     
    link/ether da:34:49:a6:18:ce brd ff:ff:ff:ff:ff:ff link-netnsid 0
    inet 192.168.5.1/24 brd 192.168.5.255 scope global veth11
       valid_lft forever preferred_lft forever
netns1:~ # exit
exit
mytux:~ # nsenter -t $pid_netns2 -u -n /bin/bash
netns2:~ # ip addr add 192.168.5.2/24 brd 192.168.5.255 dev veth22
netns2:~ # ip link set veth22 up
netns2:~ # ip a s
1: lo: <LOOPBACK> mtu 65536 qdisc noop state DOWN group default qlen 1
    link/loopback 00:00:00:00:00:00 brd 00:00:00:00:00:00
2: veth22: <NO-CARRIER,BROADCAST,MULTICAST,UP,LOWER_UP> mtu 1500 qdisc noqueue state DOWN group default qlen 1000   
    link/ether f2:ee:52:f9:92:40 brd ff:ff:ff:ff:ff:ff link-netnsid 0
    inet 192.168.5.2/24 brd 192.168.5.255 scope global veth22
       valid_lft forever preferred_lft forever
    inet6 fe80::f0ee:52ff:fef9:9240/64 scope link tentative 
       valid_lft forever preferred_lft forever
netns2:~ # exit
exit
mytux:~ # lsns -t net -t uts
        NS TYPE NPROCS   PID USER  COMMAND
4026531838 uts     387     1 root  /usr/lib/systemd/systemd --switched
4026531963 net     385     1 root  /usr/lib/systemd/systemd --switched
4026532178 net       1   581 root  /usr/sbin/haveged -w 1024 -v 0 -F
4026540861 net       1  4138 rtkit /usr/lib/rtkit/rtkit-daemon
4026540984 uts       1 32146 root  /bin/bash
4026540986 net       1 32146 root  /bin/bash
4026541078 uts       1 32154 root  /bin/bash
4026541080 net       1 32154 root  /bin/bash
mytux:~ # 

Of course, you recognize some of the commands from my first blog post. Still, some details are worth a comment:

Unshare, background shells and shell variables

We create a separate network (and uts) namespace with the “unshare” command and background processes.

unshare –net –uts /bin/bash &

Note the options! We export shell variables with the PIDs of the started background processes [$!] to have these PIDs available in subshells later on. Note: From our original terminal window (in my case a KDE “konsole” window) we can always open a subshell window with:

mytux:~ # konsole &>/dev/null   

You may use another terminal window command on your system. The output redirection is done only to avoid KDE message clattering. In the subshell you may enter a previously created network namespace netnsX by

nsenter -t $pid_netnsX -u -n /bin/bash

Hostnames to distinguish namespaces at the shell prompt

Assignment of hostnames to the background processes via commands like

nsenter -t $pid_netns1 -u hostname netns1

This works through the a separation of the uts namespace. See the first post for an explanation.

Create veth devices with the “ip” command

The key command to create a veth device and to assign its two interfaces to 2 different network namespaces is:

ip link add veth11 netns $pid_netns1 type veth peer name veth22 netns $pid_netns2

Note, that we can use PIDs to identify the target network namespaces! Explicit names of the network namespaces are not required!

The importance of a running lo-device in each network namespace

We intentionally did not set the loopback device “lo” up in netns2. This leads to an interesting observation, which many admins are not aware of:

The lo device is required (in UP status) to be able to ping network interfaces (here e.g. veth11) in the local namespace!

This is standard: If you do not specify the interface to ping from via an option “-I” the ping command will use device lo as a default! The ping traffic runs through it! Normally, we just do not realize this point, because lo almost always is UP on a standard system (in its root namespace).

For testing the role of “lo” we now open a separate terminal window:

mytux:~ # konsole &>/dev/null 

There:

mytux:~ # nsenter -t $pid_netns2 -u -n /bin/bash
netns2:~ # ping 192.168.5.2
PING 192.168.5.2 (192.168.5.2) 56(84) bytes of data.
^C
--- 192.168.5.2 ping statistics ---
2 packets transmitted, 0 received, 100% packet loss, time 1008ms   

netns2:~ # ip link set lo up
netns2:~ # ping 192.168.5.2 -c2
PING 192.168.5.2 (192.168.5.2) 56(84) bytes of data.
64 bytes from 192.168.5.2: icmp_seq=1 ttl=64 time=0.017 ms
64 bytes from 192.168.5.2: icmp_seq=2 ttl=64 time=0.033 ms

--- 192.168.5.2 ping statistics ---
2 packets transmitted, 2 received, 0% packet loss, time 998ms    
rtt min/avg/max/mdev = 0.017/0.034 ms

And: Within the same namespace and “lo” down you cannot even ping the second Ethernet interface of a veth device from the first interface – even if they belong to the same network class!

Open a new sub shell and enter e.g. netns1 there:

netns1:~ # ip link add vethx type veth peer name vethy 
netns1:~ # ip addr add 192.168.20.1/24 brd 192.168.20.255 dev vethx    
netns1:~ # ip addr add 192.168.20.2/24 brd 192.168.20.255 dev vethy    
netns1:~ # ip link set vethx up
netns1:~ # ip link set vethy up
netns1:~ # ping 192.168.20.2 -I 192.168.20.1
PING 192.168.20.2 (192.168.20.2) from 192.168.20.1 : 56(84) bytes of data.    
^C
--- 192.168.20.2 ping statistics ---
4 packets transmitted, 0 received, 100% packet loss, time 3000ms
netns1:~ # ip link set lo up
netns1:~ # ping 192.168.20.2 -I 192.168.20.1       
PING 192.168.20.2 (192.168.20.2) from 192.168.20.1 : 56(84) bytes of data.   
64 bytes from 192.168.20.2: icmp_seq=1 ttl=64 time=0.019 ms     
64 bytes from 192.168.20.2: icmp_seq=2 ttl=64 time=0.052 ms                                
^C                                                              
--- 192.168.20.2 ping statistics ---                            
2 packets transmitted, 2 received, 0% packet loss, time 999ms   
rtt min/avg/max/mdev = 0.019/0.035/0.052/0.017 ms               
netns1:~ #                                           

Connection test

Now back to our experiment. Let us now try to ping netns1 from netns2:

netns2:~ # ip a s
1: lo: <LOOPBACK,UP,LOWER_UP> mtu 65536 qdisc noqueue state UNKNOWN group default qlen 1   
    link/loopback 00:00:00:00:00:00 brd 00:00:00:00:00:00
    inet 127.0.0.1/8 scope host lo
       valid_lft forever preferred_lft forever
    inet6 ::1/128 scope host 
       valid_lft forever preferred_lft forever
2: veth22: <BROADCAST,MULTICAST,UP,LOWER_UP> mtu 1500 qdisc noqueue state UP group default qlen 1000     
    link/ether f2:ee:52:f9:92:40 brd ff:ff:ff:ff:ff:ff link-netnsid 0
    inet 192.168.5.2/24 brd 192.168.5.255 scope global veth22
       valid_lft forever preferred_lft forever
    inet6 fe80::f0ee:52ff:fef9:9240/64 scope link 
       valid_lft forever preferred_lft forever
netns2:~ # ping 192.168.5.1
PING 192.168.5.1 (192.168.5.1) 56(84) bytes of data.
64 bytes from 192.168.5.1: icmp_seq=1 ttl=64 time=0.030 ms  
64 bytes from 192.168.5.1: icmp_seq=2 ttl=64 time=0.033 ms  
64 bytes from 192.168.5.1: icmp_seq=3 ttl=64 time=0.036 ms  
^C
--- 192.168.5.1 ping statistics ---                                                                  
3 packets transmitted, 3 received, 0% packet loss, time 1998ms                                       
rtt min/avg/max/mdev = 0.030/0.033/0.036/0.002 ms                                                    
netns2:~ #     

OK! And vice versa:

mytux:~ #  nsenter -t $pid_netns1 -u -n /bin/bash
netns1:~ #  nsenter -t $pid_netns2 -u -n /bin/bash
netns1:~ # ping 192.168.5.2 -c2
PING 192.168.5.2 (192.168.5.2) 56(84) bytes of data.
64 bytes from 192.168.5.2: icmp_seq=1 ttl=64 time=0.023 ms   
64 bytes from 192.168.5.2: icmp_seq=2 ttl=64 time=0.023 ms

--- 192.168.5.2 ping statistics ---
2 packets transmitted, 2 received, 0% packet loss, time 1003ms   
rtt min/avg/max/mdev = 0.023/0.023/0.023/0.000 ms
netns1:~ # 

Our direct communication via veth works as expected! Network packets are not stopped by network namespace borders – this would not make much sense.

Experiment 2: Connect two namespaces via a bridge in a third namespace

We now try a connection of netns1 and netns2 via a Linux bridgebrx“, which we place in a third namespace netns3:

Note:

This is a standard way to connect containers on a host!

LXC tools as well as libvirt/virt-manager would help you to establish such a bridge! However, the bridge would normally be place inside the host’s root namespace. In my opinion this is not a good idea:

A separate 3rd namespace gets the the bridge and related firewall and VLAN rules outside the control of the containers. But a separate namespace also helps to isolate the host against any communication (and possible attacks) coming from the containers!

So, let us close our sub terminals from the first experiment and kill the background shells:

mytux:~ # kill -9 32146
[2]-  Killed                  unshare --net --uts /bin/bash
mytux:~ # kill -9 32154
[3]+  Killed                  unshare --net --uts /bin/bash

We adapt our setup commands now to create netns3 and bridge “brx” there by using “brctl bradd“. Futhermore we add two different veth devices; each with one interface in netns3. We attach the interface to the bridge via “brctl addif“:

unshare --net --uts /bin/bash &
export pid_netns1=$!
nsenter -t $pid_netns1 -u hostname netns1
unshare --net --uts /bin/bash &
export pid_netns2=$!
nsenter -t $pid_netns2 -u hostname netns2
unshare --net --uts /bin/bash &
export pid_netns3=$!
nsenter -t $pid_netns3 -u hostname netns3
nsenter -t $pid_netns3 -u -n /bin/bash
brctl addbr brx  
ip link set brx up
exit 
ip link add veth11 netns $pid_netns1 type veth peer name veth13 netns $pid_netns3     
ip link add veth22 netns $pid_netns2 type veth peer name veth23 netns $pid_netns3    
nsenter -t $pid_netns1 -u -n /bin/bash
ip addr add 192.168.5.1/24 brd 192.
168.5.255 dev veth11
ip link set veth11 up
ip link set lo up
ip a s
exit
nsenter -t $pid_netns2 -u -n /bin/bash
ip addr add 192.168.5.2/24 brd 192.168.5.255 dev veth22
ip link set veth22 up
ip a s
exit
nsenter -t $pid_netns3 -u -n /bin/bash
ip link set veth13 up
ip link set veth23 up
brctl addif brx veth13
brctl addif brx veth23
exit

It is not necessary to show the reaction of the shell to these commands. But note the following:

  • The bridge has to be set into an UP status.
  • The veth interfaces located in netns3 do not get an IP address. Actually, a veth interface plays a different role on a bridge than in normal surroundings.
  • The bridge itself does not get an IP address.

Bridge ports

By attaching the veth interfaces to the bridge we create a “port” on the bridge, which corresponds to some complicated structures (handled by the kernel) for dealing with Ethernet packets crossing the port. You can imagine the situation as if e.g. the veth interface veth13 corresponds to the RJ45 end of a cable which is plugged into the port. Ethernet packets are taken at the plug, get modified sometimes and then are transferred across the port to the inside of the bridge.

However, when we assign an Ethernet address to the other interface, e.g. veth11 in netns1, then the veth “cable” ends in a full Ethernet device, which accepts network commands as “ping” or “nc”.

No IP address for the bridge itself!
We do NOT assign an IP address to the bridge itself; this is a bit in contrast to what e.g. happens when you set up a bridge for networking with the tools of virt-manager. Or what e.g. Opensuse does, when you setup a KVM virtualization host with YaST. In all these cases something like

ip addr add 192.168.5.100/24 brd 192.168.5.255 dev brx 

happens in the background. However, I do not like this kind of implicit politics, because it opens ways into the namespace surrounding the bridge! And it is easy to forget this bridge interface both in VLAN and firewall rules.

Almost always, there is no necessity to provide an IP address to the bridge itself. If we need an interface of a namespace, a container or the host to a Linux bridge we can always use a veth device. This leads to a much is much clearer situation; you see the Ethernet interface and the port to the bridge explicitly – thus you have much better control, especially with respect to firewall rules.

Enter network namespace netns3

Now we open a terminal as a sub shell (as we did in the previous example) and enter netns3 to have a look at the interfaces and the bridge.

mytux:~ # nsenter -t $pid_netns3 -u -n /bin/bash
netns3:~ # brctl show brx
bridge name     bridge id               STP enabled     interfaces
brx             8000.000000000000       no
netns3:~ # ip a s
1: lo: <LOOPBACK> mtu 65536 qdisc noop state DOWN group default qlen 1
    link/loopback 00:00:00:00:00:00 brd 00:00:00:00:00:00
2: brx: <BROADCAST,MULTICAST,UP,LOWER_UP> mtu 1500 qdisc noqueue state UP group default qlen 1000
    link/ether ce:fa:74:92:b5:00 brd ff:ff:ff:ff:ff:ff
    inet6 fe80::1c08:76ff:fe0c:7dfe/64 scope link 
       valid_lft forever preferred_lft forever
3: veth13@if2: <BROADCAST,MULTICAST,UP,LOWER_UP> mtu 1500 qdisc noqueue master brx state UP group default qlen 1000   
    link/ether ce:fa:74:92:b5:00 brd ff:ff:ff:ff:ff:ff link-netnsid 0
    inet6 fe80::ccfa:74ff:fe92:b500/64 scope link 
       valid_lft forever preferred_lft forever
4: veth23@if2: <BROADCAST,MULTICAST,UP,LOWER_UP> mtu 1500 qdisc noqueue master brx state UP group default qlen 1000   
    link/ether fe:5e:0b:d1:44:69 brd ff:ff:ff:ff:ff:ff link-netnsid 1
    inet6 fe80::fc5e:
bff:fed1:4469/64 scope link 
       valid_lft forever preferred_lft forever
netns3:~ # bridge link
3: veth13 state UP @brx: <BROADCAST,MULTICAST,UP,LOWER_UP> mtu 1500 master brx state forwarding priority 32 cost 2    
4: veth23 state UP @brx: <BROADCAST,MULTICAST,UP,LOWER_UP> mtu 1500 master brx state forwarding priority 32 cost 2    

Useful commands

Let us briefly discuss some useful commands:

Incomplete information of “brctl show”
Unfortunately, the standard command

brctl show brx

does not work properly inside network namespaces; it does not produce a complete output. E.g., the attached interfaces are not shown. However, the command

ip a s

shows all interfaces and their respective “master“. The same is true for the very useful “bridge” command :

bridge link

If you want to see even more details on interfaces use

ip -d a s

and grep the line for a specific interface.

Just for completeness: To create a bridge and add a veth devices to the bridge, we could also have used:

ip link add name brx type bridge
ip link set brx up
ip link set dev veth13 master brx   
ip link set dev veth23 master brx   

Connectivity test with ping
Now, let us turn to netns1 and test connectivity:

mytux:~ # nsenter -t $pid_netns1 -u -n /bin/bash
netns1:~ # ip a s 
1: lo: <LOOPBACK,UP,LOWER_UP> mtu 65536 qdisc noqueue state UNKNOWN group default qlen 1
    link/loopback 00:00:00:00:00:00 brd 00:00:00:00:00:00
    inet 127.0.0.1/8 scope host lo
       valid_lft forever preferred_lft forever
    inet6 ::1/128 scope host 
       valid_lft forever preferred_lft forever
2: veth11@if3: <BROADCAST,MULTICAST,UP,LOWER_UP> mtu 1500 qdisc noqueue state UP group default qlen 1000    
    link/ether 6a:4d:0c:30:12:04 brd ff:ff:ff:ff:ff:ff link-netnsid 0
    inet 192.168.5.1/24 brd 192.168.5.255 scope global veth11
       valid_lft forever preferred_lft forever                                                       
    inet6 fe80::684d:cff:fe30:1204/64 scope link                                                     
       valid_lft forever preferred_lft forever                                                       
netns1:~ # ping 192.168.5.2
PING 192.168.5.2 (192.168.5.2) 56(84) bytes of data.
64 bytes from 192.168.5.2: icmp_seq=1 ttl=64 time=0.039 ms
64 bytes from 192.168.5.2: icmp_seq=2 ttl=64 time=0.045 ms
64 bytes from 192.168.5.2: icmp_seq=3 ttl=64 time=0.054 ms
^C
--- 192.168.5.2 ping statistics ---
3 packets transmitted, 3 received, 0% packet loss, time 1998ms
rtt min/avg/max/mdev = 0.039/0.046/0.054/0.006 ms
netns1:~ # nc -l 41234

Note that – as expected – we do not see anything of the bridge and its interfaces in netns1! Note that the bridge basically is a device on the data link layer, i.e. OSI layer 2. In the current configuration we did nothing to stop the propagation of Ethernet packets on this layer – this will change in further experiments.

Connectivity test with netcat
At the end of our test we used the netcat command “nc” to listen on a TCP port 41234. At another (sub) terminal we can now start a TCP communication from netns2 to the TCP port 41234 in netns1:

mytux:~ # nsenter -t $pid_netns2 -u -n /bin/bash
netns2:~ # nc 192.168.5.1 41234
alpha
beta

This leads to an output after the last command in netns1:

netns1:~ # nc -l 41234
alpha
beta

So, we have full connectivity – not only for ICMP packets, but also for TCP packets. In yet another terminal:

mytux:~ # nsenter -t $pid_netns1 -u -n /bin/bash
netns1:~ # netstat -a
Active 
Internet connections (servers and established)
Proto Recv-Q Send-Q Local Address           Foreign Address         State      
tcp        0      0 *:41234                 *:*                     LISTEN      
tcp        0      0 192.168.5.1:41234       192.168.5.2:45122       ESTABLISHED     
Active UNIX domain sockets (servers and established)
Proto RefCnt Flags       Type       State         I-Node Path   
netns1:~ # 

Conclusion

It is pretty easy to connect network namespaces with veth devices. The interfaces can be assigned to different network namespaces by using a variant of the “ip” command. The target network namespaces can be identified by PIDs of their basic processes. We can link to namespaces directly via the interfaces of one veth device.

An alternative is to use a Linux bridge (for Layer 2 transport) in yet another namespace. The third namespace provides better isolation; the bridge is out of the view and control of the other namespaces.

We have seen that the commands “ip a s” and “bridge link” are useful to get information about the association of bridges and their assigned interfaces/ports in network namespaces.

In the coming article
Fun with veth-devices, Linux bridges and VLANs in unnamed Linux network namespaces – IV
we extend our efforts to creating VLANs with the help of our Linux bridge. Stay tuned ….