When designing and building web applications with OO techniques the following elementary questions come up:
- How to represent real world objects [RWOs] in the PHP OO code of Web applications by PHP objects?
- How and where to define and control hierarchical relations between different object classes?
- How and where to define the relation of the object properties to database table and column definitions of a RDBMS?
- How to define rules for presentation and web template controller objects and/or web generator objects ?
As a common answer I often use a kind of “SCHEMA” oriented approach. By a SCHEMA on the programming level I understand a container of information that helps to control objects of an application and their properties in a flexible, yet standardized way. So, I am not talking about database schemata – I refer to SCHEMATA describing and controlling the data structure, the behavior, properties and certain methods of OO objects (OO Schemata). Such an object control SCHEMA may, however, refer to and use information coded in a relational database schema. Actually, important parts of a SCHEMA support the objectives of a classical data mapper pattern (OO properties vs. database table fields). But SCHEMATA in my own application framework contain more and other logical control information and settings than just data mapping definitions (see below).
When many object relations and properties are involved the maintenance of multiple OO SCHEMATA may get painful. This article is about the idea that the use of decoupled Schemata for property groups and a rigorous use of composite patterns in the object design may make things easier.
In the following text we call a PHP object instance that represents a RWO a “PWO”. The PWO object properties are of course defined in the PWO class definition. What kinds of PWO classes are required is defined by the results of a object oriented analysis combined with an ER model. A specific PWO class may be derived from a general (framework) class defining “Single” [SGL] objects that shall work as PWOs (and represent a single RWO each) plus the methods required for handling a PWO and its property data.
Schemata to encapsulated structural data knowledge for (PHP) PWO objects
A PWO may represent a RWO of a certain type like a free position, a product, a contract, an employee or a web page. We need classes of PWOs to cover all required RWO types. For each class of PWOs that appear in a new PHP application I define a specific PHP SCHEMA object class (derived from Schema base classes). I use such a PWO Schema class to define – among other things – e.g.
- all required properties of a PWO object class, associated data types, value ranges, default values, criteria for must and (un/)changeable properties by appropriate arrays,
- schematic control parameters for other application objects that deal with the data,
- associated database tables/views of a RDBMS,
- the relation of properties to database fields and index definitions,
- the relation of properties to $_POST oder $_SESSION data arrays,
- standard or Null value settings for all fields,
- typical SQL fragments for a variety of database interactions,
- all required Master-Detail [MD] relations to other object classes and associated tables/columns,
- possible constraints for deletions,
inserts, updates to maintain data and relation integrity,
- constraints regarding unique values within relations.
Most of the property/field information is typically kept in arrays. The definitions can be provided directly in the class definition field or indirectly by fetching information from special database tables which an application designer may fill. Normally, only one Schema object instance – a PWO class specific SCHEMA object – is generated for each type of PWOs during the run time of a PHP application program. SCHEMA objects of a specific class are typical singletons.
The ultimate goal of using Schema definitions in an application development framework is:
If you once have defined a Schema consistently with your database most – if not all – application features and methods to maintain the PWO objects and their underlying data should be ready to run. The object constructor uses the SCHEMA definitions to prepare and fill the objects properties.
In addition a SCHEMA provides a very flexible and dynamic way to change the property list of object classes.
As a central part of this task the Schema information relates (PHP) PWO object properties to database tables and their field/columns (of a RDBMS) in the sense of a “mapping“. Such tasks are theoretically well covered by the use of “Data Mapper” patterns as a bridge between the OO and the RDBMS worlds. A SCHEMA is – among other things – a concrete Data Mapper object. It defines what PWO property corresponds to which database table column. (It may also define the property and data type, value limits changeability, and so on). If you for a moment neglect object relations (and related table relations in the database), in very many simple applications RWO properties and related PWO properties are mapped to the fields of exactly one database table.
However, in case of complex applications you may also have to define parameters describing Master-Detail [MD] relations or other types of relations to other object classes or other external MD hierarchies. For complex applications we furthermore will add parameters defining which properties shall or shall not appear in which order, in which PWO single or PWO list representation, in MD views, in maintenance masks and so on.
Especially list definitions (What fields appear? From which joined tables? In which order?) and definitions for which fields should appear in which order in maintenance masks or public web pages add complexity to a SCHEMA. Moreover, for the purposes of an application meta framework, I provide a lot of parameters to control presentation tasks both for automatically providing maintenance masks for whole object hierarchies and controlling the methods of web page generator objects.
Therefore, in a complicated application environment, a SCHEMA object can be a very complex thing in itself – it must be modified with care and there should always be defined methods to guarantee consistency conditions – e.g.
- internally between definitions inside a SCHEMA,
- between SCHEMATA for object classes defined on different levels of a MD hierarchy
- and of course between the SCHEMA definitions and the tables in the database.
Note that SCHEMA definitions in application developer meta frameworks can also be used to generate tables for new applications (if they are not present yet) and/or to change existing tables and/or to validate the real database tables against what the PHP object representation in a program expects.
A typical (web) application will of course require multiple distinct SCHEMATA for the definition of different PWO classes.
Typically the appropriate SCHEMA object for a PWO or an object describing lists of PWOs will be loaded or injected
into a PWO instance during the creation of this instance by a constructor function. [An alternative to an external injection into the constructor could of course be an automatic identification and loading of the already created singleton Schema object by static methods of a classical Singleton pattern in PHP.]
A major disadvantage of a Schema oriented approach is:
If you make errors when maintaining the Schema definitions your application(s) probably will not run anymore. The reason of course is that Schema objects transport a substantial, crucial knowledge about the PWO object(s) and the database structure as well as object relations and table relations. This knowledge is used at many places in your application methods.
Maintainability of SCHEMA definitions ?
The idea of encapsulating extensive knowledge about data structures in a SCHEMA may lead to maintainability problems. In my experience, a SCHEMA based approach works very well and relatively effortless if
- the number of properties/fields is limited,
- selection conditions for defining which fields appear are limited,
- when sequence and ordering conditions (i.e. the order of fields or conditions on the order of field appearances in representation objects) are simple and also limited
- the relations to other object classes are simple and the number of relations is limited
- your application, object and and database design is finalized already.
But, whenever the number of properties of RWOs/PWOs gets big, or large groups of logically connected properties appear and/or the relations to other objects get numerous and complicated then the effort to change the settings in the interconnected SCHEMATA for several PWO classes may get a painful and a very time consuming task.
Especially the insertion of new object properties at some positions in defined sequence of properties may lead to a lot of manual adjustments a programmer may have to do in different affected Schemata. E.g., a renumbering of many array elements may happen. Changing the database tables may be much less of an effort than changing all affected Schemata in a complex application environment (to be developed).
In parallel to the number of properties the number of columns in a database table may get big – so that even handling the tables with tools like phpMyAdmin may also become a bit difficult. Note that in a CMS like application the variables (properties) describing the position and look of page elements may easily be more than hundred.
Typically, the last condition of my criteria list above will not be met during development phases – especially not in agile projects. Tests and new insights may lead to continuous modifications of data and object models. Resulting Schema adaptions to changes in database or object models may happen very often during some development phases. And then time is a more crucial factor than developers may wish it to be.
Some SCHEMA edit actions like renumbering of arrays or adjusting property/field order definitions will feel like a waste of time especially in cases when only a special group of related properties is the main target of the changes whilst other property groups could be left alone – at least in principle – if things were decoupled … . However, this is not the case if all properties of all property groups are sequentially listed and probably enumerated in one and the same SCHEMA object. And believe me – some enumeration has to be done – you cannot cover all and everything by associative arrays.
To enhance the maintainability of SCHEMATA in vast MD applications I have used a different approach for some time now,
which may also be of interest for other developers. Actually – as I am originally a physicist and programming is not even my main profession within IT – I am not sure whether the following approach has been described elsewhere. Probably it has. There is a big overlap with the well known general “Composite Pattern” in OO design – however, it is the relation to SCHEMA objects that is of interest here. My goal is to fold a composite pattern for SCHEMATA into a related composite pattern for PWOs. For myself it marked a bit of a change of how I incorporate structural information into complex PHP/MySQL applications like a CMS.
SLAVE Schemata and SLAVE Objects
I summarize my approach which leads to a split of tables and Schema definitions by the words “Slave Schemata and Slave Objects”.
By the word “SLAVE” I do not refer to Master-Detail relations. I neither refer to Master-Slave structures in a database or LDAP server environment. To mark the difference I shall below call the “master” of a SLAVE SCHEMA the “MAIN SCHEMA“. Nevertheless SLAVEs mark a level in a new hierarchy of a composite pattern as I explain below.
I have three main objectives:
- The first objective of this approach is to decouple the conventional definitions of property and data groups in a classical Schema class from each other and encapsulate each data group definition in a separate SCHEMA object, i.e. in a separate SLAVE SCHEMA class definition.
- The second objective is that – instead of comprising all data fields for object properties in just one database table – we will distribute the fields over several separate database tables – one for each group of properties.
- The third objective is to make the resulting MAIN/SLAVE-SCHEMA structure and the distribution of data over several tables usable for (restructured) PWOs – without having to reprogram basic methods already available to PWOs by inheritance from some Base classes (of a framework). This will lead us to the definition of SLAVE objects.
SLAVE SCHEMATA and distinct database tables for property groups
Please note, that the rearrangement of data over several database tables is NOT done because of reasons like redundancy reduction or to get a better ER model. On the contrary, we shall need additional efforts in our object methods to gather all property information from separate tables. The whole effort is done to enhance the maintainability of our SCHEMATA. Nevertheless, reflecting the logical association of data groups by separate distinct tables may help to deal better with associative structures – although we even get a bit more redundancy.
At its core a SCHEMA defines the relation between database table fields and PWO properties. If we want to split the properties of PWOs of a defined class into groups and distribute these groups into separate database tables we need of course multiple SCHEMATA and a related definition of several SCHEMA classes.
As an example let us assume that we have a RWO/PWO (like an art picture) which shall be described
- by some basic geometrical information (as e.g. an art picture canvas) (property group “geo”)
- and by some standard maintainable CMS parameters determining the presentation structure of text information and illustrating pictures on a web page (property group “cms”).
Then we may identify two groups of properties “geo” and “cms” of such a PWO. We could define the properties and their mapping to database fields in 2 Schemata – one for the “geo” group of object properties and one for the “cms” group.
r
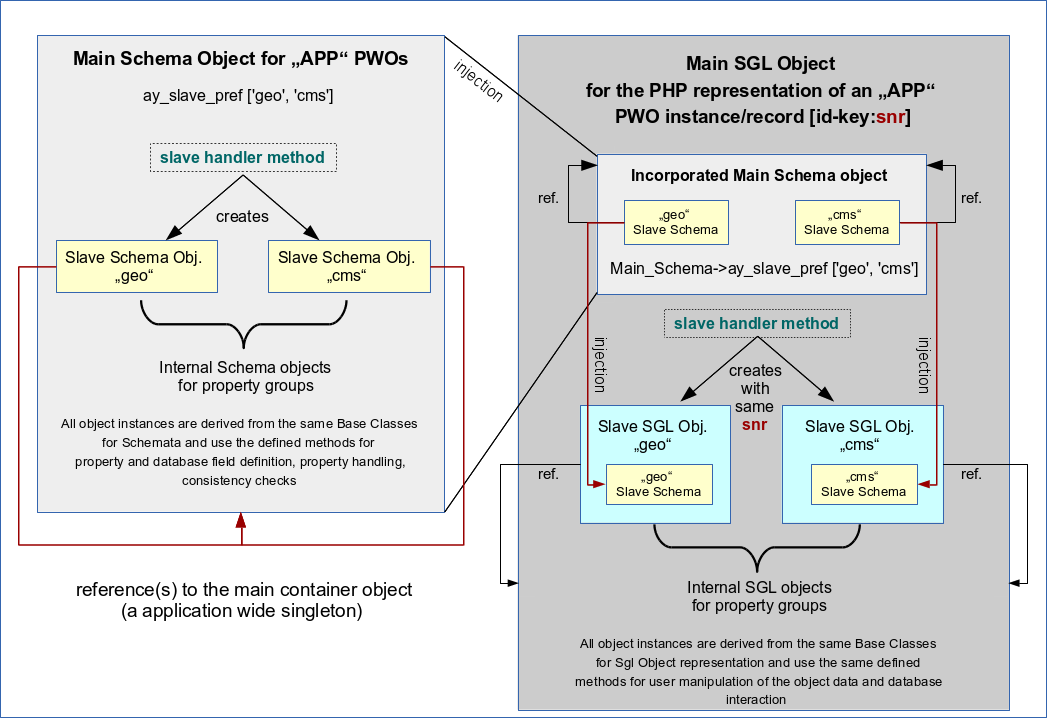
However, we also need a kind of “Main Schema” to bind these (Sub-) Schemata together. Following this idea we get a new hierarchy – in addition to a potentially already existing logical and hierarchical Master-Detail relation between different classes of PWO objects (e.g. a picture-artist relation). But this time we deal just with a grouping of data in “rooms” of a house under one “roof”. So, this new hierarchy of SCHEMATA only has two levels:
- A MAIN SCHEMA – which defines as usual basic properties of a specific PWO object class and the MD hierarchy relations or other relations to object instances of other PWO classes (besides other things)
- Multiple SLAVE SCHEMATA – each describing a special group of semantically connected properties of its related specific PWO class.
Note that we will define basic logical and fundamental relational aspects of a PWO in the MAIN SCHEMA. A SLAVE SCHEMA contains information about some standard properties confined in a group. Each SLAVE SCHEMA describes the relation of the properties of its associated group with the fields of a distinguished SLAVE database table – separate from the MAIN table and other SLAVE tables.
All properties described in the MAIN SCHEMA object and it’s included SLAVE SCHEMA objects together define a complete set of properties of a PWO instance.
To logically bind associated records together it is clear that the key values identifying the associated records both in the Main table and the SLAVE tables must have a common value – identifying a PWO record and its respective object instance in a PHP program. We call this value of the unique record identification key “snr” below.
The MAIN SCHEMA has of course to comprise some knowledge about the SLAVE Schemata. In an MD application, we may in addition have to define one MAIN Schema and several SLAVE Schemata on each of the MD levels.
The basic idea regarding an improved efficiency of the maintenance of SCHEMATA is:
If you have to change some properties/fields – just and only change the affected SLAVE or the Main SCHEMA describing the related group of fields – but leave all other SCHEMATA and their definition statements unchanged !
SLAVE SCHEMA objects are created inside the MAIN SCHEMA object
As a Main Schema and its Slave Schemata strongly belong together and all the Slave Schemata depend on the Main Schema my approach was to create the SLAVE Schema object instances as sub-objects of the MAIN Schema object instance. I.e., I followed the idea of a composite pattern:
The MAIN SCHEMA object – a Singleton – acts as a container object for its SLAVE SCHEMA object instances. It generates, contains and controls SLAVE SCHEMATA as sub-objects (i.e. as complicated variables). We can save this knowledge in array-like structures for the sub-objects. The SLAVE Schemata can e.g be arranged in an associative array with indices defined in an array “ay_slave_prefs[]” of the Main Schema – containing name prefixes for each of the (Slave) property groups (e.g. “geo” and “cms”).
The MAIN SCHEMA objects of an MD application and their encapsulated SLAVE SCHEMA objects should of course be instances of the same type of general Base Classes for Schema objects. We want to use as much of the methods already defined for Schema objects as possible. SLAVE Schemata are basically Schemata after all!
Nevertheless, in such an approach we would still have to adapt or introduce some methods to deal with the hierarchical structure and the association with another – e.g. in special requirements for consistency checks between a SLAVE Schema and its MAIN Schema and other things. However, this is an easy task.
nFurthermore, each SLAVE SCHEMA object should to receive a reference to its MAIN SCHEMA object as an injected parameter to be able to create and handle further references to all the variables of the MAIN Schema. So the MAIN Schema object will contain SLAVE Schema objects – each of which itself comprises a reference to their common container object, namely the MAIN SCHEMA object.
Note, that there is still only one MAIN SCHEMA object comprising all relevant property and relation information for each PWO class.
The following drawing should make the basic ideas described above clear:
SGL PWO objects representing a single RWO become internally structured by SLAVE PWO objects
Ok, so far we grasped the idea of a kind of an array of SLAVE Schemata within a MAIN SCHEMA. Each SLAVE SCHEMA describes a bunch of properties of a PWO object class. The values of these properties are saved in a distinct database table. The MAIN SCHEMA keeps everything together and defines also the MD relations and other relations of a PWOs of different PWO classes.
At the core of PHP (web) applications, however, we need (structured) PWO objects with methods to handle all of the user’s interactions with all property data.
In my application meta framework a PWO class is realized by deriving it from a base class for so called Single [SGL] objects. The task of a SGL object class is to provide a general basis for specific PWO classes. A PWO instance is also a SGL instance and has all of its methods available. We speak of a “SGL PWO” object below. (An application class family comprises also other types of objects as e.g. LIST objects or template control objects).
A SGL PWO object is derived from some SGL Base Classes (of an inheritance chain) with all required methods e.g. to handle database transactions, to check field contents and to handle complex object relations like MD hierarchy relations of a potential PWO. It does this by extensively using the PWO SCHEMA information in its methods.
But, how to deal with our new type of a MAIN SCHEMA that contains information distributed over several SLAVE SCHEMATA? How would a PWO use it? And:
Do we need to rewrite all the base class methods for SGL PWOs to handle the database interactions because we have divided the PWO properties into distinct groups (saved in distinct database tables).
Fortunately, the answer is NO!
A SGL PWO object in my framework e.g. identifies its appropriate SCHEMA object by following name space rules and then loads the Schema as a sub object (see the graphics). It does this by injecting the PWO Schema object into the constructor of its most elementary base class in the inheritance chain. So, basically a PWO gets its Schema object injected. (I have only automatized this process by name rules and the use of Singleton patterns). A PWO deals with its data by using the knowledge of its injected SCHEMA.
Therefore, we can choose a similar approach for our SGL PWO objects as for the Schemata:
A SGL object making a specific PWO instance becomes a MAIN SGL PWO object. It will create and contain SLAVE SGL PWOs which are derived from the very same base classes as the MAIN SGL object itself. So, we use a kind of composite pattern also for the SGL PWO object:
The Main SGL PWO object acts as a container for the SLAVE SGL PWOs. Each SLAVE SGL object shall be responsible for the representation of a property group defined in a SLAVE Schema. And now comes the real power of
this intertwined double composite pattern approach:
The properties of each SLAVE SGL object correspond to fields of the table/views defined in the related SLAVE Schema, only! To use that on the programming stage we only have to create the SLAVE SGL PWO objects the same way as the MAIN SGL PWO object – BUT with an injection of the relevant SLAVE Schema instead of the Main Schema!
See the drawing above. As in the case of the SCHEMATA we create each SLAVE SGL object with a reference to its MAIN SGL object. Each SLAVE SGL object therefore knows about the identification key of the MAIN SGL object (and its rows in the database tables) and can therefore use it to identify its own records in the SLAVE tables of the database (defined in the SLAVE Schema). Remember that we defined the key value to be the same for associated records in the MAIN and SLAVE tables.
Provided that the right SLAVE SCHEMA was injected into each SLAVE SGL PWO , all base class methods that work for the MAIN SGL object regarding database operations will also work for SLAVE SGL objects. The correct identification of the right record in the associated SLAVE tables is guaranteed if each SLAVE object gets the same value “snr” for its identification key as its MAIN container object (see above). That should be straightforward to understand and can be guaranteed by the constructor functions. As a result SLAVE objects and their methods work autonomously on their SLAVE tables just as the MAIN SGL object works on its main table.
Recursive iteration of methods
All what we said above means in addition that we are able to iterate all the methods, a SGL MAIN object uses for data handling, also over it’s SLAVE SGL objects:
The thing to be guaranteed is that every UPDATE, DELETE, INSERT method for MAIN SGL object automatically triggers the execution of the very same (base class) methods for the SLAVE objects. This requires a rather simple method extension in the base classes. Actually, we could define each of the elementary methods in form of a recursion following a hierarchy:
If SLAVE objects exist call the method presently used for the MAIN SGL PWO object for each of the SLAVE objects, too.
We may stop the recursion at the level of the SLAVE objects without trying a further iterate over non existing deeper SLAVE level by evaluating some special property of a SLAVE Schema describing that the SLAVE has no SLAVE Schemata incorporated itself. (However, also the iteration over tree like object structures would be possible – although not required in my case.)
Remark regarding error handling of database transactions
For error handling we need further method extensions controlling the success of the database operations over all (MAIN and SLAVE) tables. In case of failures in a SLAVE table all other already performed transactions on other SAVE tables or the MAIN table have to be rolled back. To do this without appropriate mechanisms offered by the database the old values have to be saved in an intermediate storage. Otherwise database transaction control and rollback mechanisms could be used.
Hide or use the SLAVE structure from outside?
Note that regarding the interaction with a PWO from outside you have the choice
- to adapt objects that use PWOs to work with their data or generate e.g. web pages to use they knowledge about the SLAVE structure
- or to create interface methods that hide the internal structure.
My experience is that in case you build your own application development framework you will need both approaches. Note also that our SLAVE
approach will have an impact on objects and methods developed for representing LISTs of PWOs or MD views over several MD hierarchy levels of PWOs. But that is stuff for another article. In this article I just wanted to present the basics of the SLAVE SCHEMA and SLAVE PWO object approach.
Conclusion
Maintaining multiple SCHEMA definitions over hundreds of properties of RWO/PWOs can be dreadful. Splitting the properties into property groups and defining associated Sub-Schema-objects of a Main-Schema-object in the sense of a OO composite pattern can help to improve maintainability. This approach can be coupled with a composite pattern for the (SGL) PWO objects representing single RWOs. The SLAVE (SGL) PWO objects will be instantiated by using the same SGL base classes as for the MAIN PWO object (containing the SLAVE PWOs). The decoupling of data is guaranteed by the injection of right SLAVE Schema into a SLAVE PWO. Many methods can then be iterated over the Main/SLAVE objects and will then lead to a consistent database interaction.
In a forthcoming article I shall discuss the impact of a SLAVE object approach on (X)HTML generator methods in web applications. See:
PHP/OO/Schemata: SLAVE objects and (X)HTML generator methods