Variational Autoencoder with Tensorflow – X – VAE application to CelebA images

I continue with my series on Variational Autoencoders and methods to control the Kullback-Leibler [KL] loss.

Variational Autoencoder with Tensorflow – I – some basics
Variational Autoencoder with Tensorflow – II – an Autoencoder with binary-crossentropy loss
Variational Autoencoder with Tensorflow – III – problems with the KL loss and eager execution
Variational Autoencoder with Tensorflow – IV – simple rules to avoid problems with eager execution
Variational Autoencoder with Tensorflow – V – a customized Encoder layer for the KL loss
Variational Autoencoder with Tensorflow – VI – KL loss via tensor transfer and multiple output
Variational Autoencoder with Tensorflow – VII – KL loss via model.add_loss()
Variational Autoencoder with Tensorflow – VIII – TF 2 GradientTape(), KL loss and metrics
Variational Autoencoder with Tensorflow – IX – taming Celeb A by resizing the images and using a generator

The last method discussed made use of Tensorflow’s GradientTape()-class. We still have to test this approach on a challenging dataset like CelebA. Our ultimate objective will be to pick up randomly chosen data points in the VAE’s latent space and create yet unseen but realistic face images by the trained Decoder’s abilities. This task falls into the category of Generative Deep Learning. It has nothing to do with classification or a simple reconstruction of images. Instead we let a trained Artificial Neural Network create something new.

The code fragments discussed in the last post of this series helped us to prepare images of CelebA for training purposes. We cut and downsized them. We saved them in their final form in Numpy arrays: Loading e.g. 170,000 training images from a SSD as a Numpy array is a matter of a few seconds. We also learned how to prepare a Keras ImageDataGenerator object to create a flow of batches with image data to the GPU.

We have also developed two Python classes “MyVariationalAutoencoder” and “VAE” for the setup of a CNN-based VAE. These classes allow us to control a VAE’s input parameters, its layer structure based on Conv2D- and Conv2DTranspose layers, and the handling of the Kullback-Leibler [KL-] loss. In this post I will give you Jupyter code fragments that will help you to apply these classes in combination with CelebA data.

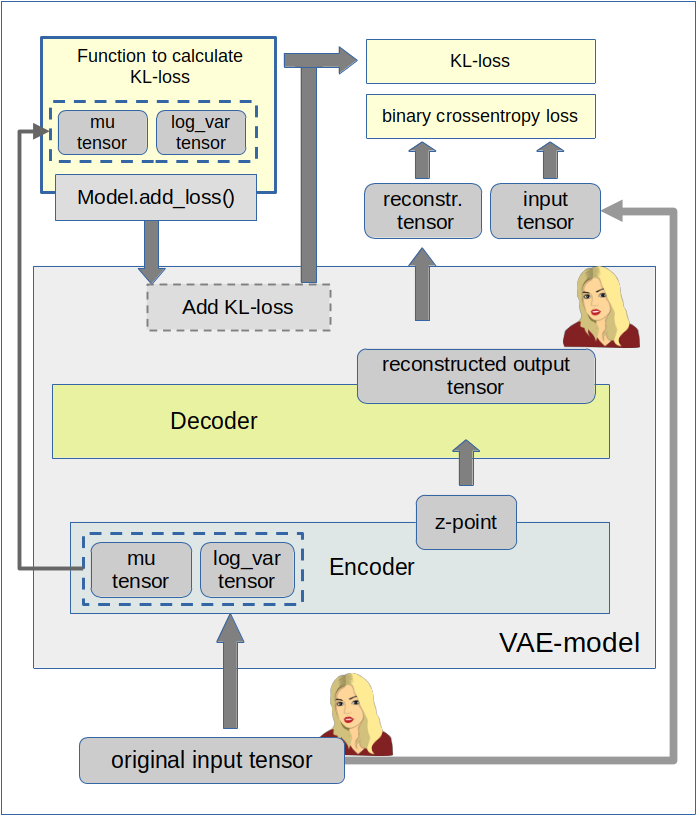
Basic structure of the CNN-based VAE – and sizing of the KL-loss contribution

The Encoder and Decoder CNNs of our VAE shall consist of 4 convolutional layers and 4 transpose convolutional layers, respectively. We control the KL loss by invoking GradientTape() and train_step().

Regarding the size of the KL-loss:
Due to the “curse of dimensionality” we will have to choose the KL-loss contribution to the total loss large enough. We control the relative size of the KL-loss in comparison to the standard reconstruction loss by a parameter “fact“. To determine an optimal value requires some experiments. It also depends on the kind of reconstruction loss: Below I assume that we use a “Binary Crossentropy” loss. Then we must choose fact > 3.0 to get the KL-loss to become bigger than 3% of the total loss. Otherwise the confining and smoothing effect of the KL-loss on the data distribution in the latent space will not be big enough to force the VAE to learn general and not specific features of the training images.

Imports and GPU usage

Below I present Jupyter cells for required imports and GPU preparation without many comments. Its all standard. I keep the Python file with the named classes in a folder “my_AE_code.models”. This folder must have been declared as part of the module search path “sys.path”.

Jupyter Cell 1 – Imports

import os, sys, time, random 
import math
import numpy as np

import matplotlib as mpl
from matplotlib import pyplot as plt
from matplotlib.colors import ListedColormap
import matplotlib.patches as mpat 

import PIL as PIL 
from PIL import Image
from PIL import ImageFilter

# temsorflow and keras 
import tensorflow as tf
from tensorflow import keras as K
from tensorflow.keras import backend as B 
from tensorflow.keras.models import Model
from tensorflow.keras import regularizers
from tensorflow.keras import optimizers
from tensorflow.keras.optimizers import Adam
from tensorflow.keras import metrics
from tensorflow.keras.layers import Input, Conv2D, Flatten, Dense, Conv2DTranspose, Reshape, Lambda, \
                                    Activation, BatchNormalization, ReLU, LeakyReLU, ELU, Dropout, \
                                    AlphaDropout, Concatenate, Rescaling, ZeroPadding2D, Layer

#from tensorflow.keras.utils import to_categorical
#from tensorflow.keras.optimizers import schedules

from tensorflow.keras.preprocessing.image import ImageDataGenerator

from my_AE_code.models.MyVAE_3 import MyVariationalAutoencoder
from my_AE_code.models.MyVAE_3 import VAE

Jupyter Cell 2 – List available Cuda devices

# List Cuda devices 
# Suppress some TF2 warnings on negative NUMA node number
# see https://www.programmerall.com/article/89182120793/
os.environ['TF_CPP_MIN_LOG_LEVEL'] = '3'  # or any {'0', '1', '2'}

tf.config.experimental.list_physical_devices()

Jupyter Cell 3 – Use GPU and limit VRAM usage

# Restrict to GPU and activate jit to accelerate 
# *************************************************
# NOTE: To change any of the following values you MUST restart the notebook kernel ! 

b_tf_CPU_only      = False   # we need to work on a GPU  
tf_limit_CPU_cores = 4 
tf_limit_GPU_RAM   = 2048

b_experiment  = False # Use only if you want to use the deprecated way of limiting CPU/GPU resources 
                      # see the next cell 

if not b_experiment: 
    if b_tf_CPU_only: 
        ... 
    else: 
        gpus = tf.config.experimental.list_physical_devices('GPU')
        tf.config.experimental.set_virtual_device_configuration(gpus[0], 
        [tf.config.experimental.VirtualDeviceConfiguration(memory_limit = tf_limit_GPU_RAM)])
    
    # JiT optimizer 
    tf.config.optimizer.set_jit(True)

You see that I limited the VRAM consumption drastically to leave some of the 4GB VRAM available on my old GPU for other purposes than ML.

Setting some basic parameters for VAE training

The next cell defines some basic parameters – you know this already from my last post.

Juypter Cell 4 – basic parameters

# Some basic parameters
# ~~~~~~~~~~~~~~~~~~~~~~~~
INPUT_DIM          = (96, 96, 3) 
BATCH_SIZE         = 128

# The number of available images 
# ~~~~~~~~~~~~~~~~~~~~~~~~~~~~~~~~~
num_imgs = 200000  # Check with notebook CelebA 

# The number of images to use during training and for tests
# ~~~~~~~~~~~~~~~~~~~~~~~~~~~~~~~~~~~~~~~~~~~~~~~~~~~~~~~~~~~
NUM_IMAGES_TRAIN  = 170000   # The number of images to use in a Trainings Run 
#NUM_IMAGES_TO_USE  = 60000   # The number of images to use in a Trainings Run 

NUM_IMAGES_TEST = 10000   # The number of images to use in a Trainings Run 

# for historic comapatibility reasons 
N_ImagesToUse        = NUM_IMAGES_TRAIN 
NUM_IMAGES           = NUM_IMAGES_TRAIN 
NUM_IMAGES_TO_TRAIN  = NUM_IMAGES_TRAIN   # The number of images to use in a Trainings Run 
NUM_IMAGES_TO_TEST   = NUM_IMAGES_TEST  # The number of images to use in a Test Run 

# Define some shapes for Numpy arrays with all images for training
# ~~~~~~~~~~~~~~~~~~~~~~~~~~~~~~~~~~~~~~~~~~~~~~~~~~~~~~~~~~~~~~~~~~~~
shape_ay_imgs_train = (N_ImagesToUse, ) + INPUT_DIM
print("Assumed shape for Numpy array with train imgs: ", shape_ay_imgs_train)

shape_ay_imgs_test = (NUM_IMAGES_TO_TEST, ) + INPUT_DIM
print("Assumed shape for Numpy array with test  imgs: ",shape_ay_imgs_test)

Load the image data and prepare a generator

Also the next cells were already described in the last blog.

Juypter Cell 5 – fill Numpy arrays with image data from disk

# Load the Numpy arrays with scaled Celeb A directly from disk 
# ~~~~~~~~~~~~~~~~~~~~~~~~~~~~~~~~~~~~~~~~~~~~~~~~~~~~~~~~~~~~~~
print("Started loop for train and test images")
start_time = time.perf_counter()

x_train = np.load(path_file_ay_train)
x_test  = np.load(path_file_ay_test)

end_time = time.perf_counter()
cpu_time = end_time - start_time
print()
print("CPU-time for loading Numpy arrays of CelebA imgs: ", cpu_time) 
print("Shape of x_train: ", x_train.shape)
print("Shape of x_test:  ", x_test.shape)

The Output is

Started loop for train and test images

CPU-time for loading Numpy arrays of CelebA imgs:  2.7438277259999495
Shape of x_train:  (170000, 96, 96, 3)
Shape of x_test:   (10000, 96, 96, 3)

Juypter Cell 6 – create an ImageDataGenerator object

# Generator based on Numpy array of image data (in RAM)
# ~~~~~~~~~~~~~~~~~~~~~~~~~~~~~~~~~~~~~~~~~~~~~~~
b_use_generator_ay = True

BATCH_SIZE    = 128
SOLUTION_TYPE = 3

if b_use_generator_ay:

    if SOLUTION_TYPE == 0: 
        data_gen = ImageDataGenerator()
        data_flow = data_gen.flow(
                           x_train 
                         , x_train
                         , batch_size = BATCH_SIZE
                         , shuffle = True
                         )
    
    if SOLUTION_TYPE == 3: 
        data_gen = ImageDataGenerator()
        data_flow = data_gen.flow(
                           x_train 
                         , batch_size = BATCH_SIZE
                         , shuffle = True
                         )

In our case we work with SOLUTION_TYPE = 3. This specifies the use of GradientTape() to control the KL-loss. Note that we do NOT need to define label data in this case.

Setting up the layer structure of the VAE

Next we set up the sequence of convolutional layers of the Encoder and Decoder of our VAE. For this objective we feed the required parameters into the __init__() function of our class “MyVariationalAutoencoder” whilst creating an object instance (MyVae).

Juypter Cell 7 – Parameters for the setup of VAE-layers

from my_AE_code.models.MyVAE_3 import MyVariationalAutoencoder
from my_AE_code.models.MyVAE_3 import VAE

z_dim = 256  # a first good guess to get a sufficient basic reconstruction quality 
#              due to the KL-loss the general reconstruction quality will 
#              nevertheless be poor in comp. to an AE  

solution_type = SOLUTION_TYPE     # We test GradientTape => SOLUTION_TYPE = 3 
loss_type     = 0                 # Reconstruction loss => 0: BCE, 1: MSE  
act           = 0                 # standard leaky relu activation function 

# Factor to scale the KL-loss in comparison to the reconstruction loss   
fact           = 5.0     #  - for BCE , other working values 1.5, 2.25, 3.0 
                         #              best: fact >= 3.0   
# fact           = 2.0e-2   #  - for MSE, other working values 1.2e-2, 4.0e-2, 5.0e-2

use_batch_norm  = True
use_dropout     = False
dropout_rate    = 0.1

n_ch  = INPUT_DIM[2]   # number of channels
print("Number of channels = ",  n_ch)
print()

# Instantiation of our main class
# ~~~~~~~~~~~~~~~~~~~~~~~~~~~~~~~ 
MyVae = MyVariationalAutoencoder(
    input_dim = INPUT_DIM
    , encoder_conv_filters     = [32,64,128,256]
    , encoder_conv_kernel_size = [3,3,3,3]
    , encoder_conv_strides     = [2,2,2,2]
    , encoder_conv_padding     = ['same','same','same','same']

    , decoder_conv_t_filters     = [128,64,32,n_ch]
    , decoder_conv_t_kernel_size = [3,3,3,3]
    , decoder_conv_t_strides     = [2,2,2,2]
    , decoder_conv_t_padding     = ['same','same','same','same']

    , z_dim = z_dim
    , solution_type = solution_type    
    , act   = act
    , fact  = fact
    , loss_type      = loss_type
    , use_batch_norm = use_batch_norm
    , use_dropout    = use_dropout
    , dropout_rate   = dropout_rate
)

There are some noteworthy things:

Choosing working values for “fact”

Reaonable values of “fact” depend on the type of reconstruction loss we choose. In general the “Binary Cross-Entropy Loss” (BCE) has steep walls around a minimum. BCE, therefore, creates much larger loss values than a “Mean Square Error” loss (MSE). Our class can handle both types of reconstruction loss. For BCE some trials show that values “3.0 <= fact <= 6.0" produce z-point distributions which are well confined around the origin of the latent space. If you lie to work with "MSE" for the reconstruction loss you must assign much lower values to fact - around fact = 0.01.

Batch normalization layers, but no drop-out layers

I use batch normalization layers in addition to the convolution layers. It helps a bit or a faster convergence, but produces GPU-time overhead during training. In my experience batch normalization is not an absolute necessity. But try out by yourself. Drop-out layers in addition to a reasonable KL-loss size appear to me as an unnecessary double means to enforce generalization.

Four convolutional layers

Four Convolution layers allow for a reasonable coverage of patterns on different length scales. Four layers make it also easy to use a constant stride of 2 and a “same” padding on all levels. We use a kernel size of 3 for all layers. The number of maps of the layers are defined as 32, 64, 128 and 256.

All in all we use a standard approach to combine filters at different granularity levels. We also cover 3 color layers of a standard image, reflected in the input dimensions of the Encoder. The Decoder creates corresponding arrays with color information.

Building the Encoder and the Decoder models

We now call the classes methods to build the models for the Encoder and Decoder parts of the VAE.

Juypter Cell 8 – Creation of the Encoder model

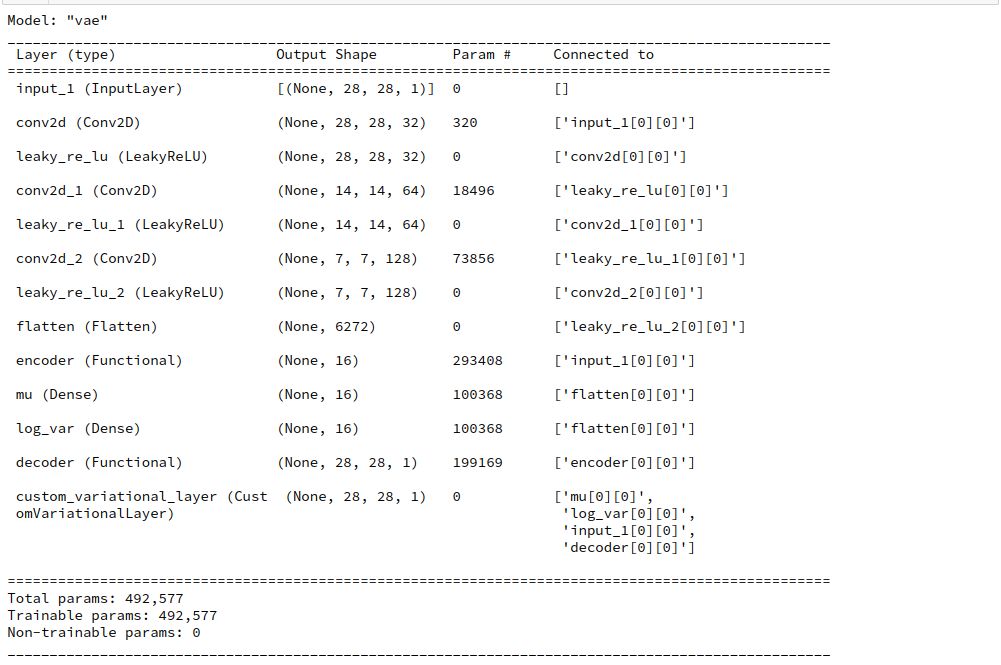
# Build the Encoder 
# ~~~~~~~~~~~~~~~~~~
MyVae._build_enc()
MyVae.encoder.summary()

Output:

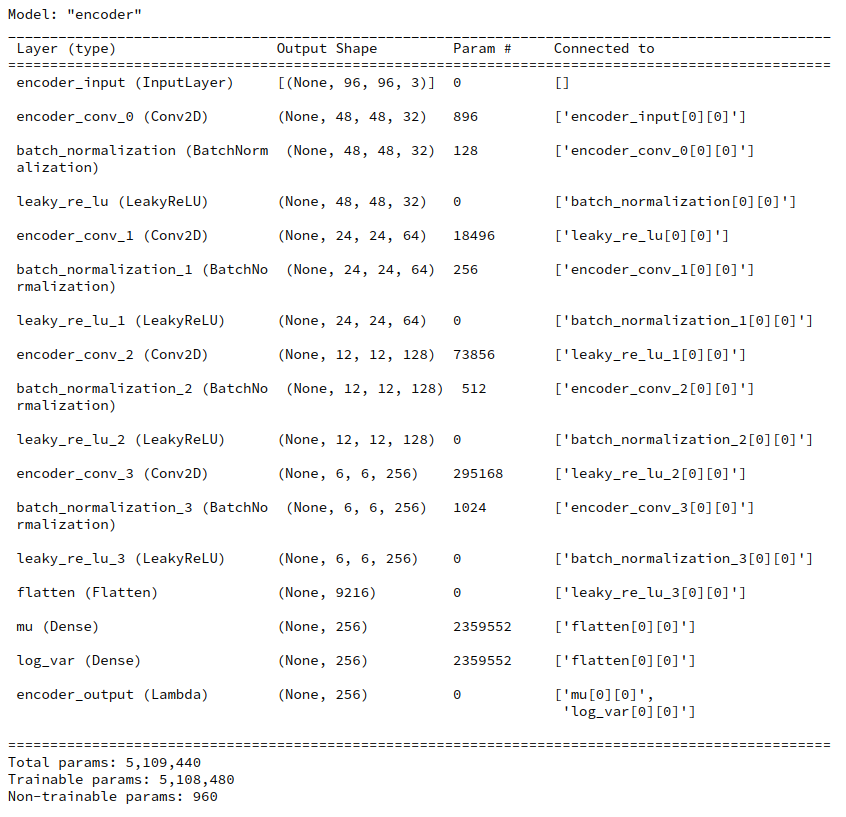
You see that the KL-loss related layers dominate the number of parameters.

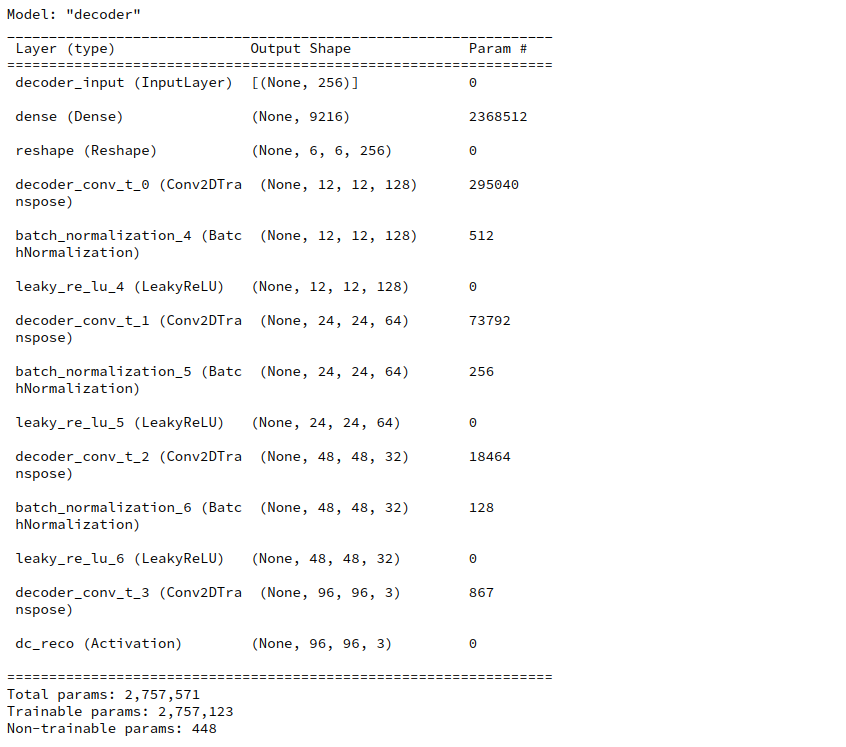
Juypter Cell 9 – Creation of the Decoder model

# Build the Decoder 
# ~~~~~~~~~~~~~~~~~~~
MyVae._build_dec()
MyVae.decoder.summary()

Output:

Building and compiling the full VAE based on GradientTape()

Building and compiling the full VAE based on parameter solution_type = 3 is easy with our class:

Juypter Cell 10 – Creation and compilation of the VAE model

# Build the full AE 
# ~~~~~~~~~~~~~~~~~~~
MyVae._build_VAE()

# Compile the model 
learning_rate = 0.0005
MyVae.compile_myVAE(learning_rate=learning_rate)

Note that internally an instance of class “VAE” is built which handles all loss calculations including the KL-contribution. Compilation and inclusion of an Adam optimizer is also handled internally. Our classes make or life easy …

Our initial learning_rate is relatively small. I followed recommendations of D. Foster’s book on “Generative Deep Learning” regarding this point. A value of 1.e-4 does not change much regarding the number of epochs for convergence.

Due to the chosen low dimension of the latent space the total number of trainable parameters is relatively moderate.

Prepare saving and loading of model parameters

To save some precious computational time (and energy consumption) in the future we need a basic option to save and load model weight parameters. I only describe a direct method; I leave it up to the reader to define a related Callback.

Juypter Cell 11 – Paths to save or load weight parameters

path_model_save_dir = 'YOUR_PATH_TO_A_WEIGHT_SAVING_DIR'

dir_name = 'MyVAE3_sol3_act0_loss0_epo24_fact_5p0emin0_ba128_lay32-64-128-256/'
path_dir = path_model_save_dir + dir_name
if not os.path.isdir(path_dir): 
    os.mkdir(path_dir, mode = 0o755)

dir_all_name = 'all/'
dir_enc_name = 'enc/'
dir_dec_name = 'dec/'

path_dir_all = path_dir + dir_all_name
if not os.path.isdir(path_dir_all): 
    os.mkdir(path_dir_all, mode = 0o755)

path_dir_enc = path_dir + dir_enc_name
if not os.path.isdir(path_dir_enc): 
    os.mkdir(path_dir_enc, mode = 0o755)

path_dir_dec = path_dir + dir_dec_name
if not os.path.isdir(path_dir_dec): 
    os.mkdir(path_dir_dec, mode = 0o755)

name_all = 'all_weights.hd5'
name_enc = 'enc_weights.hd5'
name_dec = 'dec_weights.hd5'

#save all weights
path_all = path_dir + dir_all_name + name_all
path_enc = path_dir + dir_enc_name + name_enc
path_dec = path_dir + dir_dec_name + name_dec

You see that I define separate files in “hd5” format to save parameters of both the full model as well as of its Encoder and Decoder parts.

If we really wanted to load saved weight parameters we could set the parameter “b_load_weight_parameters” in the next cell to “True” and execute the cell code:

Juypter Cell 12 – Load saved weight parameters into the VAE model

b_load_weight_parameters = False

if b_load_weight_parameters:
    MyVae.model.load_weights(path_all)

Training and saving calculated weights

We are ready to perform a training run. For our 170,000 training images and the parameters set I needed a bit more than 18 epochs, namely 24. I did this in two steps – first 18 epochs and then another 6.

Juypter Cell 13 – Load saved weight parameters into the VAE model

INITIAL_EPOCH = 0 

#n_epochs      = 18
n_epochs      = 6

MyVae.set_enc_to_train()
MyVae.train_myVAE(   
             data_flow
            , b_use_generator = True 
            , epochs = n_epochs
            , initial_epoch = INITIAL_EPOCH
            )

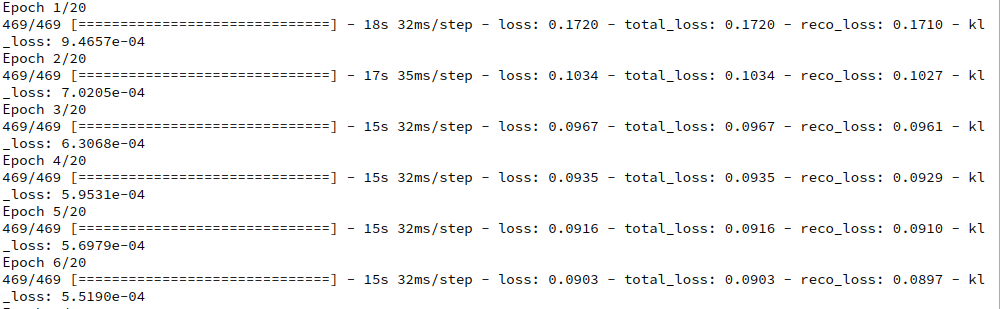
The total loss starts in the beginning with a value above 6,900 and quickly closes in to something like 5,100 and below. The KL-loss during raining rises continuously from something like 30 to 176 where it stays almost constant. The 6 epochs after epoch 18 gave the following result:

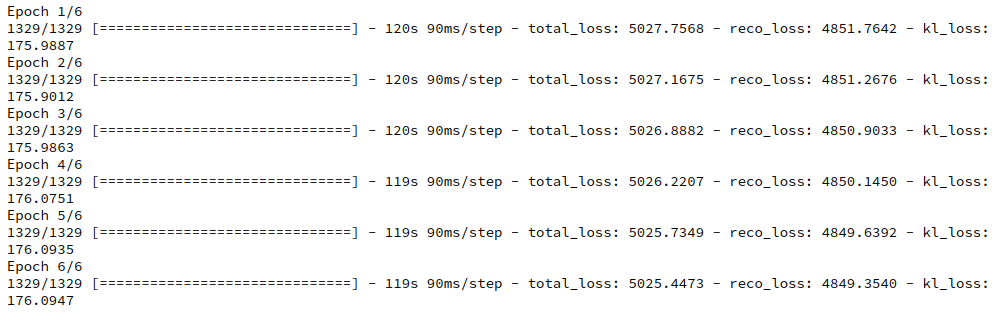
I stopped the calculation at this point – though a full convergence may need some more epochs.

You see that an epoch takes about 2 minutes GPU time (on a GTX960; a modern graphics card will deliver far better values). For 170,000 images the training really costs. On the other side you get a broader variation of face properties in the resulting artificial images later on.

After some epoch we may want to save the weights calculated. The next Jupyter cell shows how.

Juypter Cell 14 – Save weight parameters to disk

print(path_all)
MyVae.model.save_weights(path_all)
print("saving all weights is finished")

print()
#save enc weights
print(path_enc)
MyVae.encoder.save_weights(path_enc)
print("saving enc weights is finished")

print()
#save dec weights
print(path_dec)
MyVae.decoder.save_weights(path_dec)
print("saving dec weights is finished")

How to test the reconstruction quality?

After training you may first want to test the reconstruction quality of the VAE’s Decoder with respect to training or test images. Unfortunately, I cannot show you original data of the Celeb A dataset. However, the following code cells will help you to do the test by yourself.

Juypter Cell 15 – Choose images and compare them to their reconstructed counterparts

# We choose 14 "random" images from the x_train dataset
# ~~~~~~~~~~~~~~~~~~~~~~~~~~~~~~~~~~~~~~~~~~~~~~~~~~~~
from numpy.random import MT19937
from numpy.random import RandomState, SeedSequence
# For another method to create reproducale "random numbers" see https://albertcthomas.github.io/good-practices-random-number-generators/

n_to_show = 7  # per row 

# To really recover all data we must have one and the same input dataset per training run 
l_seed = [33, 44]   #l_seed = [33, 44, 55, 66, 77, 88, 99]
num_exmpls = len(l_seed)
print(num_exmpls) 

# a list to save the image rows 
l_img_orig_rows = []
l_img_reco_rows = []

start_time = time.perf_counter()

# Set the Encoder to prediction = epsilon * 0.0 
# MyVae.set_enc_to_predict()

for i in range(0, num_exmpls):

    # fixed random distribution 
    rs1 = RandomState(MT19937( SeedSequence(l_seed[i]) ))

    # indices of example array selected from the test images 
    #example_idx = np.random.choice(range(len(x_test)), n_to_show)
    example_idx    = rs1.randint(0, len(x_train), n_to_show)
    example_images = x_train[example_idx]

    # calc points in the latent space 
    if solution_type == 3:
        z_points, mu, logvar  = MyVae.encoder.predict(example_images)
    else:
        z_points  = MyVae.encoder.predict(example_images)

    # Reconstruct the images - note that this results in an array of images  
    reconst_images = MyVae.decoder.predict(z_points)

    # save images in a list 
    l_img_orig_rows.append(example_images)
    l_img_reco_rows.append(reconst_images)

end_time = time.perf_counter()
cpu_time = end_time - start_time

# Reset the Encoder to prediction = epsilon * 1.00 
# MyVae.set_enc_to_train()

print()
print("n_epochs : ", n_epochs, ":: CPU-time to reconstr. imgs: ", cpu_time) 

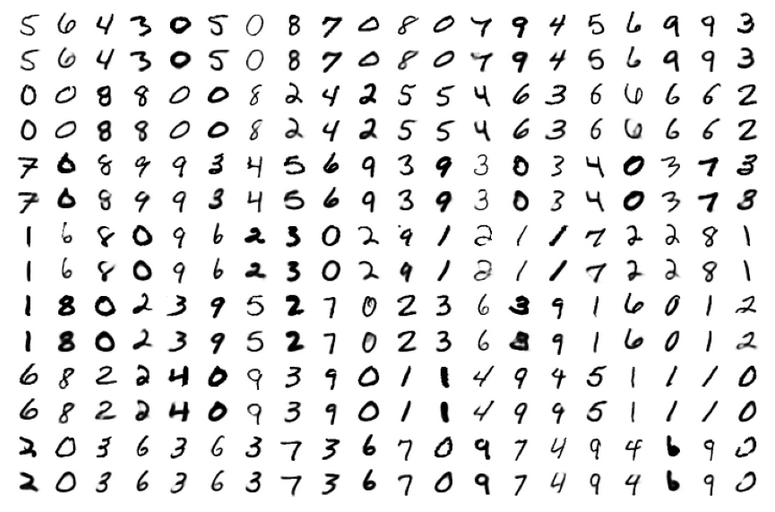
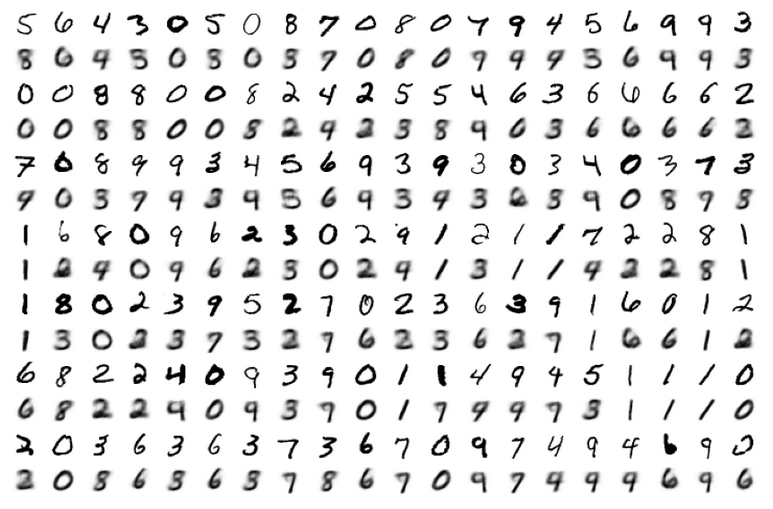
We save the selected original images and the reconstructed images in Python lists.
We then display the original images in one row of a matrix and the reconstructed ones in a row below. We arrange 7 images per row.

Juypter Cell 16 – display original and reconstructed images in a matrix-like array

# Build an image mesh 
# ~~~~~~~~~~~~~~~~~~~~
fig = plt.figure(figsize=(16, 8))
fig.subplots_adjust(hspace=0.2, wspace=0.2)

n_rows = num_exmpls*2 # One more for the original 

for j in range(num_exmpls): 
    offset_orig = n_to_show * j * 2
    for i in range(n_to_show): 
        img = l_img_orig_rows[j][i].squeeze()
        ax = fig.add_subplot(n_rows, n_to_show, offset_orig + i+1)
        ax.axis('off')
        ax.imshow(img, cmap='gray_r')
    
    offset_reco = offset_orig + n_to_show
    for i in range(n_to_show): 
        img = l_img_reco_rows[j][i].squeeze()
        ax = fig.add_subplot(n_rows, n_to_show, offset_reco+i+1)
        ax.axis('off')
        ax.imshow(img, cmap='gray_r')

You will find that the reconstruction quality is rather limited – and not really convincing by any measures regarding details. Only the general shape of faces an their features are reproduced. But, actually, it is this lack of precision regarding details which helps us to create images from arbitrary z-points. I will discuss these points in more detail in a further post.

First results: Face images created from randomly distributed points in the latent space

The technique to display images can also be used to display images reconstructed from arbitrary points in the latent space. I will show you various results in another post.

For now just enjoy the creation of images derived from z-points defined by a normal distribution around the center of the latent space:

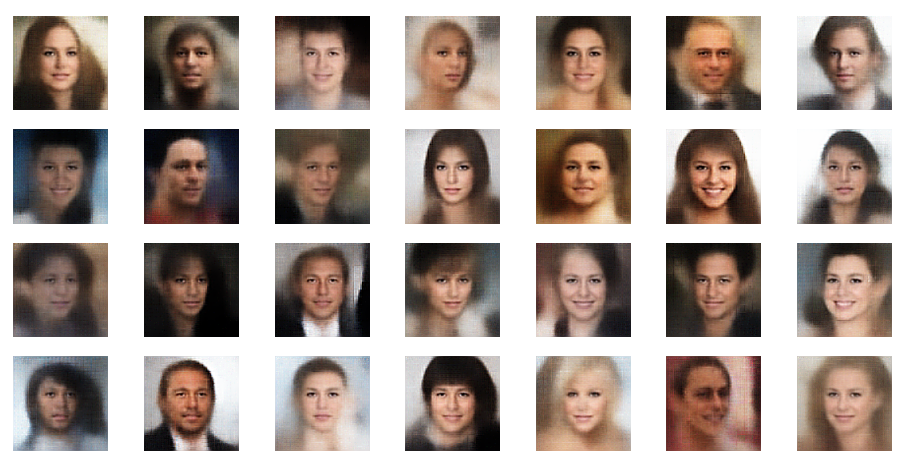
Most of these images look quite convincing and crispy down to details. The sharpness results from some photo-processing with PIL functions after the creation by the VAE. But who said that this is not allowed?

Conclusion

In this post I have presented Jupyter cells with code fragments which may help you to apply the VAE-classes created previously. With the VAE setup discussed above we control the KL-loss by a GradientTape() object.
Preliminary results show that the images created of arbitrarily chosen z-points really show heads with human-like faces and hair-dos. In contrast to what a simple AE would produce (see:
Autoencoders, latent space and the curse of high dimensionality – I

In the next post
Variational Autoencoder with Tensorflow – XI – image creation by a VAE trained on CelebA
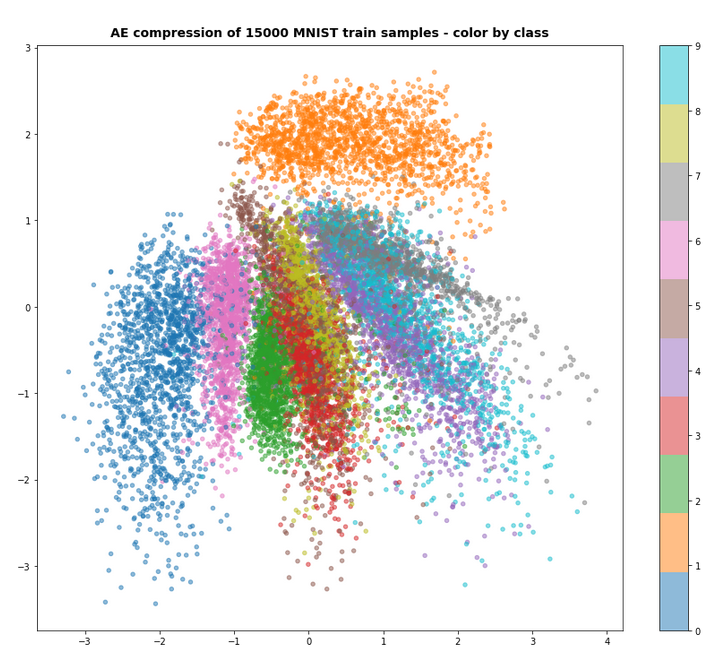
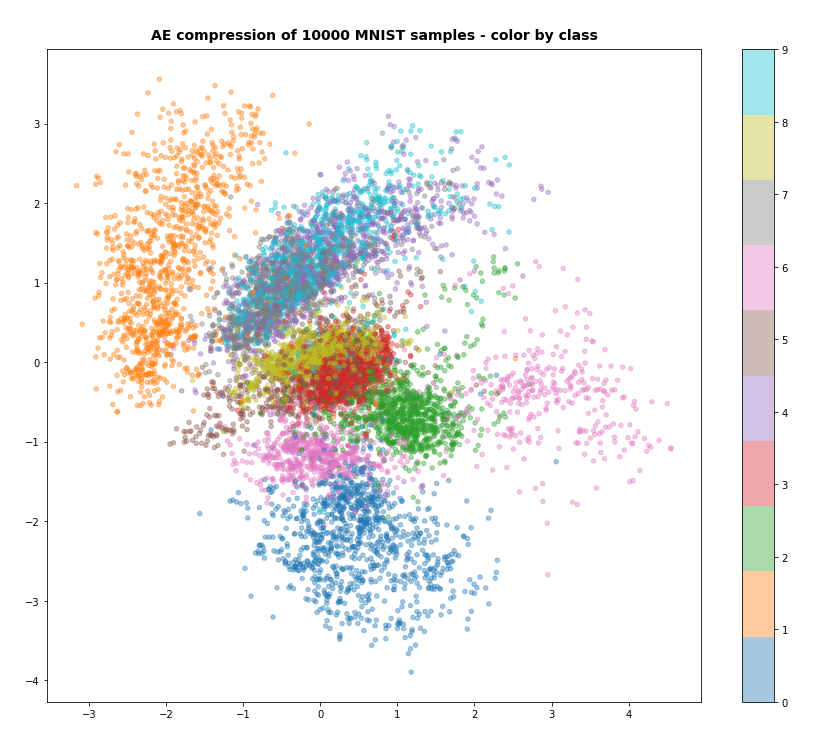
I will have a look at the distribution of z-points corresponding to the CelebA data and discuss the delicate balance between the representation of details and the generalization of features. With VAEs you cannot get both.

And let us all who praise freedom not forget:
The worst fascist, war criminal and killer living today is the Putler. He must be isolated at all levels, be denazified and sooner than later be imprisoned. Long live a free and democratic Ukraine!


Variational Autoencoder with Tensorflow – IX – taming Celeb A by resizing the images and using a generator

Another post in my series about options to handle the Kullback-Leibler [KL] loss of Variational Autoencoders [AEs] under the conditions of Tensorflows eager execution.

Variational Autoencoder with Tensorflow – I – some basics
Variational Autoencoder with Tensorflow – II – an Autoencoder with binary-crossentropy loss
Variational Autoencoder with Tensorflow – III – problems with the KL loss and eager execution
Variational Autoencoder with Tensorflow – IV – simple rules to avoid problems with eager execution
Variational Autoencoder with Tensorflow – V – a customized Encoder layer for the KL loss
Variational Autoencoder with Tensorflow – VI – KL loss via tensor transfer and multiple output
Variational Autoencoder with Tensorflow – VII – KL loss via model.add_loss()
Variational Autoencoder with Tensorflow – VIII – TF 2 GradientTape(), KL loss and metrics

We still have to test the Python classes which we have so laboriously developed during the last posts. One of these classes, “VAE()”, supports a specific approach to control the KL-loss parameters during training and cost optimization by gradient descent: The class may use Tensorflow’s [TF 2] GradientTape-mechanism and the Keras function train_step() – instead of relying on Keras’ standard “add_loss()” functions.

Instead of recreating simple MNIST images of digits from ponts in a latent space I now want to train a VAE (with GradienTape-based loss control) to solve a more challenging task:

We want to create artificial images of naturally appearing human faces from randomly chosen points in the latent space of a VAE, which has been trained with images of real human faces.

Actually, we will train our VAE with images provided by the so called “Celeb A” dataset. This dataset contains around 200,000 images showing the heads of so called celebrities. Due to the number and size of its images this dataset forces me (due to my very limited hardware) to use a Keras Image Data Generator. A generator is a tool to transfer huge amounts of data in a continuous process and in form of small batches to the GPU during neural network training. The batches must be small enough such that the respective image data fit into the VRAM of the GPU. Our VAE classes have been designed to support a generator.

In this post I first explain why Celeb A poses a thorough test for a VAE. Afterwards I shall bring the Celeb A data into a form suitable for older graphics cards with small VRAM.

Why do the Celeb A images pose a good test case for a VAE?

To answer the question we first have to ask ourselves why we need VAEs at all. Why do certain ML tasks require more than just a simple plain Autoencoder [AE]?

The answer to the latter question lies in the data distribution an AE creates in its latent space. An AE, which is trained for the precise reconstruction of presented images will use a sufficiently broad area/volume of the latent space to place different points corresponding to different imageswith a sufficiently large distance between them. The position in an AE’s latent space (together with the Encode’s and Decoder’s weights) encodes specific features of an image. A standard AE is not forced to generalize sufficiently during training for reconstruction tasks. On the contrary: A good reconstruction AE shall learn to encode as many details of input images as possible whilst filling the latent space.

However: The neural networks of a (V)AE correspond to a (non-linear) mapping functions between multi-dimensional vector spaces, namely

  • between the feature space of the input data objects and the AE’s latent space
  • and also between the latent space and the reconstruction space (normally with the same dimension as the original feature space for the input data).

This poses some risks whenever some tasks require to use arbitrary points in the latent space. Let us, e.g., look at the case of images of certain real objects in font of varying backgrounds:

During the AE’s training we map points of a high-dimensional feature-space for the pixel values of (colored) images to points in the multi-dimensional latent space. The target region in the latent space stemming from regions in the original feature-space which correspond to “reasonable” images displaying real objects may cover only a relatively thin, wiggled manifold within in the latent space (z-space). For points outside the curved boundaries of such regions in z-space the Decoder may not give you clear realistic and interpretable images.

The most important objectives of invoking the KL-loss as an additional optimization element by a VAE are

  1. to confine the data point distribution, which the VAE’s Encoder part produces in the multidimensional latent space, around the origin O of the z-space – as far as possible symmetrically and within a very limited distance from O,
  2. to normalize the data distribution around any z-point calculated during training. Whenever a real training object marks the center of a limited area in latent space then reconstructed data objects (e.g. images) within such an area should not be too different from the original training object.

I.e.: We force the VAE to generalize much more than a simple AE.

Both objectives are achieved via specific parameterized parts of the KL-loss. We optimize the KL-loss parameters – and thus the data distribution in the latent space – during training. After the training phase we want the VAE’s Decoder to behave well and smoothly for neighboring points in extended areas of the latent space:

The content of reconstructed objects (e.g. images) resulting from neighboring points within limited z-space areas (up to a certain distance from the origin) should vary only smoothly.

The KL loss provides the necessary smear-out effect for the data distribution in z-space.

During this series I have only shown you the effects of the KL-loss on MNIST data for a dimension of the latent space z_dim = 2. We saw the general confinement of z-points around the origin and also a confinement of points corresponding to different MNIST-numbers (= specific features of the original images) in limited areas. With some overlaps and transition regions for different numbers.

But note: The low dimension of the latent space in the MNIST case (between 2 and 16) simplifies the confinement task – close to the origin there are not many degrees of freedom and no big volume available for the VAE Encoder. Even a standard AE would be rather limited when trying to vastly distribute z-points resulting from MNIST images of different digits.

However, a more challenging task is posed by the data distribution, which a (V)AE creates e.g. of images showing human heads and faces with characteristic features in front of varying backgrounds. To get a reasonable image reconstruction we must assign a much higher number of dimensions to the latent space than in the MNIST case: z_dim = 256 or z_dim = 512 are reasonable values at the lower end!

Human faces or heads with different hair-dos are much more complex than digit figures. In addition the influence of details in the background of the faces must be handled – and for our objective be damped. As we have to deal with many more dimensions of the z-space than in the MNIST case a simple standard AE will run into trouble:

Without the confinement and local smear-out effect of the KL-loss only tiny and thin areas of the latent space will correspond to reconstructions of human-like “faces”. I have discussed this point in more detail also in the post
Autoencoders, latent space and the curse of high dimensionality – I

As a result a standard AE will NOT reconstruct human faces from randomly picked z-points in the latent space. So, an AE will fail on the challenge posed in the introduction of this post.

Celeb A and the necessity to use a “generator” for the Celeb A dataset on graphics cards with small VRAM

I recommend to get the Celeb A data from some trustworthy Kaggle contributor – and not from the original Chinese site. You may find cropped images e.g. at here. Still check the image container and the images carefully for unwanted add-ons.

The Celeb A dataset contains around 200,000 images of the heads of celebrities with a resolution of 218×178 pixels. Each image shows a celebrity face in front of some partially complex background. The amount of data to be handled during VAE training is relatively big – even if you downscale the images. The whole set will not fit into the limited VRAM of older graphics cards as mine (GTX960 with 4 GB, only). This post will show you how to deal with this problem.

You may wonder why the Celeb A dataset poses a problem as the original data only consume about 1.3 GByte on a hard disk. But do not forget that we need to provide floating point tensors of size (height x width x 3 x 32Bit) instead of compressed integer based jpg-information to the VAE algorithm. You can do the math on your own. In addition: Working with multiple screens and KDE on Linux may already consume more than 1 GB of our limited VRAM.

How can we deal with the Celeb A images on GPUs with limited VRAM ?

We use three tricks to work reasonably fast with the Celeb A data on a Linux systems with limited VRAM, but with around 32 GB or more standard RAM:

  1. We first crop and downscale the images – in my case to 96×96 pixels.
  2. We save a binary of a Numpy array of all images on a SSD and read it into the RAM during Jupyter experiments.
  3. We then apply a so called Keras Image Data Generator to transfer the images to the graphics card when required.

The first point reduces the amount of MBytes per image. For basic experiments we do not need the full resolution.

The second point above is due to performance reasons: (1) Each time we want to work with a Jupyter notebook on the data we want to keep the time to load the data small. (2) We need the array data already in the system’s RAM to transfer them efficiently and in portions to the GPU.

A “generator” is a Keras tool which allows us to deliver input data for the VAE training in form of a continuously replenished dataflow from the CPU environment to the GPU. The amount of data provided with each transfer step to the GPU is reduced to a batch of images. Of course, we have to choose a reasonable size for such a batch. It should be compatible with the training batch size defined in the VAE-model’s fit() function.

A batch alone will fit into the VRAM whereas the whole dataset may not. The control of the data stream costs some overhead time – but this is better than not top be able to work at all. The second point helps to accelerate the transfer of data to the GPU significantly: A generator which sequentially picks data from a hard disk, transfers it to RAM and then to VRAM is too slow to get a convenient performance in the end.

Each time before we start VAE applications on the Jupyter side, we first fill the RAM with all image data in tensor-like form. From a SSD the totally required time should be small. The disadvantage of this approach is the amount of RAM we need. In my case close to 20 GB!

Cropping and resizing Celeb A images

We first crop each of the original images to reduce background information and then resize the result to 96×96 px. D. Foster uses 128×128 px in his book on “Generative Deep Learning”. But for small VRAM 96×96 px is a bit more helpful.
I also wanted the images to have a quadratic shape because then one does not have to adjust the strides of
the VAE’s CNN Encoder and Decoder kernels differently for the two geometrical dimensions. 96 px in each dimension is also a good number as it allows for exactly 4 layers in the VAE’s CNNs. Each of the layers then reduces the resolution of the analyzed patterns by a factor of 2. At the innermost layer of the Encoder we deal with e.g. 256 maps with an extension of 6×6.

Cropping the original images is a bit risky as we may either cut some parts of the displayed heads/faces or the neck region. I decided to cut the upper part of the image. So I lost part of the hair-do in some cases, but this did not affect the ability to create realistic images of new heads or faces in the end. You may with good reason decide differently.

I set the edge points of the cropping region to

top=40, bottom = 0, left=0, right=178 .

This gave me quadratic pictures. But you may choose your own parameters, of course.

A loop to crop and resize the Celeb A images

To prepare the pictures of the Celeb A dataset I used the PIL library.

import os, sys, time 
import numpy as np
import scipy
from glob import glob 

import PIL as PIL 
from PIL import Image
from PIL import ImageFilter

import matplotlib as mpl
from matplotlib import pyplot as plt
from matplotlib.colors import ListedColormap
import matplotlib.patches as mpat 

A Juyter cell with a loop to deal with almost all CelebA images would then look like:

Jupyter cell 1

dir_path_orig = 'YOUR_PATH_TO_THE_ORIGINAL_CELEB A_IMAGES'
dir_path_save = 'YOUR_PATH_TO_THE_RESIZED_IMAGES'

num_imgs = 200000 # the number of images we use 

print("Started loop for images")
start_time = time.perf_counter()

# cropping corner positions and new img size
left  = 0;   top = 40
right = 178; bottom = 218
width_new  = 96
height_new = 96

# Cropping and resizing 
for num in range(1, num_imgs): 
    jpg_name ='{:0>6}'.format(num) 
    jpg_orig_path = dir_path_orig + jpg_name +".jpg"
    jpg_save_path = dir_path_save + jpg_name +".jpg"
    im = Image.open(jpg_orig_path)
    imc = im.crop((left, top, right, bottom))
    #imc = imc.resize((width_new, height_new), resample=PIL.Image.BICUBIC)
    imc = imc.resize((width_new, height_new), resample=PIL.Image.LANCZOS)
    imc.save(jpg_save_path, quality=95)  # we save with high quality
    im.close()

end_time = time.perf_counter()
cpu_time = end_time - start_time
print()
print("CPU-time: ", cpu_time) 

Note that we save the images with high quality. Without the quality parameter PIL’s save function for a jpg target format would reduce the given quality unnecessarily and without having a positive impact on the RAM or VRAM consumption of the tensors we have to use in the end.

The whole process of cropping and resizing takes about 240 secs on my old PC without any parallelized operations on the CPU. The data were read from a standard old hard disk and not a SSD. As we have to make this investment of CPU time only once I did not care about optimization.

Defining paths and parameters to control loading/preparing CelebA images

To prepare and save a huge Numpy array which contains all training images for our VAE we first need to define some parameters. I normally use 170,000 images for training purposes and around 10,000 for tests.

Jupyter cell 2

# Some basic parameters
# ~~~~~~~~~~~~~~~~~~~~~~~~
INPUT_DIM          = (96, 96, 3) 
BATCH_SIZE         = 128

# The number of available images 
# ~~~~~~~~~~~~~~~~~~~~~~~~~~~~~~~~~
num_imgs = 200000  # Check with notebook CelebA 

# The number of images to use during training and for tests
# ~~~~~~~~~~~~~~~~~~~~~~~~~~~~~~~~~~~~~~~~~~~~~~~~~~~~~~~~~~~
NUM_IMAGES_TRAIN  = 170000   # The number of images to use in a Trainings Run 
#NUM_IMAGES_TO_USE  = 60000   # The number of images to use in a Trainings Run 

NUM_IMAGES_TEST = 10000   # The number of images to use in a training Run 

# for historic compatibility reasons of other code-fragments (the reader may not care too much about it) 
N_ImagesToUse        = NUM_IMAGES_TRAIN 
NUM_IMAGES           = NUM_IMAGES_TRAIN 
NUM_IMAGES_TO_TRAIN  = NUM_IMAGES_TRAIN   # The number of images to use in a Trainings Run 
NUM_IMAGES_TO_TEST   = NUM_IMAGES_TEST  # The number of images to use in a Test Run 

# Define some shapes for Numpy arrays with all images for training
# ~~~~~~~~~~~~~~~~~~~~~~~~~~~~~~~~~~~~~~~~~~~~~~~~~~~~~~~~~~~~~~~~~~~~
shape_ay_imgs = (N_ImagesToUse, ) + INPUT_DIM
print("Assumed shape for Numpy array with train imgs: ", shape_ay_imgs)

shape_ay_imgs_test = (NUM_IMAGES_TO_TEST, ) + INPUT_DIM
print("Assumed shape for Numpy array with test  imgs: ",shape_ay_imgs_test)

We also need to define some parameters to control the following aspects:

  • Do we directly load Numpy arrays with train and test data?
  • Do we load image data and convert them into Numpy arrays?
  • From where do we load image data?

The following Jupyter cells help us:

Jupyter cell 3

# Set parameters where to get the image data from  
# ************************************************
# Use the cropped 96x96 HIGH-Quality images 
b_load_HQ = True 

# Load prepared Numpy-arrays 
# ~~~~~~~~~~~~~~~~~~~~~~~~~+
b_load_ay_from_saved = False     # True: Load prepared x_train and x_test Numpy arrays 

# Load from SSD  
# ~~~~~~~~~~~~~~~~~~~~~~
b_load_from_SSD   = True 

# Save newly calculated x_train, x_test-arrays in binary format onto disk 
# ~~~~~~~~~~~~~~~~~~~~~~~~~~~~~~~~~~~~~~~~~~~~~~~~~~~~~~~~~~~~~~~~~~~~~~~
b_save_to_disk = False

# Paths 
# ******

# Images on SSD  
# ~~~~~~~~~~~~~
if b_load_from_SSD: 
    if b_load_HQ:
        dir_path_load = 'YOUR_PATH_TO_HQ_DATA_ON_SSD/'    # high quality 
    else: 
        dir_path_load = 'YOUR_PATH_TO_HQ_DATA_ON_HD/'               #  low quality 

# Images on slow HD 
# ~~~~~~~~~~~~~~~~~~
if not b_load_from_SSD:
    if b_load_HQ:
        # high quality on slow Raid 
        dir_path_load = 'YOUR_PATH_TO_HQ_DATA_ON_HD/'
    else:
        # low quality on slow HD 
        dir_path_load = 'YOUR_PATH_TO_HQ_DATA_ON_HD/'

        
# x_train, x_test arrays on SSD
# ~~~~~~~~~~~~~~~~~~~~~~~~~~~~~
if b_load_from_SSD: 
    dir_path_ay = 'YOUR_PATH_TO_Numpy_ARRAY_DATA_ON_SSD/'     
    if b_load_HQ:
        path_file_ay_train = dir_path_ay + "celeba_200tsd_norm255_hq-x_train.npy"
        path_file_ay_test  = dir_path_ay + "celeba_200tsd_norm255_hq-x_test.npy"
    else: 
        path_file_ay_train = dir_path_ay + "celeba_200tsd_norm255_lq-x_train.npy"
        path_file_ay_test  = dir_path_ay + "celeba_200tsd_norm255_lq-x_est.npy"

        
# x_train, x_test arrays on slow HD
# ~~~~~~~~~~~~~~~~~~~~~~~~~~~~~~~~~~~
if not b_load_from_SSD: 
    dir_path_ay = 'YOUR_PATH_TO_Numpy_ARRAY_DATA_ON_HD/'     
    if b_load_HQ:
        path_file_ay_train = dir_path_ay + "celeba_200tsd_norm255_hq-x_train.npy"
        path_file_ay_test  = dir_path_ay + "celeba_200tsd_norm255_hq-x_test.npy"
    else: 
        path_file_ay_train = dir_path_ay + "celeba_200tsd_norm255_lq-x_train.npy"
        path_file_ay_test  = dir_path_ay + "celeba_200tsd_norm255_lq-x_est.npy"

You must of course define your own paths and names.
Note that the ending “.npy” defines the standard binary format for Numpy data.

Preparation of Numpy array for CelebA images

In case that I want to prepare the Numpy arrays (and not load already prepared ones from a binary) I make use of the following straightforward function:

Jupyter cell 4

def load_and_scale_celeba_imgs(start_idx, num_imgs, shape_ay, dir_path_load): 
    
    ay_imgs = np.ones(shape_ay, dtype='float32')
    end_idx = start_idx + num_imgs
    
    # We open the images and transform them into Numpy arrays  
    for j in range(start_idx, end_idx): 
        idx = j - start_idx
        jpg_name ='{:0>6}'.format(j) 
        jpg_orig_path = dir_path_load + jpg_name +".jpg"
        im = Image.open(jpg_orig_path)
        
        # transfrom data into a Numpy array 
        img_array = np.array(im)
        ay_imgs[idx] = img_array
        im.close()

    # scale the images 
    ay_imgs = ay_imgs / 255. 

    return ay_imgs 

We call this function for training images as follows:

Jupyter cell 5

# Load training images from SSD/HD and prepare Numpy float32-arrays 
#               - (18.1 GByte of RAM required !! Int-arrays) 
#               - takes around 30 to 35 Secs 
# ************************************

if not b_load_ay_from_saved:
    
    # Prepare float32 Numpy array for the training images   
    # ~~~~~~~~~~~~~~~~~~~~~~~~~~~~~~~~~~~~~~~~~~~~~~~~~~~~
    start_idx_train = 1
    print("Started loop for training images")
    start_time = time.perf_counter()
    x_train = load_and_scale_celeba_imgs(start_idx = start_idx_train, 
                                         num_imgs=NUM_IMAGES_TRAIN, 
                                         shape_ay=shape_ay_imgs_train,
                                         dir_path_load=dir_path_load)
    
    end_time = time.perf_counter()
    cpu_time = end_time - start_time
    print()
    print("CPU-time for array of training images: ", cpu_time) 
    print("Shape of x_train: ", x_train.shape)
    
    # Plot an example image 
    plt.imshow(x_train[169999])

And for test images:

Jupyter cell 6

# Load test images from SSD/HD and prepare Numpy float32-arrays 
# ~~~~~~~~~~~~~~~~~~~~~~~~~~~~~~~~~~~~~~~~~~~~~~~~~~~~~~~~~~~~~
if not b_load_ay_from_saved:
    
    # Prepare Float32 Numpy array for test images   
    # ~~~~~~~~~~~~~~~~~~~~~~~~~~~~~~~~~~~~~~~~~~~~
    start_idx_test = NUM_IMAGES_TRAIN + 1

    print("Started loop for test images")
    start_time = time.perf_counter()
    x_test = load_and_scale_celeba_imgs(start_idx = start_idx_test, 
                                         num_imgs=NUM_IMAGES_TEST, 
                                         shape_ay=shape_ay_imgs_test,
                                         dir_path_load=dir_path_load)
    
    end_time = time.perf_counter()
    cpu_time = end_time - start_time
    print()
    print("CPU-time for array of test images: ", cpu_time) 
    print("Shape of x_test: ", x_test.shape)

    #Plot an example img 
    plt.imshow(x_test[27])

This takes about 35 secs in my case for the training images (170,000) and about 2 secs for the test images. Other people in the field use much lower numbers for the amount of training images.

If you want to save the Numpy arrays to disk:

Jupyter cell 7

# Save the newly calculatd NUMPY arrays in binary format to disk 
# ****************************************************************
if not b_load_ay_from_saved and b_save_to_disk: 
    print("Start saving arrays to disk ...")
    np.save(path_file_ay_train, x_train)
    print("Finished saving the train img array")
    np.save(path_file_ay_test, x_test)
    print("Finished saving the test img array")

If we wanted to load the Numpy arrays with training and test data from disk we would use the following code:

Jupyter cell 8

# Load the Numpy arrays with scaled Celeb A directly from disk 
# ~~~~~~~~~~~~~~~~~~~~~~~~~~~~~~~~~~~~~~~~~~~~~~~~~~~~~~~~~~~~~~
print("Started loop for test images")
start_time = time.perf_counter()

x_train = np.load(path_file_ay_train)
x_test  = np.load(path_file_ay_test)

end_time = time.perf_counter()
cpu_time = end_time - start_time
print()
print("CPU-time for loading Numpy arrays of CelebA imgs: ", cpu_time) 
print("Shape of x_train: ", x_train.shape)
print("Shape of x_test:  ", x_test.shape)

This takes about 2 secs on my system, which has enough and fast RAM. So loading a prepared Numpy array for the CelebA data is no problem.

Defining the generator

Easy introductions to Keras’ ImageDataGenerators, their purpose and usage are given here and here.

ImageDataGenerators can not only be used to create a flow of limited batches of images to the GPU, but also for parallel operations on the images coming from some source. The latter ability is e.g. very welcome when we want to create additional augmented images data. The sources of images can be some directory of image files or a Python data structure. Depending on the source different ways of defining a generator object have to be chosen. The ImageDataGenerator-class and its methods can also be customized in very many details.

If we worked on a directory we might have to define our generator similar to the following code fragment

    data_gen = ImageDataGenerator(rescale=1./255) # if the image data are not scaled already for float arrays  
    # class_mode = 'input' is used for Autoencoders 
    # see https://vijayabhaskar96.medium.com/tutorial-image-classification-with-keras-flow-from-directory-and-generators-95f75ebe5720
    data_flow = data_gen.flow_from_directory(directory = YOUR_PATH_TO_ORIGINAL IMAGE DATA
                                             #, target_size = INPUT_DIM[:2]
                                             , batch_size = BATCH_SIZE
                                             , shuffle = True
                                             , class_mode = 'input'
                                             , subset = "training"
                                             )

This would allow us to read in data from a prepared sub-directory “YOUR_PATH_TO_ORIGINAL IMAGE DATA/train/” of the file-system and scale the pixel data at the same time to the interval [0.0, 1.0]. However, this approach is too slow for big amounts of data.

As we already have scaled image data available in RAM based Numpy arrays both the parameterization and the usage of the Generator during training is very simple. And the performance with RAM based data is much, much better!

So, how to our Jupyter cells for defining the generator look like?

Jupyter cell 9

# Generator based on Numpy array for images in RAM
# ~~~~~~~~~~~~~~~~~~~~~~~~~~~~~~
b_use_generator_ay = True
BATCH_SIZE    = 128
SOLUTION_TYPE = 3

if b_use_generator_ay:
    # solution_type == 0 works with extra layers and add_loss to control the KL loss
    # it requires the definition of "labels" - which are the original images  
    if SOLUTION_TYPE == 0: 
        data_gen = ImageDataGenerator()
        data_flow = data_gen.flow(
                           x_train 
                         , x_train
                         #, target_size = INPUT_DIM[:2]
                         , batch_size = BATCH_SIZE
                         , shuffle = True
                         #, class_mode = 'input'   # Not working with this type of generator 
                         #, subset = "training"    # Not required 
                         )
    if ....
    if ....

    if SOLUTION_TYPE == 3: 
        data_gen = ImageDataGenerator()
        data_flow = data_gen.flow(
                           x_train 
                         #, x_train
                         #, target_size = INPUT_DIM[:2]
                         , batch_size = BATCH_SIZE
                         , shuffle = True
                         #, class_mode = 'input'   # Not working with this type of generator 
                         #, subset = "training"    # Not required 
                         )

Besides the method to use extra layers with layer.add_loss() (SOLUION_TYPE == 0) I have discussed other methods for the handling of the KL-loss in previous posts. I leave it to the reader to fill in the correct statements for these cases. In our present study we want to use a GradientTape()-based method, i.e. SOLUTION_TYPE = 3. In this case we do NOT need to pass a label-array to the Generator. Our gradient_step() function is intelligent enough to handle the loss calculation on its own! (See the previous posts).

So it is just

        data_gen = ImageDataGenerator()
        data_flow = data_gen.flow(
                           x_train 
                         , batch_size = BATCH_SIZE
                         , shuffle = True
                         )

which does a perfect job for us.

In the end we will only need the following call when we want to train our VAE-model

MyVae.train_myVAE(   
             data_flow
            , b_use_generator = True 
            , epochs = n_epochs
            , initial_epoch = INITIAL_EPOCH
            )

to train our VAE-model. This class function in turn will internally call something like

    self.model.fit(     
        data_flow   # coming as a batched dataflow from the outside generator 
        , shuffle = True
        , epochs = epochs
        , batch_size = batch_size # best identical to the batch_size of data_flow
        , initial_epoch = initial_epoch
    )

But the setup of a reasonable VAE-model for CelebA images and its training will be the topic of the next post.

Conclusion

What have we achieved? Nothing yet regarding VAE results. However, we have prepared almost 200,000 CelebA images such that we can easily load them from disk into a Numpy float32 array with 2 seconds. Around 20 GB of conventional PC RAM is required. But this array can now easily be used as a source of VAE training.

Furthermore I have shown that the setup of a Keras “ImageDataGenerator” to provide the image data as a flow of batches fitting into the GPU’s VRAM is a piece of cake – at least for our VAE objectives. We are well prepared now to apply a VAE-algorithm to the CelebA data – even if we only have an old graphics card available with limited VRAM.

In the next post of this series

I show you the code for VAE-training with CelebA data. Afterward we will pick random points in the latent space and create artificial images of human faces.
Variational Autoencoder with Tensorflow – X – VAE application to CelebA images
People interested in data augmentation should have a closer look at the parameterization options of the ImageDataGenerator-class.

Links

Celeb A
https://datagen.tech/guides/image-datasets/celeba/

Data generators
https://stanford.edu/~shervine/blog/keras-how-to-generate-data-on-the-fly
towardsdatascience.com/ keras-data-generators-and-how-to-use-them-b69129ed779c

And last not least my standard statement as long as the war in Ukraine is going on:
Ceterum censeo: The worst fascist, war criminal and killer living today is the Putler. He must be isolated at all levels, be denazified and sooner than later be imprisoned. Long live a free and democratic Ukraine!


Variational Autoencoder with Tensorflow – VIII – TF 2 GradientTape(), KL loss and metrics

I continue with my series on options for an implementation of the Kullback-Leibler divergence as a loss [KL loss] contribution in Variational Autoencoder [VAE] models:

Variational Autoencoder with Tensorflow – I – some basics
Variational Autoencoder with Tensorflow – II – an Autoencoder with binary-crossentropy loss
Variational Autoencoder with Tensorflow – III – problems with the KL loss and eager execution
Variational Autoencoder with Tensorflow – IV – simple rules to avoid problems with eager execution
Variational Autoencoder with Tensorflow – V – a customized Encoder layer for the KL loss
Variational Autoencoder with Tensorflow – VI – KL loss via tensor transfer and multiple output
Variational Autoencoder with Tensorflow – VII – KL loss via model.add_loss()

Our objective is to avoid or circumvent potential problems with the eager execution mode of present Tensorflow 2 versions. I have already described three solutions based on standard Keras functionality:

  • Either we add loss contributions via the function layer.add_loss()and a special layer of the Encoder part of the VAE
  • or we add a loss to the output of a full VAE-model via function model.add_loss()
  • or we build a complex model which transports required KL-related tensors from the Encoder part of the VAE model to the Decoder’s output layer.

In all these cases we invoke native Keras functions to handle loss contributions and related operations. Keras controls the calculation of the gradient components of the KL related tensors “mu” and “log_var” in the background for us. This comprises partial derivatives with respect to trainable weight variables of lower Encoder layers and related operations. The same holds for partial derivatives of reconstruction tensors at the Decoder’s output layer with respect to trainable parameters of all layers of the VAE-model. Keras does most of the job

  • of derivative calculation and the registration of related operation sequences during forward pass
  • and the correct application of the registered operations and values in later weight corrections during backward propagation

for us in the background as long as we respect certain rules for eager mode execution.

But Tensorflow 2 [TF2] gives us a much more flexible and low-level option to control the calculation of gradients under the conditions of eager execution. This option requires that we inform the TF/Keras machinery which processes the training steps of an epoch of how to exactly calculate losses and their partial derivatives. Rules to determine and create metrics output must be provided in addition.

TF2 provides a context for registering operations for loss and derivative evaluations. This context is provided by a functional object called GradientTape(). In addition we have to write an encapsulating function “train_step()” to control gradient calculations and output during training.

In this post I will describe how we integrate such an approach with our class “MyVariationalAutoencoder()” for the setup of a VAE model based on convolutional layers. I have discussed the elements and methods of this class MyVariationalAutoencoder() in detail during the last posts.

Regarding the core of the technical solution for train_step() and GradientTape() I follow more or less the recommendations of one of the masters of Keras: F. Chollet. His original code for a TF2-compatible implementation of a VAE can be found here:
https://keras.io/ examples/ generative/vae/

However, in my opinion Chollet’s code contains a small problem, which I have allowed myself to correct.

The general recipe presented here can, of course, be extended to more complex tasks beyond the optimization of KL and reconstruction losses of VAEs. Therefore, a brief study of the methods to establish detailed loss control is really worth it for ML and VAE beginners. But TF2 and Keras experts will not learn anything new from this post.

I provide the pure code of the classes in this post. In the next post you will find Jupyter cell code for an application to the Celeb A dataset. To prove that the classes below do their job in the end I show you some faces which have been created from arbitrarily chosen points in the latent space after training.

These faces do not exist in reality. They are constructed by the VAE based on compressed and “normalized” data for face patterns and face attribute distributions in the latent space. Note that I used a latent space with a dimension of z_dim =200.

Layer setup by class MyVariationalAutoencoder()

We have already many of the required methods ready. In the last posts we used the flexible functional interface of Keras to set up Neural Network models for both Encoder and Decoder, each with sequences of (convolutional) layers. For our present purposes we will not change the elementary layer structure of the Encoder or Decoder. In particular the layers for the “mu” and “log_var” contributions to the KL loss and a subsequent sampling-layer of the Encoder will remain unchanged.

In the course of the last two posts I have already introduced a parameter “solution_type” to control specifics of our VAE model. We shall use it now to invoke a child class of Keras’ Model() which allows for detailed steps of loss and gradient evaluations.

A child class of keras.models.Model() for loss and gradient evaluation

The standard Keras method Model.fit() normally provides a convenient interface for Keras users. We do not have to think about calling the low-level functions at all if we do not want to or do not need to control gradient calculations in detail. In our present approach, however, we use the low level functionality of GradientTape() directly. This requires to overwrite a specific method of the standard Keras class Model() – namely the function “train_step()”.

If you have never worked with a self-defined training_step() and GradientTape() before then I recommend to read the following introductions first:
https://www.tensorflow.org/ guide/ autodiff
customizing what happens in fit() and the relation to training_step()
These articles contain valuable information about how to operate at low level with training_step() regarding losses, derivatives and metrics. This information will help to better understand the methods of a new class VAE() which I am going to derive from Keras’ class Model() below.

Let us first briefly repeat some imports required.

Imports

# Imports 
# ~~~~~~~~ 
import sys
import numpy as np
import os
import pickle

import tensorflow as tf
import tensorflow.keras as keras
from tensorflow.keras.layers import Layer, Input, Conv2D, Flatten, Dense, Conv2DTranspose, Reshape, Lambda, \
                                    Activation, BatchNormalization, ReLU, LeakyReLU, ELU, Dropout, AlphaDropout
from tensorflow.keras.models import Model
# to be consistent with my standard loading of the Keras backend in Jupyter notebooks:  
from tensorflow.keras import backend as B      
from tensorflow.keras import metrics
#from tensorflow.keras.backend import binary_crossentropy

from tensorflow.keras.optimizers import Adam
from tensorflow.keras.callbacks import ModelCheckpoint 
from tensorflow.keras.utils import plot_model

#from tensorflow.python.debug.lib.check_numerics_callback import _maybe_lookup_original_input_tensor

# Personal: The following works only if the path in the notebook is supplemented by the path to /projects/GIT/mlx
# The user has to organize his paths for modules to be referred to from Jupyter notebooks himself and 
# replace this settings  
from mynotebooks.my_AE_code.utils.callbacks import CustomCallback, VAE_CustomCallback, step_decay_schedule    
from keras.callbacks import ProgbarLogger

Now we define a class VAE() which inherits basic functionality from the Keras class Model() and overwrite the method train_step(). We shall later create an instance of this new class within an object of class MyVariationalAutoencoder().

New Class VAE

from tensorflow.keras import metrics
...
...
# A child class of Model() to control train_step with GradientTape() 
class VAE(keras.Model): 
    
    # We use our self defined __init__() to provide a reference MyVAE 
    # to an object of type "MyVariationalAutoencoder" 
    # This in turn allows us to address the Encoder and the Decoder  
    def __init__(self, MyVAE, **kwargs):
        super(VAE, self).__init__(**kwargs)
        self.MyVAE   = MyVAE 
        self.encoder = self.MyVAE.encoder
        self.decoder = self.MyVAE.decoder
        
        # A factor to control the ratio between the KL loss and the reconstruction loss 
        self.fact = MyVAE.fact
        
        # A counter 
        self.count = 0 
        
        # A factor to scale the absolute values of the losses 
        # e.g. by the number of pixels of an image
        self.scale_fact = 1.0  # no scaling
        # self.scale_fact = tf.constant(self.MyVAE.input_dim[0] * self.MyVAE.input_dim[1], dtype=tf.float32)
        self.f_scale    = 1. / self.scale_fact
        
        # loss type : 0: BCE, 1: MSE 
        self.loss_type = self.MyVAE.loss_type
        
        # track loss development via metrics 
        self.total_loss_tracker = keras.metrics.Mean(name="total_loss")
        self.reco_loss_tracker  = keras.metrics.Mean(name="reco_loss")
        self.kl_loss_tracker    = keras.metrics.Mean(name="kl_loss")

    def call(self, inputs):
        x, z_m, z_var = self.encoder(inputs)
        return self.decoder(x)  

    # Overwrite the metrics() of Model() - use getter mechanism  
    @property
    def metrics(self):
        return [
            self.total_loss_tracker,
            self.reco_loss_tracker,
            self.kl_loss_tracker
        ]

    # Core function to control all operations regarding eager differentiation operations, 
    # i.e. the calculation of loss terms with respect to tensors and differentiation variables 
    # and metrics data 
    def train_step(self, data):
        # We use the GradientTape context to record differntiation operations/results 
        #self.count += 1 
        
        with tf.GradientTape() as tape:
            z, z_mean, z_log_var = self.encoder(data)
            reconstruction = self.decoder(z)
            #reco_shape = tf.shape(self.reconstruction)
            #print("reco_shape = ", reco_shape, self.reconstruction.shape, data.shape)
            
            #BCE loss (Binary Cross Entropy) 
            if self.loss_type == 0: 
                reconstruction_loss = tf.reduce_mean(
                    tf.reduce_sum(
                        keras.losses.binary_crossentropy(data, reconstruction), axis=(1, 2)
                    )
                ) * self.f_scale
            
            # MSE loss (Mean Squared Error) 
            if self.loss_type == 1: 
                reconstruction_loss = tf.reduce_mean(
                    tf.reduce_sum(
                        keras.losses.mse(data, reconstruction), axis=(1, 2)
                    )
                ) * self.f_scale
            
            kl_loss = -0.5 * self.fact * (1 + z_log_var - tf.square(z_mean) - tf.exp(z_log_var))
            kl_loss = tf.reduce_mean(tf.reduce_sum(kl_loss, axis=1))  
            total_loss = reconstruction_loss + kl_loss 
        
        grads = tape.gradient(total_loss, self.trainable_weights)
        self.optimizer.apply_gradients(zip(grads, self.trainable_weights))
        #if self.count == 1: 
            
        self.total_loss_tracker.update_state(total_loss)
        self.reco_loss_tracker.update_state(reconstruction_loss)
        self.kl_loss_tracker.update_state(kl_loss)
        return {
            "total_loss": self.total_loss_tracker.result(),
            "reco_loss": self.reco_loss_tracker.result(),
            "kl_loss": self.kl_loss_tracker.result(),
        }
        
    def compile_VAE(self, learning_rate):

        # Optimizer
        # ~~~~~~~~~ 
        optimizer = Adam(learning_rate=learning_rate)
        # save the learning rate for possible intermediate output to files 
        self.learning_rate = learning_rate
        self.compile(optimizer=optimizer)

Explanation of class VAE(): Details of the methods of the additional class

First, we need to import an additional library tensorflow.keras.metrics. Its functions, as e.g. Mean(), will help us to print out intermediate data about various loss contributions during training – averaged over the batches of an epoch.

Then, we have added four central methods to class VAE:

  • a function __init__(),
  • a function metrics() together with Python’s getter-mechanism
  • a function call()
  • and our central function training_step().

All functions overwrite the defaults of the parent class Model(). Be careful to distinguish the range of batches which keras.metrics() and training_step() operate on:

  • A “training step” covers just one batch eventually provided to the training mechanism by the Model.fit()-function.
  • Averaging performed by functions of keras.metrics instead works across all batches of an epoch.

Functions “__init__() ” and call() to instantiate a Model based on class VAE()

In general we can use the standard interface of __init__(inputs, outputs, …) or a call()-interface to instantiate an object of class-type Model(). See
https://www.tensorflow.org/ api_docs/python/ tf/ keras/ Model
https://docs.w3cub.com/ tensorflow~python/ tf/ keras/ model.html

We have to be precise about the parameters of __init()__ or the call()-interface if we intend to use properties of the standard compile()– and fit()-interfaces of a model – at least in application cases where we do not control everything regarding losses and gradients ourselves.

To define a complete model for the general case we therefore add the call()-method. At the same time we “misuse” the __init__() function of VAE() to provide a reference to our instance of class “MyVariationalAutoencoder”. Actually, providing “call()” is done only for the sake of flexibility in other use cases than the one discussed here. For our present purposes we could actually omit call().

The __init__()-function retrieves some parameters from MyVAE. You see the factor “fact” which controls the ratio of the KL-loss to the reconstruction loss. In addition I provided an option to scale the loss values by a division by the number of pixels of input images. You just have to un-comment the respective statement. Sorry, I have not yet made it controllable by a parameter of MyVariationalAutoencoder().

Finally, the parameter loss_type is evaluated; for a value of “1” we take MSE as a loss function instead of the standard BCE (Binary Cross-Entropy); see the Jupyter cells in the next post. This allows for some more flexibility in dealing with certain datasets.

Function “metrics()” to produce loss values as output during training

With the function metrics() we are able to establish our own “tracking” of the evolution of the Model’s loss contributions during training. In our case we are particularly interested in the evolution of the “reconstruction loss” and the “KL-loss“.

Note that the @property decorator is added to the metrics()-function. This allows us to define its output via the getter-mechanism for Python classes. In our case the __init__()-function defines the mechanism to fill required variables:
The three “tracker”-variables there get their values from the function tensorflow.keras.metrics.Mean(). Note that the names given to the loss-trackers in __init__() are of importance for later output handling!

Note also that keras.metrics.Mean() calculates averages over values derived for all batches of an epoch. The tf.reduce_mean()-statements in the GradientTape() section of the code above, instead, refer to averages calculated over the samples of a single batch.

Actualized loss output is later delivered during each training step by the method update_state(). You find a description of the methods of keras.metrics.Mean() here.

The result of all this is that metrics() delivers loss values by actualized tracker-variables of our child class VAE(). Note that neither __init__() nor metrics() define what exactly is to be done to calculate each loss term. __init__() and metrics() only prepare the later output technically by formal class constructs. Note also that all the data defined by metrics() are updated and averaged per epoch without the requirement to call the function “reset_states()” (see the Keras docs). This is automatically done at the beginning of each epoch.

train_step() and GradientTape() to control losses and their gradients

Let us turn to the necessary calculations which must be performed during each training step. In an eager environment we must watch the trainable variables, on which the different loss terms depend, to be able to calculate the partial derivatives and record related operations and intermediate results already during forward pass:

We must track the differentiation operations and resulting values to know exactly what has to be done in reverse during error backward propagation. To be able to do this TF2 offers us a recording mechanism called GradientTape(). Its results are kept in an object which often is called a “tape”.

You find more information about these topics at
https://debuggercafe.com/ basics-of-tensorflow-gradienttape/
https://runebook.dev/de/docs/ tensorflow/gradienttape

Within train_step() we need some tensors which are required for loss calculations in an explicit form. So, we must change the Keras model for the Encoder to give us the tensors for “mu” and “log_var” as its output.

This is no problem for us. We have already made the output of the Encoder dependent on a variable “solution_type” and discussed a multi-output Encoder model already in the post Variational Autoencoder with Tensorflow 2.8 – VI – KL loss via tensor transfer and multiple output.

Therefore, we just have to add a new value 3 to the checks of “solution_type”. The same is true for the input control of the Decoder (see a section about the related methods of MyVariationalAutoencoder() below).

The statements within the section for GradientTape() deal with the calculation of loss terms and record the related operations. All the calculations should be be familiar from previous posts of this series.

This includes an identification of the trainable_weights of the involved layers. Quote from
https://keras.io/ guides/ writing_a_ training_loop_ from_scratch/ #using-the-gradienttape-a-first-endtoend-example:

Calling a model inside a GradientTape scope enables you to retrieve the gradients of the trainable weights of the layer with respect to a loss value. Using an optimizer instance, you can use these gradients to update these variables (which you can retrieve using model.trainable_weights).

In train_step() we need to register that the total loss is dependent on all trainable weights and that all related partial derivatives have to be taken into account during optimization. This is done by

        grads = tape.gradient(total_loss, self.trainable_weights)
        self.optimizer.apply_gradients(zip(grads, self.trainable_weights))

To be able to get actualized output during training we update the state of all tracked variables:

        self.total_loss_tracker.update_state(total_loss)
        self.reco_loss_tracker.update_state(reco_loss)
        self.kl_loss_tracker.update_state(kl_loss)

A small problem with F. Chollet’s code

The careful reader may have noticed that my code of the function “train_step()” deviates from F. Chollet’s recommendations. Regarding the return statement I use

        return {
            "total_loss": self.total_loss_tracker.result(),
            "reco_loss": self.reco_loss_tracker.result(),
            "kl_loss": self.kl_loss_tracker.result(),
        }

whilst F. Chollet’s original code contains a statement like

        return {
            "loss": self.total_loss_tracker.result(),     # here lies the main difference - different "name" than defined in __init__!
            "reconstruction_loss": self.reconstruction_loss_tracker.result(),  # ignore my abbreviation to reco_loss 
            "kl_loss": self.kl_loss_tracker.result(),
        }

Chollet’s original code unfortunately gives inconsistent loss data: The sum of his “reconstruction loss” and the “KL (Kullback Leibler) loss” do not add up to the (total) “loss”. This can be seen from the data of the first epochs in F. Chollet’s example on the tutorial at
keras.io/ examples/ generative/ vae.

Some of my own result data for the MNIST example with this error look like:

Epoch 1/5
469/469 [============================_build_dec==] - 7s 13ms/step - reconstruction_loss: 209.0115 - kl_loss: 3.4888 - loss: 258.9048
Epoch 2/5
469/469 [==============================] - 7s 14ms/step - reconstruction_loss: 173.7905 - kl_loss: 4.8220 - loss: 185.0963
Epoch 3/5
469/469 [==============================] - 6s 13ms/step - reconstruction_loss: 160.4016 - kl_loss: 5.7511 - loss: 167.3470
Epoch 4/5
469/469 [==============================] - 6s 13ms/step - reconstruction_loss: 155.5937 - kl_loss: 5.9947 - loss: 162.3994
Epoch 5/5
469/469 [==============================] - 6s 13ms/step - reconstruction_loss: 152.8330 - kl_loss: 6.1689 - loss: 159.5607

Things do get better from epoch to epoch – but we want a consistent output from the beginning: The averaged (total) loss should always be printed as equal to the sum of the averaged) KL loss plus the reconstruction loss.

The deviation is surprising as we seem to use the right tracker-results in the code. And the name used in the return statement of the train_step()-function here should only be relevant for the printing …

However, the name “loss” is NOT consistent with the name defined in the statement Mean(name=”total_loss”) in the __init__() function of Chollet, where he defines his tracking mechanisms.

self.total_loss_tracker = keras.metrics.Mean(name="total_loss")

This has consequences: The inconsistency triggers a different output than a consistent use of names. Just try it out on your own …

This is not only true for the deviation between “loss” in

return {
            "loss": self.total_loss_tracker.result(),
            ....
       }

and “total_loss” in the __init__) function

self.total_loss_tracker = keras.metrics.Mean(name="total_loss") , namely a value lacking averaging  -     

but also for deviations in the names used for the other loss contributions. In case of an inconsistency Keras seems to fall back to a default here which does not reflect the standard linear averaging of Mean() over all values calculated for the batches of an epoch (without any special weights).

That there is some common default mechanism working can be seen from the fact that wrong names for all individual losses (here the KL loss and the reconstruction loss) give us at least a consistent sum-value for the total amount again. But all the values derived by the fallback are much closer to the start values at an epochs begin than the mean values averaged over an epoch. You may test this yourself.

To get on the safe side we use the correct “names” defined in the __init__()-function of our code:

        return {
            "total_loss": self.total_loss_tracker.result(),
            "reco_loss": self.reco_loss_tracker.result(),
            "kl_loss": self.kl_loss_tracker.result(),
        }

For MNIST data fed into our VAE model we then get:

Epoch 1/5
469/469 [==============================] - 8s 13ms/step - reco_loss: 214.5662 - kl_loss: 2.6004 - total_loss: 217.1666
Epoch 2/5
469/469 [==============================] - 7s 14ms/step - reco_loss: 186.4745 - kl_loss: 3.2799 - total_loss: 189.7544
Epoch 3/5
469/469 [==============================] - 6s 13ms/step - reco_loss: 181.9590 - kl_loss: 3.4186 - total_loss: 185.3774
Epoch 4/5
469/469 [==============================] - 6s 13ms/step - reco_loss: 177.5216 - kl_loss: 3.9433 - total_loss: 181.4649
Epoch 5/5
469/469 [==============================] - 6s 13ms/step - reco_loss: 163.7209 - kl_loss: 5.5816 - total_loss: 169.3026

This is exactly what we want.

A general recipe to use train_step()

So, the general recipe is:

  • Define what metric properties you are interested in. Create respective tracker-variables in the __init__() function.
  • Use the getter mechanism to define your metrics() function and its output via references to the trackers.
  • Define your own training step by a function train_step().
  • Use Tensorflow’s GradientTape context to register statements which control the calculation of loss contributions from elementary tensors of your (functional) Keras model. Provide all layers there, e.g. by references to their models.
  • Register gradient-operations of the total loss with respect to all trainable weights and updates of metrics data within function “train_step()”.

Actually, I have used the GradientTape() mechanism already in this blog when I played a bit with approaches to create so called DeepDream images. See
https://linux-blog.anracom.com/category/machine-learning/deep-dream/
for more information – there in a different context.

How to combine the classes “VAE()” and “MyVariationalAutoencoder()” ?

Where do we stand? We have defined a new class “VAE()” which modifies the original Keras Model() class. And we have our class “MyVariationalAutoencoder()” to control the setup of a VAE model.

Next we need to address the question of how we combine these two classes. If you have read my previous posts you may expect a major change to the method “_build_VAE()“. This is correct, but we also have to modify the conditions for the Encoder output construction in _build_enc() and the definition of the Decoder’s input in _build_dec(). Therefore I give you the modified code for these functions. For reasons of completeness I add the code for the __init__()-function:

Function __init__()

    def __init__(self
        , input_dim                  # the shape of the input tensors (for MNIST (28,28,1)) 
        , encoder_conv_filters       # number of maps of the different Conv2D layers   
        , encoder_conv_kernel_size   # kernel sizes of the Conv2D layers 
        , encoder_conv_strides       # strides - here also used to reduce spatial resolution avoid pooling layers 
                                     # used instead of Pooling layers 
        , encoder_conv_padding       # padding - valid or same  
        
        , decoder_conv_t_filters     # number of maps in Con2DTranspose layers 
        , decoder_conv_t_kernel_size # kernel sizes of Conv2D Transpose layers  
        , decoder_conv_t_strides     # strides for Conv2dTranspose layers - inverts spatial resolution
        , decoder_conv_t_padding     # padding - valid or same  
        
        , z_dim                      # A good start is 16 or 24  
        , solution_type  = 0         # Which type of solution for the KL loss calculation ?
        , act            = 0         # Which type of activation function?  
        , fact           = 0.65e-4   # Factor for the KL loss (0.5e-4 < fact < 1.e-3is reasonable) 
        , loss_type      = 0         # 0: BCE, 1: MSE   
        , use_batch_norm = False     # Shall BatchNormalization be used after Conv2D layers? 
        , use_dropout    = False     # Shall statistical dropout layers be used for tregularization purposes ? 
        , dropout_rate   = 0.25      # Rate for statistical dropout layer  
        , b_build_all    = False     # Added by RMO - full Model is build in 2 steps 
        ):
        
        '''
        Input: 
        The encoder_... and decoder_.... variables are Python lists,
        whose length defines the number of Conv2D and Conv2DTranspose layers 
        
        input_dim : Shape/dimensions of the input tensor - for MNIST (28,28,1) 
        encoder_conv_filters:     List with the number of maps/filters per Conv2D layer    
        encoder_conv_kernel_size: List with the kernel sizes for the Conv-Layers   
        encoder_conv_strides:     List with the strides used for the Conv-Layers   

        z_dim : dimension of the "latent_space"
        solution_type : Type of solution for KL loss calculation (0: Customized Encoder layer, 
                                                                  1: transfer of mu, var_log to Decoder 
                                                                  2: model.add_loss()
                                                                  3: definition of training step with Gradient.Tape()
        
        act :  determines activation function to use (0: LeakyRELU, 1:RELU , 2: SELU)
               !!!! NOTE: !!!!
               If SELU is used then the weight kernel initialization and the dropout layer need to be special   
               https://github.com/christianversloot/machine-learning-articles/blob/main/using-selu-with-tensorflow-and-keras.md
               AlphaDropout instead of Dropout + LeCunNormal for kernel initializer
        fact = 0.65e-4 : Factor to scale the KL loss relative to the reconstruction loss
                         Must be adapted to the way of calculation - 
                         e.g. for solution_type == 3 the loss is not averaged over all pixels 
                         => at least factor of around 1000 bigger than normally 
        loss-type = 0:   Defines the way we calculate a reconstruction loss 
                         0: Binary Cross Entropy - recommended by many authors 
                         1: Mean Square error - recommended by some authors especially for "face arithmetics"
        use_batch_norm = False   # True : We use BatchNormalization   
        use_dropout    = False   # True : We use dropout layers (rate = 0.25, see Encoder)
        b_build_all    = False   # True : Full VAE Model is build in 1 step; 
                                   False: Encoder, Decoder, VAE are build in separate steps   
        '''
        
        self.name = 'variational_autoencoder'

        # Parameters for Layers which define the Encoder and Decoder 
        self.input_dim                  = input_dim
        self.encoder_conv_filters       = encoder_conv_filters
        self.encoder_conv_kernel_size   = encoder_conv_kernel_size
        self.encoder_conv_strides       = encoder_conv_strides
        self.encoder_conv_padding       = encoder_conv_padding
        
        self.decoder_conv_t_filters     = decoder_conv_t_filters
        self.decoder_conv_t_kernel_size = decoder_conv_t_kernel_size
        self.decoder_conv_t_strides     = decoder_conv_t_strides
        self.decoder_conv_t_padding     = decoder_conv_t_padding
        
        self.z_dim = z_dim

        # Check param for activation function 
        if act < 0 or act > 2: 
            print("Range error: Parameter act = " + str(act) + " has unknown value ")  
            sys.exit()
        else:
            self.act = act 
        
        # Factor to scale the KL loss relative to the Binary Cross Entropy loss 
        self.fact = fact 
        
        # Type of loss - 0: BCE, 1: MSE 
        self.loss_type = loss_type
        
        
        # Check param for solution approach  
        if solution_type < 0 or solution_type > 3: 
            print("Range error: Parameter solution_type = " + str(solution_type) + " has unknown value ")  
            sys.exit()
        else:
            self.solution_type = solution_type 

        self.use_batch_norm = use_batch_norm
        self.use_dropout    = use_dropout
        self.dropout_rate   = dropout_rate

        # Preparation of some variables to be filled later 
        self._encoder_input  = None  # receives the Keras object for the Input Layer of the Encoder 
        self._encoder_output = None  # receives the Keras object for the Output Layer of the Encoder 
        self.shape_before_flattening = None # info of the Encoder => is used by Decoder 
        self._decoder_input  = None  # receives the Keras object for the Input Layer of the Decoder
        self._decoder_output = None  # receives the Keras object for the Output Layer of the Decoder

        # Layers / tensors for KL loss 
        self.mu      = None # receives special Dense Layer's tensor for KL-loss 
        self.log_var = None # receives special Dense Layer's tensor for KL-loss 

        # Parameters for SELU - just in case we may need to use it somewhere 
        # https://keras.io/api/layers/activations/ see selu
        self.selu_scale = 1.05070098
        self.selu_alpha = 1.67326324

        # The number of Conv2D and Conv2DTranspose layers for the Encoder / Decoder 
        self.n_layers_encoder = len(encoder_conv_filters)
        self.n_layers_decoder = len(decoder_conv_t_filters)

        self.num_epoch = 0 # Intialization of the number of epochs 

        # A matrix for the values of the losses 
        self.std_loss  = tf.TensorArray(tf.float32, size=0, dynamic_size=True, clear_after_read=False)

        # We only build the whole AE-model if requested
        self.b_build_all = b_build_all
        if b_build_all:
            self._build_all()


Changes to the Encoder and Decoder code

We just need to set the right options for the output tensors of the Encoder and the input tensors of the Decoder. The relevant code parts are controlled by the parameter “solution_type”.

Modified code of _build_enc() of class MyVariationalAutoencoder

    def _build_enc(self, solution_type = -1, fact=-1.0):
        '''  Your documentation '''
        # Checking whether "fact" and "solution_type" for the KL loss shall be overwritten
        if fact < 0:
            fact = self.fact  
        if solution_type < 0:
            solution_type = self.solution_type
        else: 
            self.solution_type = solution_type
        
        # Preparation: We later need a function to calculate the z-points in the latent space 
        # The following function wiChangedll be used by an eventual Lambda layer of the Encoder 
        def z_point_sampling(args):
            '''
            A point in the latent space is calculated statistically 
            around an optimized mu for each sample 
            '''
            mu, log_var = args # Note: These are 1D tensors !
            epsilon = B.random_normal(shape=B.shape(mu), mean=0., stddev=1.)
            return mu + B.exp(log_var / 2) * epsilon

        
        # Input "layer"
        self._encoder_input = Input(shape=self.input_dim, name='encoder_input')

        # Initialization of a running variable x for individual layers 
        x = self._encoder_input

        # Build the CNN-part with Conv2D layers 
        # Note that stride>=2 reduces spatial resolution without the help of pooling layers 
        for i in range(self.n_layers_encoder):
            conv_layer = Conv2D(
                filters = self.encoder_conv_filters[i]
                , kernel_size = self.encoder_conv_kernel_size[i]
                , strides = self.encoder_conv_strides[i]
                , padding = 'same'  # Important ! Controls the shape of the layer tensors.    
                , name = 'encoder_conv_' + str(i)
                )
            x = conv_layer(x)
            
            # The "normalization" should be done ahead of the "activation" 
            if self.use_batch_norm:
                x = BatchNormalization()(x)

            # Selection of activation function (out of 3)      
            if self.act == 0:
                x = LeakyReLU()(x)
            elif self.act == 1:
                x = ReLU()(x)
            elif self.act == 2: 
                # RMO: Just use the Activation layer to use SELU with predefined (!) parameters 
                x = Activation('selu')(x) 

            # Fulfill some SELU requirements 
            if self.use_dropout:
                if self.act == 2: 
                    x = AlphaDropout(rate = 0.25)(x)
                else:
                    x = Dropout(rate = 0.25)(x)

        # Last multi-dim tensor shape - is later needed by the decoder 
        self._shape_before_flattening = B.int_shape(x)[1:]

        # Flattened layer before calculating VAE-output (z-points) via 2 special layers 
        x = Flatten()(x)
        
        # "Variational" part - create 2 Dense layers for a statistical distribution of z-points  
        self.mu      = Dense(self.z_dim, name='mu')(x)
        self.log_var = Dense(self.z_dim, name='log_var')(x)

        if solution_type == 0: 
            # Customized layer for the calculation of the KL loss based on mu, var_log data
            # We use a customized layer according to a class definition  
            self.mu, self.log_var = My_KL_Layer()([self.mu, self.log_var], fact=fact)


        # Layer to provide a z_point in the Latent Space for each sample of the batch 
        self._encoder_output = Lambda(z_point_sampling, name='encoder_output')([self.mu, self.log_var])

        # The Encoder Model 
        # ~~~~~~~~~~~~~~~~~~~
        # With extra KL layer or with vae.add_loss()
        if self.solution_type == 0 or self.solution_type == 2: 
            self.encoder = Model(self._encoder_input, self._encoder_output, name="encoder")
        
        # Transfer solution => Multiple outputs 
        if self.solution_type == 1  or self.solution_type == 3: 
            self.encoder = Model(inputs=self._encoder_input, outputs=[self._encoder_output, self.mu, self.log_var], name="encoder")

The difference is the dependency of the output on “solution_type 3”. For the Decoder we have:

Modified code of _build_enc() of class MyVariationalAutoencoder

    def _build_dec(self):
        ''' Your documentation       '''       
 
        # Input layer - aligned to the shape of z-points in the latent space = output[0] of the Encoder 
        self._decoder_inp_z = Input(shape=(self.z_dim,), name='decoder_input')
        
        # Additional Input layers for the KL tensors (mu, log_var) from the Encoder
        if self.solution_type == 1  or self.solution_type == 3: 
            self._dec_inp_mu       = Input(shape=(self.z_dim), name='mu_input')
            self._dec_inp_var_log  = Input(shape=(self.z_dim), name='logvar_input')
            
            # We give the layers later used as output a name 
            # Each of the Activation layers below just correspond to an identity passed through 
            #self._dec_mu            = self._dec_inp_mu 
            #self._dec_var_log       = self._dec_inp_var_log 
            self._dec_mu            = Activation('linear',name='dc_mu')(self._dec_inp_mu) 
            self._dec_var_log       = Activation('linear', name='dc_var')(self._dec_inp_var_log) 

        # Here we use the tensor shape info from the Encoder          
        x = Dense(np.prod(self._shape_before_flattening))(self._decoder_inp_z)
        x = Reshape(self._shape_before_flattening)(x)

        # The inverse CNN
        for i in range(self.n_layers_decoder):
            conv_t_layer = Conv2DTranspose(
                filters = self.decoder_conv_t_filters[i]
                , kernel_size = self.decoder_conv_t_kernel_size[i]
                , strides = self.decoder_conv_t_strides[i]
                , padding = 'same' # Important ! Controls the shape of tensors during reconstruction
                                   # we want an image with the same resolution as the original input 
                , name = 'decoder_conv_t_' + str(i)
                )
            x = conv_t_layer(x)

            # Normalization and Activation 
            if i < self.n_layers_decoder - 1:
                # Also in the decoder: normalization before activation  
                if self.use_batch_norm:
                    x = BatchNormalization()(x)
                
                # Choice of activation function
                if self.act == 0:
                    x = LeakyReLU()(x)
                elif self.act == 1:
                    x = ReLU()(x)
                elif self.act == 2: 
                    #x = self.selu_scale * ELU(alpha=self.selu_alpha)(x)
                    x = Activation('selu')(x)
                
                # Adaptions to SELU requirements 
                if self.use_dropout:
                    if self.act == 2: 
                        x = AlphaDropout(rate = 0.25)(x)
                    else:
                        x = Dropout(rate = 0.25)(x)
                
            # Last layer => Sigmoid output 
            # => This requires s<pre style="padding:8px; height: 400px; overflow:auto;">caled input => Division of pixel values by 255
            else:
                x = Activation('sigmoid', name='dc_reco')(x)

        # Output tensor => a scaled image 
        self._decoder_output = x

        # The Decoder model 
        # solution_type == 0/2/3: Just the decoded input 
        if self.solution_type == 0 or self.solution_type == 2 or self.solution_type == 3: 
            self.decoder = Model(self._decoder_inp_z, self._decoder_output, name="decoder")
        
        # solution_type == 1: The decoded tensor plus the transferred tensors mu and log_var a for the variational distribution 
        if self.solution_type == 1: 
            self.decoder = Model([self._decoder_inp_z, self._dec_inp_mu, self._dec_inp_var_log], 
                                 [self._decoder_output, self._dec_mu, self._dec_var_log], name="decoder")

Changes to the methods _build_VAE for building the VAE model

Our VAE model now is set up with the help of the __init__() method of our new class VAE. We just have to supplement the object created by MyVariationalAutoencoder.

Modified code of _build_VAE() of class MyVariationalAutoencoder

    def _build_VAE(self):     
        ''' Your documentation '''
        
        # Solution with train_step() and GradientTape(): Control is transferred to class VAE  
        if self.solution_type == 3:
            self.model = VAE(self)   # Here parameter "self" provides a reference to an instance of MyVariationalAutoencoder  
            self.model.summary()
        
        # Solutions with layer.add_loss or model.add_loss() 
        if self.solution_type == 0 or self.solution_type == 2:
            model_input  = self._encoder_input
            model_output = self.decoder(self._encoder_output)
            self.model = Model(model_input, model_output, name="vae")

        # Solution with transfer of data from the Encoder to the Decoder output layer
        if self.solution_type == 1: 
            enc_out      = self.encoder(self._encoder_input)
            dc_reco, dc_mu, dc_var = self.decoder(enc_out)
            # We organize the output and later association of cost functions and metrics via a dictionary 
            mod_outputs = {'vae_out_main': dc_reco, 'vae_out_mu': dc_mu, 'vae_out_var': dc_var}
            self.model = Model(inputs=self._encoder_input, outputs=mod_outputs, name="vae")

Note that we keep the resulting model within the object for class MyVariationalAutoencoder. See the Jupyter cells in my next post.

Changes to the method compile_myVAE()

The modification of the function compile_myVAE is simple

    def compile_myVAE(self, learning_rate):

        # Optimizer
        # ~~~~~~~~~ 
        optimizer = Adam(learning_rate=learning_rate)
        # save the learning rate for possible intermediate output to files 
        self.learning_rate = learning_rate
        
        # Parameter "fact" will be used by the cost functions defined below to scale the KL loss relative to the BCE loss 
        fact = self.fact
        
        # Function for solution_type == 1
        # ~~~~~~~~~~~~~~~~~~~~~~~~~~~~~~~~~  
        @tf.function
        def mu_loss(y_true, y_pred):
            loss_mux = fact * tf.reduce_mean(tf.square(y_pred))
            return loss_mux
        
        @tf.function
        def logvar_loss(y_true, y_pred):
            loss_varx = -fact * tf.reduce_mean(1 + y_pred - tf.exp(y_pred))    
            return loss_varx

        # Function for solution_type == 2 
        # ~~~~~~~~~~~~~~~~~~~~~~~~~~~~~~~~
        # We follow an approach described at  
        # https://www.tensorflow.org/api_docs/python/tf/keras/layers/Layer
        # NOTE: We can NOT use @tf.function here 
        def get_kl_loss(mu, log_var):
            kl_loss = -fact * tf.reduce_mean(1 + log_var - tf.square(mu) - tf.exp(log_var))
            return kl_loss


        # Required operations for solution_type==2 => model.add_loss()
        # ~~~~~~~~~~~~~~~~~~~~~~~~~~~~~~~~~~~~~~~~~
        res_kl = get_kl_loss(mu=self.mu, log_var=self.log_var)

        if self.solution_type == 2: 
            self.model.add_loss(res_kl)    
            self.model.add_metric(res_kl, name='kl', aggregation='mean')
        
        # Model compilation 
        # ~~~~~~~~~~~~~~~~~~~~
        
        # Solutions with layer.add_loss or model.add_loss() 
        if self.solution_type == 0 or self.solution_type == 2: 
            if self.loss_type == 0: 
                self.model.compile(optimizer=optimizer, loss="binary_crossentropy",
                                   metrics=[tf.keras.metrics.BinaryCrossentropy(name='bce')])
            if self.loss_type == 1: 
                self.model.compile(optimizer=optimizer, loss="mse",
                                   metrics=[tf.keras.metrics.MSE(name='mse')])
        
        # Solution with transfer of data from the Encoder to the Decoder output layer
        if self.solution_type == 1: 
            if self.loss_type == 0: 
                self.model.compile(optimizer=optimizer
                                   , loss={'vae_out_main':'binary_crossentropy', 'vae_out_mu':mu_loss, 'vae_out_var':logvar_loss} 
                                   #, metrics={'vae_out_main':tf.keras.metrics.BinaryCrossentropy(name='bce'), 'vae_out_mu':mu_loss, 'vae_out_var': logvar_loss }
                                   )
            if self.loss_type == 1: 
                self.model.compile(optimizer=optimizer
                                   , loss={'vae_out_main':'mse', 'vae_out_mu':mu_loss, 'vae_out_var':logvar_loss} 
                                   #, metrics={'vae_out_main':tf.keras.metrics.MSE(name='mse'), 'vae_out_mu':mu_loss, 'vae_out_var': logvar_loss }
                                   )
       
        # Solution with train_step() and GradientTape(): Control is transferred to class VAE  
        if self.solution_type == 3:
            self.model.compile(optimizer=optimizer)

Note the adaptions to the new parameter “loss_type” which we have added to the __init__()-function!

Changes to the method train_myVAE() – inclusion of a dataflow “generator

It gets a bit more complicated for the function “train_myVAE()”. The reason is that we use the opportunity to include the output of so called generators which create limited batches on the fly from disc or memory.

Such a generator is very useful if you have to handle datasets which you cannot get into the VRAM of your video card. A typical case might be the Celeb A dataset for older graphics cards as mine.

In such a case we provide a dataflow to the function. The batches in this data flow are continuously created as needed and handed over to Tensorflows data processing on the graphics card. So, “x_train” as an input variable must not be taken literally in this case! It is replaced by the generator’s dataflow then. See the code for the Jupyter cells in the next post.

In addition we prepare for cases where we have to provide target data to compare the input data “x_train” to which deviate from each other. Typical cases are the application of AEs/VAEs for denoising or recolorization.

    # Function to initiate training 
    # ~~~~~~~~~~~~~~~~~~~~~~~~~~~~~~~~
    def train_myVAE(self, x_train, x_target=None
                    , b_use_generator   = False 
                    , b_target_ne_train = False
                    , batch_size = 32
                    , epochs = 2
                    , initial_epoch = 0, 
                    t_mu=None, 
                    t_logvar=None 
                    ):

        ''' 
        @note: Sometimes x_target MUST be provided - e.g. for Denoising, Recolorization 
        @note: x_train will come as a dataflow in case of a generator 
        '''

        # cax = ProgbarLogger(count_mode='samples', stateful_metrics=None)
        
        class MyPrinterCallback(tf.keras.callbacks.Callback):
            # def on_train_batch_begin(self, batch, logs=None):
            #     # Do something on begin of training batch
        
            def on_epoch_end(self, epoch, logs=None):
                # Get overview over available keys 
                #keys = list(logs.keys())
                print("\nEPOCH: {}, Total Loss: {:8.6f}, // reco loss: {:8.6f}, mu Loss: {:8.6f}, logvar loss: {:8.6f}".format(epoch, 
                      logs['loss'], logs['decoder_loss'], logs['decoder_1_loss'], logs['decoder_2_loss'] 
                                            ))
                print()
                #print('EPOCH: {}, Total Loss: {}'.format(epoch, logs['loss']))
                #print('EPOCH: {}, metrics: {}'.format(epoch, logs['metrics']))
        
            def on_epoch_begin(self, epoch, logs=None):
                print('-'*50)
                print('STARTING EPOCH: {}'.format(epoch))
                
        if not b_target_ne_train : 
            x_target = x_train

        # Data are provided from tensors in the Video RAM 
        if not b_use_generator: 

            # Solutions with layer.add_loss or model.add_loss() 
            # Solution with train_step() and GradientTape(): Control is transferred to class VAE  
            if self.solution_type == 0 or self.solution_type == 2 or self.solution_type == 3: 
                self.model.fit(     
                    x_train
                    , x_target
                    , batch_size = batch_size
                    , shuffle = True
                    , epochs = epochs
                    , initial_epoch = initial_epoch
                )
            
            # Solution with transfer of data from the Encoder to the Decoder output layer
            if self.solution_type == 1: 
                self.model.fit(     
                    x_train
                    , {'vae_out_main': x_target, 'vae_out_mu': t_mu, 'vae_out_var':t_logvar}
    #               also working  
    #                , [x_train, t_mu, t_logvar] # we provide some dummy tensors here  
                    , batch_size = batch_size
                    , shuffle = True
                    , epochs = epochs
                    , initial_epoch = initial_epoch
                    #, verbose=1
                    , callbacks=[MyPrinterCallback()]
                )
    
        # If data are provided as a batched dataflow from a generator - e.g. for Celeb A 
        else: 

            # Solution with transfer of data from the Encoder to the Decoder output layer
            if self.solution_type == 1: 
                print("We have no solution yet for solution_type==1 and generators !")
                sys.exit()

            # Solutions with layer.add_loss or model.add_loss() 
            # Solution with train_step() and GradientTape(): Control is transferred to class VAE  
            if self.solution_type == 0 or self.solution_type == 2 or self.solution_type == 3: 
                self.model.fit(     
                    x_train   # coming as a batched dataflow from the outside generator - no batch size required here 
                    , shuffle = True
                    , epochs = epochs
                    , initial_epoch = initial_epoch
                )

As I have not tested a solution for solution_type==1 and generators, yet, I leave the writing of a working code to the reader. Sorry, I did not find the time for experiments. Presently, I use generators only in combination with the add_loss() based solutions and the solution based on train_step() and GradientTape().

Note also that if we use generators they must take care for a flow of target data to. As said: You must not take “x_train” literally in the case of generators. It is more of a continuously created “dataflow” of batches then – both for the training’s input and target data.

Conclusion

In this post I have outlined how we can use the methods train_step() and the tape-context of Tensorflows GradientTape() to control loss contributions and their gradients. Though done for the specific case of the KL-loss of a VAE the general approach should have become clear.

I have added a new class to create a Keras model from a pre-constructed Encoder and Decoder. For convenience reasons we still create the layer structure with our old class “MyVariationalAutoencoder(). But we switch control then to a new instance of a class representing a child class of Keras’ Model. This class uses customized versions of train_step() and GradientTape().

I have added some more flexibility in addition: We can now include a dataflow generator for input data (as images) which do not fit into the VRAM (Video RAM) of our graphics card but into the PC’s standard RAM. We can also switch to MSE for reconstruction losses instead of BCE.

The task of the KL-loss is to compress the data distribution in the latent space and normalize the distribution around certain feature centers there. In the next post
Variational Autoencoder with Tensorflow – IX – taming Celeb A by resizing the images and using a generator
we apply this to images of faces. We shall use the “Celeb A” dataset for this purpose. We are going to see that the scaling factor of the KL loss in this case has to be chosen rather big in comparison to simple cases like MNIST. We will also see that chosing a high dimension of the latent space does not really help to create a reasonable face from statistically chosen points in the latent space.

And before I forget it:
Ceterum Censeo: The worst living fascist and war criminal living today is the Putler. He must be isolated at all levels, be denazified and imprisoned. Long live a free and democratic Ukraine!