KVM/Qemu VMs with a multi-screen Spice console – VI – remote access with remote-viewer and TLS encryption

In my series on various methods to access a Spice console of a VM I have already covered two remote scenarios in an Intranet based on remote-viewer and SSH:

  • Scenario 1: remote-viewer is run on the KVM/Qemu server and accesses the Qemu-hypervisor over a Unix socket. The user at the remote client-system opens a “ssh -X” or “ssh -XC” session to the server, starts remote-viewer there and uses the graphical output data via the client’s X-server. Audio requires a reverse SSH tunnel for Pulseaudio ( “ssh -X -R 44713:localhost:4713” ).
  • Scenario 2: remote-viewer is started on the remote client-system. A Spice and VM-specific TCP-port (TCP socket) on the server is used for the transfer of video + audio data. Security can be achieved by establishing a SSH tunnel with port-forwarding and further user-related SSH-restrictions.

See
KVM/Qemu VMs with a multi-screen Spice console – V – remote access via remote-viewer, a network port and a SSH-tunnel
KVM/Qemu VMs with a multi-screen Spice console – IV – remote access via SSH, remote-viewer and a Unix socket
KVM/Qemu VMs with a multi-screen Spice console – III – local access with remote-viewer via a Unix socket
KVM/Qemu VMs with a multi-screen Spice console – II – local access with remote-viewer via a network port
KVM/Qemu VMs with a multi-screen Spice console – I – Overview over local and remote access methods

Security regarding an encrypted data transfer, user authentication and port or socket access was achieved via SSH in both scenarios, plus ACLs in case of the first scenario. A critical point in both scenarios was data compression. SSH compression (=gzip) had a palpable negative impact on the responsiveness of the VM’s desktop in the Spice windows. However, data compression offered via Spice options did not diminish the performance – at least it could not be felt.

In this article we have a look at yet another scenario for remote-viewer: Spice is this time combined with TLS encryption. However, in this post, we use TLS for data encryption, only, and not yet for client-authentication. Client authentication methods in combination with TLS and remote-viewer will be the topic of the next article.

We use the same systems as in the last articles: A KVM/Qemu server host “MySRV” with a Leap 15.2 OS on it, a test-VM “debianx” with a Kali-OS on it and a client-system “MyLAP” (a laptop with a Leap 15.2 OS). On the KVM/Qemu host our meanwhile familiar user “uvma” is used to start the VM “debianx” for us with the help of virt-manager. On the client-system “MyLAP”, instead, a user “myself” will start remote-viewer.

Schematic drawing

The following sketch shows what we want to achieve:

The
Qemu-hypervisor shall use a TLS server-key and a X509-server-certificate to encrypt all application data transferred in our Intranet between the server and the remote-viewer application on the client-system. This should include all data channels of the Spice protocol.

TLS CA, server certificates and RSA-keys

A sound TLS setup requires at least a CA, a CA-certificate, a server-certificate for the KVM/Qemu-server and a file with the private key of an asymmetric (RSA) key-pair. This brings us to the question: What tools can we use on a Leap-system to create such certificates for our private network?

On a Linux system there are, of course the OpenSSL libraries together with the so called “certtool“, a CLI-tool. You get the latter on Leap 15.2 by installing the “gnutls” RPM from the Leap15.2-Update repository. A documentation for the creation of CA, server and client TLS certificates and related key-pairs with certtool is given on the following web-pages:
https://libvirt.org/tlscerts.html
https://qemu-project.gitlab.io/qemu/system/tls.html.

Personally, I prefer a graphical tool to keep an overview about my own CAs and related server-certificates. As Opensuse never replaced their YaST CA-tool after they changed to Ruby as the programming platform for YaST we have to look elsewhere.

A very good tool which provides a lot of options is “XCA“. You find it in the package “xca” on a Leap 15.2 system. It is intuitive to use, offers a lot of options and its “help” documentation is very good – if you already know something about the differences and requirements of certificates. It offers suitable templates for CA-, server- and client-certificates. For a step-by-step description of how to create certificates see section 14 in the help functionality. Other tutorials for certificate creation with “xca” can be found in th following PDFs
http://help.mguard.com/ pdf /en / mguard8/ AppNotes/ AH EN X.509 CERT XCA 108396 en 00
http://evardsson.github.io/ s3c3/ Generating, signing and exporting keys and certificates with XCA

Another older tool, which I still use, is TinyCA. The following image shows a test example (I have no such net nor server as displayed).

Its templates are simpler than those of “xca”; the options are also a bit more limited, but sufficient for private purposes. Opensuse provides a RPM “tinyca2” in its standard repositories. I have written some blog posts about it; see: TinyCA2 as a replacement for YaST’s CA-tools on Opensuse Leap servers with TLS/SSL – I and two later posts.
Please, be aware of the fact that you need to apply additional patches to get SHA-256 and SHA-512 capabilities. See the named post about it. You should be able with my descriptions to create a server certificate for your KVM/Qemu-host. Also see TinyCA2 as a replacement for YaST’s CA-tools on Opensuse Leap servers with TLS/SSL – II for a description into which directory the CA-certificate files should be placed on a Leap 15.x OS.

For the rest of the present article I assume
the following:
You have created a CA, a CA-certificate, a X509-compatible server-certificate and a RSA based private key for the server. You do this on whatever system you use for the administration of your CA. You have also exported the certificate data and the key into files with the “pem“-format and copied them (scp) to a save place under the control of root on your KVM/Qemu server host. In the end you should have the following files there:

  • ca-cert.pem
  • server-cert.pem
  • server-key.pem

Note that these specific file-names are important for the later Qemu-configuration. You should rename your files accordingly or make copies with these names. Note that the server-key file contains a private key – this file must be protected against unauthorized access during all steps of the configuration process and after.

Note also that the server-certificate should be set up with the FQDN of our KVM/Qemu-server: This is “mysrv.anraconc.de” for our test situation.

You must also place a copy of the CA-cert file onto the client-system(s) from which the Spice user later connects to the KVM-server. The “CA-cert”-file must in addition be known there as coming from a trustworthy CA. See a separate section below for the required measures on an Opensuse Leap system.

If you already had a CA and had already issued certificates in the past – can we reuse them? The answer is: Yes, you could. Personally, however, I prefer to issue a special dedicated server-certificate and keys for Qemu. One of the reasons is that the Qemu process must be able to read the server-key-file and it is run for a special user “qemu” and not root. But I do not want “qemu” to be able to read other server-keys used by completely other processes as e.g. for a web- or mysql-server.

Configuration of Qemu on the KVM-host for TLS connections

You remember from previous articles of this series that remote-viewer talks directly to the Qemu-hypervisor; it does not involve any libvirt layer. It is therefore no surprise that we need to configure Qemu itself such that it uses TLS. But which is the right configuration file to take? And where do we place our certificates and keys?

On a Leap 15.2 system we normally use the libvirt machinery to create and start Qemu-based VMs and the related Qemu-processes. Then we need to tell libvirt how to start a Qemu-process with the required correct options. The config-file to take in this case is “/etc/libvirt/qemu.conf” (see the 2nd article of this series).

[If you, by the way, are interested in the qemu-options and in particular the TLS options which can be used if and when you start a qemu-process manually see the qemu documentation, e.g. here and here.]

The named “qemu.conf”-file on our Leap based KVM/Qemu-server has multiple sections regarding TLS. The first main section covers the directories used for certificate and key-files. There you also find the file-names mentioned above. Later on you find an option to change the directory for Spice related certificates. We use this option.

For the time being we set the following parameters and un-comment the related lines:

# The following tells Qemu to use TLS for the encr<yption of Spice cahnnels 
spice_tls = 1  

# We need to specify a directory where we place the certifactes and key to be used  
spice_tls_x509_cert_dir = "/etc/pki/libvirt-spice"

That is all we need for this article. (As mentioned in a previous post: On systems with apparmor active one should also activate “security_default_confined = 1”. But this no special TLS option).

Afterwards we have to copy our certificate- and key-files to “/etc/pki/libvirt-spice/“.

Note
again:
It is obligatory to use the filenames given above. A VM would not start otherwise and Qemu would complain non-existing or unusable files.

What file access rights are required?
The certificates should only include public keys, so here we could grant others the “r”-right. The situation is different with the file “server-key.pem“. It contains the server’s private key – and probably in unencrypted form if we did not protect it by password.

Therefore, we need to restrict the read rights for this file. And here we are confronted with a small glitch in the Opensuse configuration – the apparmor settings allow the privileged libvirt-user who is allowed to start virsh or virt-manager to read the files – but not “qemu”. A simple solution is

mysrv:~ # cd /etc/pki/libvirt-spice/
mysrv:/etc/pki/libvirt-spice # chmod 440 *
mysrv:/etc/pki/libvirt-spice # chown root.qemu * 
mysrv:/etc/pki/libvirt-spice # la
total 20
drwxr-xr-x 2 root root 4096 Apr 11 11:44 .
drwxr-xr-x 8 root root 4096 Feb 27 15:11 ..
-r--r----- 1 root qemu 2504 Feb 27 15:14 ca-cert.pem
-r--r----- 1 root qemu 2504 Apr 11 09:49 server-cert.pem
-r--r----- 1 root qemu 3243 Apr 11 09:49 server-key.pem
mysrv:/etc/pki/libvirt-spice # 

But from now on you should be careful during your experiments and check what members the group “qemu” has – on a Leap system it should only contain the user “qemu”, nobody else!

The question remains whether you need the CA-cert-file for any other purposes on the KVM server. If so, please follow the advice given in the section for using the ca-cert-file on the client-system and apply them in an analogous way on the server.

You should restart the libvirtd-daemon to activate the changed options for the start of Qemu-based VMs via virsh or virt-manager in the future.

Configuring Qemu to use TLS is NOT the same as configuring libvirt to use TLS!

Just a warning:
Readers who work totally libvirt-centered and use virt-viewer instead remote-viewer should at this point of reading become very clear about the fact that configuring Qemu for using TLS with Spice is something else than configuring libvirtd to use TLS for external connections. The Opensuse documentation at
doc.opensuse.org/ documentation/ leap/ virtualization/ html/ book-virt/ cha-libvirt-connect.html
refers to the latter. The settings to activate TLS for libvirtd and libvirt-tools use a different directory scheme and different file-names in comparison to what we did above. Also the required file access to certificates and private keys can be limited to root for pure libvitr-based tools – but not in our scenario.

Configuring the VM to use TLS with Spice

So far Qemu is prepared to support TLS on the KVM-server – if and when the use of TLS is requested. We, therefore, still have to define that TLS should be used for connections to the Spice console of our specific test-VM “debianx”.

Actually, we have to define a special network port for this purpose. In the XML-configuration file for the VM we change the Spice settings :

    
    <graphics type='spice' port='20001' tlsPort='20002' autoport='no' keymap='de' defaultMode='any' >
      <listen type='address' address='0.0.0.0'/>
      <image compression='auto_glz'/>
      <gl enable='no'/>
    </graphics>
    <sound model='ich6'>
      <address type='pci' domain='0x0000' bus='0x00' slot='0x04' function='0x0'/>
    </sound>
    <video>
      <model type='virtio' heads='2' primary='yes'>
        <acceleration accel3d='yes'/>
      </model>
      <address type='pci' domain='0x0000' bus='0x00' slot='0x02' function='0x0'
/>
    </video>

The first change in comparison to previous settings consists of a new attribute “tlsPort
(Off topic: I use the same audio and video settings as before.)

Note:

The “tlsPort” – just as the the standard “port” – is specific for the VM.
For another VM you must define another “tlsPort”.

The second change is the removal of the attribute “defaultMode”. This allows us later to switch between TLS-secure and “insecure” access methods as we like. Remember that we always can make a insecure” connection (regrding a lack of TLS) secure at any time by building a SSH tunnel.

Some reader may ask why we did not set the default mode to “secure” and deleted the “port”-attribute. Well, if we were in a position in which we had tested the TLS configuration already and wanted to use TLS only in the future (and not SSH, for example) then we could make these changes, yes. But I keep the option of using a SSH-tunnel open. TLS is anyway the preferred option if the associated port is specified by the Spice client (here remote-viewer).

The reader certainly has noticed that I activated Spice image data compression. We made a good experience with it the other day.

How to deal with the CA-certificate on the Leap 15.2 client-system? Where to place it?

OpenSSL will validate the whole CA-chain when confronted with a server-certificate. It needs the CA-certificate for it. In addition it should trust the related public key – as the CA-root-certificate is self-signed. This means that we have to make the certificate of our private CA known to the client-system(s) – here MyLAP – on which we want to start a Spice client requesting a TLS encrypted connection from the KVM/Qemu-server.

Opensuse Leap systems are a bit picky about were to place the CA-certificates. To say it clearly: “/etc/ssl/certs” is the wrong place!

Any certificates unknown to Leap 15.2 will not survive a reboot there. They won’t even survive a call of the “update-ca-certificate“-program, which would make the CA-certificate known to other programs as a usable and trustworthy one. So, placing the “ca-cert.pem”-file of our private CA into “/etc/ssl/certs” will lead to severe problems: It won’t be found or won’t be accepted during the start of remote-viewer on a client-system as MyLAP.

Note:

The right place for the certificate of our private CA on a Leap-system is “/etc/pki/trust/anchors/“.

You should copy it there. By the way: You should use the name given to your CA initially – not necessarily the special file name used for Qemu on the KVM/Qmu server. In my case it is something like “anraconc-CA”, thus “anraconc-CA.pem”.

So, we perfom the following copy-process

CaSRV:~ # scp /root/.TinyCA/anraconc-CA/cacert.pem root@MyLAP:/etc/pki/trust/anchors/anraconc-CA.pem
Password: 

On MyLAP we then enter

mylap:/etc/pki/trust/anchors # la 
-r--r--r-- 1 root root  2540 Apr 11 11:11 anraconc-CA.pem
mylap:/etc/pki/trust/anchors # update-ca-certificates
mylap:/etc/pki/trust/anchors # la /var/lib/ca-certificates/openssl | grep anrac
lrwxrwxrwx 1 root root    15 Apr 11 12:13 610c65bd.0 -> anraconc-CA.pem
-r--r--r-- 1 root root  2540 Apr 11 12:13 anraconc-CA.pem
lrwxrwxrwx 1 root root    15 Apr 11 12:13 bfb4c341.0 -> anraconb-CA.pem

“update-ca-certificates” makes the CA-certificate system-wide. The look into “/var/lib/ca-certificates/openssl” just was a check for this.
That is all we have to do regarding certificates on the client.

Test of the TLS encrypted remote connection to the Spice console

We first open our firewalls for connection from MyLAP to port 20002 on MySRV. On our KVM/Qemu-host we then start the libvirtd-daemon again to cover all
changes to Qemu and the VM. Afterward our privileged user “uvma” starts the VM “debianx” for us on the server. This should work without any problems – there should not be any errors regarding the TLS options and TLS files.

Then we have a brief look at https://libvirt.org/uri.html and https://www.spice-space.org/spice-user-manual.html to get an idea how we have to formulate our remote-viewer parameters for TLS:

myself@mylap:~> remote-viewer spice://mysrv.anraconc.de?tls-port=20002

(remote-viewer:29853): GSpice-WARNING **: 15:29:34.201: Warning no automount-inhibiting implementation available

with results that look very similar to what we have done in the last article. I omit the proof by screenshots as we would get no new information from them.

But did you notice a major difference besides the special way of specifying the TLS-port to use ?
We have to use the FQDN of the server!
Exactly in the form it was filled as the “common name” into the server-certificate! If we just used “mysrv” this would lead to an error message of OpenSSL – despite the fact that the short name can be resolved by a DNS server.
Note also that something like “remote-viewer spice://mysrv.anraconc.de:20002” will NOT work.

The required form of the command for remote-viewer with TLS is :

remote-viewer spice://FQDN_OF_KVM_HOST?tls-port=VM_SPECIFIC_PORT_NR

You should also test that the variant

myself@mylap:~> remote-viewer --spice-ca-file=/etc/pki/trust/anchors/anraconc-CA.pem  spice://mysrv.anraconc.de?tls-port=20002

works flawlessly.

Checking for encryption

A look at netstat on the server proves a connection to port 20002:

mysrv:~ # netstat -an | grep 20002
tcp        0      0 0.0.0.0:20002           0.0.0.0:*               LISTEN     
tcp        0      0 192.168.2.4:20002      192.168.2.22:36650      ESTABLISHED
tcp        0      0 192.168.2.4:20002      192.168.2.22:36646      ESTABLISHED
tcp        0      0 192.168.2.4:20002      192.168.2.22:36642      ESTABLISHED
tcp        0      0 192.168.2.4:20002      192.168.2.22:36648      ESTABLISHED
tcp        0      0 192.168.2.4:20002      192.168.2.22:36658      ESTABLISHED
tcp        0      0 192.168.2.4:20002      192.168.2.22:36656      ESTABLISHED
tcp        0      0 192.168.2.4:20002      192.168.2.22:36640      ESTABLISHED
tcp        0      0 192.168.2.4:20002      192.168.2.22:36644      ESTABLISHED
tcp        0      0 192.168.2.4:20002      192.168.2.22:36652      ESTABLISHED
tcp        0      0 192.168.2.4:20002      192.168.2.22:36654      ESTABLISHED
mysrv:~ # 

While this only shows that a connection to the right port is established. However, an additional look with wireshark shows you the TLS version (which it gets from protocol headers):

We see that TLS V1.3 is indeed used to encrypt the application data crossing port 20002.

Data transfer rates and responsiveness

The data transfer rates for the present scenario overall are very similar to the ones measured for the SSH-scenarios with Spice data compression. Maybe a tiny bit higher for TLS. But there are too many impact factors to really say this. The responsiveness of the window manager and single applications are excellent – as with the SSH scenario of the last article. I leave it to the reader to test it out on his own.

Does TLS encryption to the VM work locally, too?

An interesting question is whether we can have
encryption locally on the KVM/Qemu-server, too. The answer is: Yes, but you still have to provide the FQDN of the server; the network request will nevertheless be handled over the “lo”-device. This at least enables you to test your VM settings locally. But local encryption could also be interesting in some multi-user scenarios.

Using different options for the defaultMode and the Spice data channels

Allowed values for the “defaultMode” attribute in the Spice configuration of the VM are “secure”, “insecure” and “any”. With “any” you can switch between encrypted and unencrypted access at any time by closing the Spice windows and opening them again with different settings for the remote-viewer. You should check which port is taken by looking at the output of e.g. netstat. Using “secure” will enforce TLS-encryption; if no sufficient certificates were in place the VM would not even start then.

An important feature regarding TLS is that you may define which Spice data channel should/must be encrypted. You find more information about this at https://libvirt.org/formatdomain.html#graphical-framebuffers. I quote from the documentation there:

When SPICE has both a normal and TLS secured TCP port configured, it can be desirable to restrict what channels can be run on each port. This is achieved by adding one or more elements inside the main element and setting the mode attribute to either secure or insecure. Setting the mode attribute overrides the default value as set by the defaultMode attribute. (Note that specifying any as mode discards the entry as the channel would inherit the default mode anyways.) Valid channel names include main, display, inputs, cursor, playback, record (all since 0.8.6 ); smartcard ( since 0.8.8 ); and usbredir ( since 0.9.12 ).

The example given in the libvirt documentation is:

    
<graphics type='spice' port='-1' tlsPort='-1' autoport='yes'>
  <channel name='main' mode='secure'/>
  <channel name='record' mode='insecure'/>
  <image compression='auto_glz'/>
  <streaming mode='filter'/>
  <clipboard copypaste='no'/>
  <mouse mode='client'/>
  <filetransfer enable='no'/>
  <gl enable='yes' rendernode='/dev/dri/by-path/pci-0000:00:02.0-render'/>
</graphics>

Off topic: You see that there are more options for Spice – e.g. the streaming parameter, which can be used for video-streaming. In a quiet minute the interested reader should have a look into the Spice documentation at
https://www.spice-space.org/spice-user-manual.html
and
https://qemu.readthedocs.io/en/latest/system/invocation.html
to get more information.

What about other security elements?

It is nice that we now are able to use a TLS encrypted connection for remote-viewer. But a noticeable disadvantage in comparison to the SSH-tunnel scenario of my last article is that we must keep the Spice TLS-port open and accessible on the server. In addition: Basic security measures on a server should also include some form of user authentication – and the access to the Spice console of a VM should be restricted to selected users. With the TLS-elements discussed above alone we cannot achieve this. So, you have to wait for yet another blog article.

In the meantime you can and should at least set a password for the Spice console:

    
<graphics type='spice' port='20001' tlsPort='20002' autoport='no' keymap='de' defaultMode='any' password='my_verysecret_pwd' >
..... 

See the 2nd article of this series about it.

Conclusion

It is relatively easy to
configure a KVM/Qemu-server such that it encrypts Spice data with TLS. We tested this with a remote-viewer instance started on a client-system somewhere in our Intranet. A basic requirement is of course the creation of a private CA and certificates/keys. Tools like TinyCA or XCA help us with this.
As remote-viewer directly talks to the Qemu-emulator we had to configure libvirtd to enable dependent tools like “virsh” and “virt-manager” to start qemu-processes with the required parameters for TLS. This could be done via a few settings in the file “/etc/libvirt/qemu.conf”.
This type of qemu-configuration differs from activating TLS for a remote access to libvirt-based tools themselves. As a consequence the private server-key to be used by the Qemu process must be made readable for the “qemu”-user.
The TLS setup for remote-viewer and Spice neither allowed for user authentication on the server nor for user-specific restrictions so far. In the next article

KVM/Qemu VMs with a multi-screen Spice console – VII – remote-viewer, qemu and SASL authentication

we shall, therefore, have a look at methods for user authentication combined with TLS.

Links

Qmu, Spice und TLS
https://qemu-project.gitlab.io/qemu/system/tls.html

https://www.libvirt.org/tlscerts.html

https://ravada.readthedocs.io/en/latest/docs/spice_tls.html

Spice + defaultMode
https://libvirt.org/formatdomain.html#video-devices

OpenSSL to check for a valid TLS certificate on a network port
https://tenable.force.com/s/article/Using-OpenSSL-to-verify-certificate-information-on-a-port

KVM/Qemu VMs with a multi-screen Spice console – I – Overview over local and remote access methods

KVM/Qemu based virtual machines [VMs] are a nice and comfortable part of my life with Linux. I use them both as dedicated entities for various services on a server host and as experimental test or work environments on my Linux workstation. Whereas the access to server VMs was dominated by SSH connections and CLI interaction so far, working with VMs on my PC was and is is characterized by graphical user-interfaces.

In the latter case we speak of desktop-virtualization: Connections to the virtual guests are set up locally via sockets (or via a network port over device “lo”) on the very same PC or workstation which also serves as KVM host. Supported by a client/server model for graphics, KVM/Qemu provides multiple capable methods for the local display of the graphical output of a VM. And by graphical output I mean a desktop environment as KDE, XFCE or Gnome.

For KVM/Qemu the combination of the so called

  • Spice display” and the Spice protocol
  • with drivers for potent virtual video devices (as QXL or Virtio)

offers a very convenient solution for the presentation of a VM’s graphical desktop with high performance – which, in my experience, is considerably faster than most VNC variants.

In addition:
With the help of certain Spice clients one can access a local VM via a desktop display which extents over up to four “screens“. All of these “screens” are displayed within scalable windows of your preferred basic desktop environment on your Linux machine – e.g. KDE, LXDE. This means that you can graphically work with a full fletched KDE desktop of the VM displayed in multiple windows within a KDE or Gnome environment on your local KVM/Qemu host (e.g your Linux workstation).

Can we get this comfort also with remote connections over a LAN? With encryption tunnels? The answer is yes – and related Qemu and Libvirt configurations are the main topics of this article series.

Why do I write about these subjects, at all? Recently, I needed to work with a KVM/Qemu guest remotely on an Opensuse Leap 15.2 server. I wanted to use a SSH tunneled connection with password authentication for a special graphical Spice client, namely “virt-viewer“. Being a bit naive, I ran into some major trouble. This in turn forced me to look closer at different possibilities for remote connections to KVM/Qemu based VM. Unfortunately, I found Opensuse’s documentation on Spice sparse – to say the best. But Spice gets especially interesting and somewhat complex with remote access methods, encryption and authorization.

In this article series I discuss some of the multiple configuration options I have experimented with. I restrict myself to Spice based solutions with the clients “virt-viewer“, “remote-viewer” and also “virt-manager“. In combination with SSH, TLS. I hope my experiences help other Opensuse Leap users to set up convenient remote solutions.

After giving some documentation links, I start with an overview over some selected remote access scenarios which are available. They are the most important ones and are all based on network ports. But, in the coming posts I will cover local access scenarios based on Unix sockets, too. And their combination with SSH.

Limitations

Unfortunately, I have to reduce expectations of readers who are out for “multi-user remote desktop solutions”. This is not what the present Spice solutions with the named clients will offer you. See below.

A topic which I will not address in the forthcoming articles is the setup of a local VM with OpenGL acceleration on the graphics device of the KVM host. With Nvidia cards and drivers this is
unfortunately a mess – and it is Nvidia’s fault, in my opinion. Very similar, by the way, to Nvidia’s EGL-based solution attempt for Wayland. All of this because of their own OpenGL handling and their declined support for GBM. So, let us not go there to avoid frustration …

Basic preparations of a KVM/Qemu VM: Documentation and guides?

I assume that you are already familiar with the basic set up and configuration of a KVM/Qemu based virtual machine – e.g. with virsh or virt-manager. If not, you will find valuable hints for Opensuse Leap systems in SuSE’s “Virtualization Guide

However, as said above, Opensuse’s documentation on virtualization does not give you much information about Spice. We only get a glimpse of it at the sections on “virsh” and “Qemu“. The information is rather spurious there; one doesn’t get a broader context. You may get a better understanding by reading introductory pages on the site “https://www.spice-space.org/“, especially the user manual
https://www.spice-space.org/spice-user-manual.html.
Regarding special configuration settings of a VM, see https://libvirt.org/formatdomain.html.

Spice with multiple screens requires a non default configuration of the VM’s QXL device

For a basic Spice setup there is not too much to do; “just” choose Spice for the display-settings of your VM and configure the VM’s QXL graphics device. Such a device corresponds to something like a virtual graphics card. Well, it sounds easy, but when I tried it myself, I had to experiment. To help others a bit: I have already discussed in depth how we can configure a KVM/Qemu guest and its QXL device such that it supports multiple scalable high-resolution screens for Spice clients. See the following articles:

KVM/qemu mit QXL – hohe Auflösungen und virtuelle Monitore im Gastsystem definieren und nutzen – I
KVM/qemu mit QXL – hohe Auflösungen und virtuelle Monitore im Gastsystem definieren und nutzen – II
KVM/qemu mit QXL – hohe Auflösungen und virtuelle Monitore im Gastsystem definieren und nutzen – III
KVM/qemu mit QXL – hohe Auflösungen und virtuelle Monitore im Gastsystem definieren und nutzen – IV

These posts were written in German; but with a little bit of goodwill one can understand the configuration settings and related commands.

An alternative today is to use a “virtio” video device in the VM’s configuration. I shall come back to this point in a later article.

What I did not cover in my previous posts on Spice was the broader spectrum of access options to a KVM/Qemu-based VM with libvirt/Space clients – both regarding local and remote connections. I only discussed how to use the “remote-viewer” client locally – despite the fact that its name already indicates something else. What I also disregarded in my articles in 2017 is the fact that
there are various (remote) access methods – direct ones and some through a libvirt-layer on the KVM-host. As always with Linux there are multiple ways to achieve your objectives :-).

However, when we use Spice instead of VNC we speak about a “one person” or a “one seat” solution.

Spice and libvirt => multiple methods to access exactly one graphical console of a KVM/Qemu based VM

What you should be aware of when you think of using Spice for a graphical access to a KVM/Qemu VM is the following:

1. The Spice protocol and the Spice display for KVM/QEMU based VMs do NOT provide a multi-user service for graphical remote terminals or remote desktop displays – at least not in their default configuration.

According to what I have read, anything in this direction still seems to be experimental. Instead:

2. We access a data stream describing the graphical contents of one or multiple screens of a console which is virtually “attached” to the VM.

Let us call this device a multi-screen Spice console of the VM.

The Spice console solution is fully integrated into the QEMU-emulator. The console screen data and related sound can, however, also be displayed and played on a remote Linux system. And here we face a point which makes the user’s life both convenient and complex at the same time :

3. The Spice console of a VM can be accessed by various protocols or protocol combinations. The Spice console is fully integrated with Qemu and directly accessible there via a (network) socket, but it is in addition accessible via libvirt components. This leads to a variety of connectivity options.

These aspects can be underestimated: Remote access for multiple screen requires sufficient band-width of the network. The second point excludes the application of Spice for multi-user scenarios. The third point opens up a range of local and remote access possibilities – some are more complicated to configure, some are more secure than others. Some options are deactivated in a default libvirt installation (not only on Opensuse Leap systems).

The most important connection options for standard libvirt/spice clients are summarized in the following schematic drawing.

The Spice console of a KVM/Qemu VM

The graphics shows a Linux KVM host at its center. KVM supports the VM emulator QEMU in the Linux kernel – thus making QEMU fast. Two virtual machines VM1 and VM2 are shown. VM1’s configuration includes a Spice (console) display – e.g. set up according to the following excerpt of a configuration example for a VM (done with virt-manager):

Note that the configuration item is called “display” in virt-manager (and “graphics” in the XML-configuration of a VM). I think that in the case of Spice “Console” would have been a better name. I should also warn you that the displayed configuration may lead to security risks – if not accompanied by protective measures.

Note also that “virt-manager” does not allow for a detailed QXL-configuration required for multiple screens on the displayed dialog. But you can edit the XML-files of the VM for this purpose via the second tab (or an editor;
you find the XML-files for VMs in the directory “/etc/libvirt/qemu” on Opensuse Leap systems):

The QXL configuration displayed here is an example – you may choose other parameters. (Or test out a “virtio” device; see a later article).

“One seat” console
In the lower right part of the first sketch above I have tried to express that a graphical Spice console corresponds to a “one console with one seat” situation. The console is only available for exactly one (authorized) user at a time. Note:

Any user having sufficient access rights may any time claim the console and throw you off the seat in front of the graphical console screen, if you do not secure the access to the console by a password (or other measures)!

We did not do this in the configuration example above; see the empty field for the password. I quote from the documentation:

“Spice does not support multiple connections to the same QEMU instance by default. So anybody who will connect to the same host and port can simply take over your session. You can solve this problem by using ticketing.” (see: https://www.spice-space.org/spice-user-manual.html)

“Ticketing” means setting a password to access the VMs console screen; but still anyone knowing the password could claim the console – a password is no real solution for a multi-user situation. To say it clearly:

If your objective is to establish something like a multi-user graphical access to a KVM/QEMU-based virtual machine with a full desktop display for each user (i.e. a “remote desktop solution”), then think about something like a headless graphical server configuration of the KVM guest. On a Linux VM, you can achieve this by either implementing a X2GO server, a commercial NoMachine server, a VNC server-variant or even XRDP. Some of these solutions can easily be combined with SSH.
And do not forget: In a LAN with sufficient bandwidth “ssh -X” may already serve most practical purposes.

But in many cases a local or remote “one seat situation” with a full graphical desktop may be sufficient. Now, let us look at the other parts of the drawing.

Different access options to the Spice console of a KVM/Qemu-based VM

There is a multitude of options to connect to the Spice console (https://www.spice-space.org/spice-for-newbies.html). We shall describe them briefly in this first article. In forthcoming articles we shall have a closer look at each of them.

Option 1: Simple connection with “remote-viewer” via a Spice (network) port

The Qemu-emulator is able to handle requests over the Spice protocol on its own, i.e. without the invocation of special libvirt-support. The Spice solution offers connections to the console either on the basis of a pure Unix socket (local solution) or a network port (remote solution).

A network oriented solution, which can be realized with the Spice client “remote-viewer” is depicted on the left side of our central sketch:

You access the Spice console of a specific VM directly via a specific network port. Spice ports have to be configured independently for each of the VMs. I.e., if you have 2 VMs whose Spice consoles you want to access independently then you need to define two different ports for the Spice consoles. Actually, you won’t be able to start a VM which has the same port associated with its Spice console as another already running VM.

nProperties of a remote-viewer connection over a network port:

  • Default port? The standard Spice port is 5900 (which is also the port used by VNC). In the example displayed above I instead used port 20001. (Do not forget to open your firewalls for your chosen ports!)
  • Security by encryption? The connection to the port is not secured by any encryption. However, it is possible to define an additional specific TLS-secured port. We shall cover spice + TLS protocol combinations in another article.
  • User authentication on the KVM server host? Can optionally be achieved via SASL.
  • Preferred Spice client? The Spice client which uses the Spice protocol directly and without libvirt is “remote-viewer“.
  • Works locally and/or remotely? Both.

Some additional hints:

In some old articles or posts on the Internet you may find descriptions of “virt-viewer” together with URIs like “spice://host:5900”. This does not work any more – at least on my systems.

By setting proper attributes to the VM, we can in addition enforce that it only accepts secured connections. For those who are eager to experiment already: Where do we learn something about such machine specific settings in XML-format? The answer is:
https://libvirt.org/formatdomain.html

Option 2: Connection with “virt-viewer” or “virt-manager” via libvirtd and a defined TCP port

Besides “remote-viewer” there is another Spice client called “virt-viewer“. This client is of special use when you work on a KVM host with multiple VMs. What some admins do not know is that it can be used via a simple socket with a specific TCP-port. You do not need SSH or TLS, if you can disregard security. This corresponds pretty much to what we got with remote-viewer and a Spice port. The difference is that we access the socket via the mediation of libvirtd components:

virt-viewer requires URIs which specify the target hypervisor for the libvirtd daemon – in our case “qemu”. Such URIs differ from URIs used for remote-viewer as they always contain a two fold protocol definition.

We shall apply such URIs in a later article. In addition this access method requires a special (non-default) configuration of the libvirt-daemon. Among other things, you, of course, have to define the port. The ability to listen to an insecure TCP port is normally deactivated in the libvirtd configuration; we have to activate it manually. This is something we shall have a closer look at.

Unencrypted access to the Spice console via a special libvirtd port may be a useful solution for KVM guests sitting in a secured physical LAN-segment or behind a virtual bridge/firewall in a virtualized LAN-segment of the KVM host.

Properties of a virt-viewer connection via a TCP port

  • Default port? 16509.
  • Security by encryption? The connection to the port is not secured by any encryption. However, we have other options for virt-viewer to connect to the VM via SSH or TLS secured connections. See below.
  • Preferred Spice client?: virt-viewer (You cannot provide a valid URI to remote-viewer this way). However, this connection option also works with “virt-manager” (and its included graphical access to the Spice console).
  • User authentication? Can be achieved via SASL.
  • Works
    locally and/or remotely?
    Both.

on the KVM host.
Note that the access to libvirtd must be allowed for the user invoking the connection! This can be configured on Opensuse Leap systems by some policy and/or libvirtd settings.

Option 3: Connection with “virt-viewer” or “virt-manager” via SSH and libvirtd

A very convenient method to get a secure connection with Linux is to use SSH encryption. Therefore, we are not astonished to find that “virt-viewer” can be combined with SSH. This connection method also requires a special URI-format. And again: access to libvirtd must be allowed for the user using this type of connection.

Properties of a virt-viewer connection via a SHH port:

  • Default port? 22 or otherwise the defined SSH-port on your system.
  • Security by encryption? SSH.
  • Preferred Spice client?: virt-viewer (You cannot provide a valid URI to remote-viewer this way). However, this connection option also works with “virt-manager” (and its included graphical access to the Spice console).
  • User authentication? Via SSH (preferably public-key authentication)
  • Works locally and/or remotely? Both.

Both options 2 and 3 work with virt-manager, too. However, virt-manager does not provide you with a multi-screen access to the Spice console.

Note that a combination of SSH and remote-viewer is also possible; but then you would open a “SSH -X” connection first and run remote-viewer on the KVM/Qemu host and not on the network client system. I will present such a solution in a later article, too.

Conclusion

The Spice console of KVM/Qemu offers access to a graphical desktop of a virtual machine guest. Spice clients as “remote-viewer”, “virt-viewer” and “virt-manager” can be used locally and remotely. The first two clients offer multiple screens – but all clients provide a one seat solution, only. This may, however, be sufficient for many use cases. There is a variety of local and remote access methods. Connections can be secured by TLS or SSH encryption.

In the next article

KVM/Qemu VMs with a multi-screen Spice console – II – local access with remote-viewer via a network port

I shall have a closer look at a local connection from the “remote-viewer” client to the Spice console of a VM.

Links

Spice console and Spice protocol
https://linuxhint.com/ configure_ spice_server_ debian_10/
https://www.spice-space.org/ spice-user-manual.html
https://www.spice-space.org/ spice-for-newbies.html

Activate spice
https://www.linux-kvm.org/page/SPICE
https://linux-blog.anracom.com/2017/08/15/kvmqemu-mit-qxl-hohe-aufloesungen-und-virtuelle-monitore-im-gastsystem-definieren-und-nutzen-iv/
https://octetz.com/docs/2020/2020-05-06-linux-hypervisor-setup/

Nvidia 🙁
https://www.phoronix.com/scan.php?page=news_item&px=XDC2016-Device-Memory-API

Further
articles in this series

KVM/Qemu VMs with a multi-screen Spice console – VIII – VM and user specific restrictions for remote-viewer connections – iptables and sudo
KVM/Qemu VMs with a multi-screen Spice console – VII – remote-viewer, qemu and SASL authentication
KVM/Qemu VMs with a multi-screen Spice console – VI – remote access with remote-viewer and TLS encryption
KVM/Qemu VMs with a multi-screen Spice console – V – remote access via remote-viewer, a network port and a SSH-tunnel
KVM/Qemu VMs with a multi-screen Spice console – IV – remote access via SSH, remote-viewer and a Unix socket
KVM/Qemu VMs with a multi-screen Spice console – III – local access with remote-viewer via a Unix socket
KVM/Qemu VMs with a multi-screen Spice console – II – local access with remote-viewer via a network port

TinyCA2 as a replacement for YaST’s CA-tools on Opensuse Leap servers with TLS/SSL – III

I proceed with my article series on using TinyCA2 instead of YaST’s CA-admin tools, whic are simply missing since Opensuse Leap 15.0. Which I regard as a shame by the way …

In the first article

TinyCA2 as a replacement for YaST’s CA-tools on Opensuse Leap servers with TLS/SSL – I

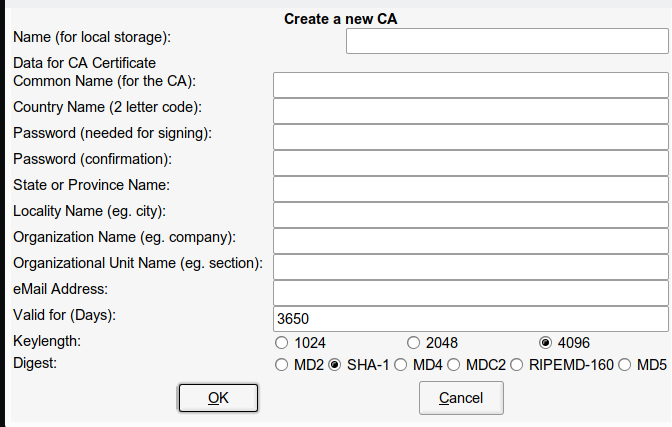
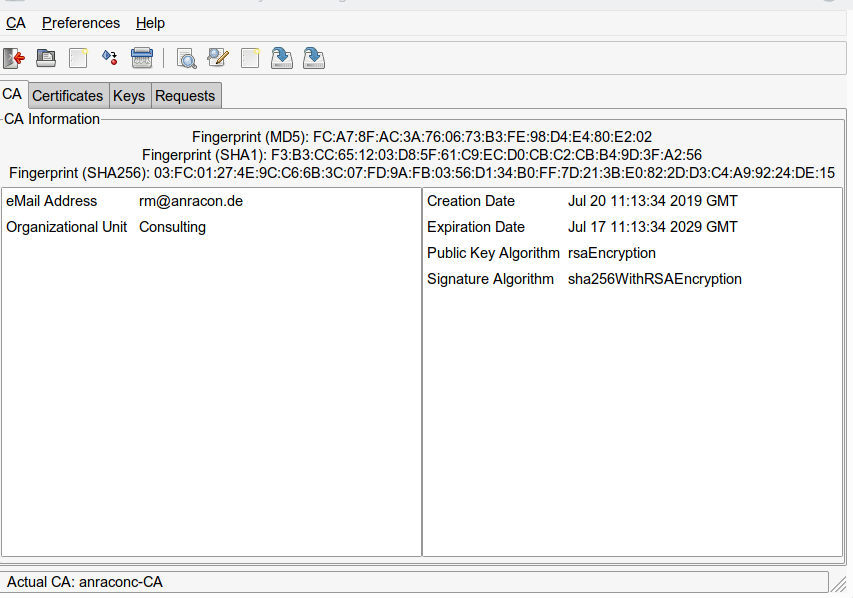
I briefly introduced the user interface of TinyCA2. We used it to create a new CA and a server certificate.

In the second article

TinyCA2 as a replacement for YaST’s CA-tools on Opensuse Leap servers with TLS/SSL – II

we found out where to place the new CA’s root certificate on an Opensuse Leap system to make it available system wide and permanently. We also used the newly created server certificate for the server “myserv.anraconc.de” for all services on this server – and placed the necessary files into “/etc/ssl/servercerts”.

We then discussed the reconfiguration of an Apache2-, an OpenLDAP- and the SSSD-service as examples of how to adapt to the CA and certificate changes. All the required operations on “myserv” were local copy and file editing operations – as “myserv” was the server for administering our new CA, too.

In this third article we, however, look at a second independent server “mymail.anraconc.de” for IMAP/SMTP-services. This server needs its own TLS/SSL-server-certificate. In lack of other tools we shall use scp to deploy the necessary files. I shall further discuss how to reconfigure “cyrus” and “postfix”. Note that these services do not only offer their own TLS/SSL connections to their clients; at the same time they themselves will work as LDAP-clients, i.e. as clients for the OpenLDAP service on server “myserv”. Therefore we must adapt the SSSD-service on “mymail”, too.

Placing a TinyCA2 server certificate on a mail server with cyrus, saslautd and postfix

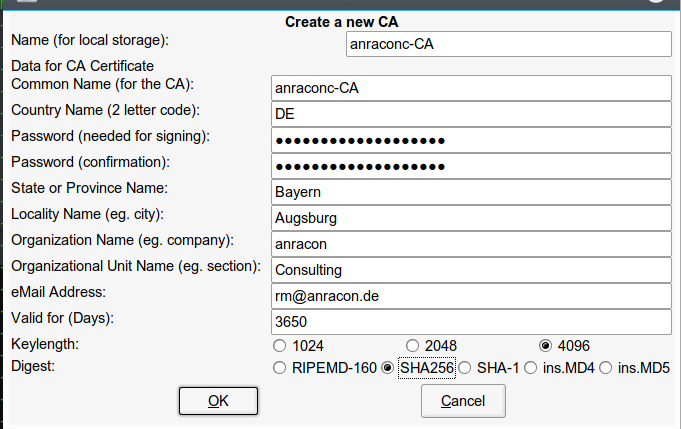
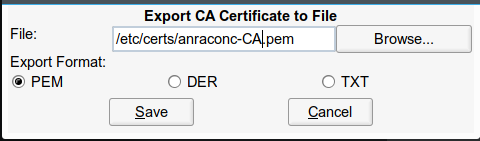
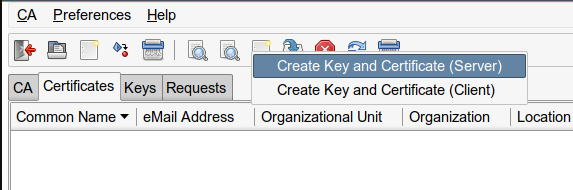
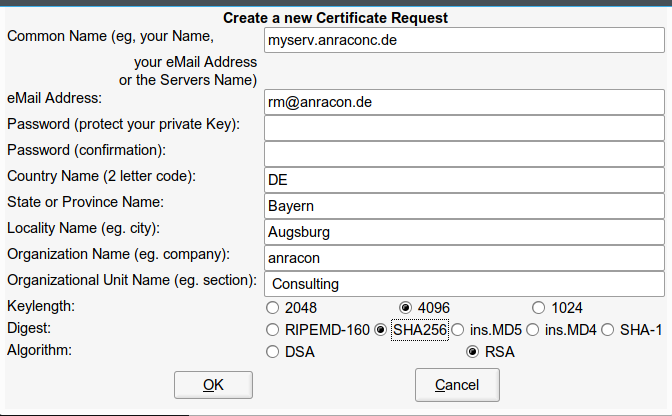
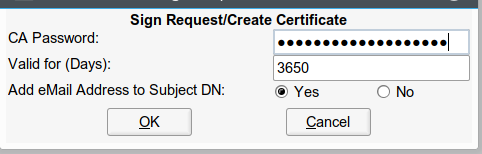
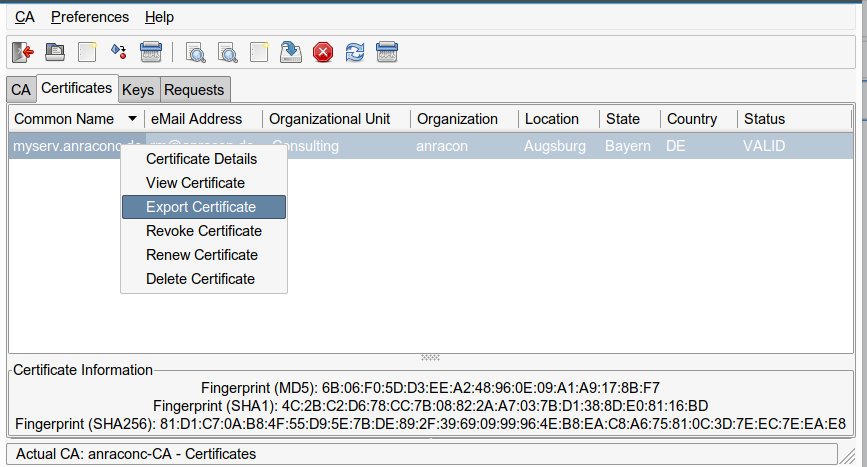
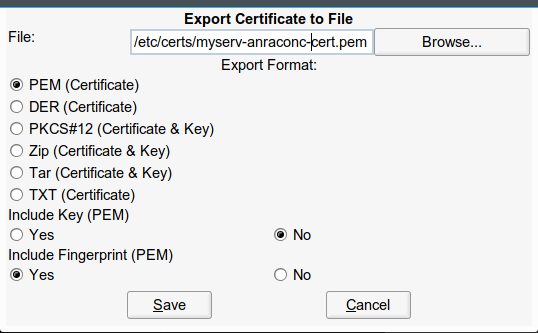
Our first step is to use TinyCA2 on our server “myserv” to create a second server certificate for the server “mymail” with the common name “mymail.anraconc.de”. This is done exactly as described in my first article for server “myserv”. We export the related certificate and the key files to “/etc/certs” on “myserv” and limit access to the private key file. We export the key file with its password – and strip it off afterwards:

myserv:/etc/certs # openssl rsa -in /etc/certs/mymail-anraconc-key.pem -out /etc/certs/mymail-anraconc-key_new.pem
Enter pass phrase for /etc/certs/mymail-anraconc-key.pem:
writing RSA key
myserv:/etc/certs # cp /etc/certs/mymail-anraconc-key_new.pem /etc/certs/mymail-anraconc-key.pem

Now, we look for some export/import mechanism for deploying “server certificates” from our sytem with the CA administration tool TinyCA2 to other systems. Unfortunately, TinyCA2 does not offer such a client/server feature for certificate deployment within a network. We are forced to transfer our certificates manually 🙁 .

I assume that we have a ssh-connection form our sever “myserv” to our mail-server “mymail”.

myserv:/etc # scp /etc/certs/mymail-anraconc-cert.pem root@mymail:/etc/certs
Password: 
mymail-anraconc-cert.pem                   100% 2147     1.5MB/s   00:00    
myserv:/etc # scp /etc/certs/mymail-anraconc-key.pem root@mymail:/etc/certs
Password: 
mymail-anraconc-key.pem                    100% 1679     1.4MB/s   00:00    
myserv:/etc # scp /etc/certs/anraconc-CA.pem root@mymail:/etc/certs
Password: 
anraconc-CA.pem                           100% 2504     1.7MB/s   00:00    
myserv:/etc # 

Note that I transferred the CA certificate, too.

On “mymail”:

mymail:~ # cp /etc/certs/anraconc-CA.pem /etc/pki/trust/anchors/
mymail:~ # cp -r /etc/ssl/servercerts/ /etc/ssl/servercerts.orig
mymail:~ # cp /etc/certs/mymail-anraconc-cert.pem /etc/ssl/servercerts/servercert.pem
mymail:~ # cp /etc/certs/mymail-anraconc-key.pem /etc/ssl/servercerts/serverkey.pem
mymail:~ # chmod 600 /etc/ssl/servercerts/serverkey.pem 
mymail:~ # 

If you read my second article of this series these steps need no further explanation.

Reconfiguring sssd, cyrus and postfix for the new SSL/TLS certificates

First, the sssd-service configuration in the file “/etc/sssd/sssd.conf” has to be updated on mymail:

.....
[pam]
[domain/default]
ldap_uri = ldap://myserv.anraconc.de
ldap_search_base = dc=anraconc,dc=de
ldap_schema = rfc2307bis
id_provider = ldap
ldap_user_uuid = entryuuid
ldap_group_uuid = entryuuid
ldap_id_use_start_tls = False
enumerate = True
cache_credentials = False
ldap_tls_cacertdir = /etc/ssl/certs
ldap_tls_cacert = /etc/ssl/certs/anraconc-CA.pem
chpass_provider = ldap
auth_provider = ldap
...
....

Note that the ldap_uri is the same (!) as on “myserv”! See the last article!

We then change “/etc/ldap.conf” – this enables any clients :

uri     ldap://myserv.anraconc.de
base    dc=anraconc,dc=de
nss_map_attribute       uniqueMember member
ssl     start_tls
tls_cacertdir   /etc/ssl/certs
tls_cacertfile  /etc/ssl/certs/anraconc-CA.pem              
pam_password    exop
pam_filter      objectClass=posixAccount
...

Afterwards we change the file “/etc/imapd.conf” – which is a central piece for a working cyrus-based IMAP-server:

....
# LMTP
# ****
lmtp_overquota_perm_failure: no
lmtp_downcase_rcpt: yes

# SASL
# ****
allowplaintext: yes
sasl_pwcheck_method: saslauthd
sasl_mech_list: PLAIN LOGIN

# TLS
# ****
tls_key_file: /etc/ssl/servercerts/serverkey.pem
tls_cert_file: /etc/ssl/servercerts/servercert.pem
tls_ca_file: /etc/ssl/certs/anraconc-CA.pem
...
...

You see that we saslauthd as an intermediate link of imap to authenticate (cyrus) users via LDAP (on another server).

Important Note:
The system users “mail” and “cyrus” must get read access to “/etc/ssl/servercerts/serverkey.pem” in case we use exactly one server-wide server certificate/key for all services. Otherwise TLS connections (starttls) cannot be provided for the imap/cyrus-service.

One solution for this problem is to use ACL-settings analogously to what we have done above for user “ldap” on the server “myserv”. See my last article …

For SMTP we also need to change “/etc/postfix/main.cf“:

...
....
 Client for the local SMTP-Server
#---------------------------------

# Changed by admin according to local sasl politics
#----------------------------------------------------
smtpd_sasl_auth_enable = yes
smtpd_sasl_security_options = noanonymous
smtpd_sasl_type = cyrus
# Postfix > 2.3
smtpd_sasl_path = smtpd
broken_sasl_auth_clients = yes


# Local SMTP server as a client for Relay servers 
#------------------------------------------------
# Inserted by admin - 06.01.2017
#-----------------------------------

smtp_sasl_auth_enable = yes
smtp_sasl_password_maps = hash:/etc/postfix/sasl_passwd
smtp_sasl_security_options = noanonymous
...
....
############################################################
# TLS stuff
############################################################
relay_clientcerts =
#tls_random_source = dev:/dev/urandom

smtp_use_tls = yes
#smtp_tls_loglevel = 0
#smtp_enforce_tls = no
smtp_tls_policy_maps = hash:/etc/postfix/tls_policy
smtp_tls_CApath = /etc/ssl/certs/
smtp_tls_
CAfile = /etc/ssl/certs/anraconc-CA.pem

smtp_tls_session_cache_database =

smtpd_use_tls = yes
smtpd_tls_auth_only = yes
smtpd_tls_loglevel = 2
smtpd_tls_CAfile = /etc/ssl/certs/anraconc-CA.pem
smtpd_tls_cert_file = /etc/ssl/servercerts/servercert.pem
smtpd_tls_key_file = /etc/ssl/servercerts/serverkey.pem
smtpd_tls_ask_ccert = no
smtpd_tls_received_header = yes

...
...

You saw again that I use saslauth for authentication. But, actually there is nothing to be changed in the saslauthd configuration in comparison to a previously working solution.

Finally, we restart all our services:

mymail:/etc/sasl2 # systemctl restart sssd.service
mymail:/etc/sasl2 # systemctl restart cyrus.service
mymail:/etc/sasl2 # systemctl restart postfix.service
mymail:/etc/sasl2 # systemctl restart saslauthd.service 

This should work flawlessly, if we have done everything correctly.

Testing with Kmail and other mail clients from client systems

Before you can start testing with email-clients you need to transfer the new CA’s certificate to your client system’s directory “/etc/pki/trust/anchors/”. Do not forget to import “anraconc-CA.pem” on all other clients that build up TLS or SSL connections to your reconfigured servers, too. And put the CA certificate into “/etc/pki/trust/anchors/” – if your clients are Opensuse Leap 15.x systems.

If you need any direct LDAP client services form your client system to the LDAP service on “myserv” you should take care of the necessary changes in the local “/etc/ldap.conf” and the “/etc/sssd/sssd.conf” !

Otherwise you should have a look at Kmail’s or your email’s IMAP account configuration:

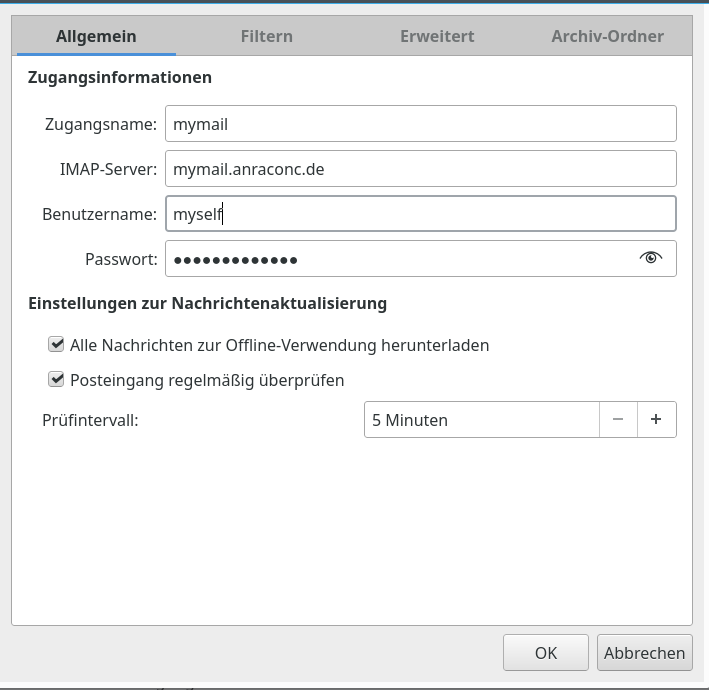
Note that you should give the name of the mail server in its FQDN-form to avoid messages on certificates not fitting the server. And:

Clicking on the button “Automatisch erkennen” (or whatever the button is named in English …”Automatic detection ?) should offer you STARTTLS now. If you get any messages about “no connection could be enabled” your configuration of the mail server still has deficits – either in offering TLS/SSL encryption or in its role as a client to the OpenLDAP server. You would have to analyze status and log information of all involved servers then.

You have to do similar things on other email-clients. I was lucky – things started to operate smoothly again on my mail clients.

Conclusion

It really is a problem that the SuSE people did not replace the YaST module for the administration of TLS/SSL CAs and server certificates by a Ruby counterpart with the start of Leap 15.0. Especially as Opensuse works as a basic platform for SLES 🙁 . Also SuSE previously often used a policy to allow for server wide certificates – i.e. one certificate for all services on a server instance. The deployment of such certificates issued by a central CA was supported by an export/import mechanism of YaST, which took care of password-protected keys by stripping of password and setting the right read access rights on the destination servers.

If you want to use TinyCA2 as a CA administration tool you are confronted with a series of challenges – among others the question of access rights of system users to certificate’s key files. In addition you have to place the CA’s root certificate at a proper location on Opensuse Leap systems (/etc/pki/trust/anchors) to
make it permanently available.

TinyCA2 – which I had a look at – is relatively old. The last Gitub change appeared in 2015. Nevertheless it does its job to create a CA, sub-CAs and server certificates (as well as client certificates) – and to revoke them if required. It also offers a simple local export mechanism for certifictaes and keys into standard file formats – as pem. However, this is it.

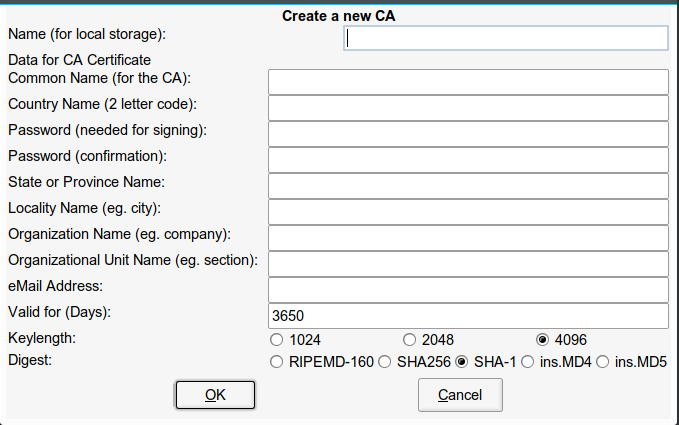
You need a patch to include SHA256 or SHA512 – which is a must these days. There are some flaws with the simple GUI, but these you can work around related problems – if you know about them. And: TinyCA2 will not help you to deploy the certificates/keys on your server or client systems. Not even a simple import mechanism for a server wide “server certificate plus key” issued by the CA is offered on target servers. So, if you do not want to invest time into your own deployment scripts you may come to the conclusion that TinyCA2 is not suited well for large networks with many servers. In my case I fount it applicable for a dozen servers – but not more. Too much handwork ….

If you consider to use TinyCA2 as a replacement for YaST’s CA administration tools most of your work will be to deploy the TLS/SSL certificates/keys onto your server systems and to reconfigure all services to use these certificates for TLS, StartTLS and SSL connections.

On Opensuse systems the deployment of the CA root certificate within the bunch of permanently trusted CA certificates requires some knowledge about the relevant directory to make the CA certificate available in a central directory as “/etc/ssl/certs” – which may be used by legacy applications. The access rights to a server certificates key file may pose some special problems – you may have to test which system user associated with your services requires read rights.

There are actually several ways how to handle the read access topic for the private certificate keys. I have shown how to use ACLs for this purpose. My recommendation, however, is to use separate certificates and related keys for all services – even if they reside on the same server and despite consequences for your network and DNS configuration due to unique FQGNs and common names. You never know what can happen to a service specific user during attacks. If one certificate/key gets corrupted the others may still survive. Actually, this could be a reason for encapsulating services even more in form of LXC containers. But this is a different story …

Good luck with Opensuse and TinyCA2 !