
It is fun to play around with Convolutional Neural Networks [CNNs] on the level of an dedicated amateur. One of the reasons is the possibility to visualize the output of elementary building blocks of this class of AI networks. The resulting images help to understand CNN algorithms in an entertaining way – at least in my opinion. The required effort is in addition relatively limited: You must be willing to invest a bit of time into programming, but on a quite modest level of difficulty. And you can often find many basic experiments which are in within the reach of limited PC capabilities.
A special area where the visualization of CNN guided processes is the main objective is the field of “Deep Dreams“. Anyone studying AI methods sooner or later stumbles across the somewhat psychedelic, but none the less spectacular images which Google presented in 2016 as a side branch of their CNN research. Today, you can download DeepDream generators from GitHub.
When I read a bit more about “DeepDream” experiments, I quickly learned that people use quite advanced CNN architectures, like Google’s Inception CNNs, and apply them to high resolution images (see e.g. the Book of F. Chollet on “Deep Learning with Keras and Python” and ai.googleblog.com, 2015, inceptionism-going-deeper-into-neural). Even if you pick up an already trained version of an Inception CNN, you need some decent GPU power to do your own experiments. Another questionable point for an interested amateur is: What does one actually learn from applying “generators”, which others have programmed, and what from just following a “user guide” without understanding what a DeepDream SW actually does? Probably not much, even if you produce stunning images after some time…
So, I asked myself: Can one study basic methods of the DeepDream technology with self programmed tools and a simple dataset? Could one create a “DeepDream” visualization with a rather simply structured CNN trained on MNIST data?
The big advantage of the MNIST data set is that the individual samples are small; and the amount of numerical operations, which a related simple CNN must perform on input images, fits well to the capabilities of PC technology – even if the latter is some years old.
After a first look into DeepDream algorithms, I think: Yes, it should be possible. In a way DeepDream experiments are a natural extension of the visualization of CNN filters and maps which I have already discussed in depth in another article series. Therefore, DeepDream visualizations might even help us to better understand how the internal filter of CNNs work and what “features” are. However, regarding the creation of spectacular images we need to reduce our expectations to a reasonably low level:
A CNN trained on MNIST data works with gray images, low resolution and only simple feature patterns. Therefore, we will never produce such impressive images as published by DeepDream artists or by Google. But, we do have a solid chance to grasp some basic principles and ideas of this side-branch of AI with very simplistic tools.
As always in this blog, I explore a new field step-wise and let you as a reader follow me through the learning process. Throughout most of this new series of articles we will use a CNN created with the help of Keras and filter visualization tools which were developed in another article series of this blog. The CNN has been trained on the MNIST data set already.
In this first post we are going to pick just a single selected feature or response map of a deep CNN layer and let it “dream” upon a down-scaled image of roses. Well, “dream“, as a matter of fact, is a misleading expression; but this is true for the whole DeepDream
business – as we shall see. A CNN does not dream; “DeepDream” creation is more to be seen as an artistic discipline using algorithmic image enhancement.
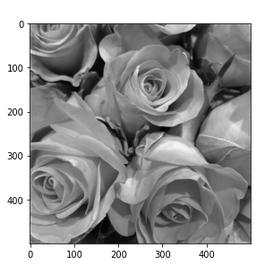
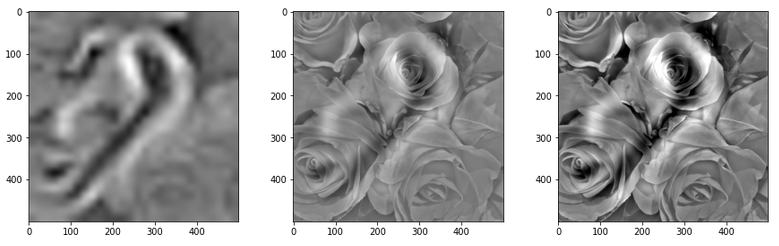
The input image which we shall feed into our CNN today is shown below:
As our CNN works on a resolution level of 28×28 pixels, only, the “dreaming” will occur in a coarse way, very comparable to hallucinations on the blurred vision level of a short-sighted, myopic man. More precisely: Of a disturbed myopic man who works the whole day with images of digits and lets this poor experience enter and manipulate his dreamy visions of nicer things :-).
Actually, the setup for this article’s experiment was a bit funny: I got the input picture of roses from my wife, who is very much interested in art and likes flowers. I am myopic and in my soul still a theoretical physicist, who is much more attracted by numbers and patterns than by roses – if we disregard the interesting fractal nature of rose blossoms for a second :-).
What do DeepDreams based on single maps of trained MNIST CNNs produce?
To rouse your interest a bit or to disappoint you from the start, I show you a typical result of today’s exercise: “Dreams” or “hallucinations” based on MNIST and a selected single map of a deep convolutional CNN layer produce gray scale images with ghost-like “apparitions”.
When these images appeared on my computer screen, I thought: This is fun, indeed! But my wife just laughed – and said “physicists” with a known undertone and something about “boys and toys” …. I hope this will not stop you from reading further. Later articles will, hopefully, produce more “advanced” hallucinations. But as I said: It all depends on your expectations.
But, lets focus: How did I create the simple “dream” displayed above?
Requirements – a CNN and analysis and visualization tools described in another article series of this blog
I shall use results and methods, which I have already explained in another article series. You need a basic understanding of how a CNN works, what convolutional layers, kernel based filters and cost functions are, how we can build simple CNNs with the help of Keras, … – otherwise you will be lost from the beginning.
A simple CNN for the MNIST datasets – I – CNN basics
We also need a CNN, already trained on the MNIST data. I have shown how to build and train a very simple, yet suitable CNN with the help of Keras and Python; see e.g.:
A simple CNN for the MNIST datasets – II – building the CNN with Keras and a first test
A simple CNN for the MNIST dataset – III – inclusion of a learning-rate scheduler, momentum and a L2-regularizer
In addition we need some
code to create input image patterns which trigger response maps or full layers of a CNN optimally. I called such pixel patterns “OIPs”; others call them “features”. I have offered a Python class in the other article series which offers an optimization loop and other methods to work on OIPs and filter visualization.
A simple CNN for the MNIST dataset – XI – Python code for filter visualization and OIP detection
We shall extend this class by further methods throughout our forthcoming work. To develop and run the codes you should have a working Jupyter environment, a virtual Python environment, an IDE like Eclipse with PyDev for building larger code segments and a working Cuda installation for a NVidia graphics card. My 960GTX proved to be fully sufficient for what we are going to do.
Deep “Dream” – or some funny image manipulation?
As it unfortunately happens so often with AI topics: Also in case of the term “DeepDream” the vocabulary is exaggerated and thoroughly misleading. A simple CNN neither thinks nor “dreams” – it is a software manifestation of the results of an optimization algorithm applied to and trained on selected input data. If applied to new input, it will only detect patterns for which it was optimized before. You could also say:
A CNN is a manifestation of learned prejudices.
CNNs and other types of AI networks filter input according to encoded rules which serve a specific purpose and which reflect the properties of the selected training data set. If you ever used the CNN of my other series on your own hand-written images after a training only on the (US-) MNIST images you will quickly see what I mean. The MNIST dataset reflects an American style of writing digits – a CNN trained on MNIST will fail relatively often when confronted with image samples of digits written by Europeans.
Why do I stress this point at all? Because DeepDreams reveal such kinds of “prejudices” in a visible manner. DeepDream technology extracts and amplifies patterns within images, which fit the trained filters of the involved CNN. F. Chollet correctly describes “DeepDream” as an image manipulation technique which makes use of algorithms for the visualization of CNN filters.
The original algorithmic concept for DeepDreams consists of the following steps:
- Extend your algorithm for CNN filter visualization (= OIP creation) from a specific map to the optimization of the response of complete layers. Meaning: Use the total response of all maps of a layer to define contributions to your cost function. Then mix these contributions in a defined weighted way.
- Take some image of whatever motive you like and prepare 4 or more down-scaled versions of this image, i.e. versions with different levels of size and resolution below the original size and resolution.
- Offer the image with the lowest resolution to the CNN as an input image.
- Loop over all prepared image sizes :
- Apply your algorithm for filter visualization of all maps and layers to the input image – but only for a very limited amount of epochs.
- Upscale the resulting output image (OIP-image) to the next level of higher resolution.
- Add details of the original image with the same resolution to the upscaled OIP-image.
- Offer the resulting image as a new input image to your CNN.
Readers who followed me through my last series on “a simple CNN for MNIST” should already raise their eyebrows: What if the CNN expects a certain fixed size of of the input image? Well, a good question. I’ll come back to it in a second. For the time being, let us say that we will concentrate more on resolution than on an
actual image size.
The above steps make it clear that we manipulate an image multiple times. In a way we transform the image slowly to improve a layer’s response and repeat the process with growing resolution. I.e., we apply pattern detection and amplification on more and more details – in the end using all available large and small scale filters of the CNN in a controlled way without fully eliminating the original contents.
What to do about the low resolution of MNIST images and the limited capability of a CNN trained on them?
MNIST images have a very low resolution, real images instead a significantly higher one. With our CNN specialized on MNIST input the OIP-creation algorithm only works on (28×28)-images (and with some warnings, maybe, on smaller ones). What to do about it when we work with input images of a size of e.g. 560×560 pixels?
Well, we just work on the given level of resolution! We have three options:
- We can downsize the input image itself or parts of it to the MNIST dimensions – with the help of a bicubic interpolation. Then our OIP-algorithm has the chance to detect OIPs on the coarse scale and to change the downsized image accordingly. Then we can upscale the result again to the original image size – and add details again.
- We can split the input image into tiles of size (28×28) and offer these tiles as input to the CNN.
- We can combine both of the above options.
Its like what a shortsighted human would do: Work with a blurred impression of the full scale image or look at parts of it from a close distance and then reassemble his/her impressions to larger scales.
A first step – apply only one specific map of a convolutional layer on a down-scaled image version
In this article we have a very limited goal for which we do not have to change our tools, yet:
- Preparation:
- We choose a map.
- We downscale the original image to (28×28) by interpolation, upscale the result again by interpolating again (with loss) and calculate the difference to the original full resolution image (all interpolations done in a bicubic way).
- Loop (4 times or so):
- We apply the OIP-algorithm on the downscaled input image for a fixed amount of epochs
- We upscale the result by bicubic interpolation to the original size.
- We re-add the difference in details.
- We downscale the result again.
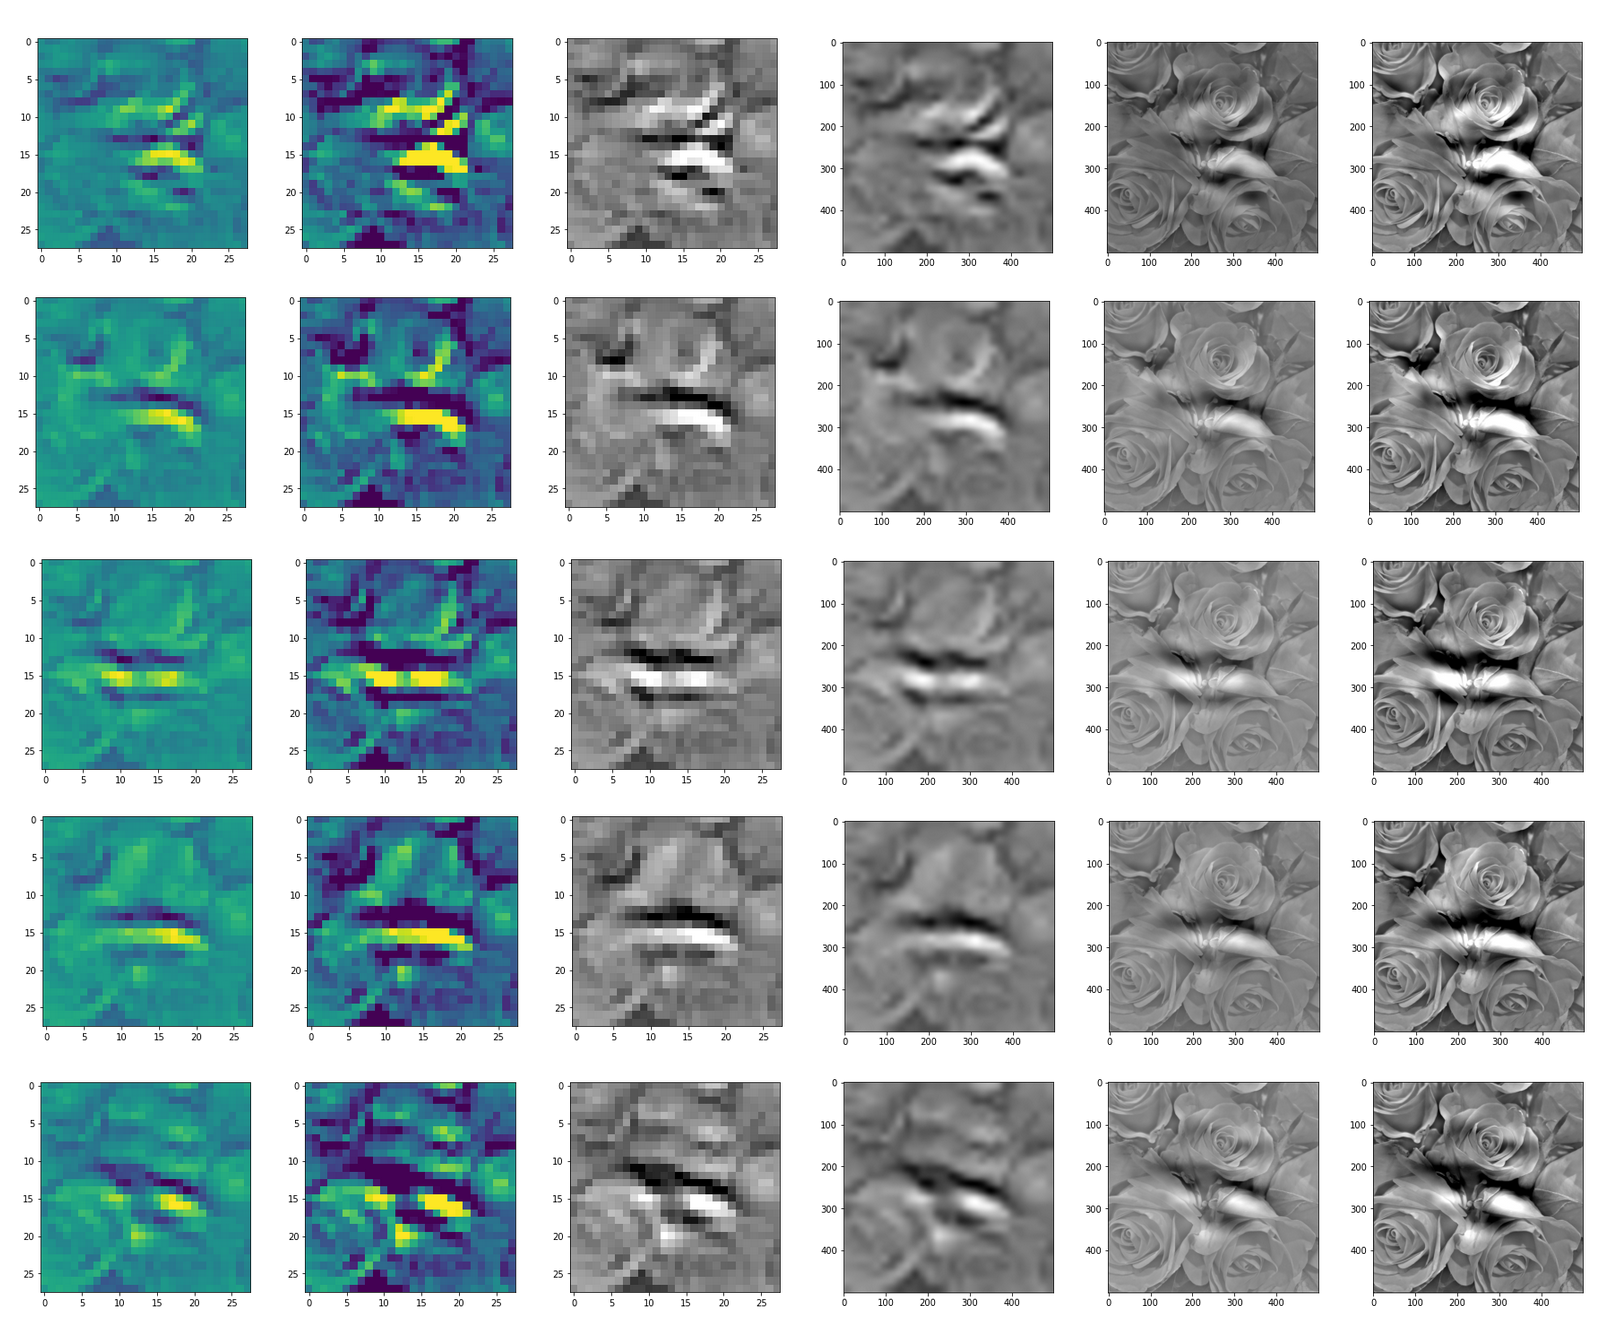
With this approach I try to apply some of the elements of the original algorithm – but just on one scale of coarse resolution. I shall discuss the code for realizing the recipe given above with Python and Jupyter in the next article. For today let us look at some of the ghost like apparitions in the dreams for selected maps of the 3rd convolutional layer; see:
A simple CNN for the MNIST dataset – IX – filter visualization at a convolutional layer
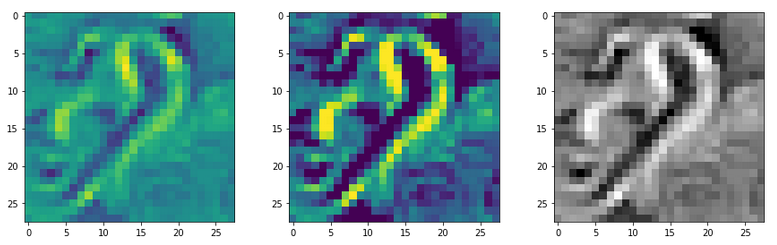
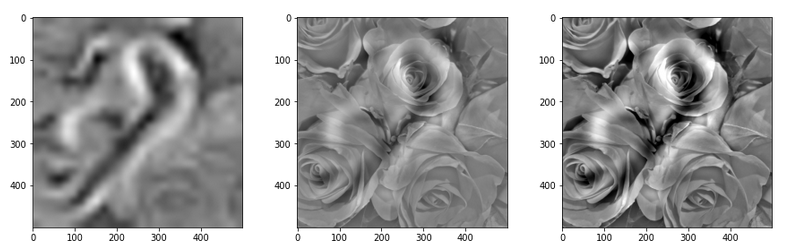
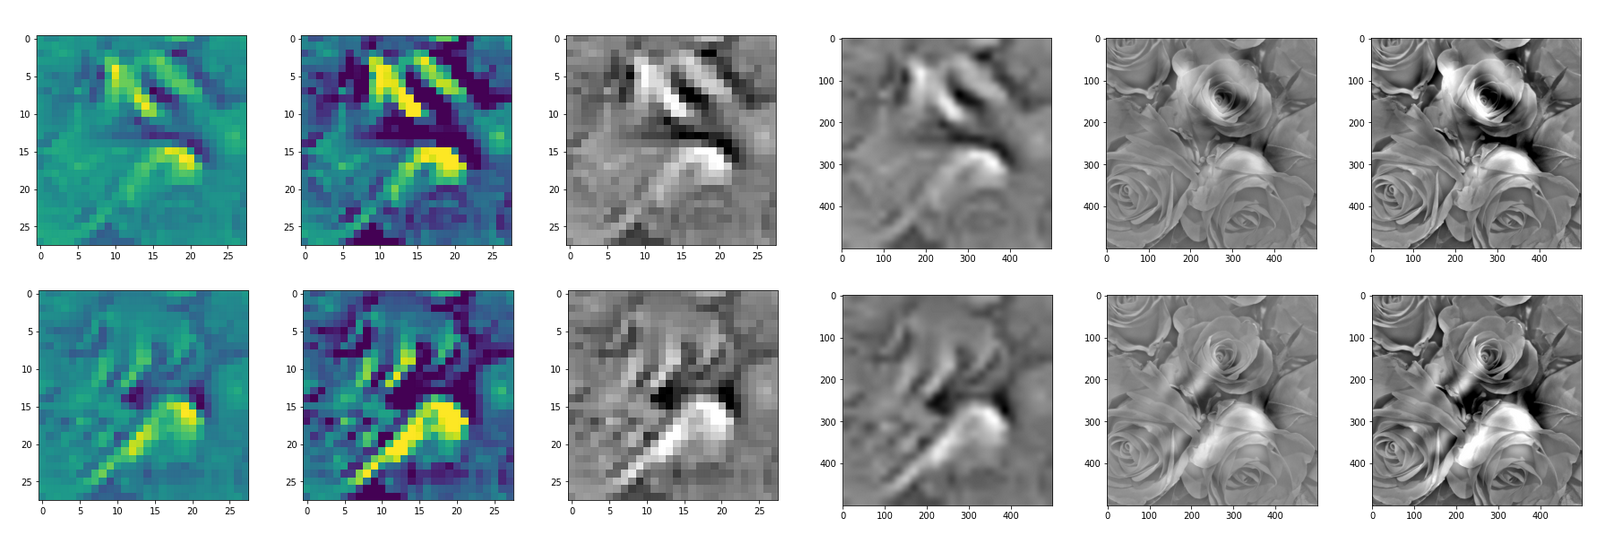
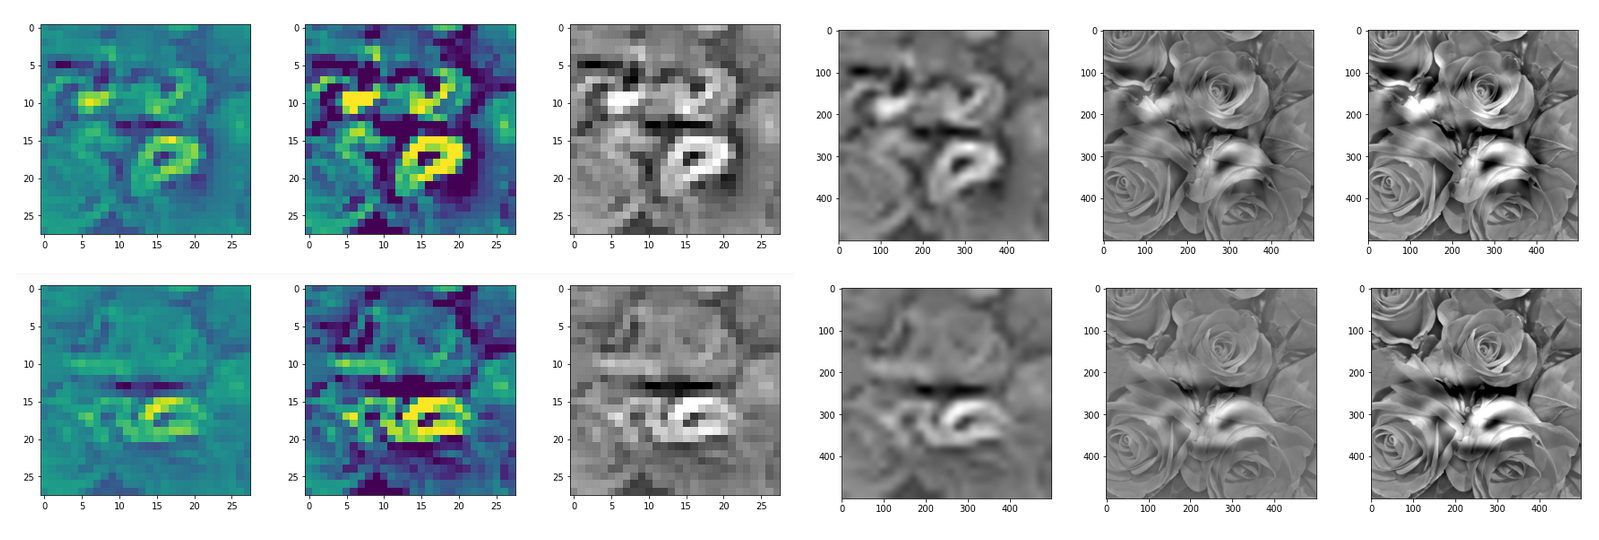
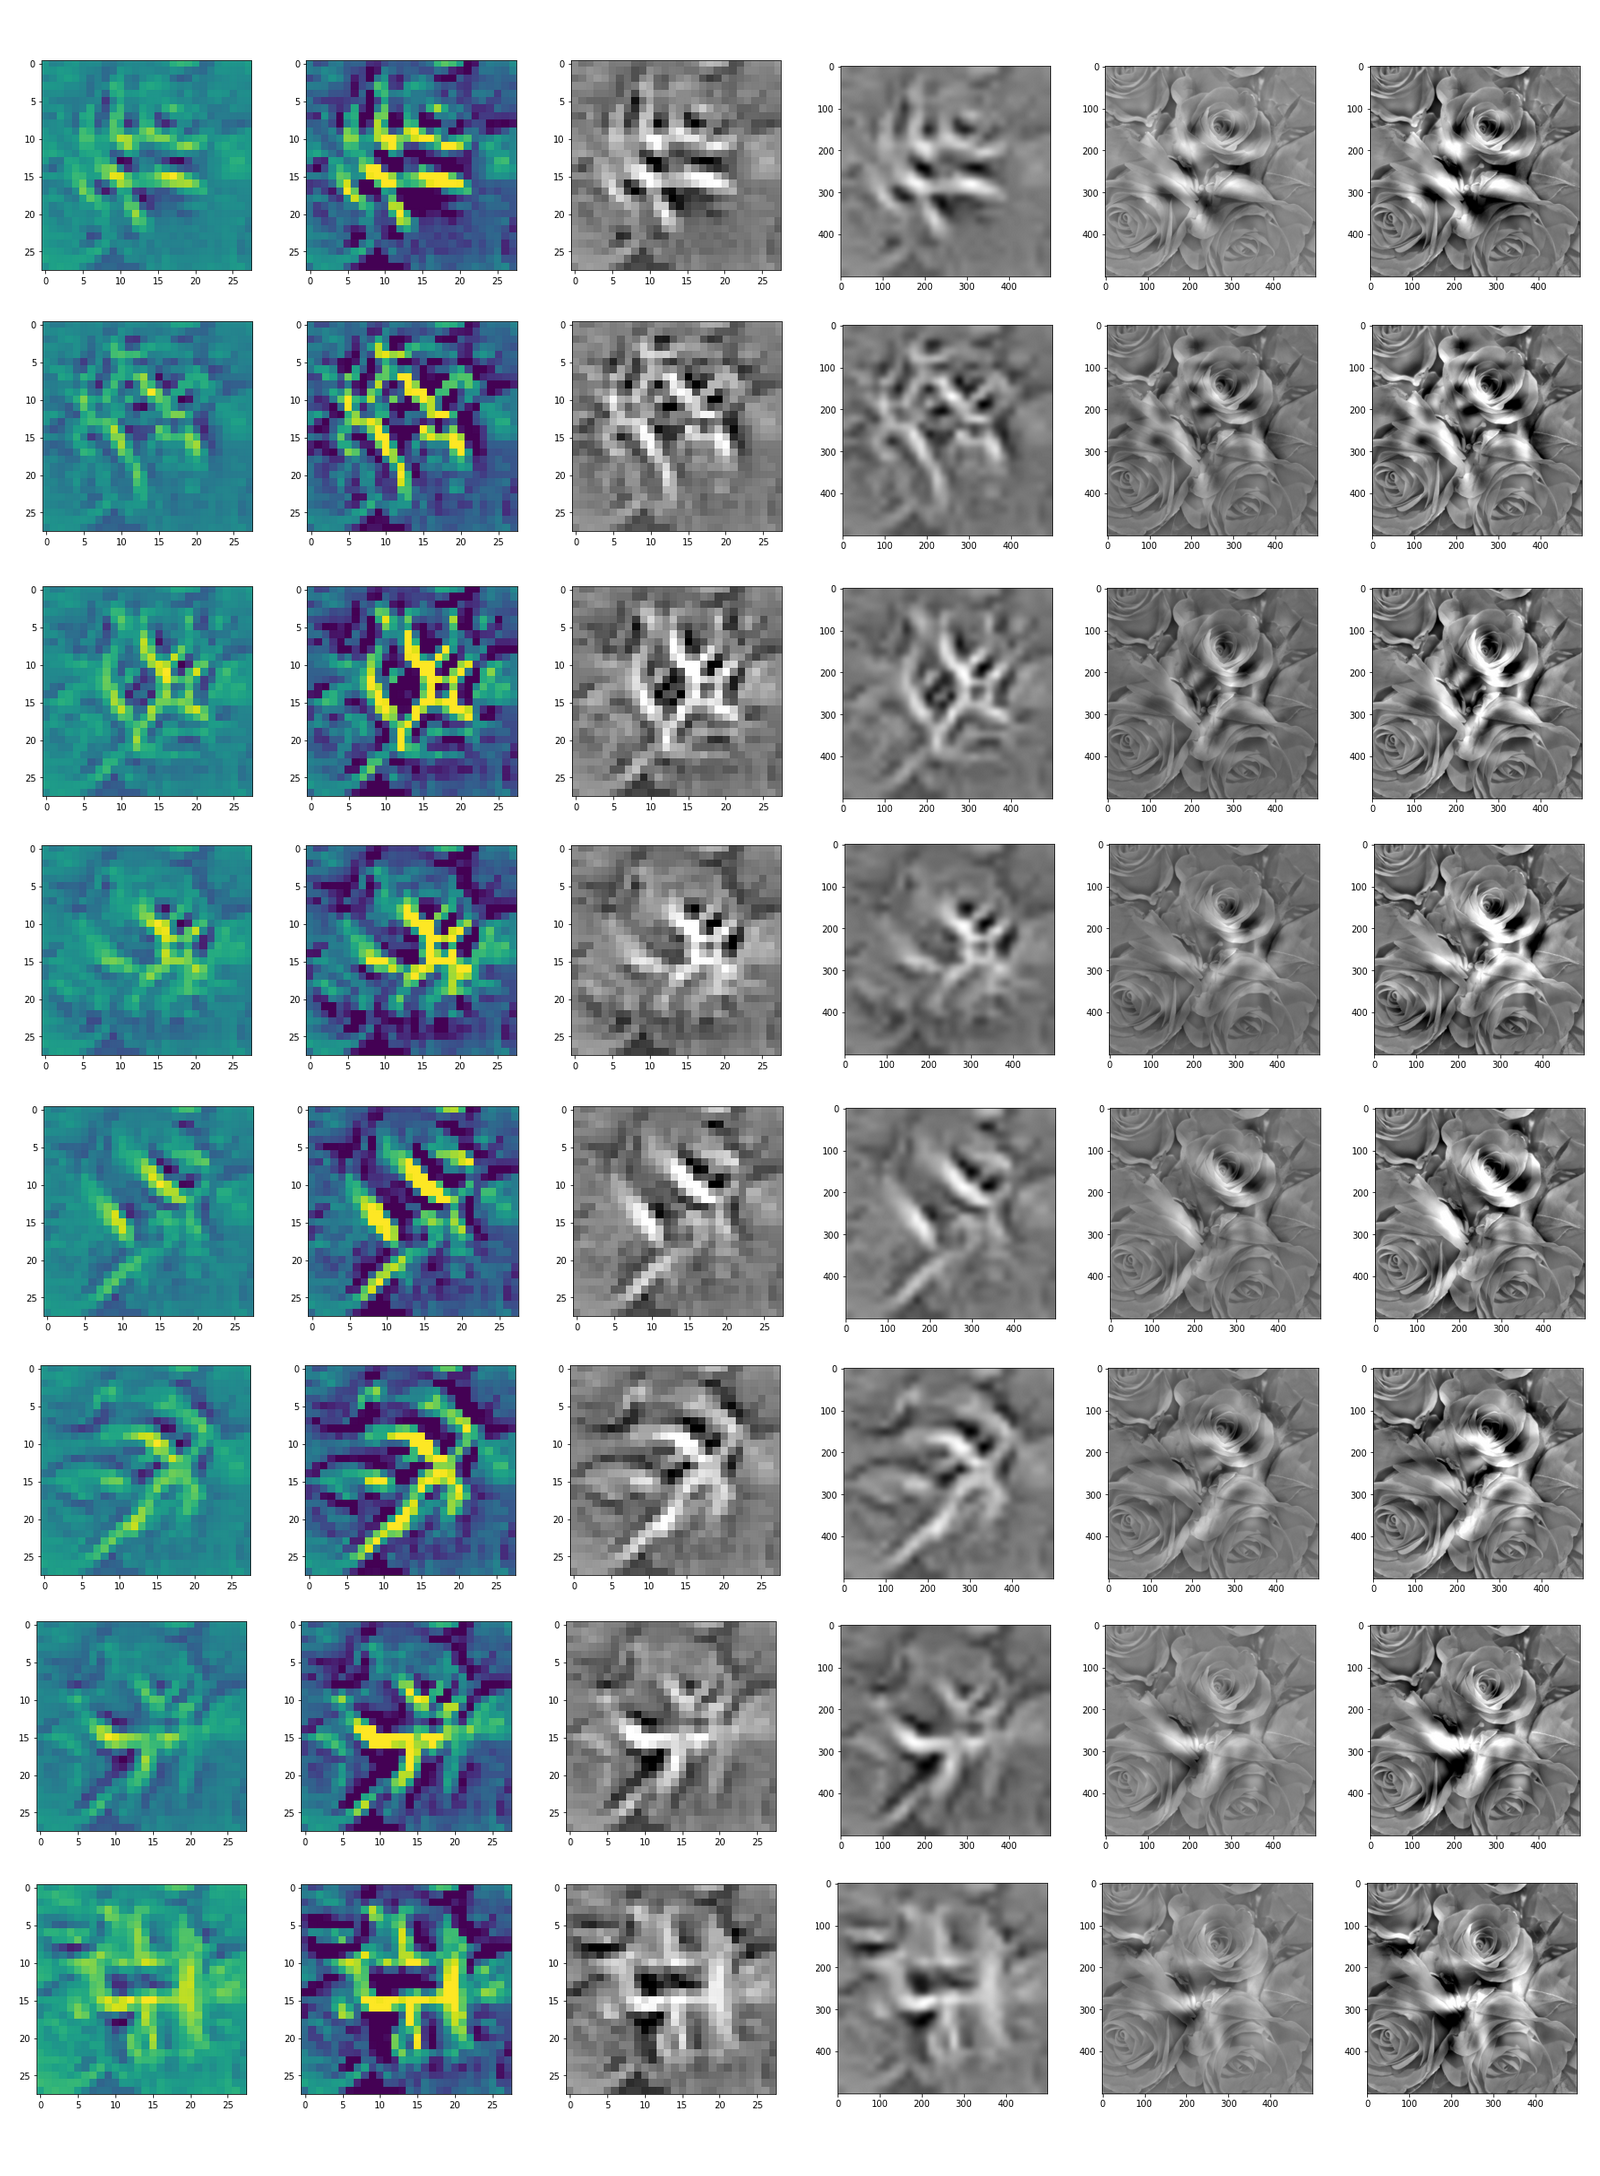
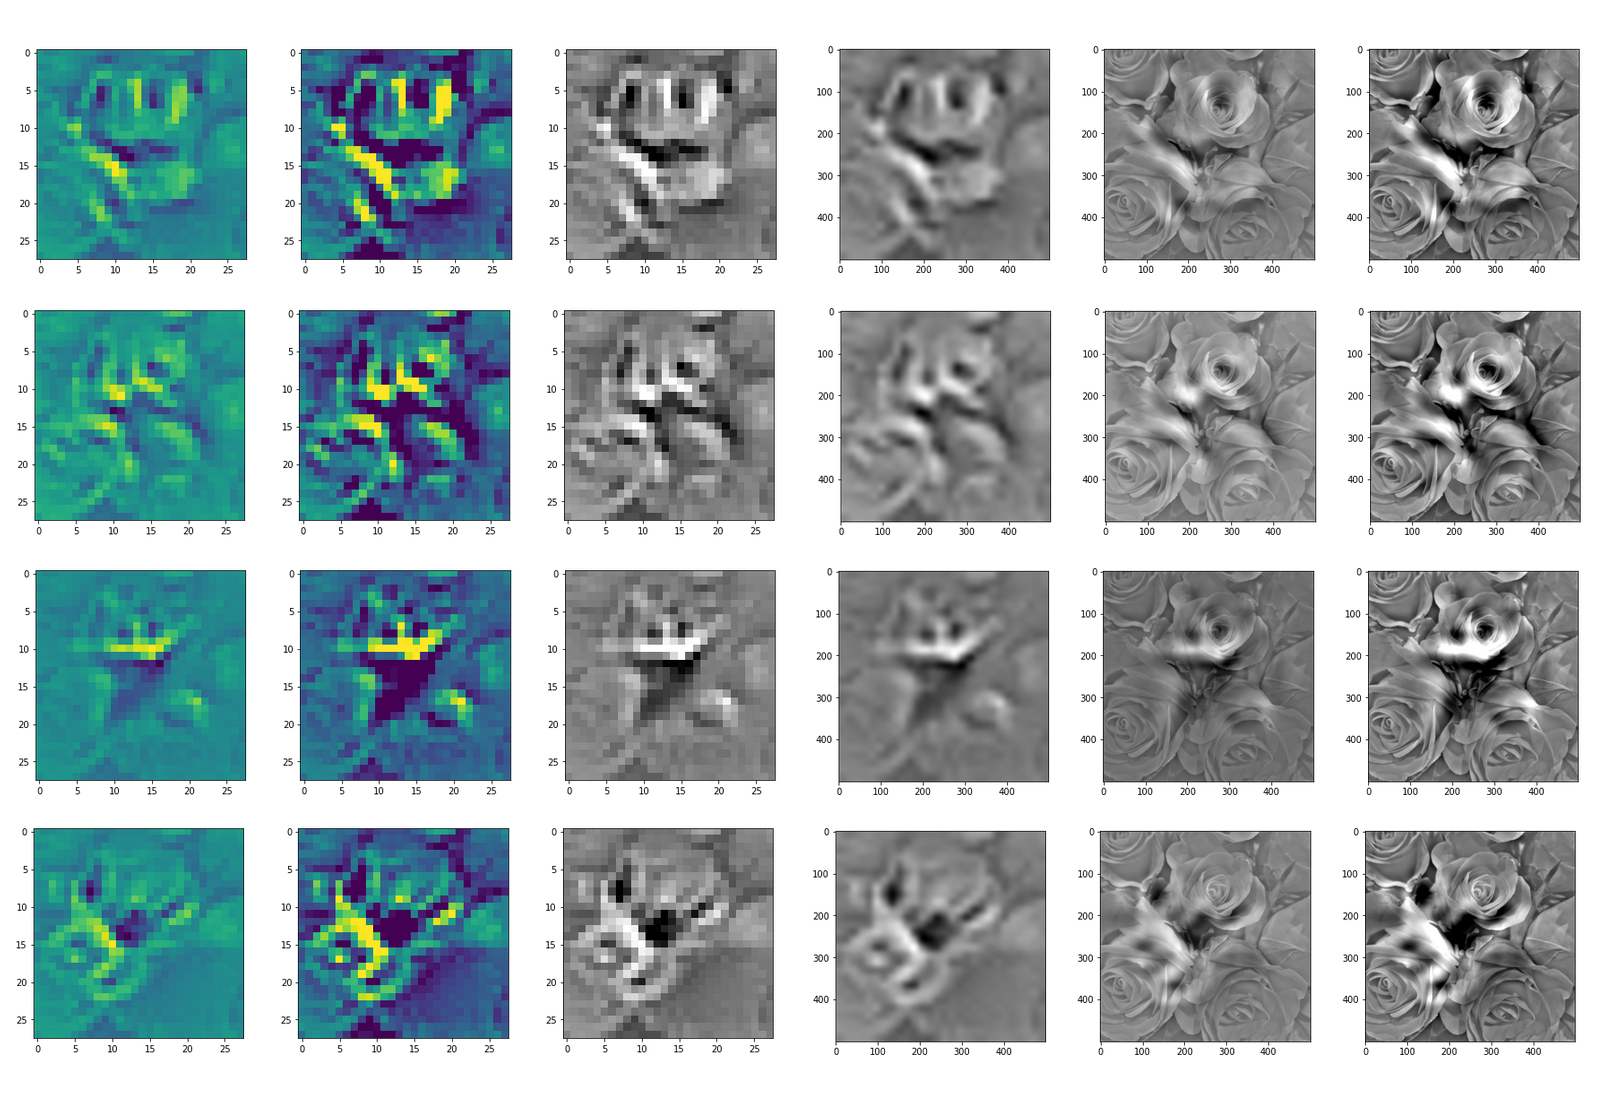
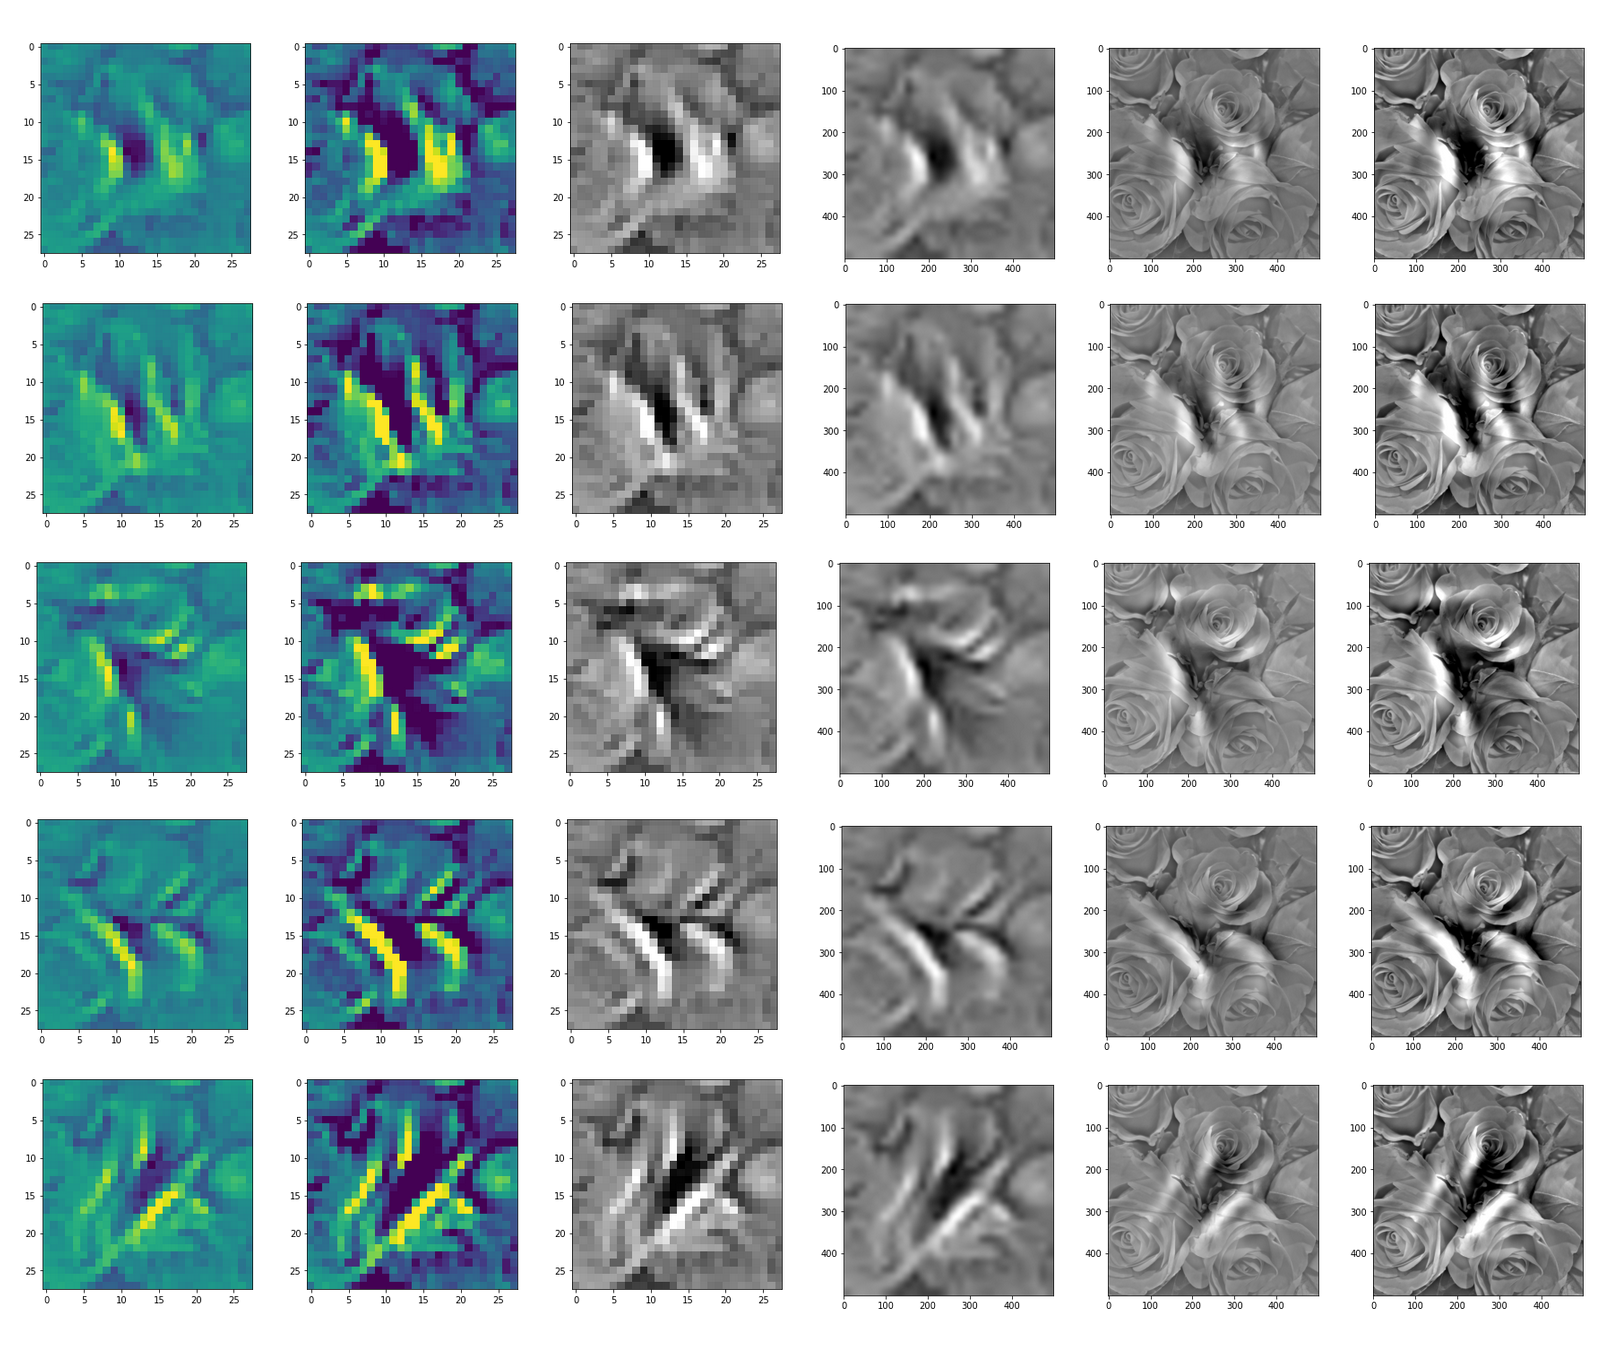
DeepDreams based on selected maps of the 3rd convolutional layer of a CNN trained on MNIST data
With the image sections displayed below I have tried to collect results for different maps which focus on certain areas of the input image (with the exception of the first image section).
The first two images of each row display the detected OIP-patterns on the (28×28) resolution level with pixel values encoded in a (viridis) color-map; the third image in gray scale. The fourth image reveals the dream on the blurry vision level – up-scaled and interpolated to the original image size. You may still detect traces of the original rose blossoms i these images. The last two images of each row display the results
after re-adding details of the original image and an adjustment of the width of the value distribution. The detected and enhanced pattern then turns into a whitey, ghostly shadow.
I have given each section a fancy headline.
I never promised you a rose garden …
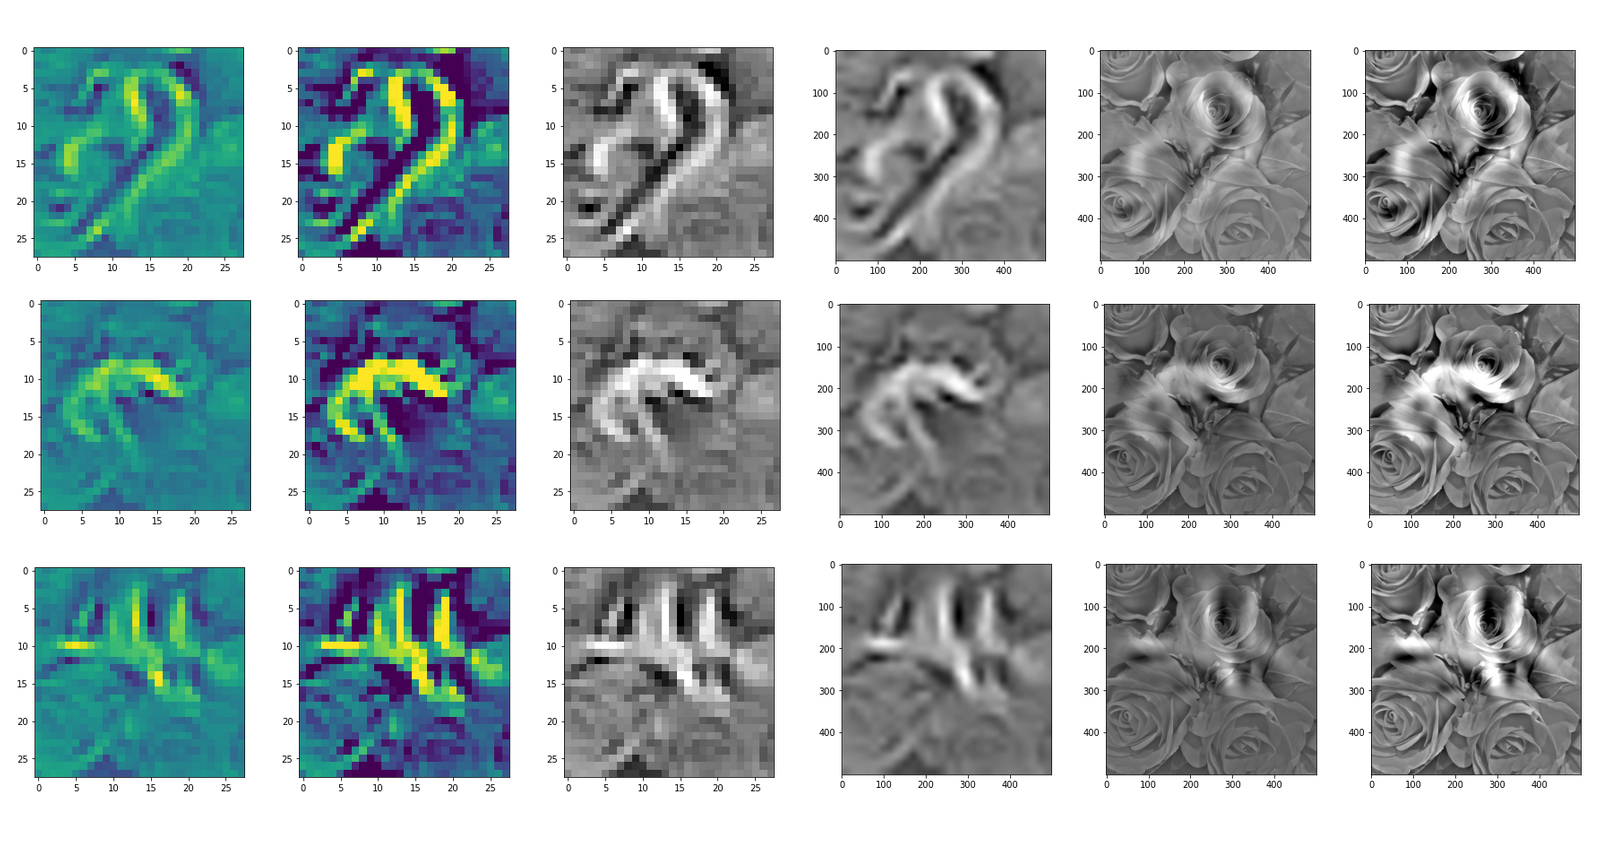
“Getting out …”
“Donut …”
“Curls to form a 3 …”
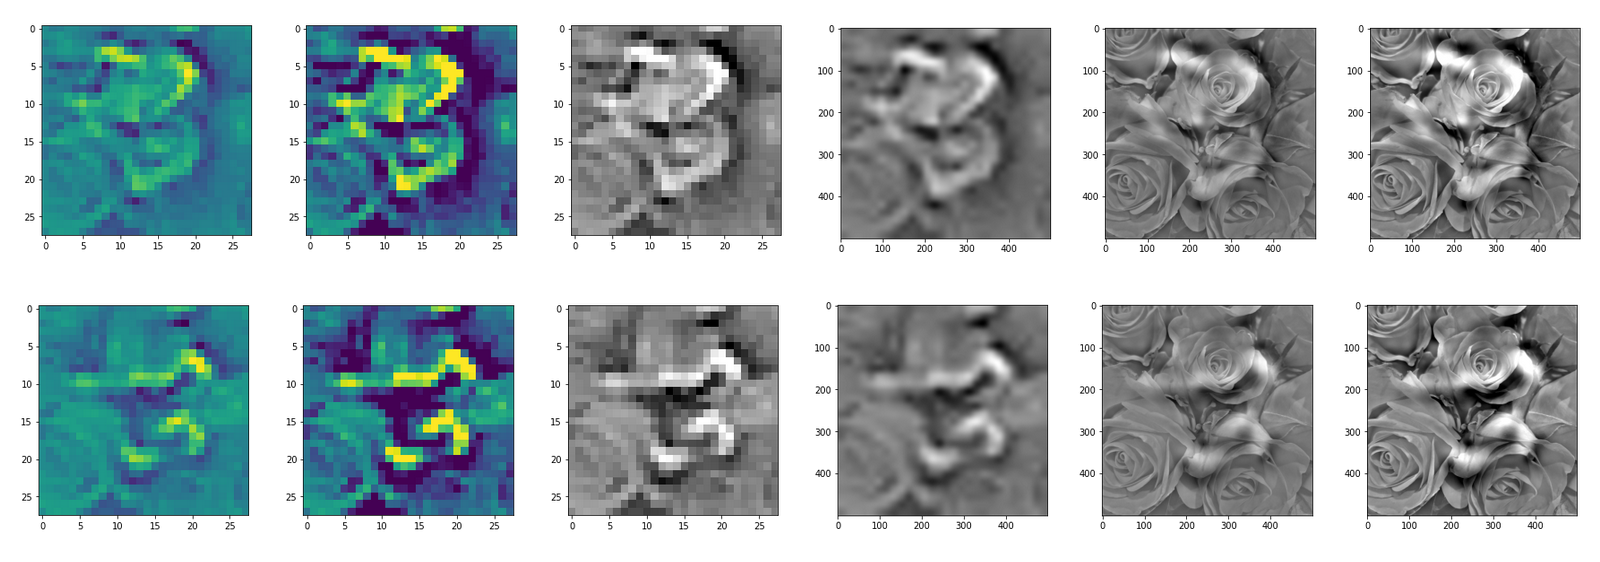
“Two of them …”
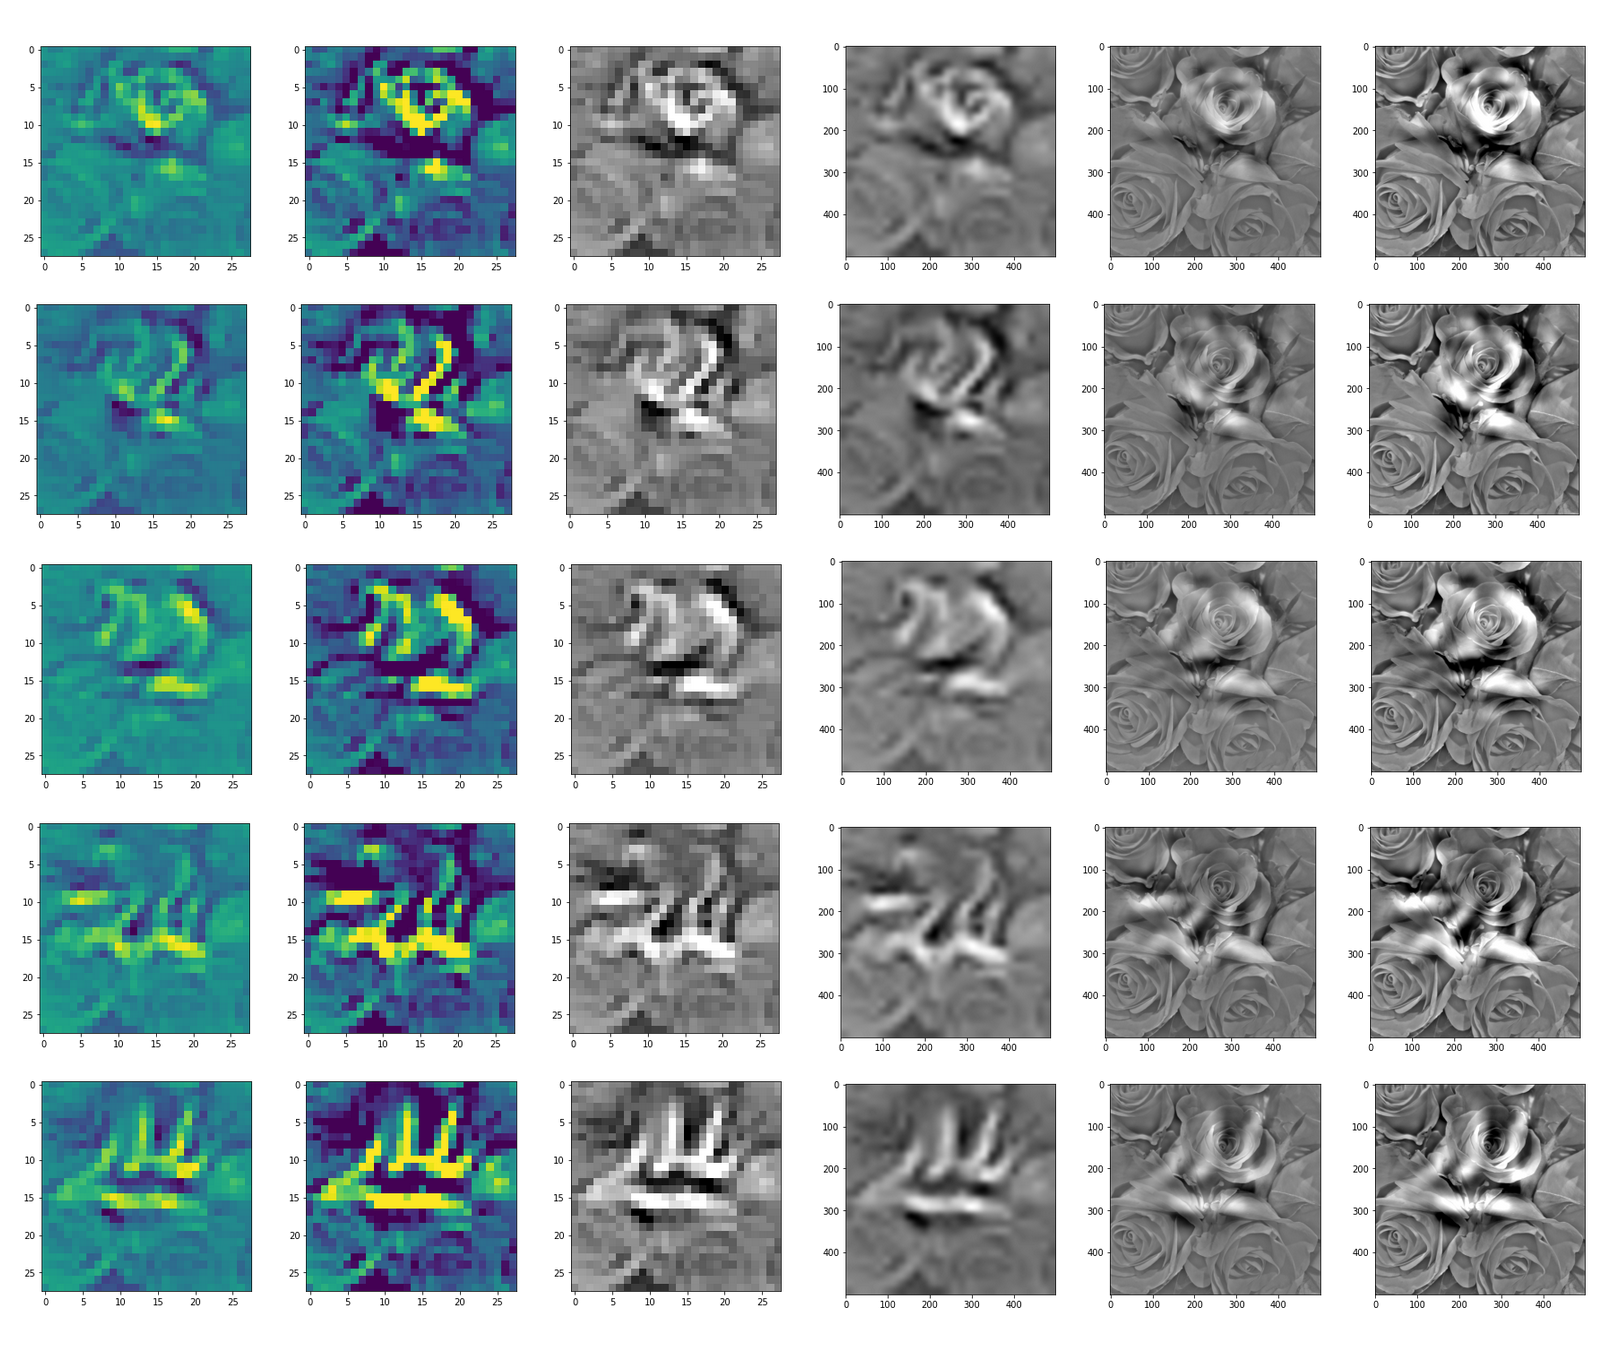
“The creepy roots of it all …”
“Look at me …”
“A hidden opening …”
“Soft is something different …”
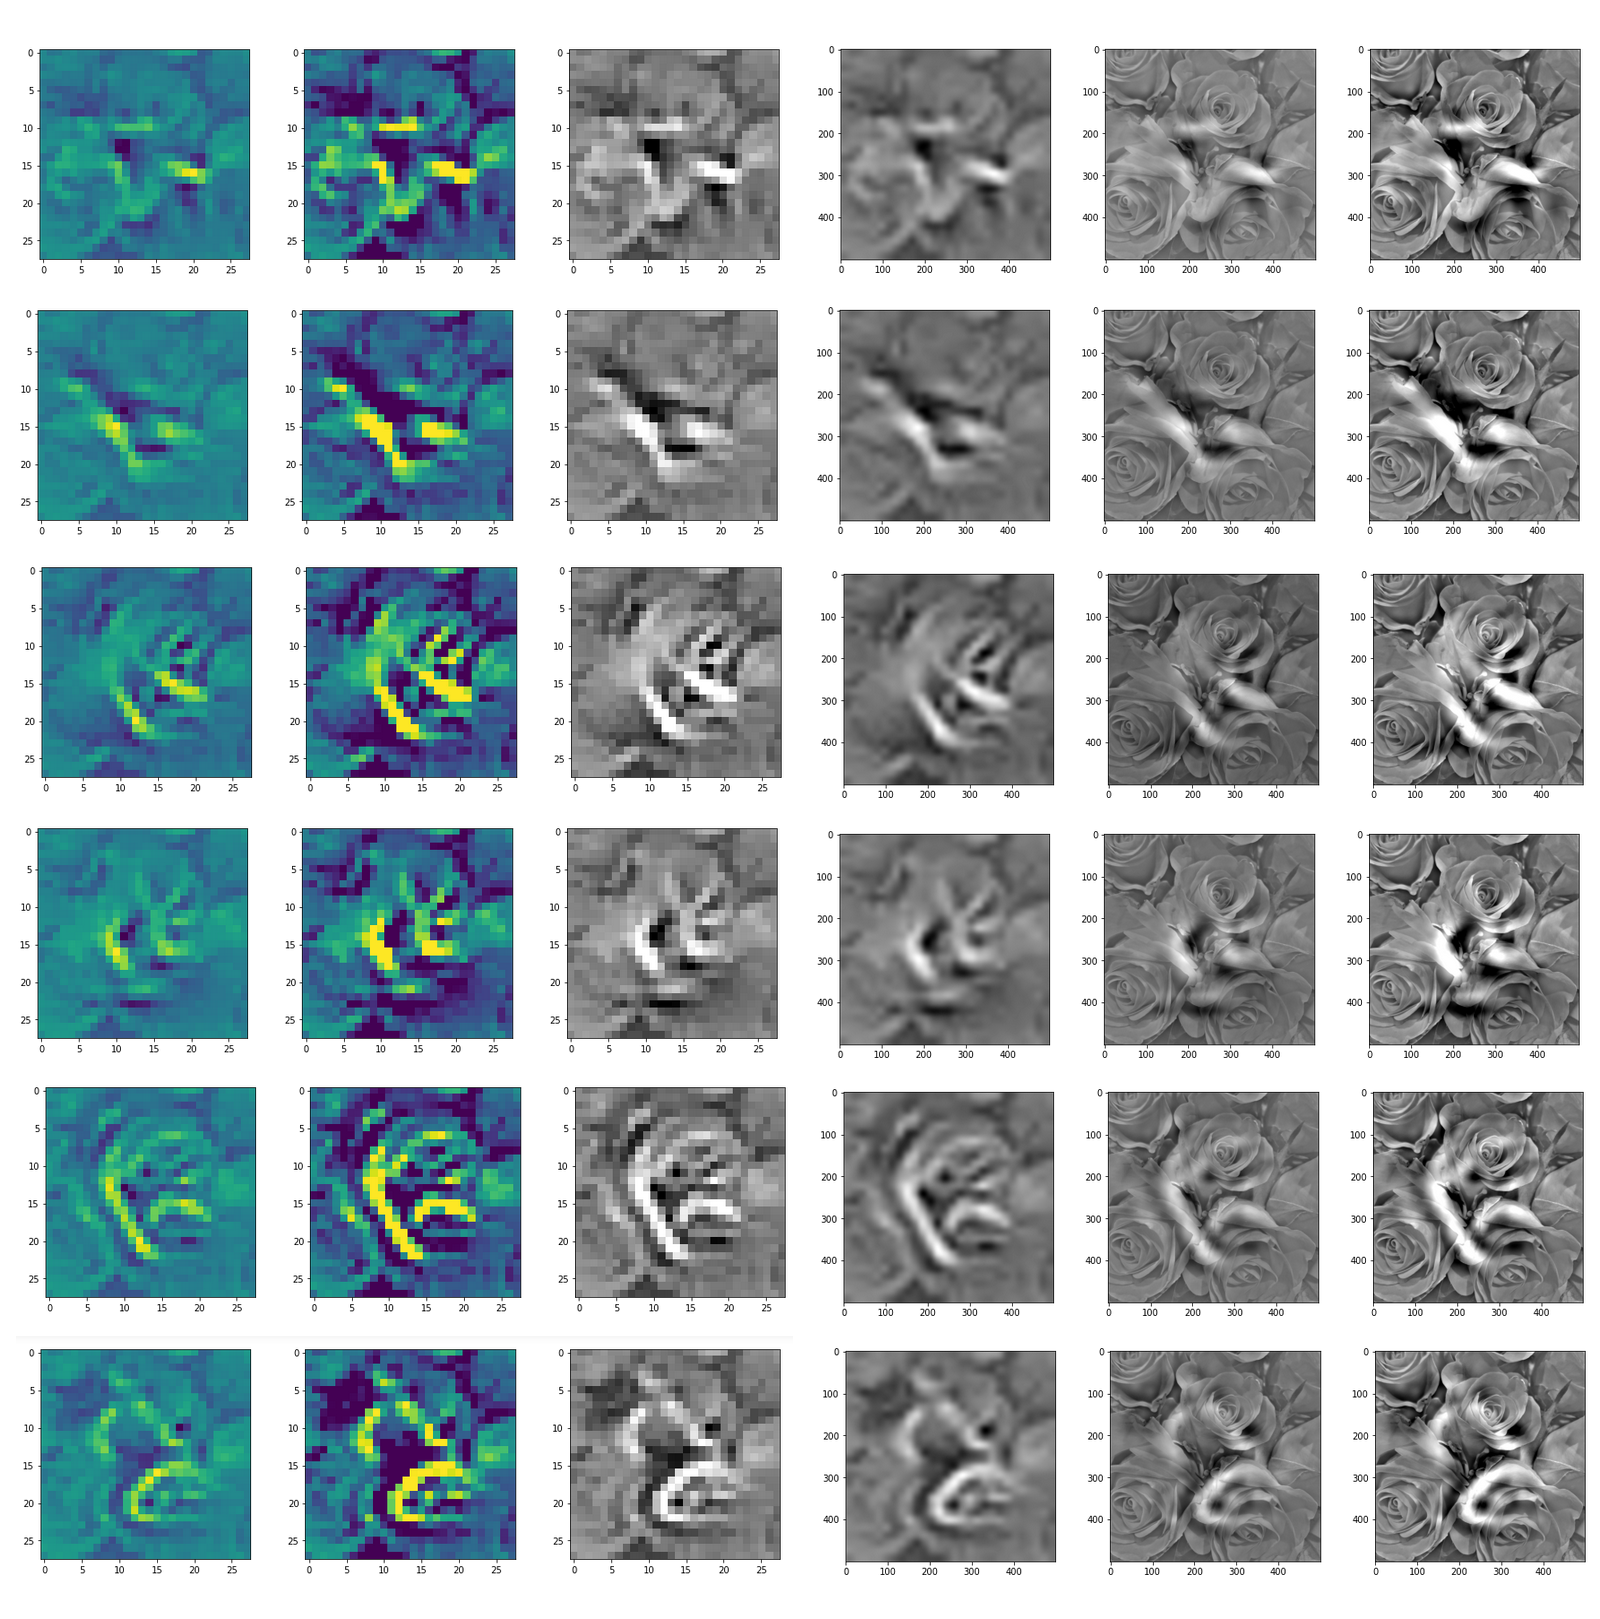
“Central separation …”
Conclusion: A CNN
detects patterns or parts of patterns it was trained for in any kind of offered input …
You can compare the results to some input patterns (OIPs) which strongly trigger individual maps on the 3rd convolutional layer; you will detect similarities. E.g. four OIP- or feature patterns to which map 56 reacts strongly, look like:

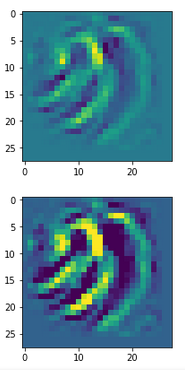
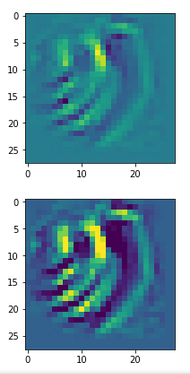
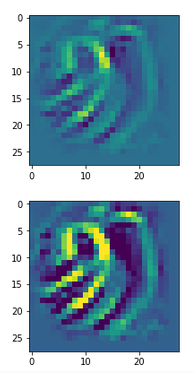
This explains the basic shape of the “apparition” in the first “dream”:
This proves that the filters of a trained CNN actually detect patterns, which proved to be useful for a certain training purpose, in any kind of input which shows some traces of such patterns. A CNN simply does not “know” better: If you only have a hammer to interact with the world, everything becomes a nail to you in the end – this is the level of stupidity on which a CNN algorithm works. And it actually is a fundamental ingredient of DeepDream image manipulation – a transportation of learned patterns or prejudices to an environment outside the original training context.
In the next article
Deep Dreams of a CNN trained on MNIST data – II – some code for pattern carving
I provide the code for creating the above images.
Further articles in this series
Deep Dreams of a CNN trained on MNIST data – II – some code for pattern carving
Deep Dreams of a CNN trained on MNIST data – III – catching dream patterns at smaller length scales