Fun with veth-devices, Linux bridges and VLANs in unnamed Linux network namespaces – VII

During previous posts of our excursion on network namespaces, veth-devices and virtual networking

  • Fun with … – III [Connecting network namespaces (or containers) by veth devices and virtual Linux bridges],
  • Fun with … – IV [Virtual VLANs for network namespaces (or containers) and rules for VLAN tagging at Linux bridge ports],
  • Fun with …. – V [Creation of two virtual VLANs for 2 groups of network namespaces/containers by configuring a Linux bridge]
  • Fun with …. – VI [Connection of two Linux bridges each with 2 VLANs]

we have studied virtual VLANs a bit. We saw that virtual VLANs can be defined just by applying certain configuration options to Linux bridge ports. In addition, virtual VLANs can be extended over several Linux bridges via veth sub-interfaces OR pure veth trunk connections.

These possibilities support already a large variety of options for the configuration of virtual networks (e.g. for a bunch of containers). We discussed some simple illustrative test cases, in which containers were represented by simple network namespaces.

However, so far, four properties characterized our test configurations:

  • All network namespaces (or container hosts) connected to a Linux bridge belonged to exactly one of the involved VLANs.
  • All network namespaces (or container hosts) belonging to the involved VLANs were connected to a Linux bridge via ports which sent out untagged packets from the bridge to the target namespaces and received untagged packets from the namespaces (or container hosts).
  • The VLANs (e.g. VLAN1, VLAN2) were completely defined by PVID/VID definition at Linux bridge ports, only. We eliminated in addition default PVID/VID values. Thus, the VLANs were completely isolated from each other: No host/namespace of a VLAN1 could communicate with a host/namespace belonging to a different VLAN2.
  • Different Linux bridges (which could reside on different hosts) were connected by (virtual or real) cables between trunk ports or sub-interface ports; the cables connecting the bridges transferred packets with different tags. We used this to keep up the isolation of the VLANs against each other even when we extended the VLANs over multiple bridges.

The third point may be good in the sense of security in many applications – but it is also restrictive. The first deficit may be that at least some hosts in a VLAN2 should be able to reach a certain server in VLAN1. This problem can be solved by establishing routing, forwarding and packet filtering outside the bridge. But there may be other requirements ….

New challenges

More interesting may be configurations

  • where you need to set up some containers/namespaces as common members of two ore more VLANs
  • or in which you need to establish network namespaces for gathering network packets
    from different VLANs and organize a common communication with further networks via specific interfaces.

In future posts of this series, we, therefore, introduce additional network namespaces (representing LXC or Docker containers) to test examples for such configurations. These new namespaces should at least be able to communicate with member namespaces/hosts of different VLANs and transfer packets from multiple VLANs to other network namespaces or routers.

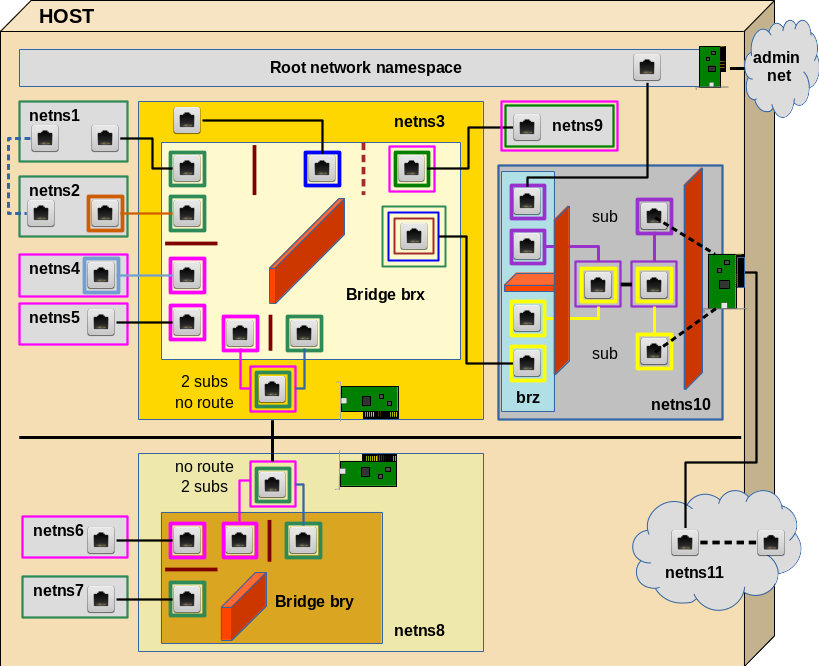
In the present post I walk through some basic considerations of such configurations. For this purpose we restrict the number of involved VLANs to 2 (VLAN1: green tags / VLAN2: pink tags). Each VLAN shall be represented by one example member network namespace (VLAN1: netns1 / VLAN2: netns2). In addition, we introduce a third network namespace netns3, which shall be connected to the VLANs and which should fulfill the following requirements:

  • Requirement 1: netns3 shall be able to receive packets from members of both VLANs and send packets to destination targets in both VLANs. I.e., netns3 must be able to communicate with member systems of both VLANs.
  • Requirement 2: netns3 shall, however, not become a packet forwarder between the VLANs; the VLANs shall remain separated despite the fact that they have a common communication partner netns3.

After all we have learned in this article series, we would, of course, try to establish the connection between members of VLAN1 (represented by netns1) and members of VLAN2 (netns2) to netns3 with the help of an intermediate network namespace netnsX. If required we would equip netnsX with a Linux bridge. Thus, the requirements lead to a typical

3 point connection problem“:
Each of the VLANs is connected to netnX by 2 separate “connectors” (NICs or ports of a Linux bridge inside netnsX). A third “connector” attaches netns3 somehow. Schematically this is shown in the following graphics:

We associate VLAN1 with VLAN packet tags depicted in green color, VLAN2 with packets tags in pink. From “requirement 2” we conclude that we have to be careful with forwarding inside of BOTH netns3 AND netnsX.

Note:
We are not talking about reaching a member of VLAN2 from certain members of VLAN1. We shall touch this VLAN subject, too, but only as a side aspect. In the center of our analysis are instead network namespaces which can talk freely to members of two VLANs and which can receive and work with packets from two VLANs without destroying the communication isolation of members in VLAN1 against members in VLAN2.

What are real world applications for scenarios with network namespaces connected to two or more VLANs?

Two basic applications scenarios are the following:

  • A common administrative network namespace – or container host – for systems in both VLANs. This namespace/container shall operate without allowing for traffic between the VLANs.
  • A system which transfers packets from/to systems in both VLANs via a router to/from the external world or the Internet – without allowing for traffic between the VLANs.

The challenge is to find virtual network configurations for such scenarios. To make it a bit more challenging we assume that both VLANs are defined for systems of the same IP network class. (There is no requirement that limits different VLANs to different IP classes. A VLAN can cover several IP class networks; on the other side two different VLANs can each have members of the same IP class).

There are of course more application scenarios – but the two elementary ones named above cover most of the basic principles. We shall see that – depending on the solution approach – routing, packet filters and even forwarding must be addressed to realize the objectives of a certain scenario.

Ambiguities: Two different classes of packet transfer solutions

In netns3 we need to work with packets arriving from both VLANs. We also need to send back packets to destinations in both VLANs. But, there is a basic ambiguity related to the third connector and the connection line between netnsX and netns3. It is expressed by the following question:

Do we want to or can we afford to exchange tagged packets between netnsX and netns3?

This is not so trivial a question as it may seem to be! The answer depends on whether the network devices or applications inside netns3 know how to deal with and how to direct or transfer tagged packets.

In case we keep up VLAN tags until the inside of netns3 we must either provide a proper termination for the connection interface(s) or be able to pass tagged packets onward. If, however, netns3 does not know how to deal with tagged packets or if it makes no sense to keep up tagging we would rather send untagged packets from netnsX to netns3. One good reason why it may not make sense to keep up tagging could be that the tags would not survive a subsequent routing to the outside world anyway.

Thus we arrive at two rather different classes of connectivity solutions:

Let us first concentrate on termination solutions for tagged packets inside netns3 as depicted on the left side of the upper drawing:

As we have already seen in previous posts it is no problem to keep up tagging on the way from netns1 or netns2 to netns3. We know how to transfer tagged and untagged packets in and out of Linux bridges and thus we can be confident to find a suitable transfer solution based on a bridge inside netnsX. By the help of 2 sub-interfaces of e.g. a virtual veth device we could terminate the network transport properly inside netns3. So, it seems to be easy to make netns3 a member of both VLANs in this first class of connection approach. But, as we shall understand in a minute, we need a little more than just a bridge in netnsX and veth sub-interfaces to get a working configuration ….

A really different situations arises if we needed a configuration as presented on the right side of the graphics. The challenge there is not so much the creation of untagged packets going out of netnsX but the path of VLAN-ignorant packets coming in e.g. from the external world through netns3 and heading for members of either VLAN. Such packets must somehow then be directed to the right VLAN according to the IP address of the target. Such a targeting problem typically requires some kind of routing. So, on first sight a Linux bridge does not seem to be of much help in netnsX as there is no routing on a level 2 device! But, actually, we shall find that a Linux bridge in netnsX can lead to a working solution for untagged packets from/to netns3 – but such a solution comes with a prize.

Approaches with terminated VLAN connections in a common network namespace fit very well to the scenario of a common container host for the administration of systems in multiple VLANs. Solutions which instead use untagged packets entering and leaving netns3, instead fits very well to scenarios where multiple VLANs want to use a common connection (Ethernet card) or a common router to external networks.

Solutions which use packet tags and terminate VLAN traffic inside a common member of multiple VLANs

Let us assume that netns3 shall represent a host for the administration of netns1 in VLAN 1 (green) and netns2 in VLAN 2 (pink). Let us decide to keep up tagging all along the way from netns1 or netns2 to netns3. From the previous examples in this blog post series the following approaches for a netnsX-bridge-configuration look very plausible:

However, if you only configured the bridge, its ports and the veth devices properly and eventually tried pinging from netns1 to netns3 you would fail. (There are articles and questions on the Internet describing problems with such situations…). So, what is missing? The answer is as simple as it is instructive:

netns3 needs defined well routes to IPs residing in netns1 or netns2! Such routes would be different regarding the device to use for reaching IPs in netns1 in comparison to the device of routes leading to the IPs residing in netns2.

The requirement of defined routes in netns3 with multiple VLAN sub-devices

VLANs define a closed broadcast environment on TCP/IP network level 2. Why are broadcasts so important? Because we need a working ARP protocol to connect network layer 2 to layer 3. And ARP sends broadcast requests for the MAC address of a target, which has a given IP address AND which, hopefully, is a member of the same VLAN.

With a proper bridge port configuration an ARP request packet would travel all along from netns1 to netns3. But further? And what about ARP answer packets from netns3 itself? And what about ARP requests from netns3 regarding target IPs in either VLAN?

In netns3 we have just one IP for the veth end-point, but two related sub-devices … From the perspective of netns3 this makes the situation regarding the path (back) from netns3 to netns1 or netns2.

The situation of netns3 is a bit compatible with a host having two distinct NICs for different LAN segments. Even if proper routes were defined, only activated forwarding between the LAN segments attached to the router would allow packets to move from one segment to the other. However, in our situation, we would never activate forwarding in netns3 as we want to keep the VLANs separated. So, we assume that we have no problem with VLAN separation …

In addition VLANs mark separated areas of Ethernet broadcasts. After some recapitulation of ARP basics and the fact that ARP uses Ethernet broadcast packets for ARP requests we would assume that such packets will NOT move from one segment (here: VLAN with green tags) via netns3 into our second attached segment (here: VLAN with pink tags). Tagging would in addition surely prevent such a transfer.

This leads to the conclusion that ARP requests originating e.g. in netns1 would just reach netns3. But will they be answered if the request was for the IP of the veth end-point residing in netns3?

The big problem is that any answer will only be transported to the requesting namespace if the respective unicast packet gets the right tagging. But how should netns3 know which way to send the answer? Meaning: By what criterion should netns3 know which of the sub-devices to use to create a proper ARP reply packet? It cannot get the answer from an IP netmask – we have two sub-devices for one and the same IP!

Well an answer could be sent along the correct path if netns3 knew which IPs reside behind which of the two available veth sub-devices. This is exactly what defined routes in routing tables are good for!

This line of thought leads us to the suspicion that ARP requests coming from netns1 or netns3 either remain unanswered or that a reply requires defined routes. Also for sending an ARP request from netns3 to an IP in netns1, netns3 needs to know which veth-subdevice to use. I.e. netns3 definitively must know which IPs are located behind with veth-subdevice!

But (independent of ARP) the real challenge is the way back of ICMP answering packets from netns3 to netns2 or netns1. Such answering packets must reach their targets before we can be sure that any other communication on levels 3 and 4 will work properly between netns1 and netns3 or between netns2 and netns3. You should not forget that our namespaces in real world virtualization scenarios would represent Linux hosts and respective networking programs. But how can netns3 (or a respective host program) know where to direct ICMP answering packets to if and when there are two possible paths and devices avalable Without help it can not. Reason again: The IP network mask does not help!

So, the proper answer to our problems is:

We need to establish routes inside netns3 when we
     (1) want to keep up the separation of the VLANs up until to 2 different termination points inside netns3 (for one IP),
     (2) but nevertheless want to include netns3-based packets in the direction of netns1 OR netns2 in the communication.
The routes for packets going out from netns3 to either netns1 or netns2 must assign IP-targets located in each of the VLANs to one of the 2 network interfaces (termination points) inside netns3 in a unique way.

Note in addition:
Whenever the different VLANs have members with an IP of one and the same IP class, then you may have to differentiate routes in the sense of a “host IP <=> NIC-interface” relation, instead of the usual relation “network class <=> interface”. Often enough people forget this specific type of routing …

Regarding our special situation such routes must be defined for all members of each VLAN. I shall give examples for corresponding commands in my next blog post of this series.

I am not going to clarify open ARP-related questions which arise for netns3 in this post. One should not forget regarding ARP that PROXY ARP could be activated in netns3. This increases complexity. I am going to investigate the behavior of ARP packets in more detail for namespaces in a routing position between LAN segments via respective experiments in some other posts. For first insights see e.g.

More fun with veth, network namespaces, VLANs – III – L2-segments of the same IP-subnet and routes in coupling network namespaces

More fun with veth, network namespaces, VLANs – IV – L2-segments, same IP-subnet, ARP and routes

Forwarding?

As we talk of routing: Do we need forwarding, too? Answer: No, not as long as netns3 is the final target or the origin of packet transport in a given application scenario. Why is this important? Because routing between interfaces connected to bridge ports of different VLANs would establish a communication connection between otherwise separated VLANs.

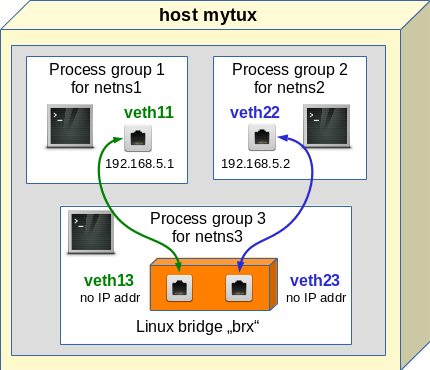
To enable packets to cross VLAN borders we either have to destroy the separation already on a bridge port level OR we must allow for routing and forwarding between NICs which are located outside the bridge but which are connected to ports of the bridge. E.g., let us assume that the sub-interfaces in netns3 are named veth33.10 (VLAN1 termination) and veth33.20 (VLAN2 termination). If we had not just set up routes like

route add 192.168.5.1 veth33.10
route add 192.168.5.4 veth33.20

but in addition had enabled forwarding with

echo 1 > /proc/sys/net/ipv4/conf/all/forwarding

inside netns3 we would have established a communication line between our two VLANs. Fortunately, in many cases, forwarding is not required in a common member of two VLANs. Most often only route definitions are necessary. In particular, we can set up a host which must perform administrative tasks in both VLANs without creating an open communication line between the VLANs. However, we would have to trust the administrator of netns3 not to enable forwarding. Personally, I would not rely on this; it is more secure to establish port and IP related packet filtering on the bridge inside netnsX. Especially rules in the sense:

Only packets for a certain IP address are allowed to leave the Linux bridge (which establishes the VLANs) across a certain egress port to a certain VLAN member.

Such rules for bridge ports can be set up e-g- with special iptables commands for bridged packets.

Intermediate conclusions for solutions with VLAN termination in a common network namespace

We summarize the results of our theoretical discussion for the first class of solutions:

  • VLAN termination inside a network namespace (or container host), which shall become a common member of several VLANs, can easily be achieved with sub-interfaces of a veth device. The other interface of the veth pair can be attached by sub-interfaces OR as a pure trunk port to a Linux bridge which is connected to the different VLANs or which establishes the VLANs itself by proper port configurations.
  • If we terminate VLANs inside a network namespace or container host, which shall become a member of two or more VLANs, then we need to define proper routes to IP targets behind each of the different VLAN related interfaces. However, we do NOT need to enable forwarding in this namespace or container host.

A three point netnX solution without packet tagging, but with forwarding to a common target network namespace

Now, let us consider solutions of the second class indicated above. If you think about it a bit you may come up with the following basic and simple approach regarding netnsX and netns3:

This solution is solid in the sense that it works on network level 3 and that it makes use of standard routing and forwarding. The required VLAN tagging at each of the lower connection points in netnsX can be achieved by a properly configured sub-interface of a veth device interface. We do not employ any bridge services in netnsX in this approach; packet distribution to VLAN members must be handled in other network namespaces behind the VLAN connection points in netnsX. (We know already how to do this …).

This simple solution, however, has its prize:

We need to enable forwarding for the transfer of packets from the VLAN connection interfaces (attaching e.g. netns1 and netns2 to netnsX) to the the interface attaching netns3 to netnsX. But, unfortunately, this creates a communication line between VLAN1 and VLAN2, too! To compensate for this we must set up a packet filter, with rules disallowing packets to travel between the VLAN connection points inside netnsX. Furthermore, packets coming via/from netns3 shall only be allowed to pass through exactly one of the lower VLAN interfaces in netnsX if and when the target IP fits to a membership in the VLAN behind the NIC.

There is, by the way a second prize, we have to pay in such a router like solution for the connection of VLANs to an outside world without tags:

Level 3 routing costs a bit more computational time than packet transport on level 2.

But, if you (for whatever reason) only can provide one working Ethernet interface to the outside world, it is a small prize to pay!

Intermediate result:

An intermediate virtual network namespace (or virtual host) netnsX with conventional routing/forwarding AND appropriate packet filter rules on a firewall can be used to control the communication of members of two or more VLANs to the outside world via a third (common) interface attached to netnsX. We do not need to care for VLAN tags beyond this third interface as VLAN tags do not survive forwarding. Further routing, forwarding and required NAT configurations with respect to the Internet can afterward be done inside yet another virtual namespace “netns3” (with a bridge and an attached real Ethernet card) or even beyond netns3 in an external physical router.

A three point netnX solution without packet tagging – but based on a Linux bridge

Now, let us consider how a Linux bridge in netnsX could transfer packets even if we do not tag packets on their way between the bridge and netns3. I.e., if we want connect two VLANs to a VLAN-ignorant network namespace netns3 and a VLAN indifferent world beyond netns3. What is the problem with a configuration as indicated on the right side of the picture on different solution classes?

A port to netns3 which shall emit untagged packets from a VLAN-aware Linux bridge must be configured such

  • that it accepts tagged packets from both VLAN1 and VLAN2 on egress; i.e. we must apply two VID settings (for green and pink tagged pakets).
  • that it sends out packets on egress untagged; i.e. we must configure the port with the flag “untagged”.

But VID settings also filter and drop incoming “ingress” packets at a port! E.g. untagged packets from netns3 are dropped on their way into the Linux bridge. See the post Fun with … – IV for related rules on Linux bridge ports. This is a major problem:

Firstly, because we cannot send any ARP broadcast requests from netns3 to netns1 or netns2. And, equally bad, netns3 cannot answer to any ARP requests which it may receive from members of VLAN1 or VLAN2:

ARP broadcast requests from e.g. netns1 will pass the bridge port to netns3 and arrive there untagged. However, untagged ARP answer packets will not be allowed to enter the bridge at the port for netns3 because they do not fit to the VID settings at this port.

But, can’t we use PVID settings? Hmm, remember: Only one PVID setting is allowed at a port! But in our case ARP broadcast and answering packets must be able to reach members of both VLANs! Are we stuck, then? No, a working solution is the following:

In the drawing above we have indicated PVID settings by squares with dotted, colored borders and VID settings by squares with solid borders. The configuration may look strange, but it eliminates the obstacles for ARP packet exchange! And it allows for packet transfer from netns3 to both VLANs.

Actually, the “blue” PVID/VID setting reflects the default PVID/VID settings (VID=1; PVID=1) which come up whenever we create a port in VLAN-aware bridge! Up to now, we have always deleted these default values to guarantee a complete VLAN isolation; but you may already have wondered why this default setting takes place at all. Now, you got a reason.

If you, in addition, take into account that a Linux bridge learns about port-MAC relations and that it – under normal conditions – forwards or filters packets during bridge internal forwarding between ports

  • according to MAC addresses located behind a port
  • AND tags matching VID values at a port,

you may rightfully assume that packets cannot move from VLAN1 to VLAN2 or vice versa under normal operation conditions. We shall test this in an example scenario in one of the coming blog posts.

HOWEVER ….virtual networks with level 2 bridges are endangered areas. The PVID/VID settings of our present bridge based approach weaken the separation between the VLANs significantly.

Security aspects

For all configurations discussed above, we must be careful with netns3: netns3 is in an excellent position to potentially transfer packets between VLAN1 and VLAN2 – either by direct forwarding/routing in some of the above scenarios or by capturing, manipulating and re-directing packets. Secondly, netns3 is in an excellent position for man-in-the-middle-attacks

  • regarding traffic between members of either VLAN
  • or regarding traffic between the VLANs and the outside world beyond netns3.

netns3 can capture, manipulate and redirect any packets passing it. As administrators we should, therefore, have full control over netns3.

In addition: If you ever worked on defense measures against bridge related attack vectors you know

  • that a Linux bridge can be forced into a HUB mode if flooded with wrong or disagreeing MAC information.
  • that man-in-the-middle-attacks are possible by flooding hosts attached to bridges with wrong MAC-IP-information; this leads to manipulated ARP tables at the attacked targets.

These points lead to potential risks especially in the last bridge based solution to our three point problem. Reason: The “blue” PVID/VID settings there eliminate the previously strict separation of the two VLANs for packets which come from netns3 and enter the bridge at a related port. We rely completely on correct entries in the bridge’s MAC/port relation table for a safe VLAN separation.

But the bridge could be manipulated from any of the attached container hosts into a HUB mode. This in turn would e.g. allow a member of VLAN1 to see (e.g. answering) packets, which arrive from netns3 (or an origin located beyond netns3) and which are targeted to a member of VLAN2. Such packets may carry enough information for opening other attack vectors.

So, a fundamental conclusion of our discussion is the following:

It is essential that you apply packet filter rules on bridge based solutions that hinder packets to reach targets (containers) with the wrong IP/MAC-relation at egress ports! Such rules can be applied to bridge ports by the various means of Linux netfilter tools.

On a host level this may be a task which becomes relatively difficult if you apply flexible DHCP-based IP assignments to members of the VLANs.
But, if you need to choose between flexibility and full control about which attached namespace/container gets which IP (and MAC) and your virtual networks are not too big : go for control – e.g via setup scripts.

Summary and outlook

Theoretically, there are several possibilities to establish virtual communication lines from a network namespace or container to members of multiple virtual VLANs. Solutions with tagged packet transfer require a proper termination inside the common member namespace and the definition of routes. As long as we do not enable forwarding outside the VLAN establishing Linux bridge the VLANs remain separated. Solutions where packets are transferred untagged from the VLANs to a target network namespace require special PVID/VID settings at the bridge port to enable a bidirectional communication. These settings weaken the VLAN separation and underline the importance of packet filter rules on the Linux bridge and for the various bridge ports.

In the next post of this series

Fun with veth-devices, Linux bridges and VLANs in unnamed Linux network namespaces – VIII

we will look at commands for setting up a test environment for 2 VLANs with a common communication target. And we will test the considerations discussed above.

In the meantime : Happy New Year – and stay tuned for more adventures with Linux, Linux virtual bridges and network namespaces …


Fun with veth-devices, Linux bridges and VLANs in unnamed Linux network namespaces – III

In the first blog post
Fun with veth-devices, Linux bridges and VLANs in unnamed Linux network namespaces – I
of this series about virtual networking between network namespaces I had discussed some basic Linux commands to set up and enter network namespaces on a Linux system.

In a second post
Fun with veth-devices, Linux bridges and VLANs in unnamed Linux network namespaces – II
I suggested and described several networking experiments which can quickly be set up by these tools. As containers are based on namespaces we can study virtual networking between containers on a host in principle just by connecting network namespaces. Makes e.g. the planning of firewall rules and VLANs a bit easier …

The virtual environment we want to build up and explore step by step is displayed in the following graphics:

In this article we shall cover experiment 1 and experiment 2 discussed in the last article – i.e. we start with the upper left corner of the drawing.

Experiment 1: Connect two network namespaces directly

This experiments creates the dotted line between netns1 and netns2. Though simple this experiments lays a foundation for all other experiments.

We place the two different Ethernet interfaces of a veth device in the two (unnamed) network namespaces (with hostnames) netns1 and netns2. We assign IP addresses (of the same network class) to the interfaces and check a basic communication between the network namespaces. The situation corresponds to the following simple picture:

What shell commands can be used for achieving this? You may put the following lines in a file for keeping them for further experiments or to create a shell script:

unshare --net --uts /bin/bash &
export pid_netns1=$!
nsenter -t $pid_netns1 -u hostname netns1
unshare --net --uts /bin/bash &
export pid_netns2=$!
nsenter -t $pid_netns2 -u hostname netns2
ip link add veth11 netns $pid_netns1 type veth peer name veth22 netns $pid_netns2   
nsenter -t $pid_netns1 -u -n /bin/bash
ip addr add 192.168.5.1/24 brd 192.168.5.255 dev veth11
ip link set veth11 up
ip link set lo up
ip a s
exit
nsenter -t $pid_netns2 -u -n /bin/bash
ip addr add 192.168.5.2/24 brd 192.168.5.255 dev veth22
ip link set veth22 up
ip a s
exit
lsns -t net -t uts

If you copy these lines to the prompt of a root shell of some host “mytux” you will get something like the following:

mytux:~ # unshare --net --uts /bin/bash &
[2] 32146
mytux:~ # export pid_netns1=$!

[2]+  Stopped                 unshare --net --uts /bin/bash
mytux:~ # nsenter -t $pid_netns1 -u hostname netns1
mytux:~ # unshare --net --uts /bin/bash &
[3] 32154
mytux:~ # export pid_netns2=$!

[3]+  Stopped                 unshare --net --uts /bin/bash
mytux:~ # nsenter -t $pid_netns2 -u hostname netns2
mytux:~ # ip link add veth11 netns $pid_netns1 type veth peer name veth22 netns $pid_netns2   
mytux:~ # nsenter -t 
$pid_netns1 -u -n /bin/bash
netns1:~ # ip addr add 192.168.5.1/24 brd 192.168.5.255 dev veth11
netns1:~ # ip link set veth11 up
netns1:~ # ip link set lo up
netns1:~ # ip a s
1: lo: <LOOPBACK,UP,LOWER_UP> mtu 65536 qdisc noqueue state UNKNOWN group default qlen 1   
    link/loopback 00:00:00:00:00:00 brd 00:00:00:00:00:00
    inet 127.0.0.1/8 scope host lo
       valid_lft forever preferred_lft forever
    inet6 ::1/128 scope host 
       valid_lft forever preferred_lft forever
2: veth11: <NO-CARRIER,BROADCAST,MULTICAST,UP> mtu 1500 qdisc noqueue state DOWN group default qlen 1000     
    link/ether da:34:49:a6:18:ce brd ff:ff:ff:ff:ff:ff link-netnsid 0
    inet 192.168.5.1/24 brd 192.168.5.255 scope global veth11
       valid_lft forever preferred_lft forever
netns1:~ # exit
exit
mytux:~ # nsenter -t $pid_netns2 -u -n /bin/bash
netns2:~ # ip addr add 192.168.5.2/24 brd 192.168.5.255 dev veth22
netns2:~ # ip link set veth22 up
netns2:~ # ip a s
1: lo: <LOOPBACK> mtu 65536 qdisc noop state DOWN group default qlen 1
    link/loopback 00:00:00:00:00:00 brd 00:00:00:00:00:00
2: veth22: <NO-CARRIER,BROADCAST,MULTICAST,UP,LOWER_UP> mtu 1500 qdisc noqueue state DOWN group default qlen 1000   
    link/ether f2:ee:52:f9:92:40 brd ff:ff:ff:ff:ff:ff link-netnsid 0
    inet 192.168.5.2/24 brd 192.168.5.255 scope global veth22
       valid_lft forever preferred_lft forever
    inet6 fe80::f0ee:52ff:fef9:9240/64 scope link tentative 
       valid_lft forever preferred_lft forever
netns2:~ # exit
exit
mytux:~ # lsns -t net -t uts
        NS TYPE NPROCS   PID USER  COMMAND
4026531838 uts     387     1 root  /usr/lib/systemd/systemd --switched
4026531963 net     385     1 root  /usr/lib/systemd/systemd --switched
4026532178 net       1   581 root  /usr/sbin/haveged -w 1024 -v 0 -F
4026540861 net       1  4138 rtkit /usr/lib/rtkit/rtkit-daemon
4026540984 uts       1 32146 root  /bin/bash
4026540986 net       1 32146 root  /bin/bash
4026541078 uts       1 32154 root  /bin/bash
4026541080 net       1 32154 root  /bin/bash
mytux:~ # 

Of course, you recognize some of the commands from my first blog post. Still, some details are worth a comment:

Unshare, background shells and shell variables

We create a separate network (and uts) namespace with the “unshare” command and background processes.

unshare –net –uts /bin/bash &

Note the options! We export shell variables with the PIDs of the started background processes [$!] to have these PIDs available in subshells later on. Note: From our original terminal window (in my case a KDE “konsole” window) we can always open a subshell window with:

mytux:~ # konsole &>/dev/null   

You may use another terminal window command on your system. The output redirection is done only to avoid KDE message clattering. In the subshell you may enter a previously created network namespace netnsX by

nsenter -t $pid_netnsX -u -n /bin/bash

Hostnames to distinguish namespaces at the shell prompt

Assignment of hostnames to the background processes via commands like

nsenter -t $pid_netns1 -u hostname netns1

This works through the a separation of the uts namespace. See the first post for an explanation.

Create veth devices with the “ip” command

The key command to create a veth device and to assign its two interfaces to 2 different network namespaces is:

ip link add veth11 netns $pid_netns1 type veth peer name veth22 netns $pid_netns2

Note, that we can use PIDs to identify the target network namespaces! Explicit names of the network namespaces are not required!

The importance of a running lo-device in each network namespace

We intentionally did not set the loopback device “lo” up in netns2. This leads to an interesting observation, which many admins are not aware of:

The lo device is required (in UP status) to be able to ping network interfaces (here e.g. veth11) in the local namespace!

This is standard: If you do not specify the interface to ping from via an option “-I” the ping command will use device lo as a default! The ping traffic runs through it! Normally, we just do not realize this point, because lo almost always is UP on a standard system (in its root namespace).

For testing the role of “lo” we now open a separate terminal window:

mytux:~ # konsole &>/dev/null 

There:

mytux:~ # nsenter -t $pid_netns2 -u -n /bin/bash
netns2:~ # ping 192.168.5.2
PING 192.168.5.2 (192.168.5.2) 56(84) bytes of data.
^C
--- 192.168.5.2 ping statistics ---
2 packets transmitted, 0 received, 100% packet loss, time 1008ms   

netns2:~ # ip link set lo up
netns2:~ # ping 192.168.5.2 -c2
PING 192.168.5.2 (192.168.5.2) 56(84) bytes of data.
64 bytes from 192.168.5.2: icmp_seq=1 ttl=64 time=0.017 ms
64 bytes from 192.168.5.2: icmp_seq=2 ttl=64 time=0.033 ms

--- 192.168.5.2 ping statistics ---
2 packets transmitted, 2 received, 0% packet loss, time 998ms    
rtt min/avg/max/mdev = 0.017/0.034 ms

And: Within the same namespace and “lo” down you cannot even ping the second Ethernet interface of a veth device from the first interface – even if they belong to the same network class!

Open a new sub shell and enter e.g. netns1 there:

netns1:~ # ip link add vethx type veth peer name vethy 
netns1:~ # ip addr add 192.168.20.1/24 brd 192.168.20.255 dev vethx    
netns1:~ # ip addr add 192.168.20.2/24 brd 192.168.20.255 dev vethy    
netns1:~ # ip link set vethx up
netns1:~ # ip link set vethy up
netns1:~ # ping 192.168.20.2 -I 192.168.20.1
PING 192.168.20.2 (192.168.20.2) from 192.168.20.1 : 56(84) bytes of data.    
^C
--- 192.168.20.2 ping statistics ---
4 packets transmitted, 0 received, 100% packet loss, time 3000ms
netns1:~ # ip link set lo up
netns1:~ # ping 192.168.20.2 -I 192.168.20.1       
PING 192.168.20.2 (192.168.20.2) from 192.168.20.1 : 56(84) bytes of data.   
64 bytes from 192.168.20.2: icmp_seq=1 ttl=64 time=0.019 ms     
64 bytes from 192.168.20.2: icmp_seq=2 ttl=64 time=0.052 ms                                
^C                                                              
--- 192.168.20.2 ping statistics ---                            
2 packets transmitted, 2 received, 0% packet loss, time 999ms   
rtt min/avg/max/mdev = 0.019/0.035/0.052/0.017 ms               
netns1:~ #                                           

Connection test

Now back to our experiment. Let us now try to ping netns1 from netns2:

netns2:~ # ip a s
1: lo: <LOOPBACK,UP,LOWER_UP> mtu 65536 qdisc noqueue state UNKNOWN group default qlen 1   
    link/loopback 00:00:00:00:00:00 brd 00:00:00:00:00:00
    inet 127.0.0.1/8 scope host lo
       valid_lft forever preferred_lft forever
    inet6 ::1/128 scope host 
       valid_lft forever preferred_lft forever
2: veth22: <BROADCAST,MULTICAST,UP,LOWER_UP> mtu 1500 qdisc noqueue state UP group default qlen 1000     
    link/ether f2:ee:52:f9:92:40 brd ff:ff:ff:ff:ff:ff link-netnsid 0
    inet 192.168.5.2/24 brd 192.168.5.255 scope global veth22
       valid_lft forever preferred_lft forever
    inet6 fe80::f0ee:52ff:fef9:9240/64 scope link 
       valid_lft forever preferred_lft forever
netns2:~ # ping 192.168.5.1
PING 192.168.5.1 (192.168.5.1) 56(84) bytes of data.
64 bytes from 192.168.5.1: icmp_seq=1 ttl=64 time=0.030 ms  
64 bytes from 192.168.5.1: icmp_seq=2 ttl=64 time=0.033 ms  
64 bytes from 192.168.5.1: icmp_seq=3 ttl=64 time=0.036 ms  
^C
--- 192.168.5.1 ping statistics ---                                                                  
3 packets transmitted, 3 received, 0% packet loss, time 1998ms                                       
rtt min/avg/max/mdev = 0.030/0.033/0.036/0.002 ms                                                    
netns2:~ #     

OK! And vice versa:

mytux:~ #  nsenter -t $pid_netns1 -u -n /bin/bash
netns1:~ #  nsenter -t $pid_netns2 -u -n /bin/bash
netns1:~ # ping 192.168.5.2 -c2
PING 192.168.5.2 (192.168.5.2) 56(84) bytes of data.
64 bytes from 192.168.5.2: icmp_seq=1 ttl=64 time=0.023 ms   
64 bytes from 192.168.5.2: icmp_seq=2 ttl=64 time=0.023 ms

--- 192.168.5.2 ping statistics ---
2 packets transmitted, 2 received, 0% packet loss, time 1003ms   
rtt min/avg/max/mdev = 0.023/0.023/0.023/0.000 ms
netns1:~ # 

Our direct communication via veth works as expected! Network packets are not stopped by network namespace borders – this would not make much sense.

Experiment 2: Connect two namespaces via a bridge in a third namespace

We now try a connection of netns1 and netns2 via a Linux bridgebrx“, which we place in a third namespace netns3:

Note:

This is a standard way to connect containers on a host!

LXC tools as well as libvirt/virt-manager would help you to establish such a bridge! However, the bridge would normally be place inside the host’s root namespace. In my opinion this is not a good idea:

A separate 3rd namespace gets the the bridge and related firewall and VLAN rules outside the control of the containers. But a separate namespace also helps to isolate the host against any communication (and possible attacks) coming from the containers!

So, let us close our sub terminals from the first experiment and kill the background shells:

mytux:~ # kill -9 32146
[2]-  Killed                  unshare --net --uts /bin/bash
mytux:~ # kill -9 32154
[3]+  Killed                  unshare --net --uts /bin/bash

We adapt our setup commands now to create netns3 and bridge “brx” there by using “brctl bradd“. Futhermore we add two different veth devices; each with one interface in netns3. We attach the interface to the bridge via “brctl addif“:

unshare --net --uts /bin/bash &
export pid_netns1=$!
nsenter -t $pid_netns1 -u hostname netns1
unshare --net --uts /bin/bash &
export pid_netns2=$!
nsenter -t $pid_netns2 -u hostname netns2
unshare --net --uts /bin/bash &
export pid_netns3=$!
nsenter -t $pid_netns3 -u hostname netns3
nsenter -t $pid_netns3 -u -n /bin/bash
brctl addbr brx  
ip link set brx up
exit 
ip link add veth11 netns $pid_netns1 type veth peer name veth13 netns $pid_netns3     
ip link add veth22 netns $pid_netns2 type veth peer name veth23 netns $pid_netns3    
nsenter -t $pid_netns1 -u -n /bin/bash
ip addr add 192.168.5.1/24 brd 192.
168.5.255 dev veth11
ip link set veth11 up
ip link set lo up
ip a s
exit
nsenter -t $pid_netns2 -u -n /bin/bash
ip addr add 192.168.5.2/24 brd 192.168.5.255 dev veth22
ip link set veth22 up
ip a s
exit
nsenter -t $pid_netns3 -u -n /bin/bash
ip link set veth13 up
ip link set veth23 up
brctl addif brx veth13
brctl addif brx veth23
exit

It is not necessary to show the reaction of the shell to these commands. But note the following:

  • The bridge has to be set into an UP status.
  • The veth interfaces located in netns3 do not get an IP address. Actually, a veth interface plays a different role on a bridge than in normal surroundings.
  • The bridge itself does not get an IP address.

Bridge ports

By attaching the veth interfaces to the bridge we create a “port” on the bridge, which corresponds to some complicated structures (handled by the kernel) for dealing with Ethernet packets crossing the port. You can imagine the situation as if e.g. the veth interface veth13 corresponds to the RJ45 end of a cable which is plugged into the port. Ethernet packets are taken at the plug, get modified sometimes and then are transferred across the port to the inside of the bridge.

However, when we assign an Ethernet address to the other interface, e.g. veth11 in netns1, then the veth “cable” ends in a full Ethernet device, which accepts network commands as “ping” or “nc”.

No IP address for the bridge itself!
We do NOT assign an IP address to the bridge itself; this is a bit in contrast to what e.g. happens when you set up a bridge for networking with the tools of virt-manager. Or what e.g. Opensuse does, when you setup a KVM virtualization host with YaST. In all these cases something like

ip addr add 192.168.5.100/24 brd 192.168.5.255 dev brx 

happens in the background. However, I do not like this kind of implicit politics, because it opens ways into the namespace surrounding the bridge! And it is easy to forget this bridge interface both in VLAN and firewall rules.

Almost always, there is no necessity to provide an IP address to the bridge itself. If we need an interface of a namespace, a container or the host to a Linux bridge we can always use a veth device. This leads to a much is much clearer situation; you see the Ethernet interface and the port to the bridge explicitly – thus you have much better control, especially with respect to firewall rules.

Enter network namespace netns3

Now we open a terminal as a sub shell (as we did in the previous example) and enter netns3 to have a look at the interfaces and the bridge.

mytux:~ # nsenter -t $pid_netns3 -u -n /bin/bash
netns3:~ # brctl show brx
bridge name     bridge id               STP enabled     interfaces
brx             8000.000000000000       no
netns3:~ # ip a s
1: lo: <LOOPBACK> mtu 65536 qdisc noop state DOWN group default qlen 1
    link/loopback 00:00:00:00:00:00 brd 00:00:00:00:00:00
2: brx: <BROADCAST,MULTICAST,UP,LOWER_UP> mtu 1500 qdisc noqueue state UP group default qlen 1000
    link/ether ce:fa:74:92:b5:00 brd ff:ff:ff:ff:ff:ff
    inet6 fe80::1c08:76ff:fe0c:7dfe/64 scope link 
       valid_lft forever preferred_lft forever
3: veth13@if2: <BROADCAST,MULTICAST,UP,LOWER_UP> mtu 1500 qdisc noqueue master brx state UP group default qlen 1000   
    link/ether ce:fa:74:92:b5:00 brd ff:ff:ff:ff:ff:ff link-netnsid 0
    inet6 fe80::ccfa:74ff:fe92:b500/64 scope link 
       valid_lft forever preferred_lft forever
4: veth23@if2: <BROADCAST,MULTICAST,UP,LOWER_UP> mtu 1500 qdisc noqueue master brx state UP group default qlen 1000   
    link/ether fe:5e:0b:d1:44:69 brd ff:ff:ff:ff:ff:ff link-netnsid 1
    inet6 fe80::fc5e:
bff:fed1:4469/64 scope link 
       valid_lft forever preferred_lft forever
netns3:~ # bridge link
3: veth13 state UP @brx: <BROADCAST,MULTICAST,UP,LOWER_UP> mtu 1500 master brx state forwarding priority 32 cost 2    
4: veth23 state UP @brx: <BROADCAST,MULTICAST,UP,LOWER_UP> mtu 1500 master brx state forwarding priority 32 cost 2    

Useful commands

Let us briefly discuss some useful commands:

Incomplete information of “brctl show”
Unfortunately, the standard command

brctl show brx

does not work properly inside network namespaces; it does not produce a complete output. E.g., the attached interfaces are not shown. However, the command

ip a s

shows all interfaces and their respective “master“. The same is true for the very useful “bridge” command :

bridge link

If you want to see even more details on interfaces use

ip -d a s

and grep the line for a specific interface.

Just for completeness: To create a bridge and add a veth devices to the bridge, we could also have used:

ip link add name brx type bridge
ip link set brx up
ip link set dev veth13 master brx   
ip link set dev veth23 master brx   

Connectivity test with ping
Now, let us turn to netns1 and test connectivity:

mytux:~ # nsenter -t $pid_netns1 -u -n /bin/bash
netns1:~ # ip a s 
1: lo: <LOOPBACK,UP,LOWER_UP> mtu 65536 qdisc noqueue state UNKNOWN group default qlen 1
    link/loopback 00:00:00:00:00:00 brd 00:00:00:00:00:00
    inet 127.0.0.1/8 scope host lo
       valid_lft forever preferred_lft forever
    inet6 ::1/128 scope host 
       valid_lft forever preferred_lft forever
2: veth11@if3: <BROADCAST,MULTICAST,UP,LOWER_UP> mtu 1500 qdisc noqueue state UP group default qlen 1000    
    link/ether 6a:4d:0c:30:12:04 brd ff:ff:ff:ff:ff:ff link-netnsid 0
    inet 192.168.5.1/24 brd 192.168.5.255 scope global veth11
       valid_lft forever preferred_lft forever                                                       
    inet6 fe80::684d:cff:fe30:1204/64 scope link                                                     
       valid_lft forever preferred_lft forever                                                       
netns1:~ # ping 192.168.5.2
PING 192.168.5.2 (192.168.5.2) 56(84) bytes of data.
64 bytes from 192.168.5.2: icmp_seq=1 ttl=64 time=0.039 ms
64 bytes from 192.168.5.2: icmp_seq=2 ttl=64 time=0.045 ms
64 bytes from 192.168.5.2: icmp_seq=3 ttl=64 time=0.054 ms
^C
--- 192.168.5.2 ping statistics ---
3 packets transmitted, 3 received, 0% packet loss, time 1998ms
rtt min/avg/max/mdev = 0.039/0.046/0.054/0.006 ms
netns1:~ # nc -l 41234

Note that – as expected – we do not see anything of the bridge and its interfaces in netns1! Note that the bridge basically is a device on the data link layer, i.e. OSI layer 2. In the current configuration we did nothing to stop the propagation of Ethernet packets on this layer – this will change in further experiments.

Connectivity test with netcat
At the end of our test we used the netcat command “nc” to listen on a TCP port 41234. At another (sub) terminal we can now start a TCP communication from netns2 to the TCP port 41234 in netns1:

mytux:~ # nsenter -t $pid_netns2 -u -n /bin/bash
netns2:~ # nc 192.168.5.1 41234
alpha
beta

This leads to an output after the last command in netns1:

netns1:~ # nc -l 41234
alpha
beta

So, we have full connectivity – not only for ICMP packets, but also for TCP packets. In yet another terminal:

mytux:~ # nsenter -t $pid_netns1 -u -n /bin/bash
netns1:~ # netstat -a
Active 
Internet connections (servers and established)
Proto Recv-Q Send-Q Local Address           Foreign Address         State      
tcp        0      0 *:41234                 *:*                     LISTEN      
tcp        0      0 192.168.5.1:41234       192.168.5.2:45122       ESTABLISHED     
Active UNIX domain sockets (servers and established)
Proto RefCnt Flags       Type       State         I-Node Path   
netns1:~ # 

Conclusion

It is pretty easy to connect network namespaces with veth devices. The interfaces can be assigned to different network namespaces by using a variant of the “ip” command. The target network namespaces can be identified by PIDs of their basic processes. We can link to namespaces directly via the interfaces of one veth device.

An alternative is to use a Linux bridge (for Layer 2 transport) in yet another namespace. The third namespace provides better isolation; the bridge is out of the view and control of the other namespaces.

We have seen that the commands “ip a s” and “bridge link” are useful to get information about the association of bridges and their assigned interfaces/ports in network namespaces.

In the coming article
Fun with veth-devices, Linux bridges and VLANs in unnamed Linux network namespaces – IV
we extend our efforts to creating VLANs with the help of our Linux bridge. Stay tuned ….


Fun with veth-devices, Linux bridges and VLANs in unnamed Linux network namespaces – II

The topics of this blog post series are

  • the basic handling of network namespaces
  • and virtual networking between different network namespaces.

One objective is a better understanding of the mechanisms behind the setup for future (LXC) containers on a host; containers are based on namespaces (see the last post of this series for a mini introduction). The most important Linux namespace for networking is the so called “network namespace”.

As explained in the previous article
Fun with veth-devices, Linux bridges and VLANs in unnamed Linux network namespaces – I
it is interesting and worthwhile to perform network experiments without referring to explicit names for network namespaces. Especially, when you plan to administer LXC containers with libvirt/virt-manager. You then cannot use the standard LXC tools or “ip“-options for explicit network namespace names.

We, therefore, had a look at relevant options for the ip-command and other typical userspace tools. The basic trick was/is to refer to PIDs of the processes originally associated with network namespaces. I discussed commands for listing network namespaces and associated processes. In addition, I showed how one can use shells for entering new or existing unnamed network namespaces. We finalized the first post with the creation of a veth device inside a distinct network namespace.

Advanced experiments – communication scenarios between network namespaces and groups of namespaces (or containers)

Regarding networking a container is represented by a network namespace, associated network devices and rules. A network namespace provides an isolation of the network devices assigned to this namespace plus related packet filter and routing rules from/against other namespaces/containers.

But very often you may have to deal not only with one container on a host but a whole bunch of containers. Therefore, another objective of experiments with network namespaces is

  • to study the setup of network communication lines between different containers – i.e. between different network namespaces –
  • and to study mechanisms for the isolation of the network packet flow between certain containers/namespaces against packets and from communication lines of other containers/namespaces or/and the host.

The second point may appear strange at first sight: Didn’t we learn that the fundamental purpose of (network) namespaces already is isolation? Yes, the isolation of devices, but not the isolation of network packet crossing the network namespace borders. In realistic situations we, in addition, need to establish and at the same time isolate communication paths in between different containers/namespaces and to their environment.

Typically, we have to address a grouping of containers/namespaces in this context:

  • Different containers on one or several hosts should be able to talk to each other and the Internet – but only if these containers are members of a defined group.
  • At the same time we may need to isolate the communication occurring within a group of containers/namespaces against the communication flow of containers/namespaces of another group and against communication lines of the host.
  • Still, we may need to allow namespaces/containers of different groups to use a common NIC to the Internet despite an otherwise isolated operation.

All this requires a confinement of the flow of distinguished network packages along certain paths between network namespaces. Thus, the question comes up how to achieve separated virtual communication circuits between network namespaces already on the L2 level and across possibly involved virtual devices.

Veth devices, VLAN aware Linux bridges (or other types of virtual Linux switches) and VLAN tagging play a key role in simple (virtual) infrastructure approaches to such challenges. Packet filter rules of Linux’ netfilter components additionally support the control of packet flow through such (virtual) infrastructure elements. Note:

The nice thing about network namespaces is that we can study all required basic networking principles easily without setting up LXC containers.

Test scenarios – an overview

I want to outline a collection of interesting scenarios for establishing and isolating communication paths between namespaces/containers. We start with a basic communication line between 2 different network namespaces. By creating more namespaces and veth devices, a VLAN aware bridge and VLAN rules we extend the test scenario’s complexity step by step to cover the questions posed above. See the graphics below.

Everything actually happens on one host. But the elements of lower part (below the horizontal black line) also could be placed on a different host. The RJ45 symbols represent Ethernet interfaces of veth devices. These interfaces, therefore, appear mostly in pairs (as long as we do not define sub interfaces). The colors represent IDs (VIDs) of VLANs. Three standard Linux bridges are involved; on each of these bridges we shall activate VLAN filtering. We shall learn that we can, but do not need to tag packets outside of VLAN filtering bridges – with a few interesting exceptions.

I suggest 10 experiments to perform within the drawn virtual network. We cannot discuss details of all experiments in one blog post; but in the coming posts we shall walk through this graphics in several steps from the top to the bottom and from the left to the right. Each step will be accompanied by experiments.

I use the abbreviation “netns” for “network namespace” below. Note in advance that the processes (shells) underlying the creation of network namespaces in our experiments always establish “uts” namespaces, too. Thus we can assign different hostnames to the basic shell processes – this helps us to distinguish in which network namespace shell we operate by just looking at the prompt of a shell. All the “names” as netns1, netns2, … appearing in the examples below actually are hostnames – and not real network namespace names in the sense of “ip” commands or LXC tools.

I should remark that I did the experiments below not just for fun, but because the use of VLAN tags in environments with Linux bridges are discussed in many Internet articles in a way which I find confusing and misleading. This is partially due to the fact that the extensions of the Linux kernel for VLAN definitions with the help of Linux bridges have reached a stable status only with kernel 3.9 (as far as I know). So many articles before 2014 present ideas which do not fit to the present options. Still, even today, you stumble across discussions which claim that you either do VLANs or bridging – but not both – and if, then only with different bridges for different VLANs. I personally think that today the only reason for such approaches would be performance – but not a strict separation of technologies.

Experiments

I hope the following experiments will provide readers some learning effects and also some fun with veth devices and bridges:

Experiment 1: Connect two namespaces directly
First we shall place the two different Ethernet interfaces of a veth device in two different (unnamed) network namespaces (with hostnames) netns1 and netns2. We assign IP addresses (of the same network class) to the interfaces and check a basic communication between the network namespaces. Simple and effective!

Experiment 2: Connect two namespaces via a bridge in a third namespace
Afterwards we instead connect our two different network namespaces netns1 and netns2 via a Linux bridge “brx” in a third namespace netns3. Note: We would use a separate 3rd namespace also in a scenario with containers to get the the bridge and related firewall and VLAN rules outside the control of the containers. In addition such a separate namespace helps to isolate the host against any communication (and possible attacks) coming from the containers.

Experiment 3: Establish isolated groups of containers
We set up two additional network namespaces (netns4, netns5). We check communication between all four namespaces attached to brx. Then we put netns1 and netns2 into a group (“green”) – and netns4 and netns5 into another group (“rosa”). Communication between member namespaces of a group shall be allowed – but not between namespaces of different groups. Despite the fact that all namespaces are part of the same IP address class! We achieve this on the L2 level by assigning VLAN IDs (VIDs) to the bridge ports to which we attach netns1, netns2, em>netns2 and netns5.

We shall see how “PVIDs” are assigned to a specific port for tagging packets that move into the bridge through this port and how we untag outgoing packets at the very same port. Conclusion: So far, no tagging is required outside the Linux bridge brx for building simple virtual VLANs!

Experiment 4: Tagging outside the bridge?
Although not required we repeat the last experiment with defined subinterfaces of two veth devices (used for netns2 and netns5) – just to check that packet tagging occurs correctly outside the bridge. This is done in preparation for other experiments. But for the isolation of VLAN communication paths inside the bridge only the tagging of packets coming into the bridge through a port is relevant: A packet coming from outside is first untagged and then retagged when moving into the bridge. The reverse untagging and retagging for outgoing packets is done correctly, too – but the tag “color” outside the bridge actually plays no role for the filtered communication paths inside the bridge.

Experiment 5: Connection to a second independent environment – with keeping up namespace grouping
In reality we may have situations in which some containers of a defined group will be placed on different hosts. Can we extend the concept of separating container/namespace groups by VLAN tagging to a different hosts via two bridges? Bridge brx on the first host and a new bridge bry on the second (netns8)? Yes, we can!

In reality we would connect two hosts by Ethernet cards. We simulate this situation in our virtual environment again with a veth interface pair between "netns3" and “netns8“. But
as we absolutely do not want to mix packets of our two groups we now need to tag the packets on their way between the bridges. We shall see how to use subinterfaces of the (veth) Ethernet interfaces to achieve this. Note, that the two resulting communication paths between bridges may potentially lead to loops! We shall deal with this problem, too.

Experiment 6: Two tags on a bridge port? Members of two groups?
Now, we could have containers (namespaces) that should be able to communicate with both groups. Then we would need 2 VIDs on a bridge port for this special container/namespace. We establish netns9 for this test. We shall see that it is no problem to assign two VIDs to a port to filter the differently tagged packets going from the bridge outwards. Nevertheless we run into problems – not because of the assignment of 2 VIDs, but due the fact that we can only assign one PVID to each bridge port. This seems to limit our possibilities to tag incoming packets if we choose its value to be among the VIDS defined already on other ports. Then we cannot direct packages to 2 groups for existing VIDs.

We have to solve this by defining new additional paths inside the bridge for packages coming in through the port for netns9: We assign a PVID to the this port, which is different from all VIDs defined so far. Then we assign additional VIDs with the value of this new PVID to the ports of the members of our existing groups. An interesting question then is: Are the groups still isolated? Is pinging interrupted? And how to stop man-in-the-middle-attacks of netns9?

The answer lies in some firewall rules which must be established on the bridge! In case we use iptables (instead of the more suited ebtables) these rules MUST refer to the ports of the bridge via physdev options and IP addresses. However, ARP packets – coming from netns9 should pass to all interfaces of members of our groups.

Experiment 7: Separate the network groups by different IP address class
If we wanted a total separation of two groups we would also separate them on L3 – i.e we would assign IP addresses of separate IP address networks to the members of the different groups. Will transport across our bridges still work correctly under this condition? It should …. However, netns9 will get a problem then. We shall see that he could still communicate with both groups if we used subinterfaces for his veth interface – and defined two routes for him.

Experiment 8: Connection of container groups and the host to the Internet
Our containers/namespaces of group “green”, which are directly or indirectly attached to bridge brx shall be able reach the Internet. The host itself, too. Normally, you would administer the host via an administration network, to which the host would connect via a specific network card separate from the card used to connect the containers/namespaces to the Internet. However, what can we do, if we only have exactly one Ethernet card available?

Then some extra care is required. There are several possible solutions for an isolation of the host’s traffic to the Internet from the rest of the system. I present one which makes use of what we have learned so far about VLAN tagging. We set up a namespace netns10 with a third bridge “brz“. We apply VLAN tagging in this namespace – inside the bridge, but also outside. Communication to the outside requires routing, too. Still, we need some firewall rules – including the interfaces of the bridge. The bridge can be interpreted as an IN/OUT interface plane to the firewall; there is of course only one firewall although the drawing indicates two sets of rules.

netns11” just represents the Internet with some routing. We can replace the Ethernet card drawn in netns10 by a veth interface to achieve a connection to netns11; the second interface inside netns11 then represents some host on the Internet. It can be simulated by a tap device. We can check, how signals move to and from this “host”.

Purely academic?

The scenarios discussed above seem to be complicated. Actually, they are not as soon as we get used to the involved elements and rules. But, still the whole setup may seem a bit academic … However, if you think a bit about it, you may find that on a development system for web services you may have

  • two containers for frontend apache systems with load balancing,
  • two containers for web service servers,
  • two or three containers for a MySQL-systems with different types of replication,
  • one container representing a user system,
  • one container to simulate OWASP and other attacks on the servers and the user client.

If we want to simulate attacks on a web-service system with such a configuration on one host only, you are not so far from the scenario presented. Modern PC-systems (with a lot of memory) do have the capacity to host a lot of containers – if the load is limited.

Anyway, enough stuff for the coming blog posts … During the posts I shall present the commands to set up the above network. These commands can be used in a script which gets longer with each post. But we start with a simple example – see:

Fun with veth-devices, Linux bridges and VLANs in unnamed Linux network namespaces – III


Fun with veth-devices, Linux bridges and VLANs in unnamed Linux network namespaces – I

Recently, I started writing some blog posts about my first experiences with LXC-containers and libvirt/virt-manager. Whilst gathering knowledge about LXC basics I stumbled across four hurdles for dummies as me, who would like to experiment with network namespaces, veth devices and bridges on the command line and/or in the context of LXC-containers built with virt-manager:

  • When you use virt-manager/libvirt to set up LXC-containers you are no longer able to use the native LXC commands to deal with these containers. virt-manager/virsh/libvirt directly use the kernel API for cgroups/namespaces and provide their own and specific user interfaces (graphical, virsh, XML configuration files) for the setup of LXC containers and their networks. Not very helpful for quick basic experiments on virtual networking in network namespaces ….
  • LXC-containers created via virt-manager/virsh/libvirt use unnamed namespaces which are identified by unique inode numbers, but not by explicit names. However, almost all articles on the Internet which try to provide a basic understanding of network namespaces and veth devices explicitly use “ip” command options for named namespaces. This raises the question: How to deal with unnamed network namespaces?
  • As a beginner you normally do not know how to get a shell for exploring an existing unnamed namespace. Books offer certain options of the “ip”-command – but these again refer to named network namespaces. You may need such a shell – not only for basic experiments, but also as the administrator of the container’s host: there are many situations in which you would like to enter the (network) namespace of a LXC container directly.
  • When you experiment with complex network structures you may quickly loose the overview over which of the many veth interfaces on your machine is assigned to which (network) namespace.

Objectives and requirements

Unfortunately, even books as “Containerization with LXC” of K. Ivanov did not provide me with the few hints and commands that would have been helpful. I want to close this gap with some blog posts. The simple commands and experiments shown below and in a subsequent article may help others to quickly setup basic network structures for different namespaces – without being dependent on named namespaces, which will not be provided by virt-manager/libvirt. I concentrate on network namespaces here, but some of the things may work for other types of namespace, too.

After a look at some basics, we will create a shell associated with a new unnamed network namespace which will be different from the network namespace of other system processes. Afterwards we will learn how to enter an existing unnamed namespaces by a new shell. A third objective is the attachment of virtual network devices to a network namespace.

In further articles we will use our gathered knowledge to attach veth interfaces of 2 different namespaces to virtual bridges/switches in yet a third namespace, then link the host to the bridge/switch and test communications as well as routing. We shall the extend our virtual networking scenario to isolated groups of namespaces (or containers, if you like) via VLANs. As a side aspect we shall learn how to use a Linux bridge for defining VLANs.

All our experiments will lead to temporary namespaces which can quickly be cretated by scripts and destroyed by killing the basic shell processes associated with them.

Requirements: The kernel should have been compiled with option “CONFIG_NET_NS=y”. We make use of userspace tools that are provided as parts of a RPM or DEB packet named “util-linux” on most Linux distributions.

Namespaces

Some basics first. There are 6 different types of “namespaces” for the isolation of processes or process groups on a Linux system. The different namespace types separate

  • PID-trees,
  • the networks,
  • User-UIDs,
  • mounts,
  • inter process communication,
  • host/domain-names (uts) of process groups

against each each other. Every process on a host is attached to certain namespace (of each type), which it may or may not have in common with another process. Note that the uts-namespace type provides an option to give a certain process an uts-namespace which may get a different hostname than the original host of the process!

“Separation” means: Limitation of the view on the process’ own environment and on the environment of other processes on the system. “Separation” also means a limitation of the control a process can get on processes/environments associated with other namespaces.

Therefore, to isolate LXC containers from other containers and from the host, the container’s processes will typically be assigned to distinct namespaces of most of the 6 types. In addition: The root filesystem of a LXC containers typically resides in a chroot jail.

Three side remarks:

  1. cgroups limit the ressource utilization of process groups on a host. We do not look at cgroups in this article.
  2. Without certain measures the UID namespace of a LXC container will be the same as the namespace of the host. This is e.g. the case for a standard container created with virt-manager. Then root in the container is root on the host. When a container’s basic processes are run with root-privileges of the host we talk of a “privileged container”. Privileged containers pose a potential danger to the host if the container’s environment could be left. There are means to escape chroot jails – and under certain circumstances there are means to cross the borders of a container … and then root is root on the host.
  3. You should be very clear about the fact that a secure isolation of processes and containers on a host depend on other more sophisticated isolation mechanisms beyond namespaces and chroot jails. Typically, SE Linux or Apparmor rules may be required to prevent crossing the line from a namespace attached process to the host environment.

In our network namespace experiments below we normally will not separate the UID namespaces. If you need to do it, you must map a non-privileged UID (> 1000) on UID 0 inside the namespace to be able to perform certain network operations. See the options in the man pages of the commands used below for this mapping.

Network namespaces

The relevant namespace type for the network environment (NICs, bridges etc.) to which a process has access to is the “network namespace”. Below I will sometimes use the abbreviation “net-ns” or simply “netns”.

When you think about it, you will find the above statements on network isolation a bit unclear:

In the real world network packets originate from electronic devices, are transported through cables and are then distributed and redirected by other devices and eventually terminate at yet other electronic devices. So, one may ask: Can a network packet created by a (virtual) network device within a certain namespace cross the namespace border (whatever this may be) at all? Yes, they can:

Network namespaces affect network devices (also virtual ones) and also routing rules coupled to device ports. However, network packets do NOT care about network namespaces on OSI level 2.

To be more precise: Network namespace separation affects network-devices (e.g. Ethernet devices, virtual Linux bridges/switches), IPv4/IPv6 protocol stacks, routing tables, ARP tables, firewalls, /proc/net, /sys/class/net/, QoS policies, ports, port numbers, sockets. But is does not stop an Ethernet packet to reach an Ethernet device in another namespace – as long as the packet can propagate through the virtual network environment at all.

So, now you may ask what virtual means we have available to represent something like cables and Ethernet transport between namespaces? This is one of the purposes veth devices have been invented for! So, we shall study how to bridge different namespaces by the using the 2 Ethernet interfaces of veth devices and by using ports of virtual Linux bridges/switches.

However, regarding container operation you would still want the following to be true for packet filtering:

A fundamental container process, its children and network devices should be confined to devices of a certain “network namespace” because they should not be able to have any direct influence on network devices of other containers or the host.
And: Even if packets move from one network namespace to another you probably want to be able to restrict this traffic in virtual networks as you do in real networks – e.g by packet filter rules (ebtables, iptables) or by VLAN definitions governing ports on virtual bridges/switches.

Many aspects of virtual bridges, filtering, VLANs can be tested already in a simple shell based namespace environment – i.e. without full-fletched containers. See the forthcoming posts for such experiments …

Listing network namespaces on a host

The first thing we need is an overview over active namespaces on a host. For listing namespaces we can use the command “lsns” on a modern Linux system. This command has several options which you may look up in the man pages. Below I show you an excerpt of the output of “lsns” for network namespaces (option “-t net”) on a system where a LXC container was previously started by virt-manager:

mytux:~ # lsns -t net -o NS,TYPE,PATH,NPROCS,PID,PPID,COMMAND,UID,USER 
        NS TYPE PATH              NPROCS   PID  PPID COMMAND                  UID USER  
4026531963 net  /proc/1/ns/net       389     1     0 /usr/lib/systemd/system    0 root   
4026540989 net  /proc/5284/ns/net     21  5284  5282 /sbin/init                 0 root  

Actually, I have omitted some more processes with separate namespaces, which are not relevant in our context. So, do not be surprised if you should find more processes with distinct network namespaces on your system.

The “NS” numbers given in the output are so called “namespace identification numbers”. Actually they are unique inode numbers. (For the reader it may be instructive to let “lsns” run for all namespaces of the host – and compare the outputs.)

Obviously, in our case there is some process with PID “5282”, which has provided a special net-ns for the process with PID “5284”:

mytux:~ # ps aux | grep 5282
root      5282  0.0  0.0 161964  8484 ?        Sl   09:58   0:00 /usr/lib64/libvirt/libvirt_lxc --name lxc1 --console 23 --security=apparmor --handshake 26 --veth vnet1    

This is the process which started the running LXC container from the virt-manager interface. The process with PID “5284” actually is the “init”-Process of this container – which is limited to the network namespace created for it.

Now let us filter or group namespace and process information in different ways:

Overview over all namespaces associated with a process

This is easy – just use the option “-p” :

mytux:~ # lsns -p 5284 -o NS,TYPE,PATH,NPROCS,PID,PPID,COMMAND,UID,USER 
        NS TYPE  PATH              NPROCS   PID  PPID COMMAND                                                            UID USER
4026531837 user  /proc/1/ns/user      416     1     0 /usr/lib/systemd/systemd --switched-root --system --deserialize 24   0 root
4026540984 mnt   /proc/5284/ns/mnt     20  5284  5282 /sbin/init                                                           0 root
4026540985 uts   /proc/5284/ns/uts     20  5284  5282 /sbin/init       
                                                    0 root
4026540986 ipc   /proc/5284/ns/ipc     20  5284  5282 /sbin/init                                                           0 root
4026540987 pid   /proc/5284/ns/pid     20  5284  5282 /sbin/init                                                           0 root
4026540989 net   /proc/5284/ns/net     21  5284  5282 /sbin/init                                                           0 root

Looking up namespaces for a process in the proc-directory

Another approach for looking up namespaces makes use of the “/proc” directory. E.g. on a different system “mylx“, where a process with PID 4634 is associated with a LXC-container:

mylx:/proc # ls -lai /proc/1/ns
total 0
344372 dr-x--x--x 2 root root 0 Oct  7 11:28 .
  1165 dr-xr-xr-x 9 root root 0 Oct  7 09:34 ..
341734 lrwxrwxrwx 1 root root 0 Oct  7 11:28 ipc -> ipc:[4026531839]
341737 lrwxrwxrwx 1 root root 0 Oct  7 11:28 mnt -> mnt:[4026531840]
344373 lrwxrwxrwx 1 root root 0 Oct  7 11:28 net -> net:[4026531963]
341735 lrwxrwxrwx 1 root root 0 Oct  7 11:28 pid -> pid:[4026531836]
341736 lrwxrwxrwx 1 root root 0 Oct  7 11:28 user -> user:[4026531837]
341733 lrwxrwxrwx 1 root root 0 Oct  7 11:28 uts -> uts:[4026531838]

mylx:/proc # ls -lai /proc/4634/ns
total 0
 38887 dr-x--x--x 2 root root 0 Oct  7 09:36 .
 40573 dr-xr-xr-x 9 root root 0 Oct  7 09:36 ..
341763 lrwxrwxrwx 1 root root 0 Oct  7 11:28 ipc -> ipc:[4026540980]
341765 lrwxrwxrwx 1 root root 0 Oct  7 11:28 mnt -> mnt:[4026540978]
345062 lrwxrwxrwx 1 root root 0 Oct  7 11:28 net -> net:[4026540983]
 38888 lrwxrwxrwx 1 root root 0 Oct  7 09:36 pid -> pid:[4026540981]
341764 lrwxrwxrwx 1 root root 0 Oct  7 11:28 user -> user:[4026531837]
341762 lrwxrwxrwx 1 root root 0 Oct  7 11:28 uts -> uts:[4026540979]

What does this output for 2 different processes tell us? Obviously, the host and the LXC container have different namespaces – with one remarkable exception: the “user namespace”! They are identical. Meaning: Root on the container is root on the host. A typical sign of a “privileged” LXC container and of potential security issues.

List all processes related to a given namespace?

“lsns” does not help us here. Note:

“lsns” only shows you the lowest PID associated with a certain (network) namespace.

So, you have to use the “ps” commands with appropriate filters. The following is from a system, where a LXC container is bound to the network namespace with identification number 4026540989:

mytux:~ # lsns -t net -o NS,TYPE,PATH,NPROCS,PID,PPID,COMMAND,UID,USER
        NS TYPE PATH              NPROCS   PID  PPID COMMAND                                               UID USER
4026531963 net  /proc/1/ns/net       401     1     0 /usr/lib/systemd/systemd --switched-root --system --d   0 root
4026540989 net  /proc/6866/ns/net     20  6866  6864 /sbin/init                                              0 root

mytux:~ #  ps -eo netns,pid,ppid,user,args --sort netns | grep 4026540989
4026531963 16077  4715 root     grep --color=auto 4026540989
4026540989  6866  6864 root     /sbin/init
4026540989  6899  6866 root     /usr/lib/systemd/systemd-journald
4026540989  6922  6866 root     /usr/sbin/ModemManager
4026540989  6925  6866 message+ /bin/dbus-daemon --system --address=systemd: --nofork --nopidfile --systemd-activation   
4026540989  6927  6866 tftp     /usr/sbin/nscd
4026540989  6943  6866 root     /usr/lib/wicked/bin/wickedd-dhcp6 --systemd --foreground
4026540989  6945  6866 root     /usr/lib/wicked/bin/wickedd-dhcp4 --systemd --foreground
4026540989  6947  6866 systemd+ avahi-daemon: running [linux.local]
4026540989  6949  6866 root     /usr/lib/wicked/bin/wickedd-auto4 --systemd --foreground
4026540989  6951  6866 avahi-a+ /usr/lib/polkit-1/polkitd --no-debug
n4026540989  6954  6866 root     /usr/lib/systemd/systemd-logind
4026540989  6955  6866 root     login -- root
4026540989  6967  6866 root     /usr/sbin/wickedd --systemd --foreground
4026540989  6975  6866 root     /usr/sbin/wickedd-nanny --systemd --foreground
4026540989  7032  6866 root     /usr/lib/accounts-daemon
4026540989  7353  6866 root     /usr/sbin/cupsd -f
4026540989  7444  6866 root     /usr/lib/postfix/master -w
4026540989  7445  7444 postfix  pickup -l -t fifo -u
4026540989  7446  7444 postfix  qmgr -l -t fifo -u
4026540989  7463  6866 root     /usr/sbin/cron -n
4026540989  7507  6866 root     /usr/lib/systemd/systemd --user
4026540989  7511  7507 root     (sd-pam)
4026540989  7514  6955 root     -bash

If you work a lot with LXC containers it my be worth writing some clever bash or python-script for analyzing the “/proc”-directory with adjustable filters to achieve a customizable overview over processes attached to certain namespaces or containers.

Hint regarding the NS values in the following examples:
The following examples have been performed on different systems or after different start situations of one and the same system. So it makes no sense to compare all NS values between different examples – but only within an example.

Create a shell inside a new network namespace with the “unshare” command …

For some simple experiments it would be helpful if we could create a process (as a shell) with its own network-namespace. For this purpose Linux provides us with the command “unshare” (again with a lot of options, which you should look up).

For starting a new bash with a separate net-ns we use the option “-n“:

mytux:~ # unshare -n /bin/bash 
mytux:~ # lsns -t net
        NS TYPE NPROCS   PID USER  COMMAND
4026531963 net     398     1 root  /usr/lib/systemd/systemd --switched-root --system --deserialize 24   
4026540989 net      21  5284 root  /sbin/init
4026541186 net       2 27970 root  /bin/bash

mytux:~ # ip link
1: lo: <LOOPBACK> mtu 65536 qdisc noop state DOWN mode DEFAULT group default qlen 1
    link/loopback 00:00:00:00:00:00 brd 00:00:00:00:00:00

mytux:~ # exit
exit

mytux:~ # ip link
1: lo: <LOOPBACK,UP,LOWER_UP> mtu 65536 qdisc noqueue state UNKNOWN mode DEFAULT group default qlen 1   
    link/loopback 00:00:00:00:00:00 brd 00:00:00:00:00:00
2: eth0: <BROADCAST,MULTICAST> mtu 1500 qdisc noop state DOWN mode DEFAULT group default qlen 1000
    link/ether d7:58:88:ab:cd:ef brd ff:ff:ff:ff:ff:ff
....
....

Obviously, it is not possible to see from the prompt that we have entered a different (network) namespace with the creation of the new shell. We shall take care of this in a moment. For the time being, it may be a good idea to issue commands like

lsns -t net -p 1; lsns -t net -p $$

in the shell opened with “unshare”. However, also our look at the network interfaces proved that the started “bash” was directly associated with a different net-ns than the “parent” bash. In the “unshared” bash only a “lo”-device was provided. When we left the newly created “bash” we at once saw more network devices (namely the devices of the host).

Note: A namespace (of any type) is always associated with at least one process. Whenever we want to create a new namespace for an experiment we have to combine it with a (new) process. During the experiments in this post series we will create new network namespaces together with related simple bash-processes.

And: A namespace lives as long as the associated process (or processes). To keep a specific new network namespace alive for later experiments we put the associated basic bash-process into the background of the host-system.

In real world scenarios the processes related to namespaces are of course more complex than a shell. Examples are containers, browser-processes, etc. This leads us to the question whether we can “enter” an existing namespace somehow (e.g. with a shell) to gather information about it or to manipulate it. We will answer this question in a minute.

Information about host processes from a shell inside a specific network namespace?

You can get information about all processes on a host from any process with a specific network namespace – as long as the PID namespace for this process is not separated from the PID namespace of the host. And as long as we have not separated the UID namespaces: root in a network namespace then is root on the host with all the rights there!

Can a normal unprivileged user use “unshare”, too?

Yes, but his/her UID must be mapped to root inside the new network namespace. For this purpose we can use the option “-r” of the unshare command; see the man pages. Otherwise: Not without certain measures – e.g. on the sudo side. (And think about security when using sudo directives. The links at the end of the article may give you some ideas about some risks.)

You may try the following commands (here executed on a freshly started system):

myself@mytux:~> unshare -n -r /bin/bash 
mytux:~ # lsns -t net -t user
        NS TYPE  NPROCS   PID USER COMMAND
4026540842 user       2  6574 root /bin/bash
4026540846 net        2  6574 root /bin/bash
mytux:~ # 

Note the change of the prompt as the shell starts inside the new network namespace! And “lsns” does not give us any information on the NS numbers for net and user namespaces of normal host processes!

However, on another host terminal the “real” root of the host gets:

mytux:~ # lsns -t net -t user 
        NS TYPE  NPROCS   PID USER   COMMAND
4026531837 user     382     1 root   /usr/lib/systemd/systemd --switched-root --system --deserialize 24   
4026531963 net      380     1 root   /usr/lib/systemd/systemd --switched-root --system --deserialize 24   
4026540842 user       1  6574 myself /bin/bash
4026540846 net        1  6574 myself /bin/bash

There, we see that the user namespaces of the unshared shell and other host processes really are different.

Open a shell for a new named network namespace

The “unshare” command does not care about “named” network namespaces. So, for the sake of completeness: If you like to or must experiment with named network namespaces you may want to use the “ip” command with appropriate options, e.g.:

mytux:~ # ip netns add mynetns1 
mytux:~ # ip netns exec mynetns1 bash   
mytux:~ # lsns -o NS -t net -p $$
        NS
4026541079
mytux:~ # exit 
mytux:~ # lsns -o NS -t net -p $$
        NS
4026531963
mytux:~ # 

“mynetns1” in the example is the name that I gave to my newly created named network namespace.

How to open a shell for an already existing network namespace? Use “nsenter”

Regarding processes with their specific namespaces or LXC containers: How can we open a shell that is assigned to the same network namespace as a specific process? This is what the command “nsenter” is good for. For our purposes the options “-t” and “-n” are relevant (see the man pages). In the following example we first create a bash shell (PID 15150) with a new network namespace and move its process in the background. Then we open a new bash in the foreground (PID 15180) and attach this bash shell to the namespace of the process with PID 15150:

mylx:~ # unshare -n /bin/bash &
[1] 15150
mylx:~ # lsns -t net 
        NS TYPE NPROCS   PID USER  COMMAND
4026531963 net     379     1 root  /usr/lib/systemd/systemd --switched-root --system --deserialize 24   
4026540983 net      23  4634 root  /sbin/init
4026541170 net       1 15150 root  /bin/bash

[1]+  Stopped                 unshare -n /bin/bash
mylx:~ # nsenter -t 15150 -n /bin/bash
mylx:~ # ip link
1: lo: <LOOPBACK> mtu 65536 qdisc noop state DOWN mode DEFAULT group default qlen 1   
    link/loopback 00:00:00:00:00:00 brd 00:00:00:00:00:00
mylx:~ # echo $$
15180
mylx:~ # lsns -t net -p $$
        NS TYPE NPROCS   PID USER COMMAND
4026541170 net       3 15150 root /bin/bash
mylx:~ # 

Note, again, that “lsns” only gives you the lowest process number that opened a namespace. Actually, we are in a different bash with PID “15180”. If you want to see all process using the same network namespace you may use :

mylx:~ # echo $$
15180
mylx:~ # ps -eo pid,user,netns,args --sort user | grep 4026541170  
15150 root     4026541170 /bin/bash
15180 root     4026541170 /bin/bash
16284 root     4026541170 ps -eo pid,user,netns,
args --sort user
16285 root     4026541170 grep --color=auto 4026541170

Note that the shell created by nsenter is different from the shell-process we created (with unshare) as the bearing process of our namespace.

In the same way you can create a shell with nsenter to explore the network namespace of a running LXC container. Let us try this for an existing LXC container on system “mylx” with PID 4634 (see above: 4026540983 net 23 4634 root /sbin/init).

mylx:~ # nsenter -t 4634 -n /bin/bash
mylx:~ # ip link
1: lo: <LOOPBACK,UP,LOWER_UP> mtu 65536 qdisc noqueue state UNKNOWN mode DEFAULT group default qlen 1   
    link/loopback 00:00:00:00:00:00 brd 00:00:00:00:00:00
13: eth0@if14: <BROADCAST,MULTICAST,UP,LOWER_UP> mtu 1500 qdisc noqueue state UP mode DEFAULT group default qlen 1000   
    link/ether 00:16:3e:a3:22:b8 brd ff:ff:ff:ff:ff:ff link-netnsid 0
mylx:~ # exit
exit

Obviously, an ethernet device eth0 exists in this container. Actually, it is an interface of a veth device with a peer interface “if14”; see below.

Change the hostname part of a shell’s prompt in a separate network namespace

We saw that the prompt of a shell in a separate network namespace normally does not indicate anything about the namespace environment. How can we change this? We need 2 steps to achieve this:

  • We open a shell in the background not only for a separate network namespace but also for a different uts namespace. Then any changes to the hostname inside the uts namespace for the running background process will have no impact on the host.
  • The “nsenter” command does not only work for shells but for any reasonable command. Therefore, we can also apply it for the command “hostname”.

Now, before we enter the separate namespaces of the process with yet another shell we can first change the hostname in the newly created uts namespace:

mytux:~ # unshare --net --uts /bin/bash &
[1] 25512
mytux:~ # nsenter -t 25512 -u hostname netns1

[1]+  Stopped                 unshare --net --uts /bin/bash   
mytux:~ # echo $$
20334
mytux:~ # nsenter -t 25512 -u -n /bin/bash 
netns1:~ #
netns1:~ # lsns -t net -t uts -p $$
        NS TYPE NPROCS   PID USER COMMAND
4026540975 uts       3 25512 root /bin/bash
4026540977 net       3 25512 root /bin/bash
netns1:~ # exit
mytux:~ # hostname
mytux

Note the “-u” in the command line where we set the hostname! Note further the change of the hostname in the prompt! In more complex scenarios, this little trick may help you to keep an overview over which namespace we are currently working in.

veth-devices

For container technology “veth” devices are of special importance. A veth device has two associated Ethernet interfaces – so called “peer” interfaces. One can imagine these interfaces like linked by a cable on OSI level 2 – a packet arriving at one interface gets available at the other interface, too. Even if one of the interfaces has no IP address assigned.

This feature is handy when we e.g. need to connect a host or a virtualized guest to an IP-less bridge. Or we can use veth-devices to uplink several bridges to one another. See a former blog post
Fun with veth devices, Linux virtual bridges, KVM, VMware – attach the host and connect bridges via veth
about these possibilities.

As a first trial we will assign the veth device and both its interfaces to one and the same network namespace. Most articles and books show you how to achieve this by the use of the “ip” command with an option for a “named” namespace. In most cases the “ip” command would have been used to create a named net-ns by something like

ip netns add NAME

where NAME is the name we explicitly give to the added network namespace. When such a named net-ns exists we can assign an Ethernet interface named “ethx” to the net-ns by:

ip link set ethx netns NAME

However, in all our previous statements no NAME for a network namespace has been used so far. So, how to achieve something similar for unnamed network namespaces? A look into the man pages helps: The “ip” command allows the introduction of a PID together with the option parameter “netns” at least for the variant “ip link set”. Does this work for veth devices and the command “ip link add”, too? And does it work for both Ethernet interfaces?

In the example discussed above we had a namespace 4026541170 of process with PID 15180. We open a bash shell on our host mylx, where PID 15150 still runs in the background, and :

mylx:~ # echo $$
27977
mylx:~ # lsns -t net
        NS TYPE NPROCS   PID USER  COMMAND   
4026531963 net     393     1 root  /usr/lib/systemd/systemd --switched-root --system --deserialize 24   
4026540983 net      23  4634 root  /sbin/init
4026541170 net       1 15150 root  /bin/bash
mylx:~ # ip link add veth1 netns 15150 type veth peer name veth2 netns 15150
mylx:~ # nsenter -t 15150 -n /bin/bash
mylx:~ # echo $$
28350
mylx:~ # ip link
1: lo: <LOOPBACK> mtu 65536 qdisc noop state DOWN mode DEFAULT group default qlen 1
    link/loopback 00:00:00:00:00:00 brd 00:00:00:00:00:00
2: veth2@veth1: <BROADCAST,MULTICAST,M-DOWN> mtu 1500 qdisc noop state DOWN mode DEFAULT group default qlen 1000   
    link/ether 8e:a0:79:28:ae:12 brd ff:ff:ff:ff:ff:ff
3: veth1@veth2: <BROADCAST,MULTICAST,M-DOWN> mtu 1500 qdisc noop state DOWN mode DEFAULT group default qlen 1000   
    link/ether fa:1e:2c:e3:00:8f brd ff:ff:ff:ff:ff:ff
mylx:~ # 

Success! Obviously, we have managed to create a veth device with both its 2 interfaces inside the network namespace associated with our background process of PID 15150.

The Ethernet interfaces are DOWN – but this was to be expected. So far, so good. Of course it would be more interesting to position the first veth interface in one network namespace and the second interface in another network namespace. This would allow network packets from a container to cross the border of the container’s namespace into an external one. Topics for the next articles …

Summary and outlook on further posts

Enough for today. We have seen how we can list (network) namespaces and associated processes. We are able to create shells together with and inside in a new network namespace. And we can open a shell that can be attached to an already existing network namespace. All without using a “NAME” of the network namespace! We have also shown how a veth device can be added to a specific network namespace. We have a set of tools now, which we can use in more complicated virtual network experiments.

In the next post

Fun with veth-devices, Linux bridges and VLANs in unnamed Linux network namespaces – II

I shall present a virtual network environment for several interesting experiments with network namespaces – or containers, if you like. Further articles will discuss such experiments step by setp.

Addendum, 25.03.2024: I have started a new series about virtual networking experiments concerning veths with VLAN-interfaces, namespaces, routes, ARP, ICMP and security aspects. If you are interested in these topics a look at the posts in the new series may give you some more information on specific topics.

Links

Introduction into network namespaces
http://www.linux-magazin.de/ Ausgaben/ 2016/06/ Network-Namespaces

Using unshare without root-privileges
https://unix.stackexchange.com/ questions/ 252714/ is-it-possible-to-run-unshare-n-program-as-an-unprivileged-user
https://bbs.archlinux.org/viewtopic.php?id=205240
https://blog.mister-muffin.de/ 2015/10/25/ unshare-without-superuser-privileges/